

Using the auto-reply bot
The บอทตอบกลับอัตโนมัติ (Auto-reply bot) menu lets you have the bot answer customers for your admins, for example greeting customers who message you for the first time, answering common questions, replying to customers who message after hours, sending promotions, replying to words customers type and replying to comments under posts.
Each kind of message is called a set (ชุด). For each set you choose which pages or accounts it uses, and you can try it on screen or with your team's own chats before turning it on. The shop owner and every admin can create and edit sets. Every topic uses the same list page, editor, statuses and testing; how to set up each topic is under Setting up each topic further down this page.
Opening the auto-reply bot
Go to the บอทตอบกลับอัตโนมัติ (Auto-reply bot) menu under Chat in the left menu bar
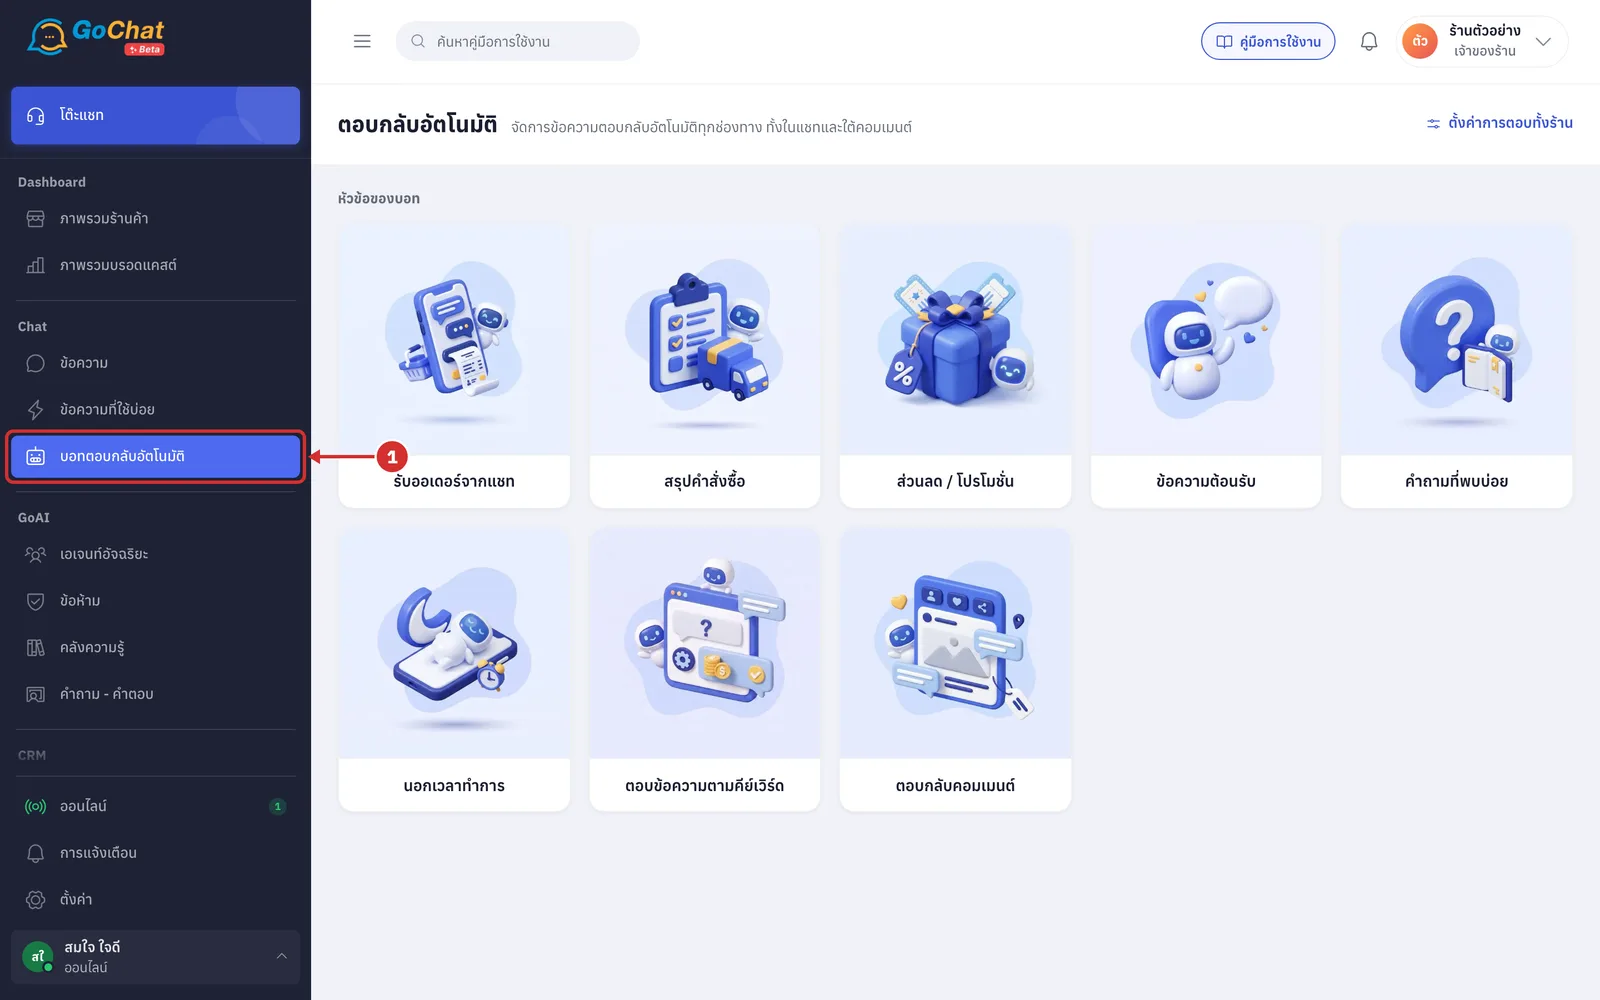
The ตอบกลับอัตโนมัติ (Auto-reply) page has these parts
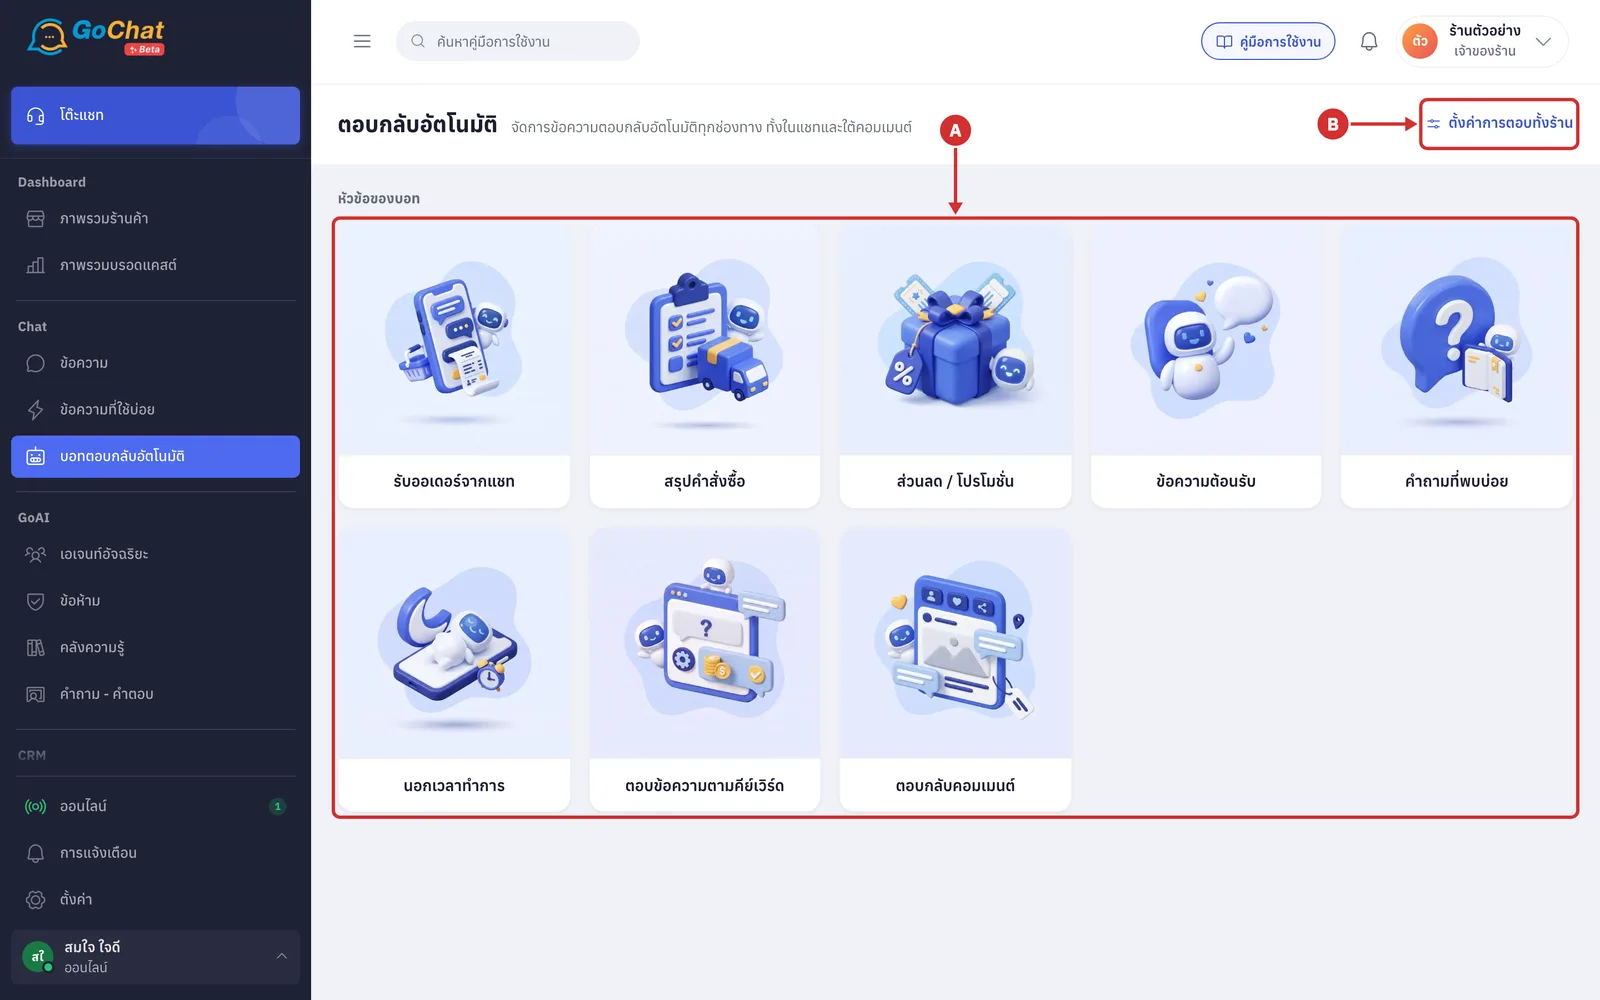
A หัวข้อของบอท (Bot topics) — one card per topic. Click a card to open that topic's list of sets (if your shop has no set in that topic yet, the page to create a new set opens straight away). The cards are
รับออเดอร์จากแชท (Chat orders): your sales team types a command in a chat and the bot creates the order straight away
สรุปคำสั่งซื้อ (Order summary): when customers ask what they ordered or where their parcel is, the bot summarises their latest order
ส่วนลด / โปรโมชั่น (Discounts / Promotions): sends a promotion when customers type words you set, during the promotion's dates
ข้อความต้อนรับ (Welcome message): greets customers who message you for the first time with your shop's message and a help menu
คำถามที่พบบ่อย (FAQ): the bot answers questions such as shipping cost, delivery time, payment and returns straight away
นอกเวลาทำการ (After hours): replies to customers outside business hours and on holidays and tells them when they will get an answer
ตอบข้อความตามคีย์เวิร์ด (Keyword replies): when customers type a word you set, the bot sends the message you prepared
ตอบกลับคอมเมนต์ (Comment replies): replies to comments under posts by keyword, and likes, hides or forwards comments to admins automatically
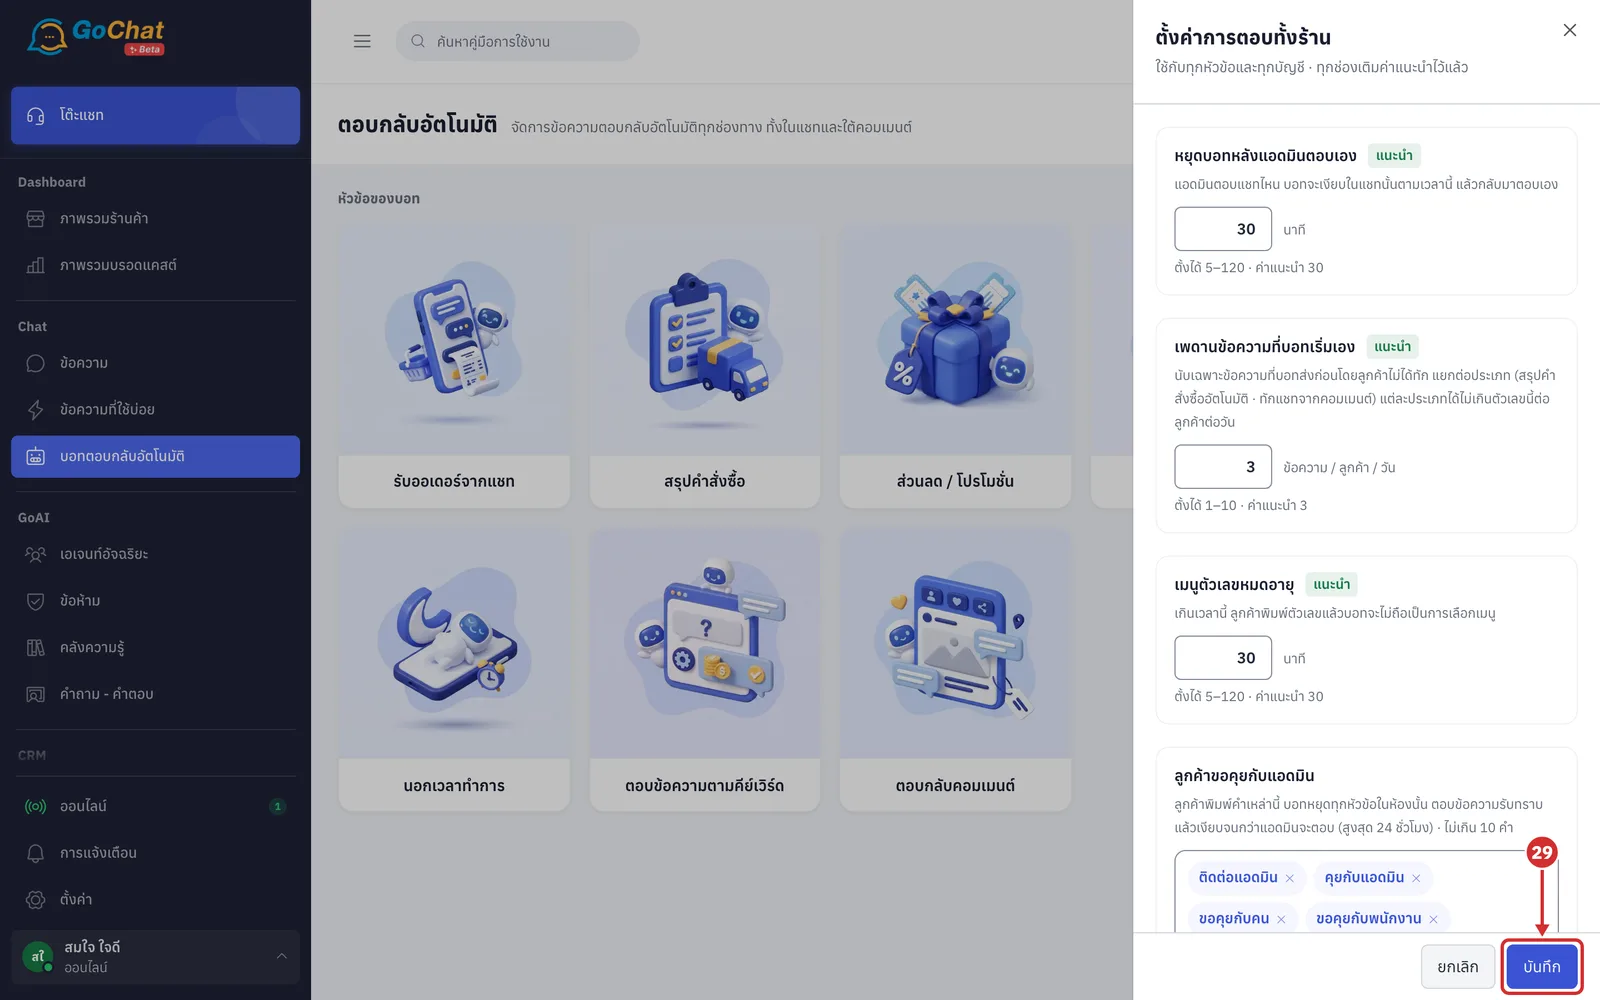
B ตั้งค่าการตอบทั้งร้าน (Shop-wide reply settings) — values used by every topic and account, such as stopping the bot when an admin replies (see Shop-wide reply settings)
Good to know: The รับออเดอร์จากแชท (Chat orders) and สรุปคำสั่งซื้อ (Order summary) cards only appear for shops connected to the GoSaaS order system, because the bot has to create or read orders in GoSaaS.
Reading a topic's list of sets
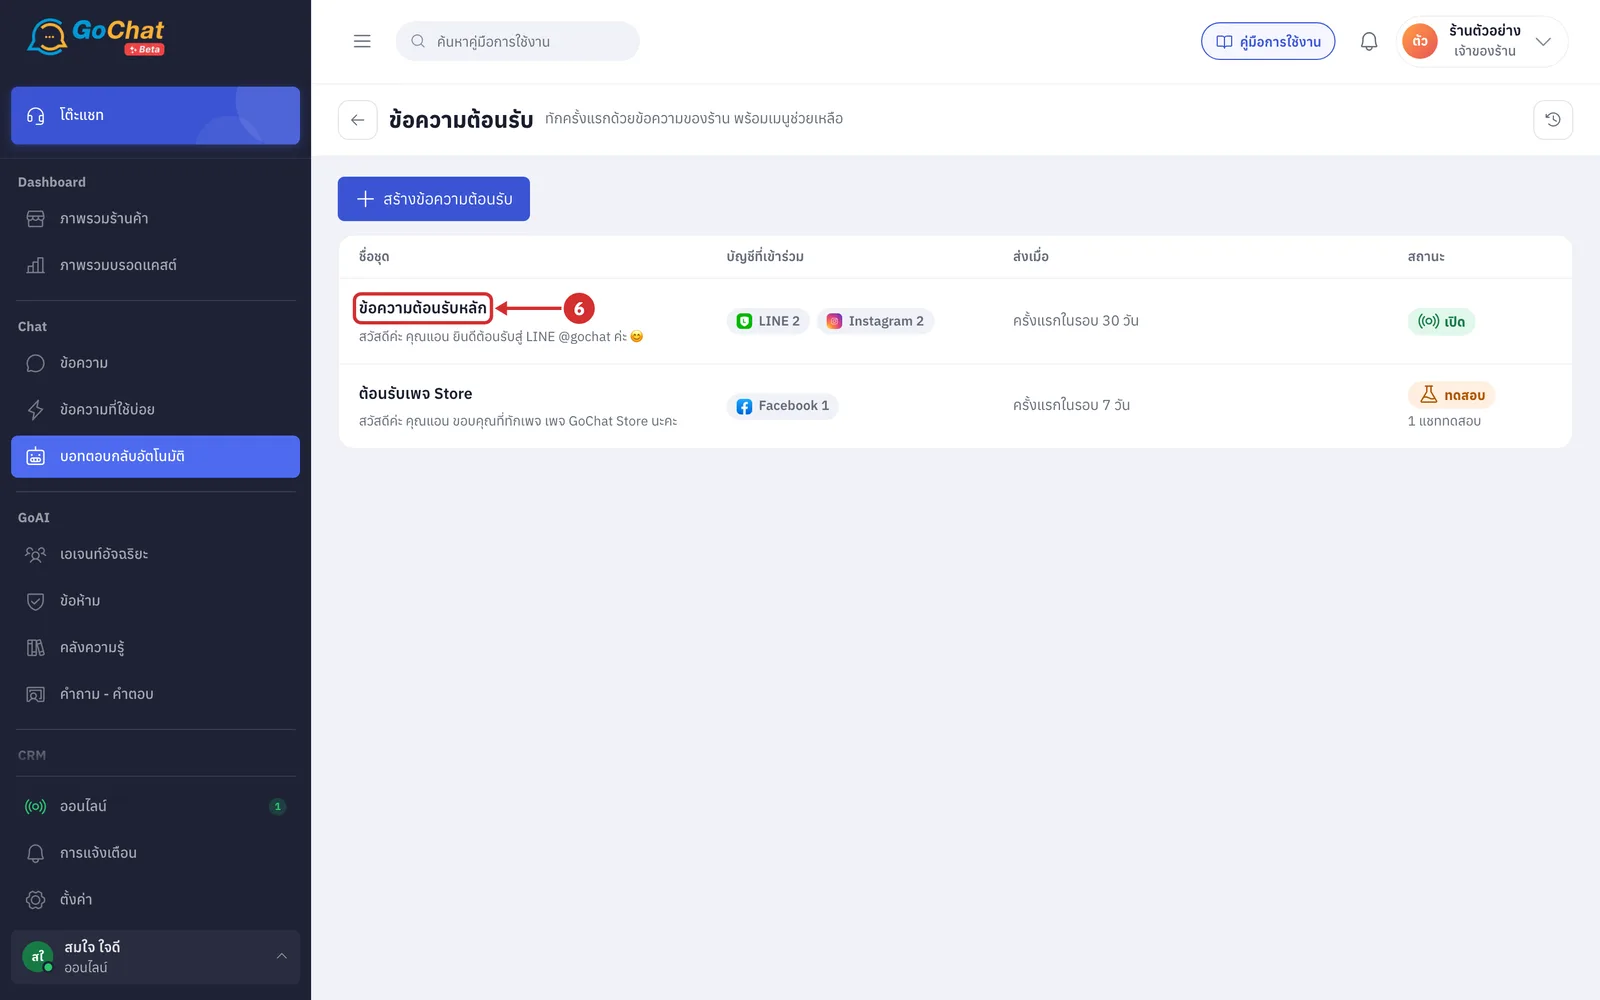
Click the card of the topic you want, such as ข้อความต้อนรับ (Welcome message)
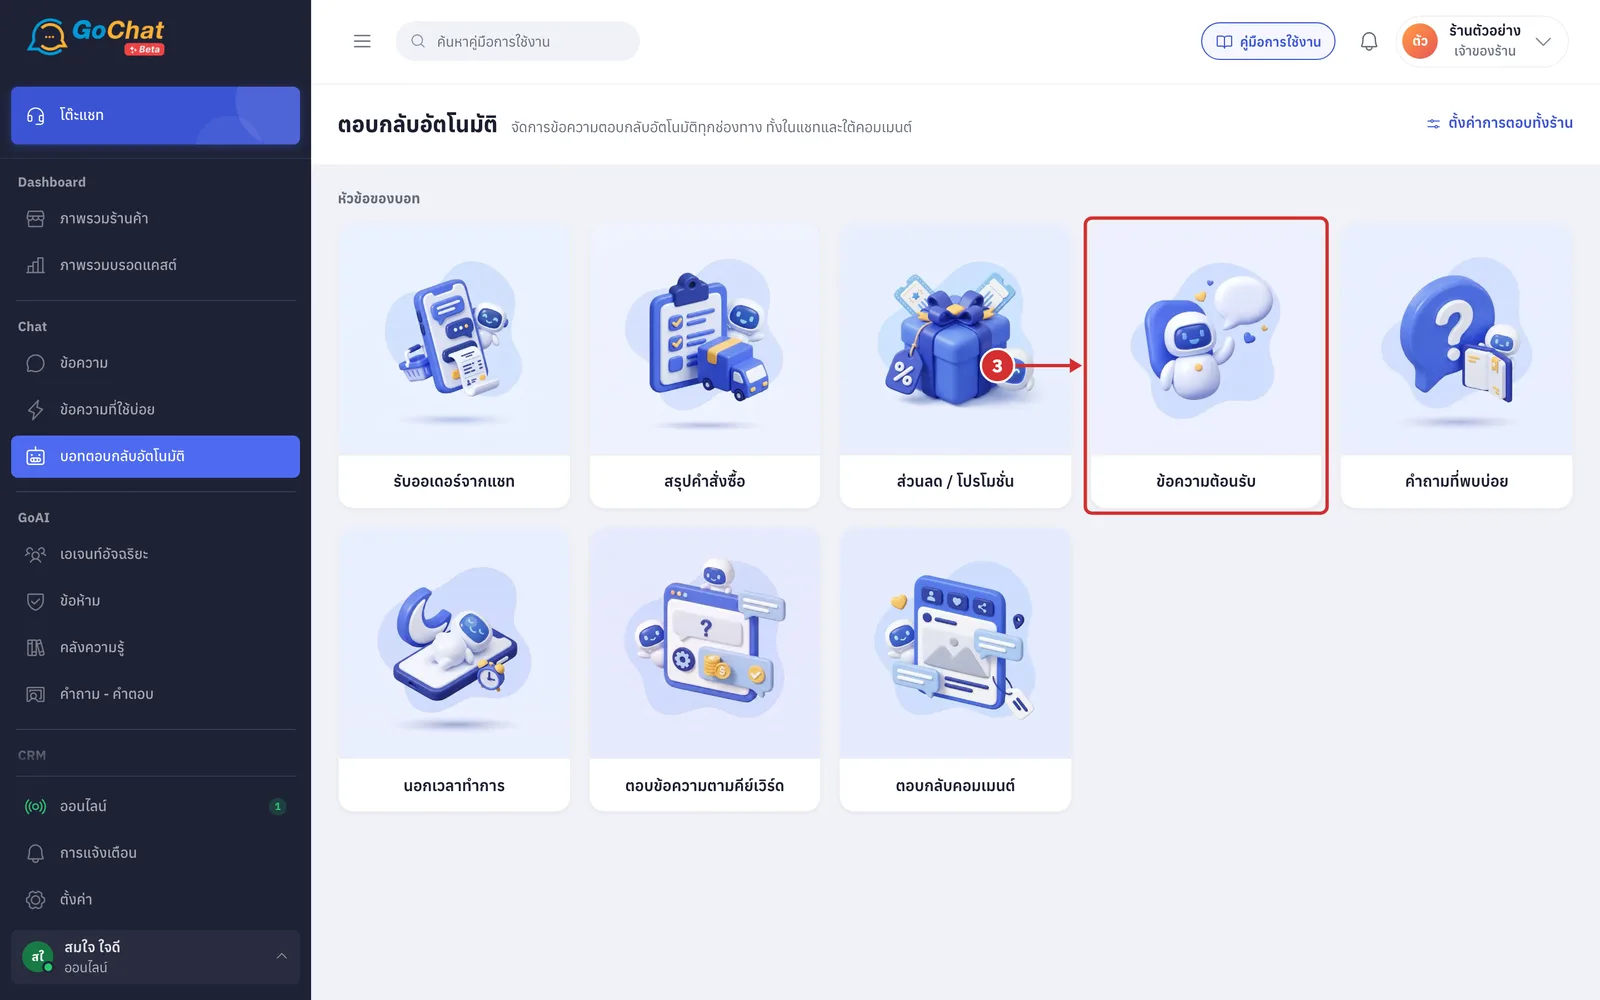
The topic's list page has these parts
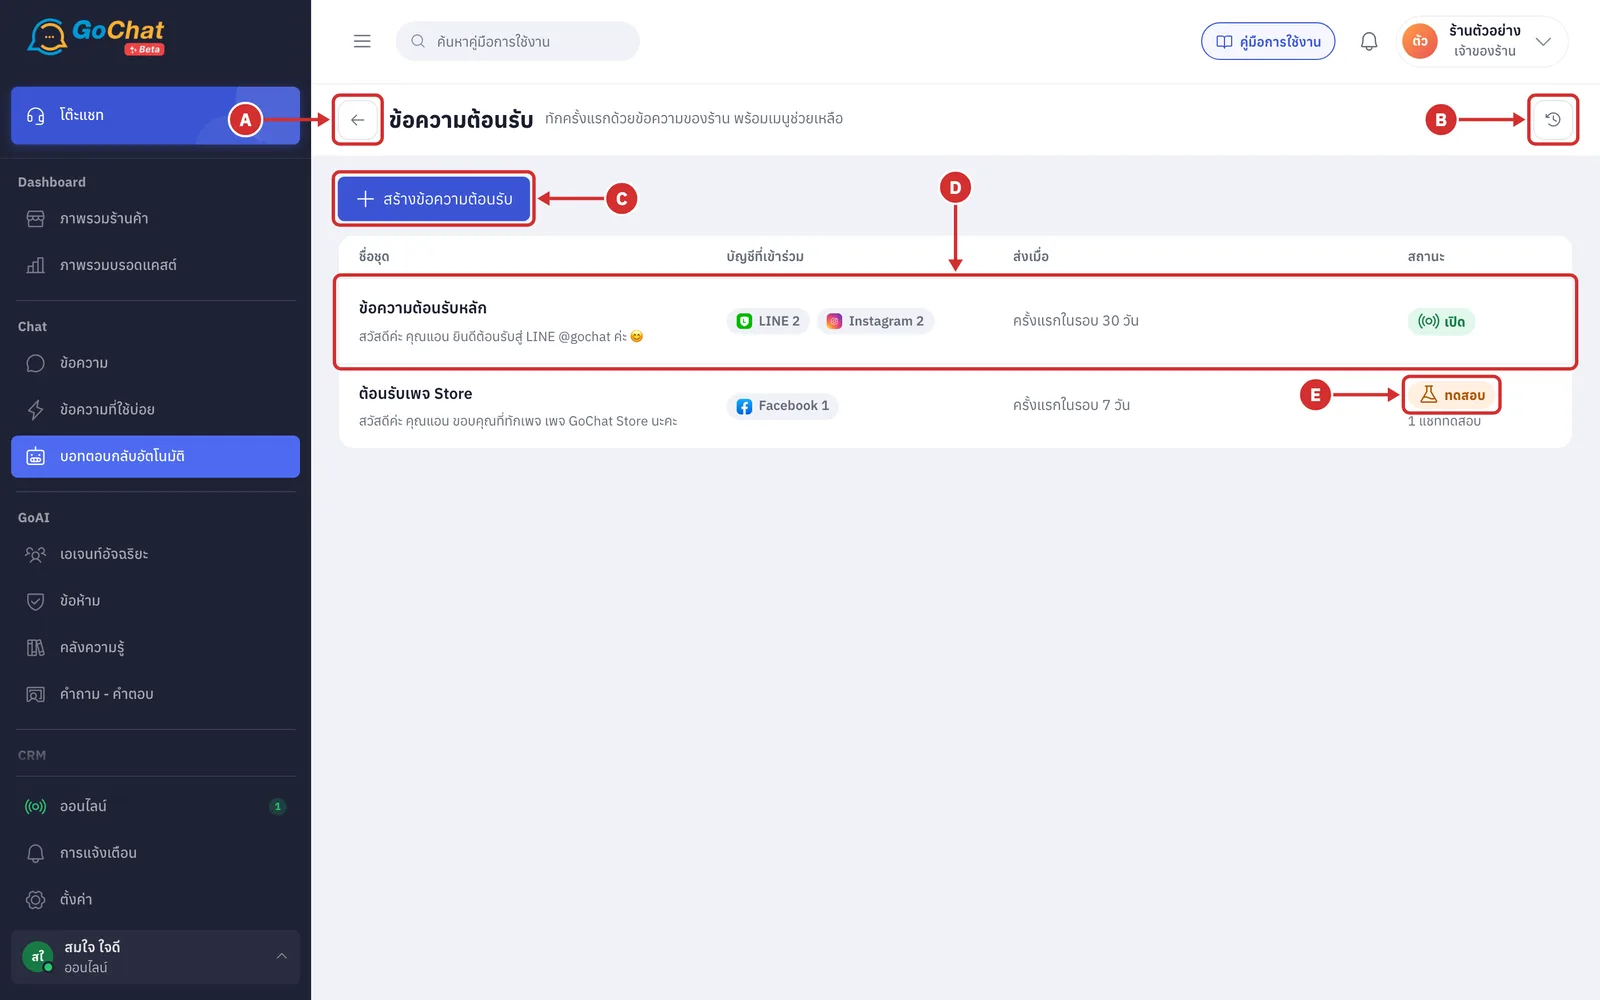
A Back — back to the auto-reply page
B ประวัติการแก้ไข (Edit history) — see who created, edited, turned on or off or deleted which set in this topic (see Viewing edit history)
C สร้างข้อความต้อนรับ (Create welcome message) — creates a new set (the button name changes with the topic, such as สร้างชุดคำถาม (Create question set), สร้างโปรโมชั่น (Create promotion) or สร้างชุดคีย์เวิร์ด (Create keyword set))
D A set's row — each row shows the following
ชื่อชุด (Set name): with a grey line under it, which is the first line of the message the bot will send, with variables replaced by sample values, such as คุณแอน for the customer's name
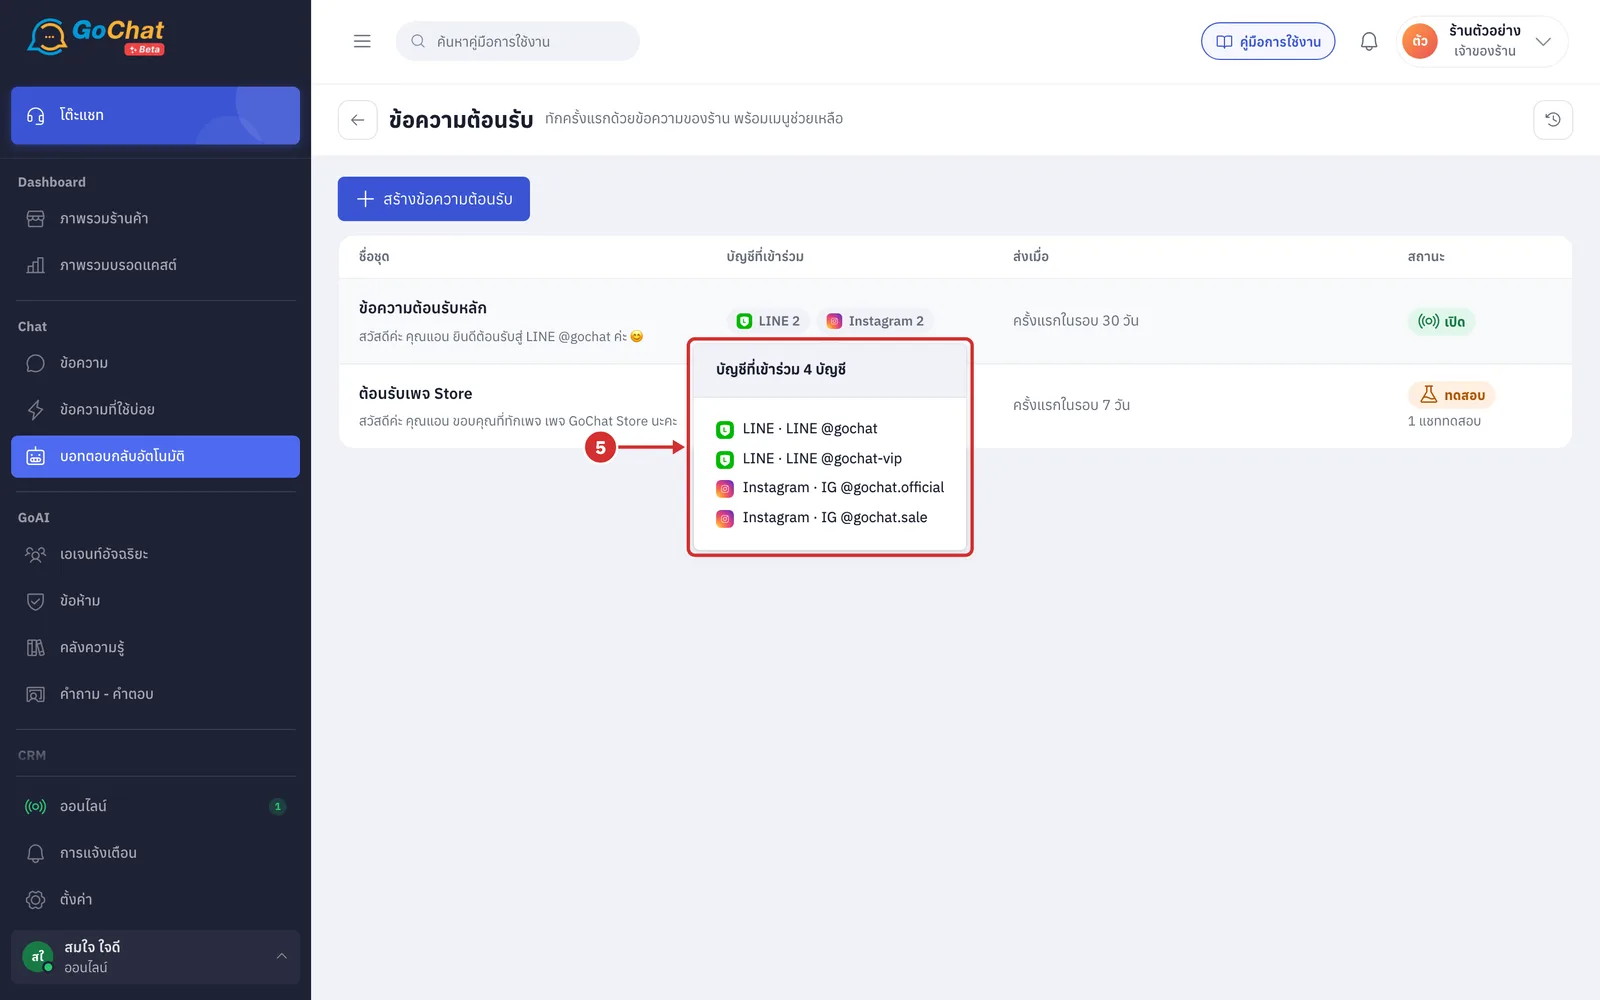
บัญชีที่เข้าร่วม (Accounts): the number of pages and accounts per channel; a set with no accounts shows ยังไม่มีบัญชี (No accounts yet)
The third column: sums up when the bot sends, which differs by topic
ข้อความต้อนรับ (Welcome message): shown under ส่งเมื่อ (Sends when), such as ครั้งแรกในรอบ 30 วัน (First message in 30 days)
คำถามที่พบบ่อย (FAQ): the number of questions
ตอบข้อความตามคีย์เวิร์ด (Keyword replies) and สรุปคำสั่งซื้อ (Order summary): the words customers type
E สถานะ (Status) — the status of each set
เปิด (On): answers real customers
ทดสอบ (Test): answers test chats only, with the number of test chats under the badge
ปิด (Off): answers no one
Good to know: The list page is view-only; change a set's status or delete it in the editor.
Point at or click the channel badges in the บัญชีที่เข้าร่วม (Accounts) column to see every account in that set (press Esc to close)
Click a set's name (or anywhere in the row) to open the editor
Parts of the set editor
Every topic's editor is split into steps. Step 1 is the same for every topic, while the ส่งเมื่อ (Sends when) and ตอบกลับ (Reply) steps differ by topic (see each topic's article). Changes on this page only take effect when you click บันทึก (Save).
The top of the editor has these parts
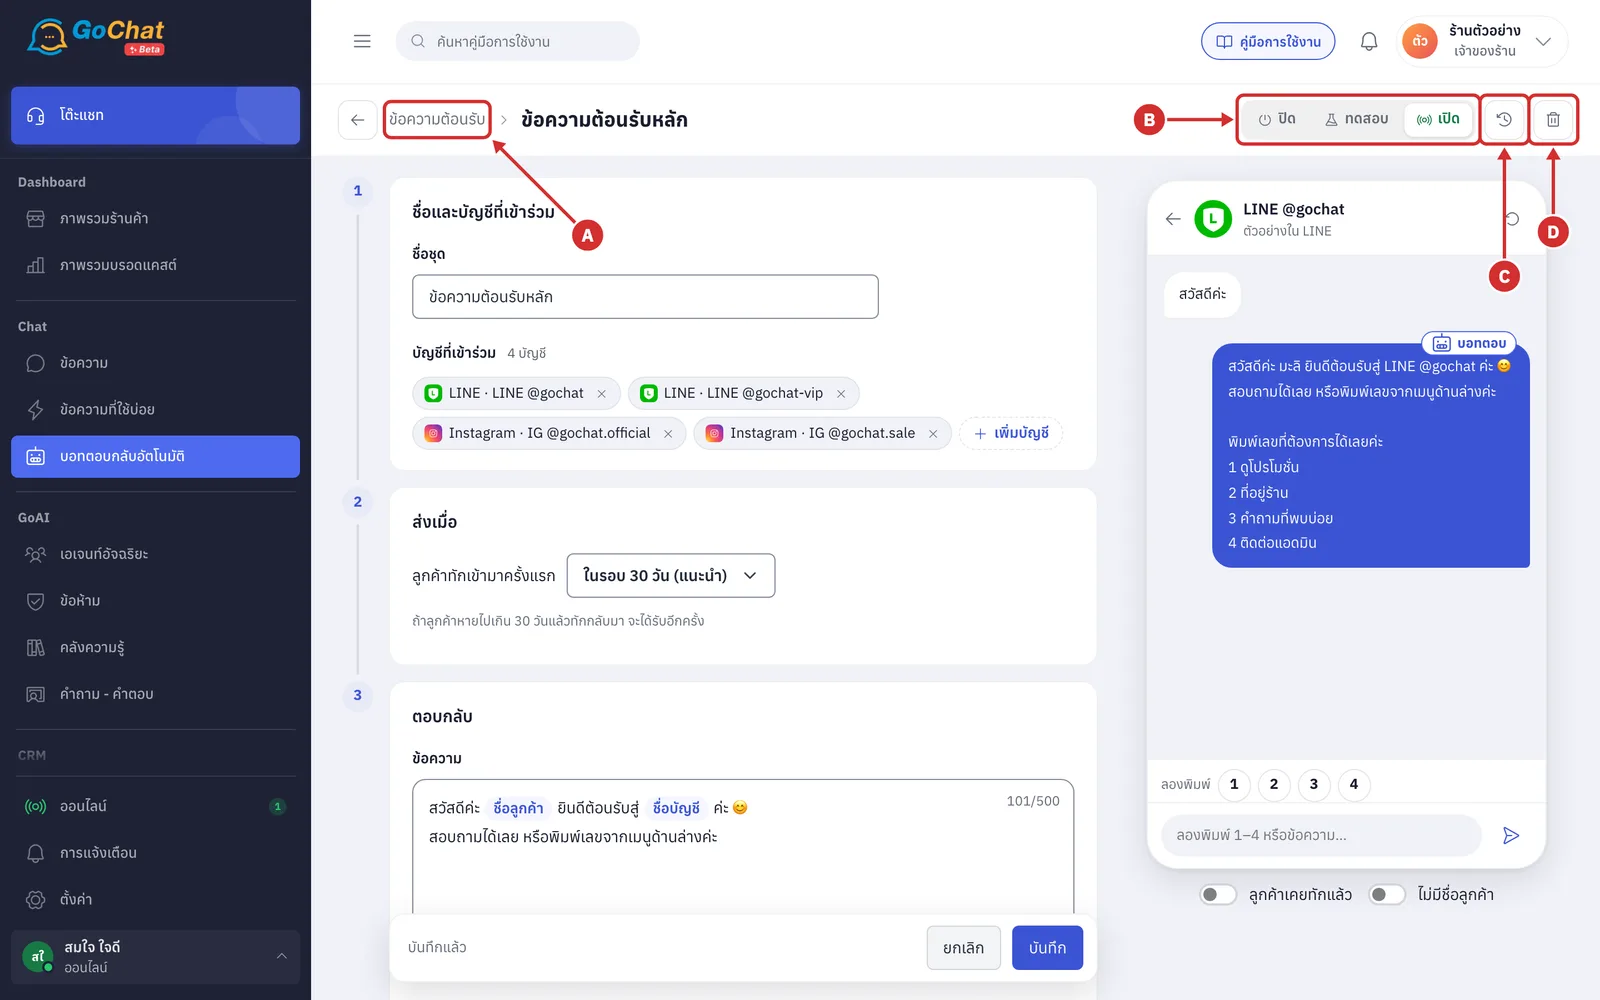
A Topic › set name — a new set shows ชุดใหม่ (New set) until you name it
Click the left arrow to go back to the list
The app does not ask first, and unsaved changes are lost
B Set status — choose ปิด (Off), ทดสอบ (Test) or เปิด (On) (see Choosing a set's status)
C ประวัติการแก้ไข (Edit history) — the edit history of this set
D Delete — deletes this set (see Deleting a set)
Good to know: A new set that has not been saved yet has no C or D buttons.
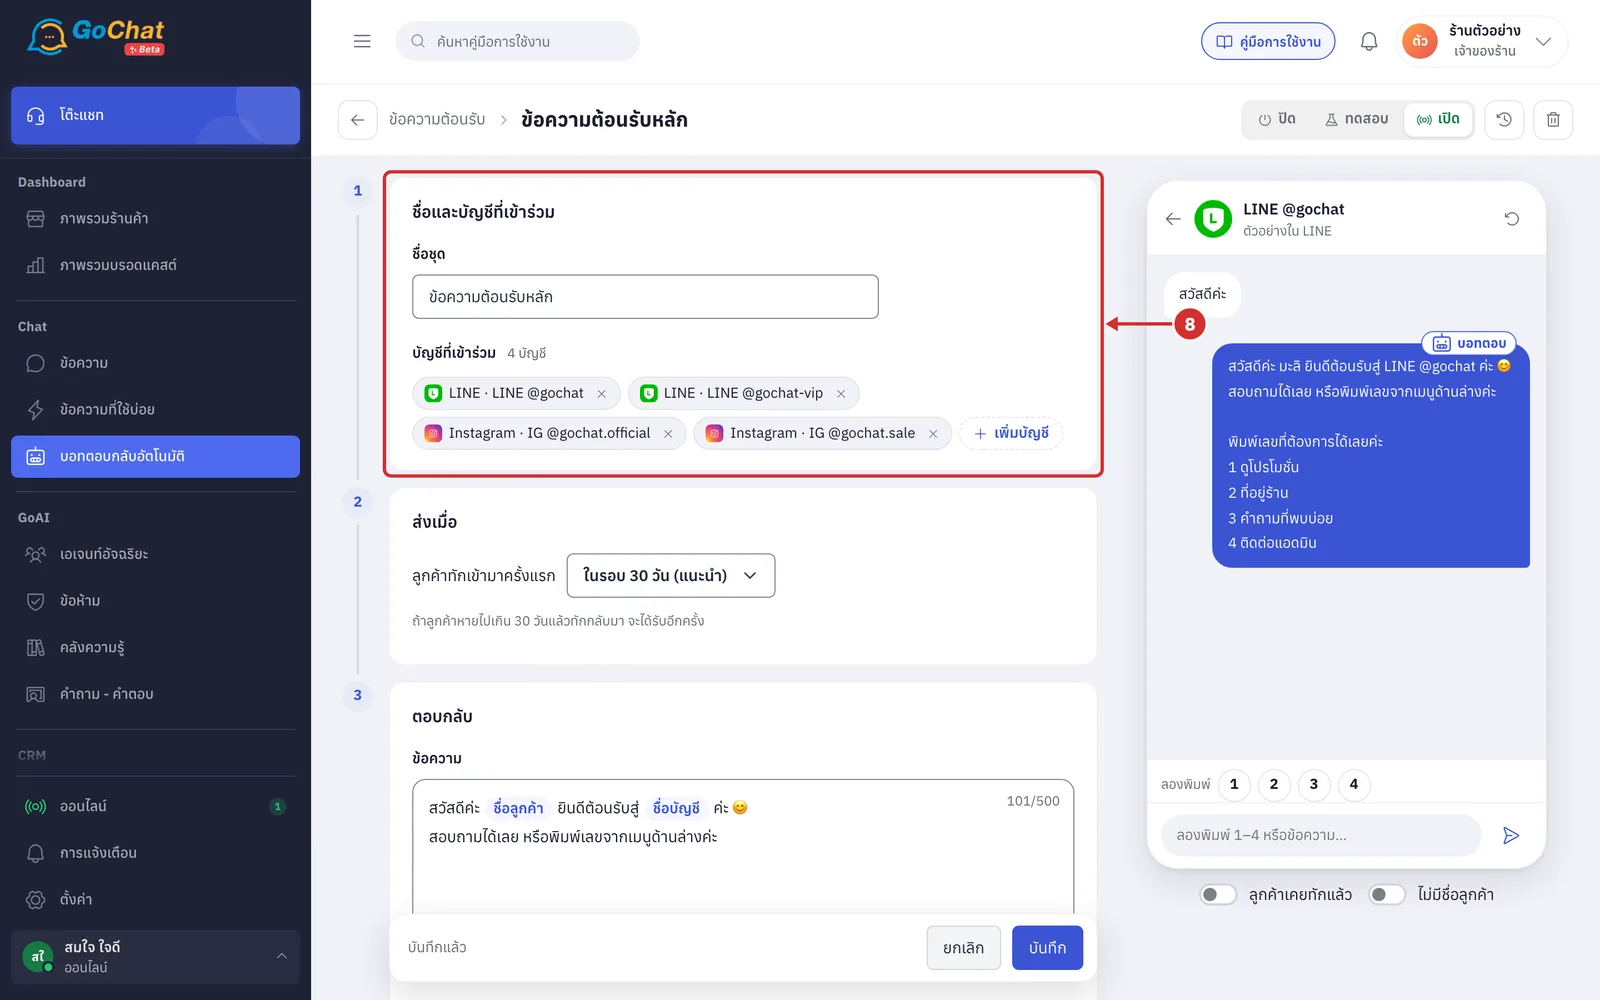
In the ชื่อและบัญชีที่เข้าร่วม (Name and accounts) step, enter the ชื่อชุด (Set name) and check the set's accounts under บัญชีที่เข้าร่วม (Accounts)
The ชื่อชุด (Set name) is required, up to 60 characters
The set name is used for the set in the list and history; the promotion topic also sends the set name to customers as the promotion's name
Click × on an account to remove it
A set with no accounts can be saved, but the bot answers no one until you add accounts
Click เพิ่มบัญชี (Add account). The เลือกบัญชีที่เข้าร่วม (Choose accounts) window opens with these parts
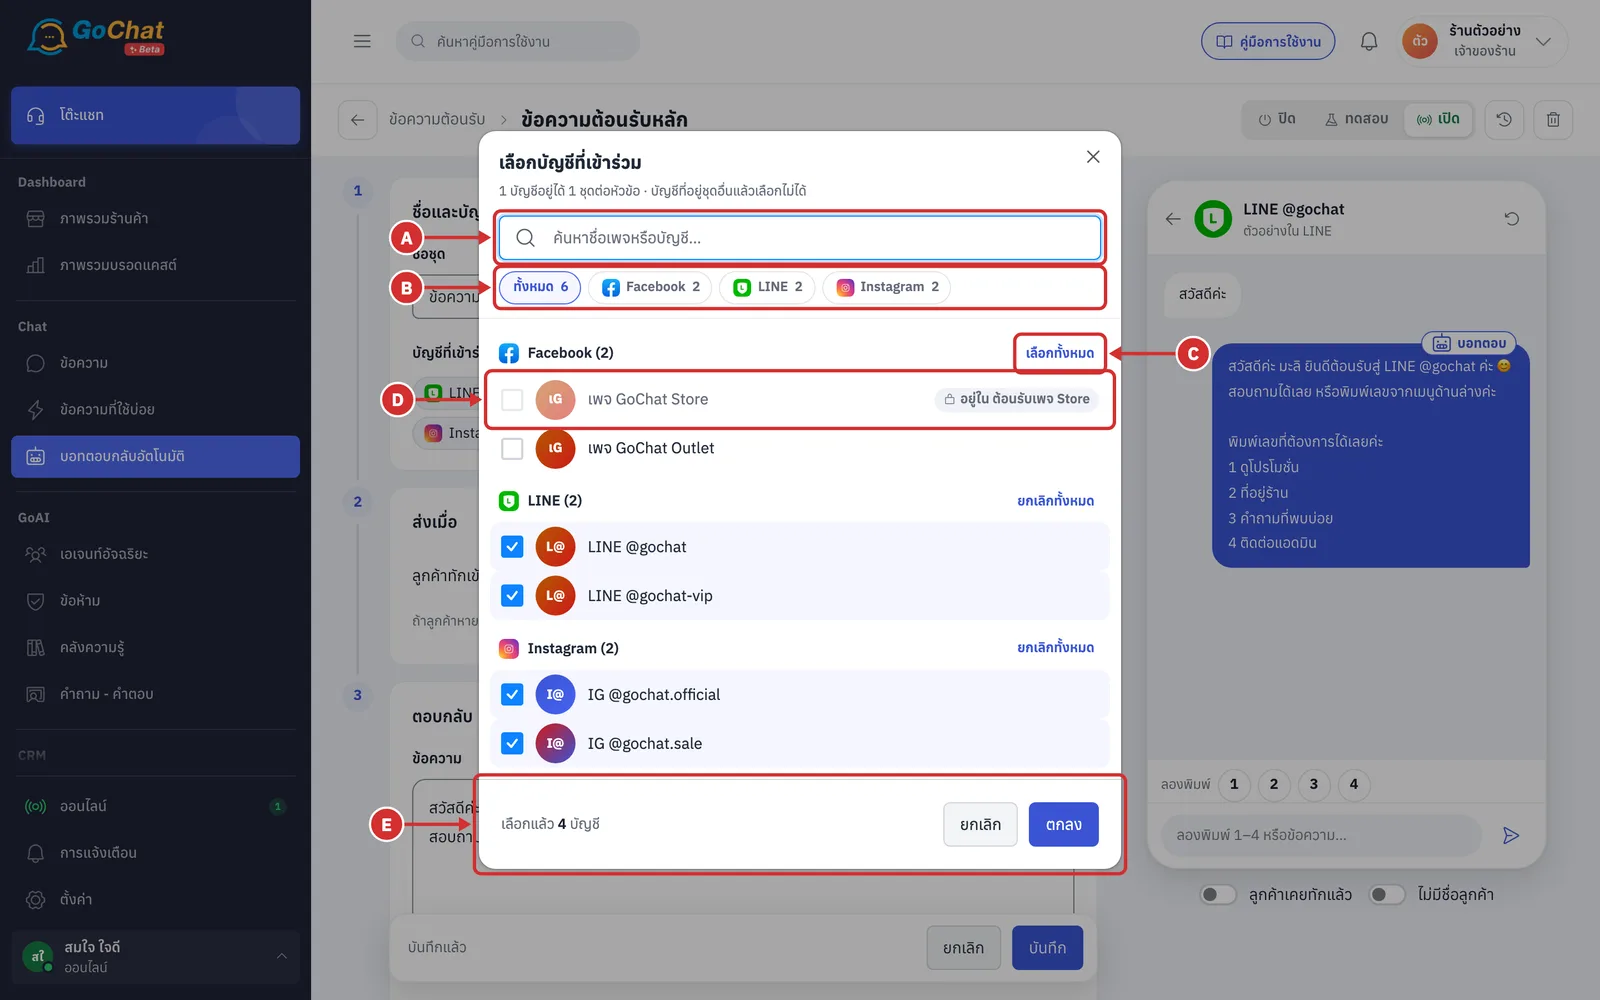
A ค้นหาชื่อเพจหรือบัญชี (Search page or account name)
B Channel filter — choose ทั้งหมด (All) or a single channel, with the number of accounts
C เลือกทั้งหมด (Select all) — selects every account in that channel (click again for ยกเลิกทั้งหมด (Clear all))
D Accounts already in another set — show a lock and อยู่ใน (In) the set's name, and cannot be selected
One account can be in one set per topic, except ส่วนลด / โปรโมชั่น (Discounts / Promotions) and ตอบข้อความตามคีย์เวิร์ด (Keyword replies), where one account can be in many sets
Disconnected accounts show หลุดการเชื่อมต่อ ต้องเชื่อมใหม่ (Disconnected, reconnect needed)
E เลือกแล้ว … บัญชี (… accounts selected) — click ตกลง (OK) to put the ticked accounts into the set, or ยกเลิก (Cancel) to close without changes (after OK you still need to click the set's บันทึก (Save))
Every topic's message box has these parts
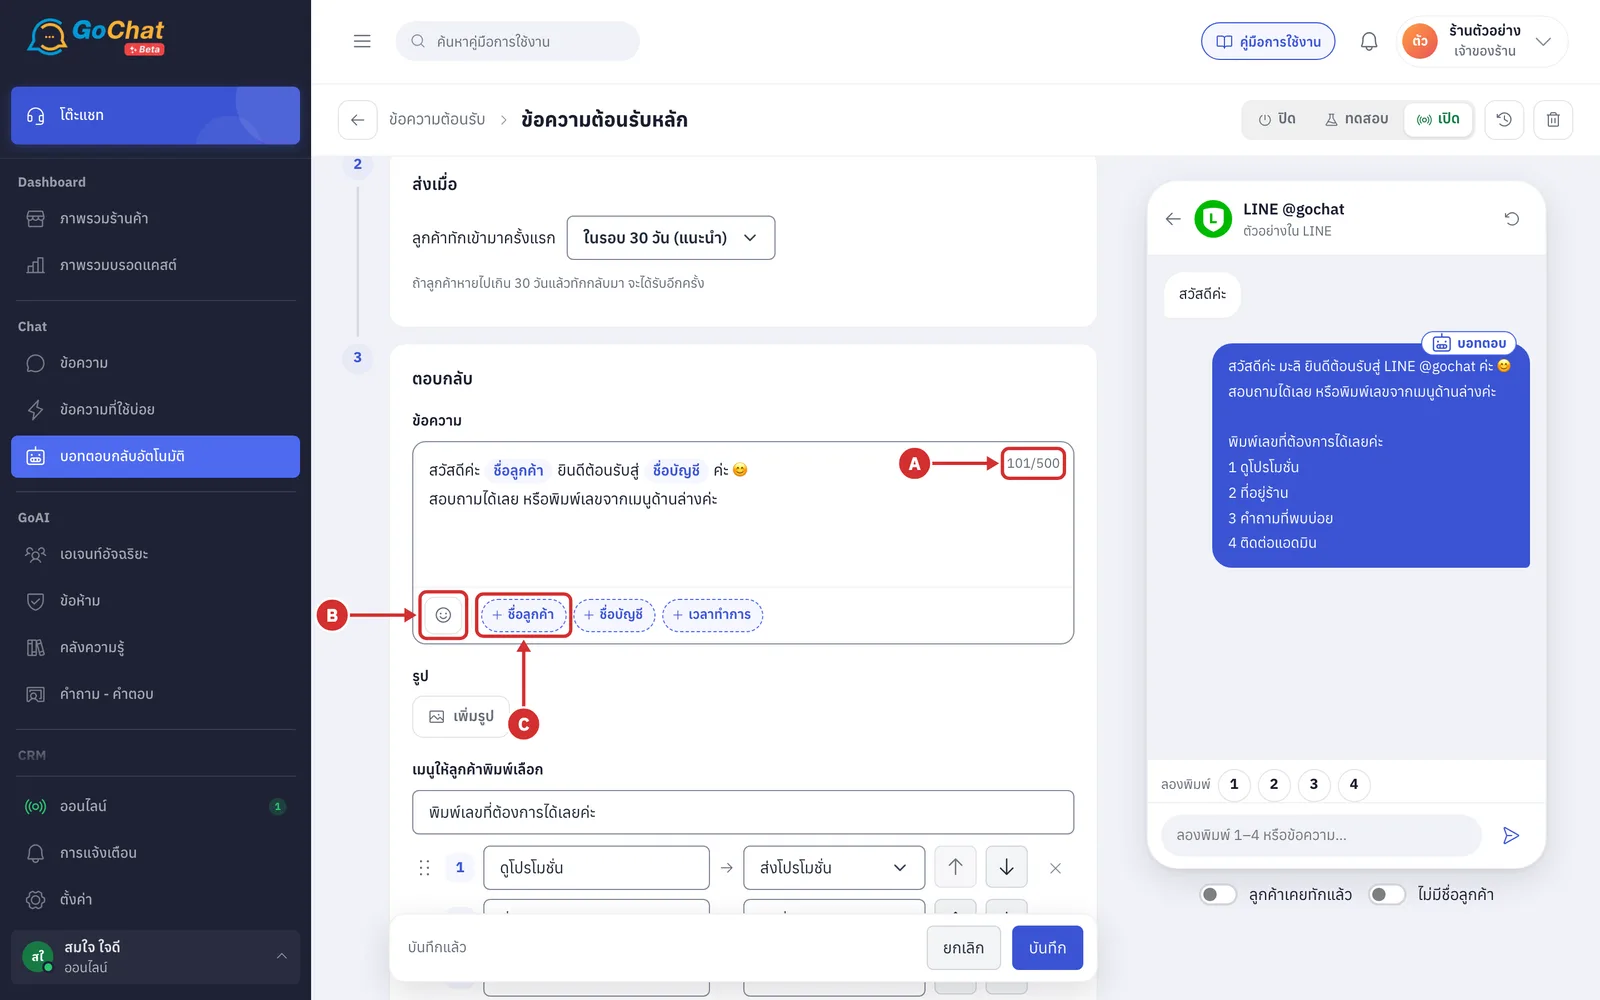
A Character counter — messages can be up to 500 characters on every channel, except สรุปคำสั่งซื้อ (Order summary), which allows 1,000. You cannot type more once it is full
B แทรกอีโมจิ (Insert emoji)
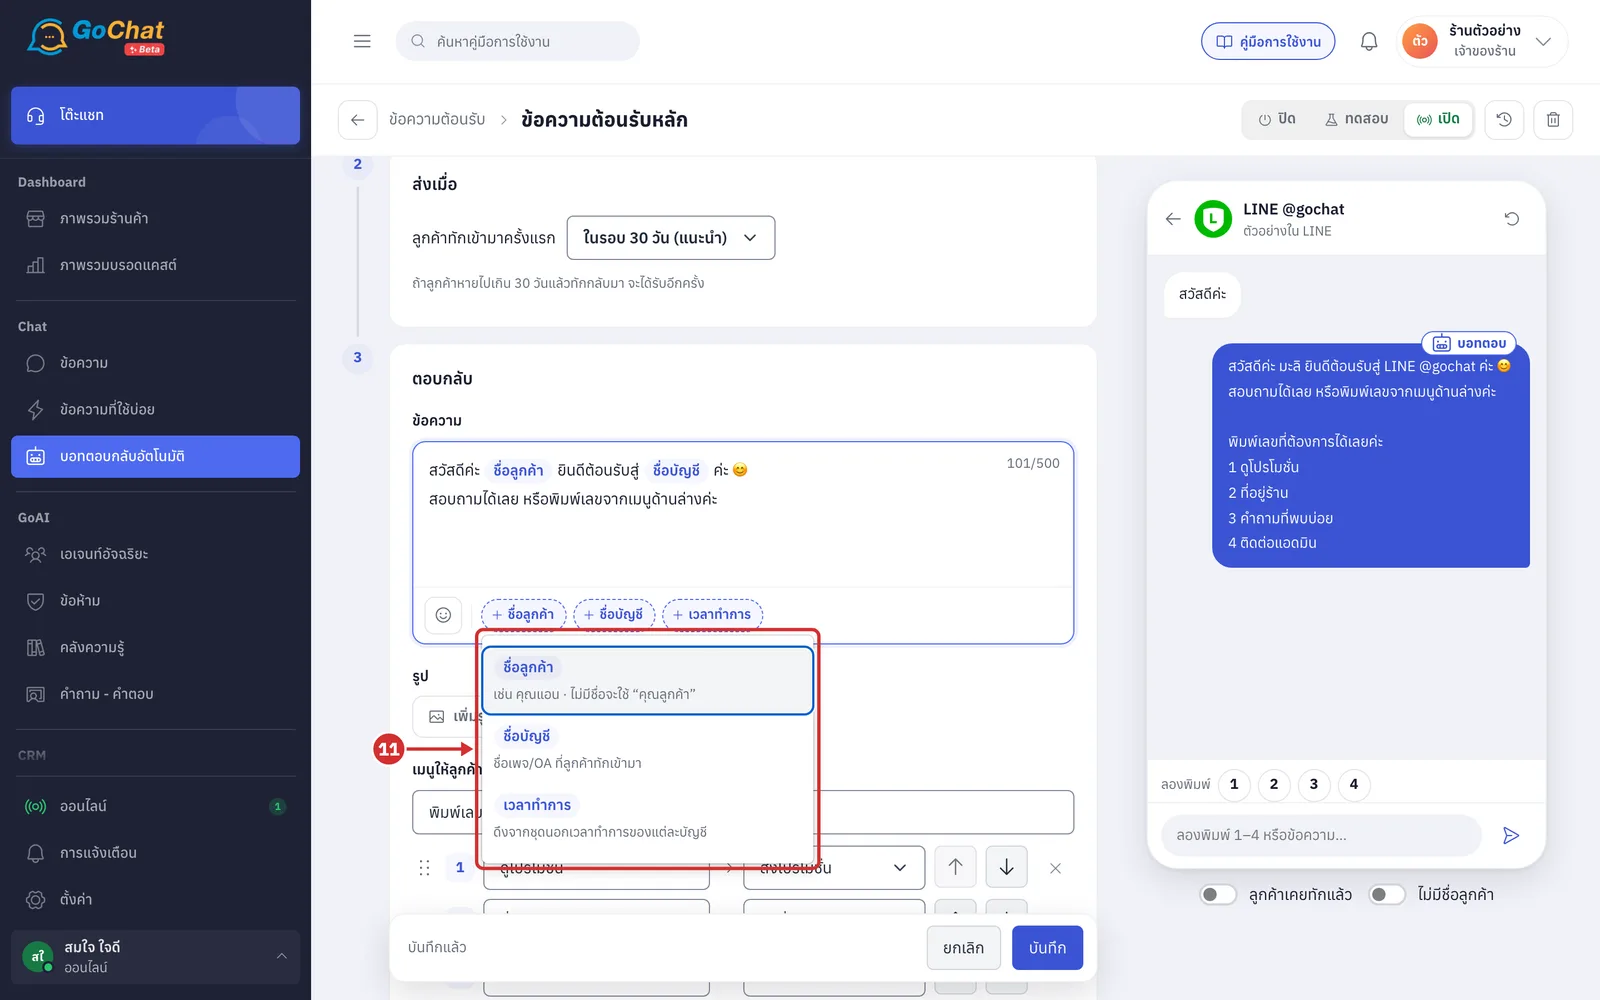
C Variable buttons such as + ชื่อลูกค้า (+ Customer name) — click one to insert the variable where you are typing. Variables appear as blue tags in the box and change to the real value when the bot sends
Point at a button to see a sample value
Backspace deletes a whole tag
The variables available differ by topic
Or type { in the message box and choose a variable from the list (each item shows a sample value, such as ชื่อลูกค้า (Customer name) — คุณแอน, or “คุณลูกค้า” (Dear customer) when there is no name)
The right side of the editor is ตัวอย่างในแชท (Chat preview). Type as a customer to see what the bot would reply, using the values in the editor even before you save. It has these parts
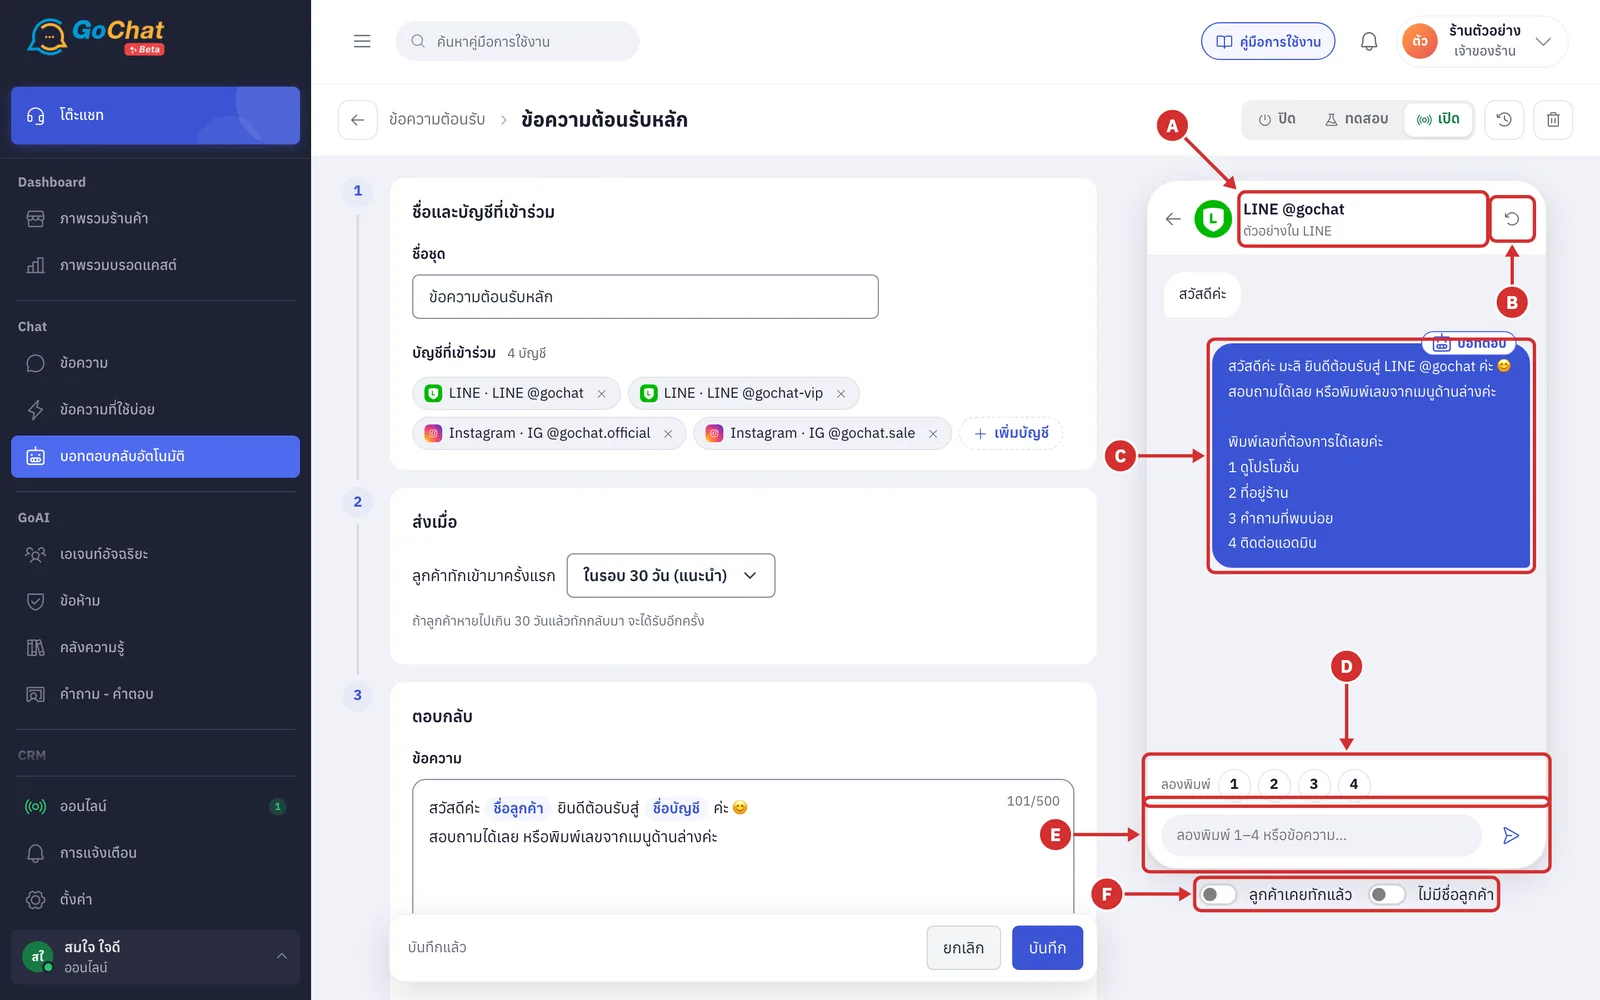
A Account used for the preview — the first account in step 1, with its channel, such as ตัวอย่างใน LINE (Preview in LINE)
A set that is off adds ชุดนี้ปิดอยู่ (This set is off) at the end
A set with no accounts shows ยังไม่มีบัญชี (No accounts yet) and cannot be tried
B เริ่มใหม่ (Restart) — clears the conversation and starts again
C Bot message — has a บอทตอบ (Bot replied) label on the bubble's corner
The sample customer is called มะลิ
If the bot does not reply, ไม่ตอบ: (No reply:) and the reason appear in the middle
D ลองพิมพ์ (Try typing) — buttons for the menu numbers the bot just sent; click one to try choosing a menu item
E Customer message box — type a message and press Enter or the send button
F Scenarios — switches or buttons to try different cases, which differ by topic, such as ลูกค้าเคยทักแล้ว (Customer has messaged before) and ไม่มีชื่อลูกค้า (No customer name) for welcome messages
Good to know: The ตัวอย่างในแชท (Chat preview) sends nothing to real customers and saves nothing. Changing the form restarts the conversation.
Click the บอทตอบ (Bot replied) label to see ทำไมบอทตอบ (Why the bot replied), which shows
The set used
The matching condition
The set's mode
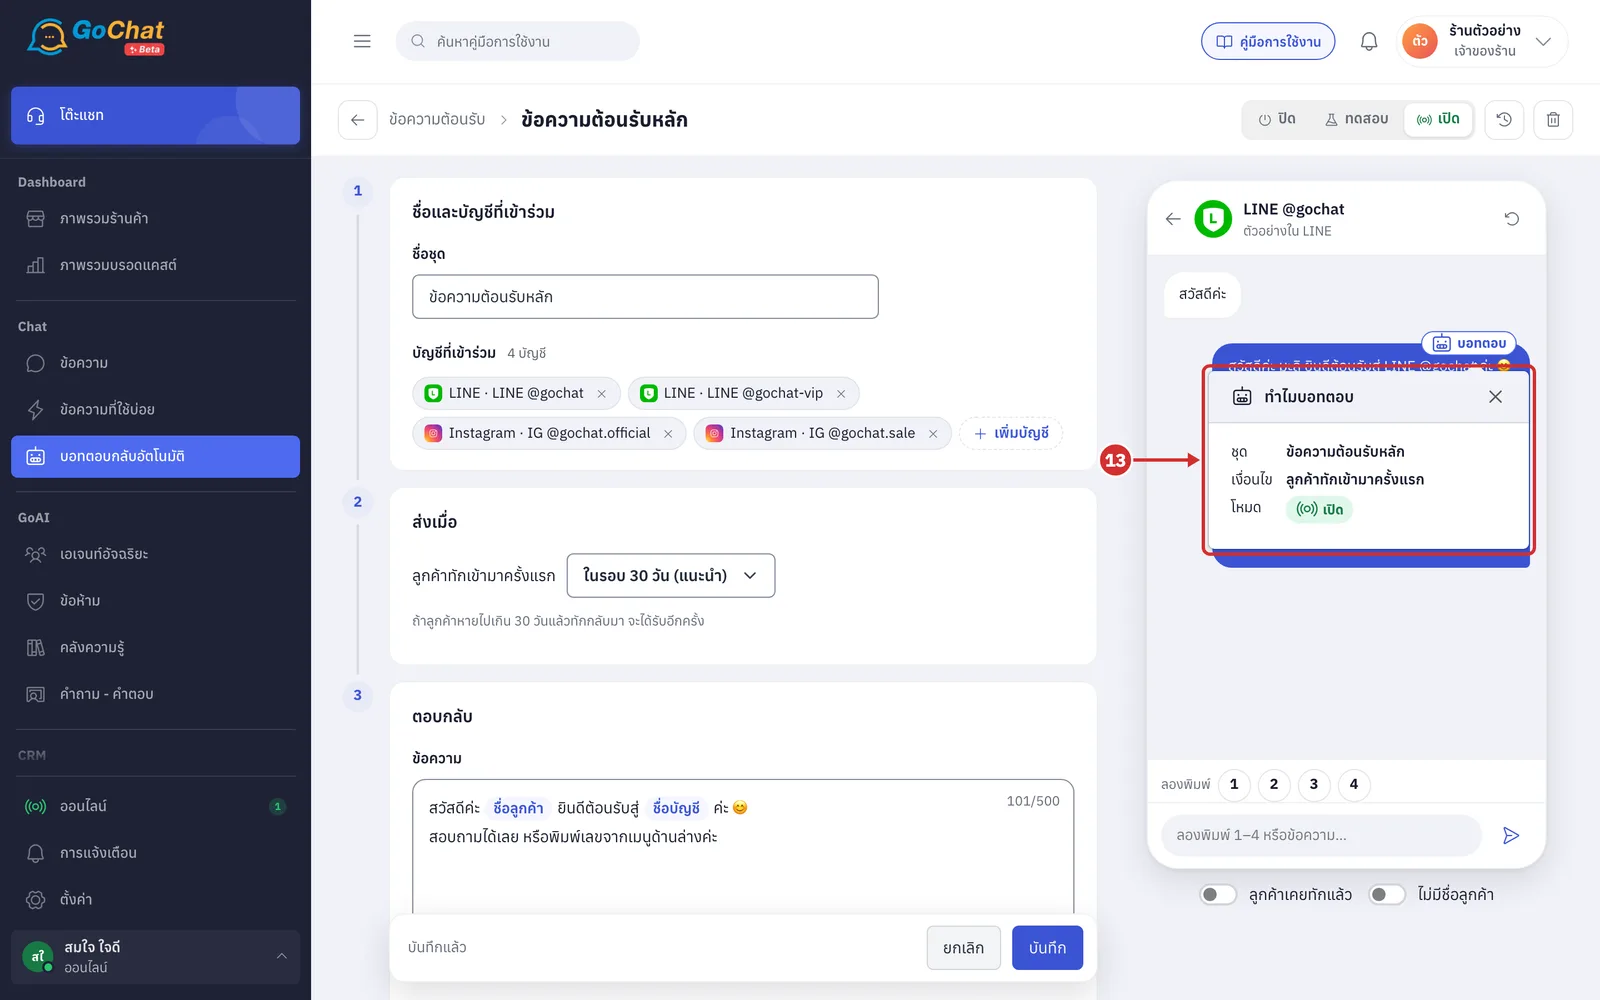
Good to know: Bot messages in real chats have the same บอทตอบ (Bot replied) label.
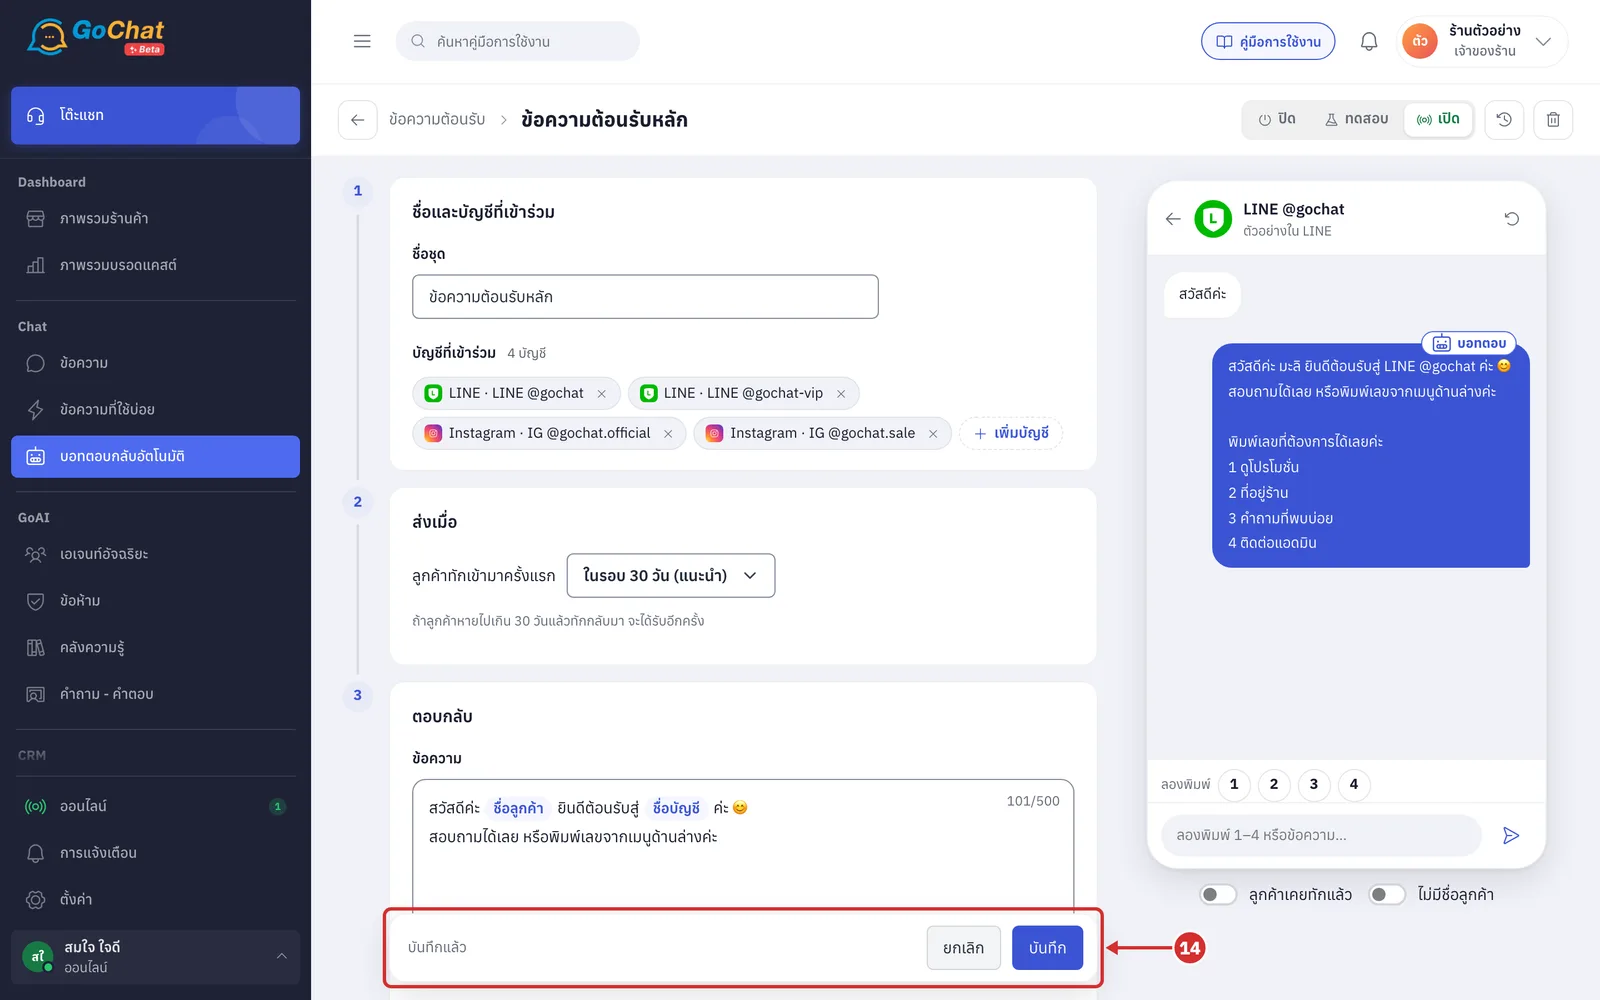
In the bar at the bottom, click สร้าง (Create) for a new set or บันทึก (Save) to save, or click ยกเลิก (Cancel) to go back to the list without saving
The bar shows the page's state
ชุดใหม่ · ยังไม่ได้บันทึก (New set · not saved yet)
มีการแก้ไขที่ยังไม่บันทึก (Unsaved changes)
บันทึกแล้ว (Saved)
An error in red
The app checks your entries when you save; fields that are not valid get a red border with the reason
Choosing a set's status
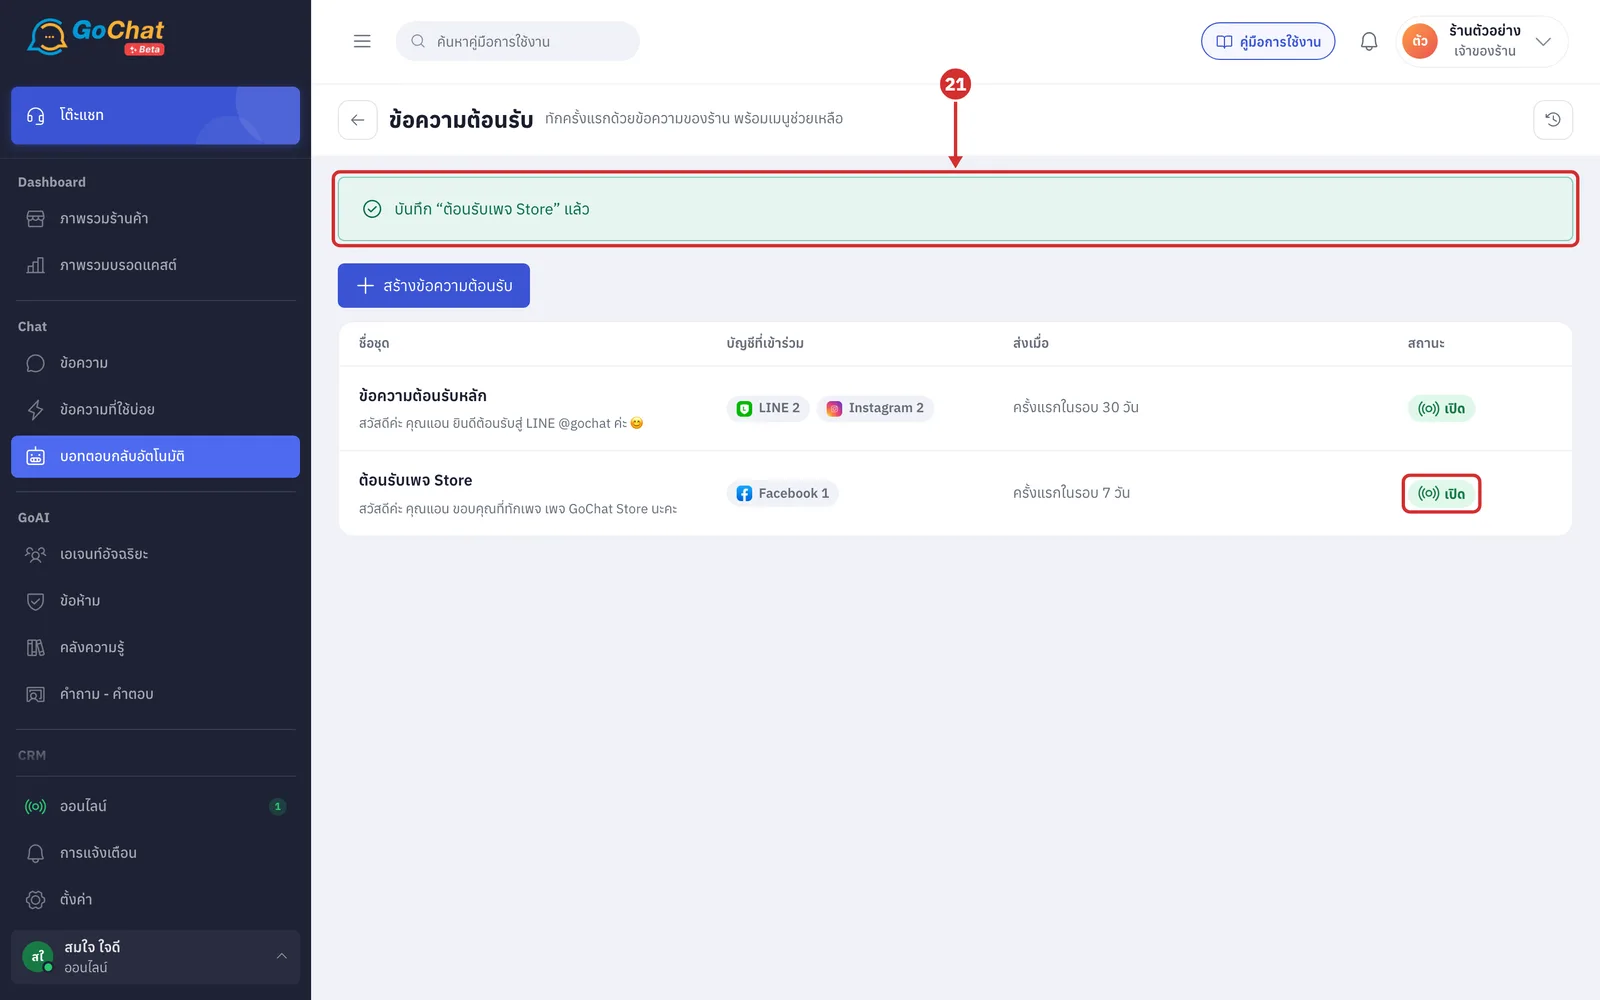
You can only change the status in the editor, and it takes effect when you click บันทึก (Save). New sets always start ปิด (Off), so no message reaches customers when you first create a set.
At the top right of the editor, choose one of 3 statuses
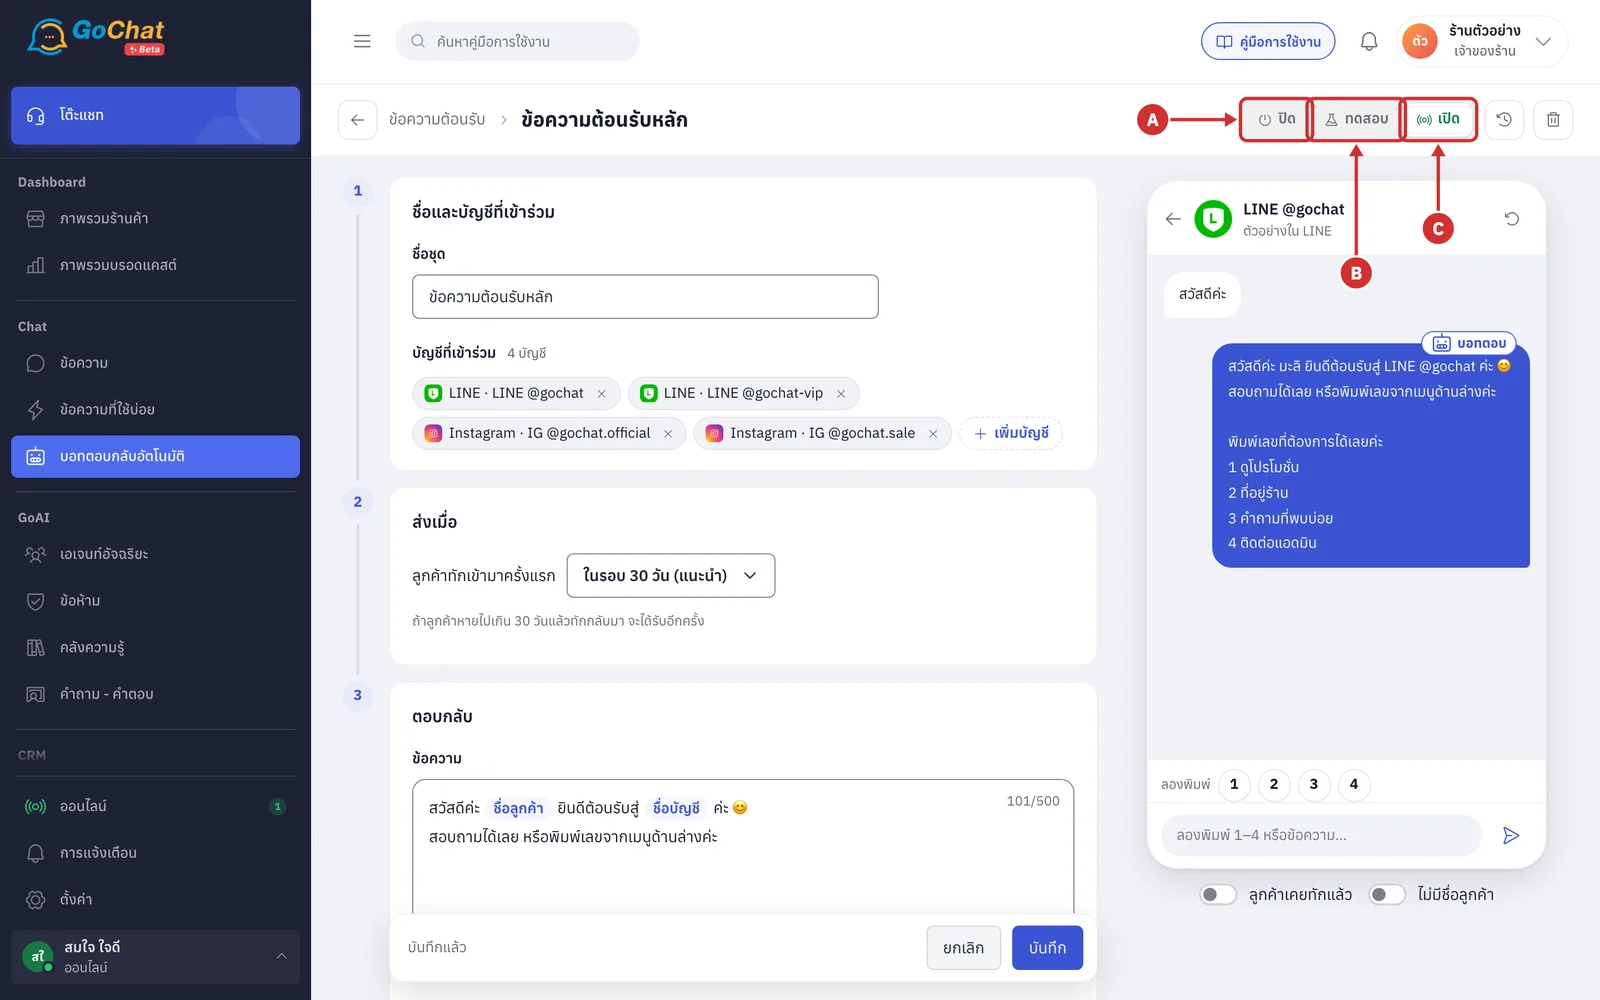
A ปิด (Off) — the bot does not send this set to anyone
B ทดสอบ (Test) — the bot answers only the chats in the test chat list; other customers on the same accounts get nothing from this set. Use it to try with your team's chats before turning it on
C เปิด (On) — the bot answers every customer of the set's accounts
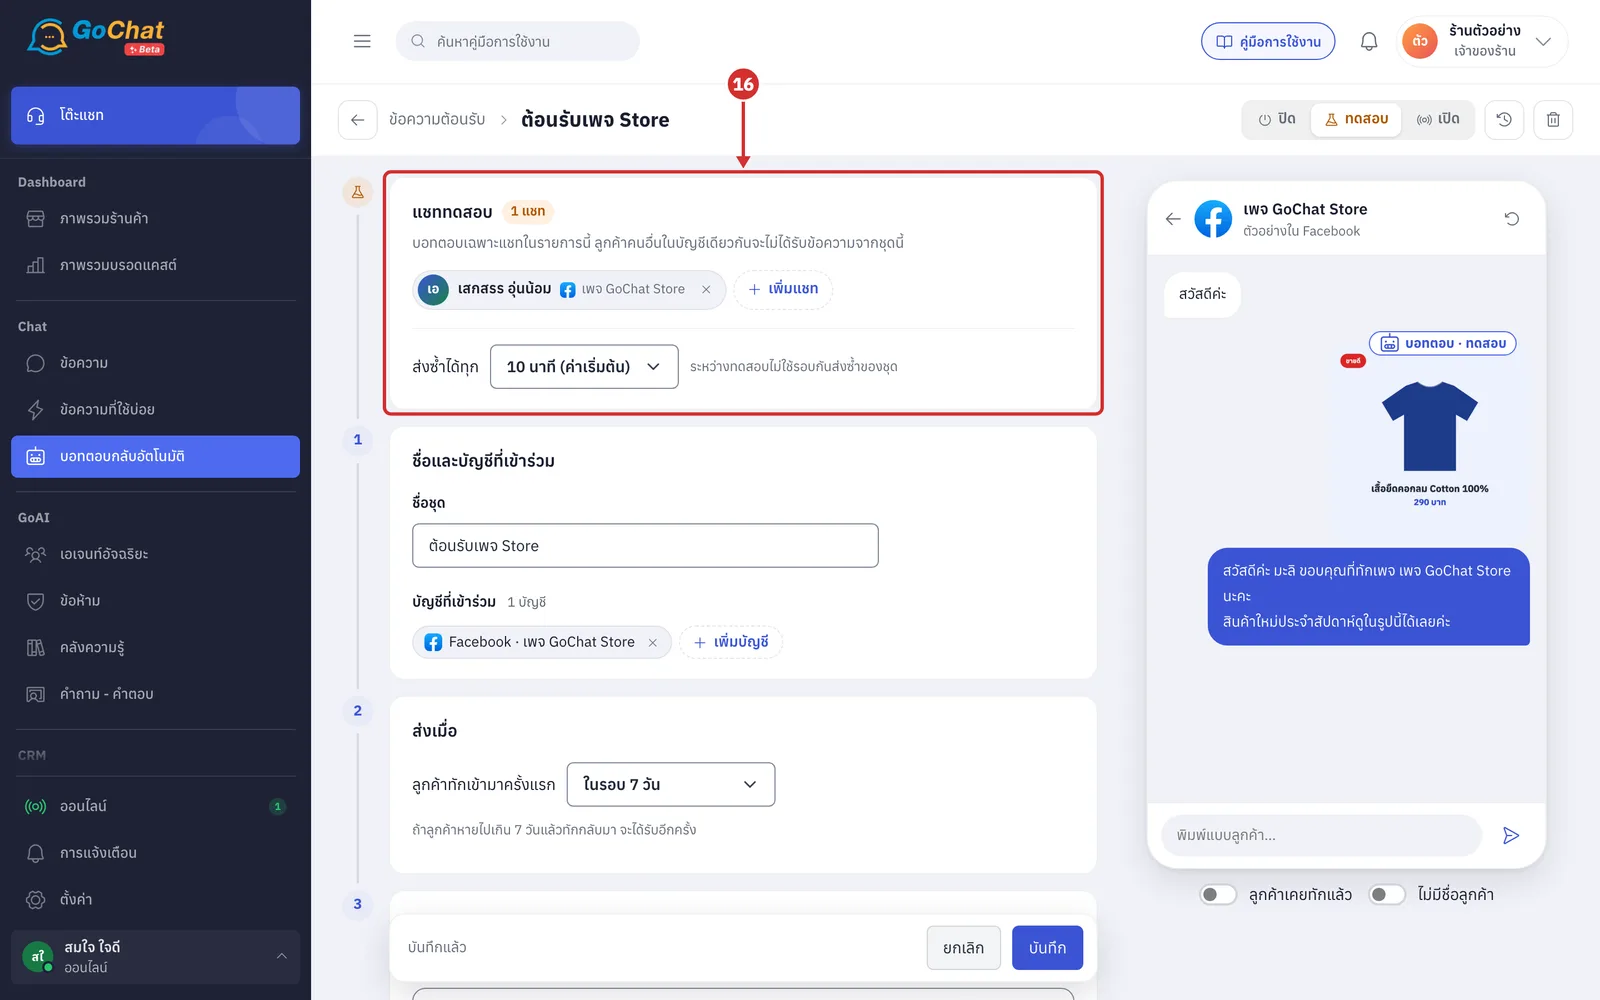
When you choose ทดสอบ (Test), a แชททดสอบ (Test chats) step appears at the top with the number and names of test chats
Click × on a name to remove it
With no test chats it shows ยังไม่มีแชททดสอบ บอทจะไม่ตอบใครเลย (No test chats yet, the bot will not answer anyone) and cannot be saved
You can choose up to 20 chats
Messages the bot sends in this mode are labelled บอทตอบ · ทดสอบ (Bot replied · Test)
Click เพิ่มแชท (Add chat) (available once you choose accounts in step 1). The เลือกห้องทดสอบ (Choose test rooms) window opens; tick the rooms you want
The window lists the chats of the chosen accounts, and you can search by customer name
The bottom of the window shows the count, เลือกไว้ … ห้อง · ไม่เกิน 20 (… rooms selected · up to 20)
It is best to use your team's own rooms: message the page or LINE OA from a personal account first and the room will appear in this list
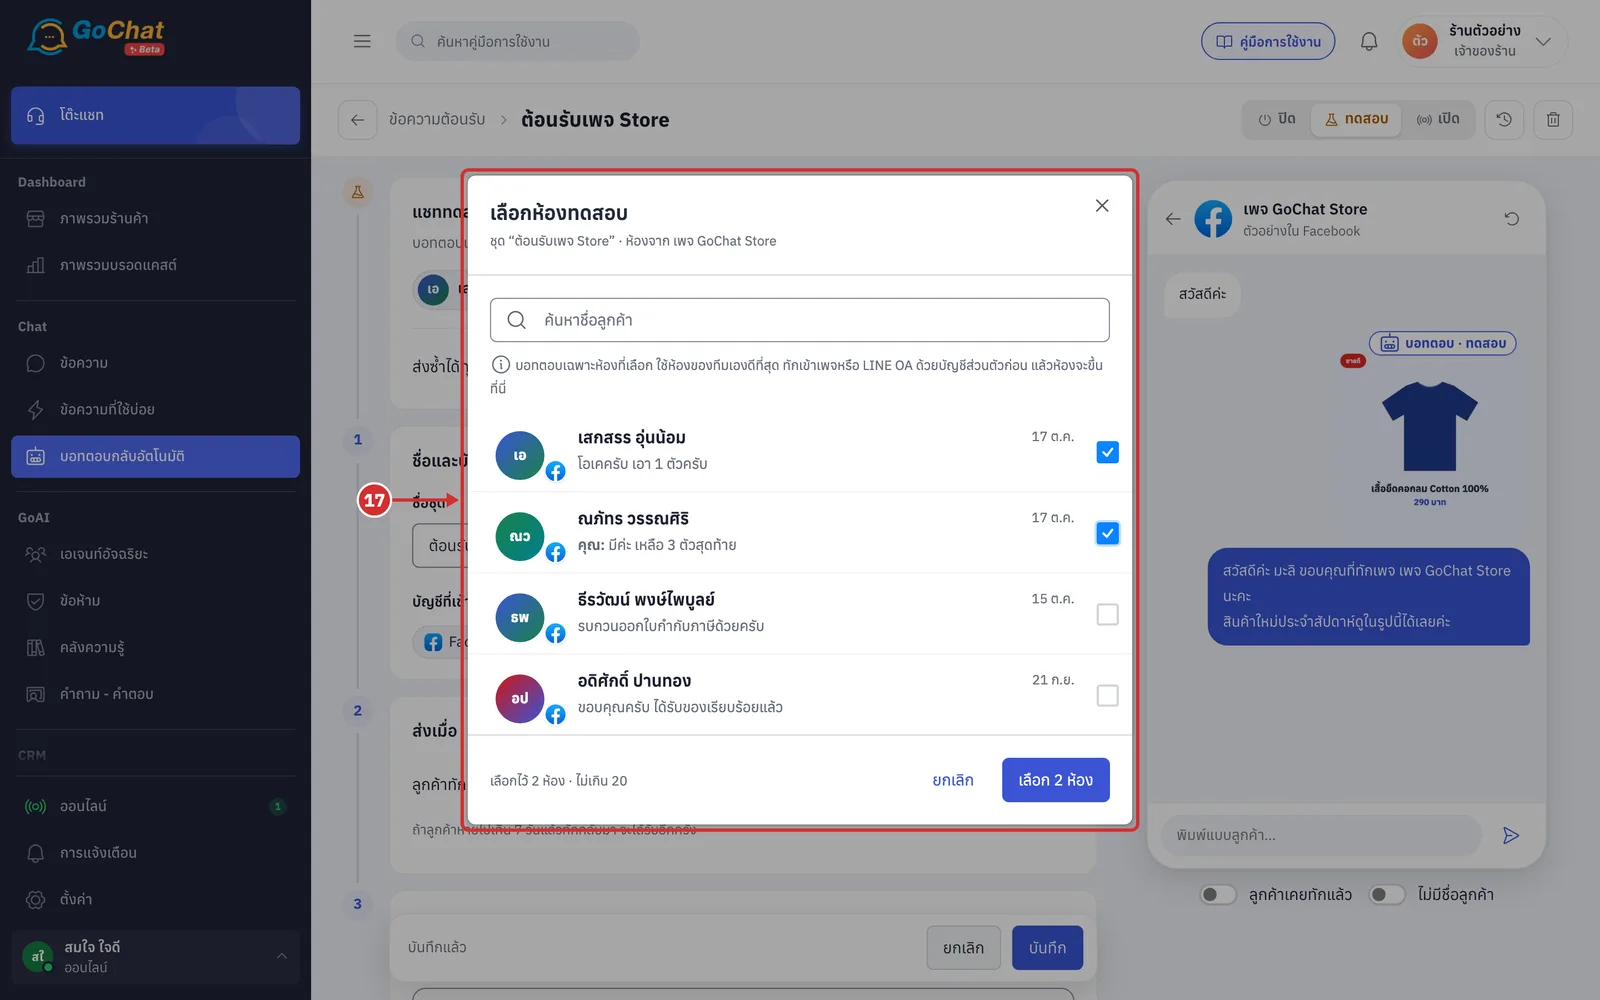
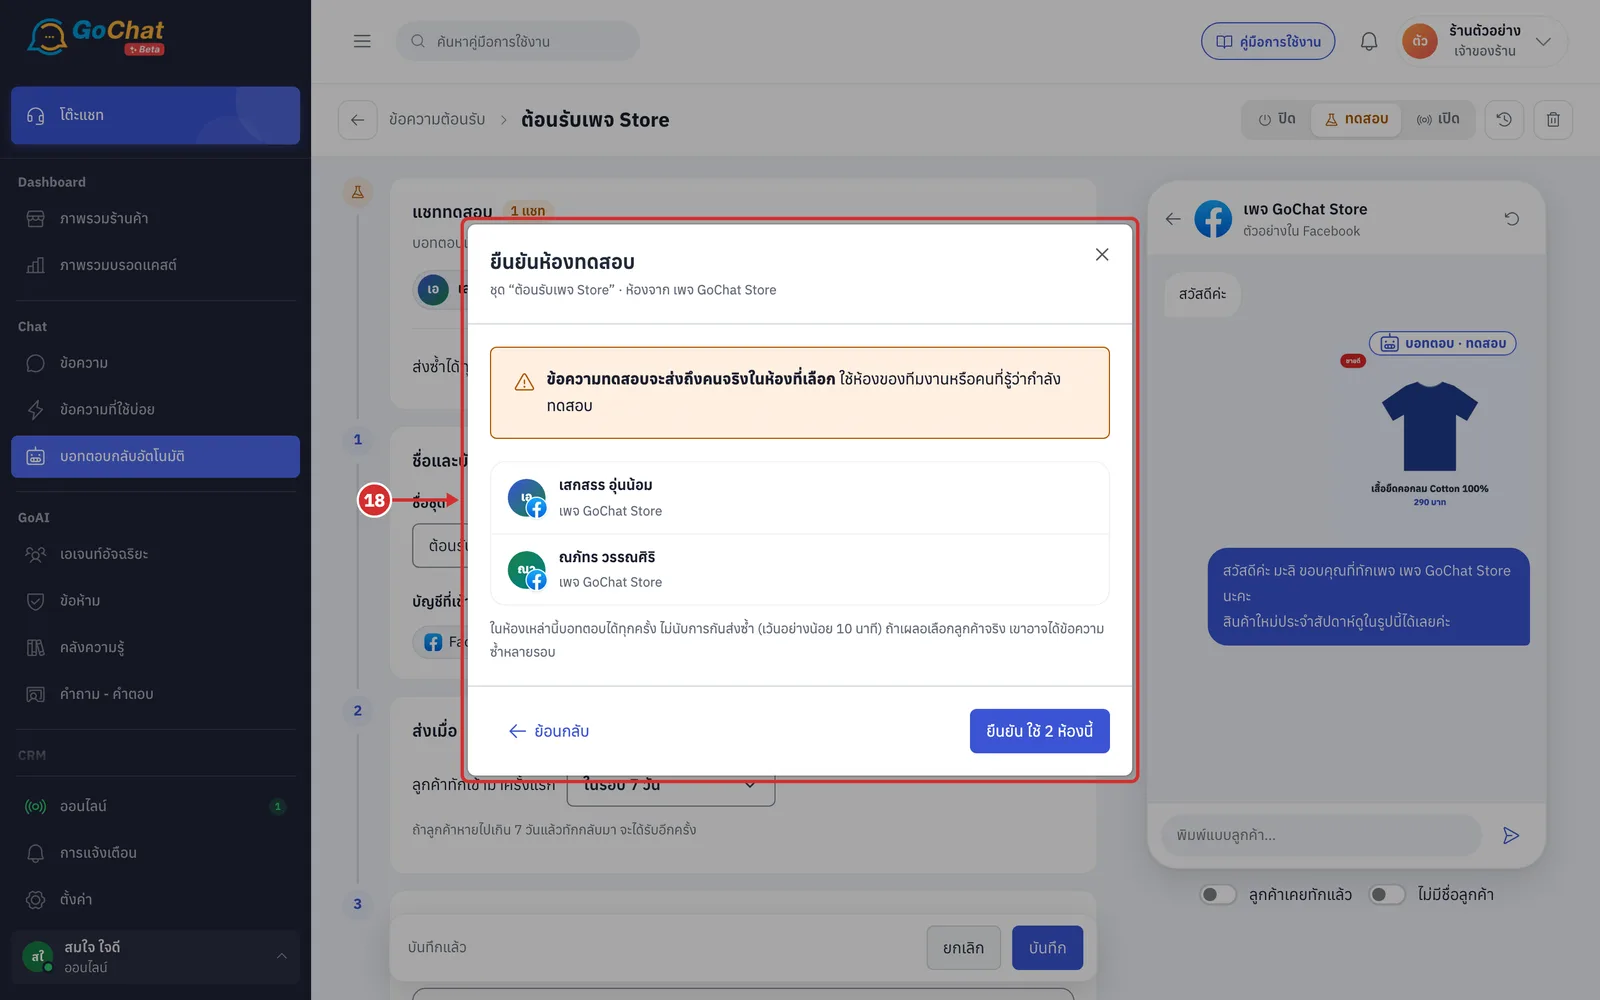
Click เลือก … ห้อง (Choose … rooms). The window changes to ยืนยันห้องทดสอบ (Confirm test rooms), warning that test messages go to the real people in those rooms. Click ยืนยัน ใช้ … ห้องนี้ (Confirm, use these … rooms) to add them to the list
To choose again, click ย้อนกลับ (Back)
After confirming you still need to click the set's บันทึก (Save)
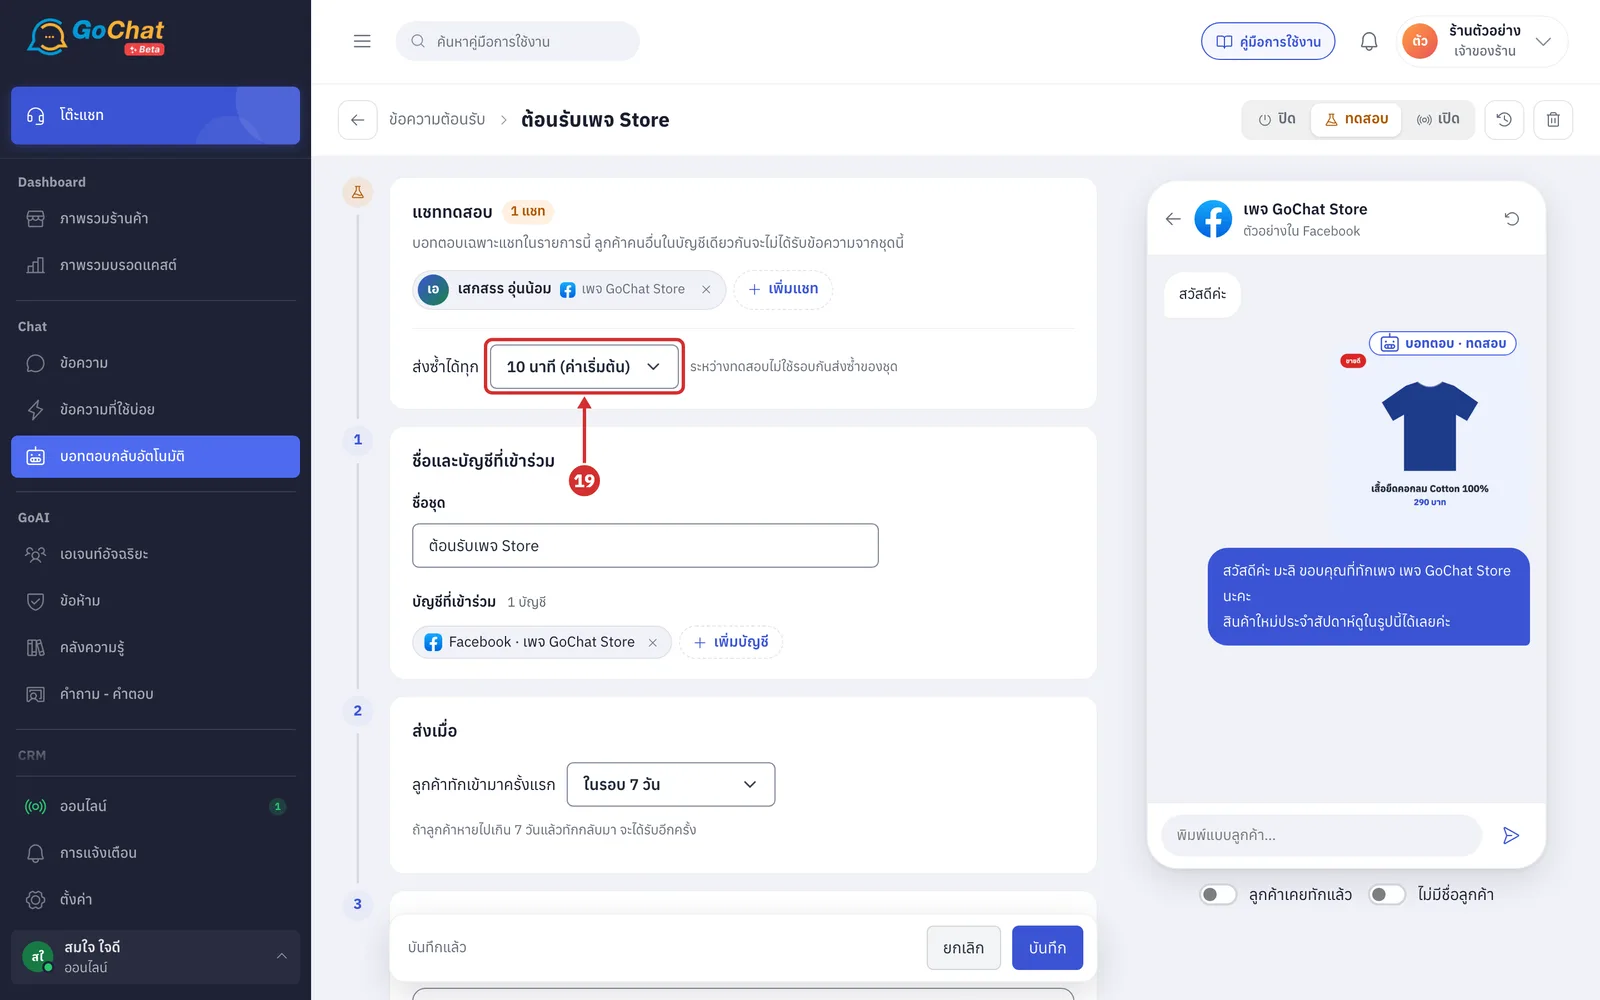
In ส่งซ้ำได้ทุก (Can resend every), choose how soon the bot can answer a test room again
The options are 1 นาที (1 minute), 5 นาที (5 minutes), 10 นาที (ค่าเริ่มต้น) (10 minutes, default), 30 นาที (30 minutes) and 1 ชั่วโมง (1 hour)
During testing the set's own repeat limits are not used, so you can try again without a long wait
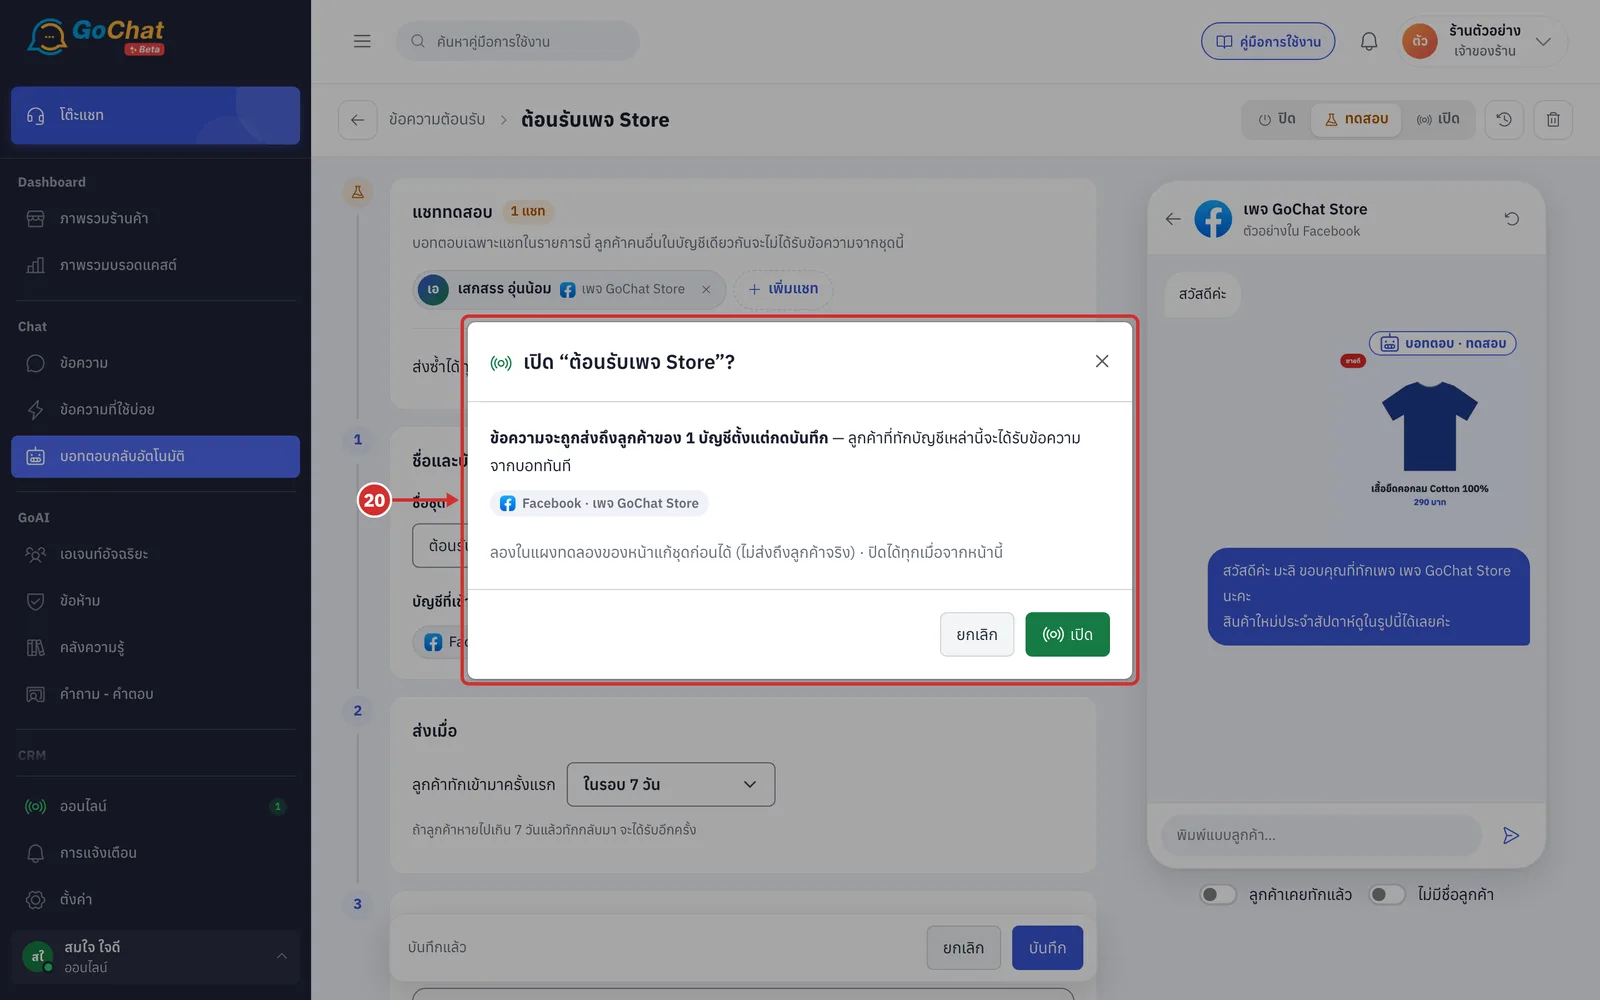
When you are ready to go live, click เปิด (On). The เปิด “set name”? (Turn on “set name”?) window shows which accounts' customers will get the message from the moment you save. Click เปิด (On) to confirm
If you click ยกเลิก (Cancel), the status stays as it was
The app asks every time you choose On
Click บันทึก (Save). The app goes back to the list, shows บันทึก “set name” แล้ว (Saved “set name”) and the set's status changes to the one you chose
Viewing edit history
Click the ประวัติการแก้ไข (Edit history) button (a clock with an arrow) on the list page to see every set in that topic, or in the editor to see that set only. The history panel has these parts
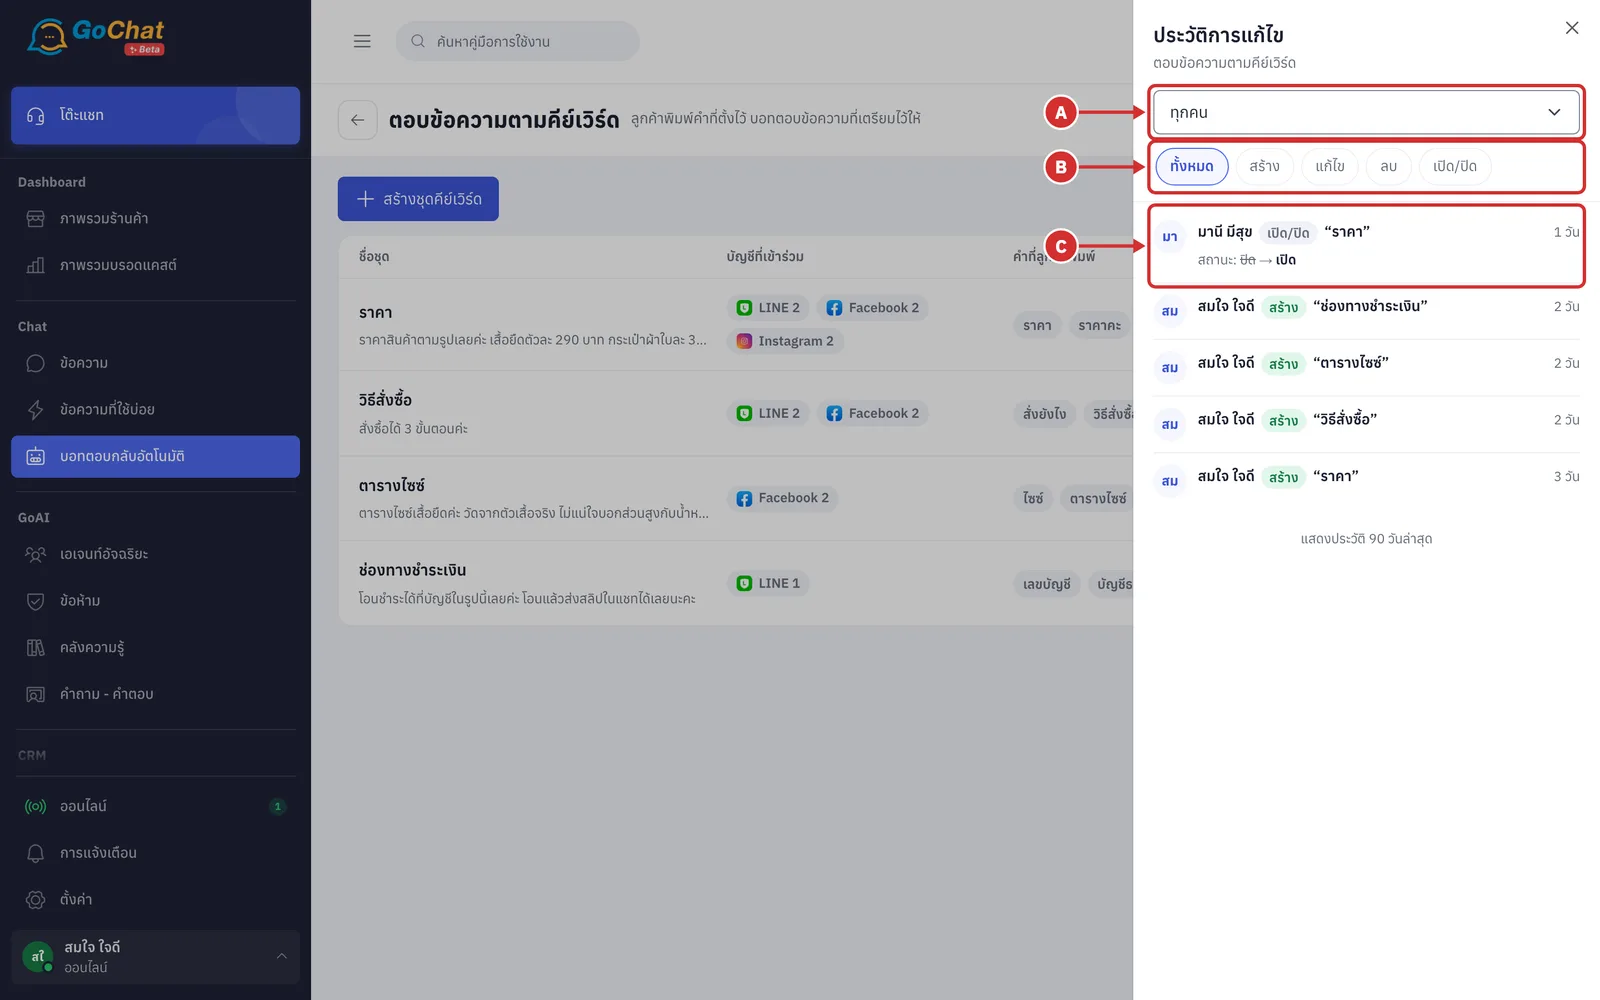
A กรองตามคน (Filter by person) — choose ทุกคน (Everyone) or one person on your team
B Type — choose ทั้งหมด (All), สร้าง (Created), แก้ไข (Edited), ลบ (Deleted) or เปิด/ปิด (On/Off)
C Each row — shows who did what to which set and when, and what changed, such as สถานะ: ปิด → เปิด (Status: Off → On)
Point at the time to see the full date and time
For long values, click ดูก่อน/หลัง (View before/after) to compare
Good to know: This panel shows the last 90 days of history, and only covers edits to sets. To see who the bot replied to and when, see Viewing auto-reply chat history.
Deleting a set
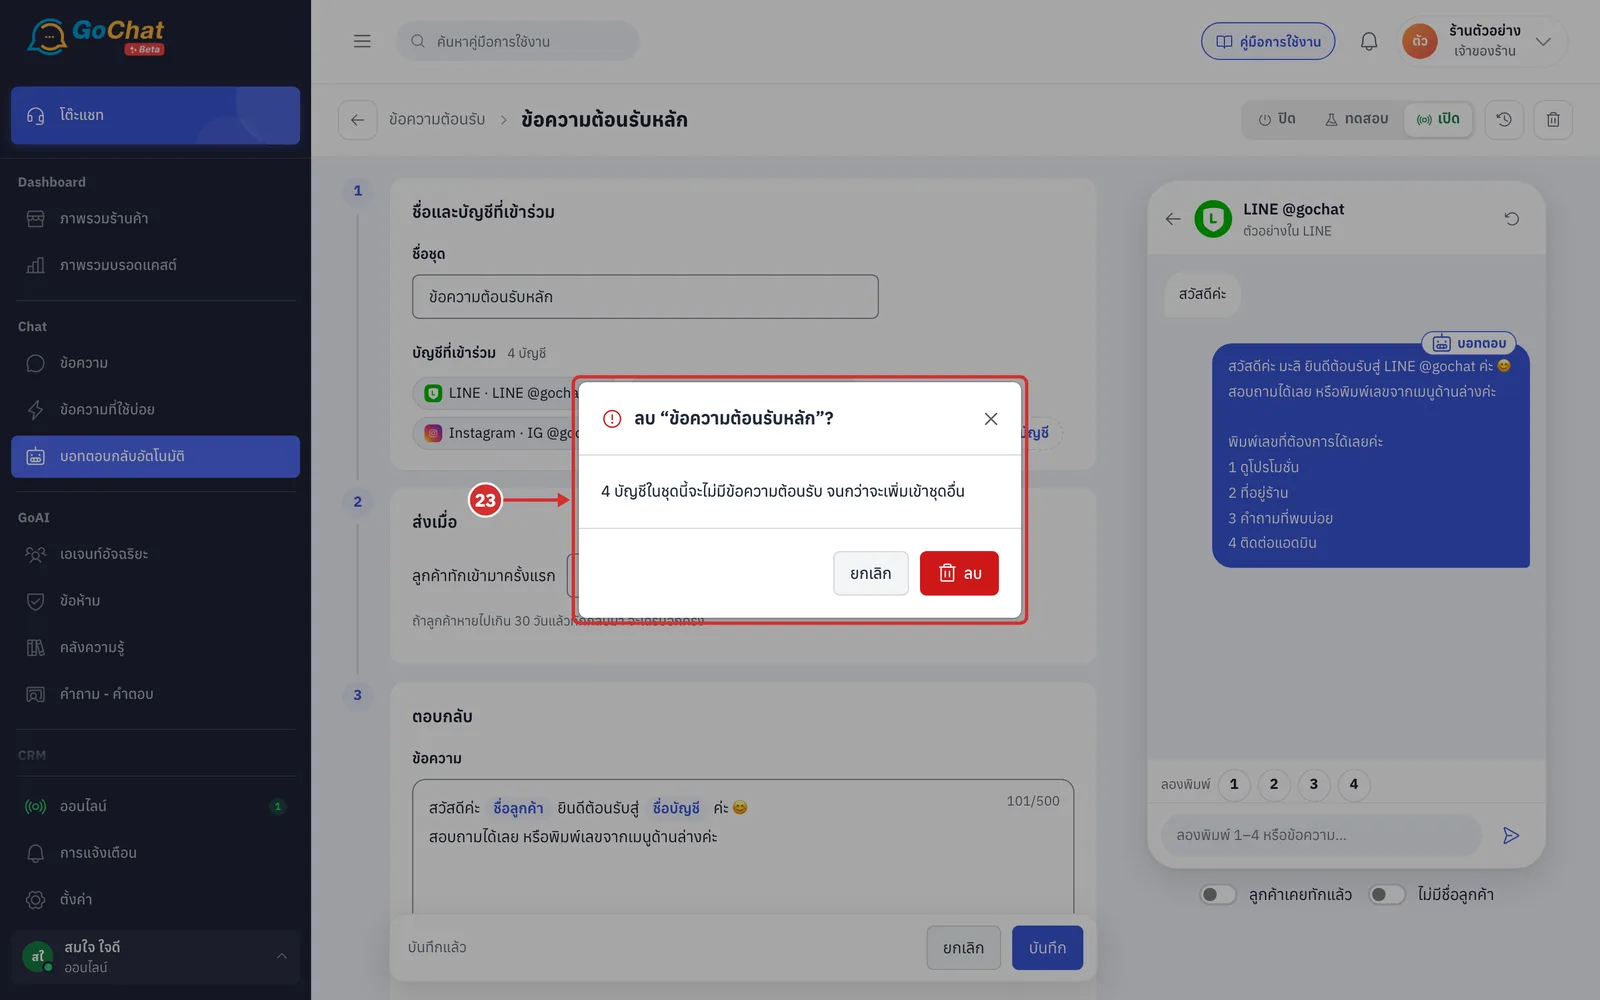
In the editor, click the trash button. The ลบ “set name”? (Delete “set name”?) window says the set's accounts will not get this topic's message until you add them to another set. Click ลบ (Delete) to delete, or ยกเลิก (Cancel)
The set is deleted as soon as you click and cannot be restored
After deleting, the app shows ลบแล้ว (Deleted) and goes back to the list
The edit history keeps a ลบ (Deleted) row
Shop-wide reply settings
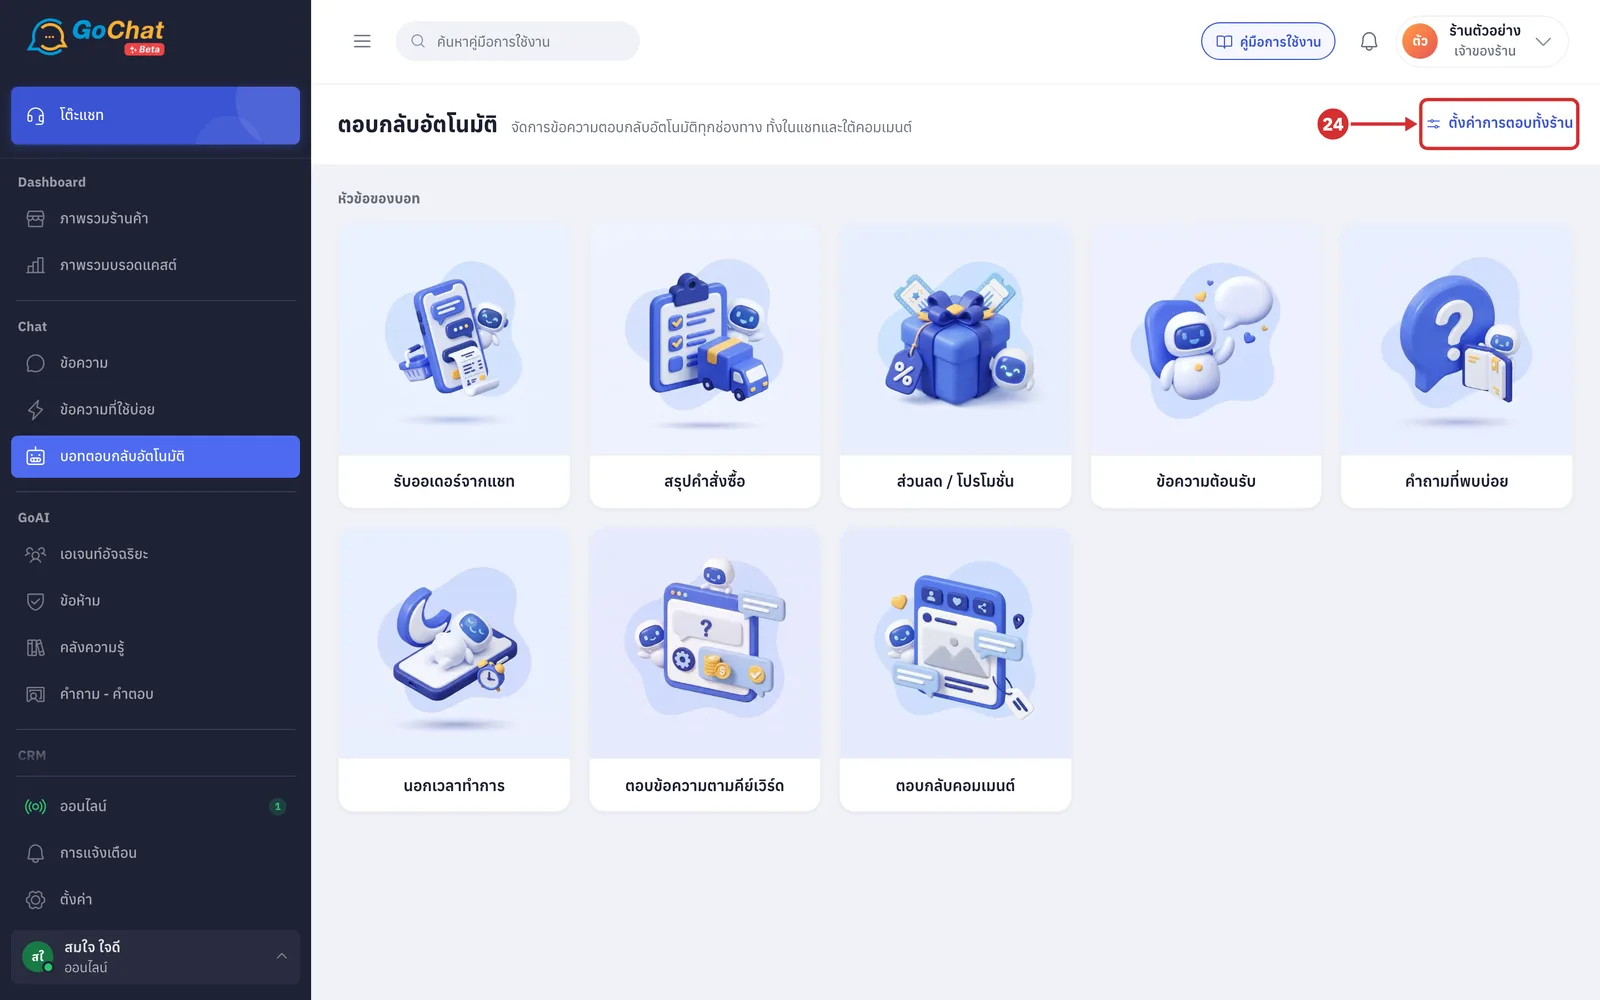
These values apply to every topic and every account, as follows
Every field is pre-filled with the recommended value
Fields at the recommended value show a แนะนำ (Recommended) badge
Fields that differ show a ใช้ค่าแนะนำ (Use recommended) link to reset them
Your changes take effect when you click บันทึก (Save)
On the ตอบกลับอัตโนมัติ (Auto-reply) page, click ตั้งค่าการตอบทั้งร้าน (Shop-wide reply settings)
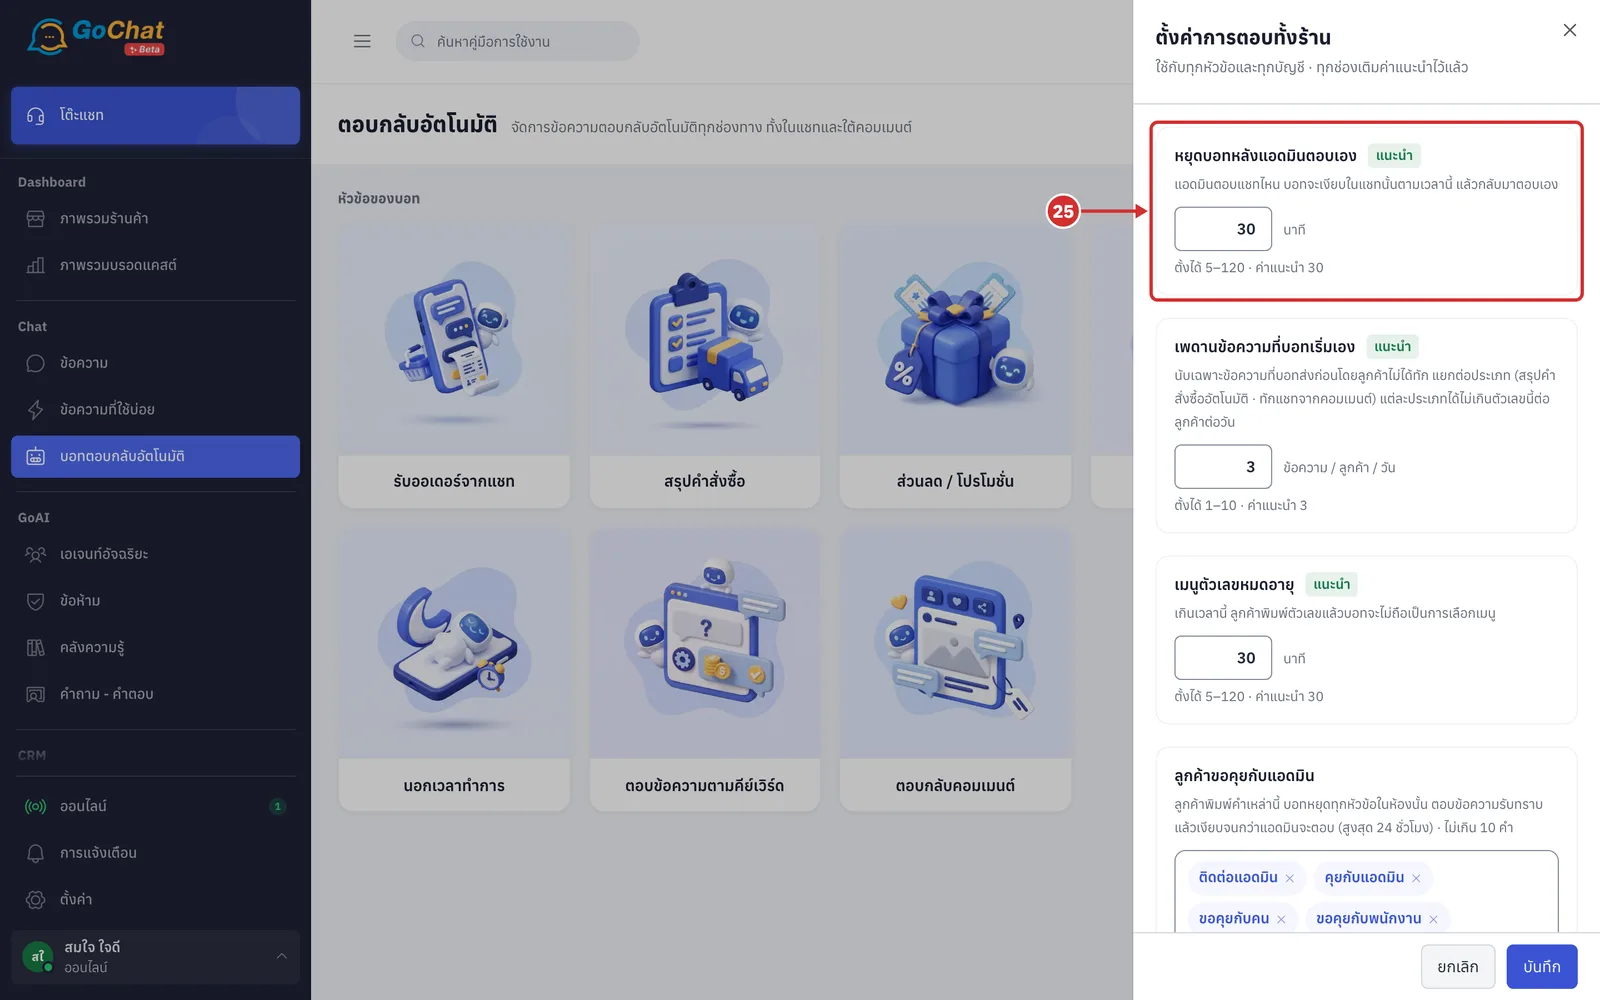
In หยุดบอทหลังแอดมินตอบเอง (Stop the bot after an admin replies), enter a number of minutes
When an admin replies in a chat, the bot stays quiet in that chat for this long, then starts answering again
5–120 minutes, recommended 30
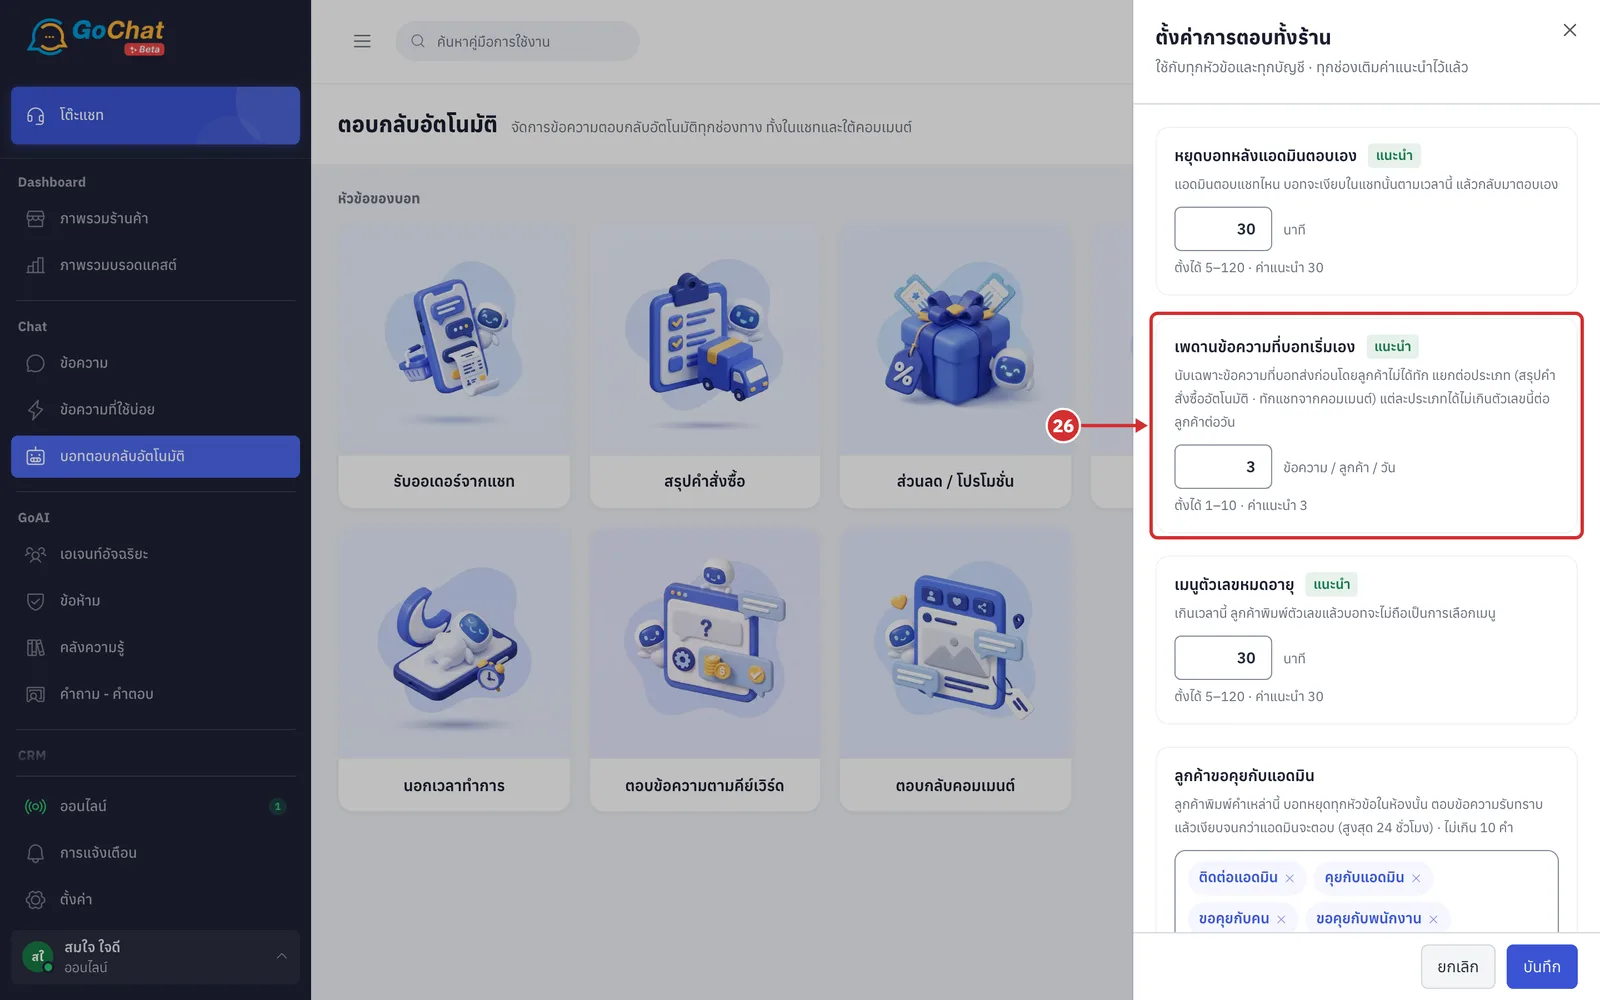
In เพดานข้อความที่บอทเริ่มเอง (Limit on messages the bot starts), enter a number of messages per customer per day
This only counts messages the bot sends before the customer has written
It counts per type, such as automatic order summaries and chat messages after a comment; each type can send up to this number
1–10, recommended 3
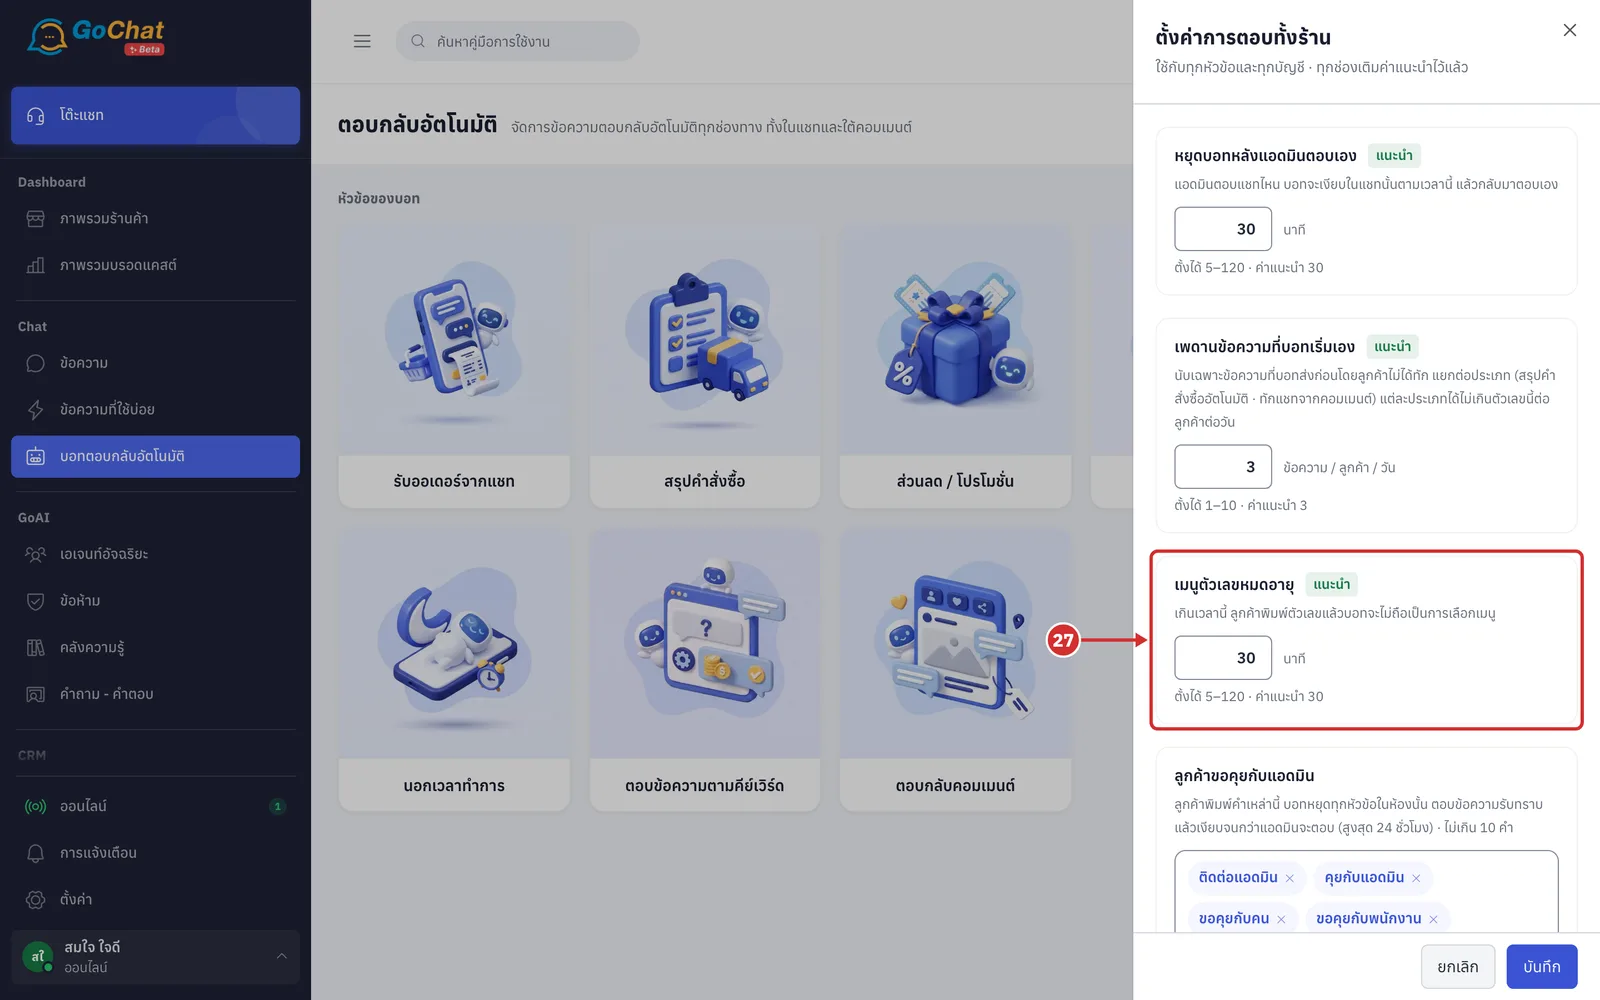
In เมนูตัวเลขหมดอายุ (Number menu expires), enter a number of minutes
After this long since the bot sent a menu, a number the customer types no longer counts as a menu choice
5–120 minutes, recommended 30
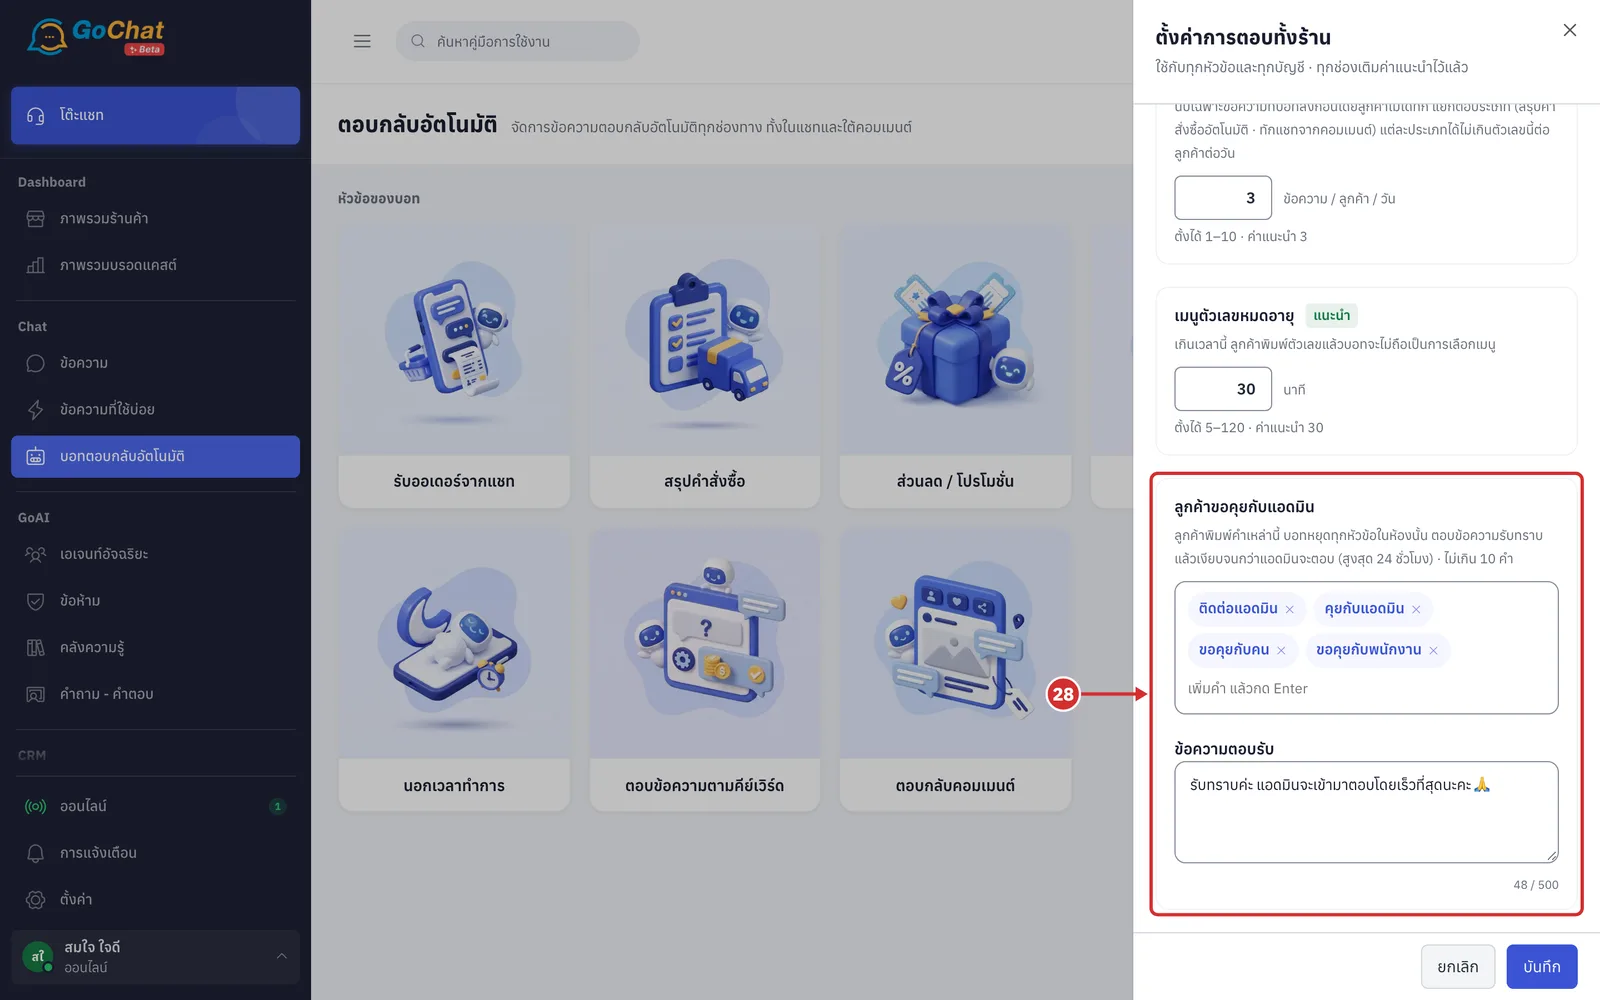
Under ลูกค้าขอคุยกับแอดมิน (Customer asks for an admin), type the words customers use to ask for a person and press Enter, and edit the ข้อความตอบรับ (Acknowledgement message)
When a customer's message contains one of these words, the bot stops every topic in that chat, sends the acknowledgement and stays quiet until an admin replies, for up to 24 hours
At least 1 and up to 10 words, each up to 30 characters
The ข้อความตอบรับ (Acknowledgement message) is required, up to 500 characters
The default words are ติดต่อแอดมิน (contact admin), คุยกับแอดมิน (talk to admin), ขอคุยกับคน (talk to a person) and ขอคุยกับพนักงาน (talk to staff)
Click บันทึก (Save). The panel closes and the new values apply to every topic straight away (click ยกเลิก (Cancel) or × to close without saving)
How the bot works
The bot only answers private chats with customers, not group chats
It waits until the customer has finished typing (5 seconds of quiet) and reads the messages they sent together
If a message has waited more than 10 minutes without an answer, the bot no longer replies to it
Each message gets an answer from one topic. The bot chooses in this order: ลูกค้าขอคุยกับแอดมิน (Customer asks for an admin) → เลขเมนู (menu number) → สรุปคำสั่งซื้อ (Order summary) → ส่วนลด / โปรโมชั่น (Discounts / Promotions) → คำถามที่พบบ่อย (FAQ) → ตอบข้อความตามคีย์เวิร์ด (Keyword replies)
ข้อความต้อนรับ (Welcome message) and นอกเวลาทำการ (After hours) are always sent together with that answer, in the order welcome → after hours → answer → menu
When an admin replies in a chat, the bot stays quiet in that chat for the time set in หยุดบอทหลังแอดมินตอบเอง (Stop the bot after an admin replies)
The bot keeps track per chat, so one customer who messages two of your accounts is counted separately in each
Setting up each topic
Read how to set up each topic in these articles
Setting up welcome messages — when it is sent to first-time customers, the message, image and a menu customers choose from by number
Setting up FAQs — questions, words customers may type, answers and the question menu
Setting up after-hours messages — business hours, special holidays and when no admin replies
Setting up keyword replies — words customers type, the message and up to 5 images
Setting up discounts and promotions — dates, words customers type and the promotion message
Setting up order summaries — summarise the latest order when customers ask, separately for bank transfer and cash on delivery
Setting up comment replies — rules for replying under posts, private messages and managing comments
Setting up chat order commands — your sales team types orders in chats and the bot creates them in GoSaaS
Note: Your shop's package must include auto-reply to save sets.
Good to know: To see who the bot did or did not reply to and why, see Viewing auto-reply chat history and Viewing auto-reply comment history.