

Managing saved replies
The ข้อความที่ใช้บ่อย (Saved replies) page keeps the replies you type over and over, such as greetings, payment details or shipping rates, in one place so you can drop them into any chat straight away and the whole team answers the same way.
Everyone in the shop can add, edit and delete replies one at a time, move them between categories and manage categories; deleting several replies at once is for the shop owner only.
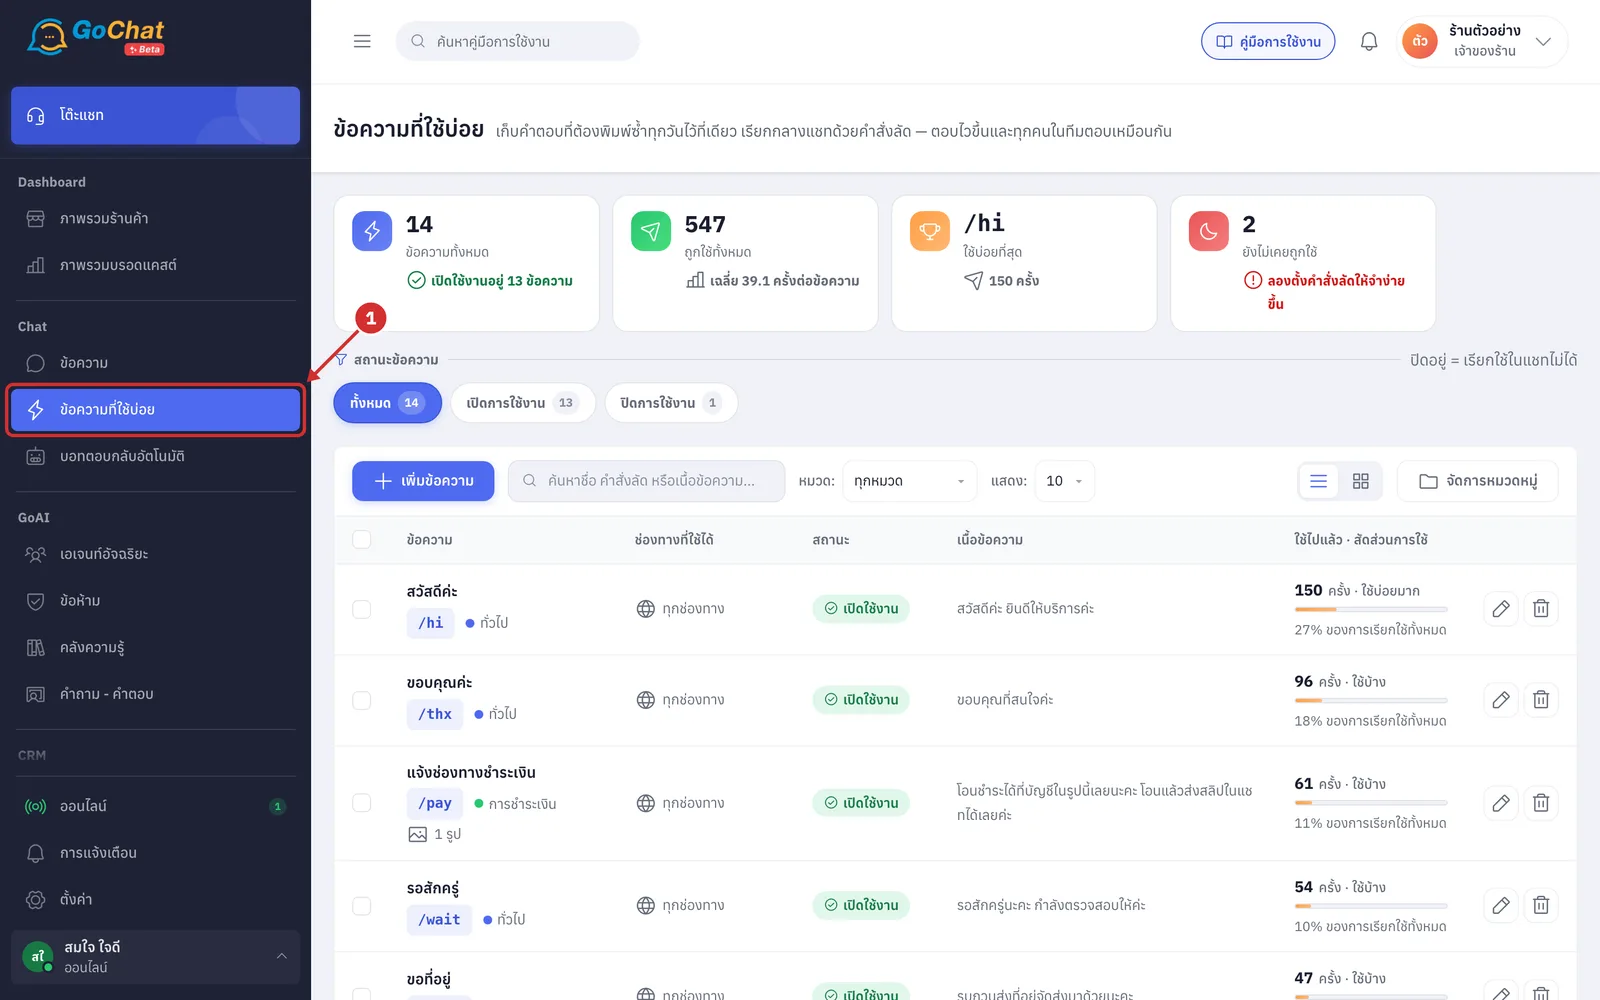
Opening the saved replies page
Go to the ข้อความที่ใช้บ่อย (Saved replies) menu under Chat in the left menu
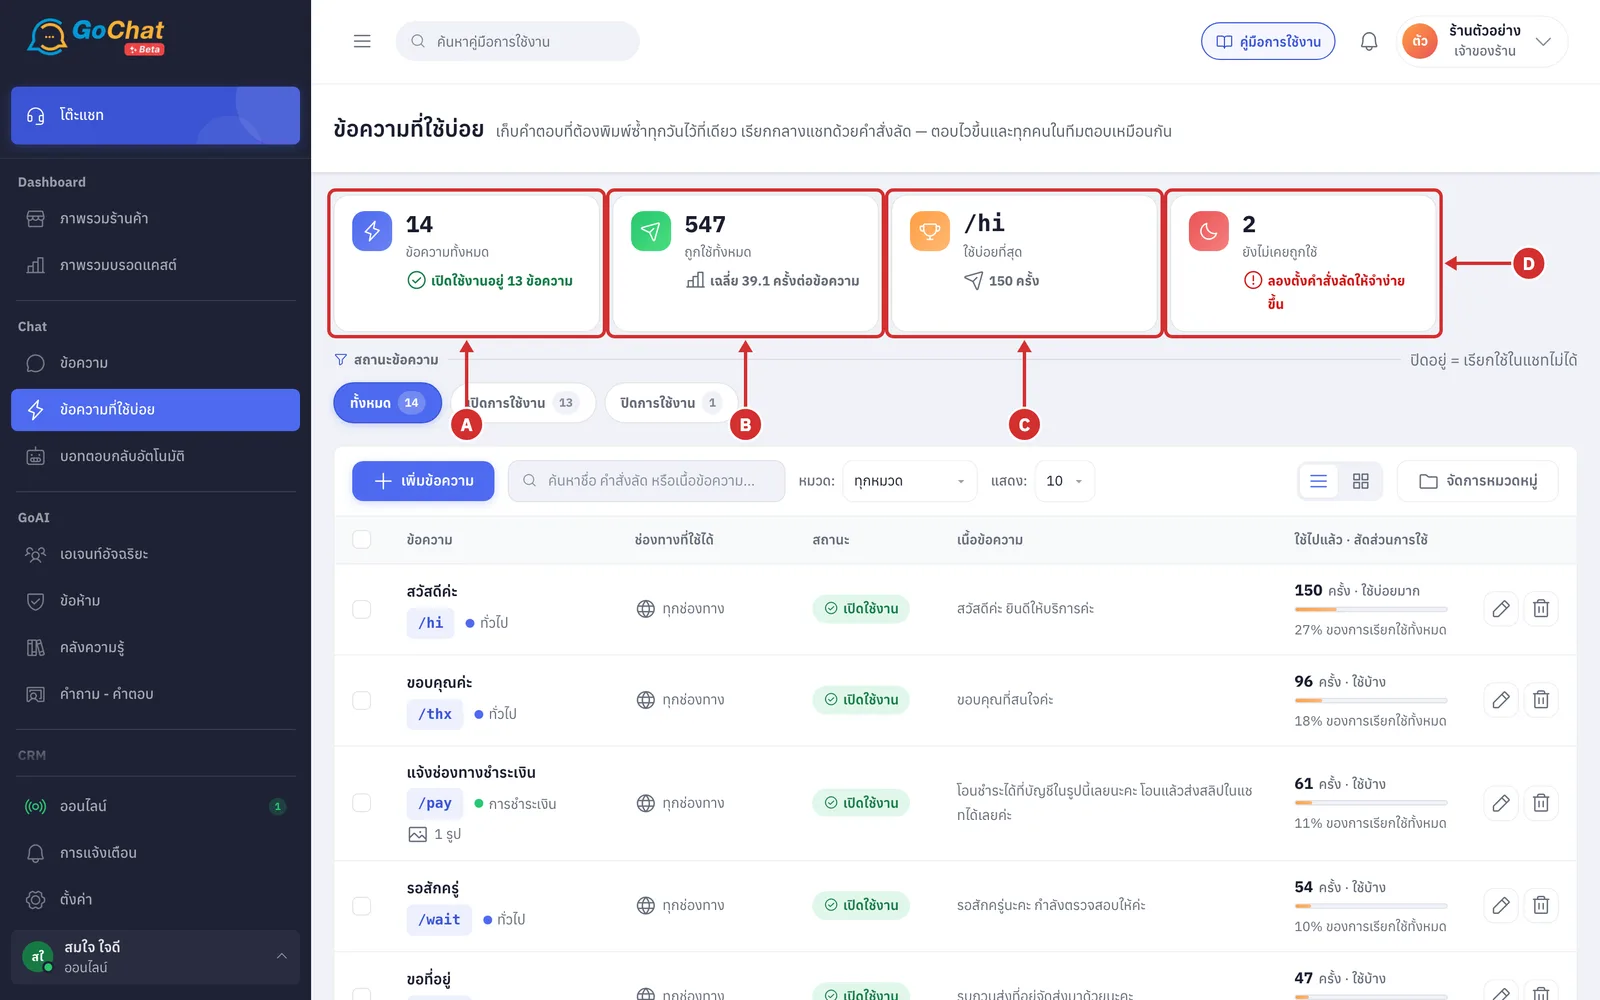
The 4 cards at the top sum up every reply in the shop (they do not change with the filters below):
A ข้อความทั้งหมด (Total replies) the number of replies, with เปิดใช้งานอยู่ … ข้อความ (… switched on), the replies that can be used in chats right now
B ถูกใช้ทั้งหมด (Total uses) how many times all replies were used, with เฉลี่ย … ครั้งต่อข้อความ (average uses per reply)
C ใช้บ่อยที่สุด (Most used) the shortcut (or title) of the most used reply and its count. A shop where nobody has used one yet shows ยังไม่มีใครกดใช้ (Nobody has used one yet)
D ยังไม่เคยถูกใช้ (Never used) the number of replies nobody has used, with the tip ลองตั้งคำสั่งลัดให้จำง่ายขึ้น (Try a shortcut that is easier to remember). When every reply has been used it shows ทุกข้อความถูกใช้แล้ว (Every reply has been used)
Good to know: One use is counted when someone picks a reply and it reaches the customer from the chat page.
Searching and filtering replies
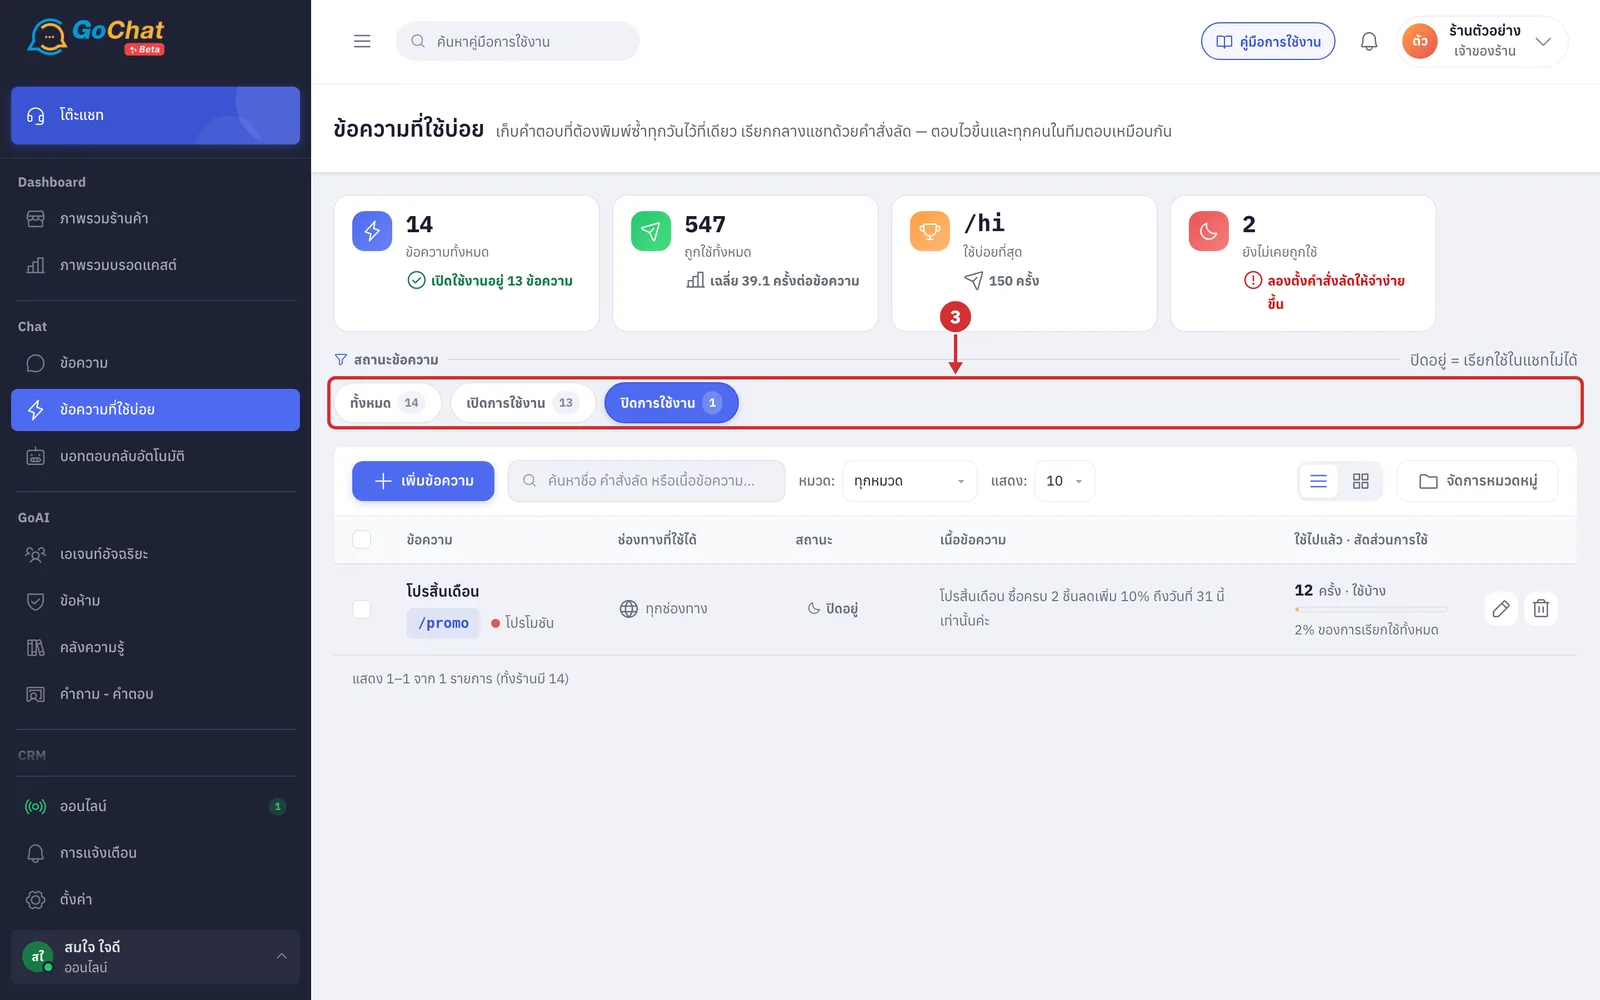
Under สถานะข้อความ (Reply status), click a chip to see only replies with that status; the number on the chip is how many replies it has
ทั้งหมด (All): replies of every status
เปิดการใช้งาน (On): replies that can be used in chats
ปิดการใช้งาน (Off): replies that cannot be used in chats but stay saved so you can edit or switch them on later
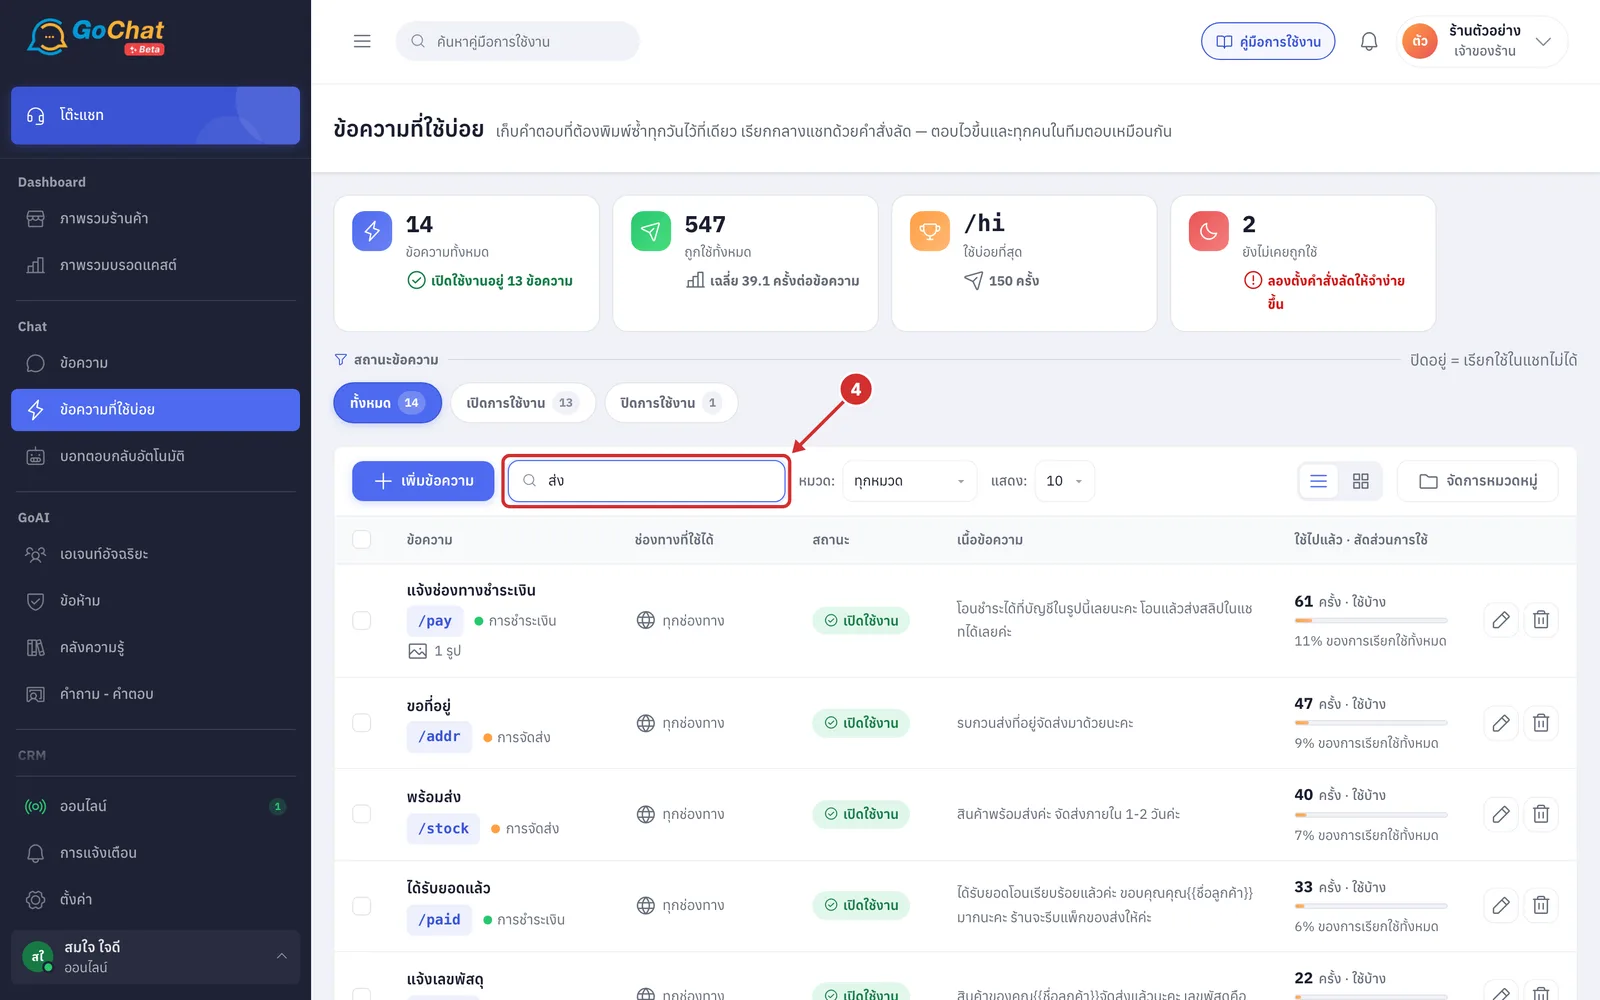
In ค้นหาชื่อ คำสั่งลัด หรือเนื้อข้อความ... (Search title, shortcut or text), type a word from the title, the shortcut (with or without the leading /, such as /pay) or the reply text; the table narrows down straight away
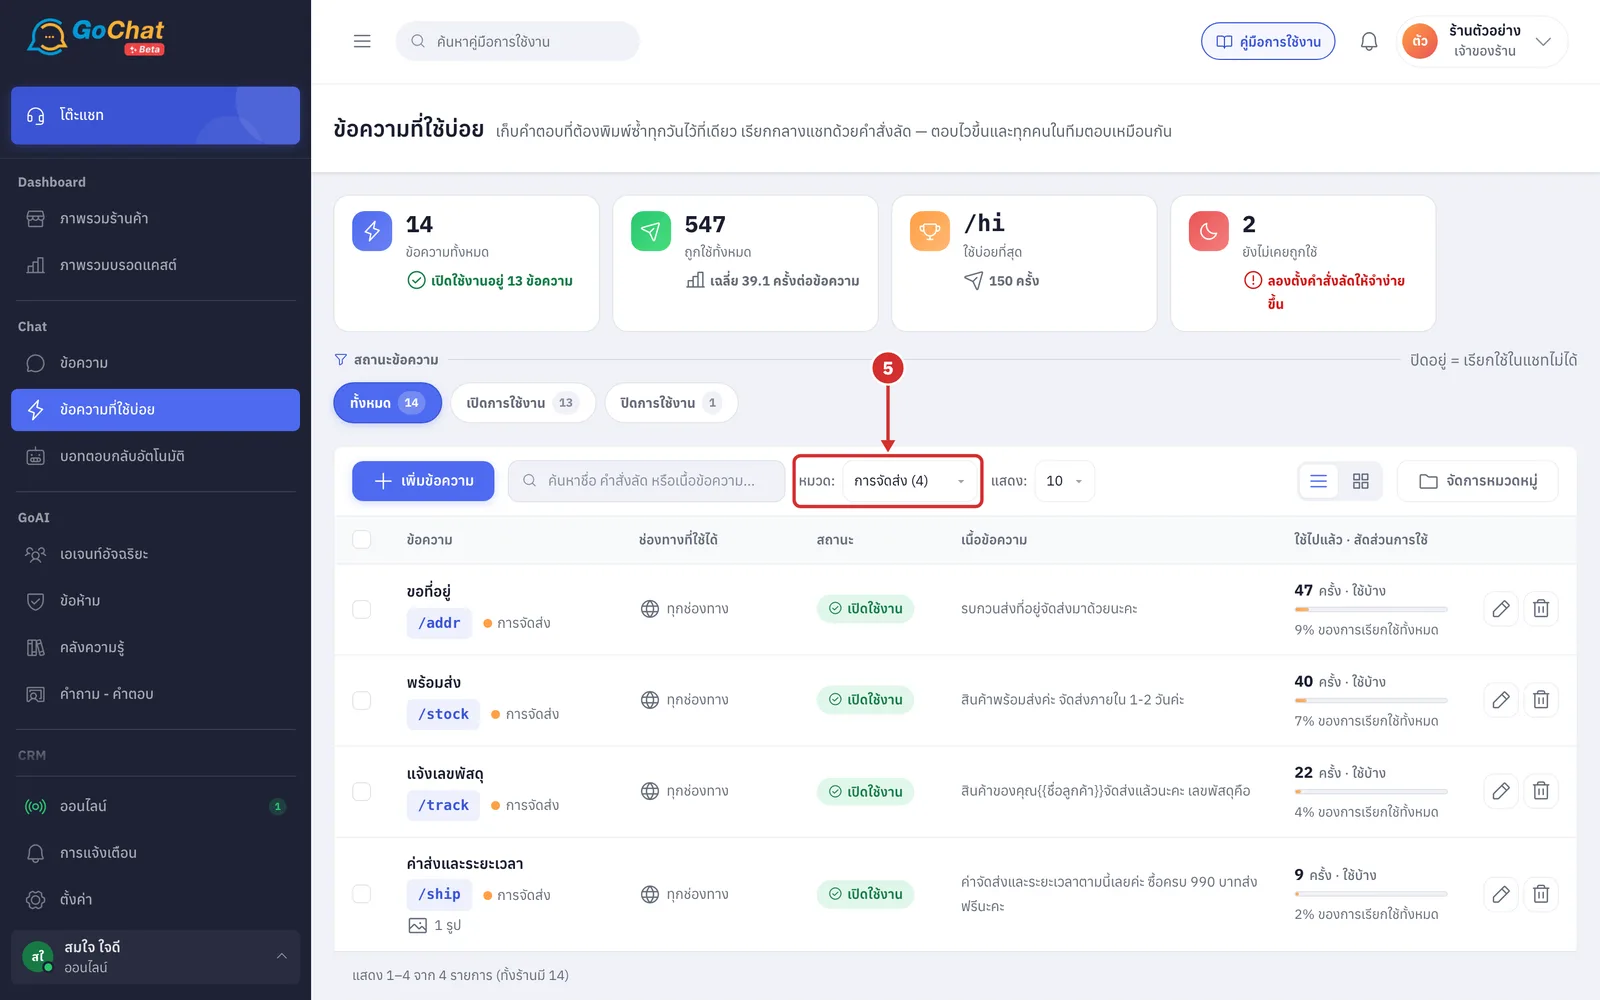
In หมวด: (Category), pick the category to see; the number in brackets is how many replies it has
ทุกหมวด (All categories): shows every reply
ไม่มีหมวดหมู่ (No category): shows replies that are not in a category yet
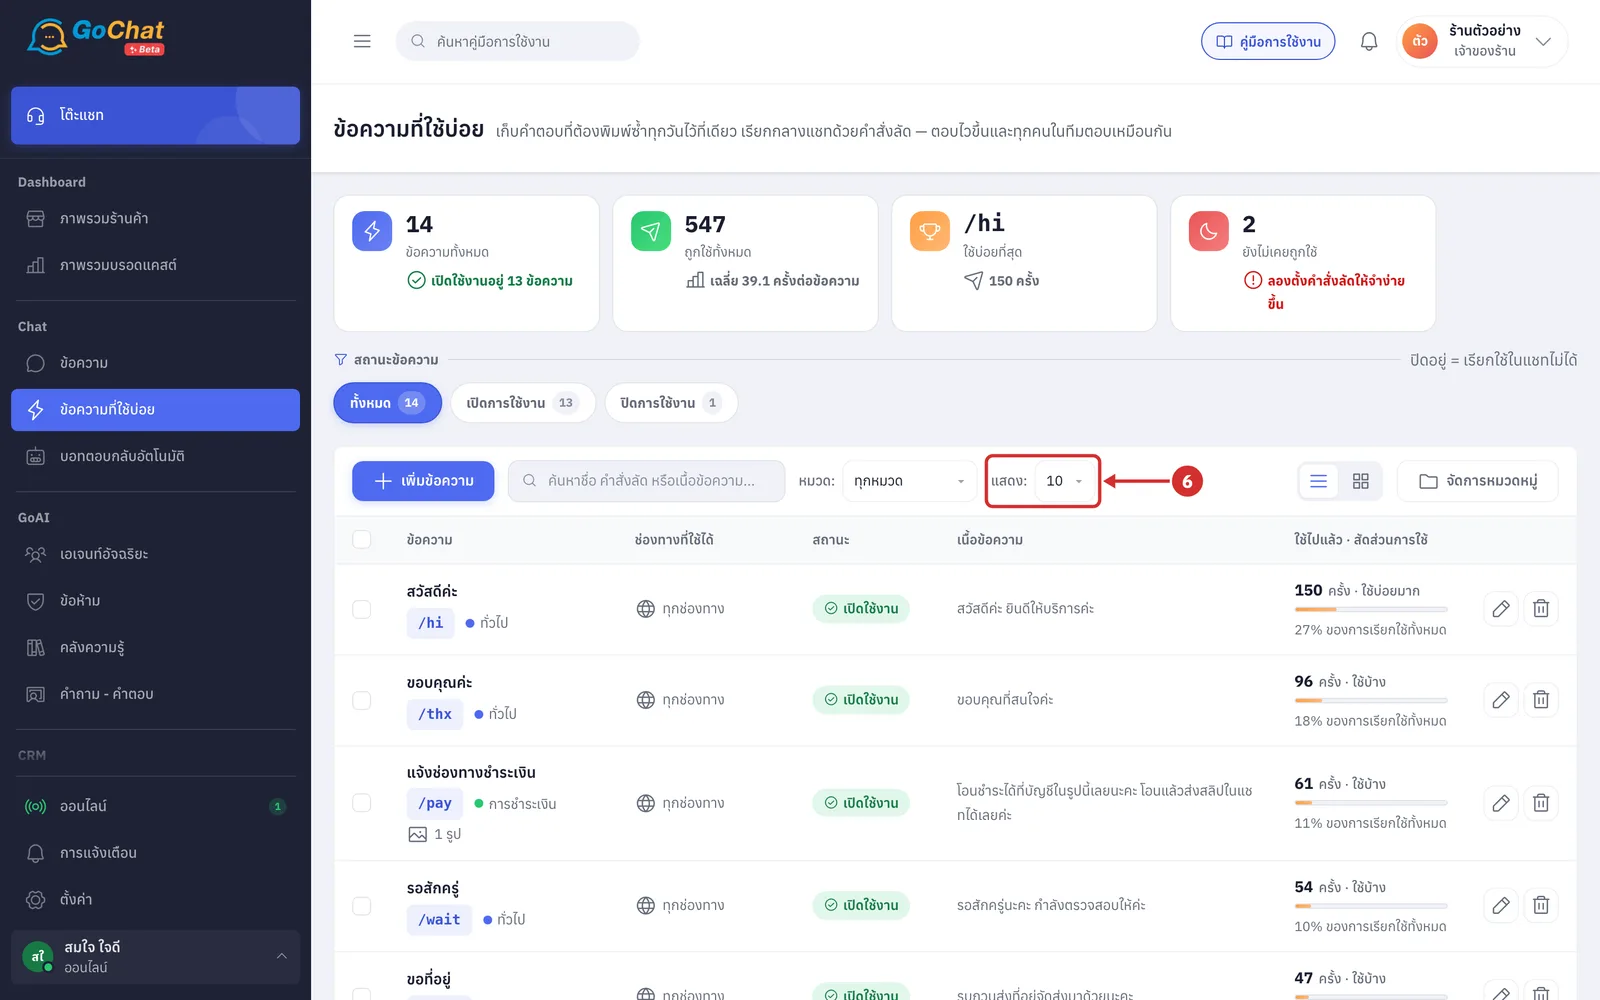
In แสดง: (Show), choose 10 · 25 · 50 replies per page
10 per page is the default
The most used replies are at the top of the table
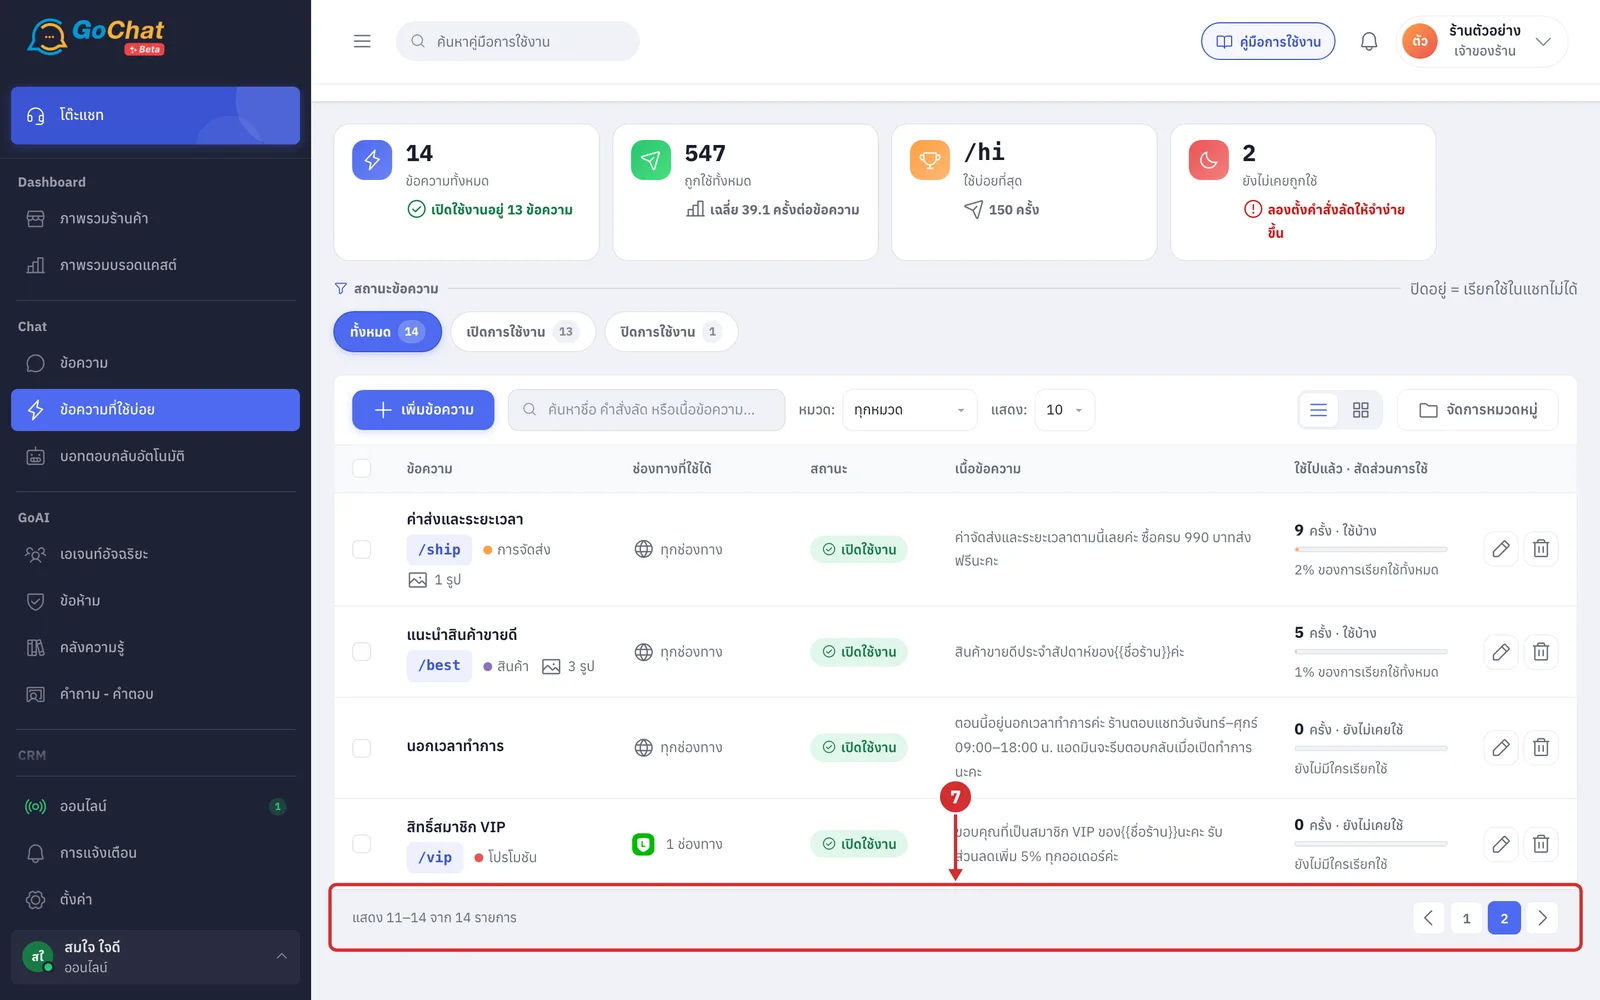
The bottom of the table shows which replies you are looking at, such as แสดง 11–14 จาก 14 รายการ (Showing 11–14 of 14). Click a page number or the arrows on the right to change page
While filtering it adds ทั้งร้านมี … (… in the shop)
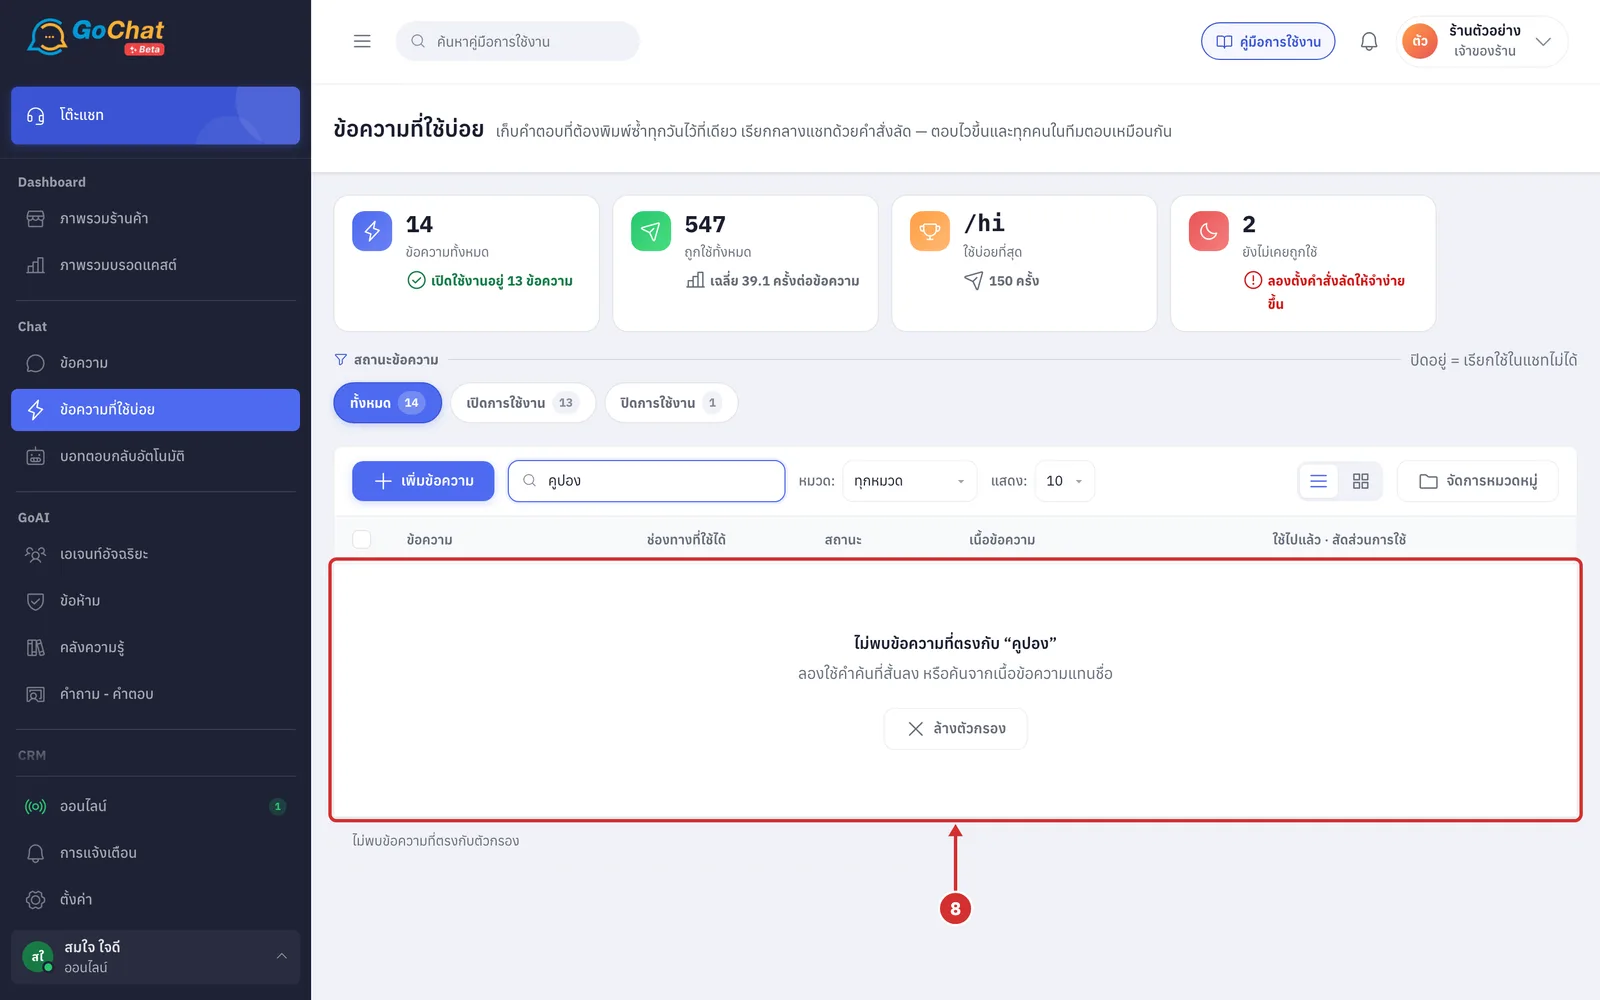
If nothing matches your search or filters, it shows ไม่พบข้อความที่ตรงกับ “…” (No replies match “…”) (or ไม่มีข้อความที่ตรงกับตัวกรองนี้ (No replies match this filter)). Click ล้างตัวกรอง (Clear filters) to see every reply again
Reading the replies table
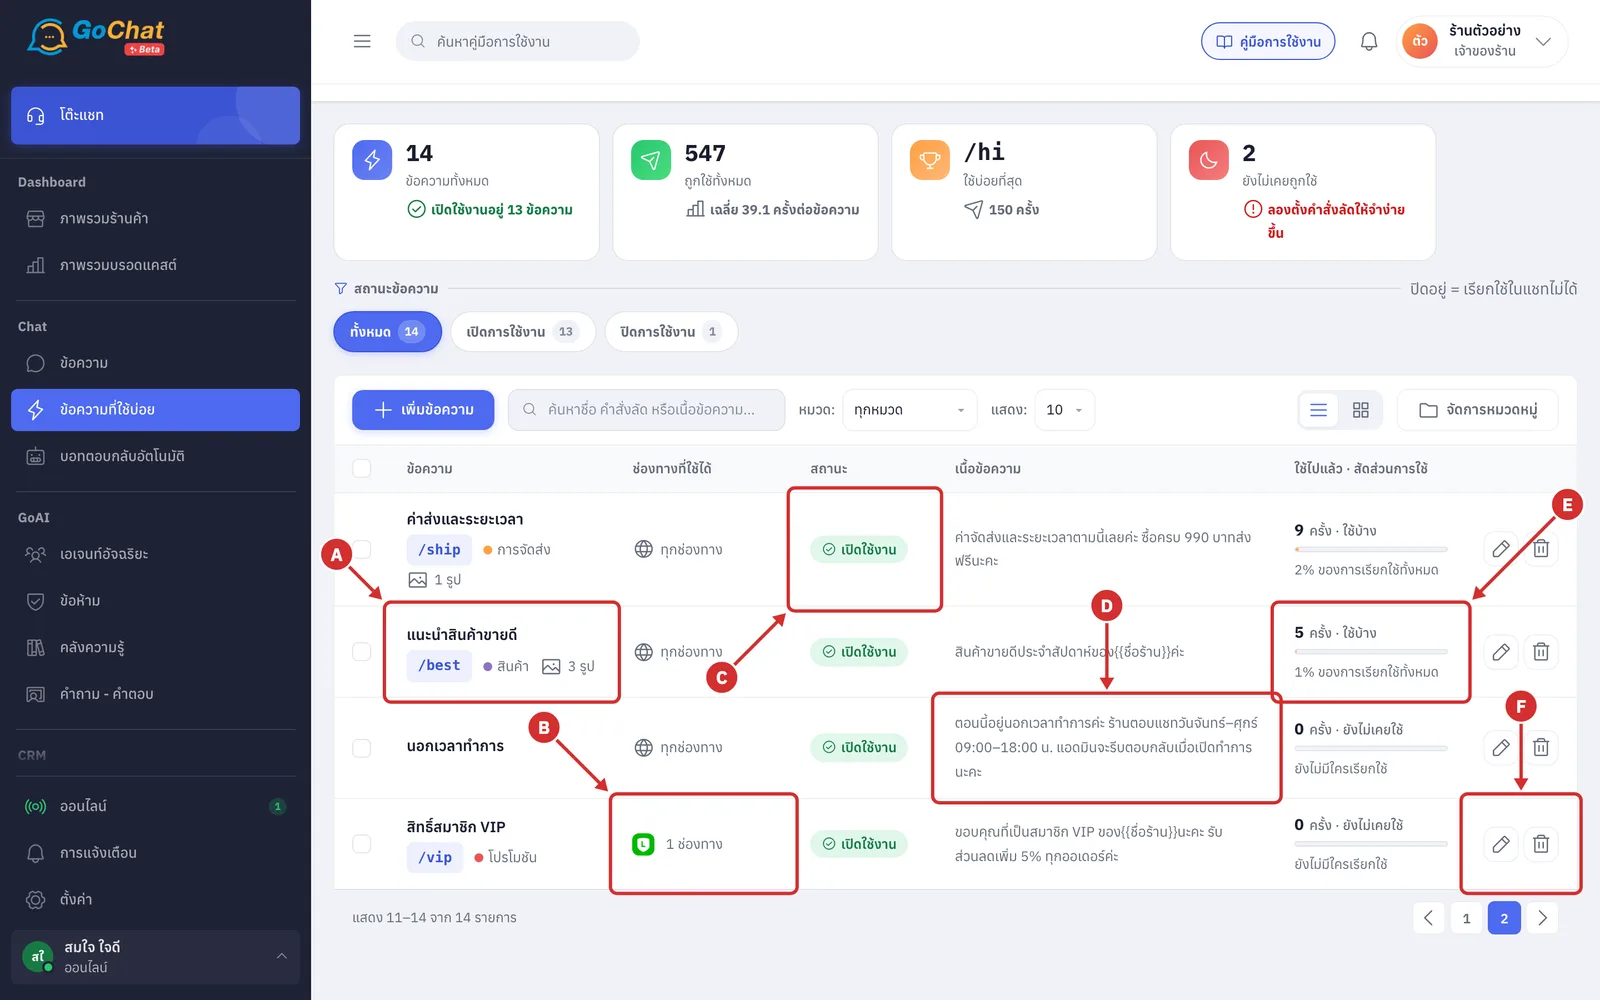
Each reply is one row. The columns mean:
A ข้อความ (Reply) shows the following
The title; click it to open the edit page
The shortcut, such as /best
The category with its colour dot
The number of attached images, across every message in the reply
Replies without a shortcut or category show only the title
B ช่องทางที่ใช้ได้ (Channels) shows ทุกช่องทาง (All channels), or platform logos with a count such as 1 ช่องทาง (1 channel) for replies limited to some channels. If every chosen channel has been removed from the shop, it shows ไม่เหลือช่องทาง — ไม่ขึ้นในแชทไหนเลย (No channels left — it shows in no chat); open the reply and choose channels again
C สถานะ (Status) shows เปิดใช้งาน (On) or ปิดอยู่ (Off); rows that are off have a different background
D เนื้อข้อความ (Text) shows the text of the first message; variables still show as {{ชื่อลูกค้า}} (customer name) and {{ชื่อร้าน}} (shop name) and are replaced with real names when used in a chat
E ใช้ไปแล้ว · สัดส่วนการใช้ (Used · share of use) shows the number of uses, a share bar and …% ของการเรียกใช้ทั้งหมด (…% of all uses), with a label for how much it is used
ใช้บ่อยมาก (Used a lot): 25% or more of all uses in the shop
ใช้บ้าง (Used sometimes): used at least once
ยังไม่เคยใช้ (Never used): not used yet
F แก้ไข · ลบ (Edit · Delete) the pencil opens the edit page and the bin deletes this reply
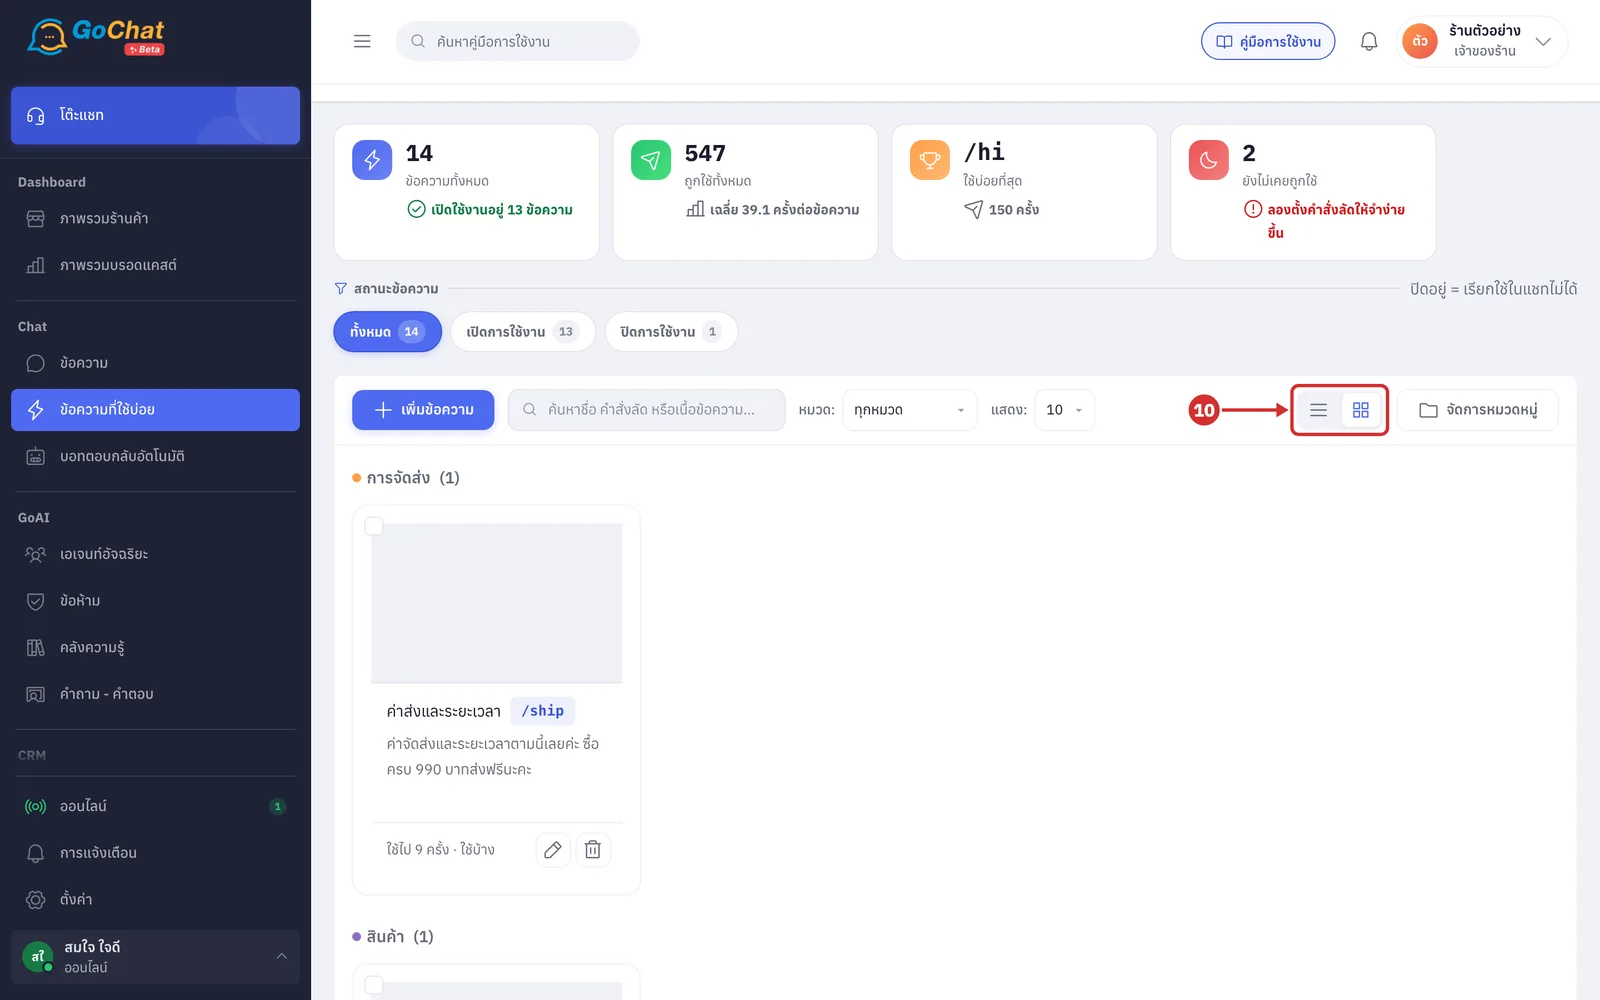
Click the มุมมองการ์ด (Card view) icon (four squares) to see replies as cards grouped by category
Each card shows the first image of the reply, the title, shortcut, text and how many times it was used
Replies with several images show a +… badge on the image corner, and replies with no image show ยังไม่มีรูป (No image yet)
Tick the box on a card corner to select it, just like in the table
Click the มุมมองตาราง (Table view) icon (three lines) to go back to the table
The view you choose is remembered on this device
Editing and deleting one reply
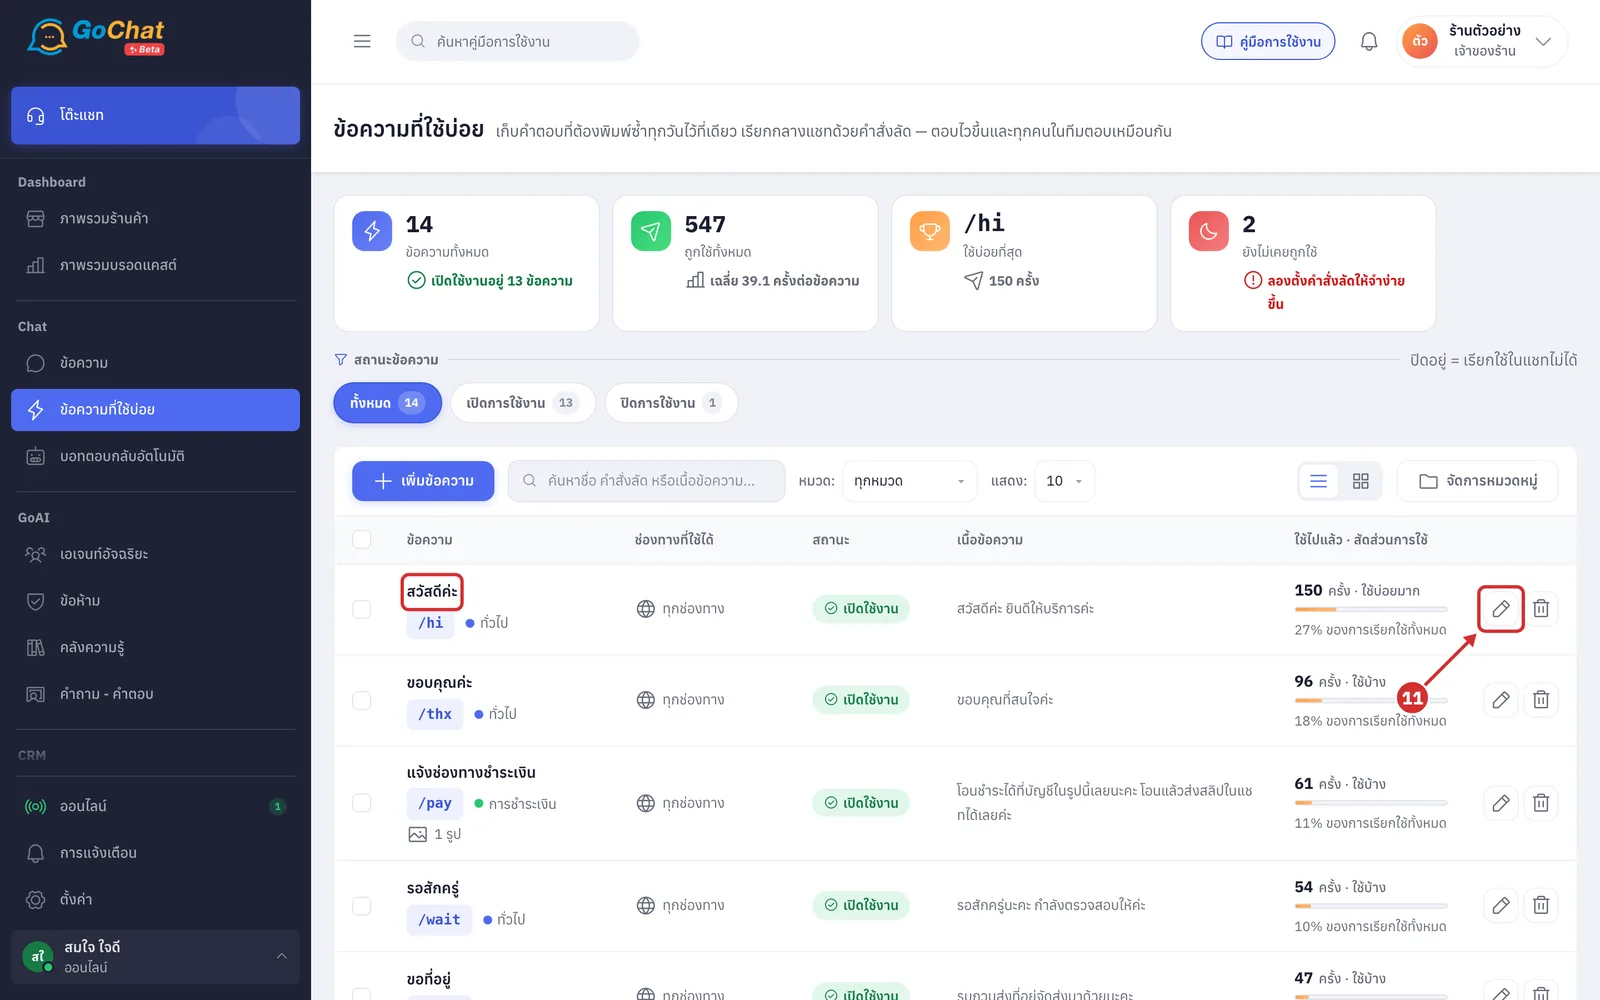
Click the title of a reply or the pencil แก้ไข (Edit) to open the edit page (every field is explained in Adding and editing saved replies)
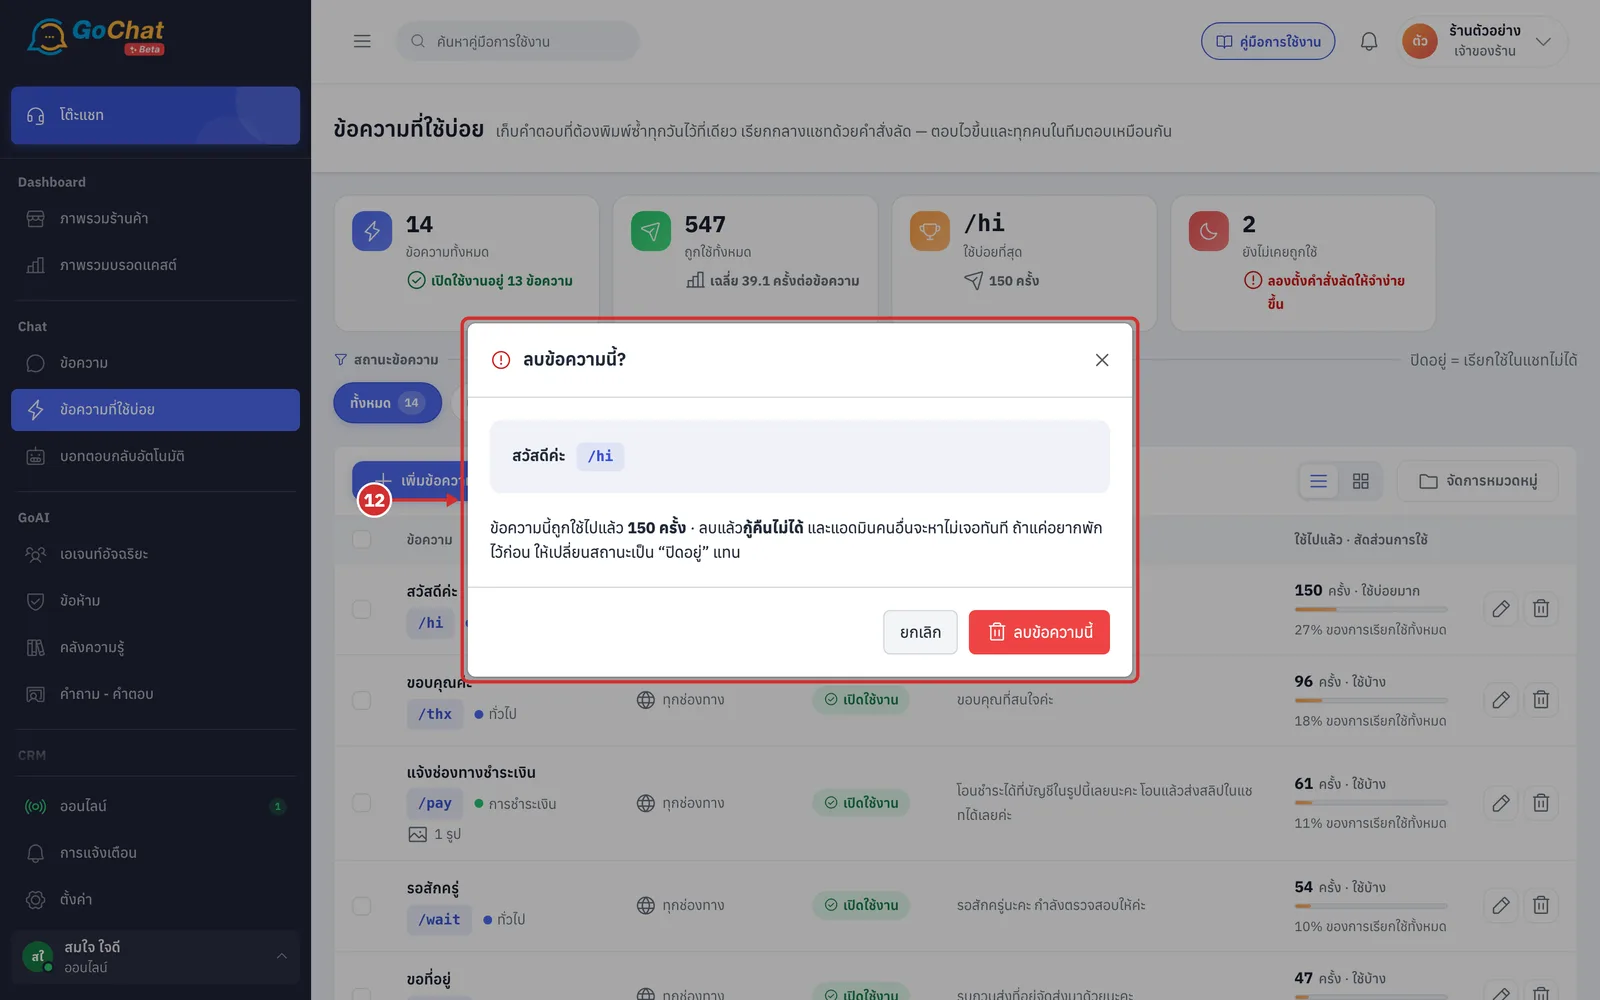
Click the bin ลบ (Delete). The ลบข้อความนี้? (Delete this reply?) window shows the title, the shortcut and how many times the reply has been used. Click ลบข้อความนี้ (Delete this reply) to delete it, or ยกเลิก (Cancel)
A deleted reply cannot be restored, and other admins lose it immediately
To set it aside instead, change its status to ปิดการใช้งาน (Off) on the edit page
After deleting, the bar ลบ “…” แล้ว (Deleted “…”) appears
Moving or deleting several replies at once
Tick the box at the start of each row you want. The bar เลือกไว้ … รายการ (… selected) appears above the table with ยกเลิกการเลือก (Clear selection) · ย้ายหมวด (Move category) · ลบที่เลือก (Delete selected)
The box in the table header selects every reply on this page, not other pages or replies hidden by filters
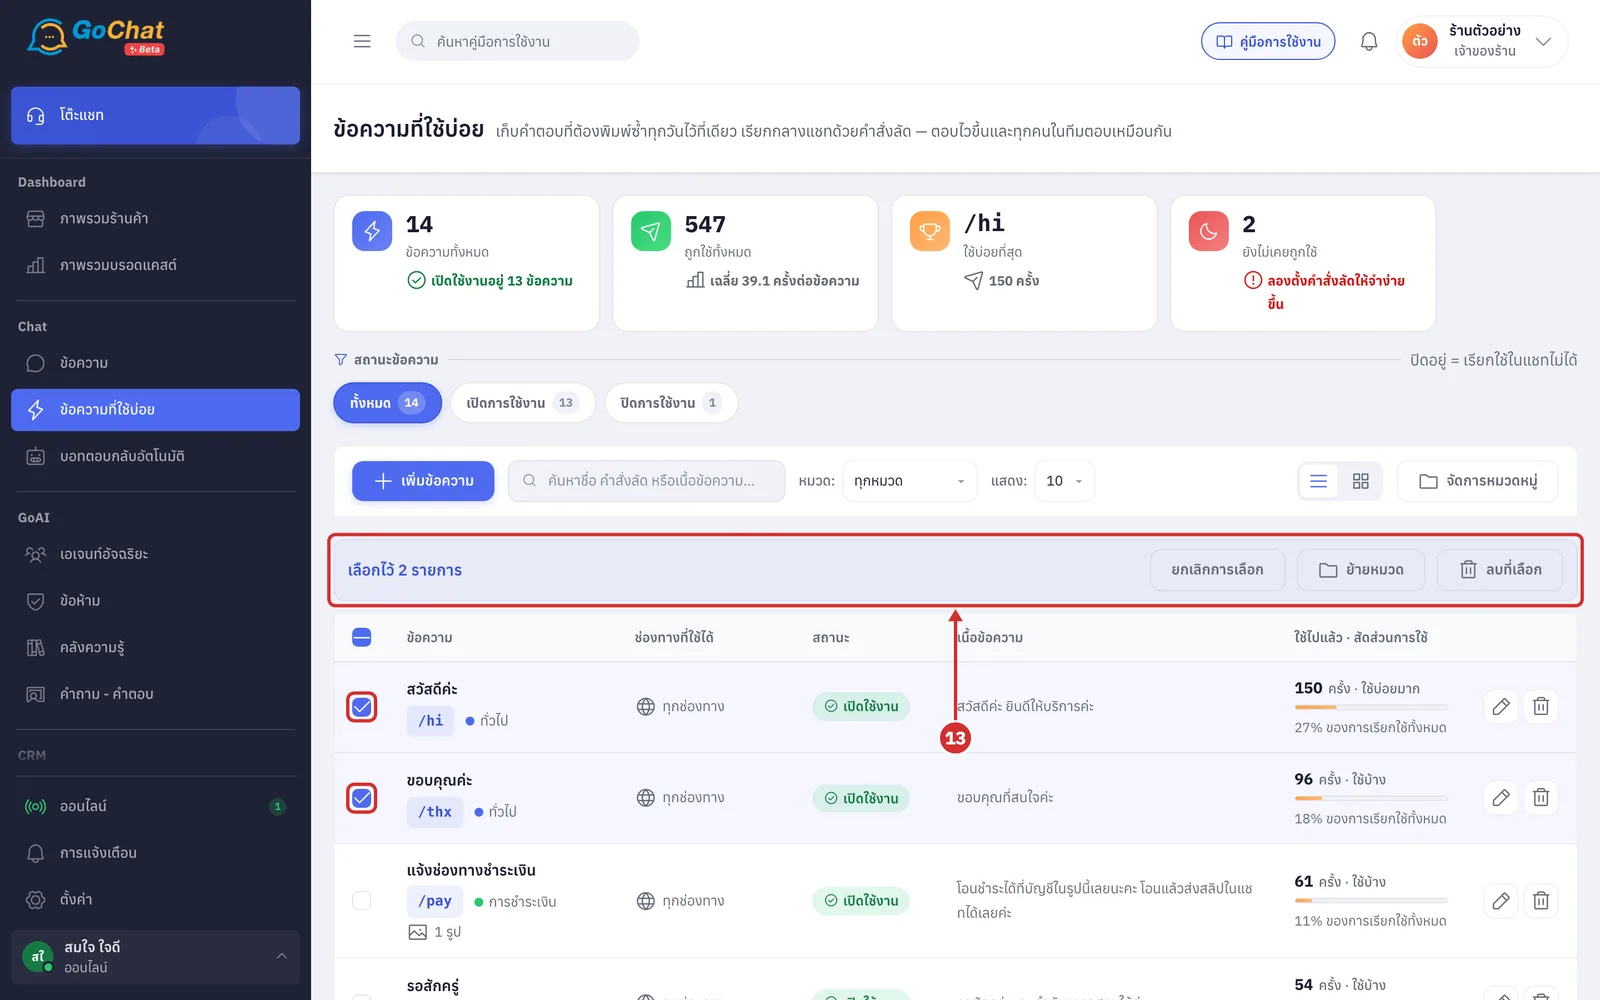
Click ย้ายหมวด (Move category). The ย้าย … ข้อความไปหมวด (Move … replies to category) window lists every category with its number of replies. Click ย้ายมาที่นี่ (Move here) on the destination; it moves straight away without asking again
Categories where the selected replies are now show อยู่ที่นี่ … ใบ (… here)
Scroll the list to see the other categories
Choose ไม่มีหมวดหมู่ (No category) at the end of the list to take replies out of their category
Shops with more than 6 categories get a ค้นหาหมวด (Search categories) box at the top
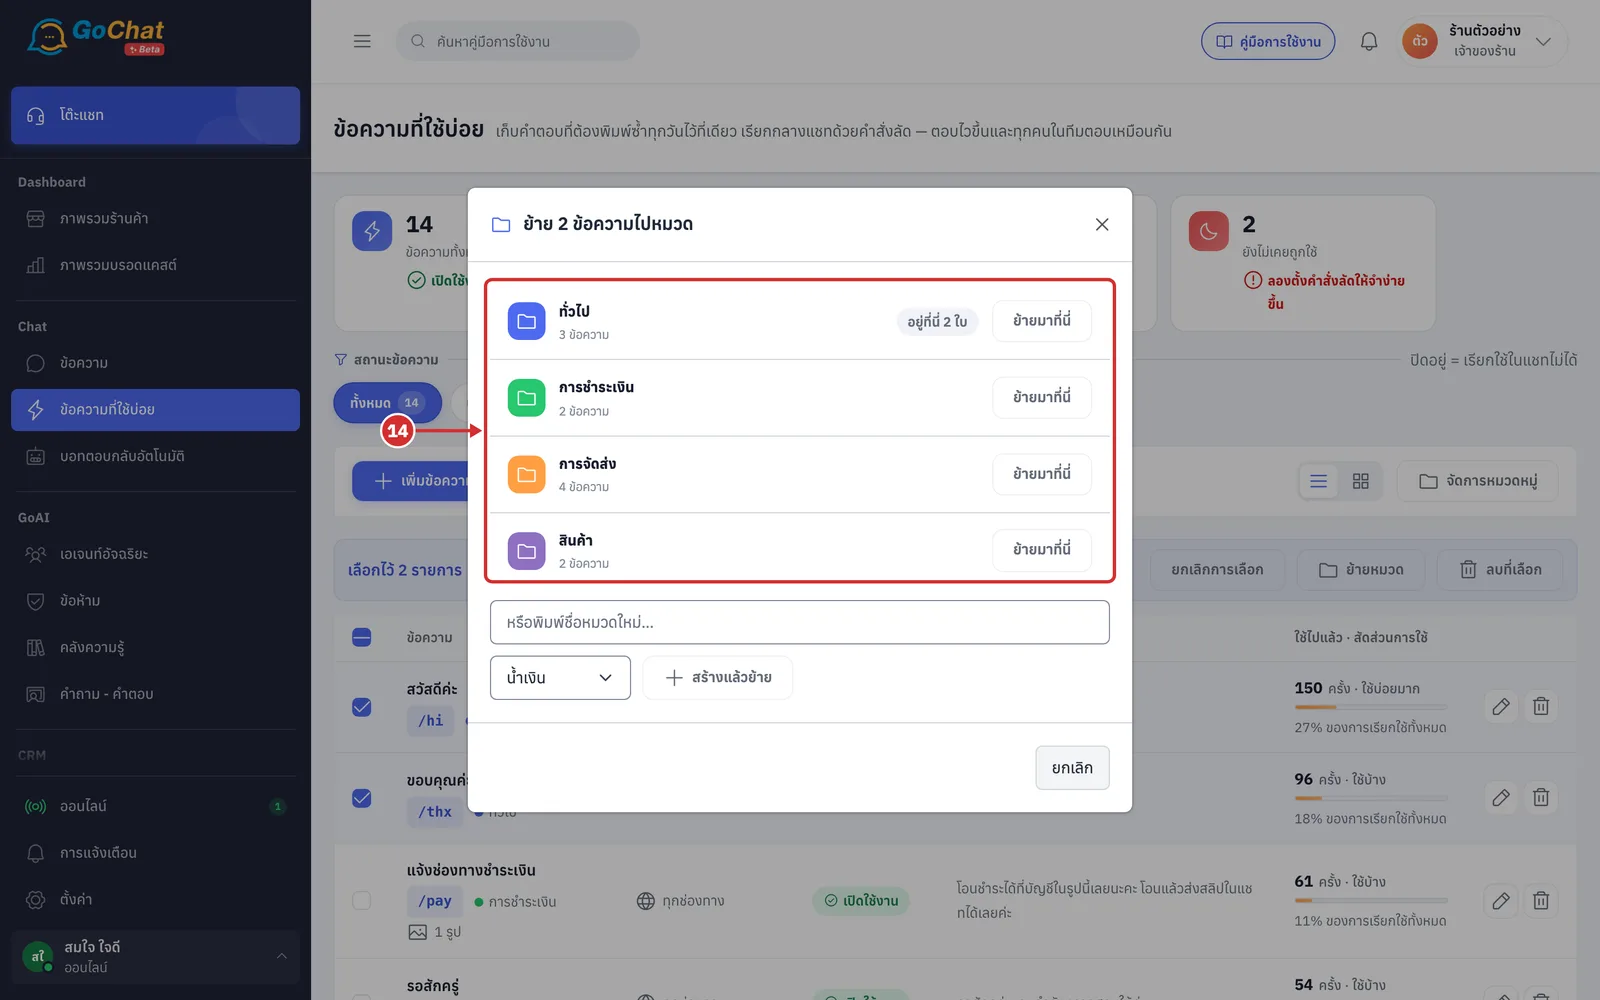
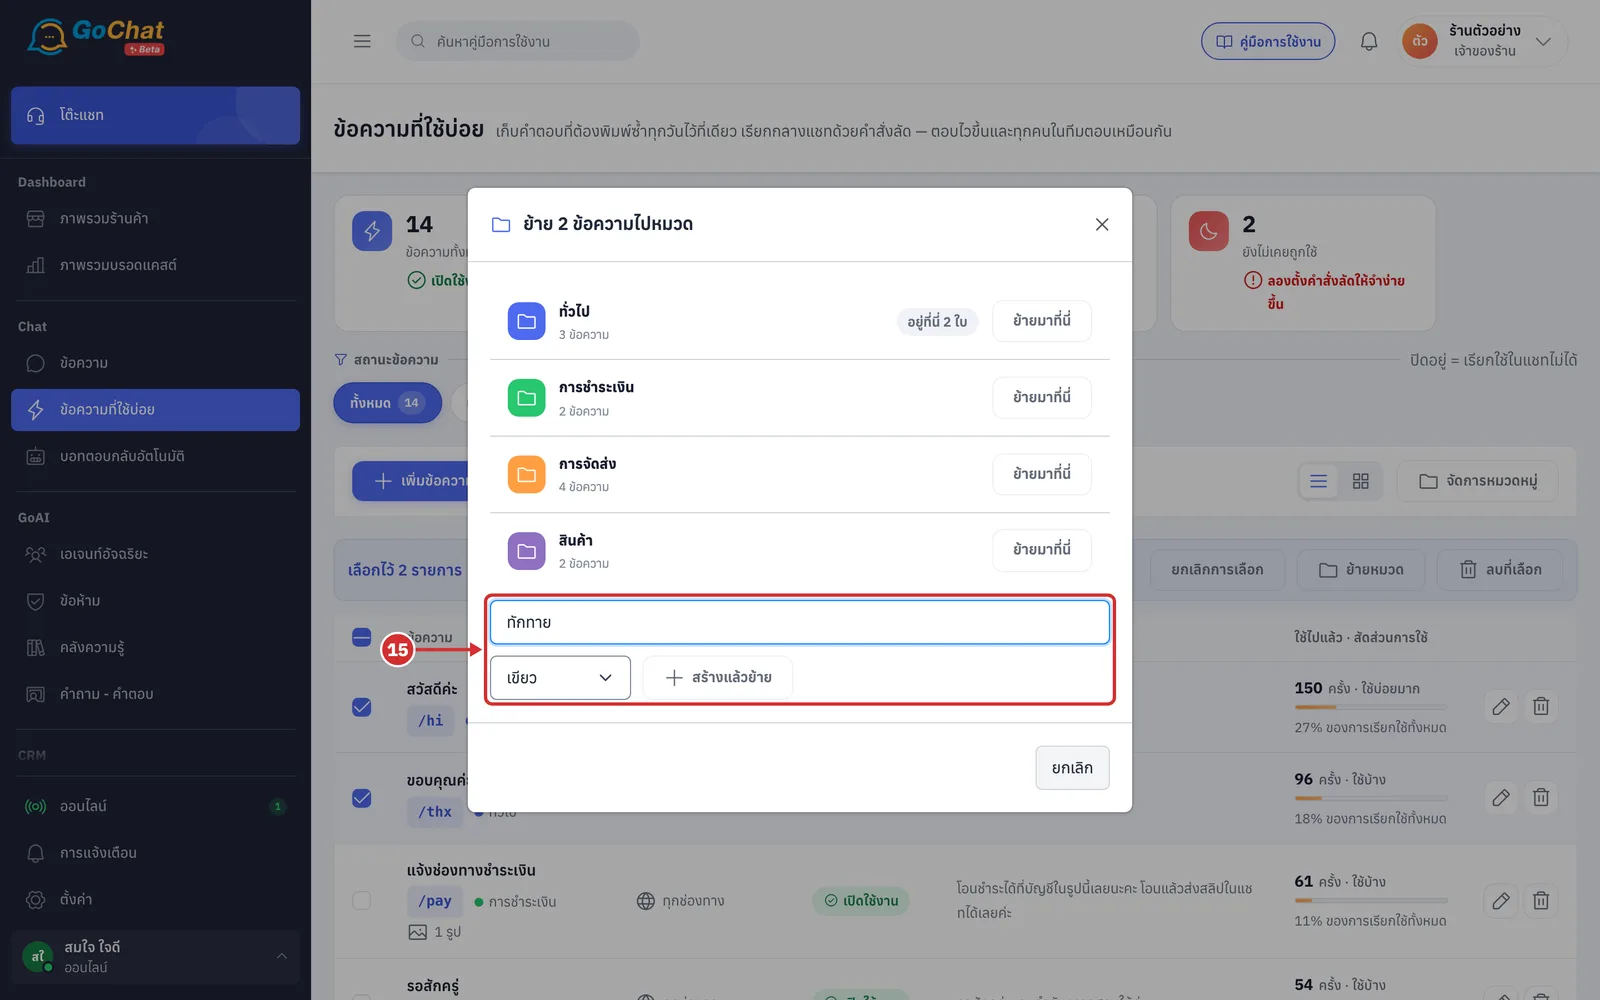
If the category you need does not exist yet, type its name in หรือพิมพ์ชื่อหมวดใหม่… (Or type a new category name…), choose a colour, then click สร้างแล้วย้าย (Create and move)
Category names can be up to 40 characters
A name that already exists shows มีหมวด “…” อยู่แล้ว — เลือกจากรายการข้างบนได้เลย (“…” already exists — pick it from the list above)
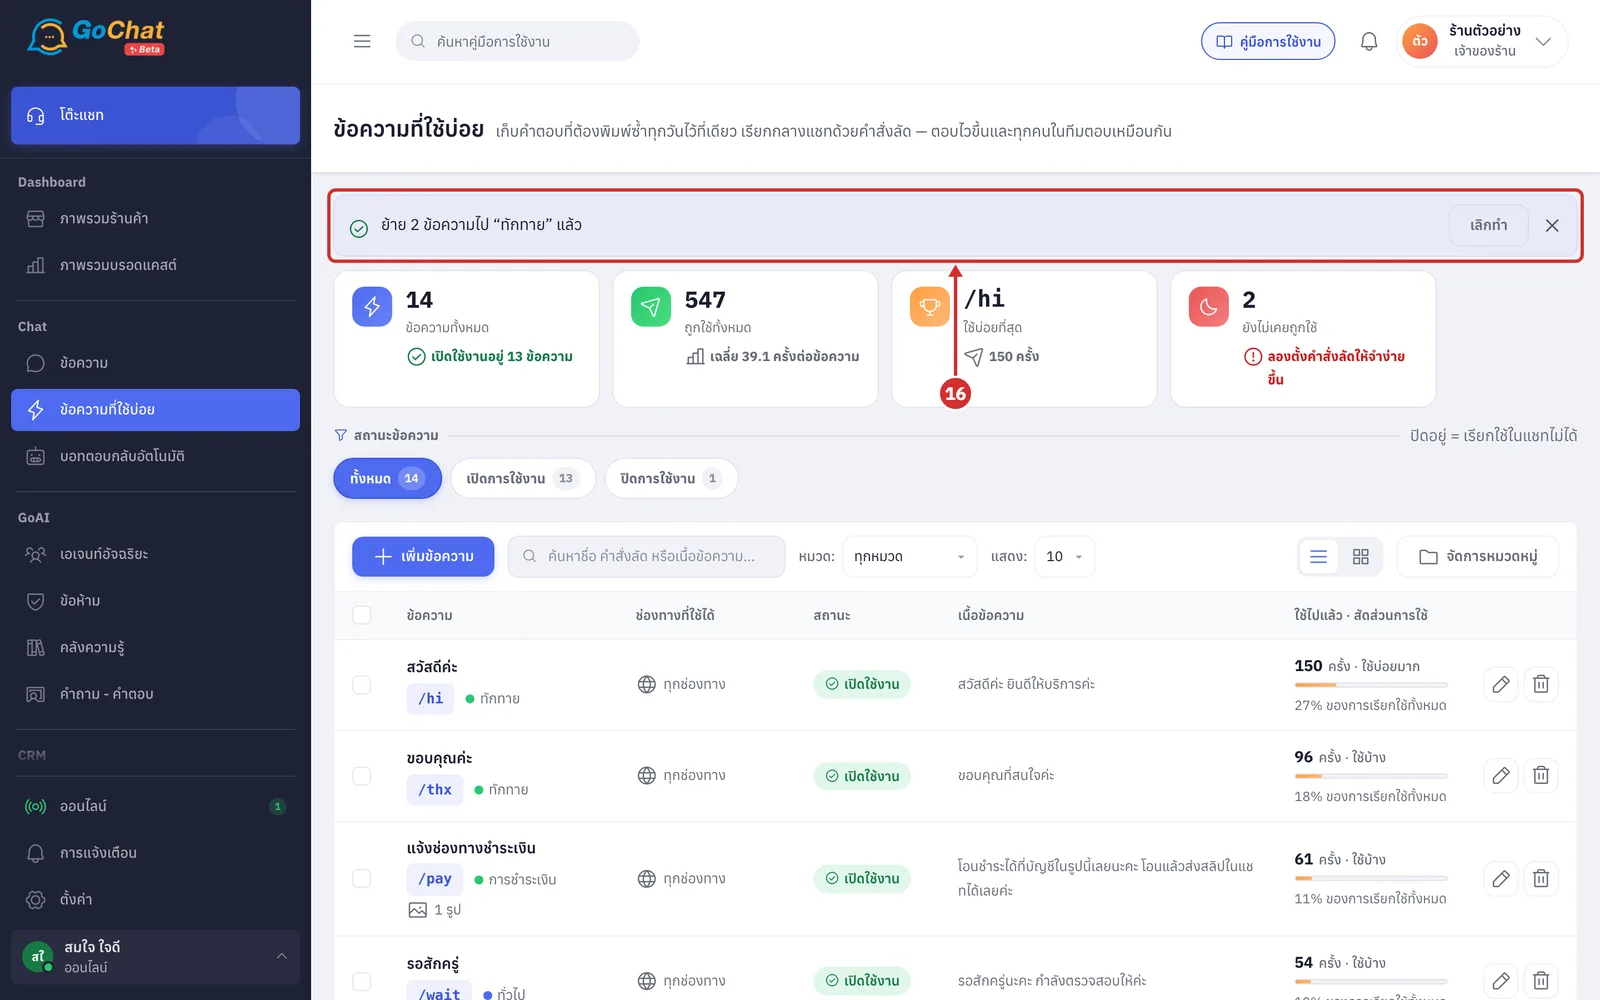
It shows ย้าย … ข้อความไป “…” แล้ว (Moved … replies to “…”). If you moved them by mistake, click เลิกทำ (Undo) in this bar; they go back to their old categories and it shows ย้าย … ข้อความกลับหมวดเดิมแล้ว (Moved … replies back)
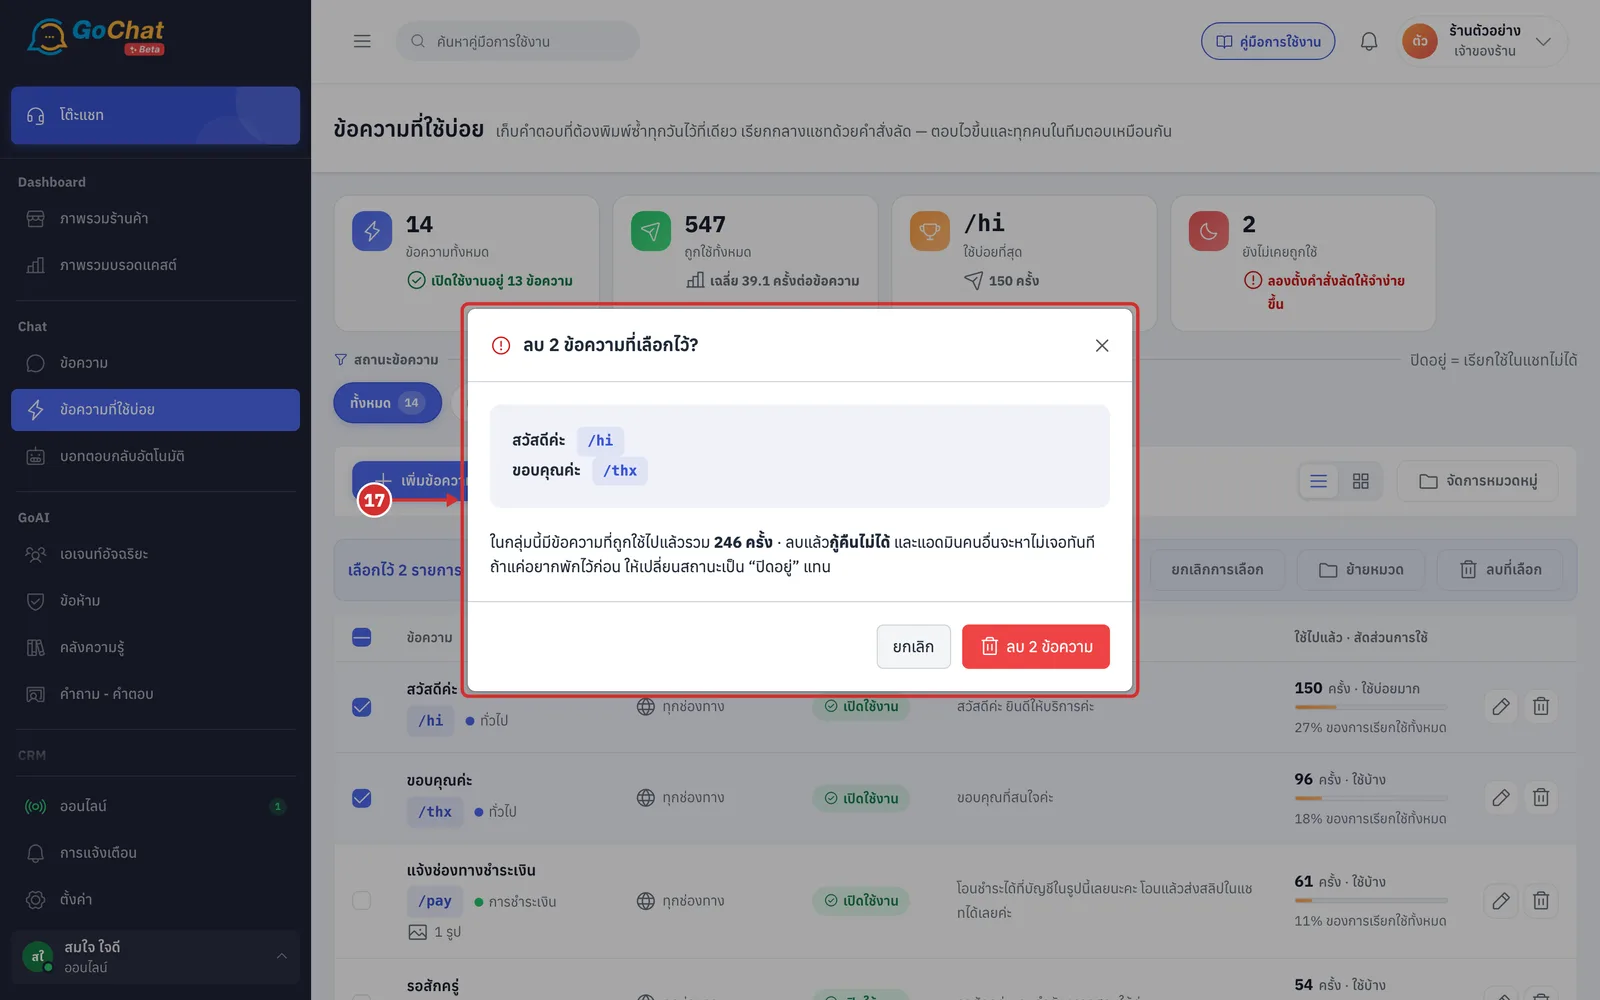
The shop owner also sees ลบที่เลือก (Delete selected). Clicking it opens ลบ … ข้อความที่เลือกไว้? (Delete … selected replies?) with the list of replies and how many times they were used in total. Click ลบ … ข้อความ (Delete … replies) to delete them
Deleted replies cannot be restored
Other admins do not see this button and delete one reply at a time with the bin in the row
Managing categories
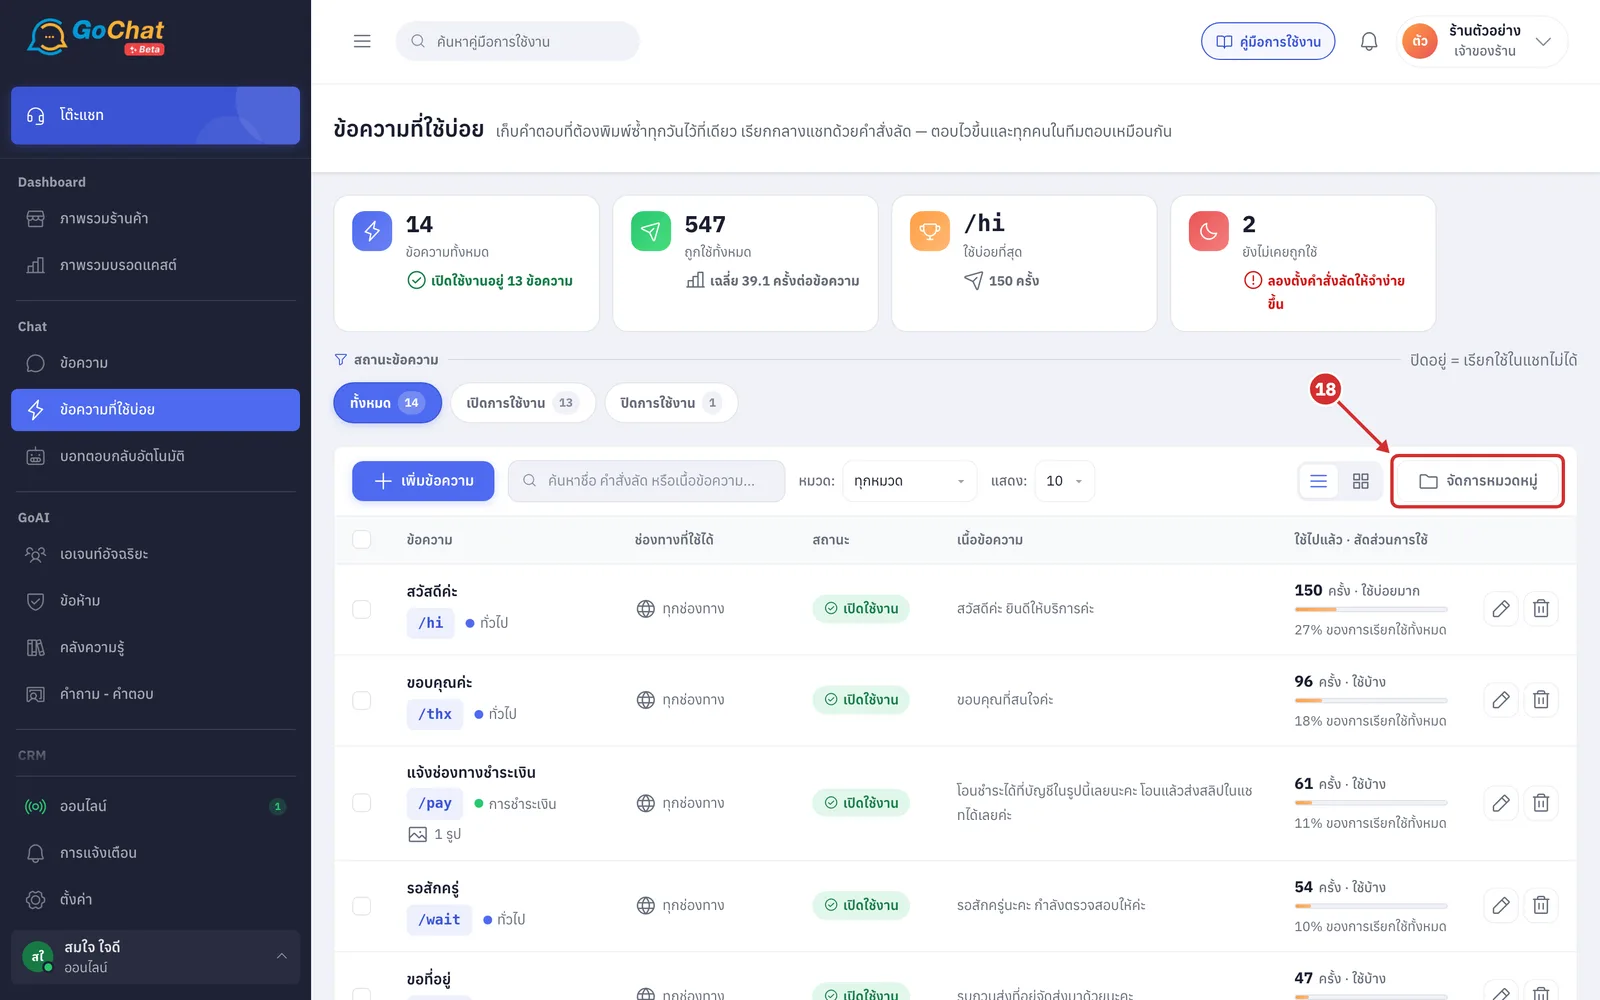
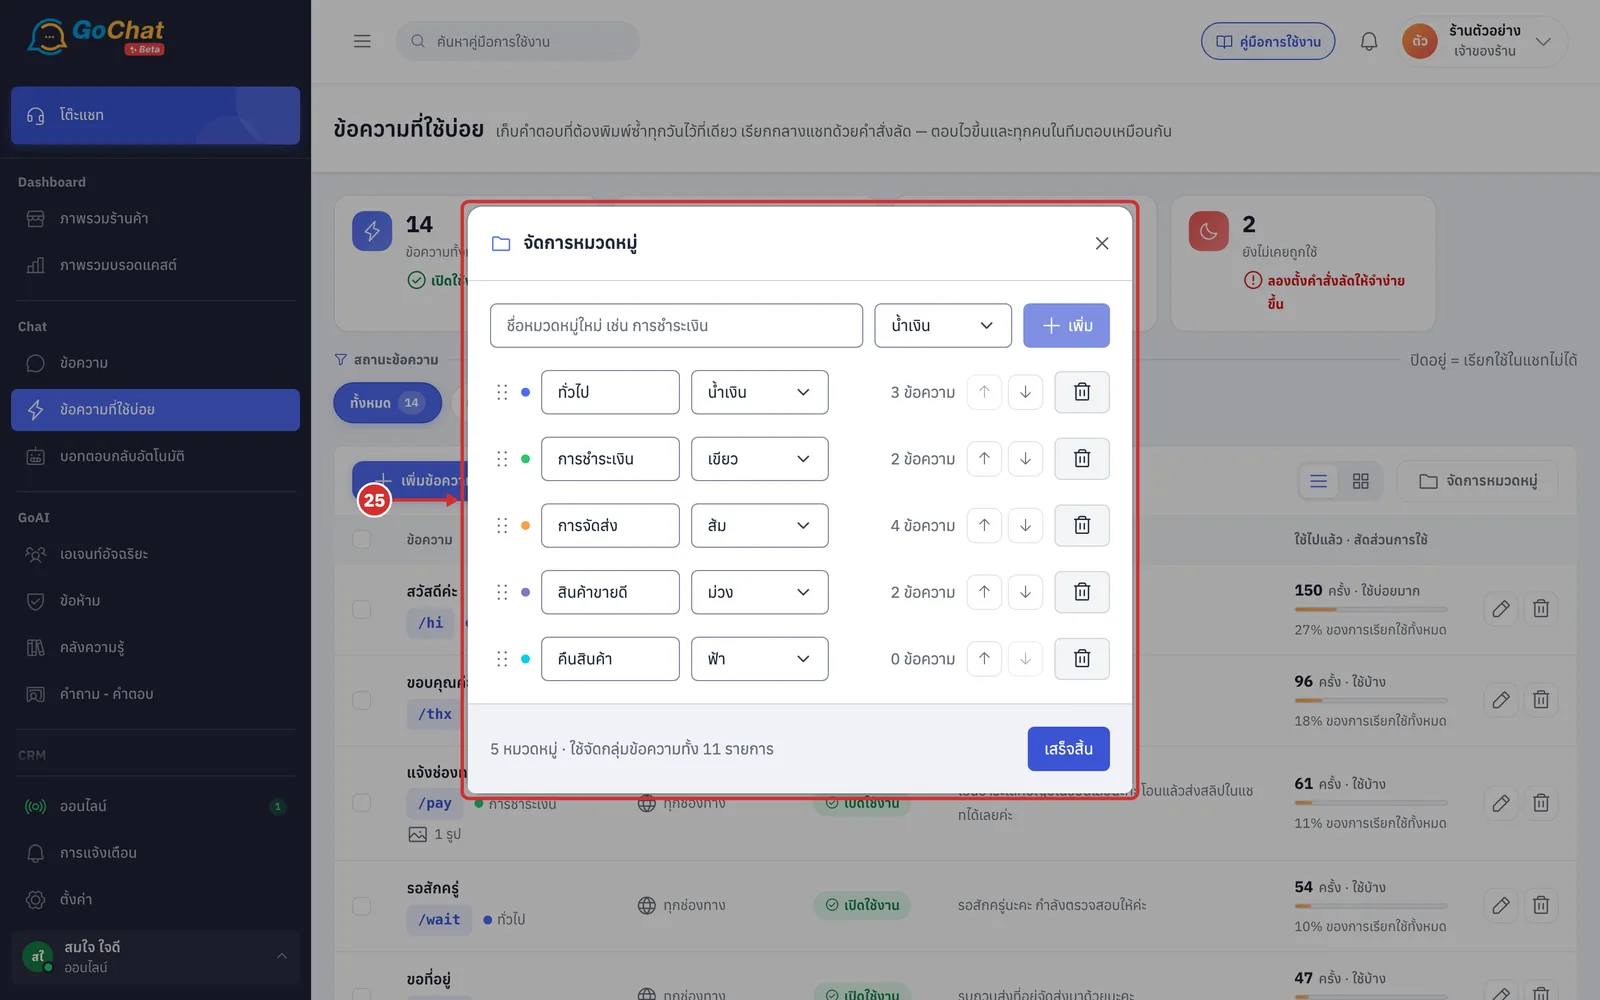
The จัดการหมวดหมู่ (Manage categories) window is where you add, edit, delete and reorder your shop's categories. Nothing you change there is saved until you click เสร็จสิ้น (Done) and then บันทึกทั้งหมด (Save all); everything is saved together in one go.
Click จัดการหมวดหมู่ (Manage categories) in the toolbar above the table
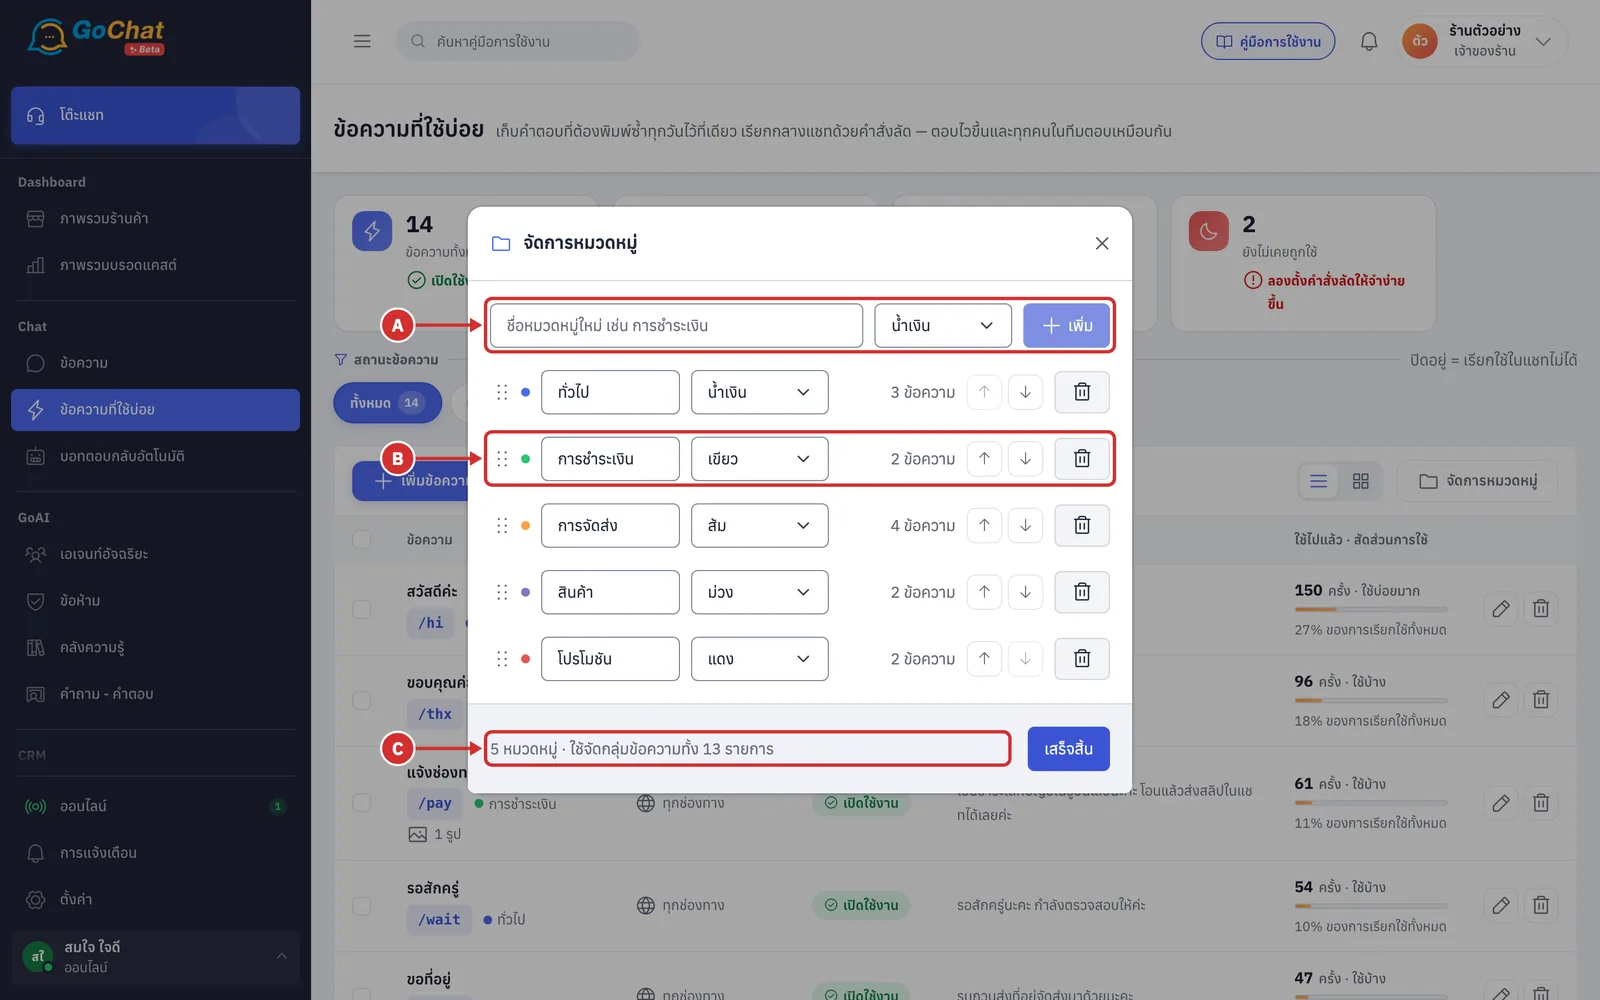
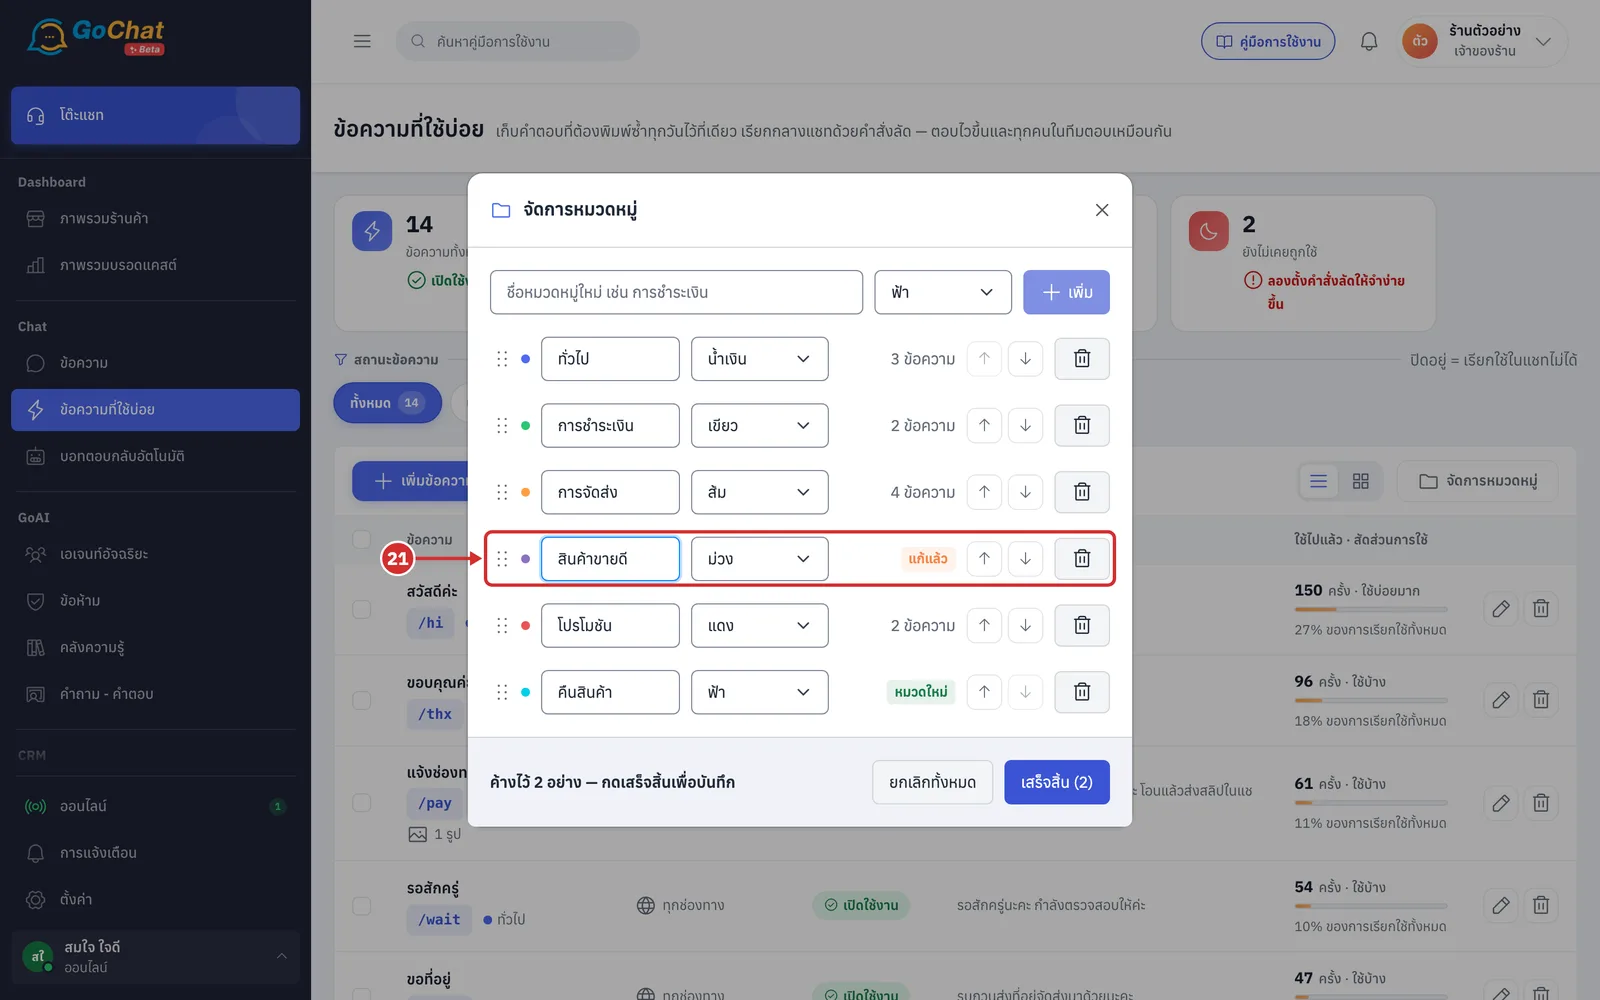
The จัดการหมวดหมู่ (Manage categories) window lists every category in order; this order is used for the groups in card view and in the saved replies window of the chat. Each part works like this:
A Add category type a new name (up to 40 characters), choose a colour, then click เพิ่ม (Add)
B Category row from left to right
Handle: drag up or down to change the order
Colour dot: shows the category colour
Name: edit it right in the box; names must be unique
Colour: changes the category colour
Number of replies: changed categories show a status label here instead
Up and down arrows: move one place at a time; use these instead of dragging on mobile
Bin: deletes the category
C Totals the number of categories and of replies that are in a category; replies without a category are not counted
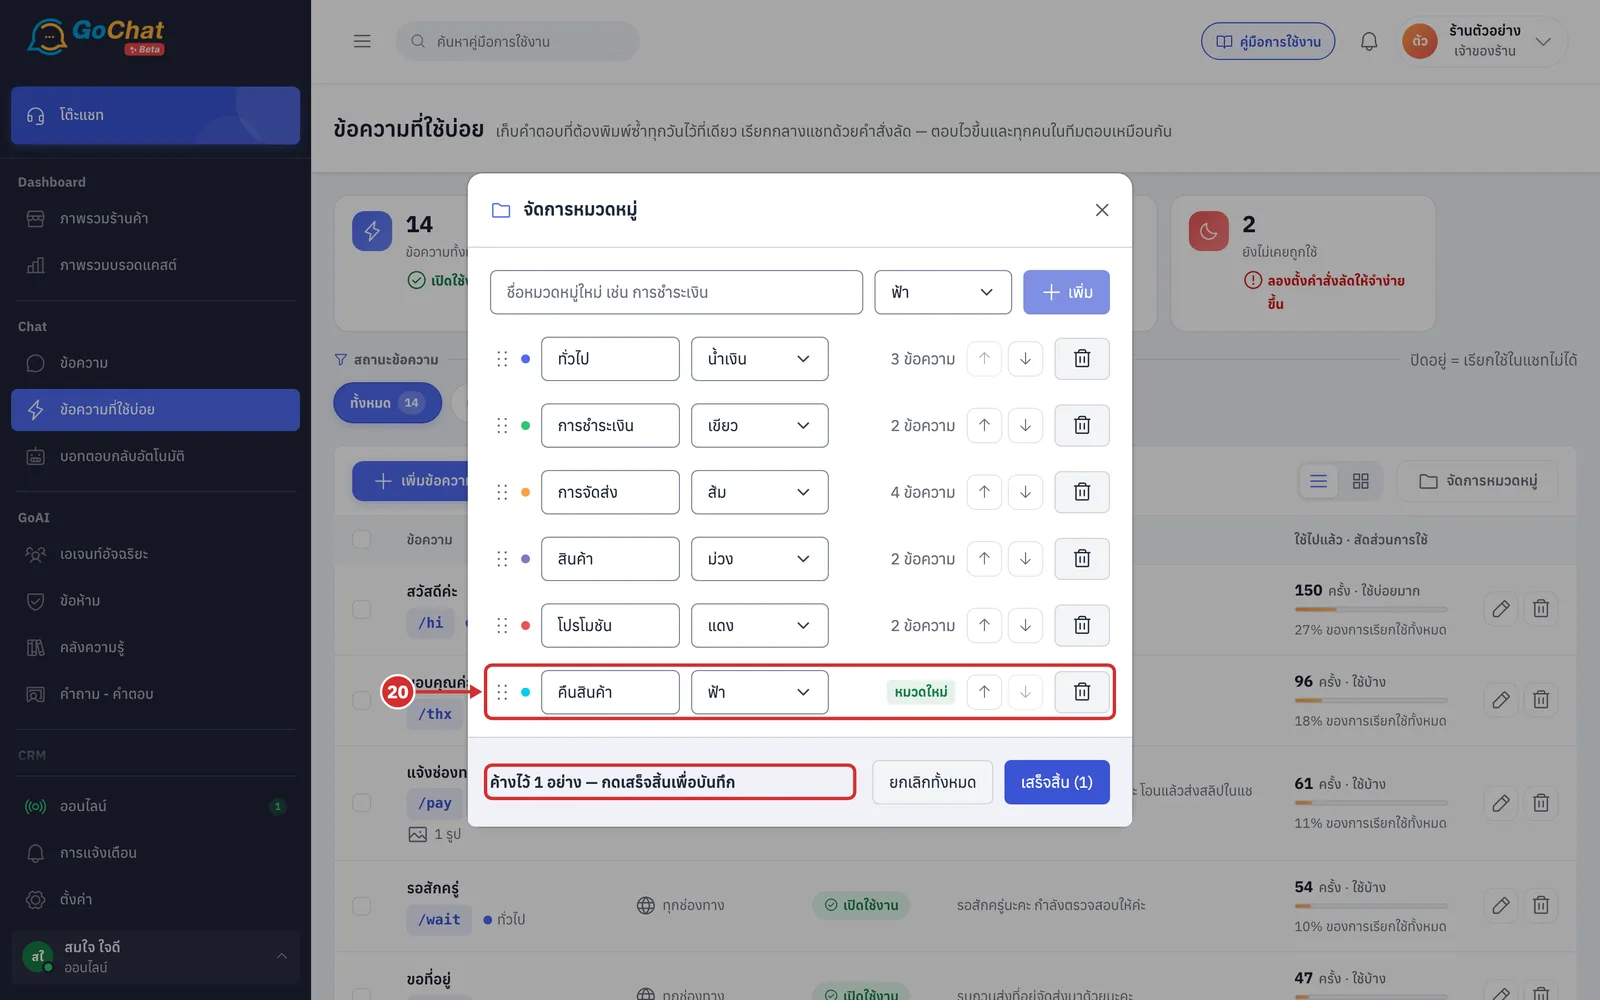
Type a name in ชื่อหมวดหมู่ใหม่ เช่น การชำระเงิน (New category name, e.g. Payment), choose a colour, then click เพิ่ม (Add)
The category is added at the end with the label หมวดใหม่ (New)
The bottom of the window says ค้างไว้ … อย่าง — กดเสร็จสิ้นเพื่อบันทึก (… pending — click Done to save)
Change the name or colour of an existing category; it gets the label แก้แล้ว (Changed) (its replies stay as they are, only the category name changes)
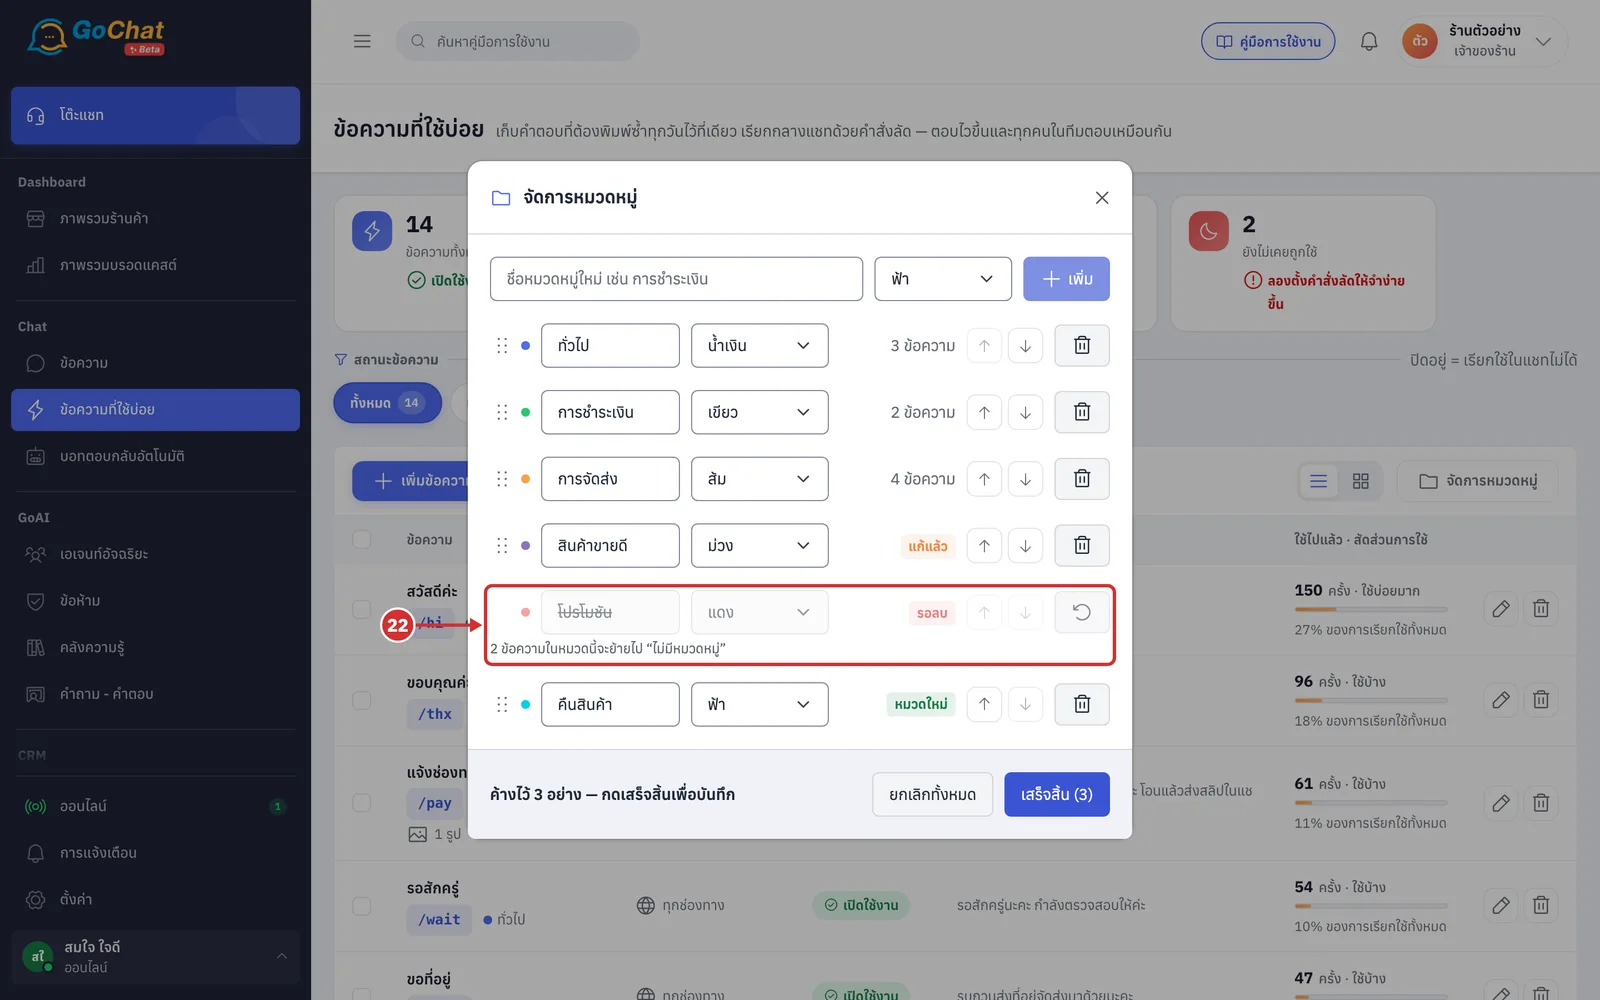
Click the bin of a category you no longer need. It gets the label รอลบ (To delete) and says … ข้อความในหมวดนี้จะย้ายไป “ไม่มีหมวดหมู่” (… replies in this category will move to “No category”)
The replies are not deleted
Click the round arrow เอากลับ (Bring back) if you change your mind
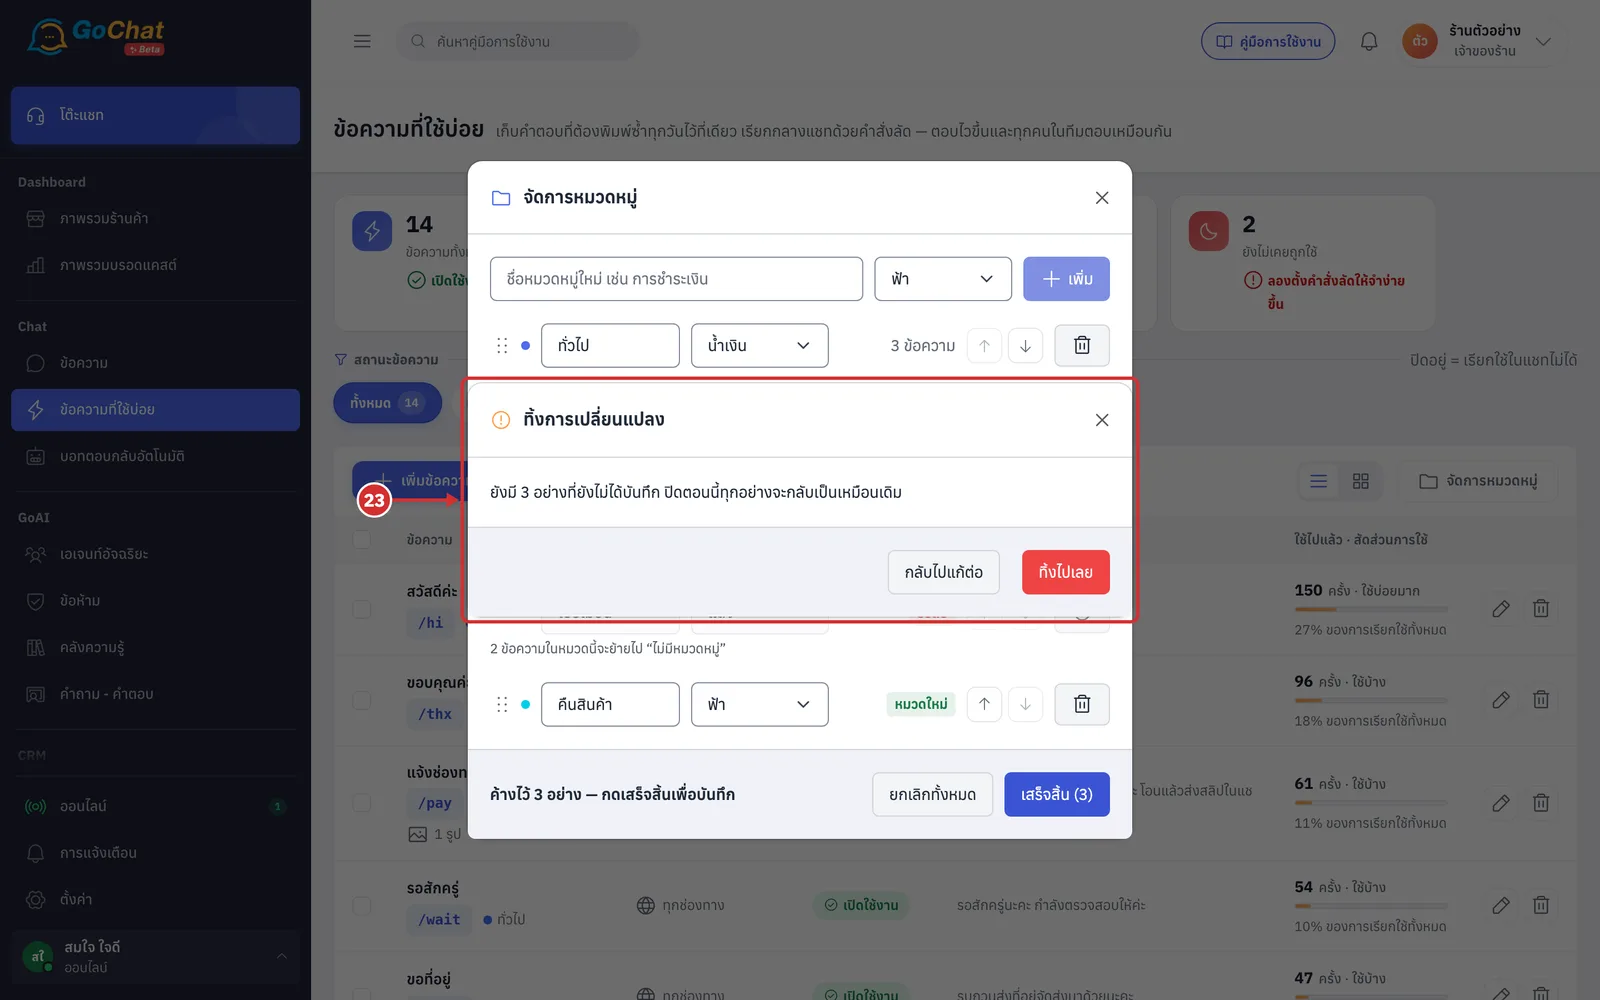
If you close the window with changes pending, the ทิ้งการเปลี่ยนแปลง (Discard changes) window asks first. Click กลับไปแก้ต่อ (Keep editing) or ทิ้งไปเลย (Discard)
Closing now puts everything back
To clear every pending change without closing the window, click ยกเลิกทั้งหมด (Undo all) at the bottom of the main window
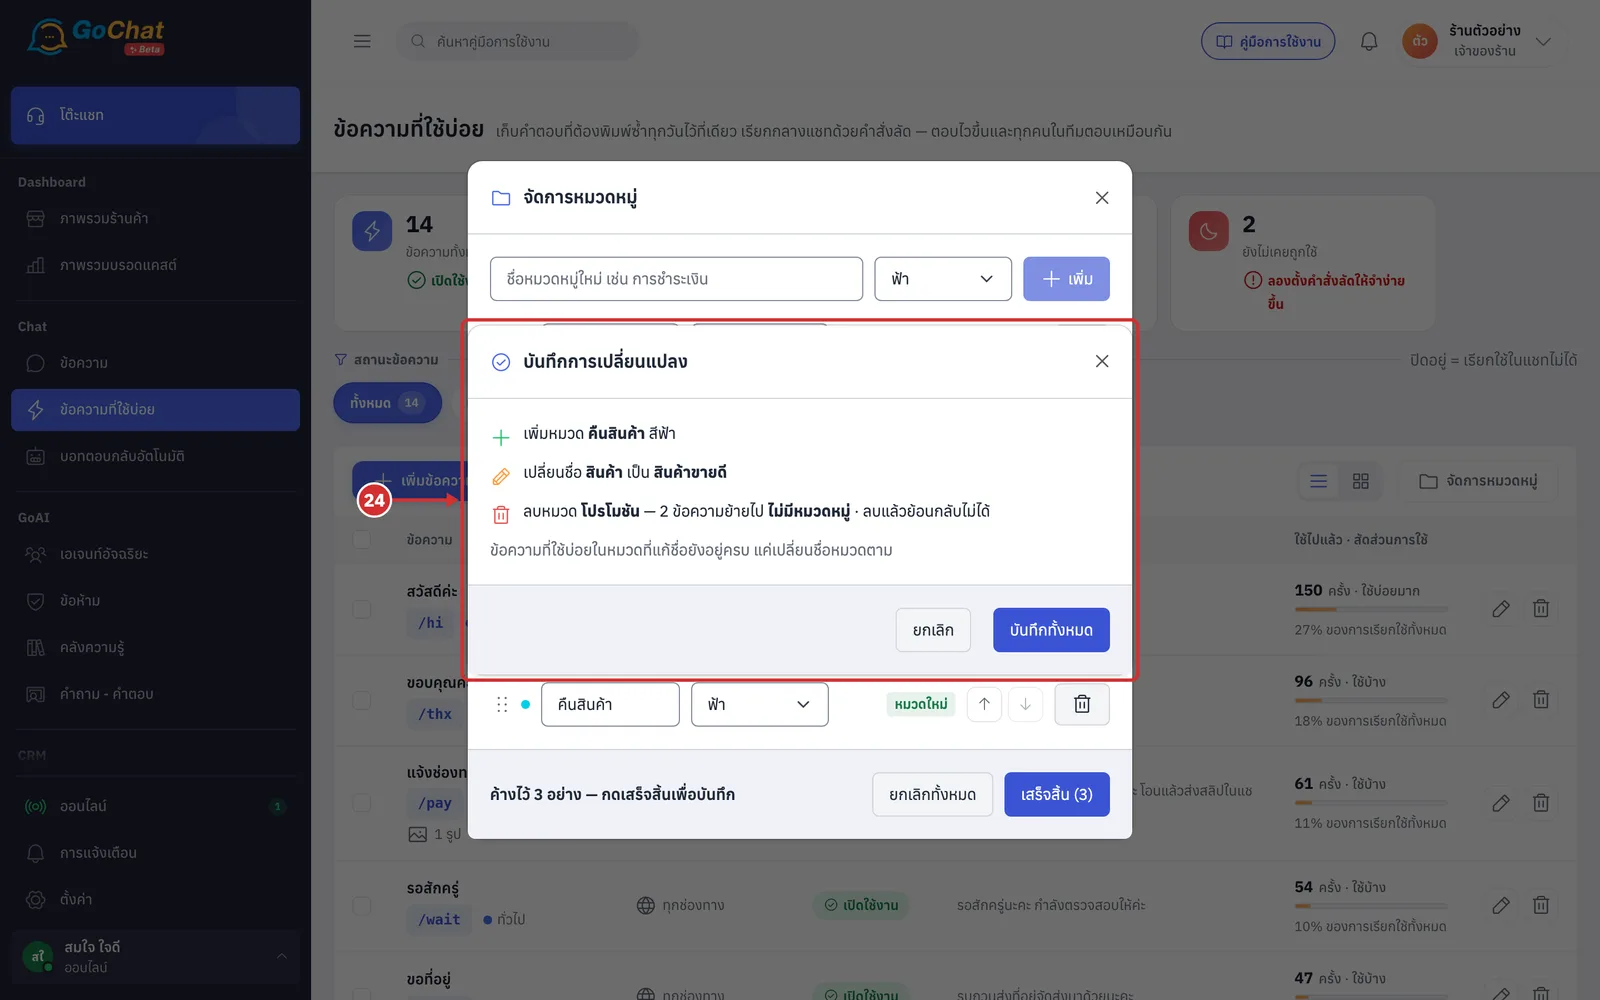
Click เสร็จสิ้น (Done). The บันทึกการเปลี่ยนแปลง (Save changes) window sums up everything that will happen
For example
เพิ่มหมวด … (Add category …)
เปลี่ยนชื่อ … เป็น … (Rename … to …)
ลบหมวด … — … ข้อความย้ายไป ไม่มีหมวดหมู่ · ลบแล้วย้อนกลับไม่ได้ (Delete … — … replies move to No category · cannot be undone)
จัดลำดับหมวดใหม่ (New category order)
Click บันทึกทั้งหมด (Save all) to confirm, or ยกเลิก (Cancel) to go back
Once saved, the window closes and the new categories are ready straight away in the category filter, the edit page and the saved replies window of the chat
Open จัดการหมวดหมู่ (Manage categories) again to see the latest list
Good to know: Clicking เสร็จสิ้น (Done) when nothing has changed simply closes the window.
More about saved replies
Read more in
Adding and editing saved replies — title, shortcut, channels, text, images, variables and sending several messages as a set
Using saved replies in a chat — insert a reply from the lightning button, by typing /, or from the suggestions that pop up as you type