

Creating a sales follow-up bot
The บอทติดตามยอดขาย (Sales follow-up bot) page sets up bots that message customers who went quiet, step by step, within 24 hours of the customer's last message, such as customers who asked but have not bought yet. There are 2 bot types: ตามเงื่อนไข (By condition), which follows every matching chat on its own, and เฉพาะกลุ่ม (Selected chats), which admins attach themselves in a chat. Everyone in the shop can create and edit bots, and everyone who can reply to a chat can attach or stop a bot in that chat.
Creating a bot by condition
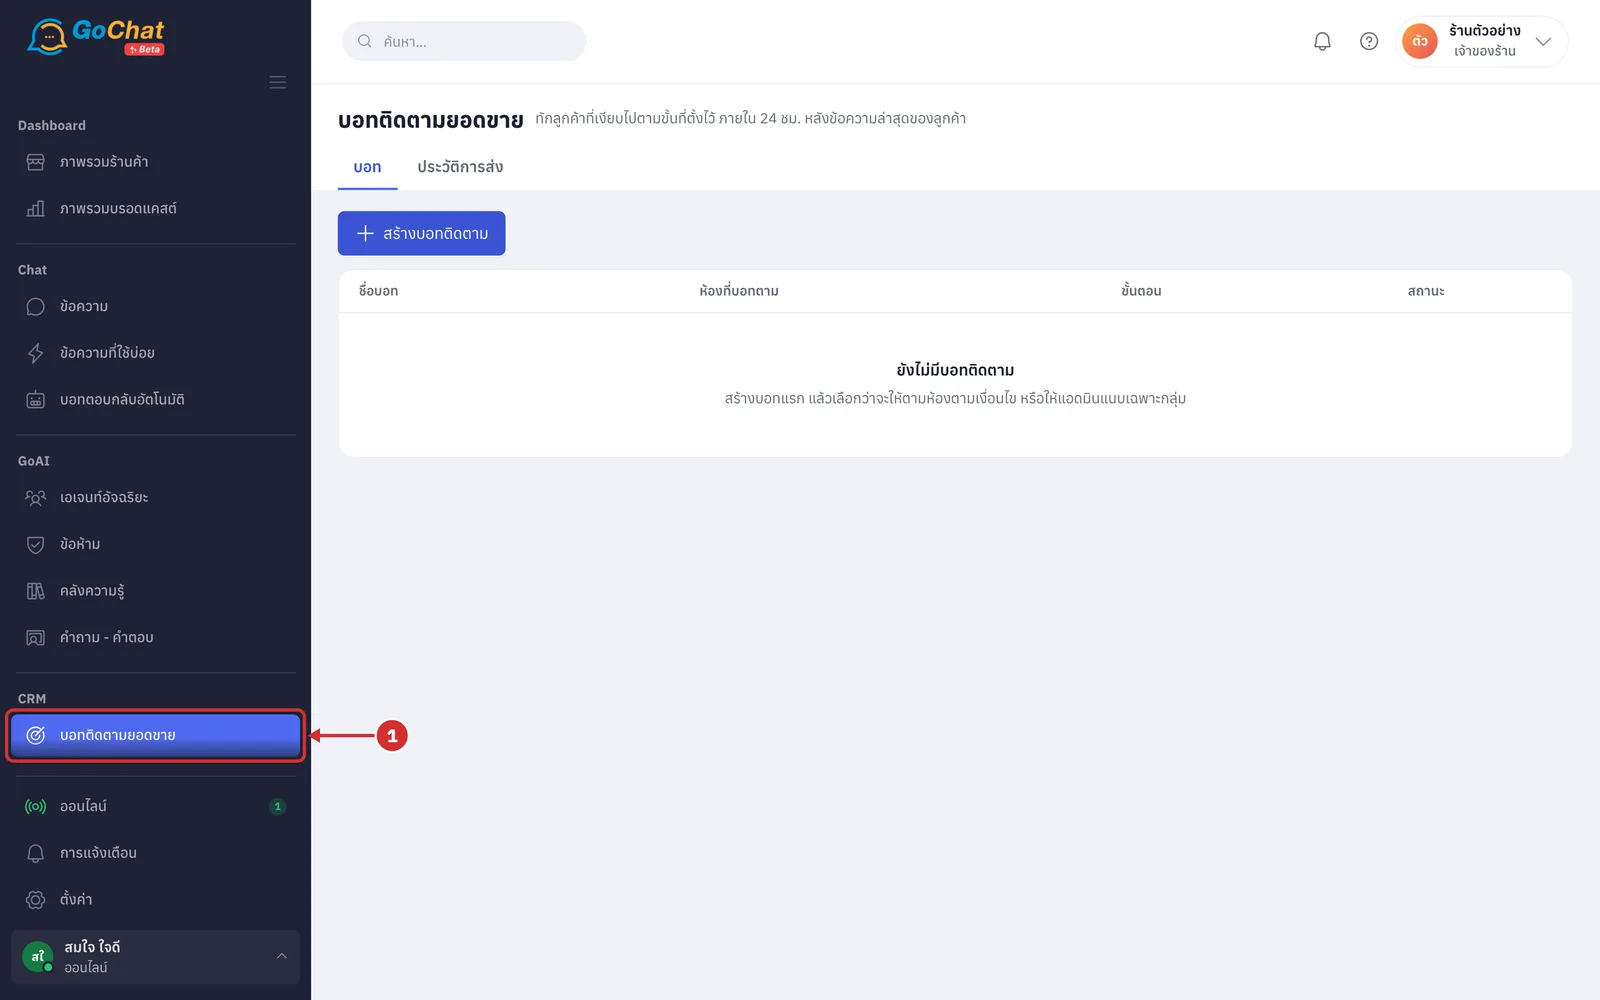
Under CRM, choose บอทติดตามยอดขาย (Sales follow-up bot) in the left menu bar
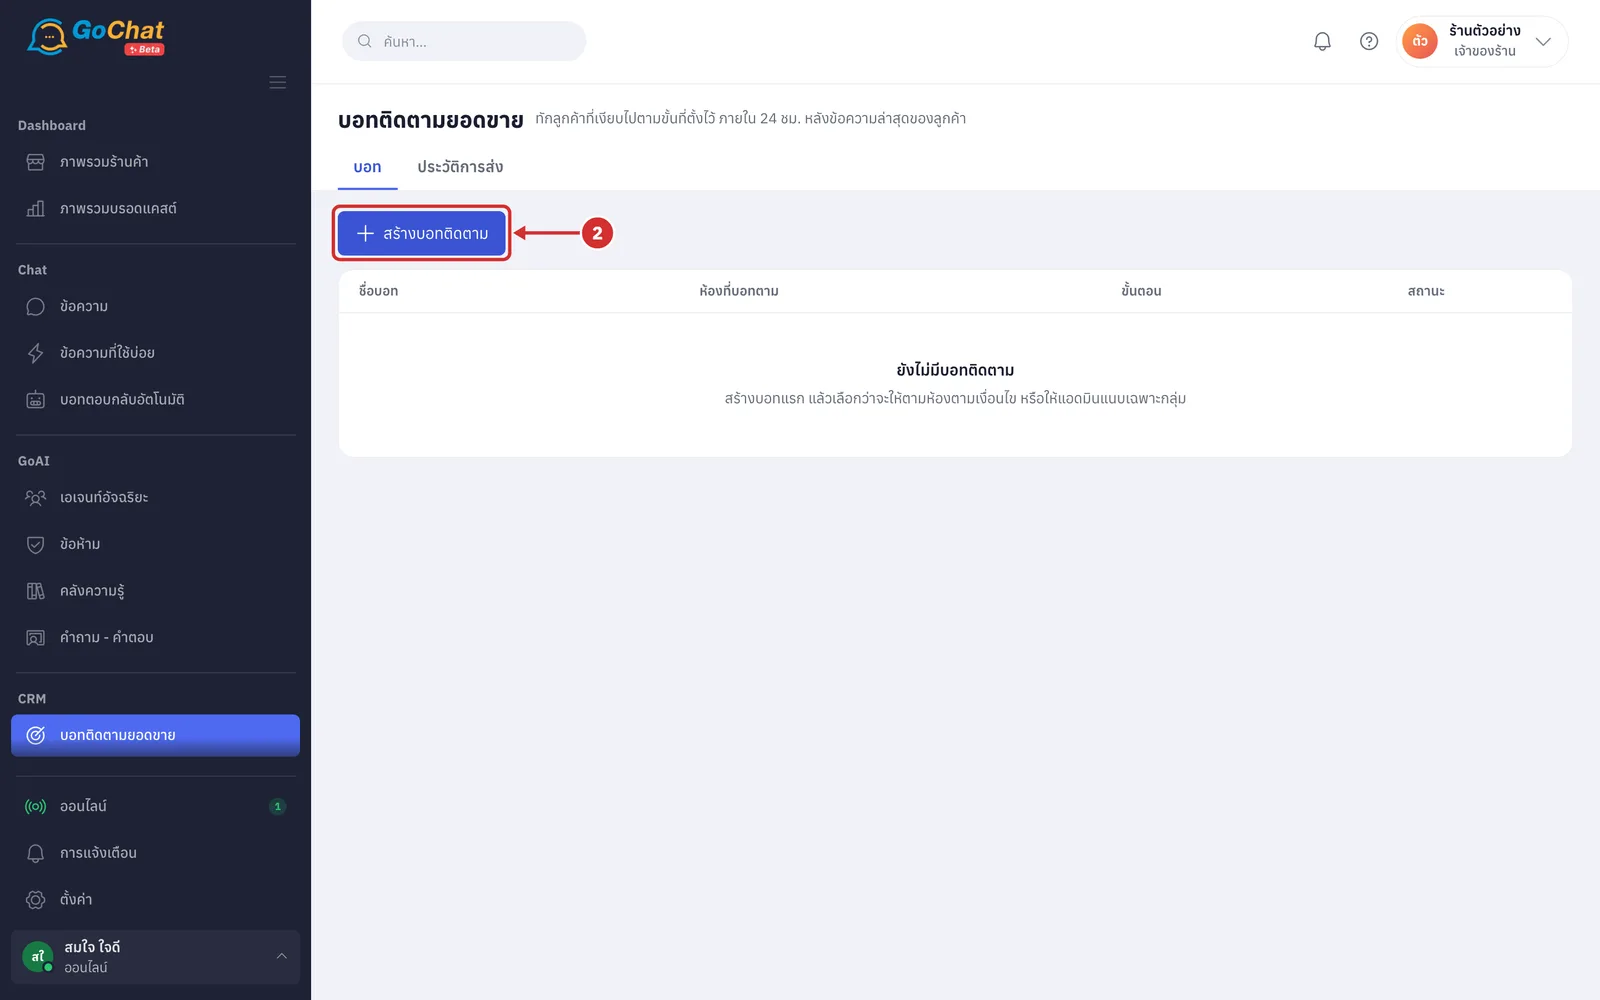
Click สร้างบอทติดตาม (Create follow-up bot)
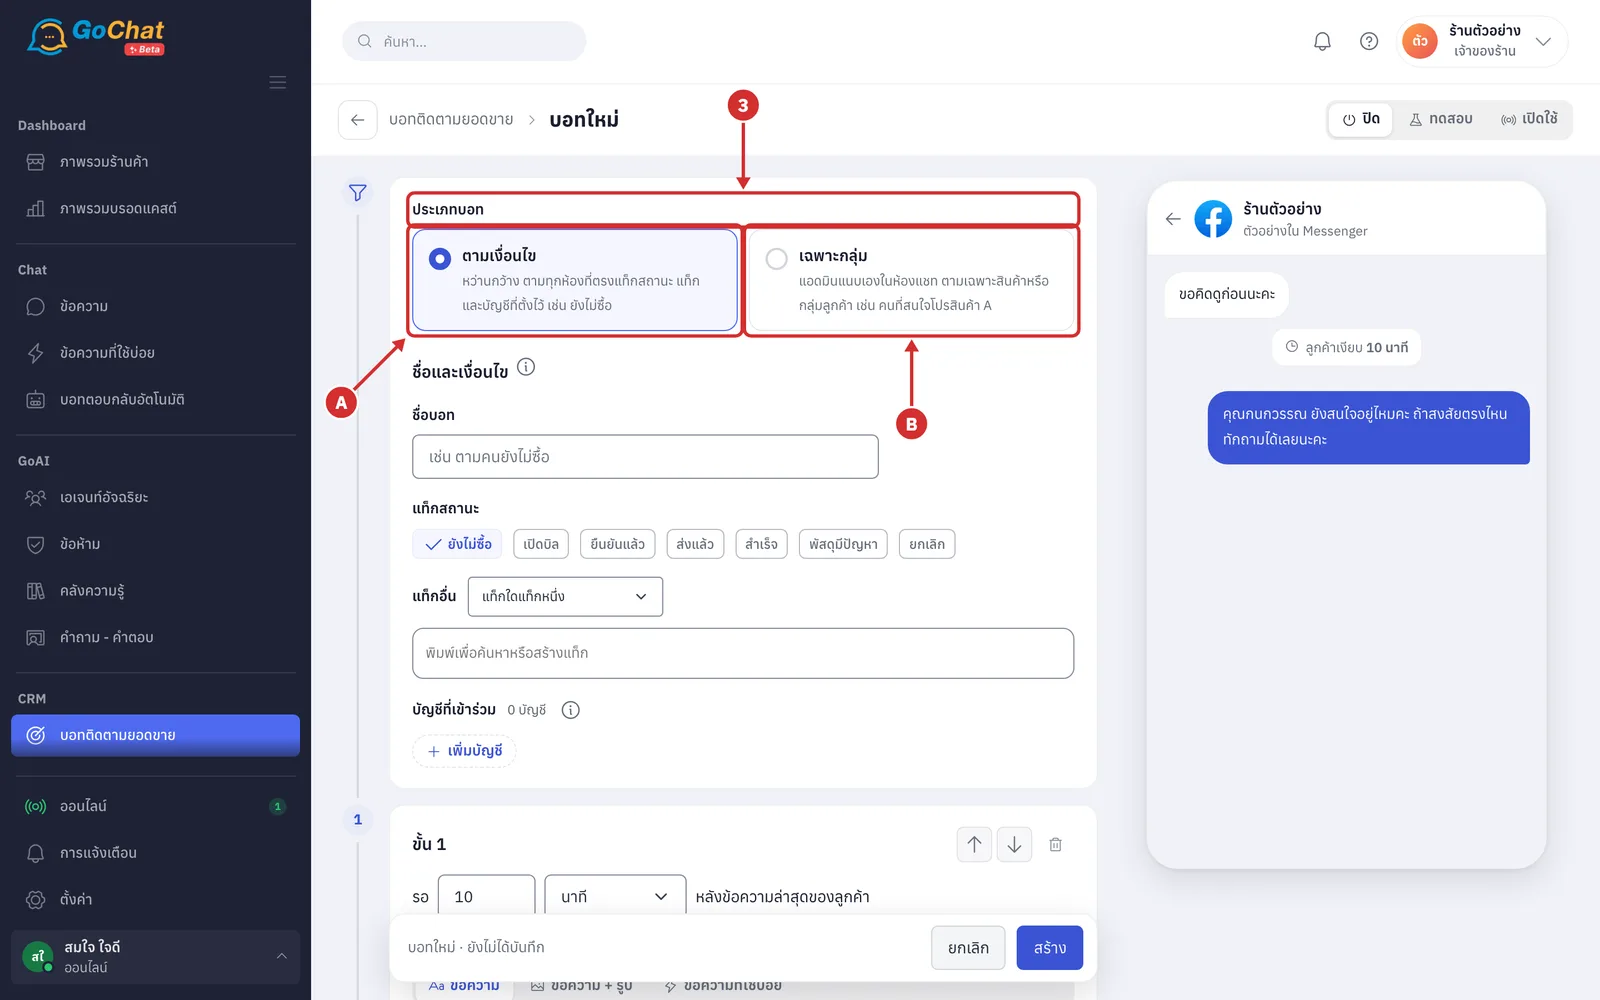
Under ประเภทบอท (Bot type), choose the bot type; there are 2 types (a bot's type cannot be changed after it is created)
A ตามเงื่อนไข (By condition) the bot follows every chat that matches the status tag, tags and accounts you set, such as every chat that is ยังไม่ซื้อ (Not bought yet) (this section uses this type)
B เฉพาะกลุ่ม (Selected chats) admins attach the bot themselves in a chat to follow a specific product or customer group, such as people interested in a promotion for product A (see การสร้างบอทเฉพาะกลุ่ม (Creating a selected-chats bot) below)
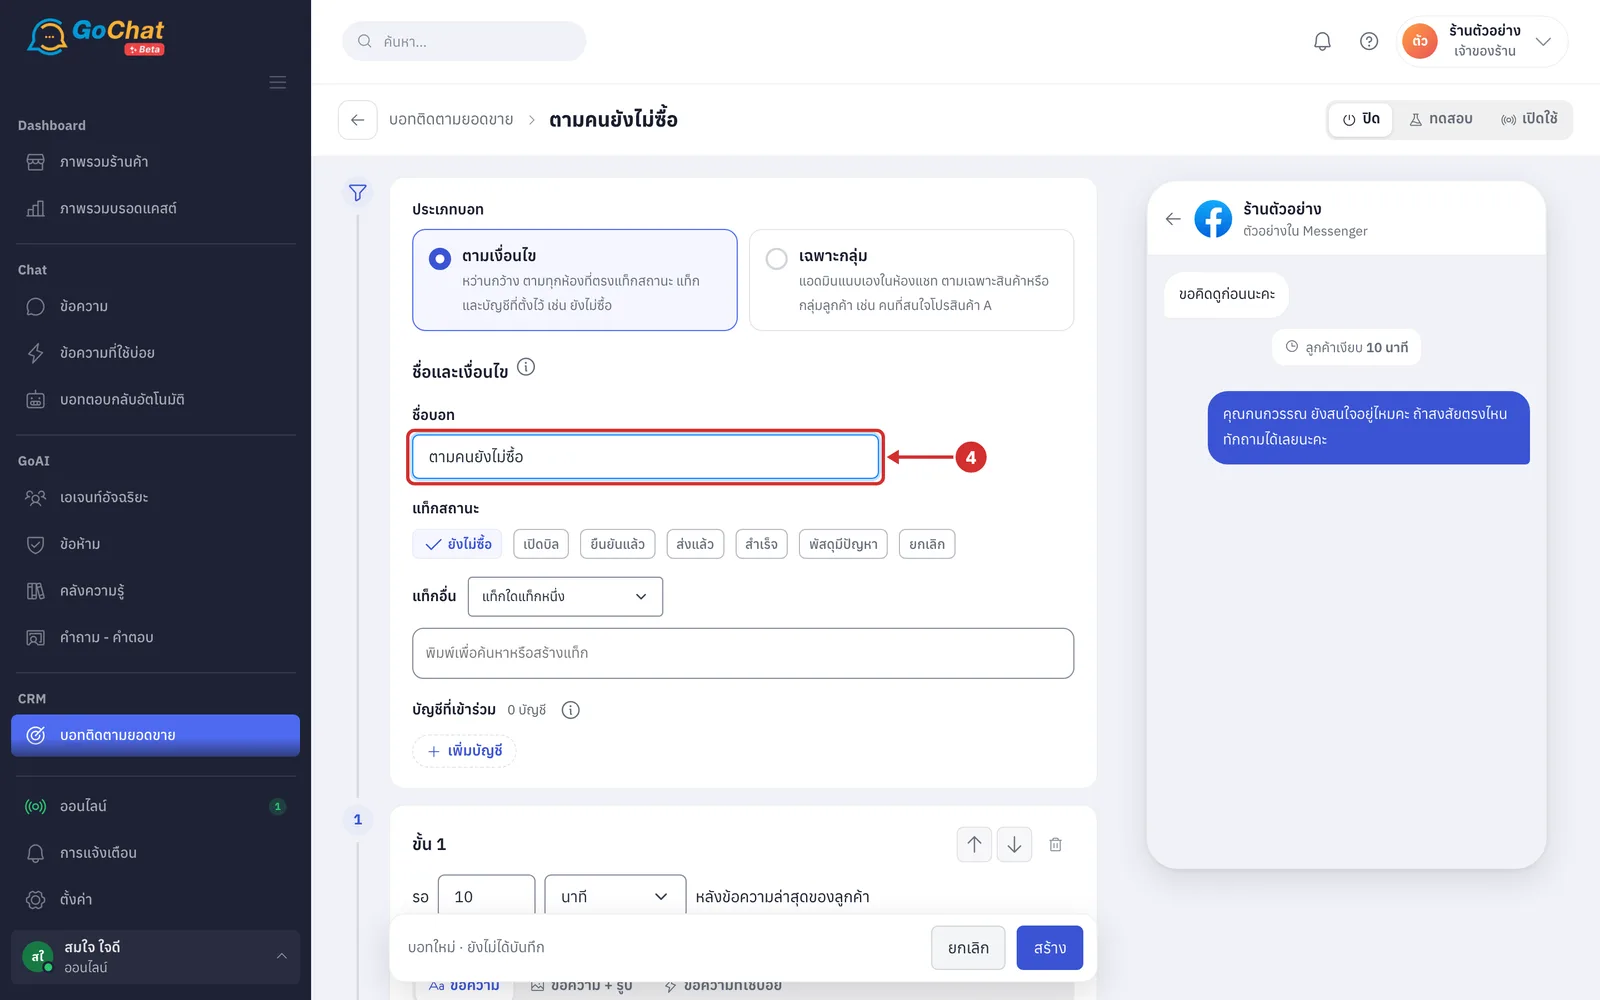
In ชื่อบอท (Bot name), name the bot, up to 60 characters (required; this name appears on this page, in chats and in the send history)
Under แท็กสถานะ (Status tag), choose the sales status of the chats the bot should follow; you can choose several, at least one (ยังไม่ซื้อ (Not bought yet), เปิดบิล (Billed), ยืนยันแล้ว (Confirmed), ส่งแล้ว (Shipped), สำเร็จ (Completed), พัสดุมีปัญหา (Delivery problem) and ยกเลิก (Cancelled); ยังไม่ซื้อ (Not bought yet) is selected for you; the status tag is the sales status the system sets on each chat from its orders, a chat where the customer messages anew becomes ยังไม่ซื้อ (Not bought yet), and admins can change it from the status label at the top of the chat)
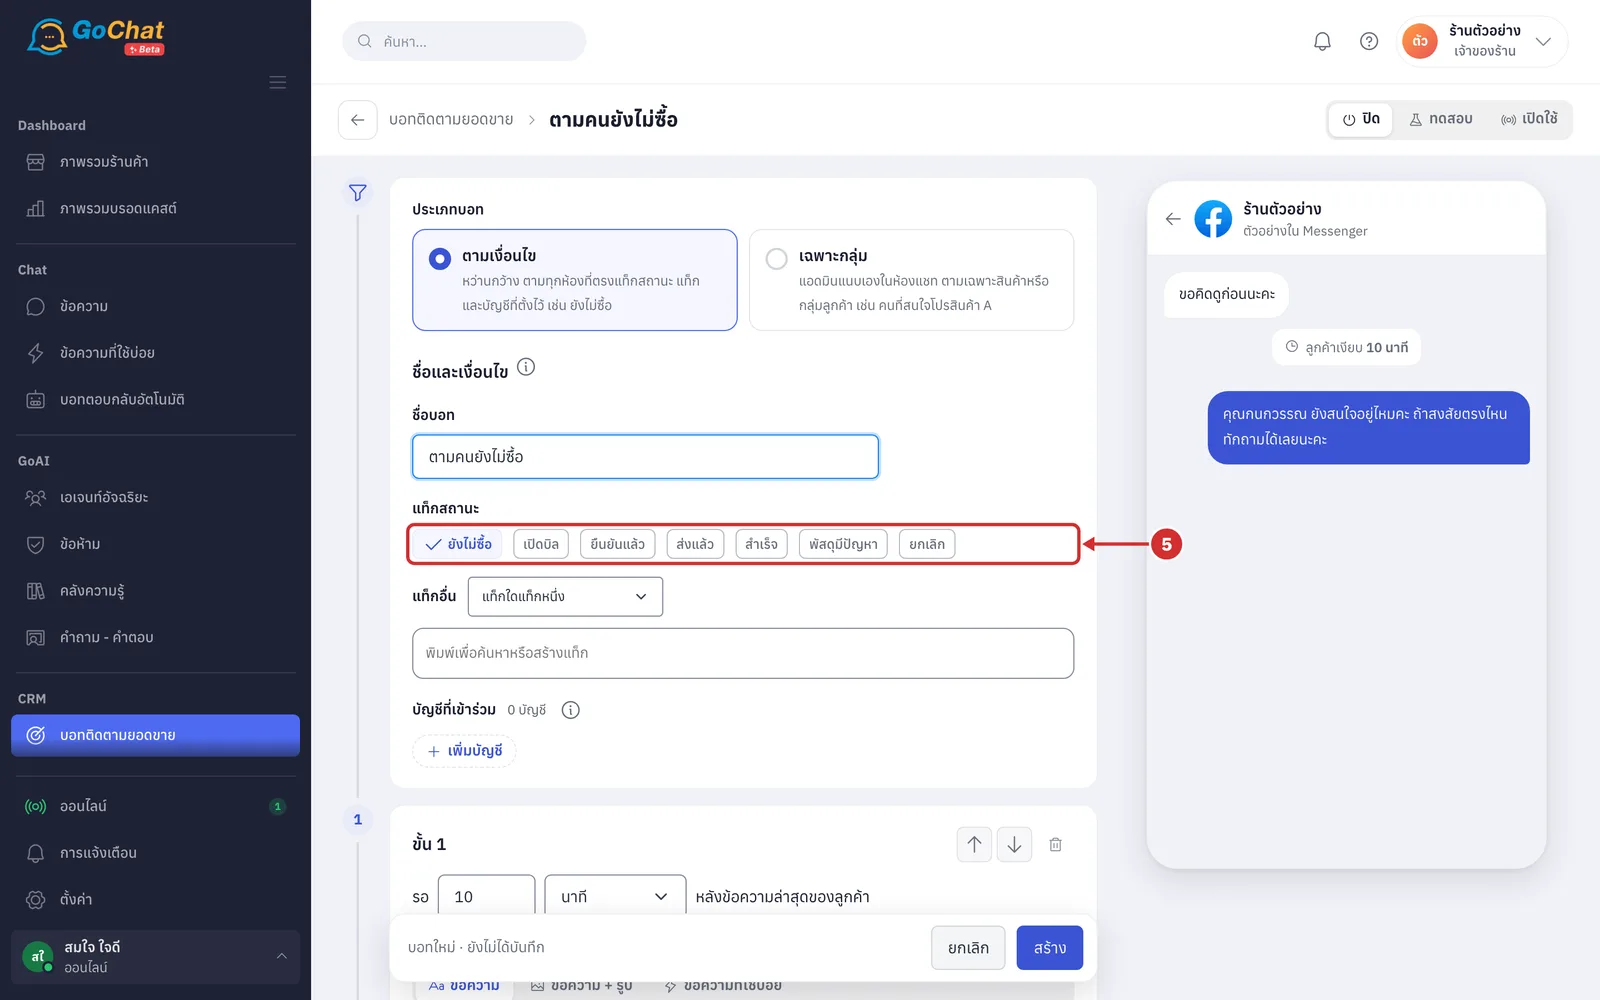
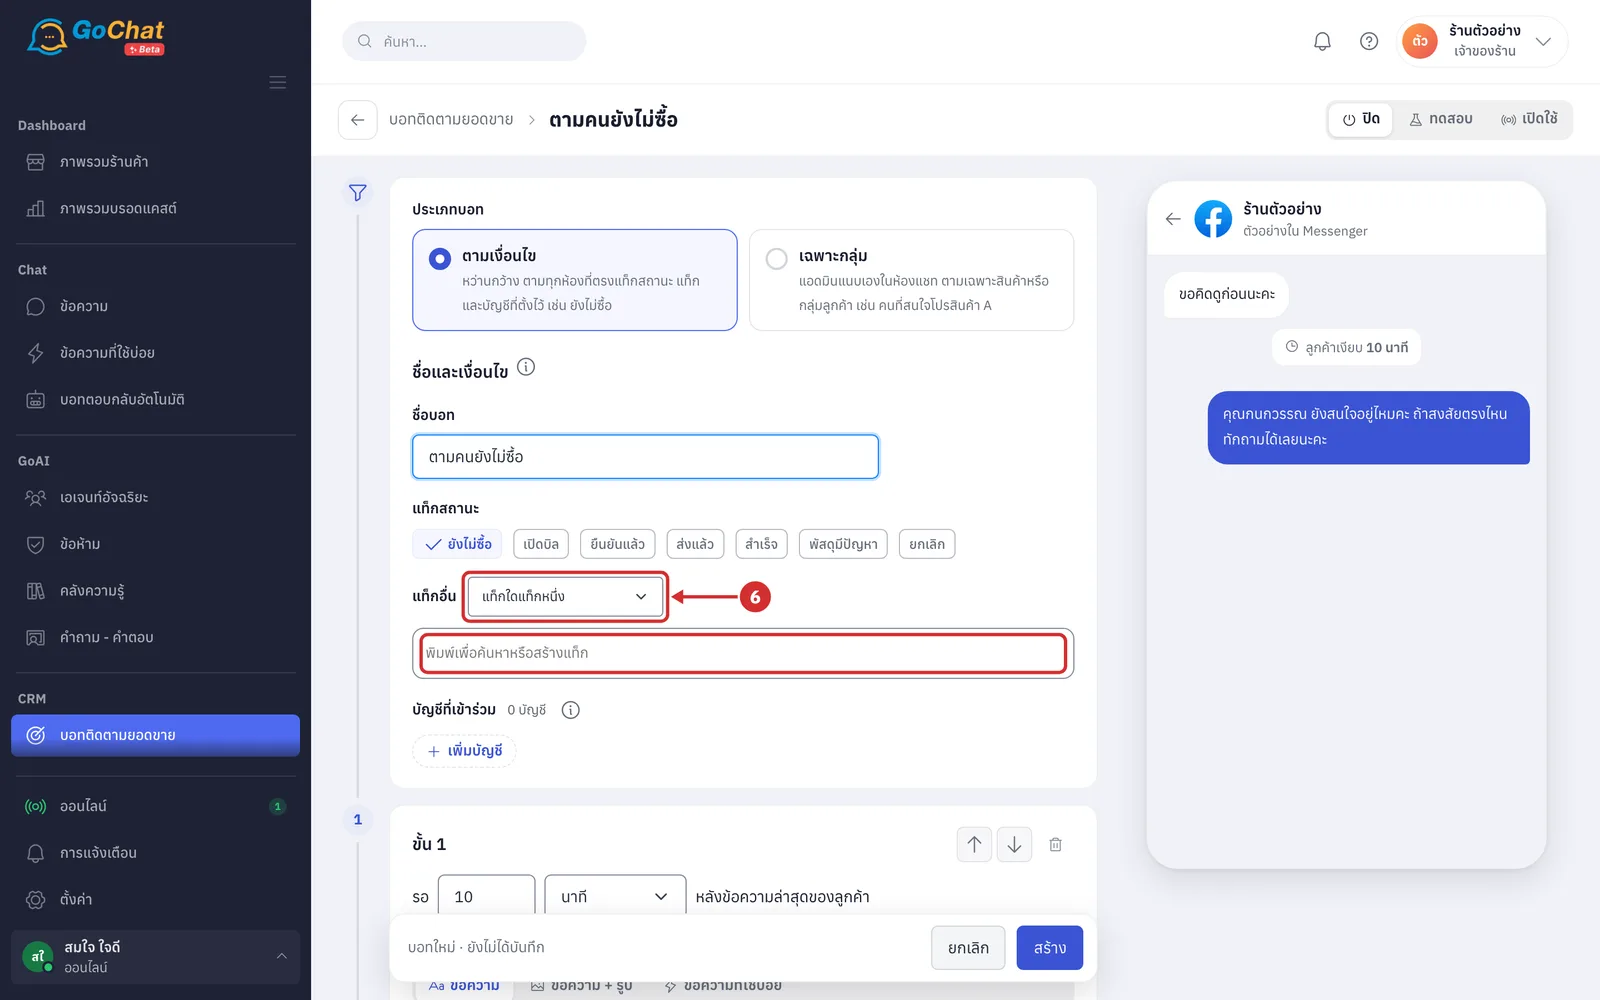
Under แท็กอื่น (Other tags), choose แท็กใดแท็กหนึ่ง (Any tag) or ครบทุกแท็ก (All tags), then type a tag name in the box so the bot only follows chats with that tag (optional; pick from your shop's tags as you type, or click สร้างแท็ก “…” (Create tag “…”) to make a new tag, which is created in your shop right away even before you save the bot; tag names are up to 40 characters; click × on a tag to remove it)
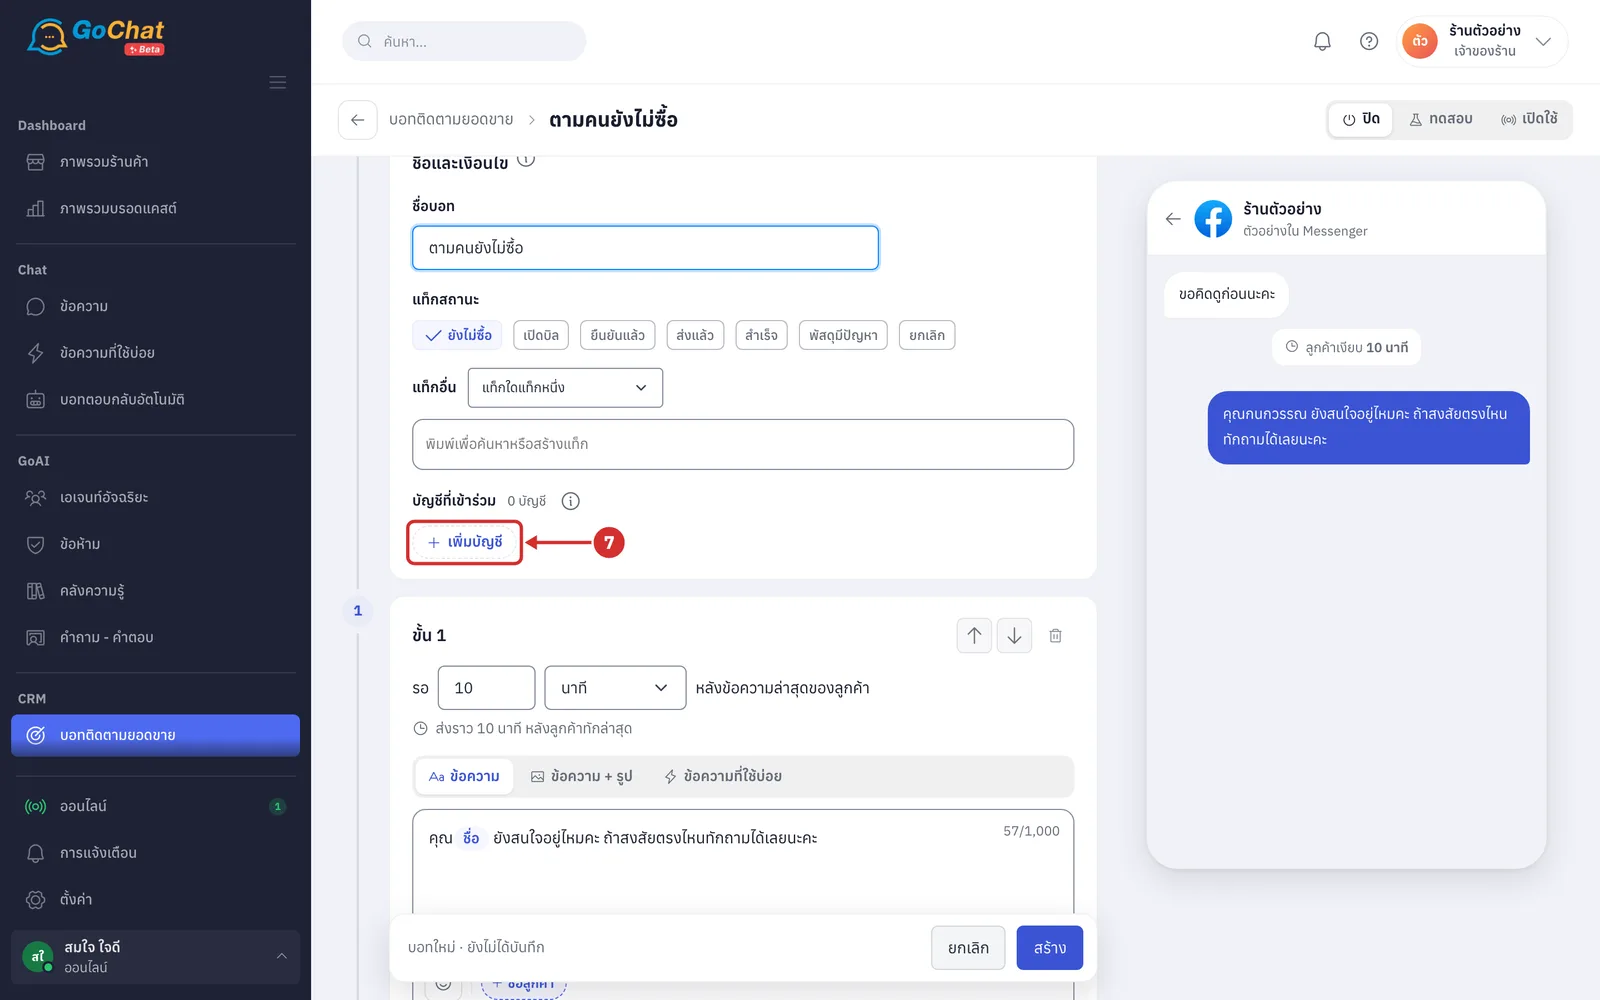
Under บัญชีที่เข้าร่วม (Accounts), click เพิ่มบัญชี (Add account)
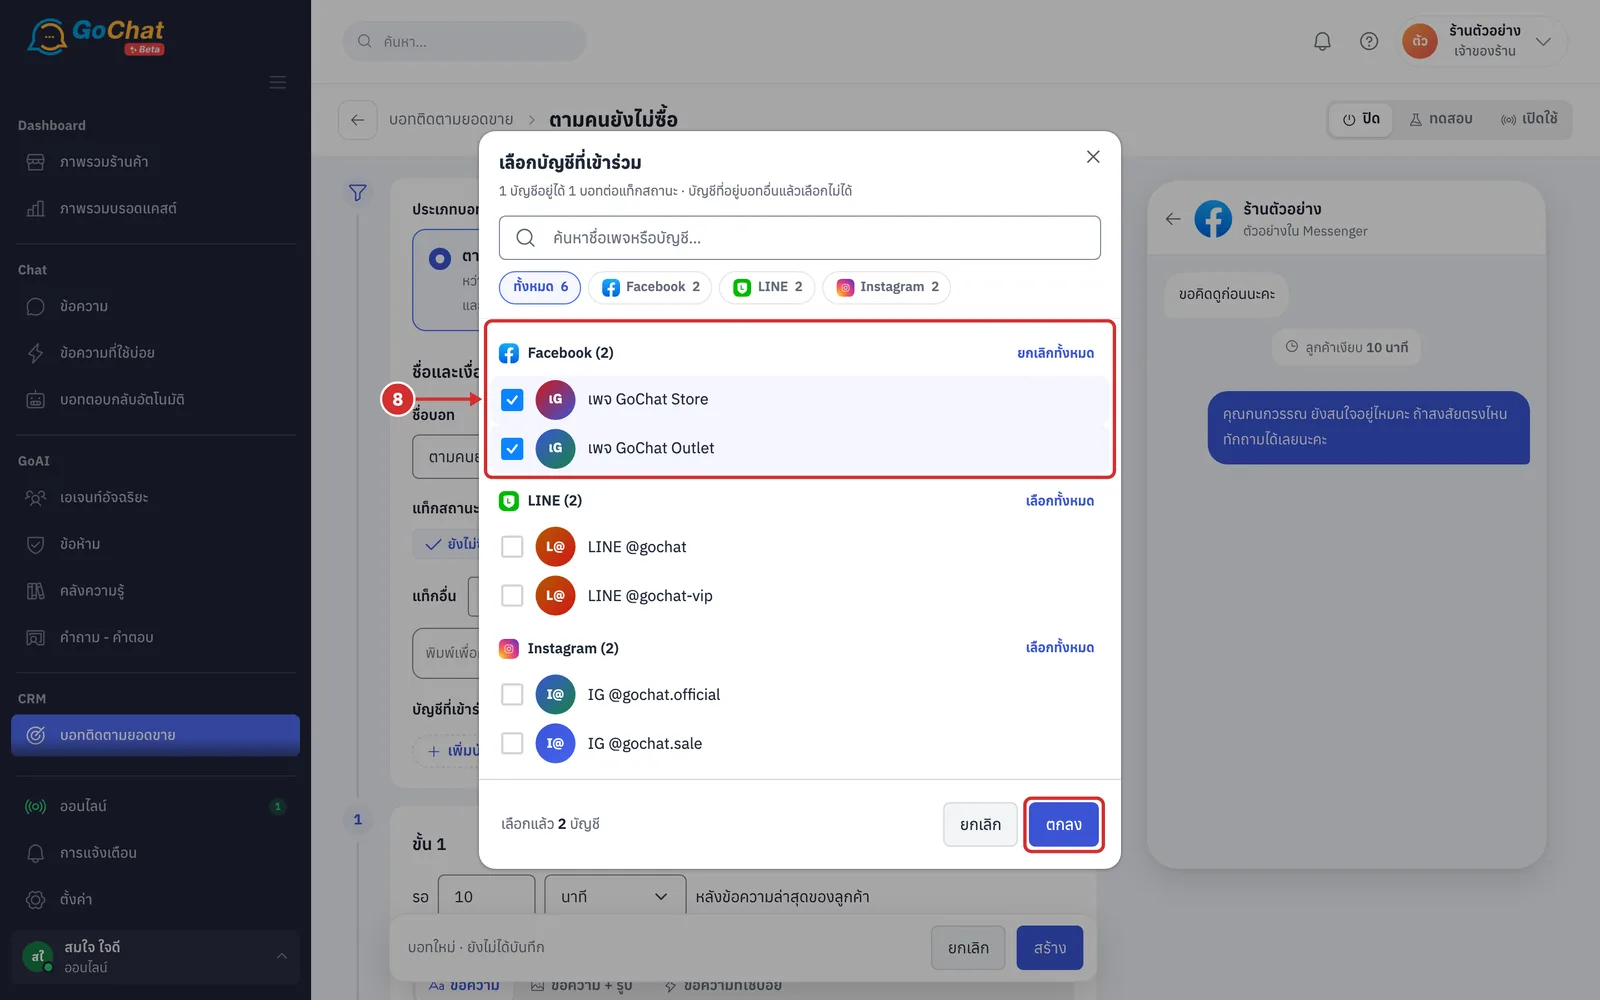
Choose the pages or accounts the bot should follow, then click ตกลง (OK) (only Facebook, Instagram and LINE; at least one account; an account can belong to one bot per status tag, and accounts already in another bot with the same status tag show a lock and cannot be chosen; messages the bot sends on LINE use the LINE OA account's monthly message quota)
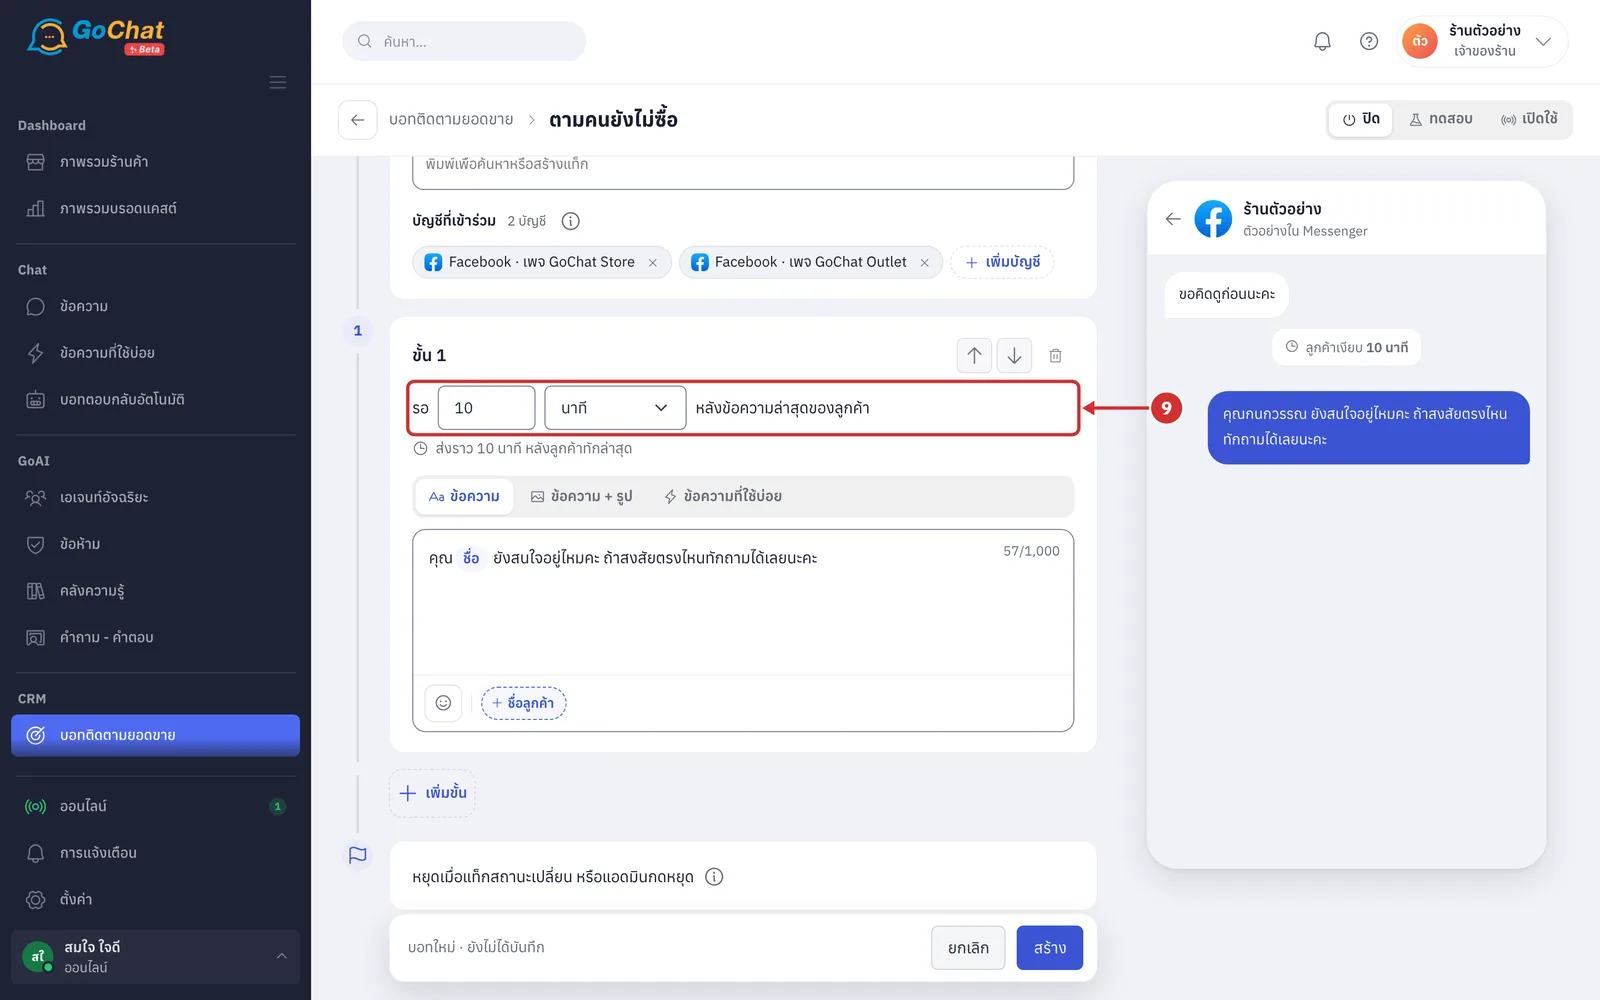
In ขั้น 1 (Step 1), set how long to wait after the customer's last message: type a number, then choose นาที (minutes) or ชั่วโมง (hours) (bots that can use customer notification messages can also choose วัน (days) · 10 minutes by default; at least 1 minute; the line under the field shows roughly when this step sends after the customer's last message)
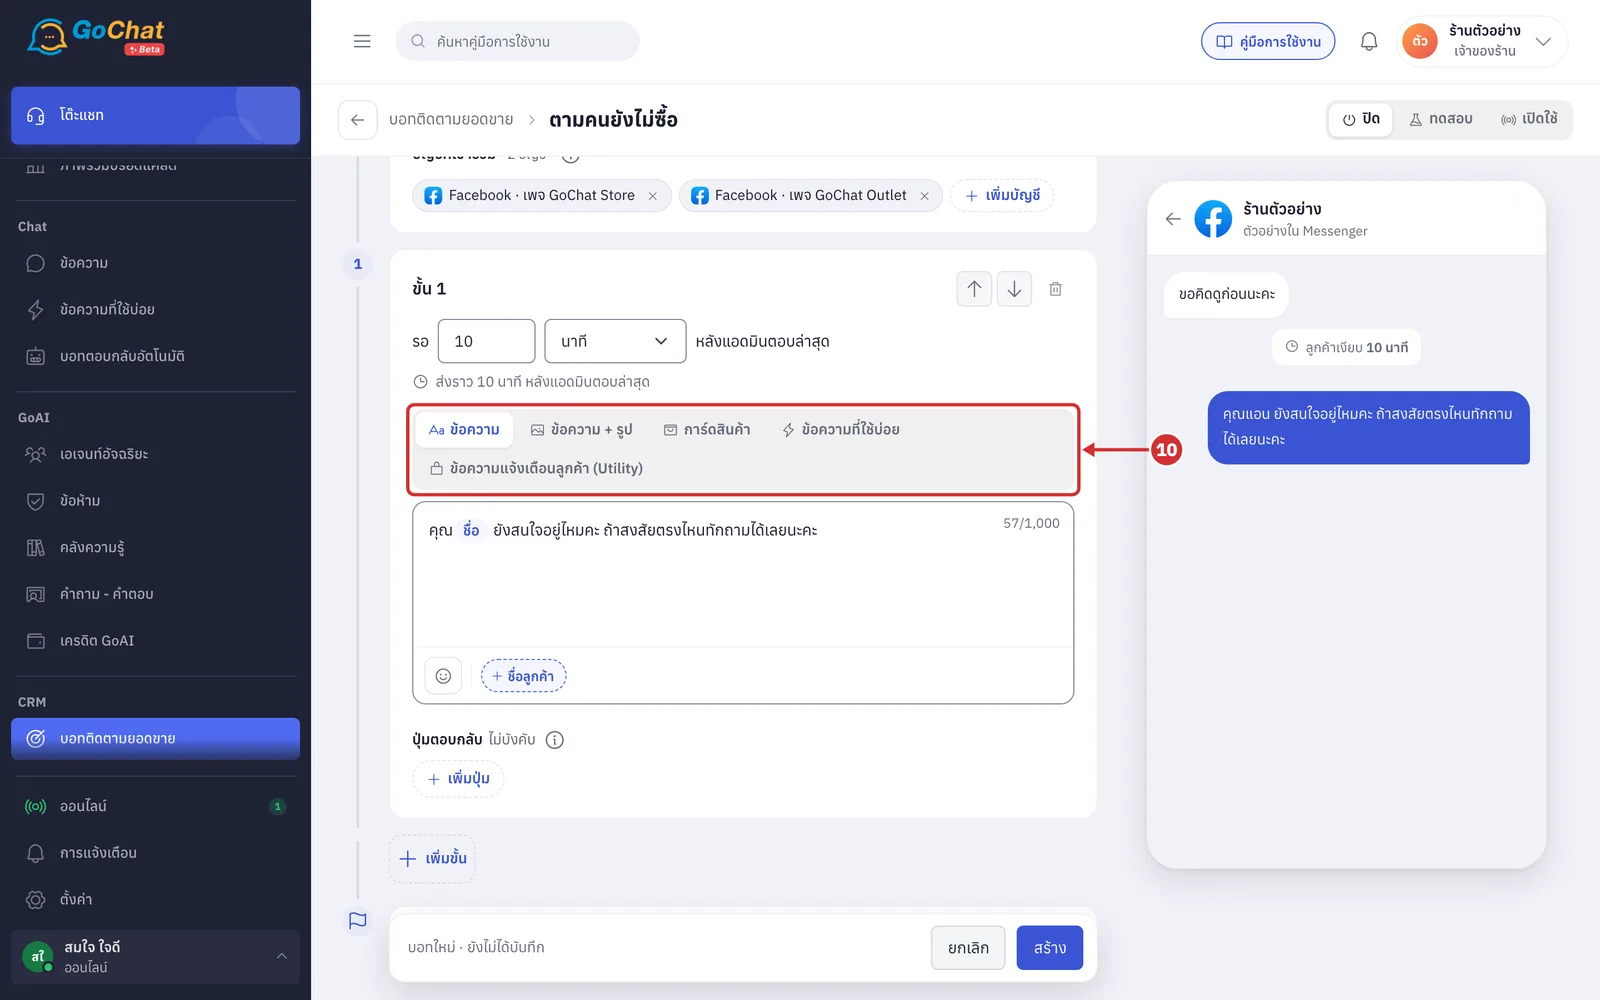
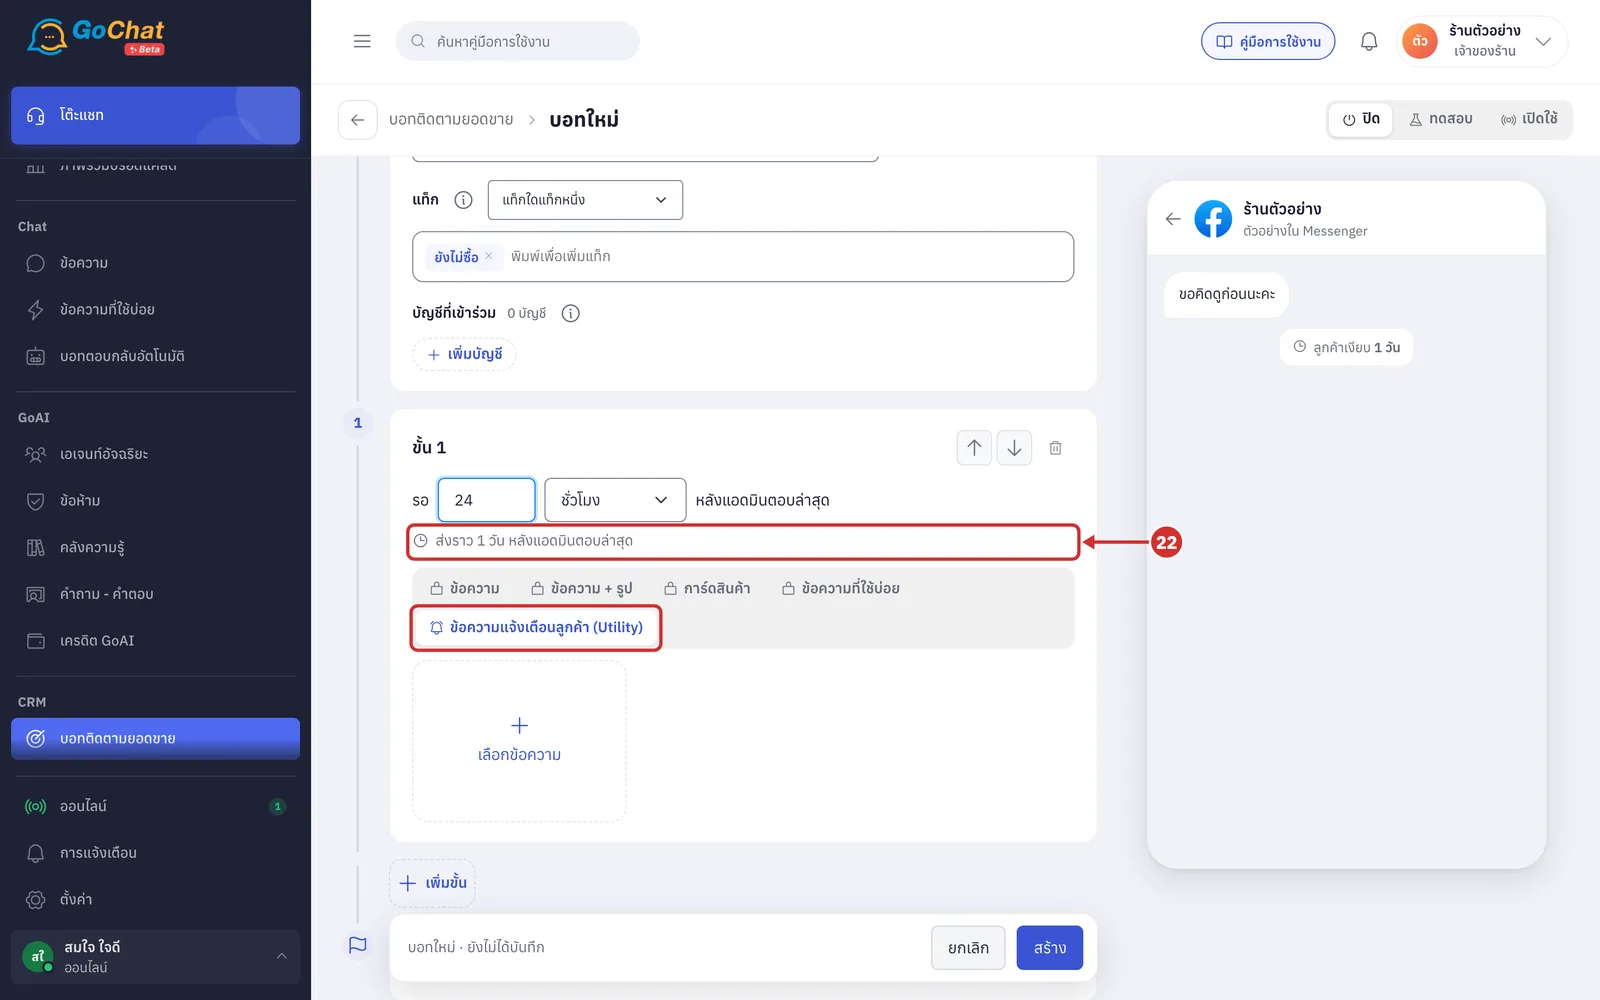
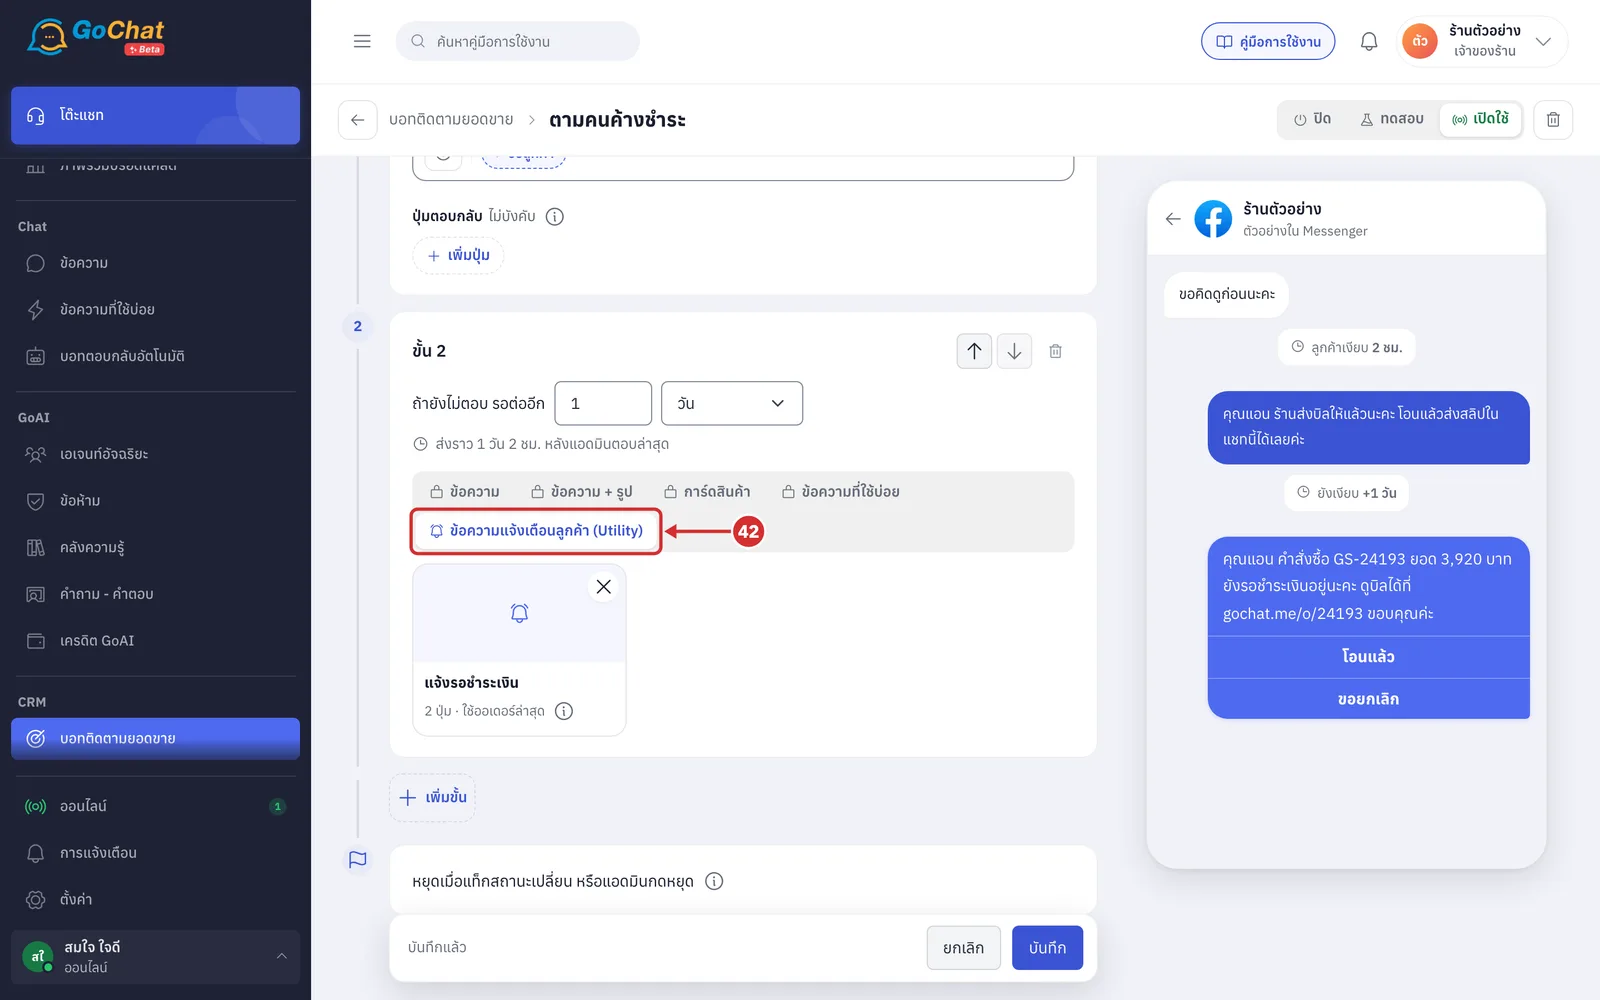
Choose the step's content type: ข้อความ (Text), ข้อความ + รูป (Text + image) or ข้อความที่ใช้บ่อย (Saved replies) (for the last two, see การส่งรูปหรือข้อความที่ใช้บ่อยในขั้น (Sending an image or saved replies in a step) below; shops connected to GoSaaS also get การ์ดสินค้า (Product card), which sends up to 10 product cards from your catalog per step; out-of-stock products can still be chosen, but products that cannot be sent are skipped when sending · the ข้อความแจ้งเตือนลูกค้า (Utility) (Customer notification message) type is for steps sent after 23 hours; see Using customer notification messages as a bot step below)
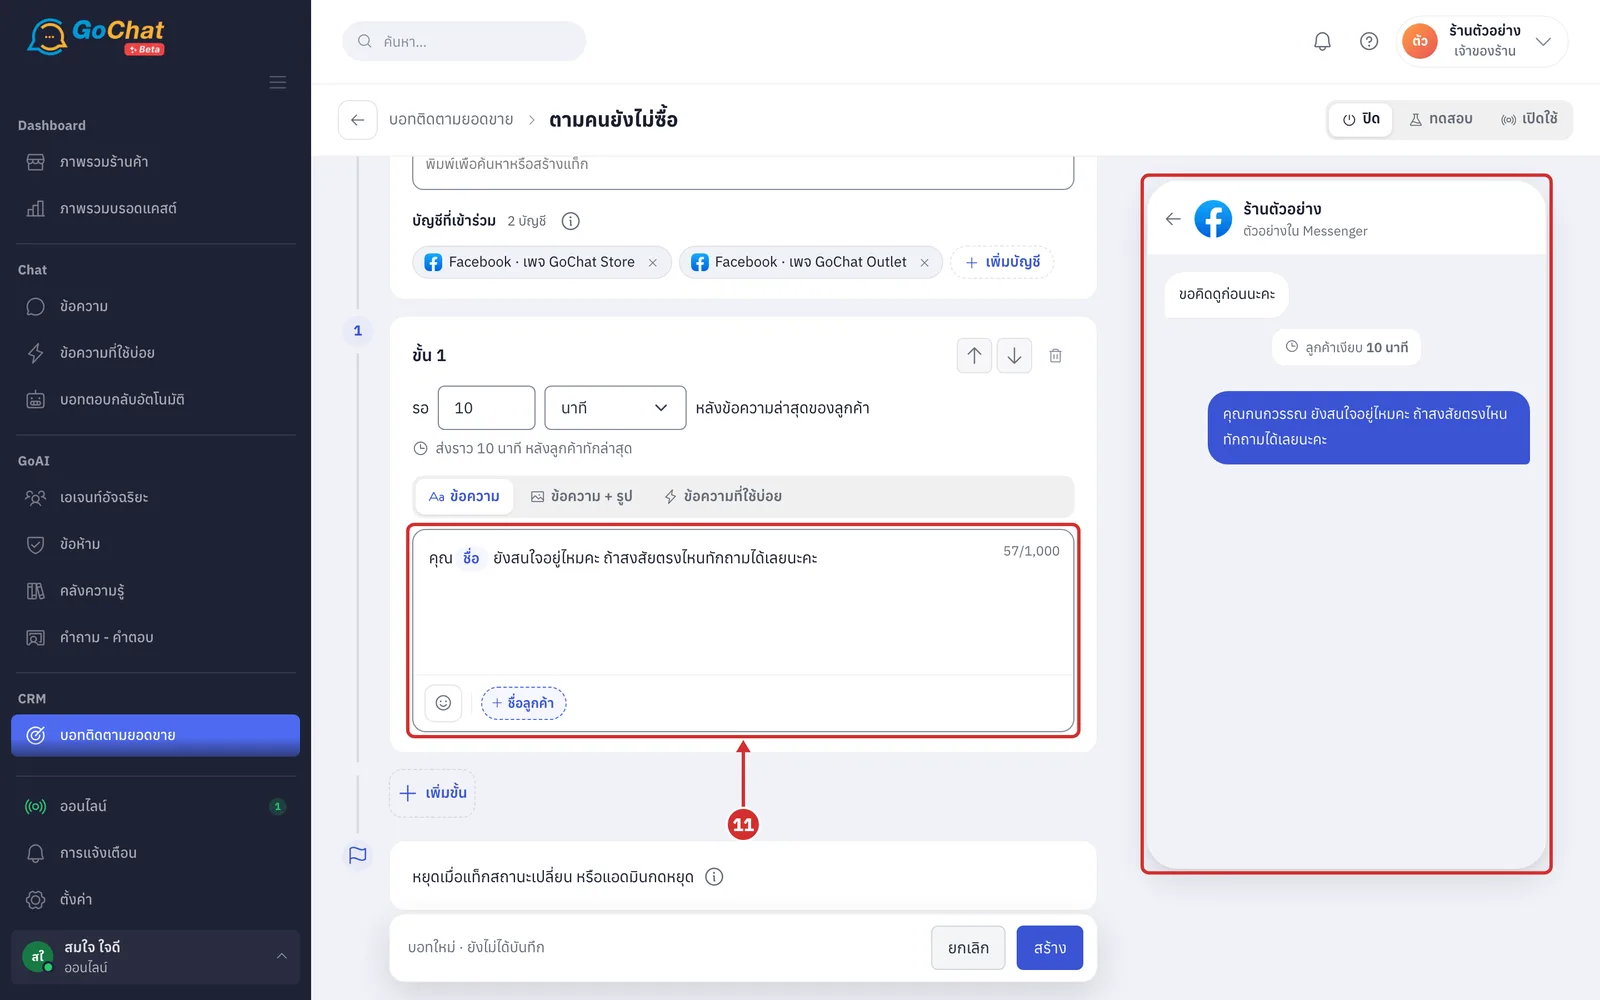
Type the message to send to the customer, up to 1,000 characters (required; click ชื่อลูกค้า (Customer name) under the box or type { to insert the customer's name, which is replaced with the real name when sending; the smiley button inserts emoji; the right side shows a chat preview with a sample name)
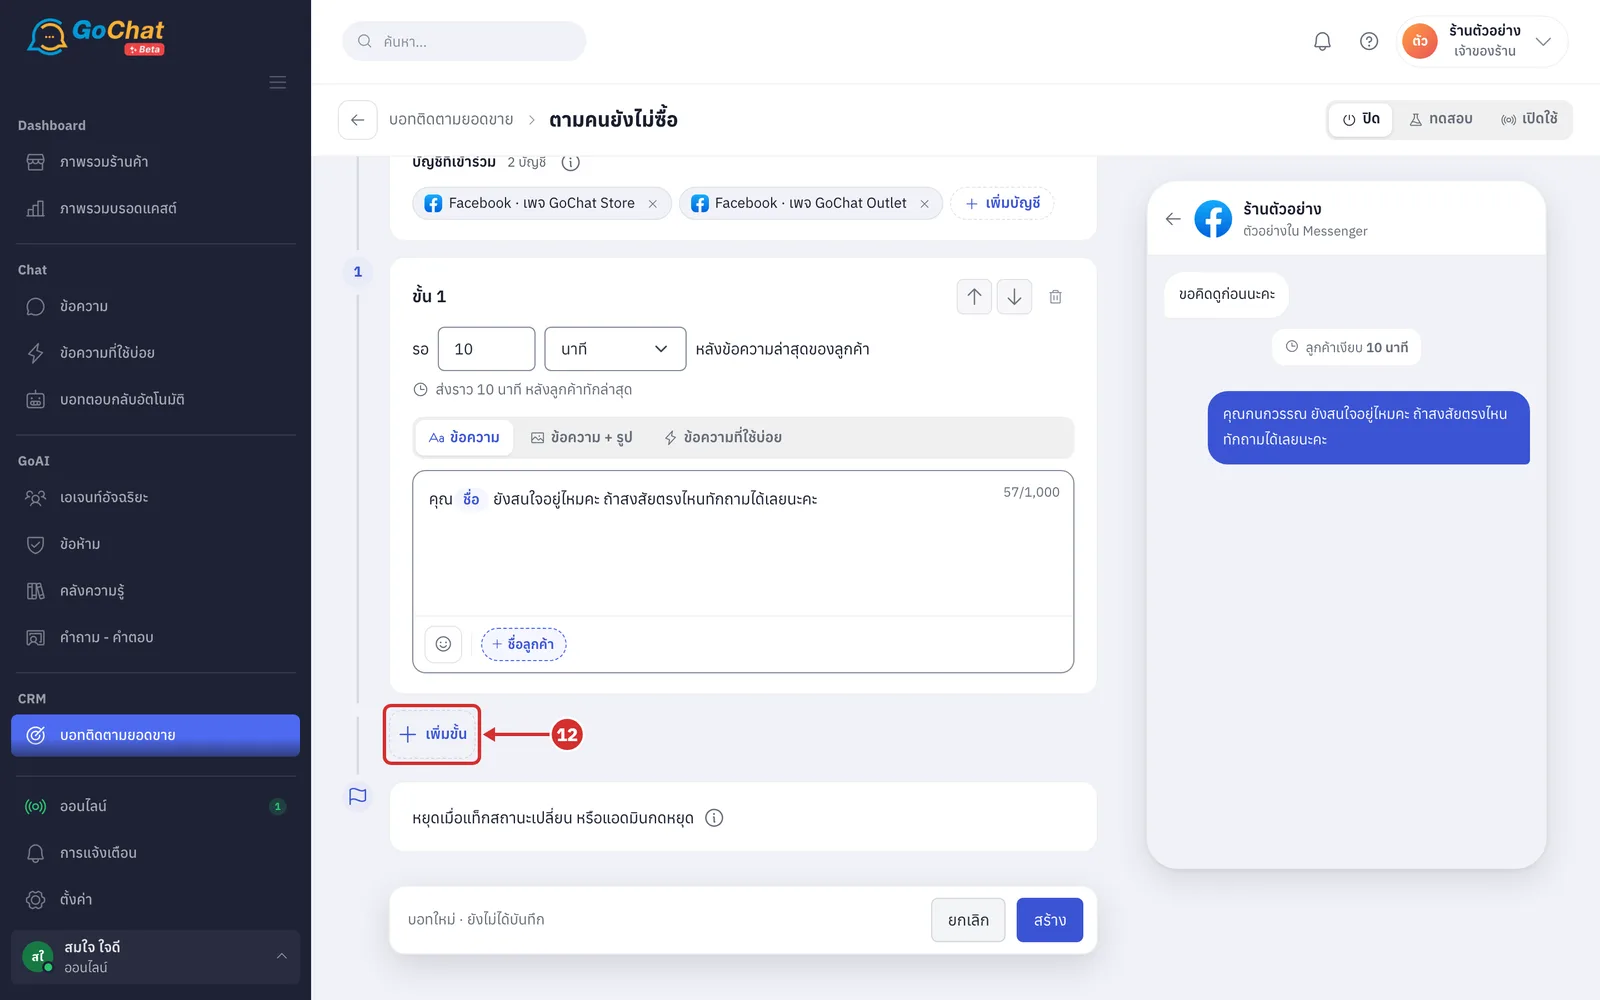
To follow up again if the customer still has not replied, click เพิ่มขั้น (Add step), then set the wait time and message of the next step (the next step starts with ถ้ายังไม่ตอบ รอต่ออีก (If no reply, wait another) and waits from the step before it; up to 10 steps, and all steps together cannot exceed 23 hours)
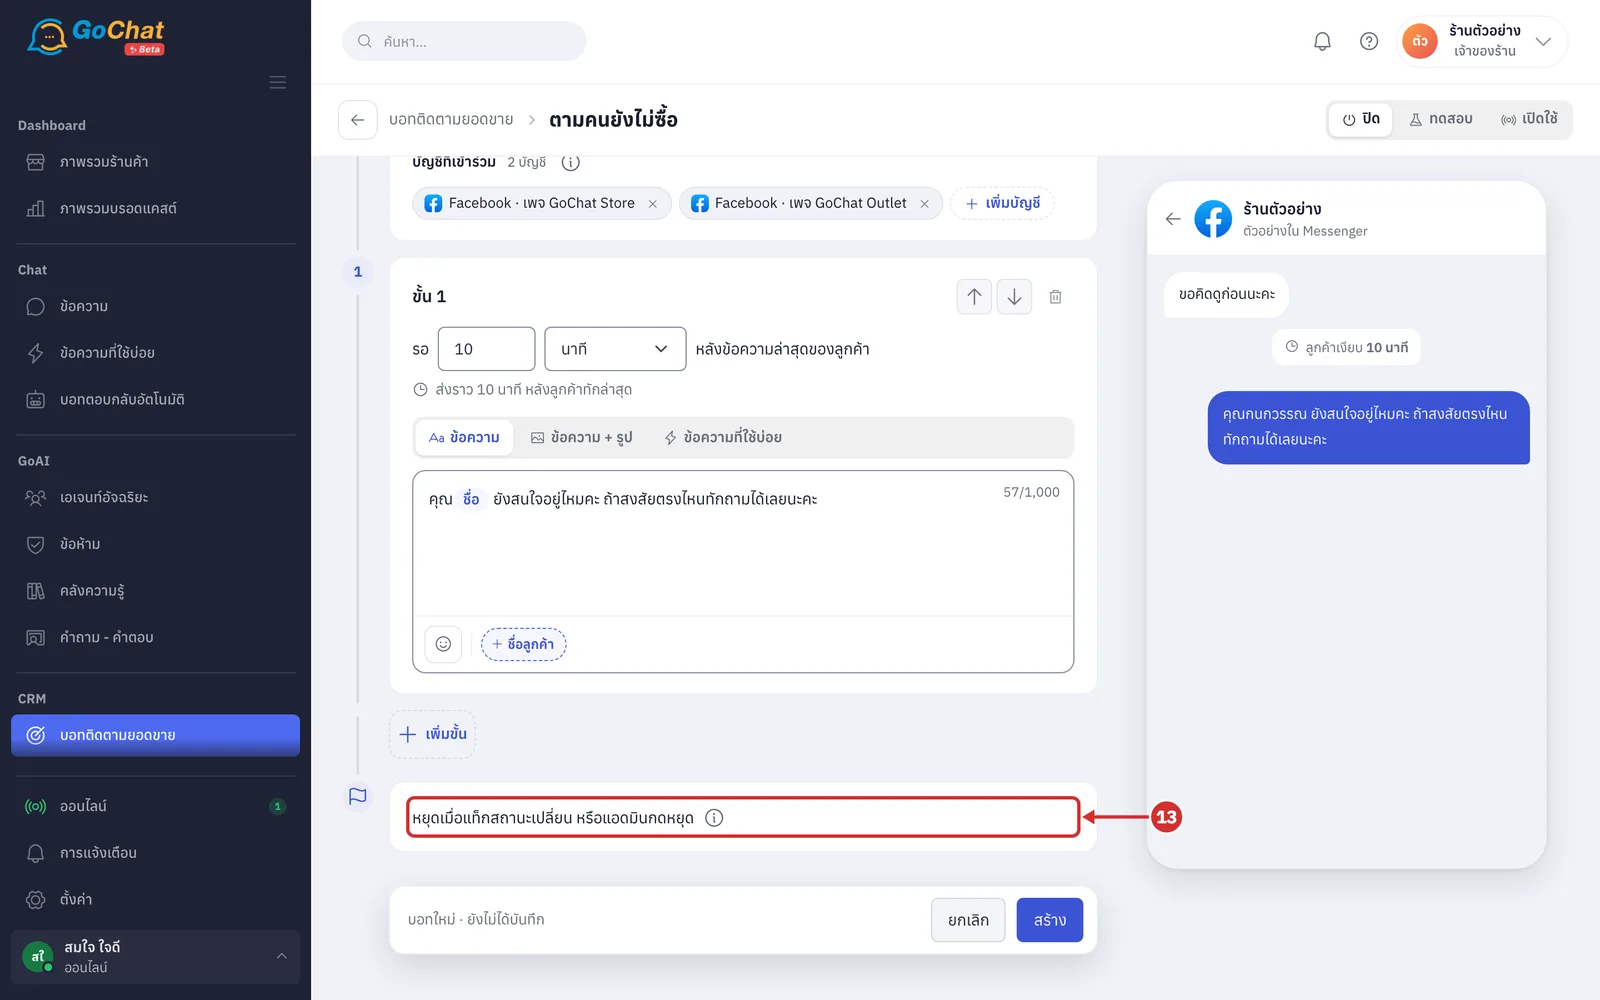
At the end of the steps, see the stop rule หยุดเมื่อแท็กสถานะเปลี่ยน หรือแอดมินกดหยุด (Stops when the status tag changes or an admin stops it) (click the i icon for details: the bot also stops by itself after sending every step or once 24 hours have passed since the customer's last message; if the customer replies while it waits, the bot does not stop but waits for an admin to reply before counting the next step; while the shop still owes the customer a reply, the bot waits until an admin replies)
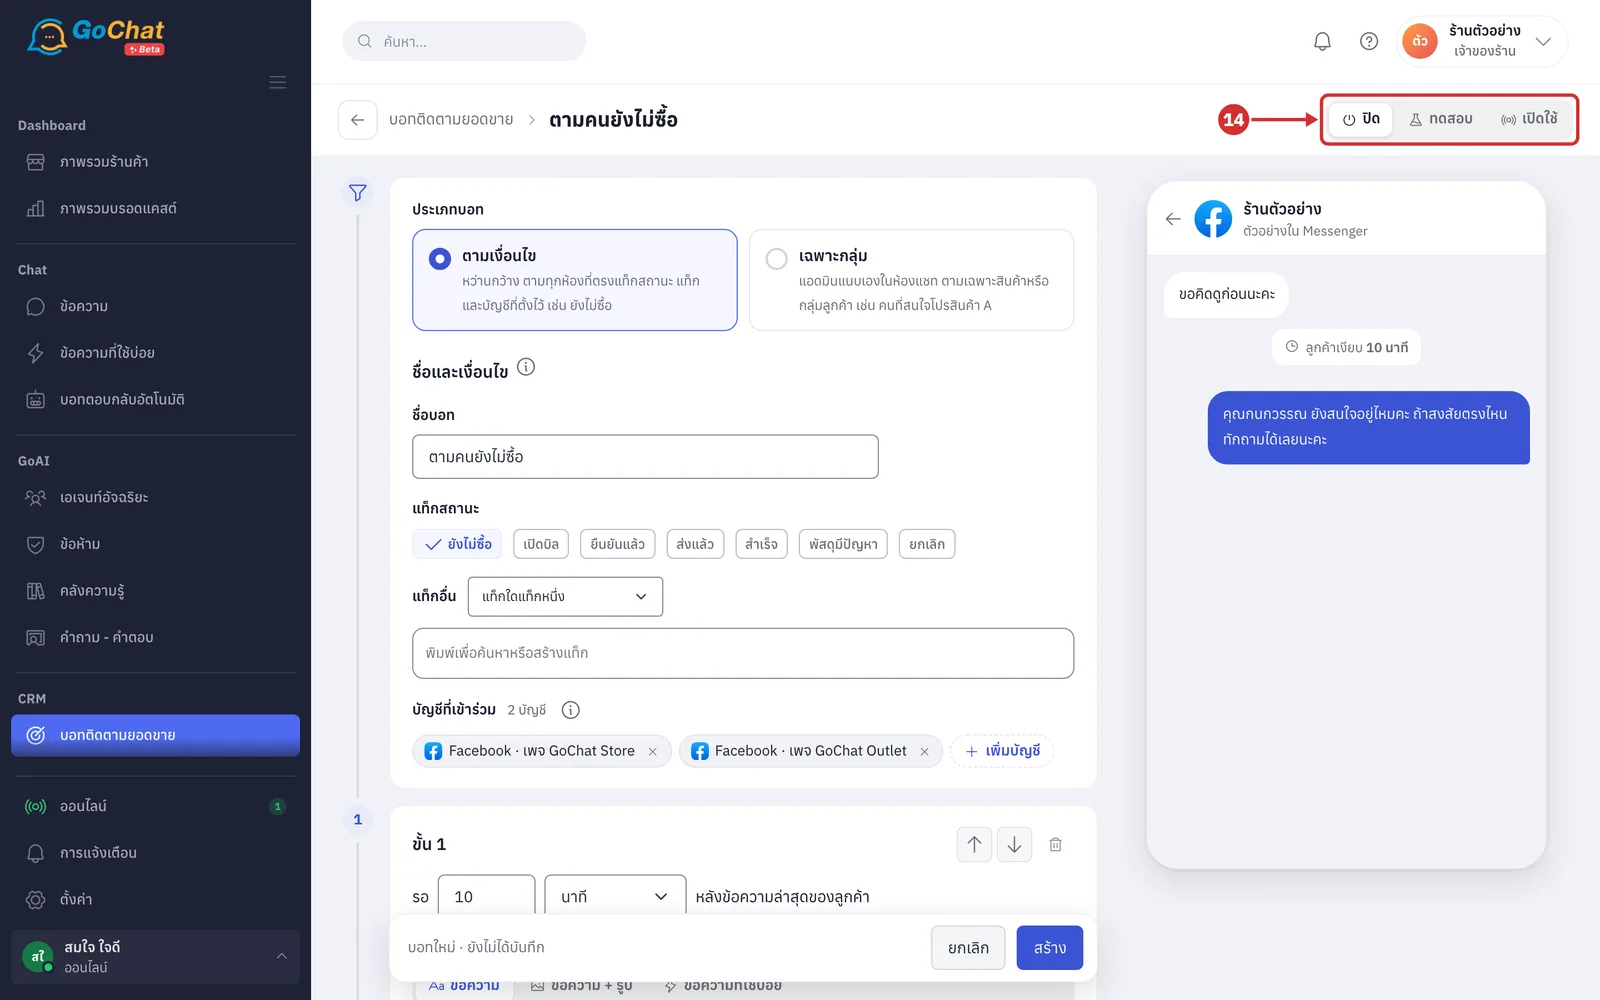
At the top right, choose the bot's status: ปิด (Off), ทดสอบ (Test) or เปิดใช้ (On) (the status is saved together with the สร้าง (Create) button; new bots start ปิด (Off) and follow no one; with ทดสอบ (Test) the bot follows only the chats you choose, see ขั้นตอนการทดสอบบอทกับแชทที่เลือก (Testing the bot with chosen chats); with เปิดใช้ (On) the bot starts following matching chats, and chats already past the step 1 wait time are not followed)
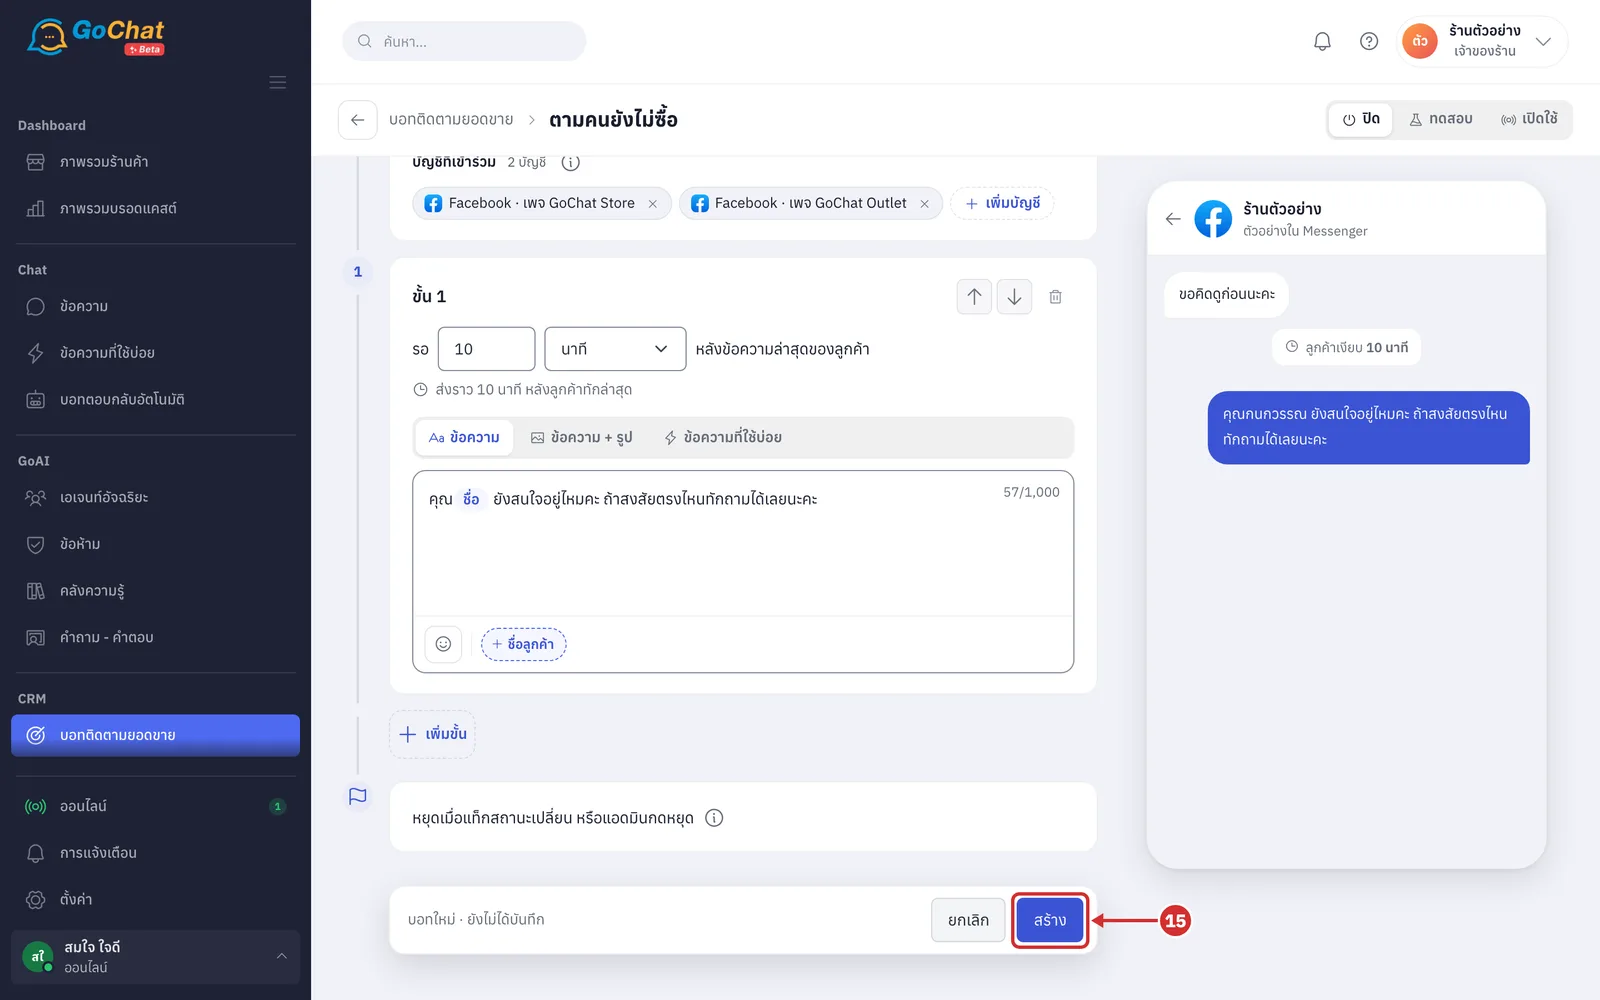
Click สร้าง (Create) (the bar at the bottom shows บอทใหม่ · ยังไม่ได้บันทึก (New bot · not saved yet); click ยกเลิก (Cancel) to go back without saving; if something is missing, the bottom bar shows a red message saying what to fix, such as เลือกบัญชีอย่างน้อย 1 บัญชี (Choose at least 1 account))
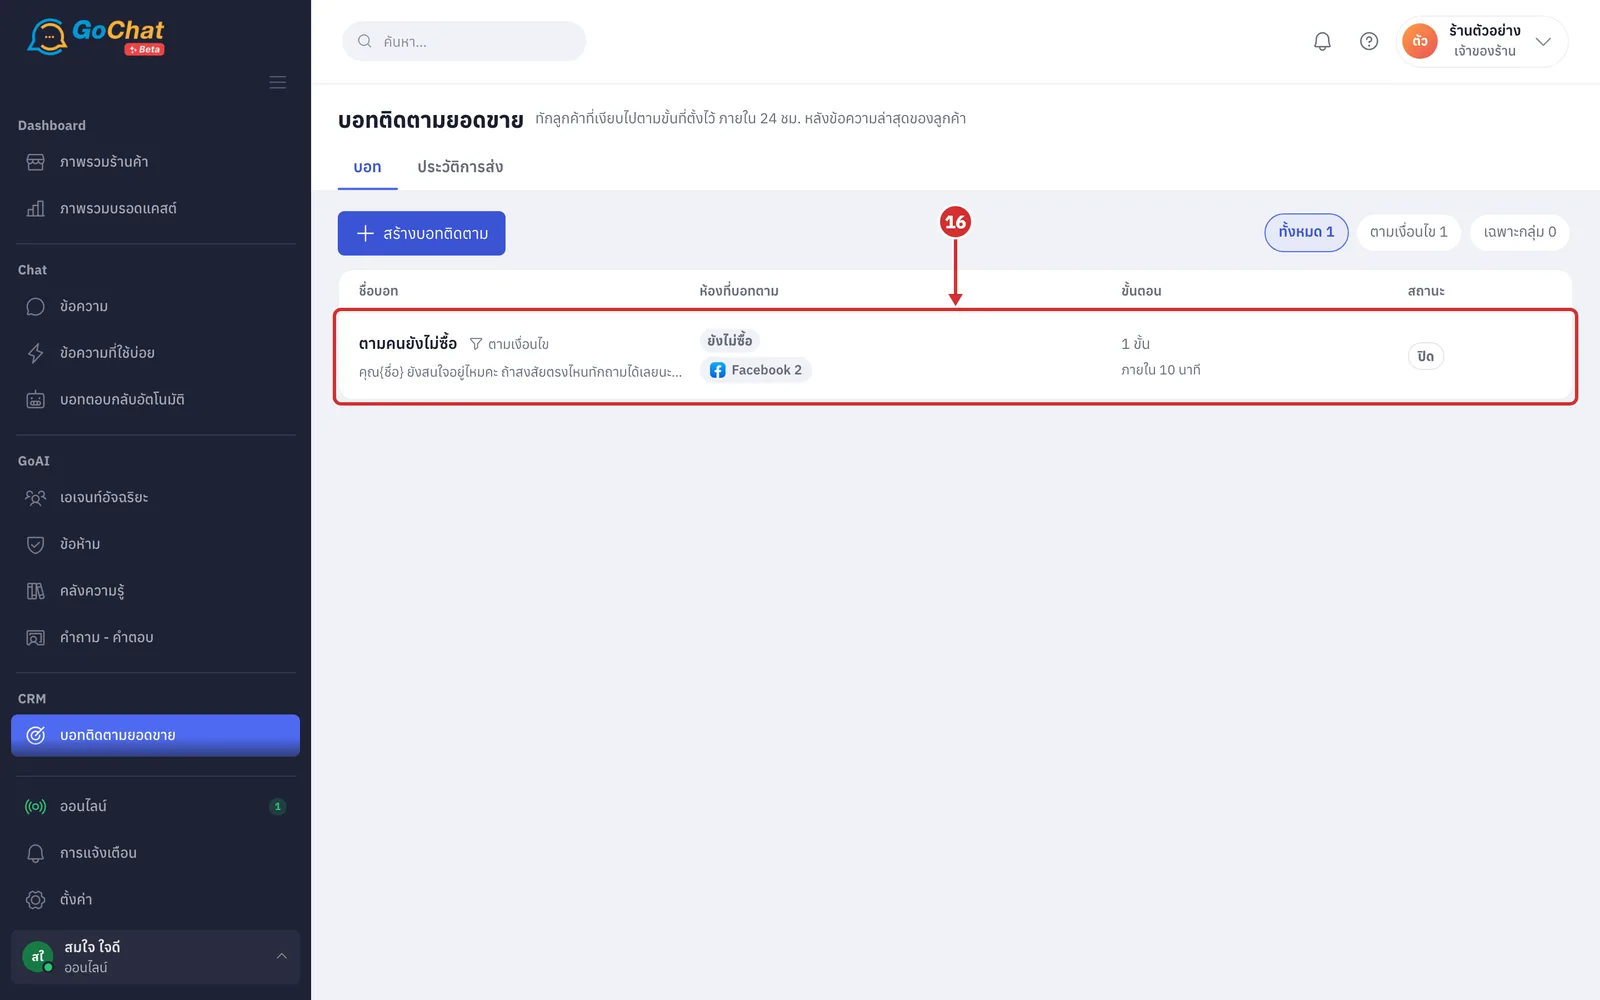
The system takes you back to the บอทติดตามยอดขาย (Sales follow-up bot) page, and the new bot appears in the list
Sending an image or saved replies in a step
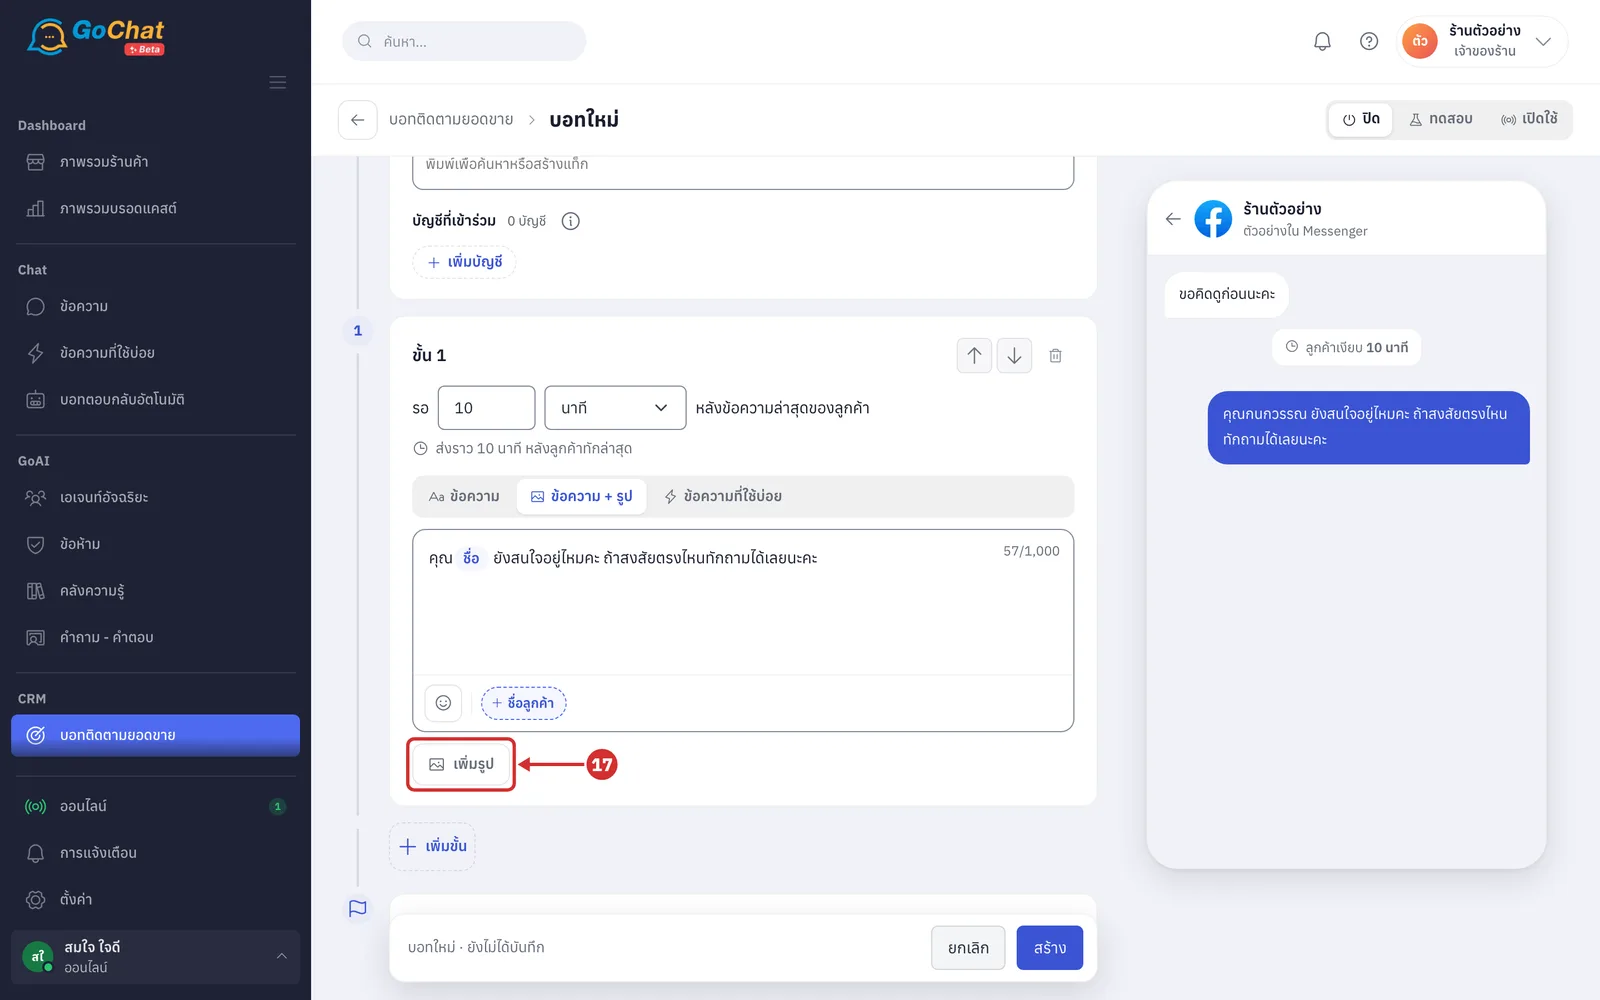
To send an image with the message, choose ข้อความ + รูป (Text + image) as the content type, then click เพิ่มรูป (Add image) to pick an image from your computer (one image per step; both the text and the image are required; click × on the image to remove it)
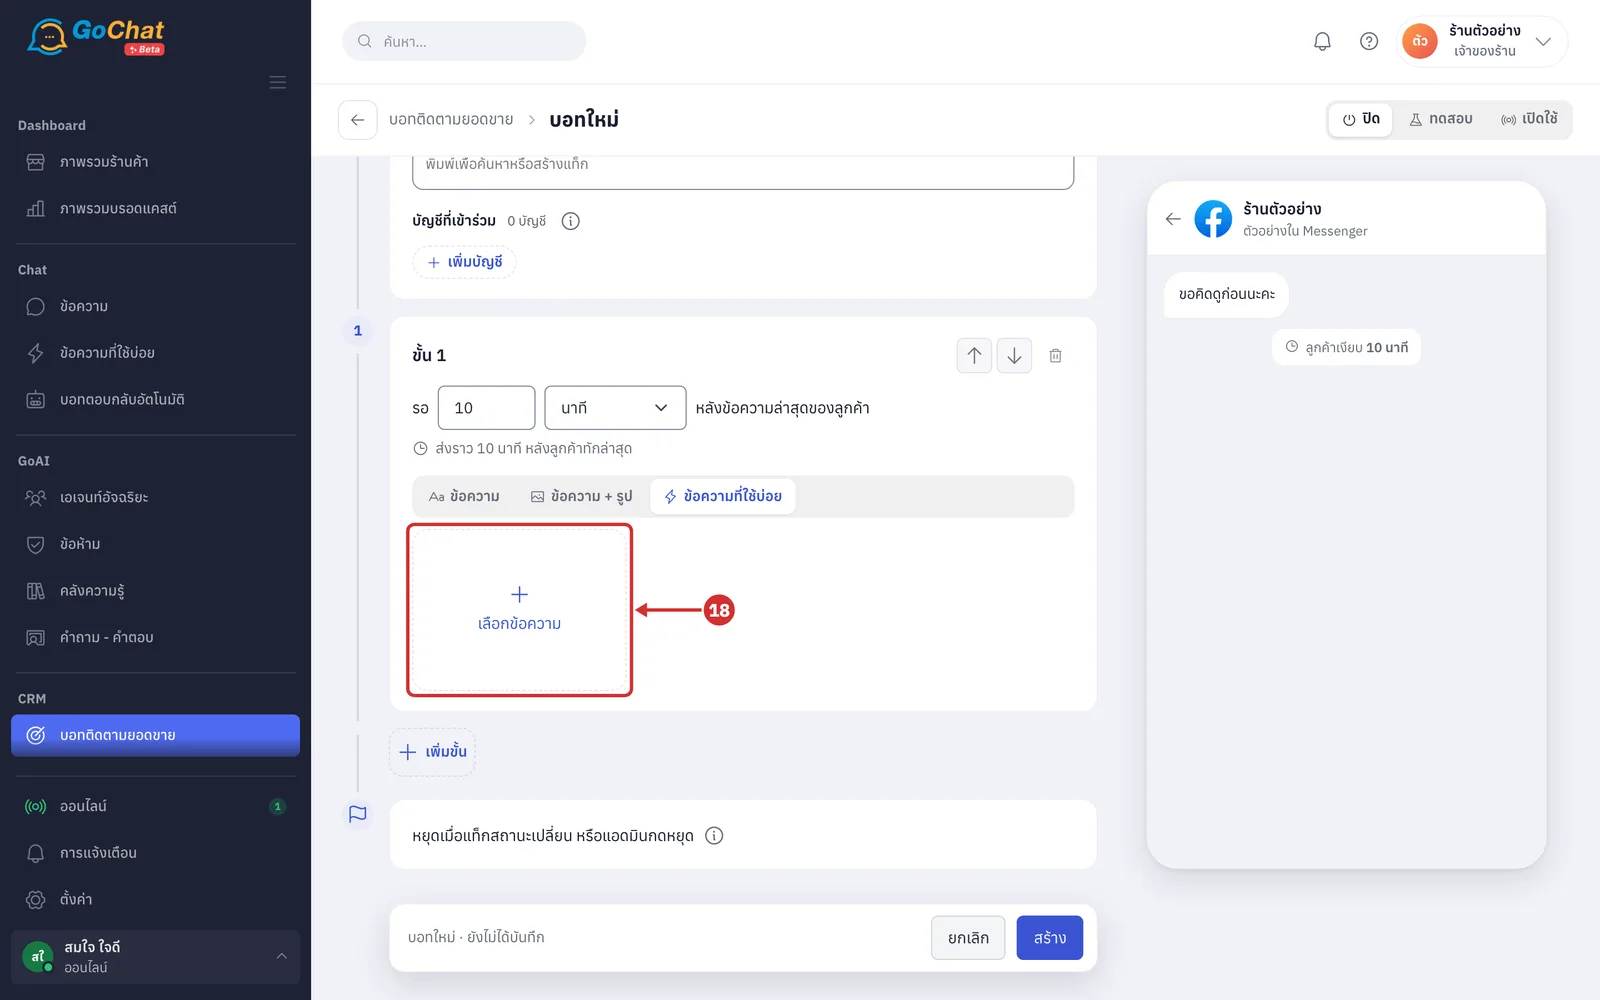
To send saved replies your shop has set up, choose ข้อความที่ใช้บ่อย (Saved replies) as the content type, then click เลือกข้อความ (Choose replies)
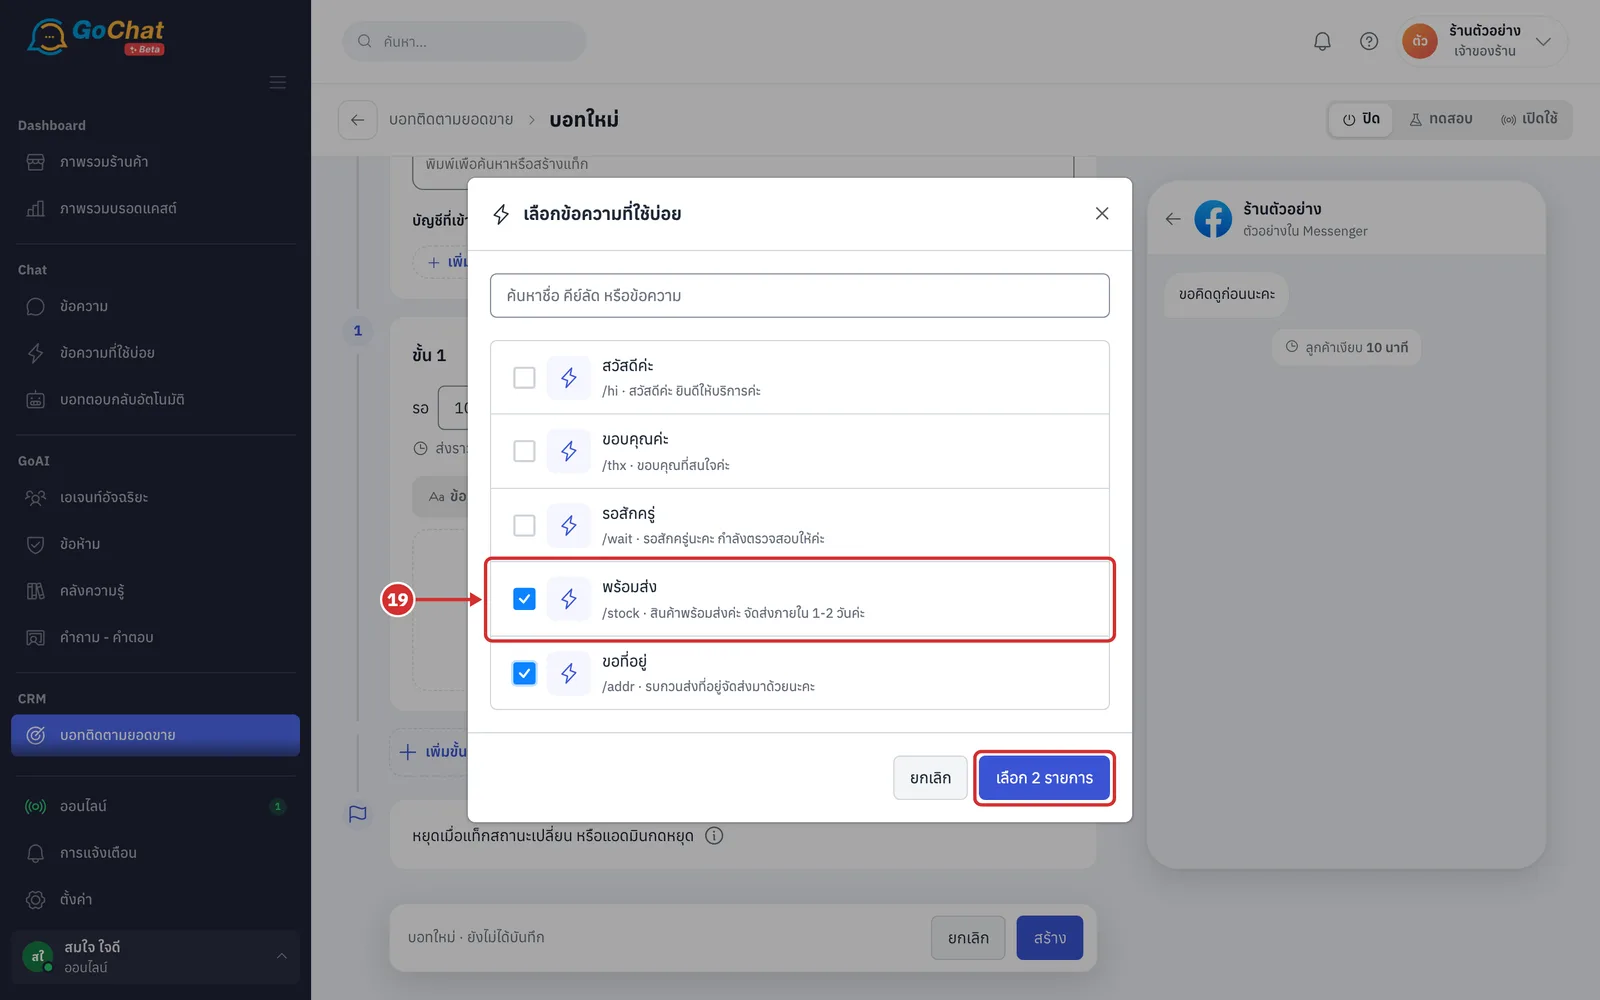
In the เลือกข้อความที่ใช้บ่อย (Choose saved replies) window, tick the replies you want, up to 5, then click เลือก N รายการ (Choose N items) (search by name, shortcut or message text; only enabled replies are listed; if your shop has none yet, a ไปสร้างข้อความ (Create replies) link appears)
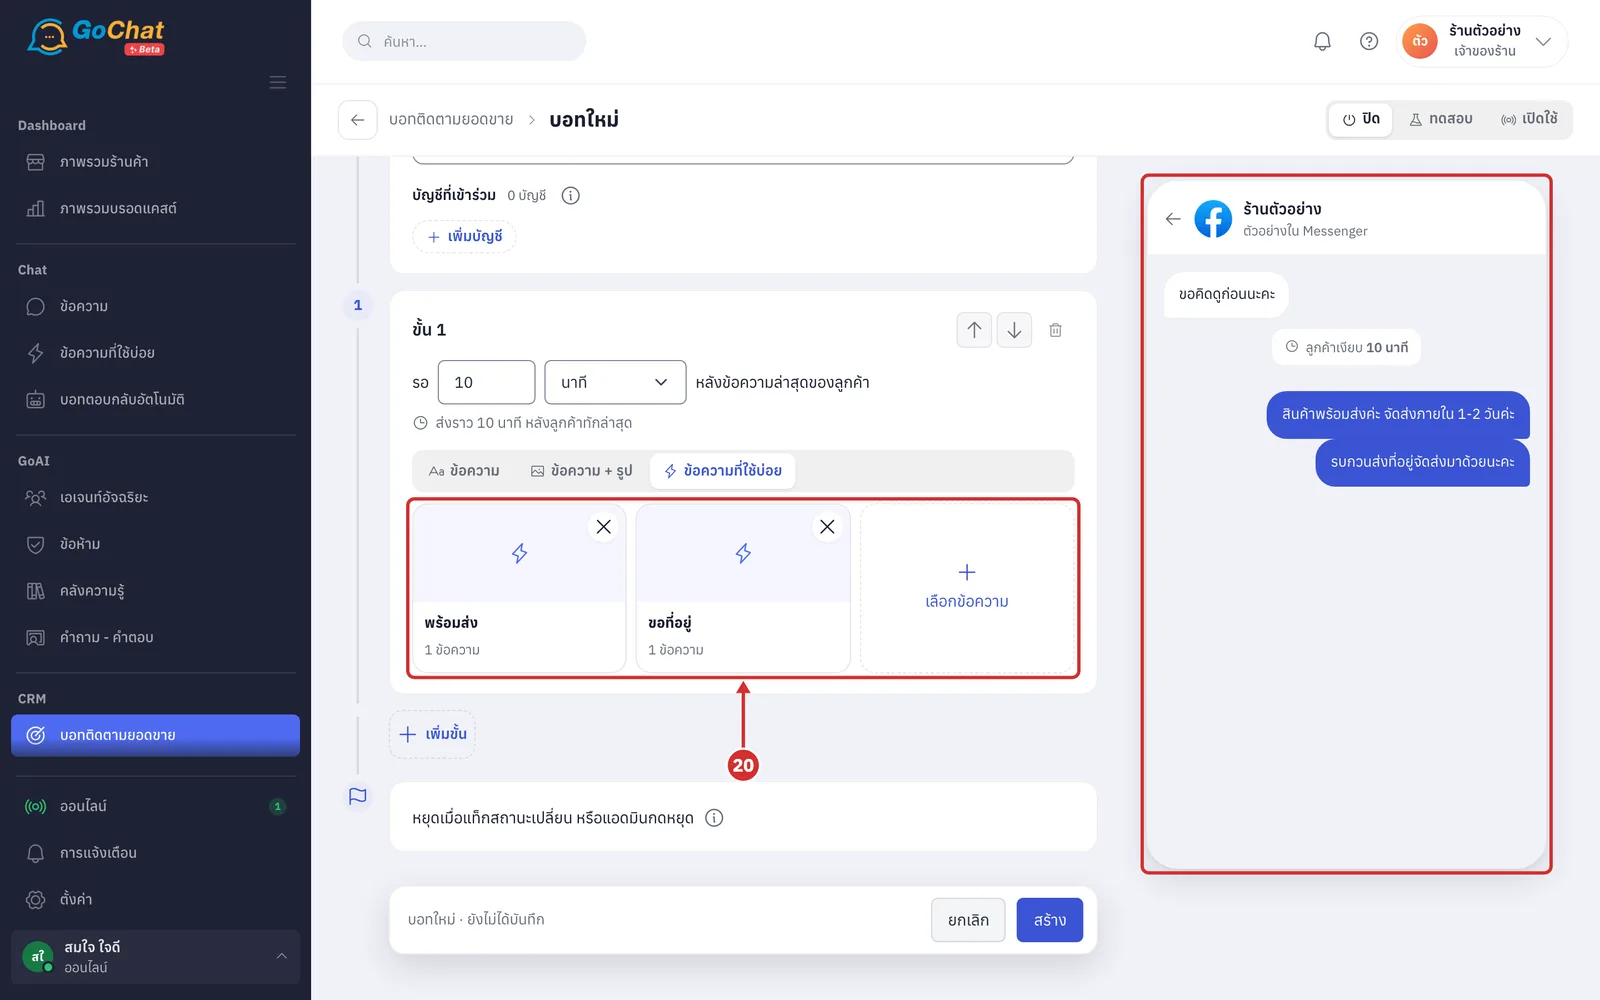
The chosen replies appear as cards in the step, in the order the bot sends them; click × at the corner of a card to remove it (the bot sends every message and image of each reply in order, and replaces the customer name and shop name in the text with the real values; the right side shows a chat preview)
Ordering steps and the total time
At the top of each step, you can manage the step in 3 ways (the up arrow of the first step, the down arrow of the last step and the bin when only one step is left cannot be clicked)
A Up arrow to move this step above the step before it
B Down arrow to move this step below the step after it
C Bin icon to delete this step
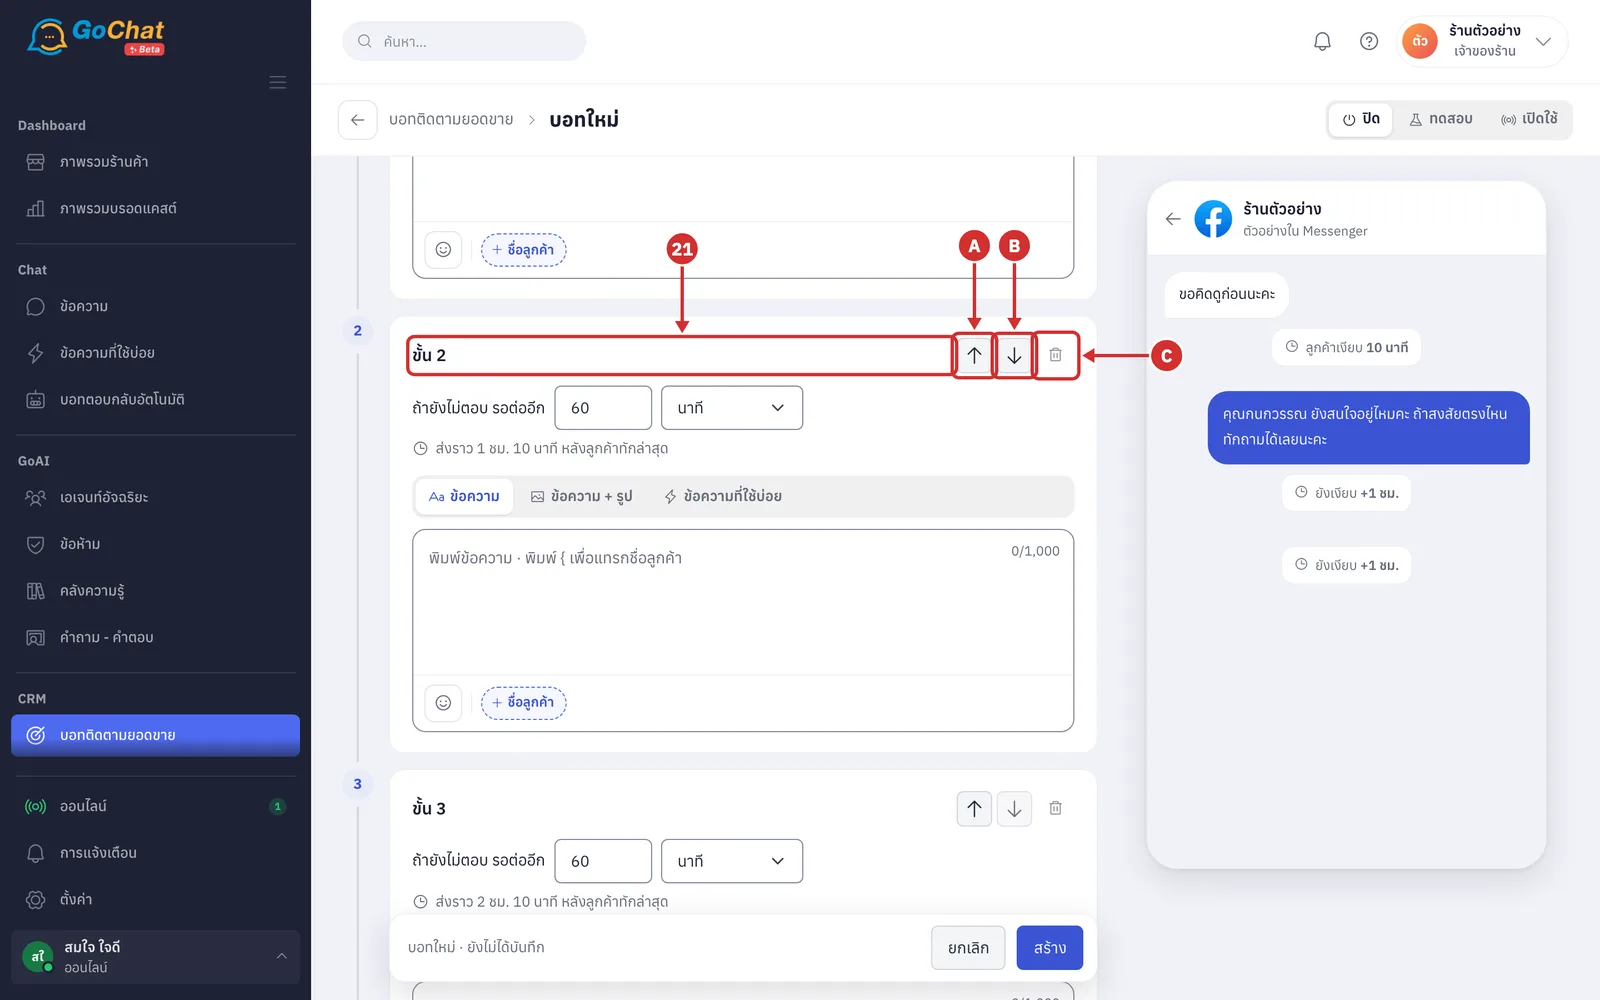
If any step's total time goes past 23 hours after the customer's last message, a bot that can use customer notification messages turns that step into the ข้อความแจ้งเตือนลูกค้า (Utility) (Customer notification message) type for you (see Using customer notification messages as a bot step below). For a bot that cannot (only Instagram accounts, or a Facebook page without permission), a red message under the wait time gives the reason and how much to cut, and the bottom bar shows ขั้น N เกิน 23 ชม. — แก้ก่อนบันทึก (Step N is over 23 hours — fix before saving); you must shorten the wait before you can save (the bot can only send within 24 hours of the customer's last message, so the system keeps 1 hour spare; once the total reaches 23 hours or there are 10 steps, เพิ่มขั้น (Add step) cannot be clicked)
Testing the bot with chosen chats
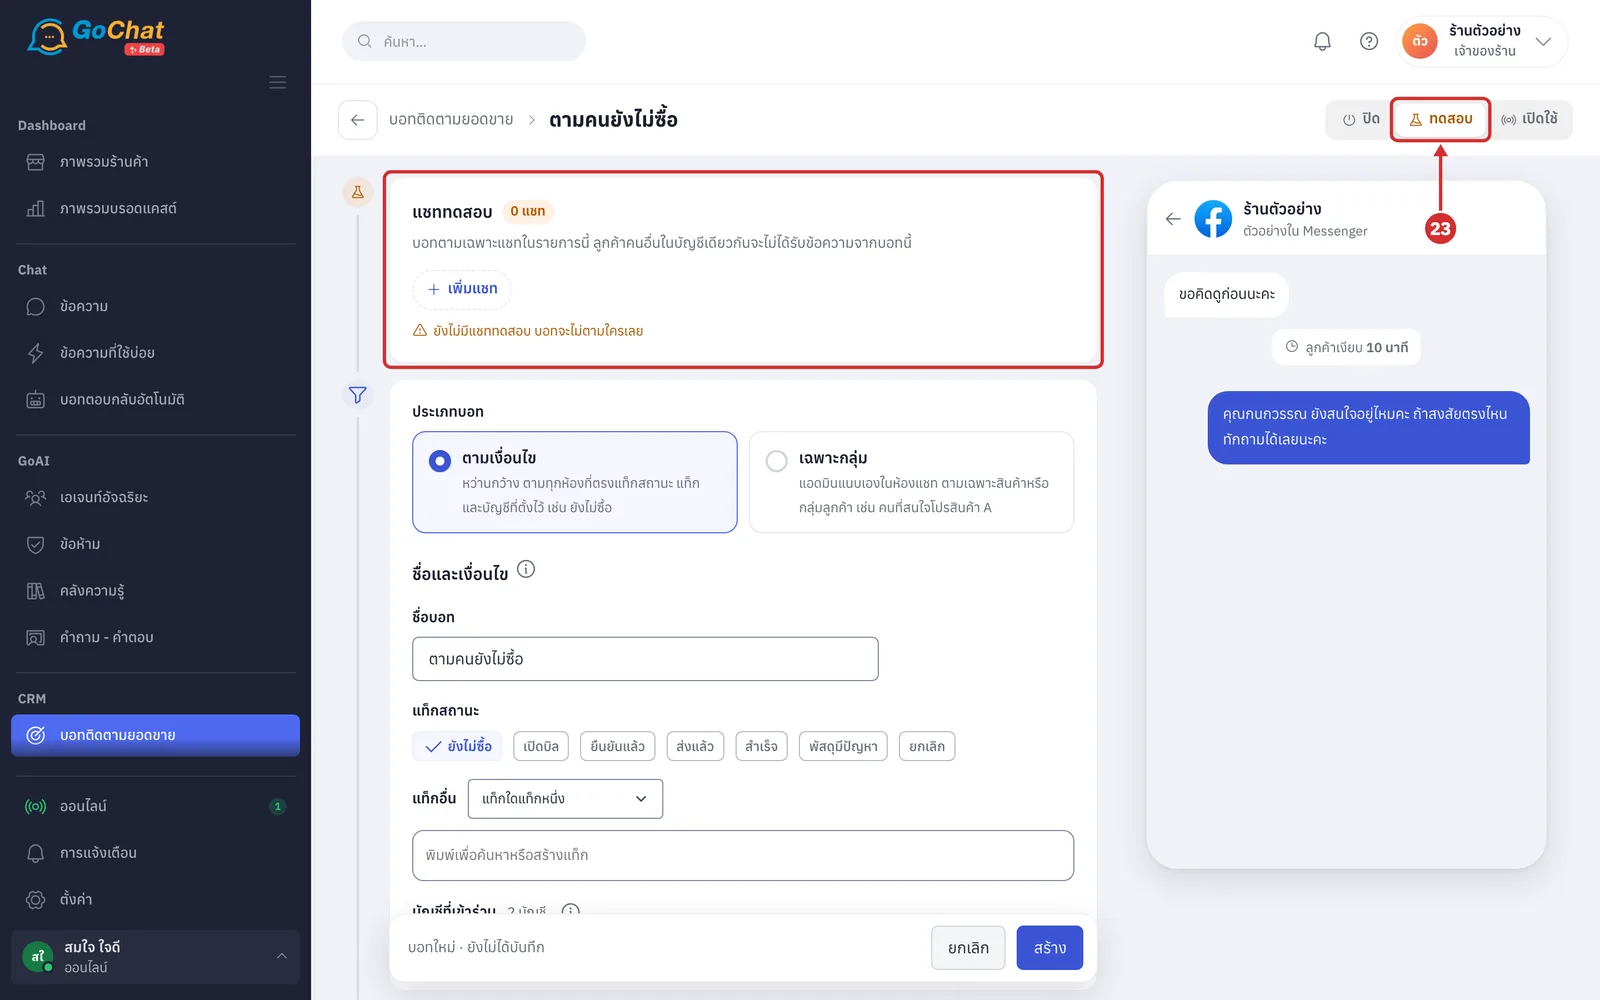
Use the ทดสอบ (Test) status to try the bot on your team's chats before it follows real customers.
At the top right, choose ทดสอบ (Test); the system adds a แชททดสอบ (Test chats) section at the top (the bot follows only the chats in this list, and other customers on the same accounts get nothing from this bot; with no test chats yet it shows ยังไม่มีแชททดสอบ บอทจะไม่ตามใครเลย (No test chats yet, the bot will not follow anyone))
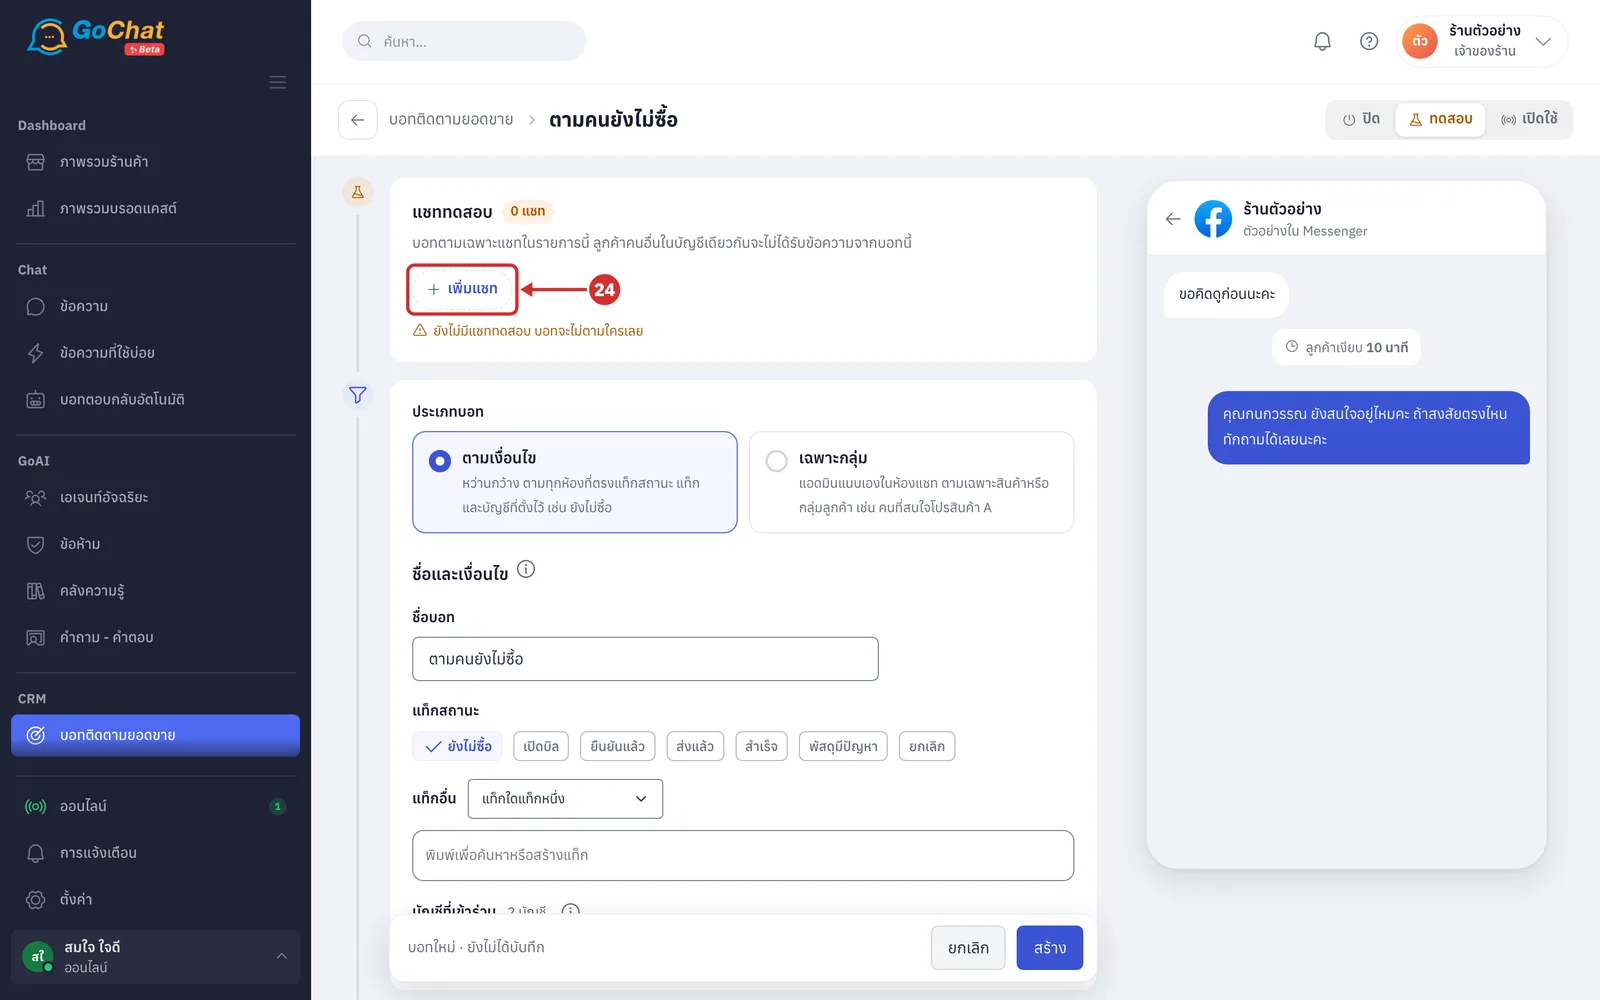
Click เพิ่มแชท (Add chat) (if you have not chosen accounts yet, the account picker opens first)
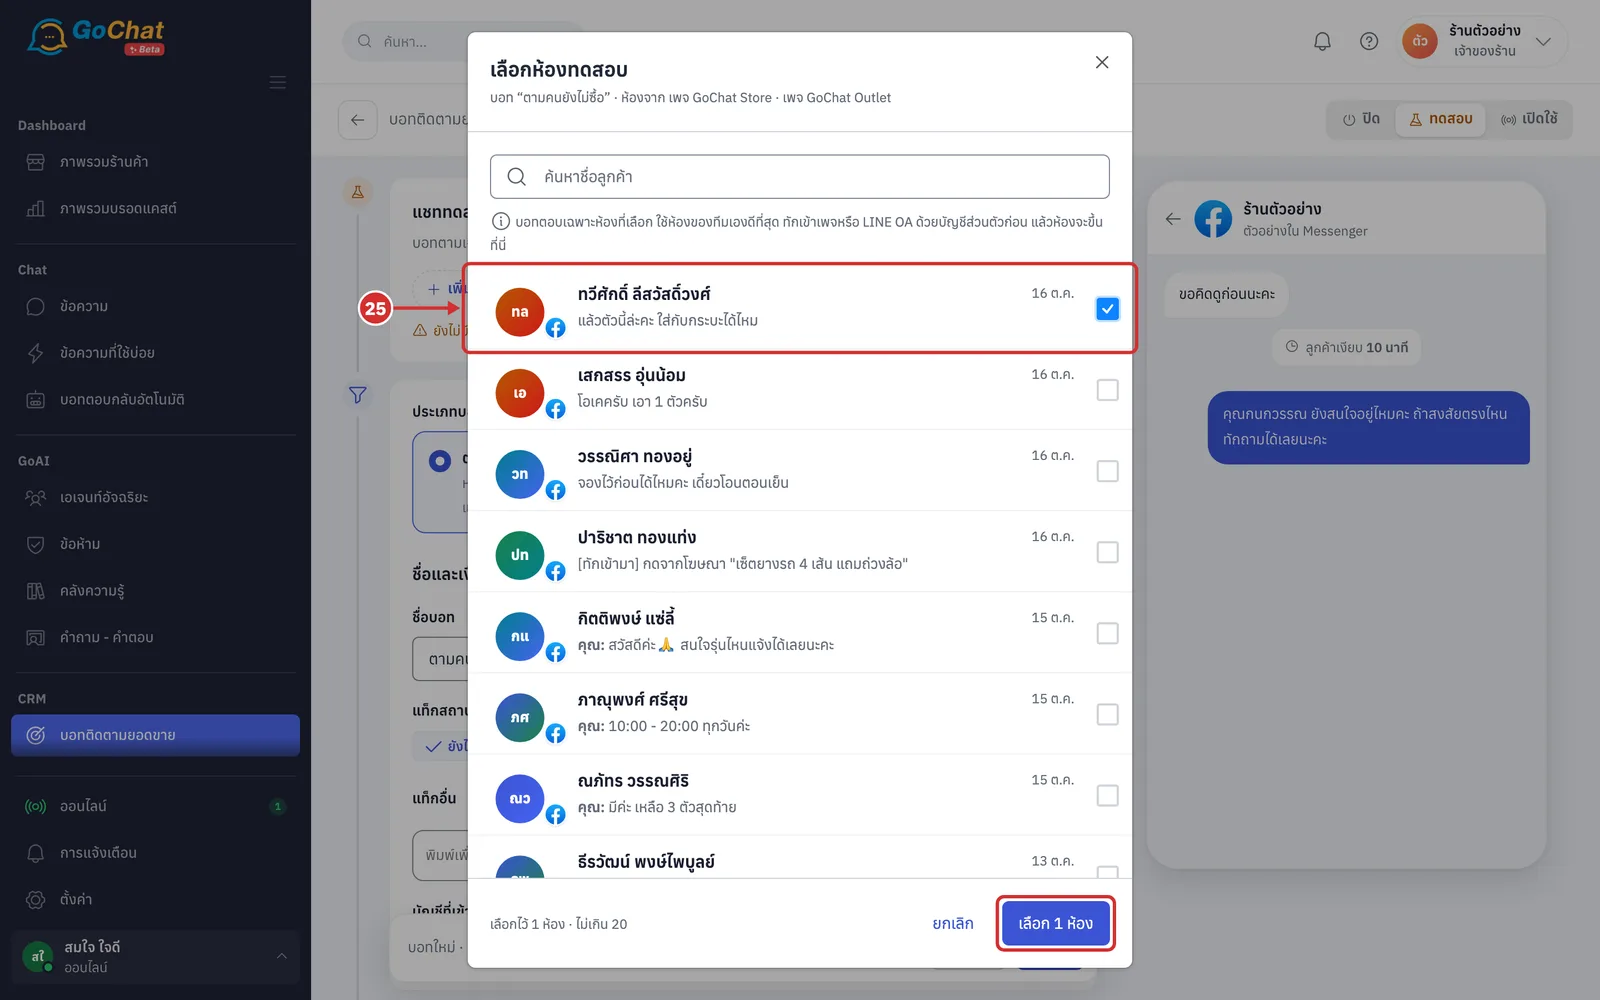
In the เลือกห้องทดสอบ (Choose test chats) window, tick the chats to test with, then click เลือก N ห้อง (Choose N chats) (chats come from the bot's accounts and you can search by customer name; up to 20 chats; your team's own chats work best: message the page or LINE OA from your personal account first, then the chat appears in the list)
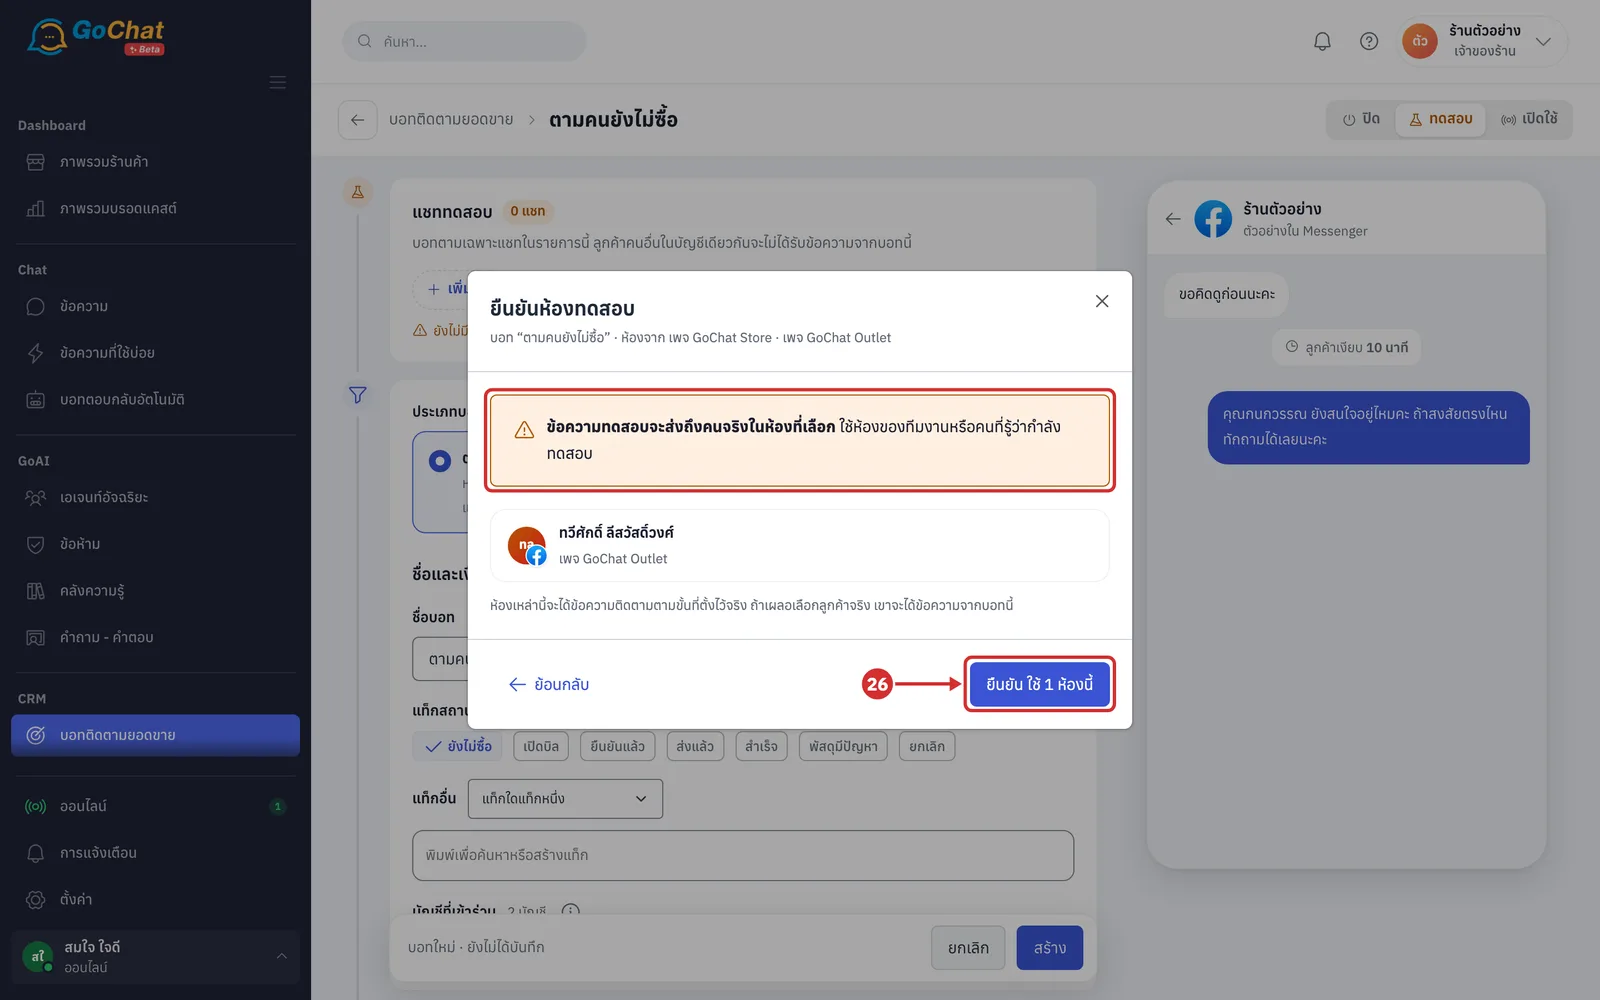
Check the names in the ยืนยันห้องทดสอบ (Confirm test chats) window, then click ยืนยัน ใช้ N ห้องนี้ (Confirm, use these N chats) (test messages reach the real people in the chosen chats, so a real customer chosen by mistake will get this bot's messages; click ย้อนกลับ (Back) to choose again)
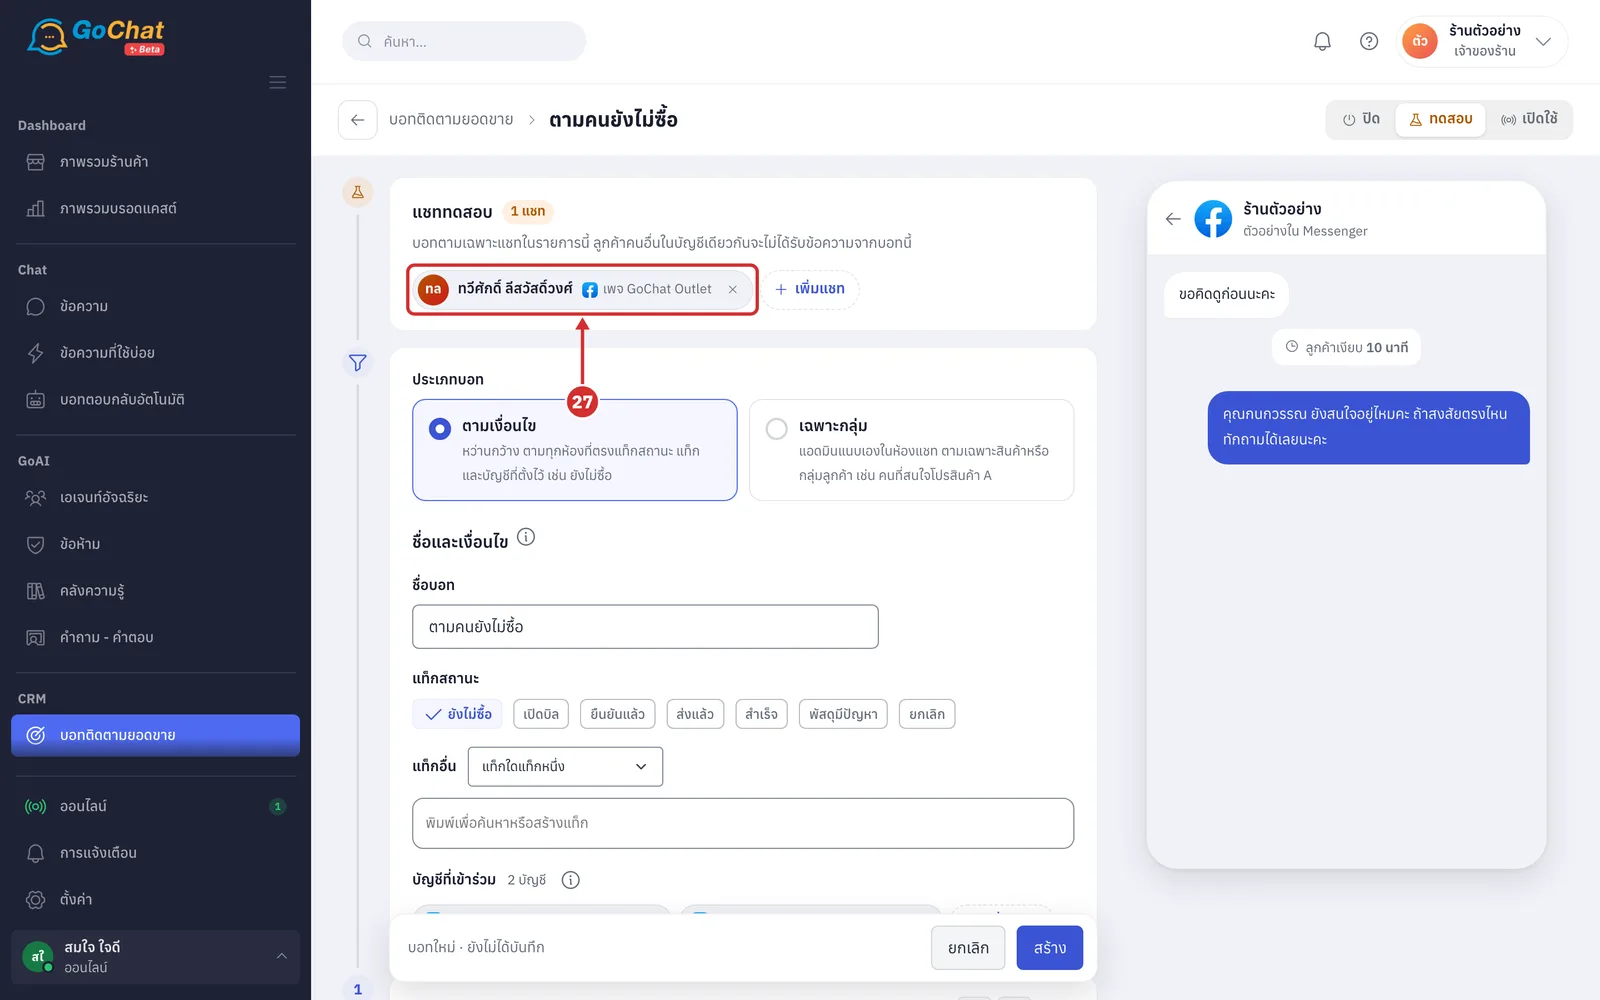
The chosen chats appear under แชททดสอบ (Test chats) (click × to remove one); then click สร้าง (Create) or บันทึก (Save) to start testing (when testing is done, switch to เปิดใช้ (On) and the bot follows other chats on the accounts too; switching from เปิดใช้ (On) back to ทดสอบ (Test) stops the chats that are not test chats)
Creating a selected-chats bot
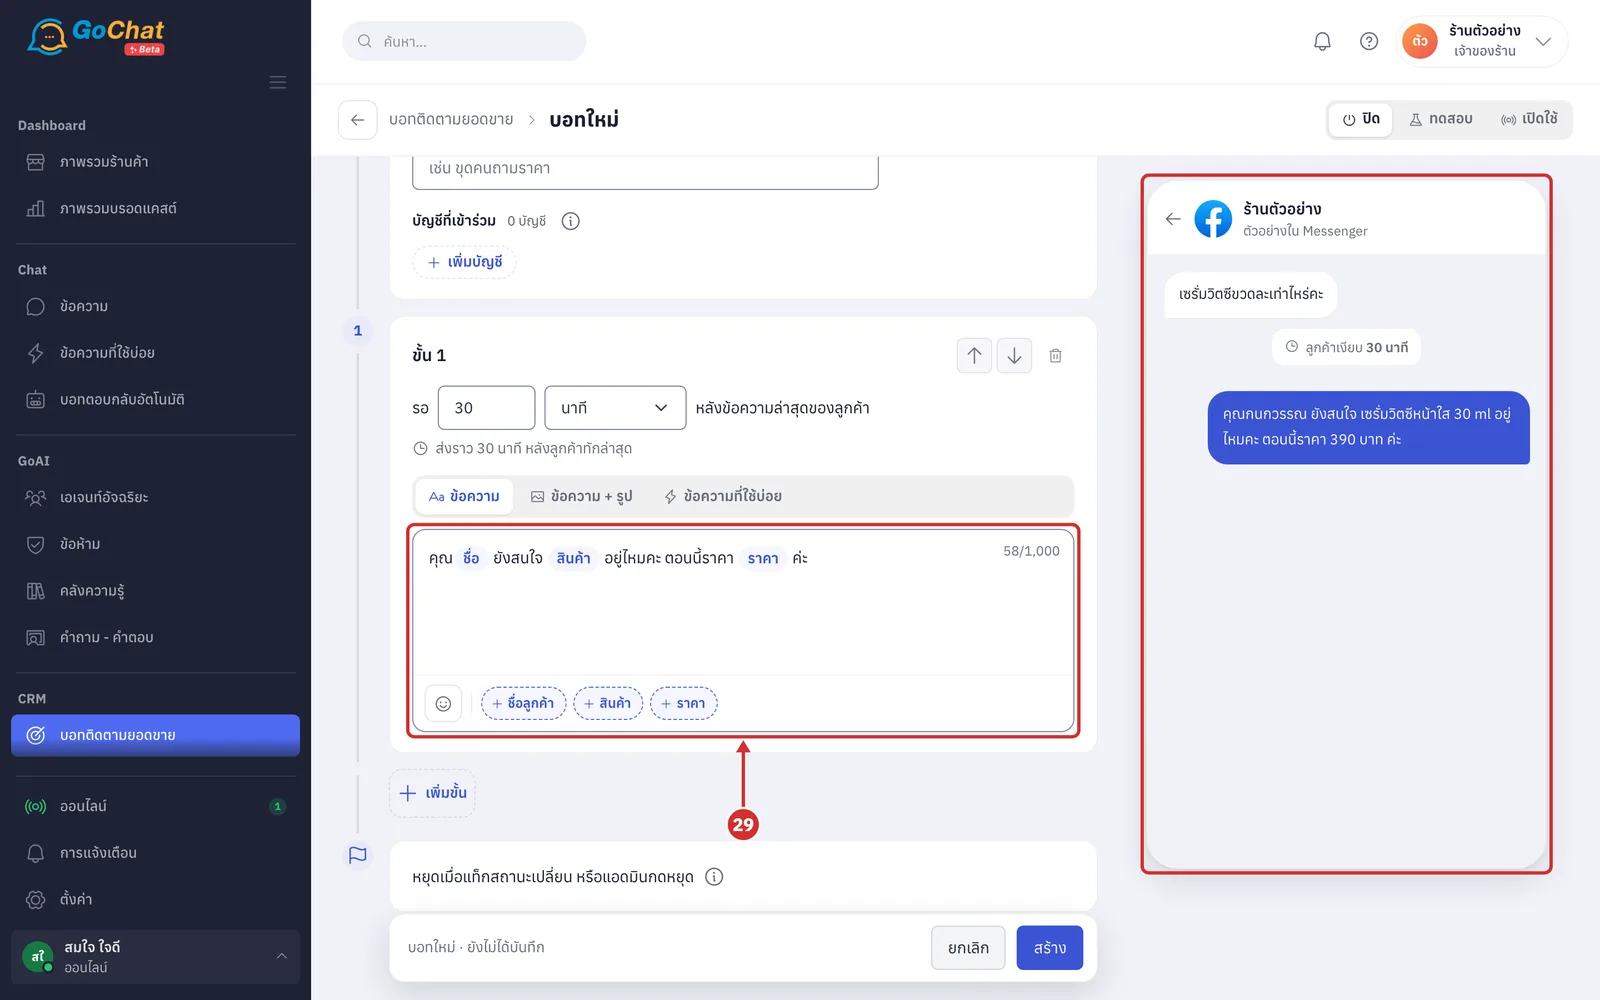
A selected-chats bot does not follow chats by itself; admins attach it in each chat and choose the product the customer is interested in. The other settings are the same as a bot by condition: bot name, accounts, steps and status, then click สร้าง (Create).
Under ประเภทบอท (Bot type), choose เฉพาะกลุ่ม (Selected chats); the form keeps only ชื่อบอท (Bot name) and บัญชีที่เข้าร่วม (Accounts), without status tags and other tags (an account can be used by many selected-chats bots; the bot can only be attached in chats of the chosen accounts; a chat with a selected-chats bot attached uses it instead of a bot by condition; the first step waits 30 minutes by default)
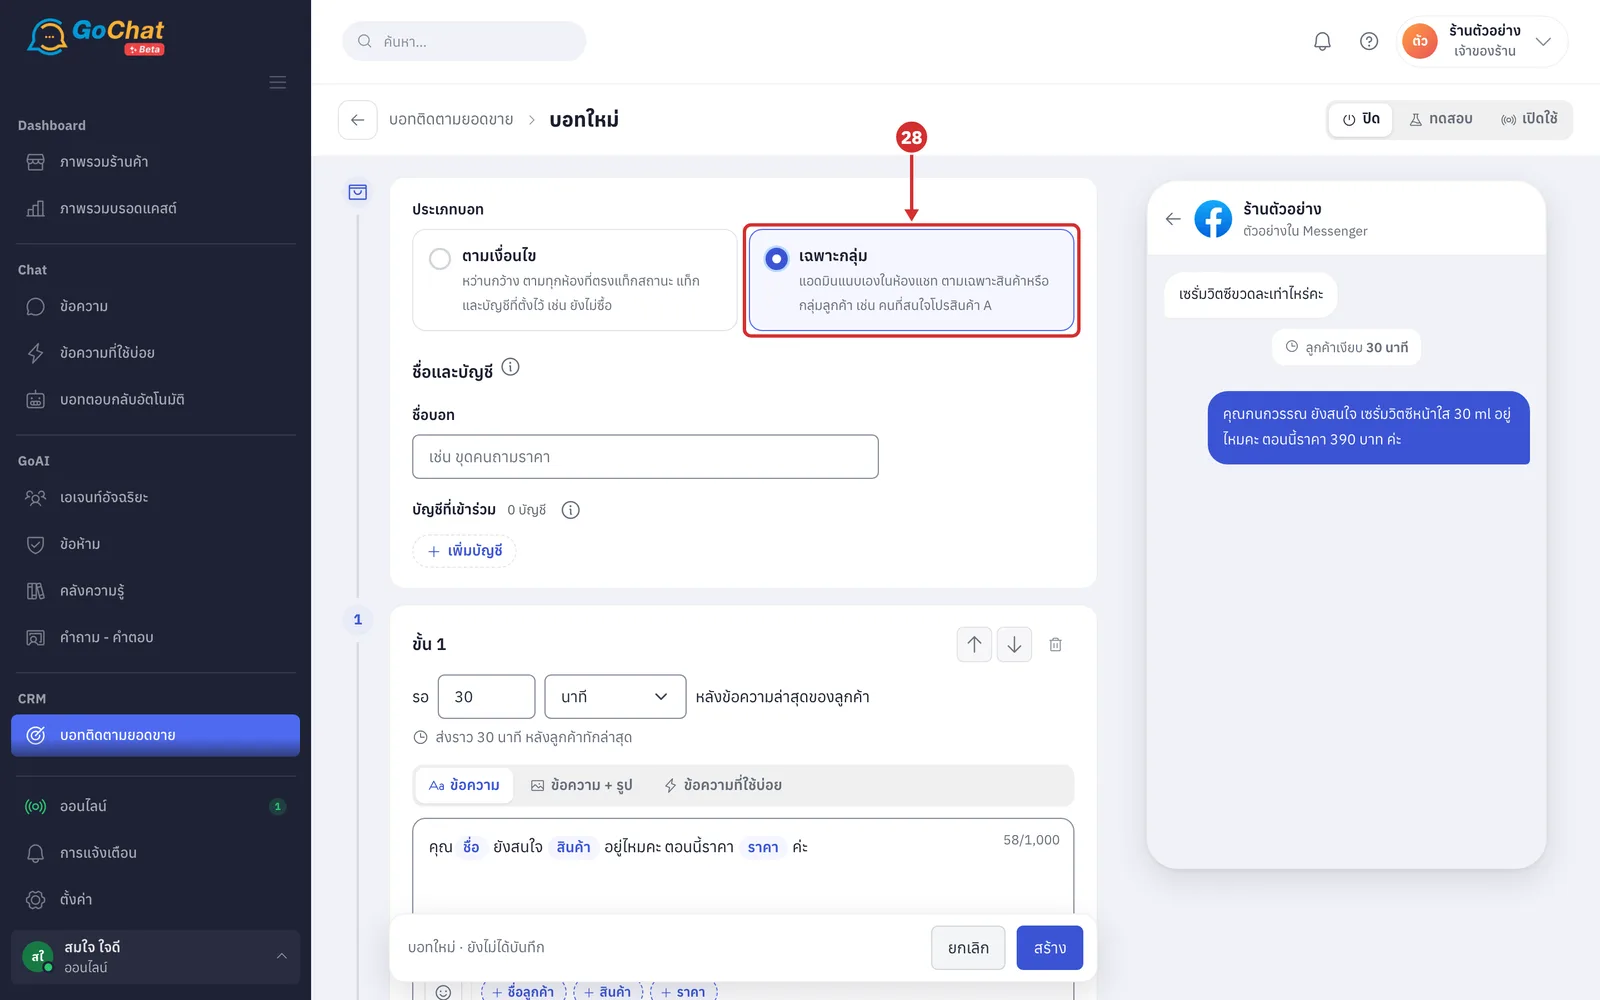
In the step's message, you can also insert สินค้า (Product) and ราคา (Price) besides ชื่อลูกค้า (Customer name) (click the buttons under the box or type { to insert them; they are replaced with the name of the product the admin chose when attaching the bot and its catalog price at sending time; the chat preview on the right uses sample values; bots by condition cannot use product and price; shops connected to GoSaaS also get the การ์ดสินค้าที่แนบ (Attached product card) content type, which sends the chosen product's card after the message)
Attaching a selected-chats bot in a chat
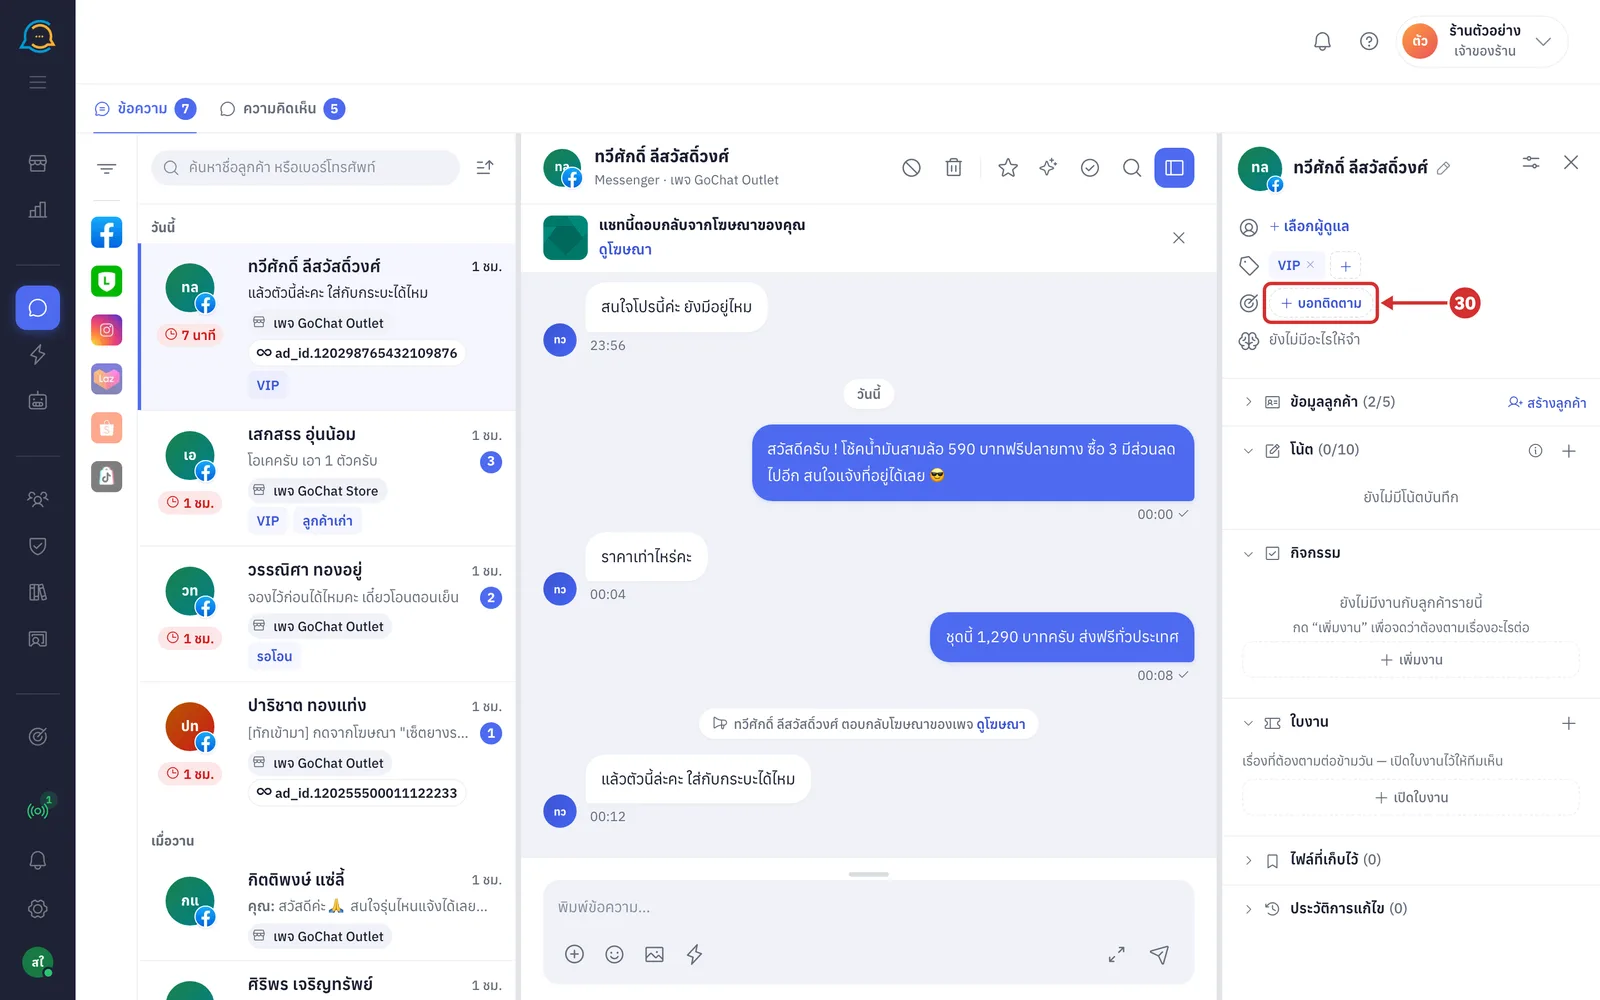
Open the customer's chat on the ข้อความ (Messages) page; in the right panel, on the บอทติดตาม (Follow-up bot) row, click บอทติดตาม (Follow-up bot) (everyone who can reply to this chat can attach a bot; this row only appears in one-to-one chats on Facebook, Instagram and LINE; if the chat has suggested products and a selected-chats bot that can be used in this chat, แนะนำ “bot name” (Suggest “bot name”) appears after the button)
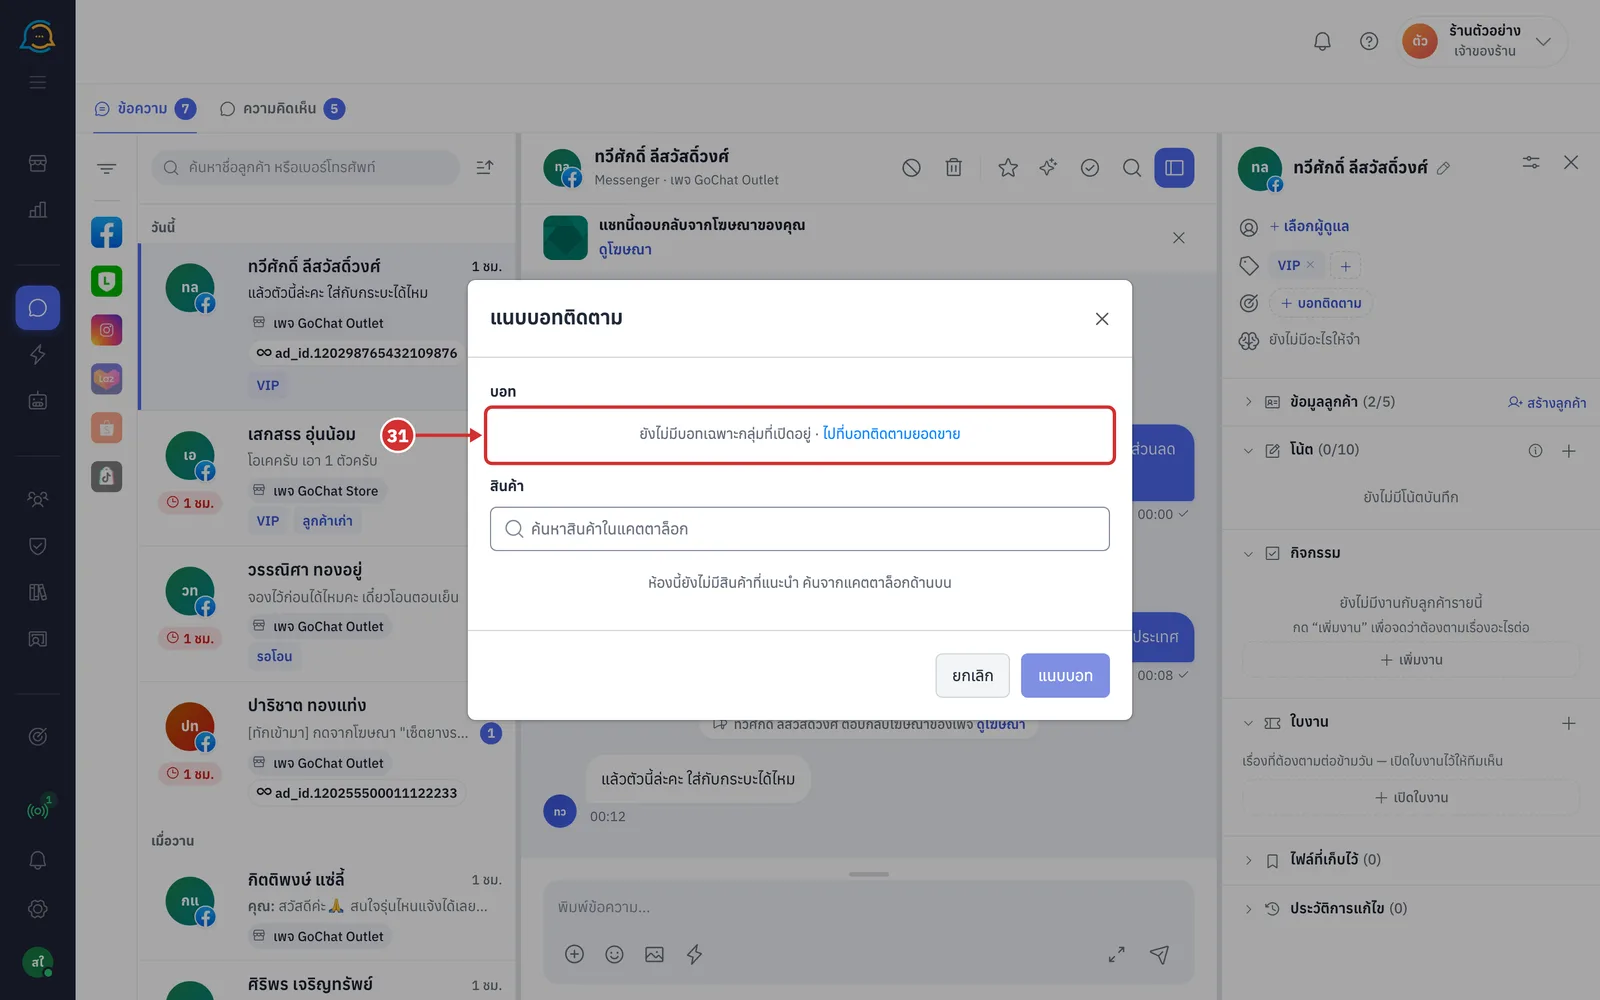
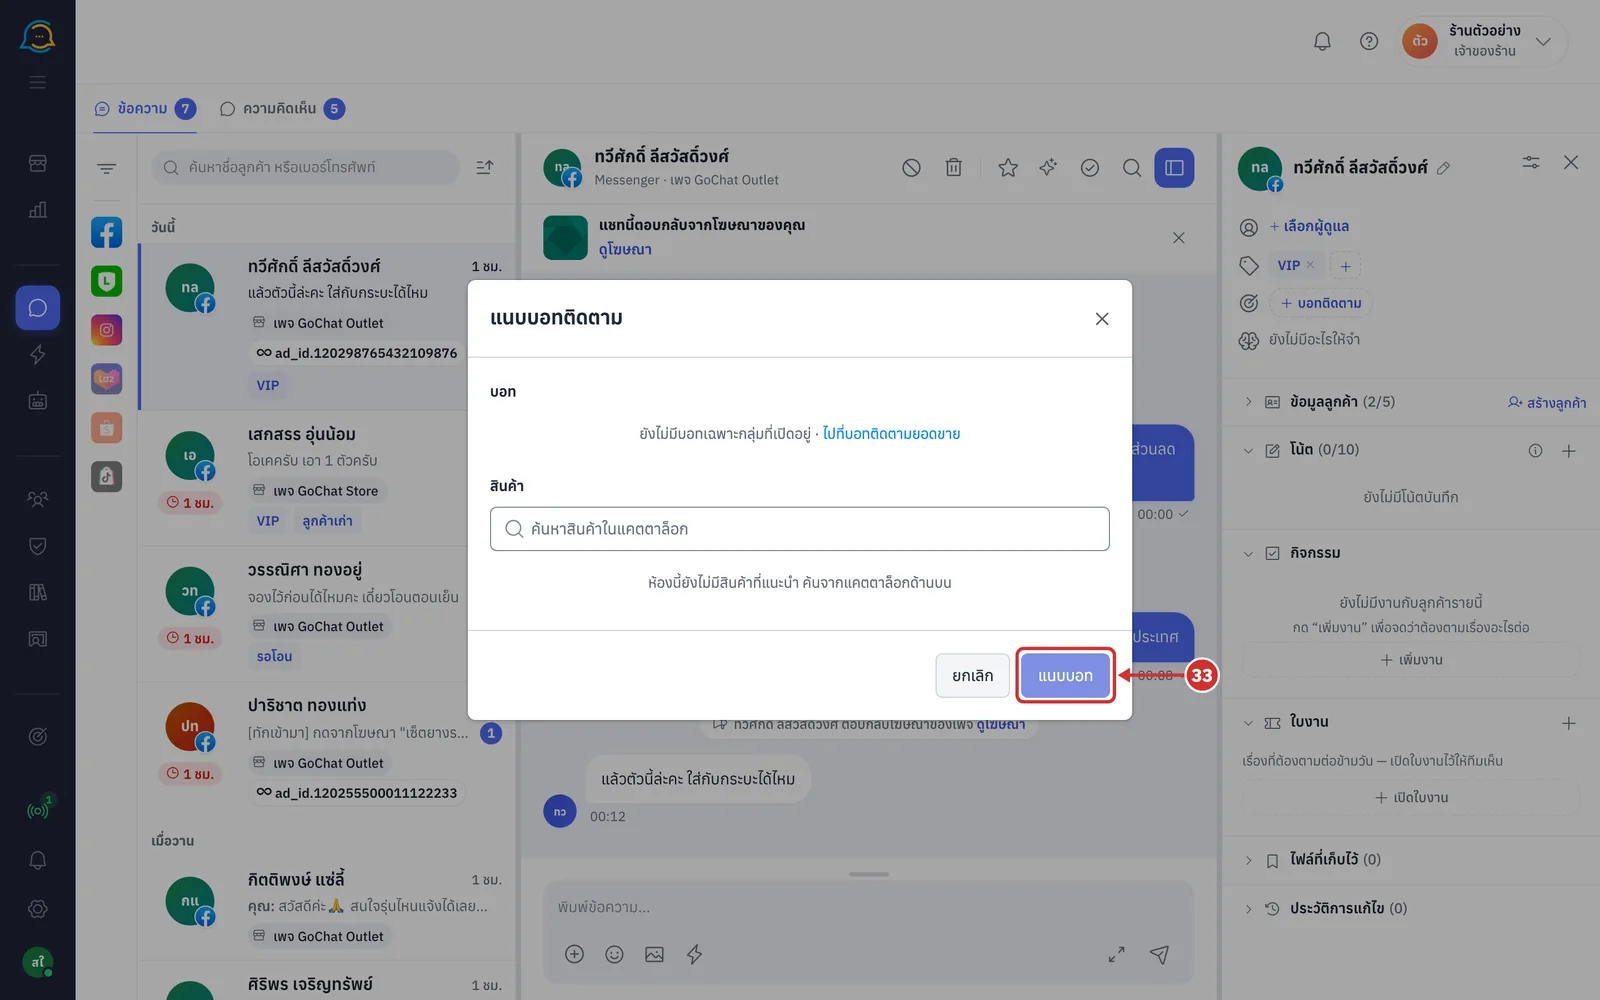
In the แนบบอทติดตาม (Attach follow-up bot) window, under บอท (Bot), choose the selected-chats bot to use (only bots that are เปิดใช้ (On) with this chat's account, or bots in ทดสอบ (Test) where this chat is a test chat, are listed; if there are none it shows ยังไม่มีบอทเฉพาะกลุ่มที่เปิดอยู่ (No selected-chats bot is on yet) with a ไปที่บอทติดตามยอดขาย (Go to Sales follow-up bot) link)
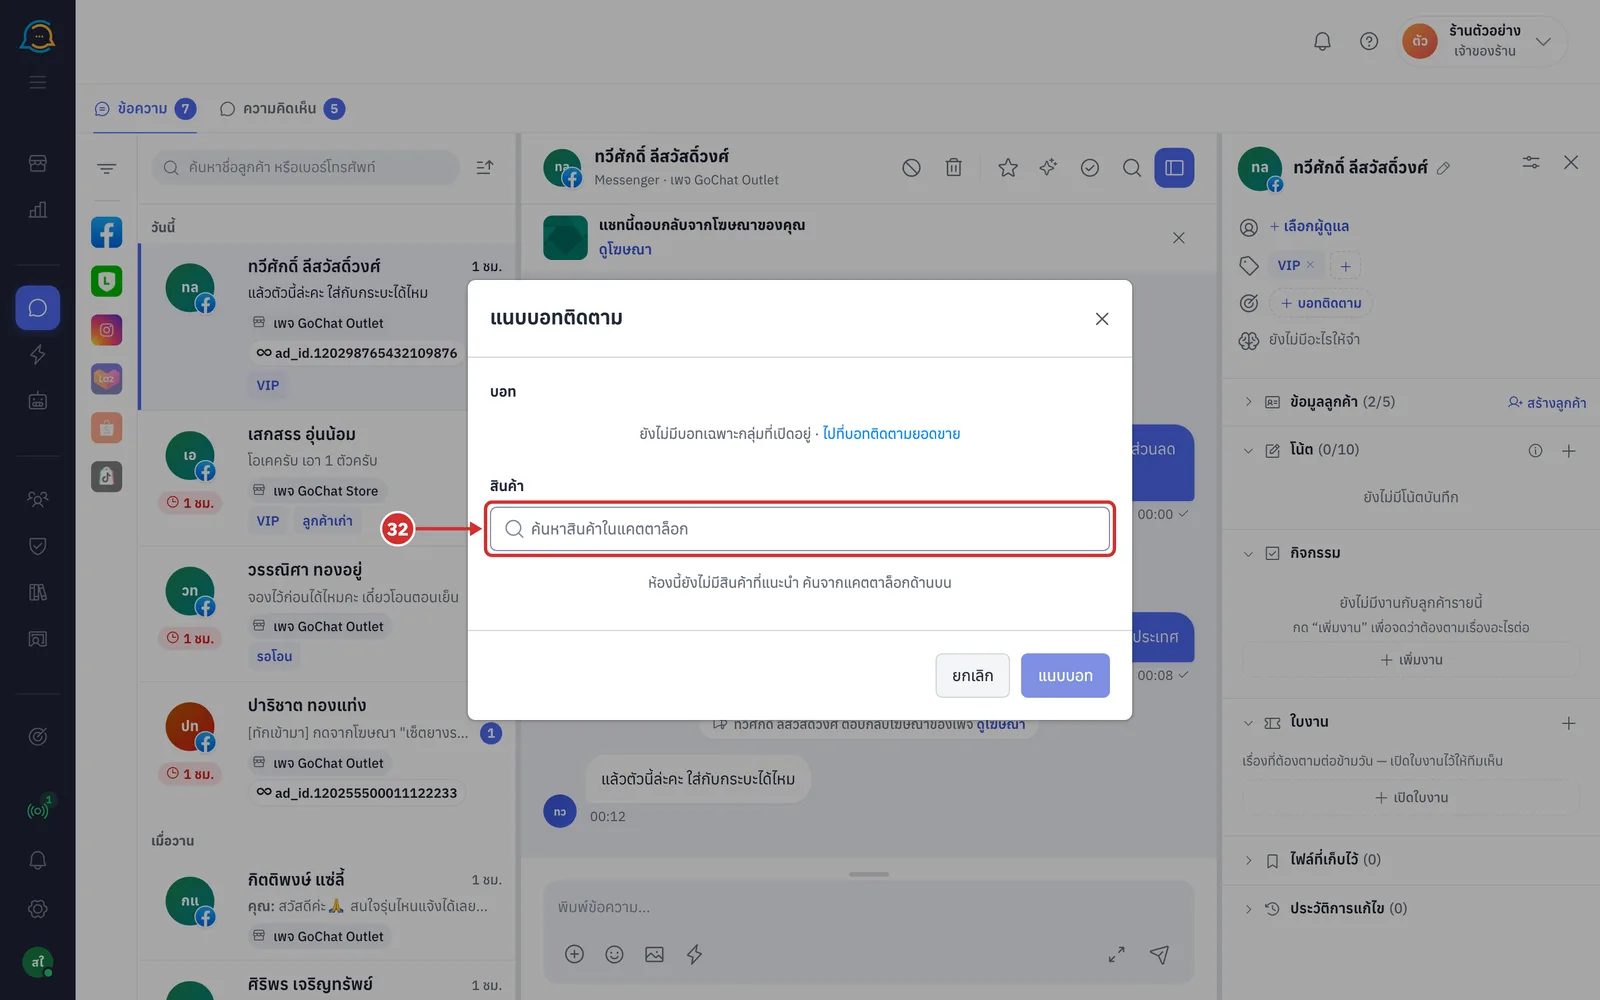
Under สินค้า (Product), choose the product the customer is interested in from the suggestions, or search in ค้นหาสินค้าในแคตตาล็อก (Search products in the catalog) (suggestions show where they came from: เคยส่งการ์ด (Card sent before), อยู่ในร่างออเดอร์ (In a draft order) or CF ในไลฟ์ (CF in a live); catalog search works only for shops connected to GoSaaS; if the chat has no suggestions it shows ห้องนี้ยังไม่มีสินค้าที่แนะนำ ค้นจากแคตตาล็อกด้านบน (No suggested products for this chat, search the catalog above))
Check the preview message of ขั้นแรก (First step), then click แนบบอท (Attach bot) (if another bot is following this chat, แทนบอท “…” ที่ติดตามห้องนี้อยู่ (Replaces bot “…” following this chat) appears; you can only attach to chats where the customer messaged within the last 24 hours)
Once attached, or once a bot by condition starts following a chat, the บอทติดตาม (Follow-up bot) row in the right panel shows the bot name, the attached product (selected-chats bots only) and the steps with their times, such as ส่งแล้ว (Sent) with the time sent, อีก … (In …), ราว … (Around …), พรุ่งนี้ … (Tomorrow …) or รอคุณตอบลูกค้า (Waiting for you to reply) when the customer messaged and the shop has not replied. Steps that could not be sent show ส่งไม่สำเร็จ (Failed) or ข้ามขั้นนี้ (Skipped). Bots with more than 3 steps show the previous, current and next steps; click ดูทั้งหมด N ขั้น (See all N steps) to see them all. In the chat list, a round badge appears at the corner of the customer's picture and blinks when the next step will be sent within 10 minutes.
Click หยุด (Stop) on the บอทติดตาม (Follow-up bot) row to stop the bot in that chat right away; the chat shows the line บอท “bot name” หยุดติดตาม · แอดมินกดหยุด (Bot “bot name” stopped following · Stopped by an admin). When the bot stops by itself the same kind of line appears with the reason, such as ส่งครบทุกขั้นแล้ว (All steps sent), สถานะของห้องเปลี่ยน (The chat's status changed) or เลยกรอบ 24 ชั่วโมงแล้ว (Past the 24-hour window).
Reading the bot list
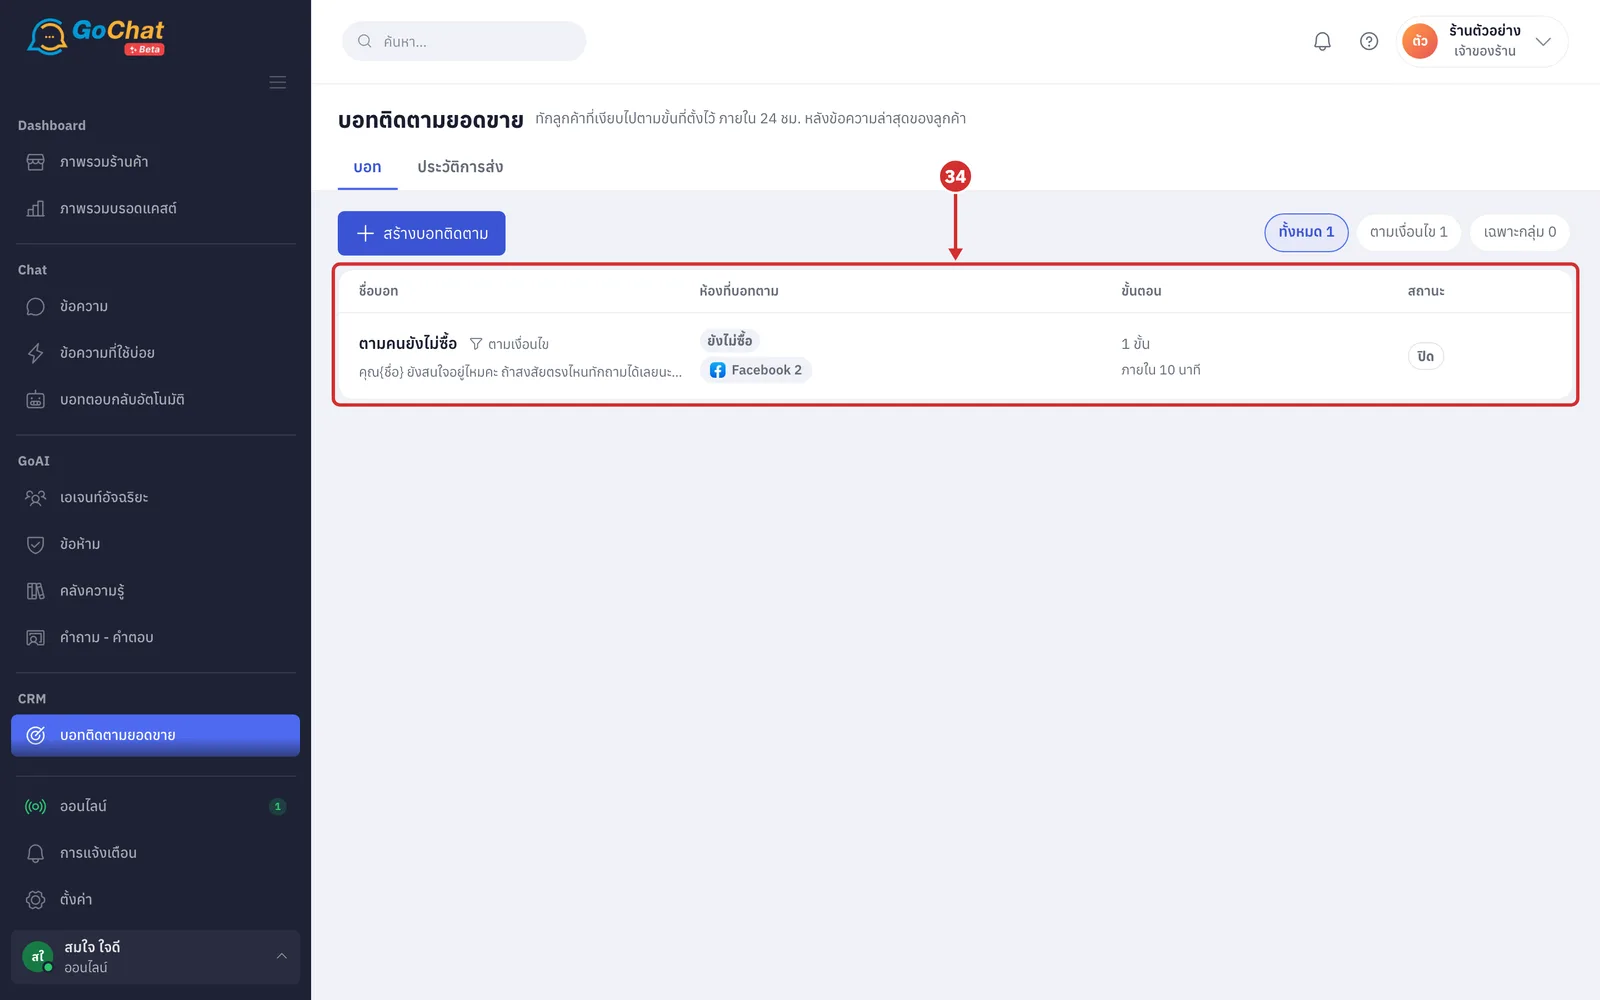
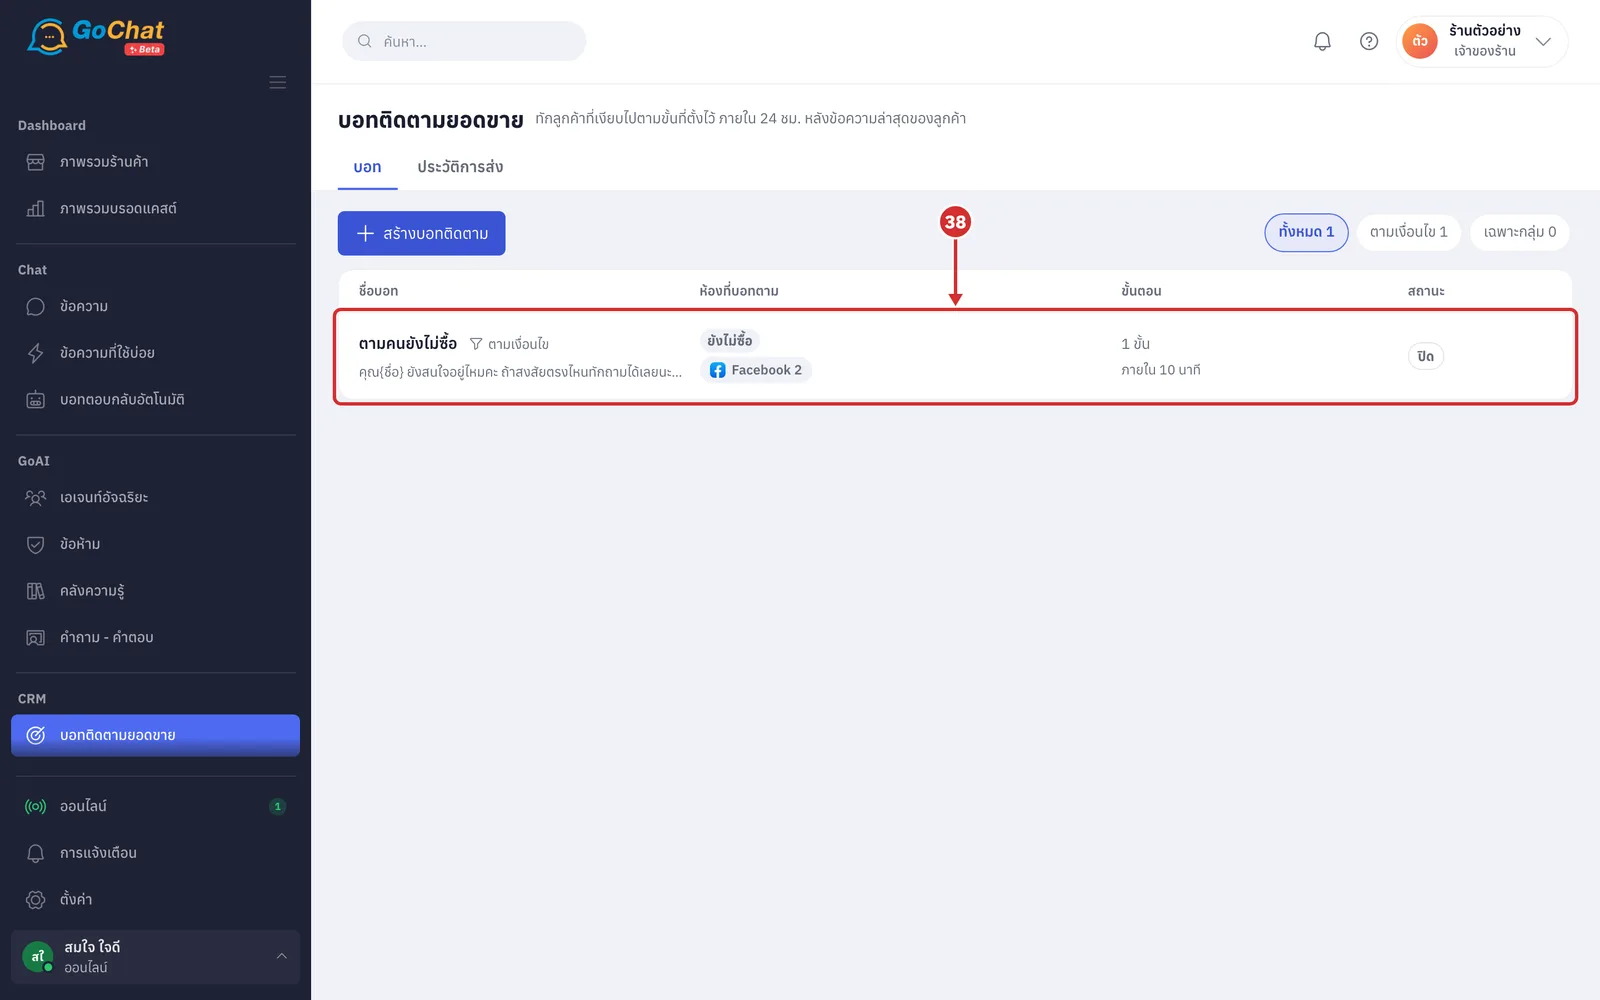
On the บอท (Bots) tab, see your shop's bots; each row has 4 columns (ชื่อบอท (Bot name) with the type label and the first step's message; ห้องที่บอทตาม (Chats followed) with the status tags, other tags and an accounts badge, point at or click the badge to see the account names, click the i icon next to other tags to see whether all tags or any tag is needed, and selected-chats bots show แอดมินแนบในห้อง · ติดตามอยู่ N ห้อง (Attached by admins · following N chats); ขั้นตอน (Steps) with the number of steps and total time; สถานะ (Status) showing ปิด (Off), ทดสอบ (Test) with the number of test chats, or เปิด (On))
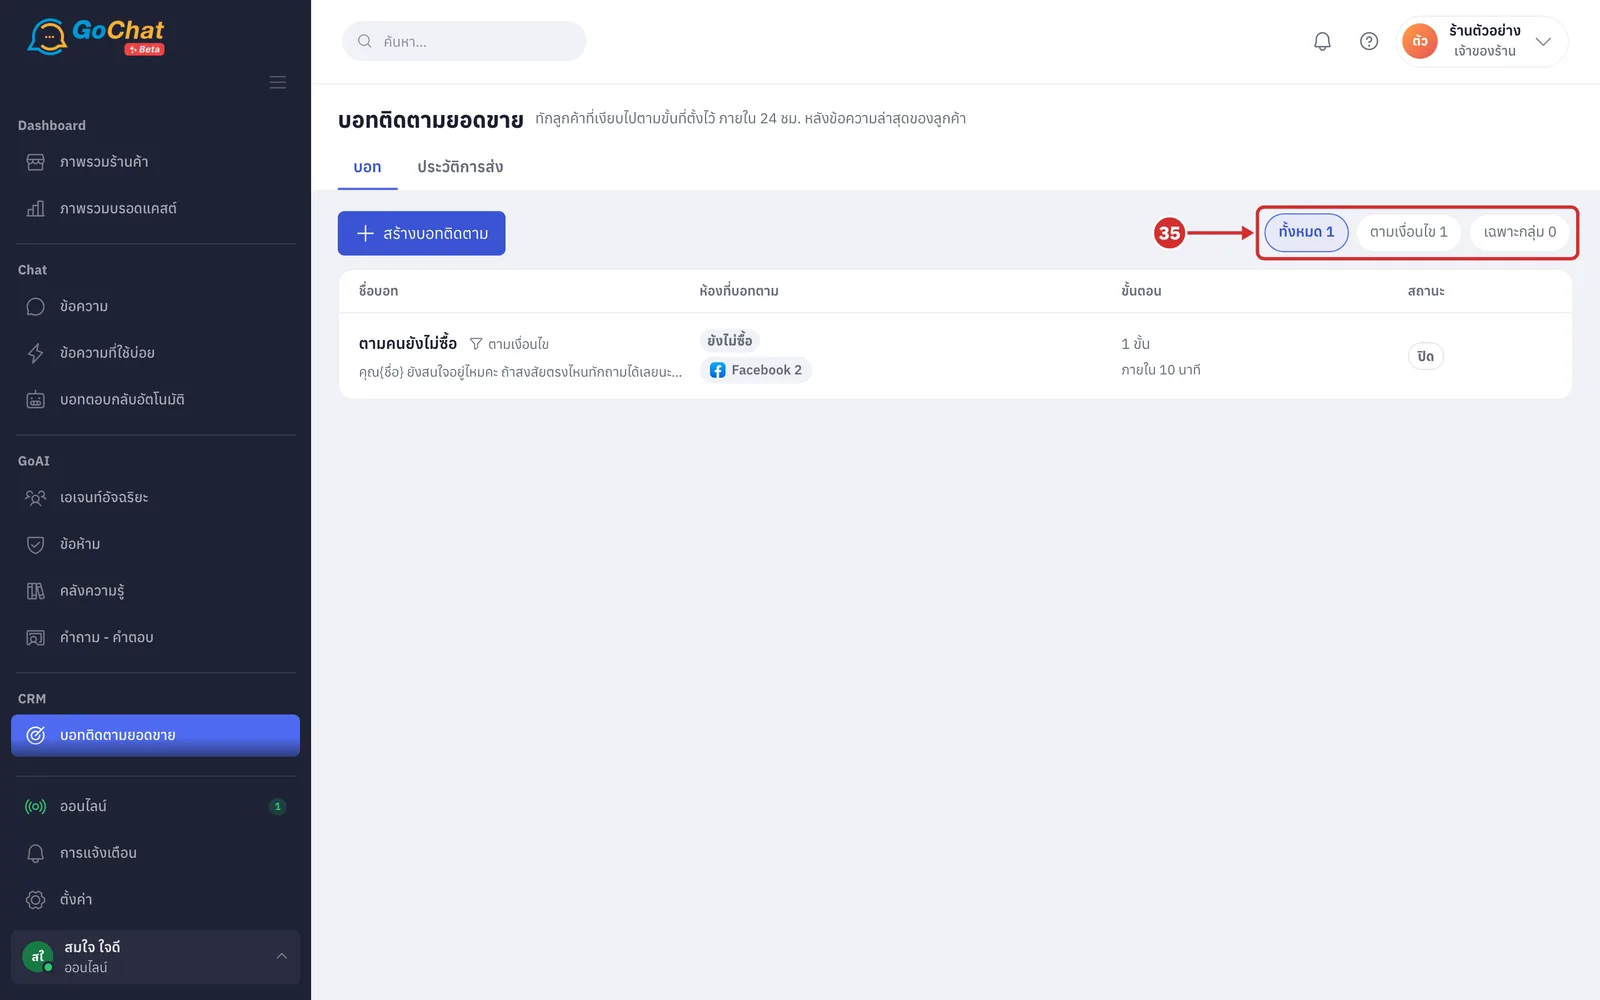
Click ทั้งหมด (All), ตามเงื่อนไข (By condition) or เฉพาะกลุ่ม (Selected chats) to filter the list by type (the number after each is how many bots of that type; the filter appears once your shop has a bot)
Viewing the send history
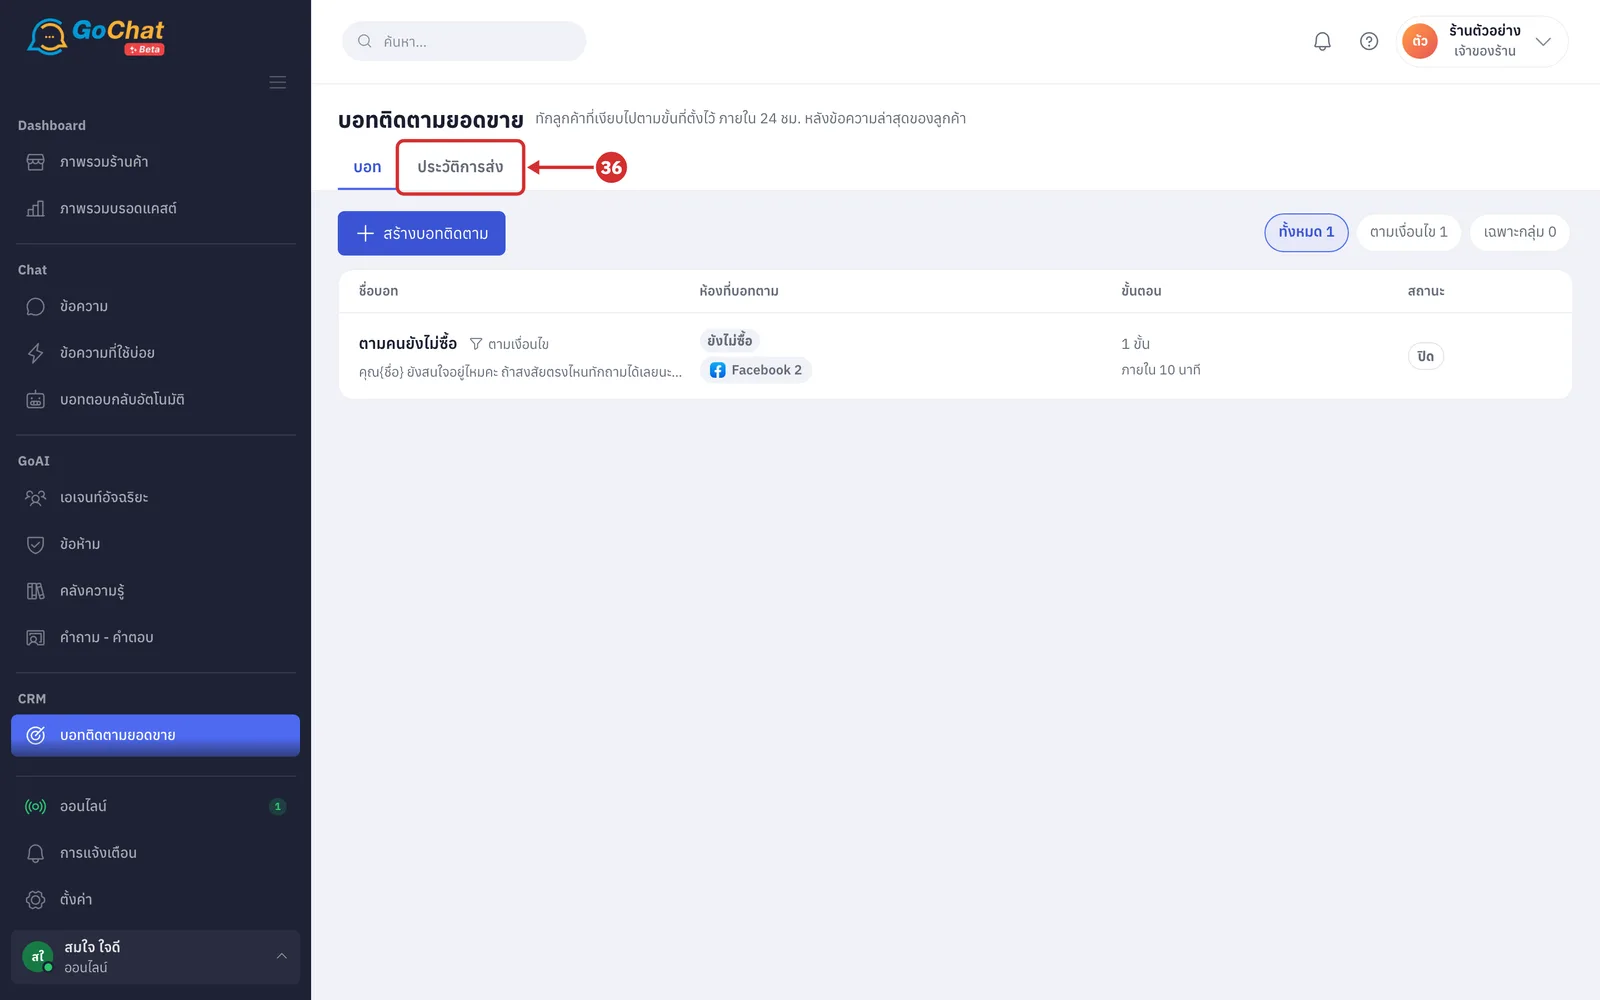
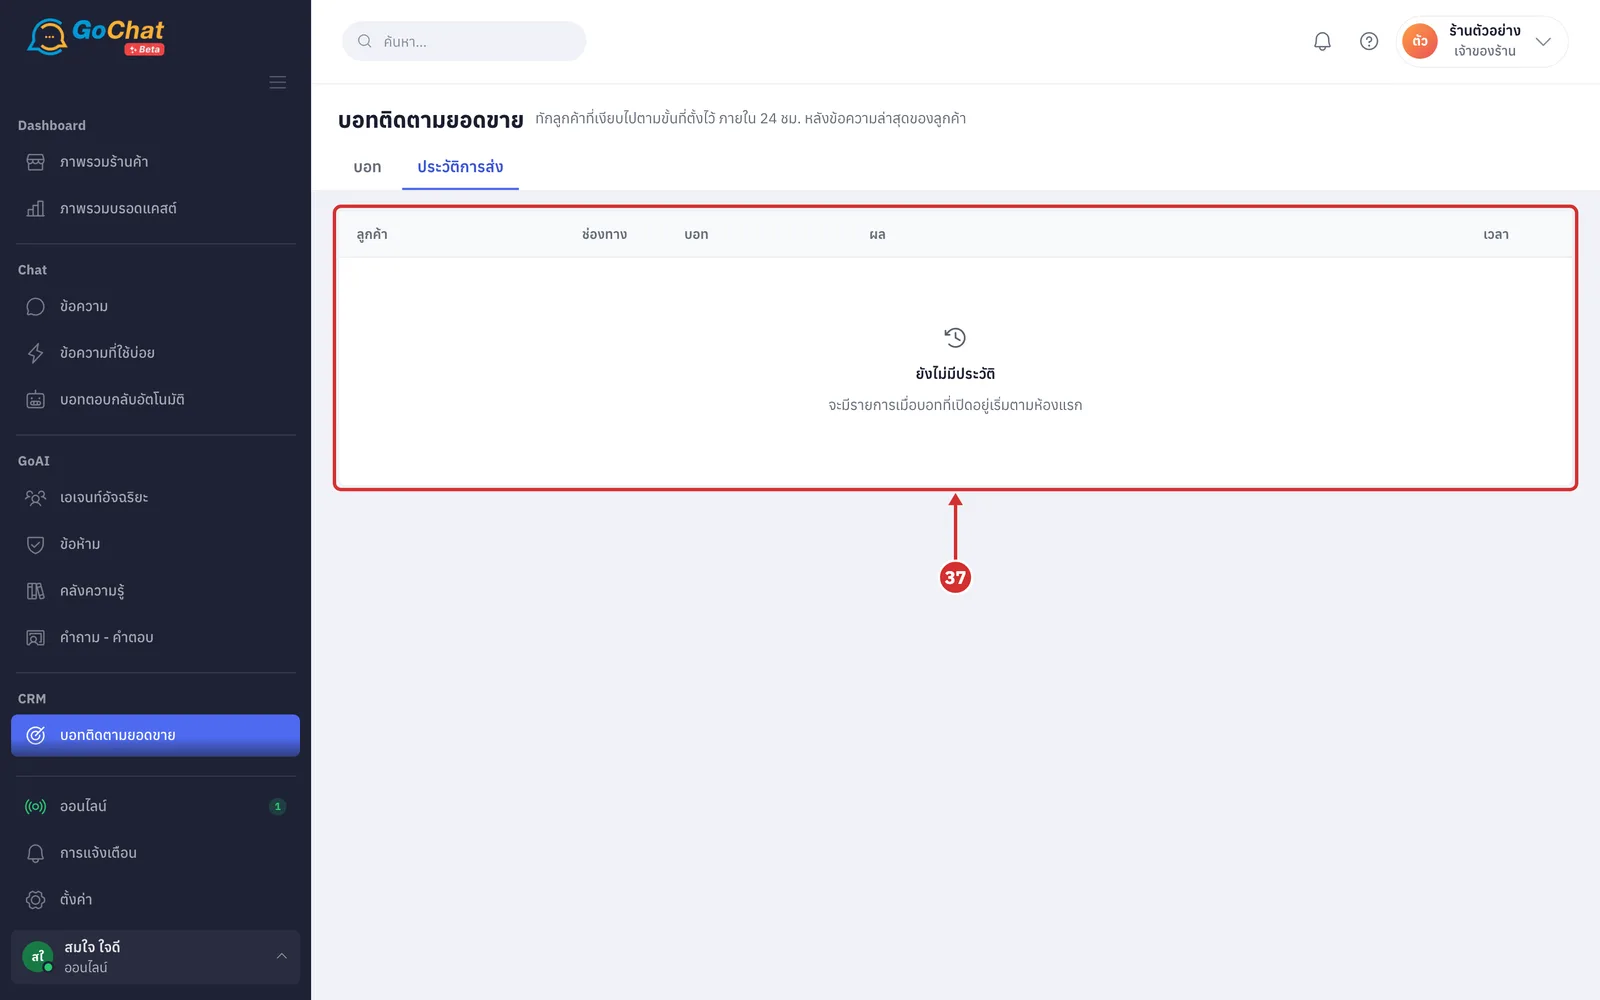
Click the ประวัติการส่ง (Send history) tab to see the messages every bot sent to customers
Read the history table, newest first; each row has ลูกค้า (Customer) (click the name to open the chat), ช่องทาง (Channel), บอท (Bot) with the step sent such as ขั้น 1/3 (step 1/3), ผล (Result) and เวลา (Time) (point at the time to see the full date and time). There are 4 results: ส่งแล้ว (Sent); ข้าม (Skipped), the step could not be sent before the 24-hour window passed; ไม่สำเร็จ (Failed), the message did not go out; and กำลังส่ง (Sending). ข้าม (Skipped) and ไม่สำเร็จ (Failed) show the reason underneath (50 rows at a time, click โหลดเพิ่ม (Load more) for earlier rows; deleted bots show บอทที่ถูกลบแล้ว (Deleted bot); with nothing sent yet it shows ยังไม่มีประวัติ (No history yet))
Editing or deleting a bot
On the บอท (Bots) tab, click the name of the bot you want to edit (anywhere in the bot's row works, except the accounts badge and the i icon)
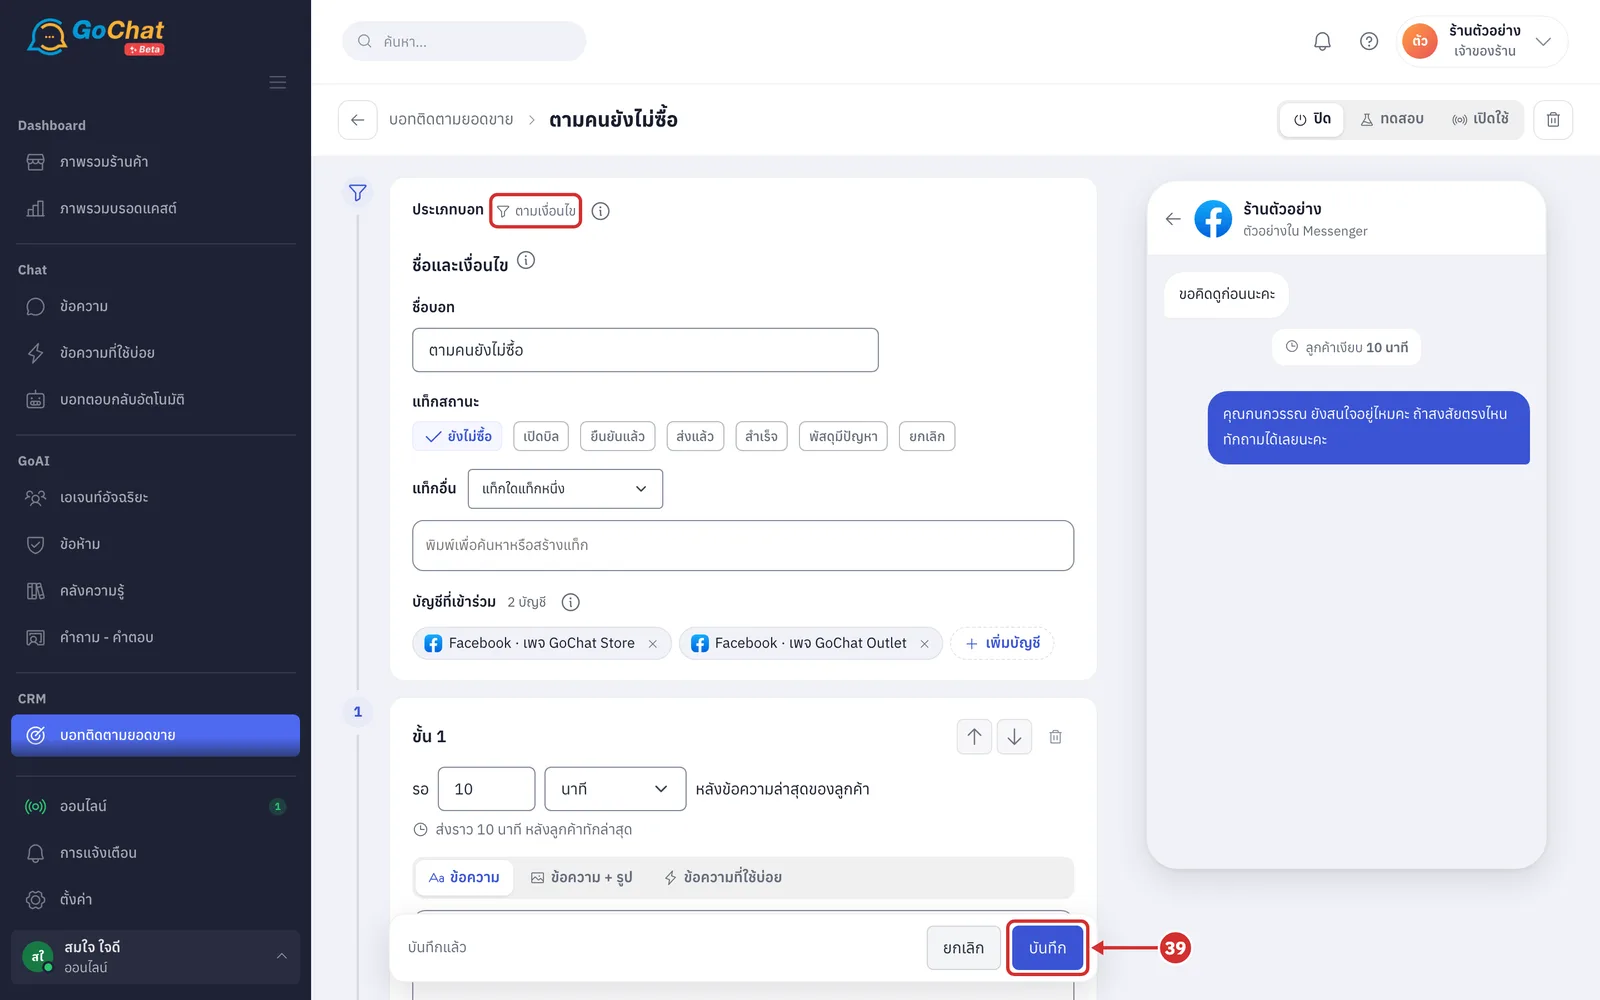
The system opens the bot's edit page; change what you need, then click บันทึก (Save) and the system takes you back to the list (everything can be changed except the bot type; the bottom bar shows มีการแก้ไขที่ยังไม่บันทึก (Unsaved changes) or บันทึกแล้ว (Saved); changing only the text or wait time lets chats being followed continue, while adding, deleting or moving steps or changing a content type stops them; setting the status to ปิด (Off) stops every chat being followed)
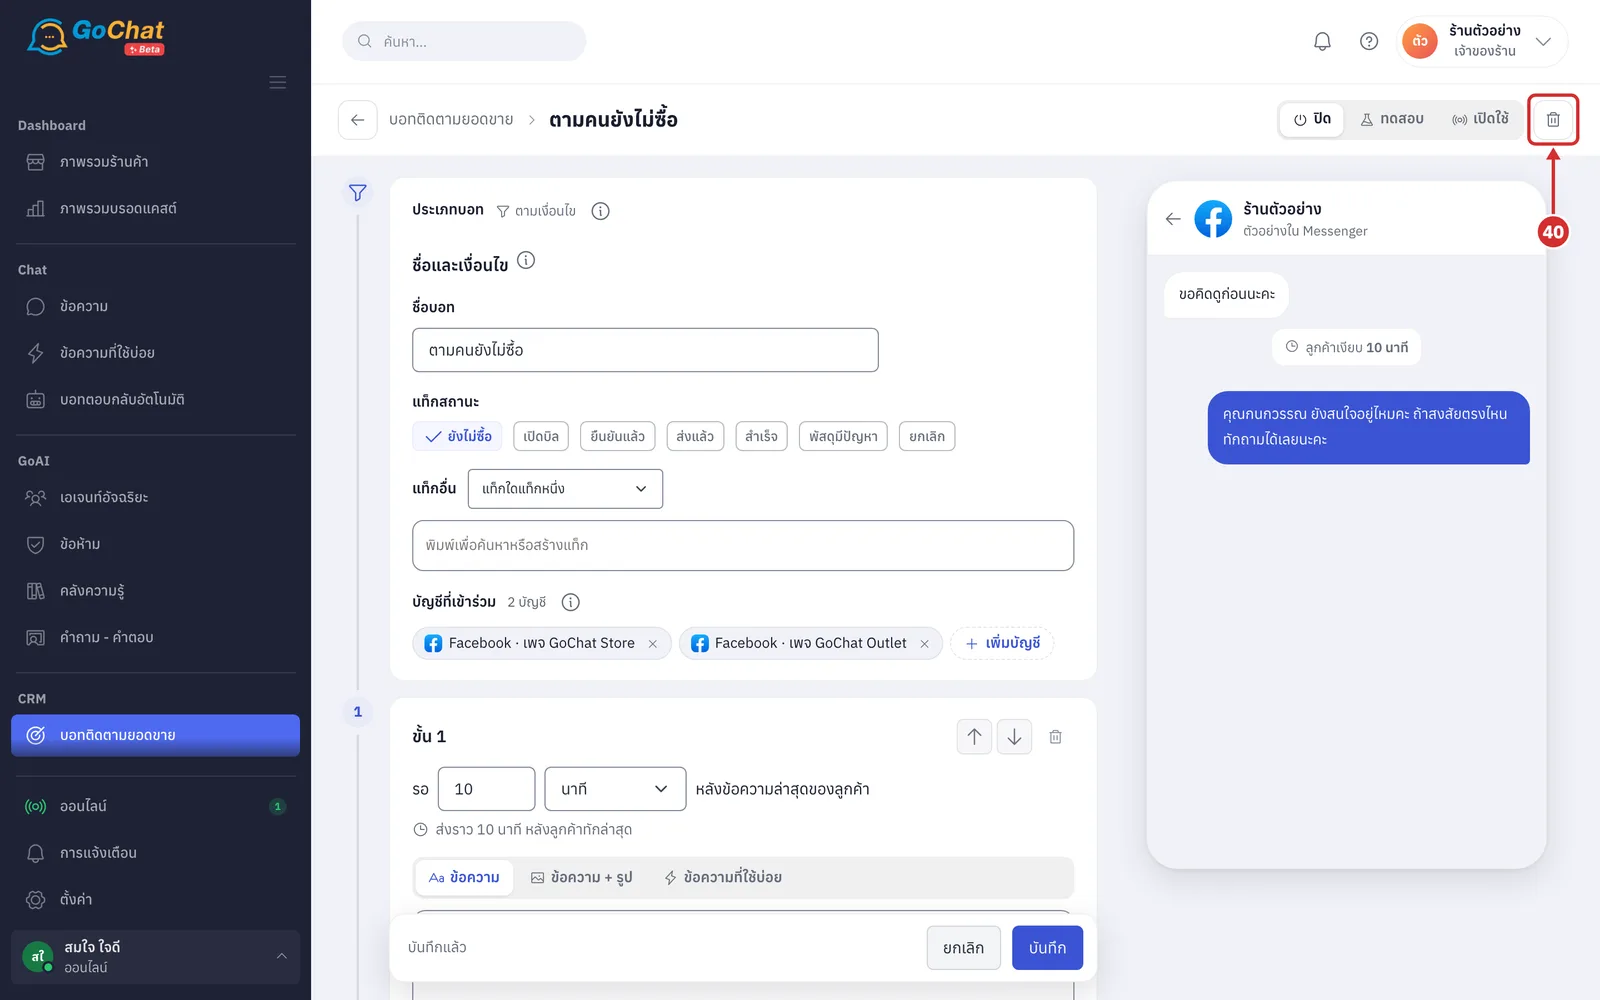
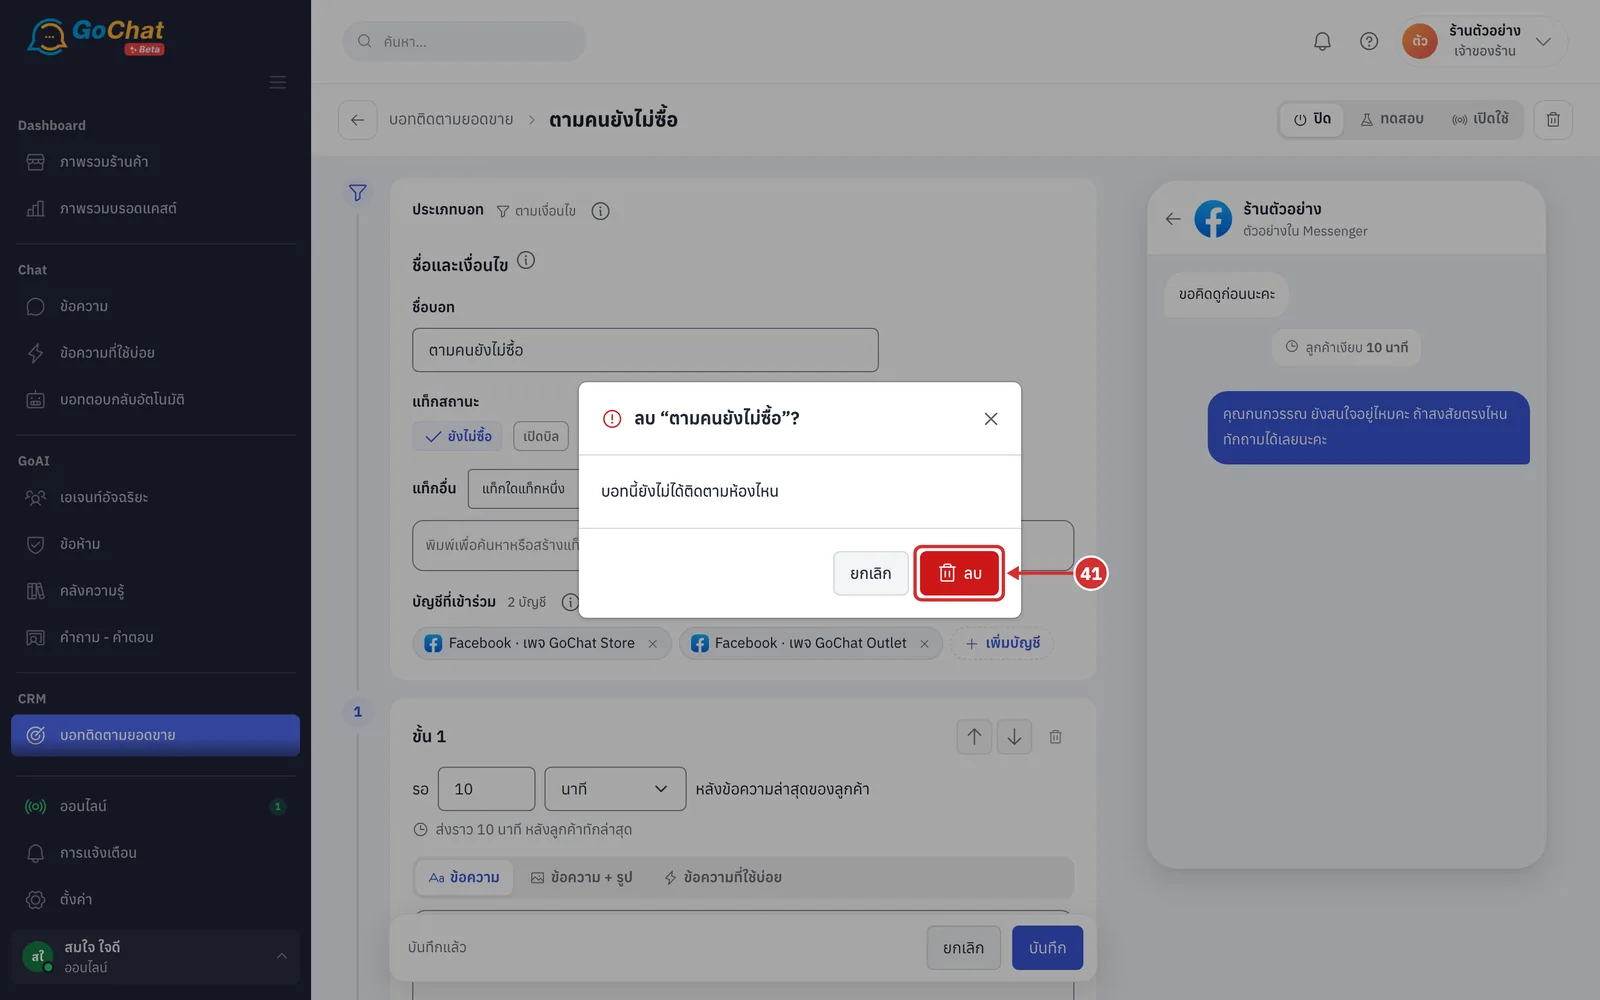
To delete the bot, click the bin icon at the top right
In the ลบ “bot name”? (Delete “bot name”?) window, click ลบ (Delete); the system deletes the bot and takes you back to the list (the window says how many chats the bot is following, and those stop right away; the deleted bot's send history stays and shows บอทที่ถูกลบแล้ว (Deleted bot))
Using customer notification messages as a bot step
A step of the ข้อความแจ้งเตือนลูกค้า (Utility) (Customer notification message) type lets the bot keep following up after 23 hours by sending a customer notification message approved by Meta (see การใช้ข้อความแจ้งเตือนลูกค้า). It works when every Facebook page of the bot has permission to send customer notification messages.
In the step you want, choose the ข้อความแจ้งเตือนลูกค้า (Utility) (Customer notification message) content type, then click เลือกข้อความ (Choose message)
The step's wait time can use วัน (days)
A step whose total time goes past 23 hours is switched to this type for you, and the other types cannot be chosen (point at a type to read why)
Once the total reaches 23 hours, clicking เพิ่มขั้น (Add step) adds a step that waits 1 day and uses this type
A bot with only Instagram accounts, or with a Facebook page without permission, cannot choose this type; point at it to read why
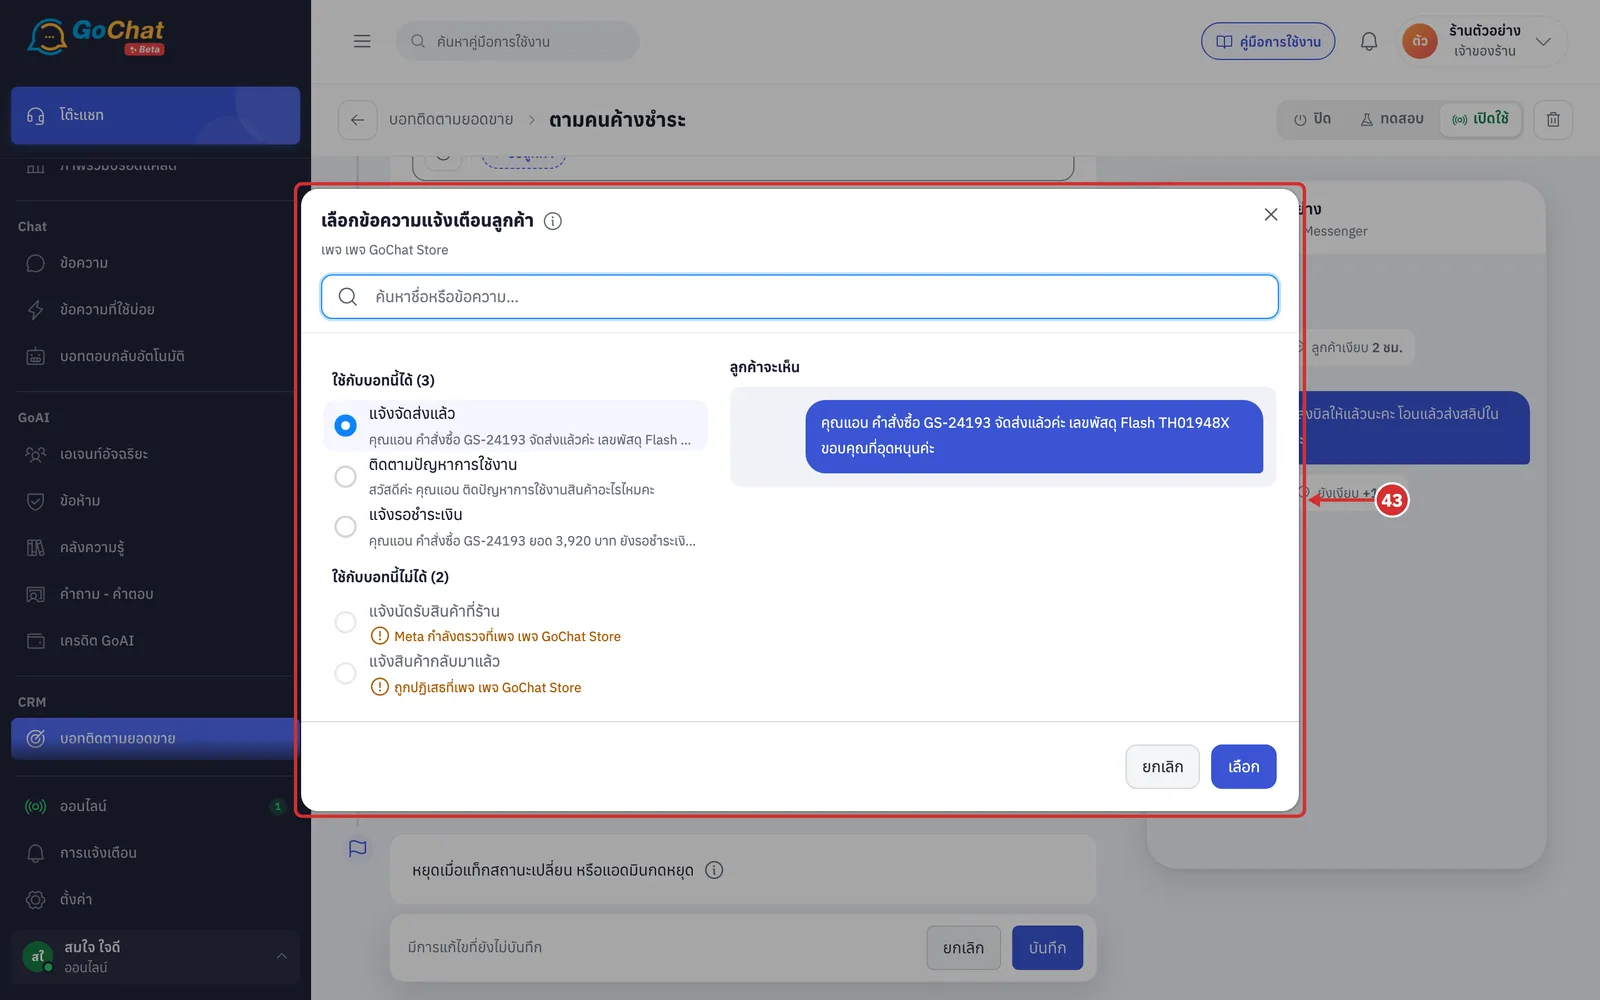
In the เลือกข้อความแจ้งเตือนลูกค้า (Choose a customer notification message) window, click the message you want, check what the ลูกค้าจะเห็น (Customer will see), then click เลือก (Choose)
Messages are grouped into ใช้กับบอทนี้ได้ (Can be used with this bot) and ใช้กับบอทนี้ไม่ได้ (Cannot be used with this bot) with the reason, such as not submitted on a page yet or Meta still reviewing it on a page (the message must be approved on every Facebook page of the bot)
If the shop has no approved messages yet, the window shows a ไปที่ข้อความแจ้งเตือนลูกค้า (Utility) (Go to Customer notification messages) button
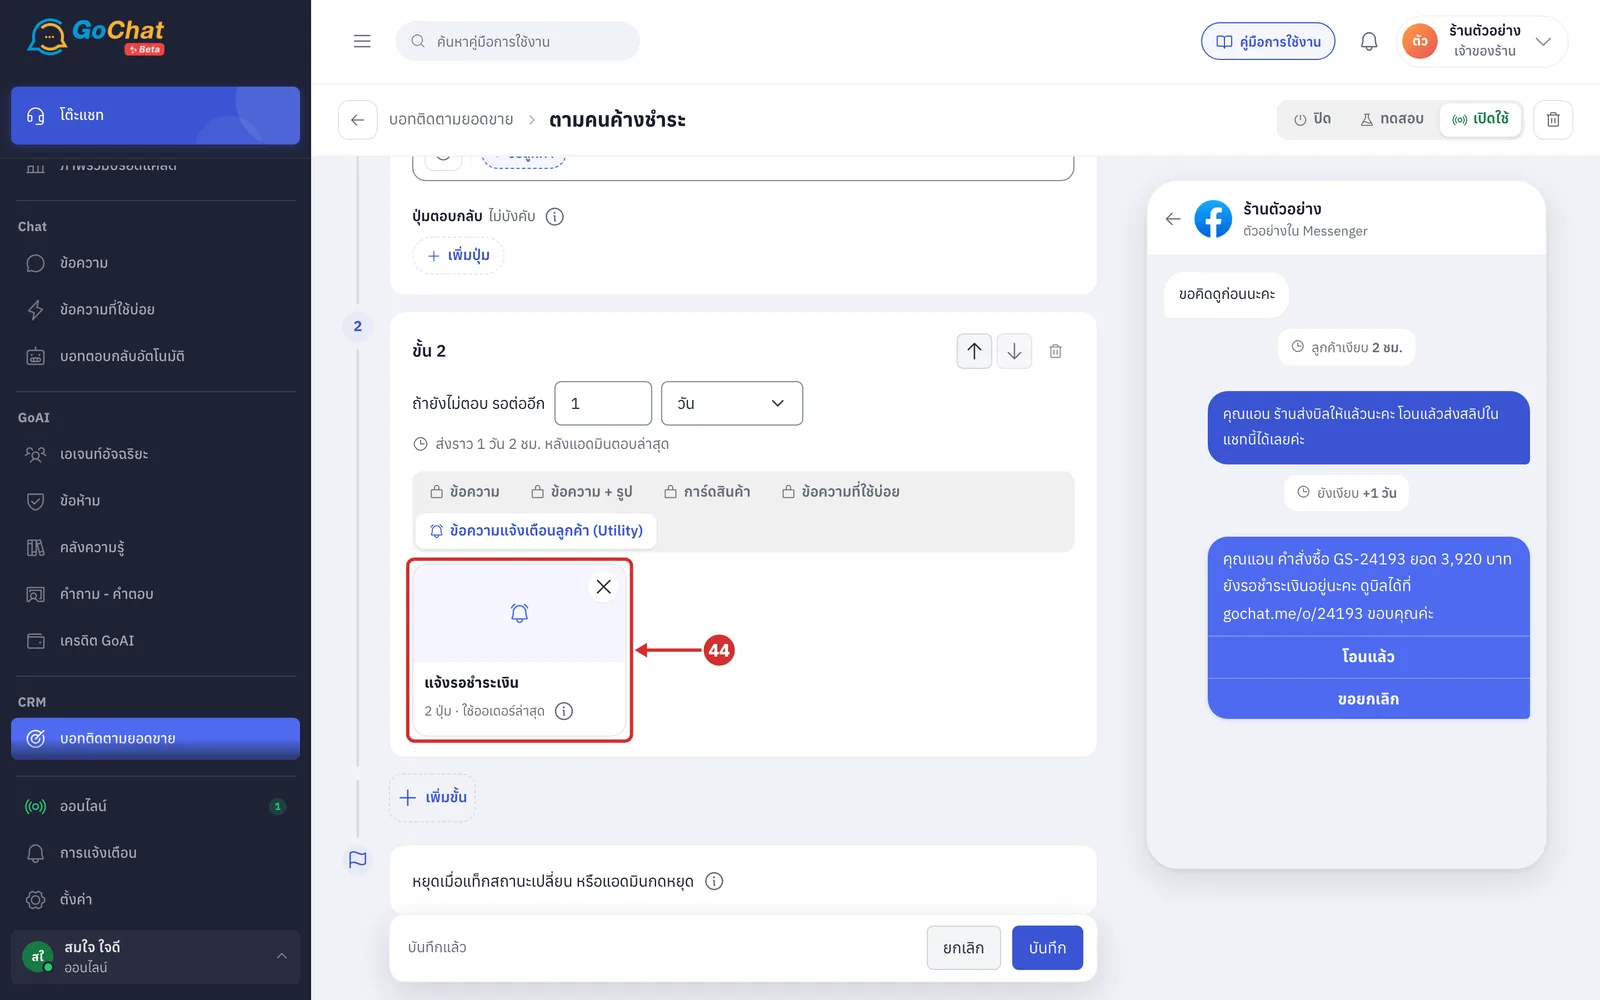
The chosen message appears as a card in the step, with how many buttons it has. Click × to choose another message
A message that uses order data says ใช้ออเดอร์ล่าสุด (Uses the latest order). The bot fills in values from the chat's latest order; for a chat with no order, or whose latest order lacks a value the message uses (such as no tracking number yet), the bot skips this step and says why on the bot row in the chat
Each channel receives this step differently
Facebook chats: get the chosen customer notification message
LINE chats: get the same message with buttons as a push message (counts toward the LINE OA message quota)
Instagram chats: the bot stops before this step, because Instagram cannot send after 24 hours (the step shows the warning ห้อง Instagram หยุดก่อนขั้นนี้ (Instagram chats stop before this step))
Note: Except for customer notification message steps, the bot only sends within 24 hours of the customer's last message, and it does not follow group chats or chats whose sales status is set to ไม่สนใจ (Not interested) from the chat's right-click menu (setting it while the bot is following stops the bot). A chat can have only one follow-up bot at a time, and if a channel is disconnected for a while, the bot waits and sends once it reconnects within the 24-hour window.