

Viewing and editing orders in a chat room
The คำสั่งซื้อ (Orders) section in the right panel of a chat lets you follow and edit a customer's orders without leaving the chat. For example, when a customer asks where their parcel is, you can open the parcel journey straight away; or when a customer wants to add more items after ordering, you can edit the order and let the system recalculate the total from the same chat.
Everyone in your shop who can open the chat can see the orders in this section. All order data is read from your shop's GoSaaS order management system, and edits are saved to GoSaaS directly. Creating a new order is explained in Keying an order in a chat room.
How the Orders section works
The section only shows orders created from this chat, both from the order form and from order commands. It does not include orders created in the back office or from other chats
It is only available to shops connected to the GoSaaS order management system, for Messenger, Instagram and LINE chats
LINE groups show orders created in the group as usual, with these limits
Cards have no buttons for sending to the customer, and the ⋮ button sits at the end of the product row
There is no แก้ไขคำสั่งซื้อ (Edit order) menu item
You can still tap a card to open its details
After you save an edit, the card and the details panel show the new data straight away without refreshing the page
Opening a chat's orders
On the ข้อความ (Messages) page, choose the customer's chat whose orders you want to see
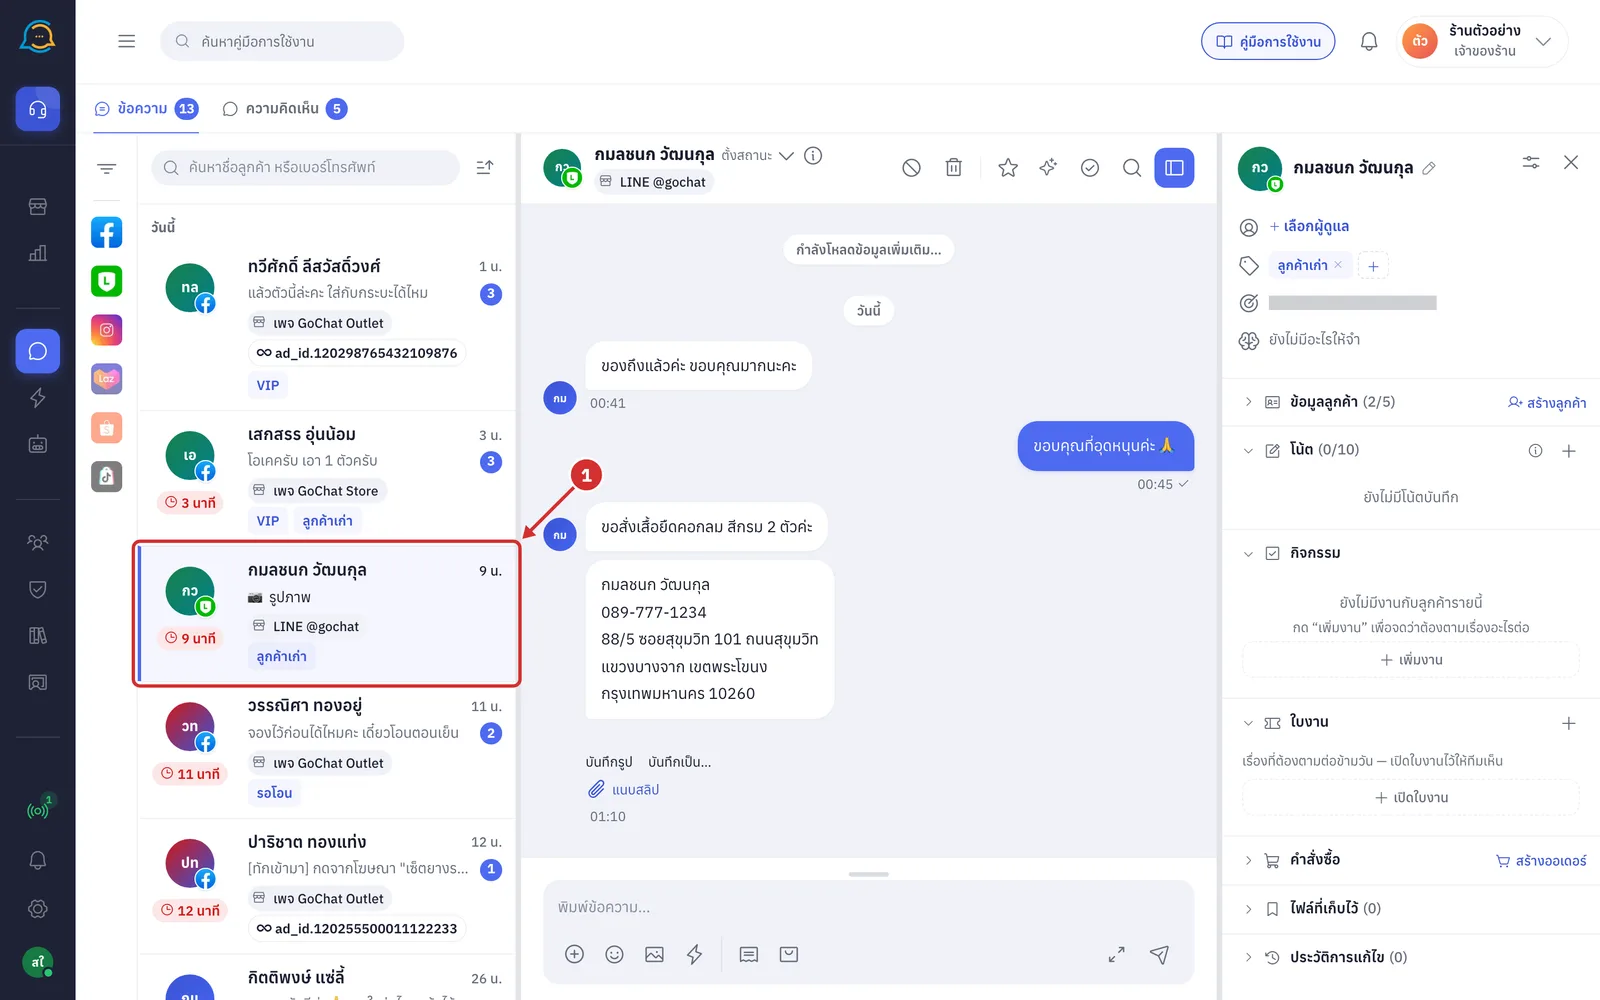
In the right panel of the chat, click the คำสั่งซื้อ (Orders) section name to expand this chat's orders
The number in brackets is the number of orders in this chat. If the system has not loaded them all yet, the number has a + after it
The section is collapsed every time you open the ข้อความ (Messages) page, but the list is loaded in advance, so the number shows even while it is collapsed
Cards are listed newest first, 5 at a time. Click โหลดเพิ่ม (Load more) at the end of the list to see the next ones
The สร้างออเดอร์ (Create order) button on the section keys a new order; see Keying an order in a chat room
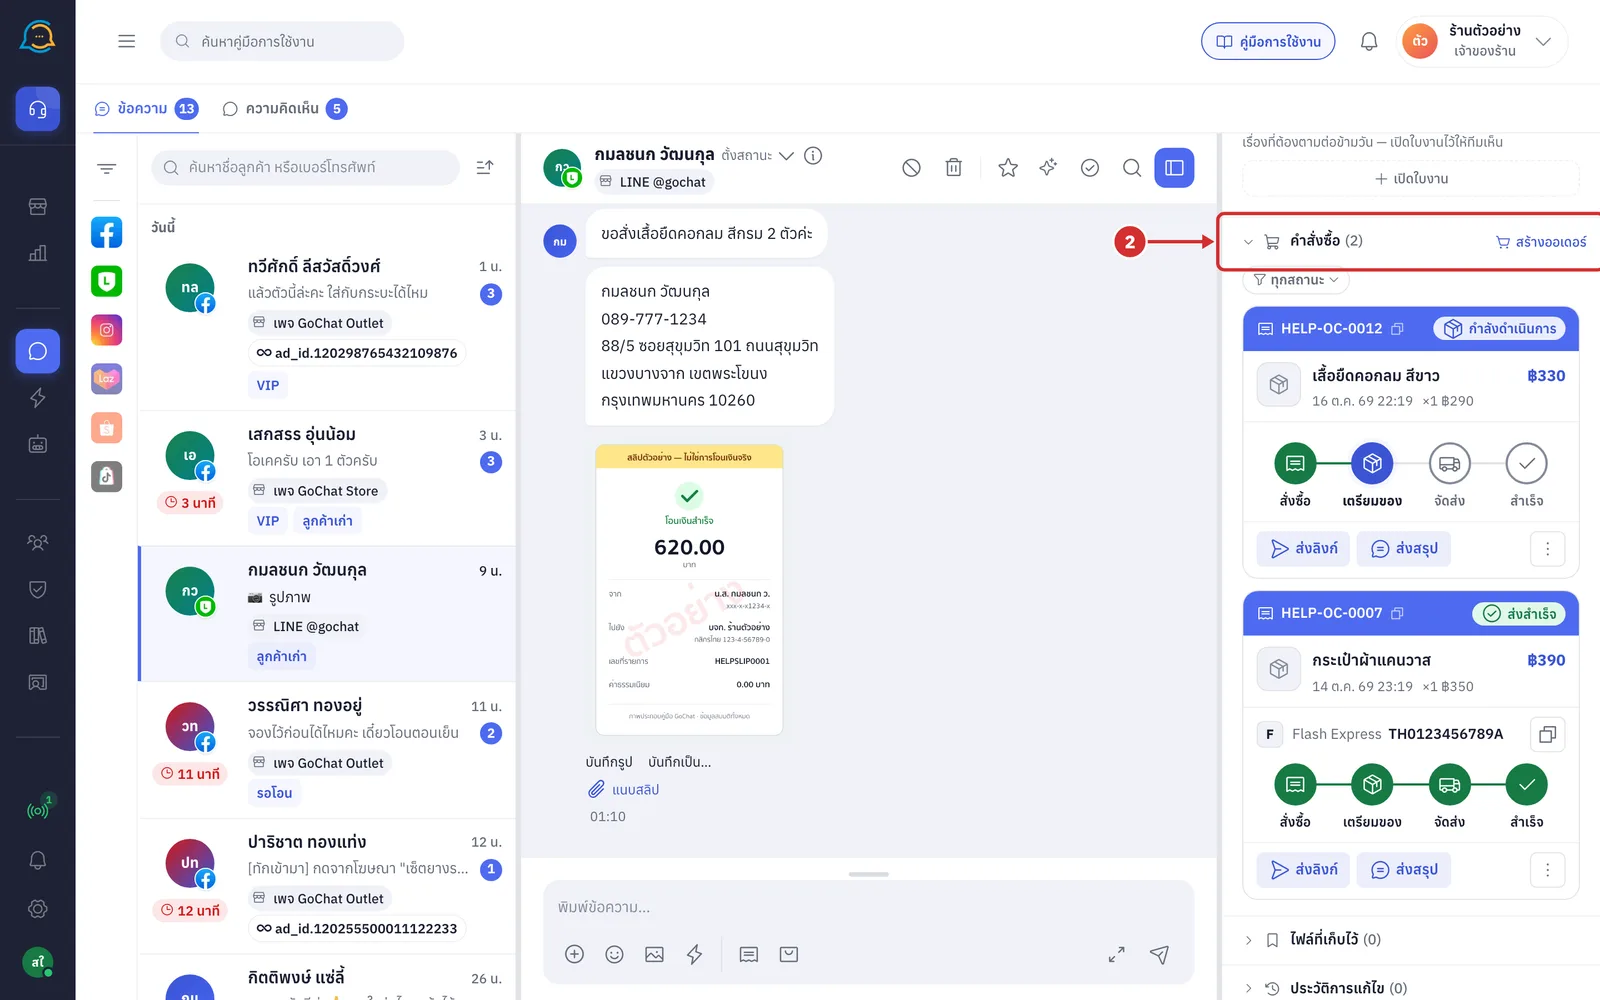
Filtering orders by status
The status filter shows only the orders in the status you want. The button appears above the cards when the chat has more than 1 order, and filtering does not need saving.
Click the ทุกสถานะ (All statuses) button with the funnel icon above the cards. The system lists the statuses
ทุกสถานะ (All statuses): all orders in this chat
Other statuses only appear when there are orders in them, in work order: รอดำเนินการ (Pending), กำลังดำเนินการ (Processing), สำเร็จ (Completed), ตีกลับ (Returned) and ยกเลิก (Cancelled)
The number in brackets is the number of orders in each status
The status names are the same as the labels on the cards, which come from GoSaaS
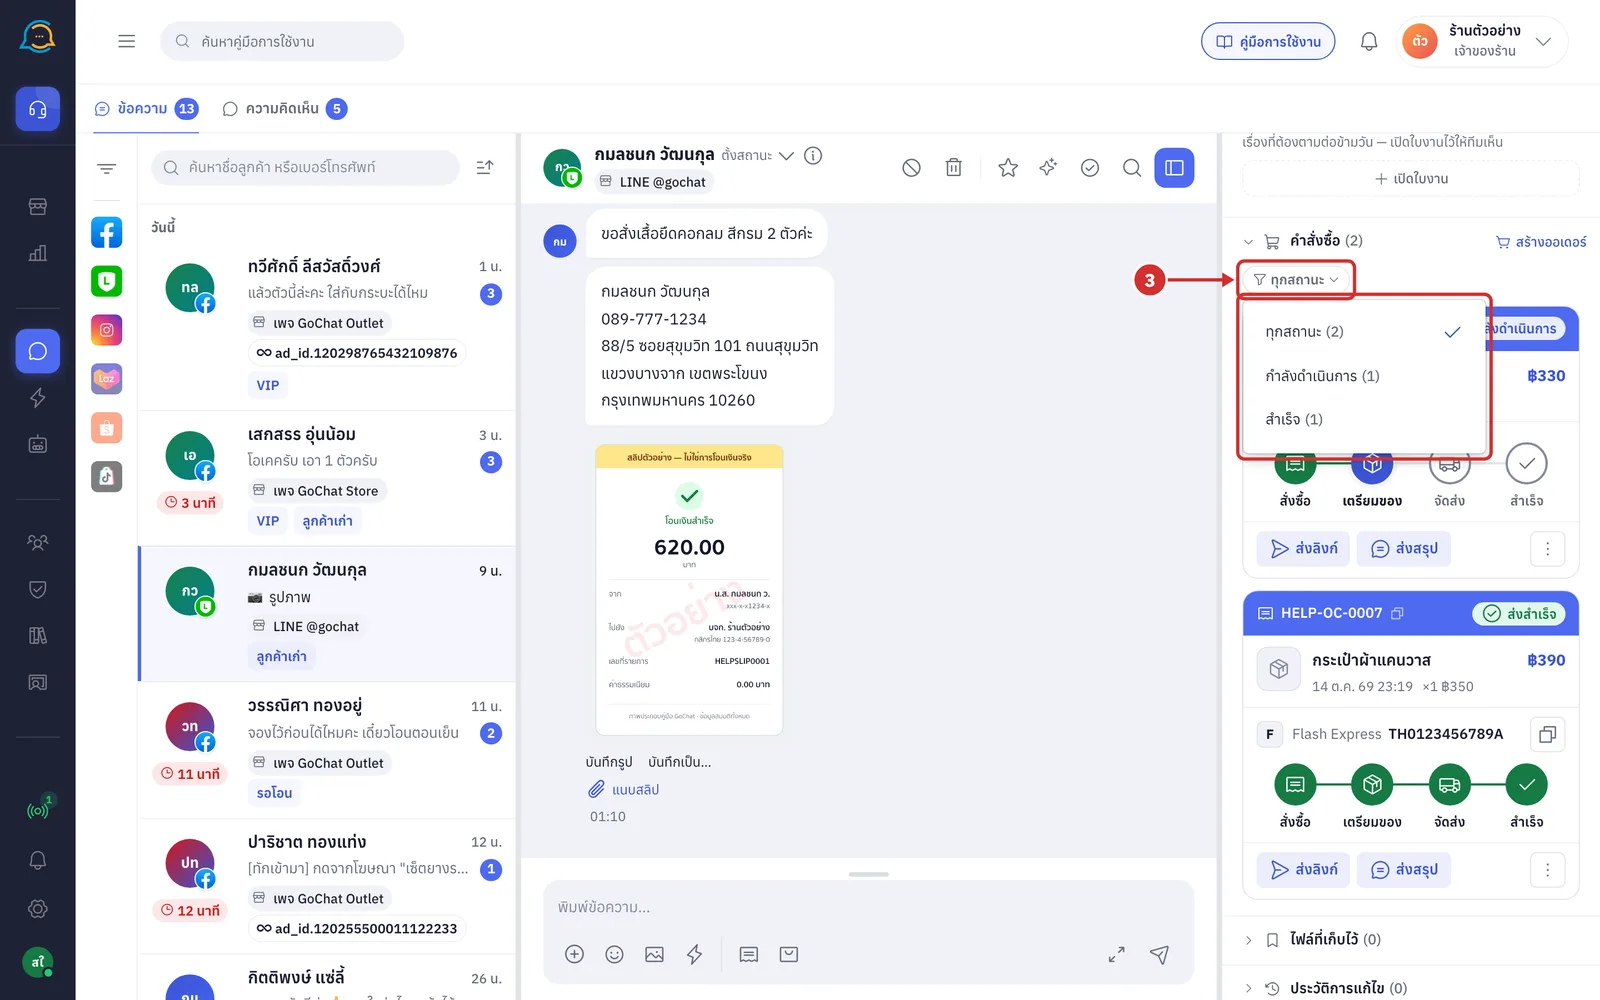
Choose a status, such as สำเร็จ (Completed). Only orders in that status are shown straight away, and the button changes to the chosen status
The number on the คำสั่งซื้อ (Orders) section still counts all orders
The filter works on the orders already loaded. If not all are loaded, the numbers in the status list have a + after them, and you may need to click โหลดเพิ่ม (Load more) to see the rest
The chosen status is only remembered for the last chat you filtered. When you filter another chat or refresh the page, the filter goes back to ทุกสถานะ (All statuses)
When you save a new order, the filter goes back to ทุกสถานะ (All statuses) so the new order is visible at the top
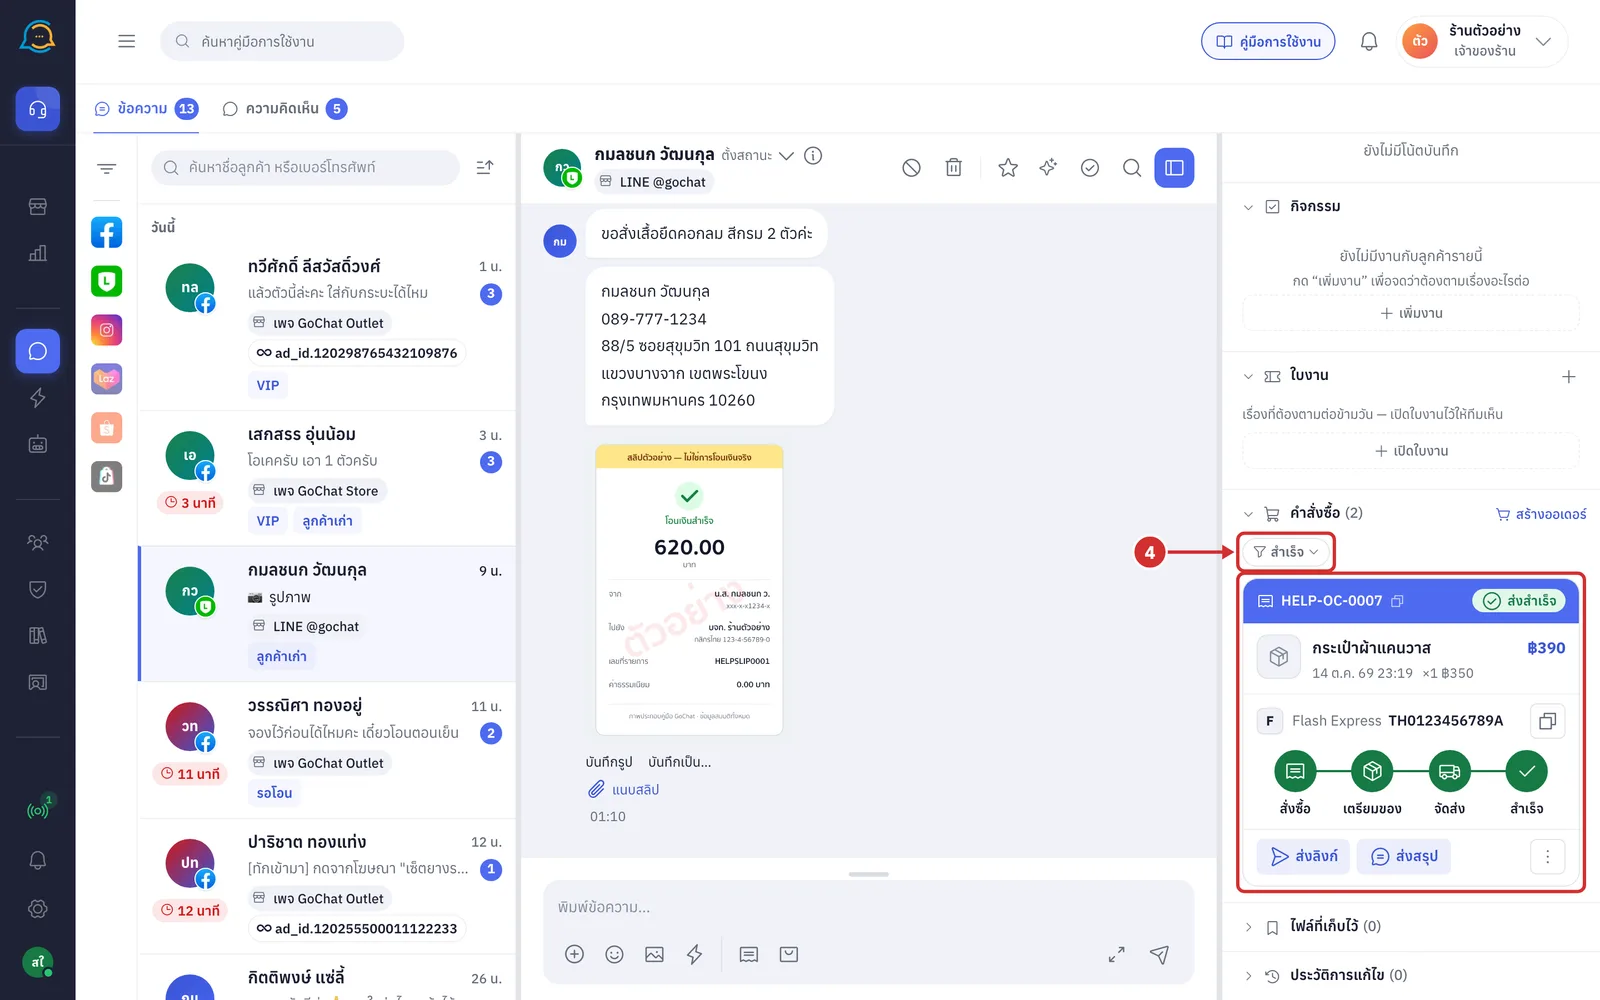
Reading an order card
Each card summarises one order. How to send the card and the order summary to the customer is explained in Keying an order in a chat room.
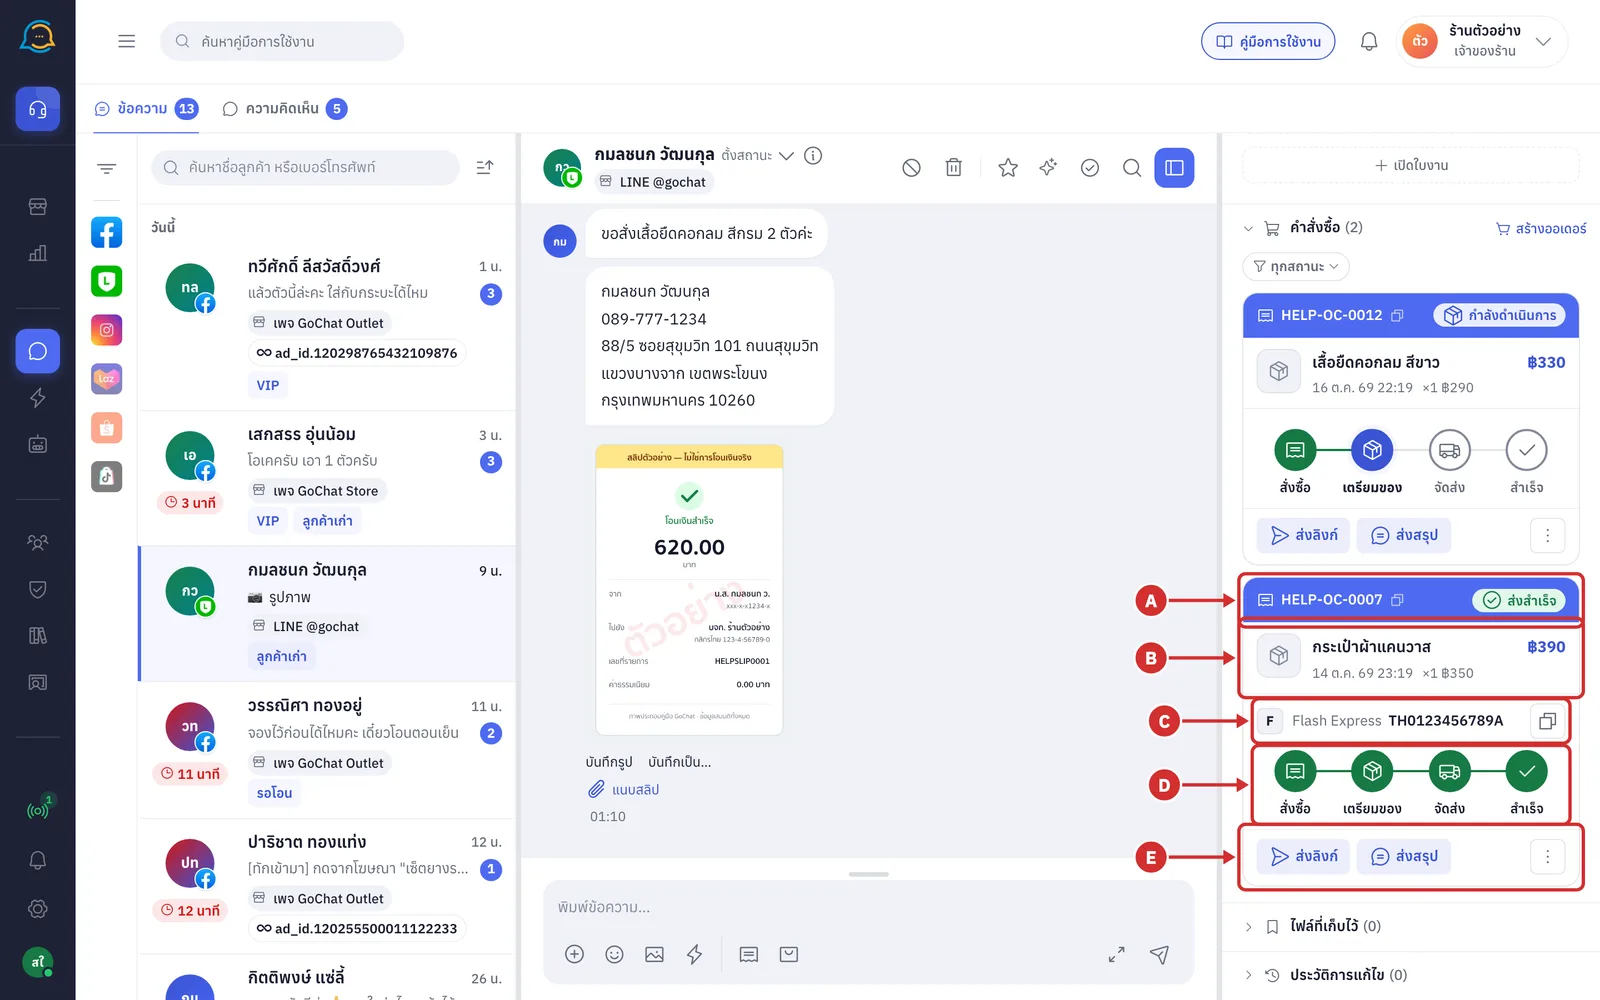
Each order card has these parts
A Card header shows the order number and a status label
Click the order number to copy it; the system shows คัดลอกเลขออเดอร์แล้ว (Order number copied)
For orders without a parcel, the label shows the GoSaaS status, such as กำลังดำเนินการ (Processing)
Once there is a parcel, the label shows the current shipping step instead, such as ส่งสำเร็จ (Delivered), and cancelled orders show ยกเลิกแล้ว (Cancelled)
An order that has just been saved and has no order number yet shows กำลังออกเลขออเดอร์… (Issuing order number…)
B Product row shows the first product, the order date and time, the quantity and price of the first product, the order total, and + อีก N รายการ (+ N more items) when there are several items. Orders that use a promotion show the promotion name under the product row
C Parcel row appears once there is a parcel
It shows the carrier name and the tracking number
Click the copy icon at the end of the row to copy the tracking number; the system shows คัดลอกเลขพัสดุแล้ว (Tracking number copied)
D Order step bar shows how far the order has gone
สั่งซื้อ (Ordered): the order is pending
เตรียมของ (Preparing): the shop is processing it, or the parcel is still waiting for the carrier to pick it up
จัดส่ง (Shipping): the carrier has picked up the parcel
สำเร็จ (Completed): the order is completed or the parcel has been delivered
For a returned parcel, the bar shows the return steps instead, with พัสดุกำลังตีกลับไปยังต้นทาง (The parcel is being returned to the sender)
Cancelled orders have no step bar
E Card buttons are
ส่งลิงก์ (Send link): send the order card to the customer in the chat
ส่งสรุป (Send summary): put an order summary in the message box without sending it
⋮: more options (step 16)
Cancelled orders have no button row, and the ⋮ button sits at the end of the product row instead
Other states of the Orders section
Besides the usual list of cards, the คำสั่งซื้อ (Orders) section can show these states
While loading for the first time, the system shows grey placeholder cards until the list arrives
ยังไม่มีคำสั่งซื้อจากแชทนี้ (No orders from this chat yet): this chat has no orders yet, with a dashed สร้างออเดอร์ (Create order) button. LINE groups only show the message
If the list cannot be loaded, the system shows a message depending on the cause
ไม่มีสิทธิ์ดูคำสั่งซื้อของร้านนี้ (No permission to view this shop's orders): GoSaaS does not allow viewing the orders, so there is no try-again button
เซสชันหมดอายุ — รีเฟรชหน้าแล้วเข้าสู่ระบบใหม่ (Session expired — refresh the page and sign in again): refresh the page and sign in again
ดึงรายการคำสั่งซื้อไม่สำเร็จ — ลองใหม่ (Could not load the orders — try again): click ลองใหม่ (Try again) to load again
If the shop's GoSaaS sign-in has expired, the system shows เข้าสู่ระบบ GoSaaS ใหม่ (Sign in to GoSaaS again) instead of the try-again button
If a reload fails while cards are already shown, the system keeps the existing cards and shows a bar such as ดึงรายการคำสั่งซื้อไม่สำเร็จ — ใบที่เห็นอยู่อาจไม่ล่าสุด (Could not load the orders — the orders shown may be out of date) with ลองใหม่ (Try again)
If โหลดเพิ่ม (Load more) fails, the system shows โหลดหน้าถัดไปไม่สำเร็จ — ใบที่เห็นอยู่ยังถูกต้อง (Could not load the next page — the orders shown are still correct) and the button changes to ลองใหม่ (Try again)
If your internet drops, the system shows ออฟไลน์ — สถานะที่เห็นอาจไม่ล่าสุด (Offline — the statuses shown may be out of date) above the cards
ร้านนี้ยังไม่ได้เชื่อมกับระบบจัดการออเดอร์ — เชื่อมที่หน้าช่องทางก่อนถึงจะเห็นคำสั่งซื้อ (This shop is not connected to the order management system — connect it on the Channels page to see orders): the shop is not connected to GoSaaS yet
Viewing order details
The details panel shows everything about one order: the parcel, recipient, products, amounts and payment. The example in this section is an order that has been delivered.
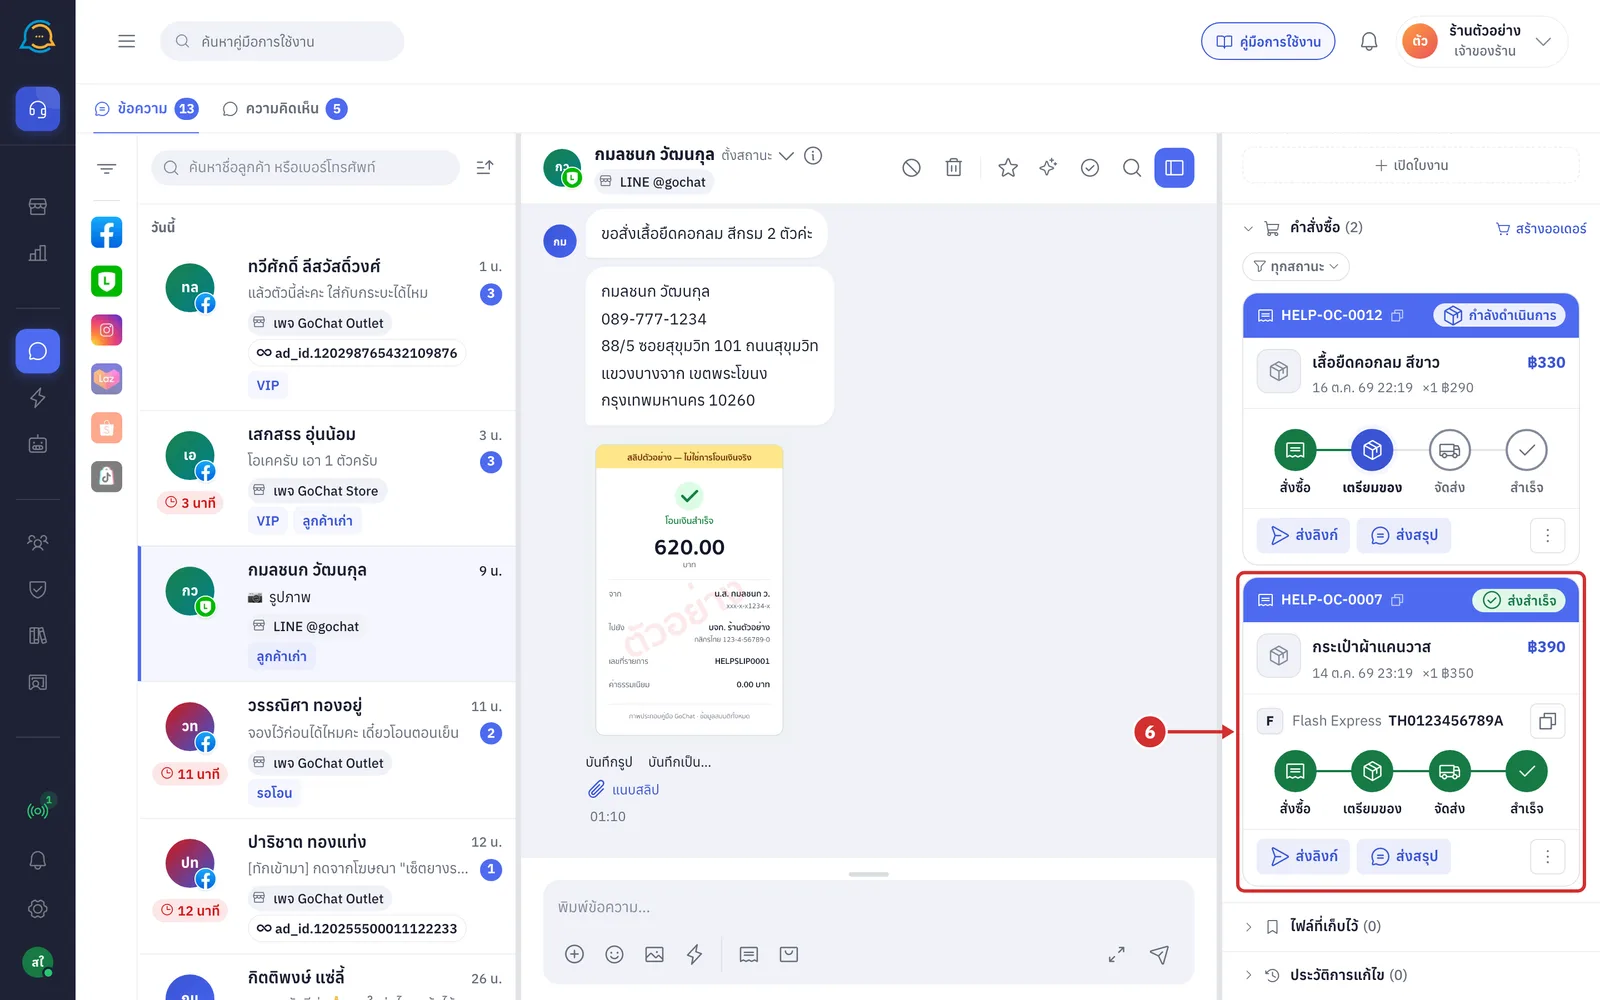
Tap the order card you want. The system opens the details panel at the full height of the right panel
You can tap anywhere on the card except the order number and the card buttons
Only orders that already have an order number can be opened
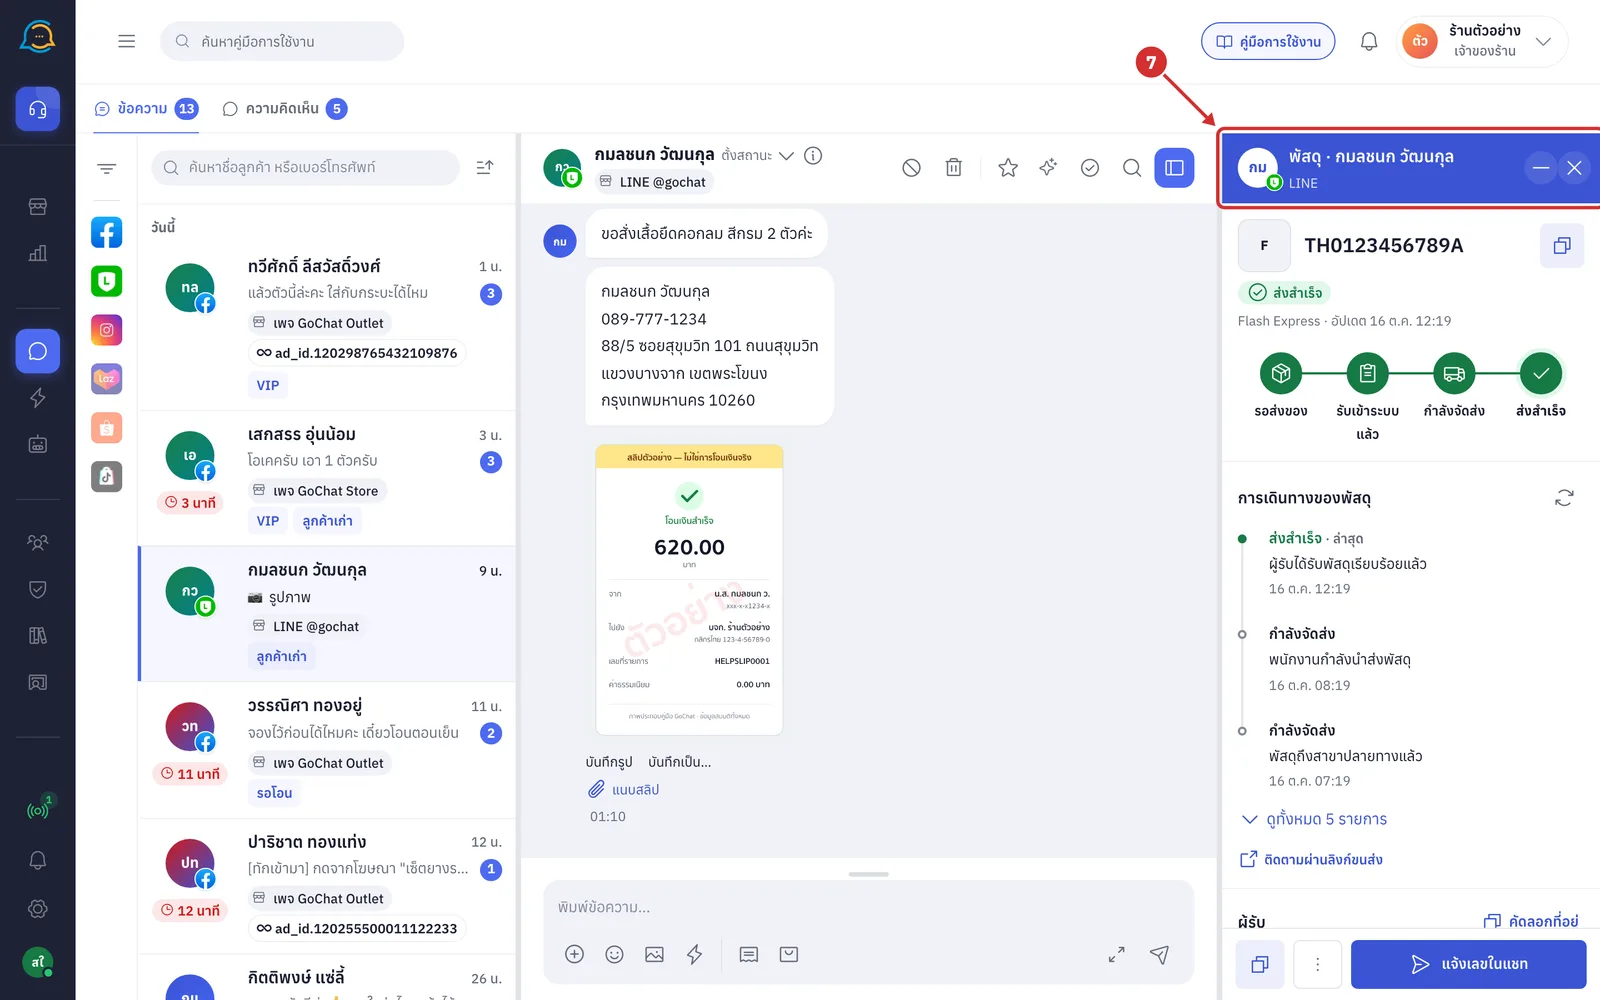
The panel header shows พัสดุ · customer name (Parcel · customer name) for orders with a parcel, or คำสั่งซื้อ · customer name (Order · customer name) for orders without one, and the second line shows the chat's channel
Click – or press Esc to go back to the order list at the same position
Click × to close the whole right panel
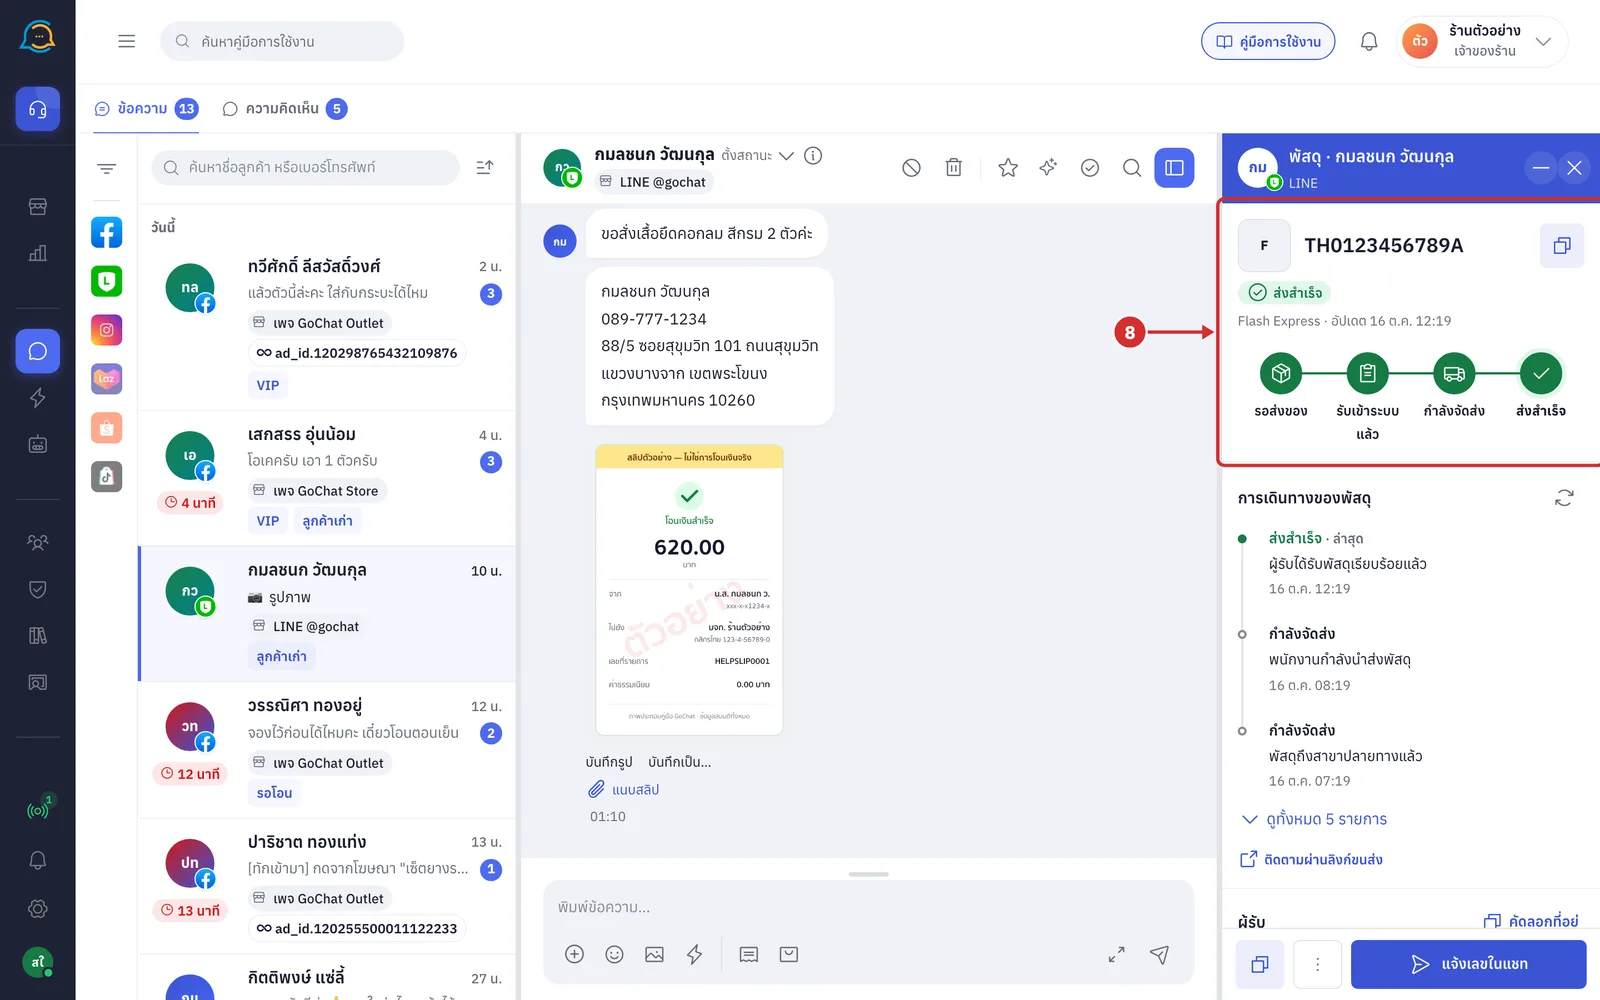
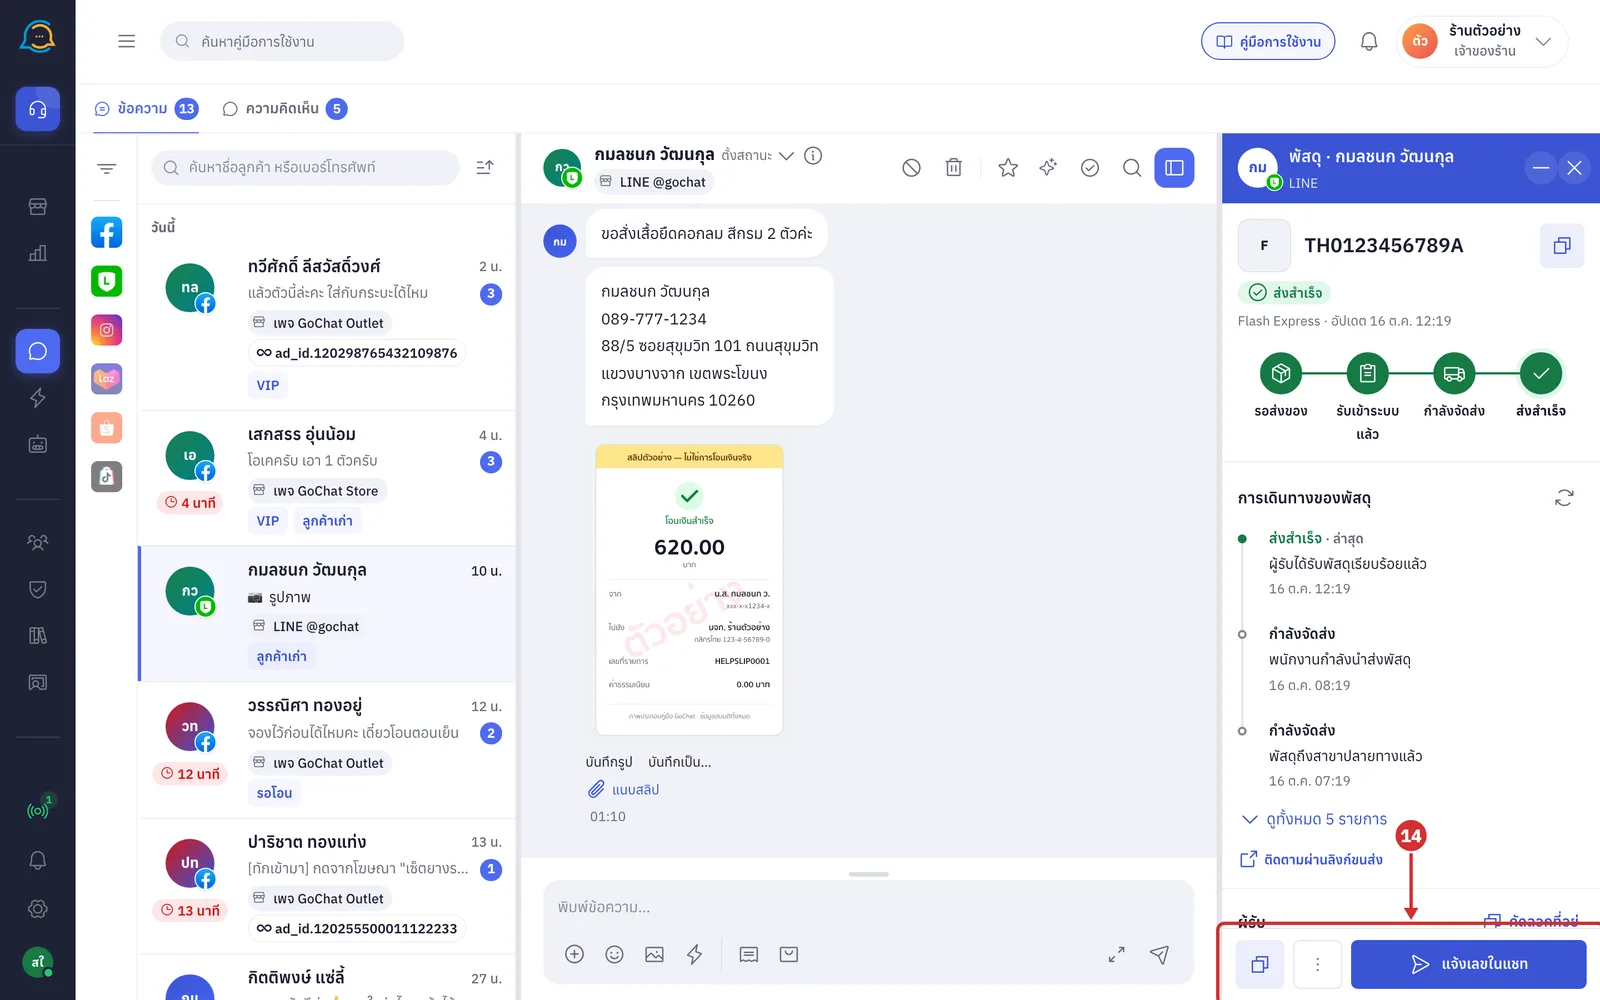
The top part of the panel shows the parcel and its status
The carrier logo or first letter, the tracking number and a copy button
A label with the current shipping step, such as ส่งสำเร็จ (Delivered), and a line with the carrier name and when the carrier last updated
The carrier's shipping steps, such as รอส่งของ (Waiting to ship), รับเข้าระบบแล้ว (Picked up), กำลังจัดส่ง (Out for delivery) and ส่งสำเร็จ (Delivered)
For orders without a parcel, this part shows the order number, a copy button, the order status label and ยังไม่มีพัสดุ (No parcel yet) with the order date and time
Cancelled orders have a bar at the top starting with คำสั่งซื้อนี้ถูกยกเลิกแล้ว (This order has been cancelled)
Under การเดินทางของพัสดุ (Parcel journey), the system shows the carrier's events, newest first. The first event has · ล่าสุด (· latest) after it
The 3 latest events are shown first (step 10)
Click the circular-arrow button at the end of the heading (ดึงสถานะล่าสุด, Get the latest status) to fetch the latest status from the carrier again
Click ติดตามผ่านลิงก์ขนส่ง (Track on the carrier's site) to open the carrier's tracking page in a new tab
More details
If the carrier data cannot be fetched, the system shows ดึงการเดินทางของพัสดุไม่ได้ตอนนี้ — แสดงสถานะตามออเดอร์ไปก่อน (The parcel journey cannot be fetched right now — showing the status from the order for now) with a ลองใหม่ (Try again) button and a button that opens the carrier's tracking page
If the carrier has no movement yet, the system shows ยังไม่มีความเคลื่อนไหวจากขนส่ง (No movement from the carrier yet)
For parcels not shipped through GoShip, the system shows ขนส่งนี้ไม่ได้ส่งผ่าน GoShip — ไม่มีขั้นและการเดินทางให้ดูในนี้ ติดตามได้ที่หน้าของขนส่ง (This carrier is not shipped through GoShip — there are no steps or journey to show here; track it on the carrier's page) with a tracking link
Orders without a parcel or cancelled orders do not have this section
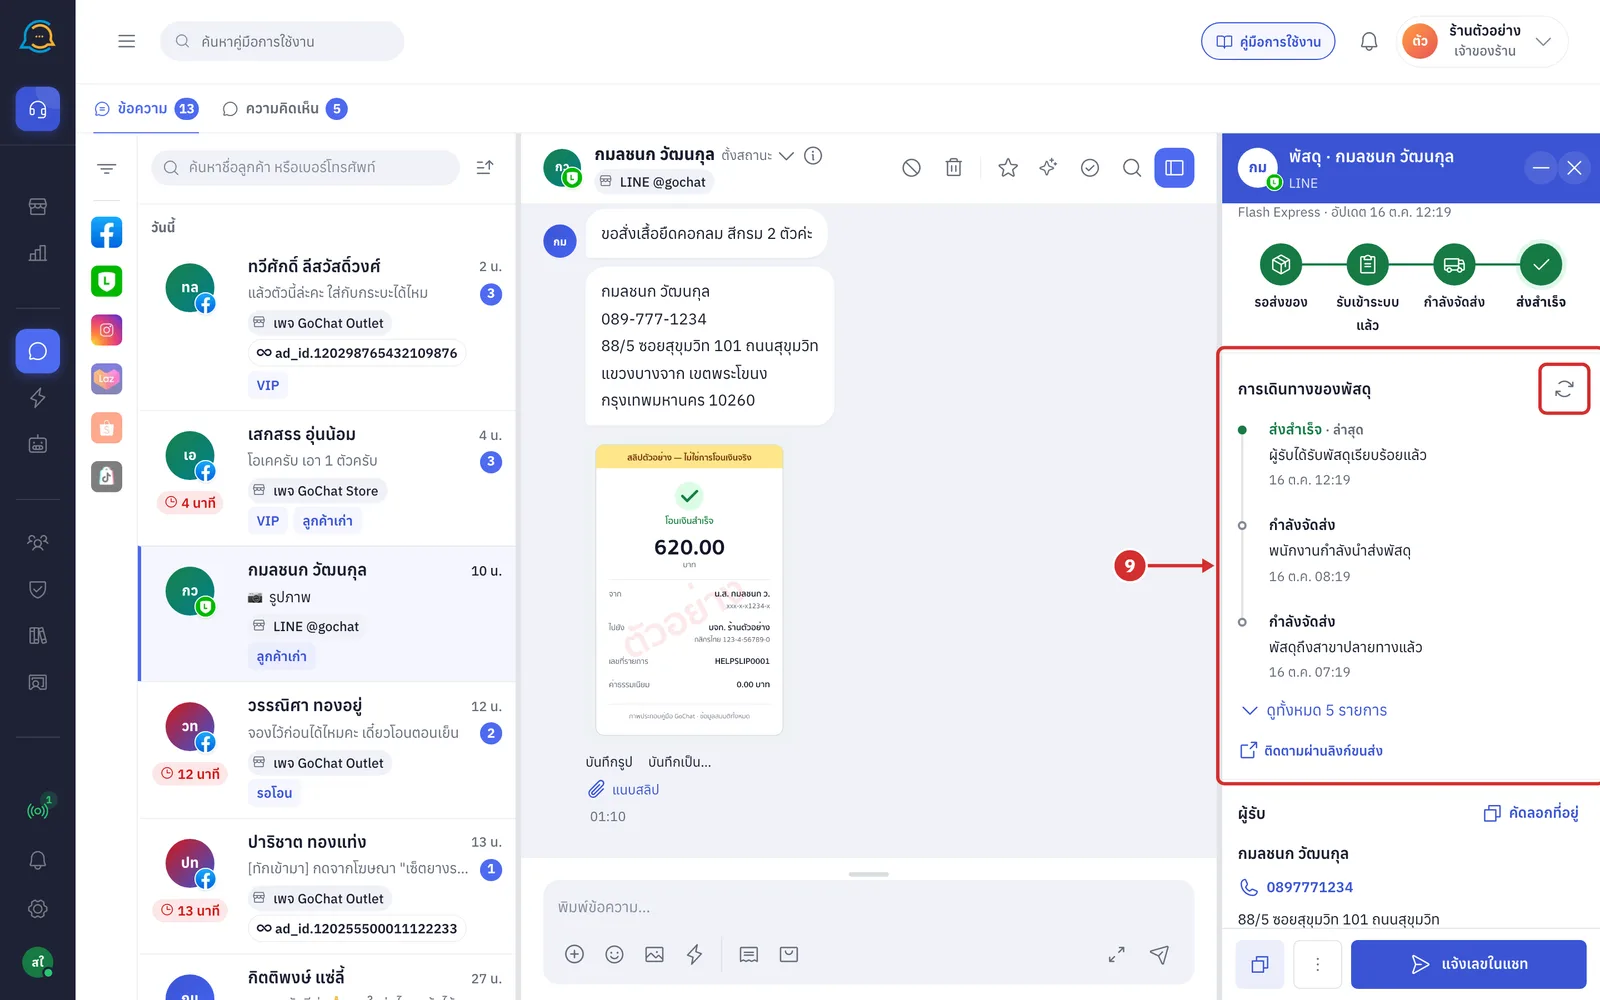
Click ดูทั้งหมด 5 รายการ (See all 5 events) to show all events
This button appears when there are more than 3 events, and the number is the total number of events
Click ย่อเหลือล่าสุด (Show latest only) to collapse back to 3 events
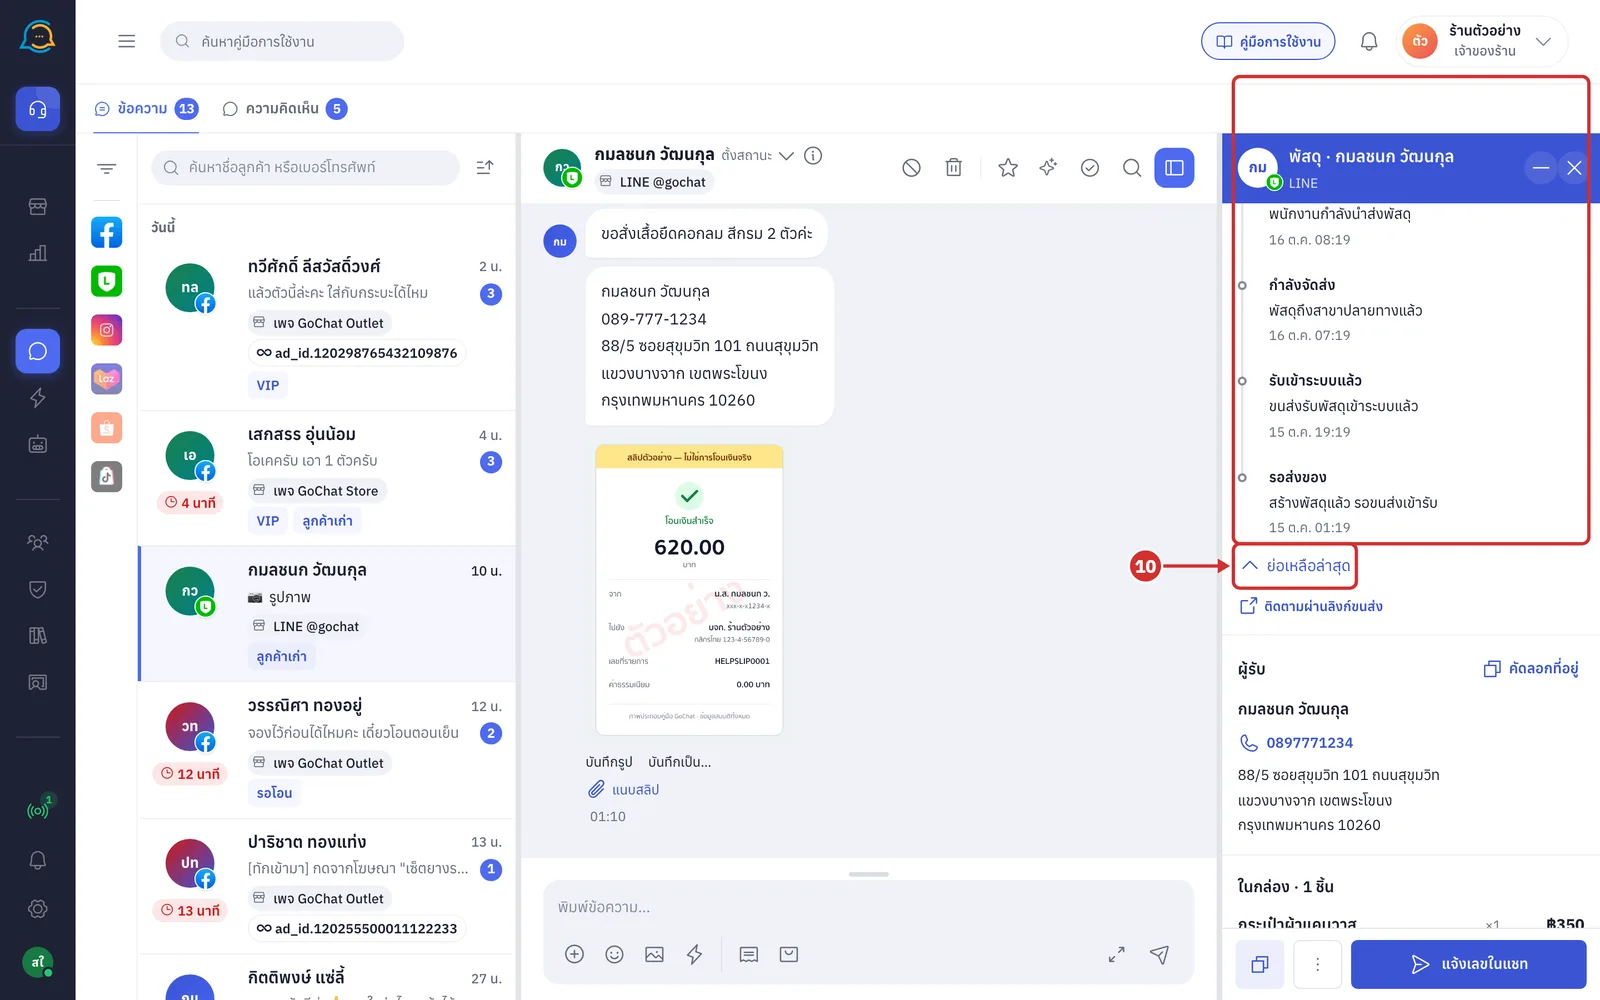
Under ผู้รับ (Recipient), the system shows the name, phone number and delivery address of this order
Click คัดลอกที่อยู่ (Copy address) to copy the name, phone and address to paste elsewhere; the system shows คัดลอกชื่อ เบอร์ และที่อยู่ผู้รับแล้ว (Recipient name, phone and address copied)
Tap the phone number to call the recipient from a device that can make calls
While loading, this part shows grey placeholders
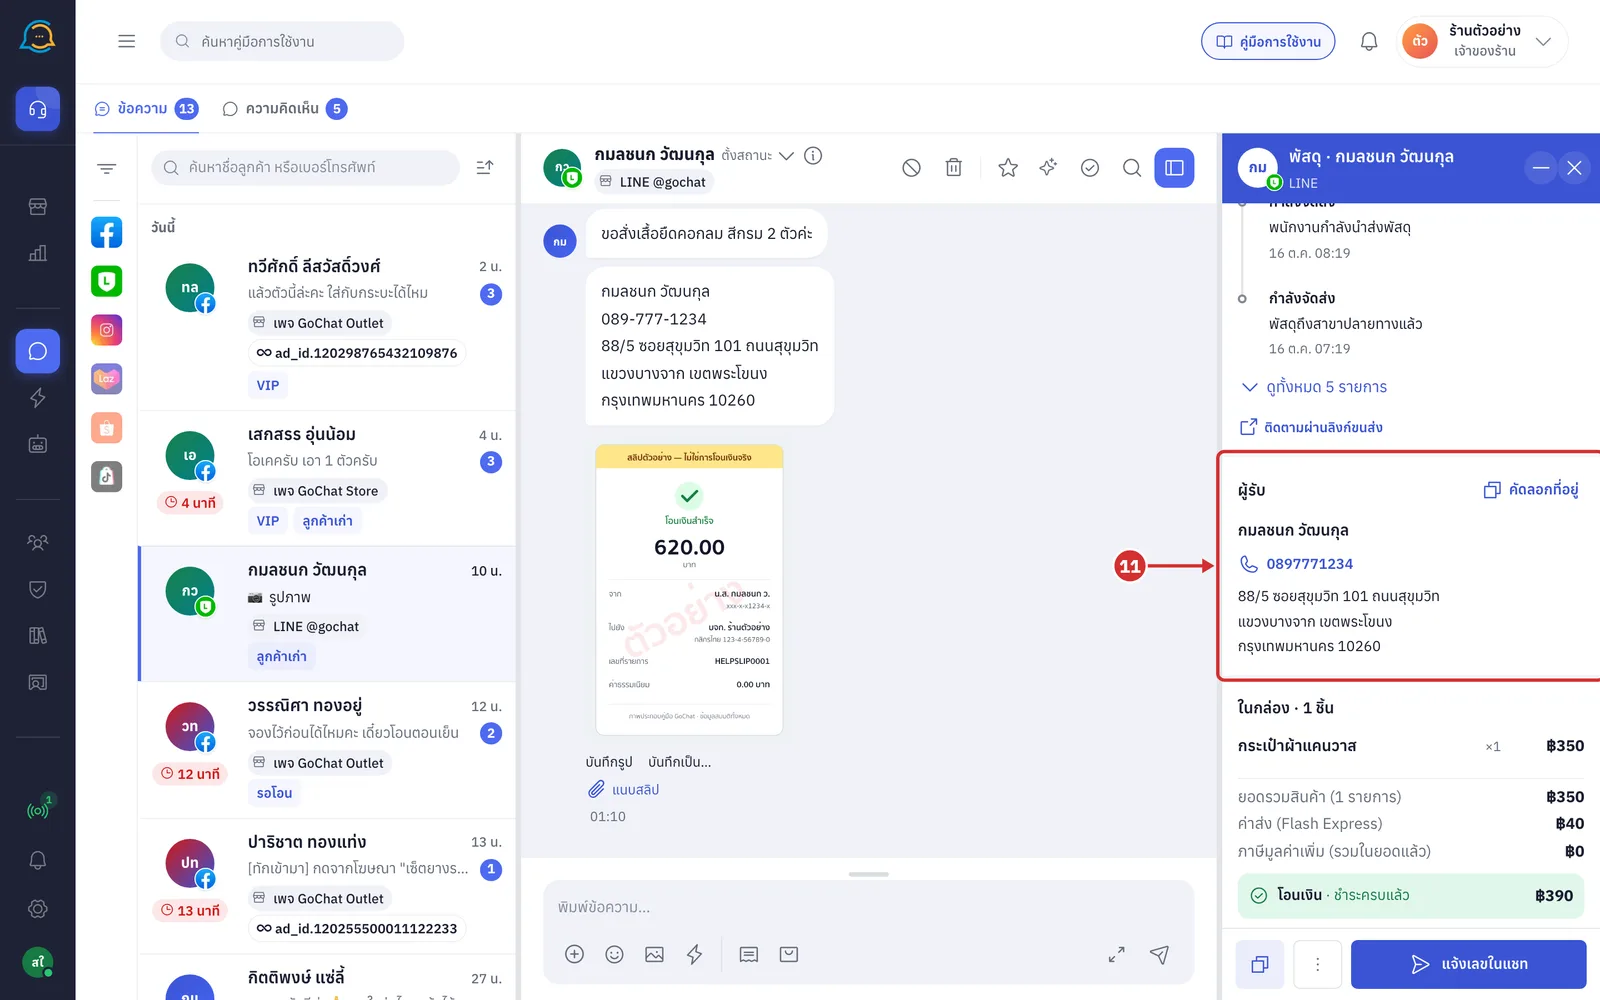
Under ในกล่อง · N ชิ้น (In the box · N pieces), the system shows the products and amounts of the order
A Product list: each line shows the product name, quantity and the line amount after discount
Products in a promotion sit under the promotion label with the discount, and free gifts show ฟรี (Free)
The order note appears at the end of the list, starting with หมายเหตุ · (Note ·)
If the list cannot be loaded, the heading becomes สินค้า · N รายการ (Products · N items) and only the first product is shown, with โหลดผู้รับ/รายการไม่สำเร็จ (Could not load the recipient/items) and a ลองใหม่ (Try again) button
B Amounts from GoSaaS are
ยอดรวมสินค้า (Products subtotal) with the number of items
ส่วนลด (Discount) and ค่าบริการเก็บเงินปลายทาง (COD service fee), shown when there is an amount
ค่าส่ง (Shipping) with the carrier name
ภาษีมูลค่าเพิ่ม (รวมในยอดแล้ว) (VAT, included in the total), which is already included, so do not add it again
C Payment shows the payment method and net total with the payment status
ชำระครบแล้ว (Fully paid): paid in full
ชำระแล้ว ฿x · ค้าง ฿y (Paid ฿x · outstanding ฿y): partly paid
ยังไม่ชำระ (Not paid): no payment yet
ตรวจสลิปผ่าน (Slip verified): the slip has passed verification
Cash-on-delivery orders show เก็บเงินปลายทาง (Cash on delivery) with the amount to collect, marked ยอดที่ขนส่งเก็บ (Amount the carrier collects) once the carrier has reported it, or (ยอดสุทธิ) (net total) when there is no amount from the carrier yet
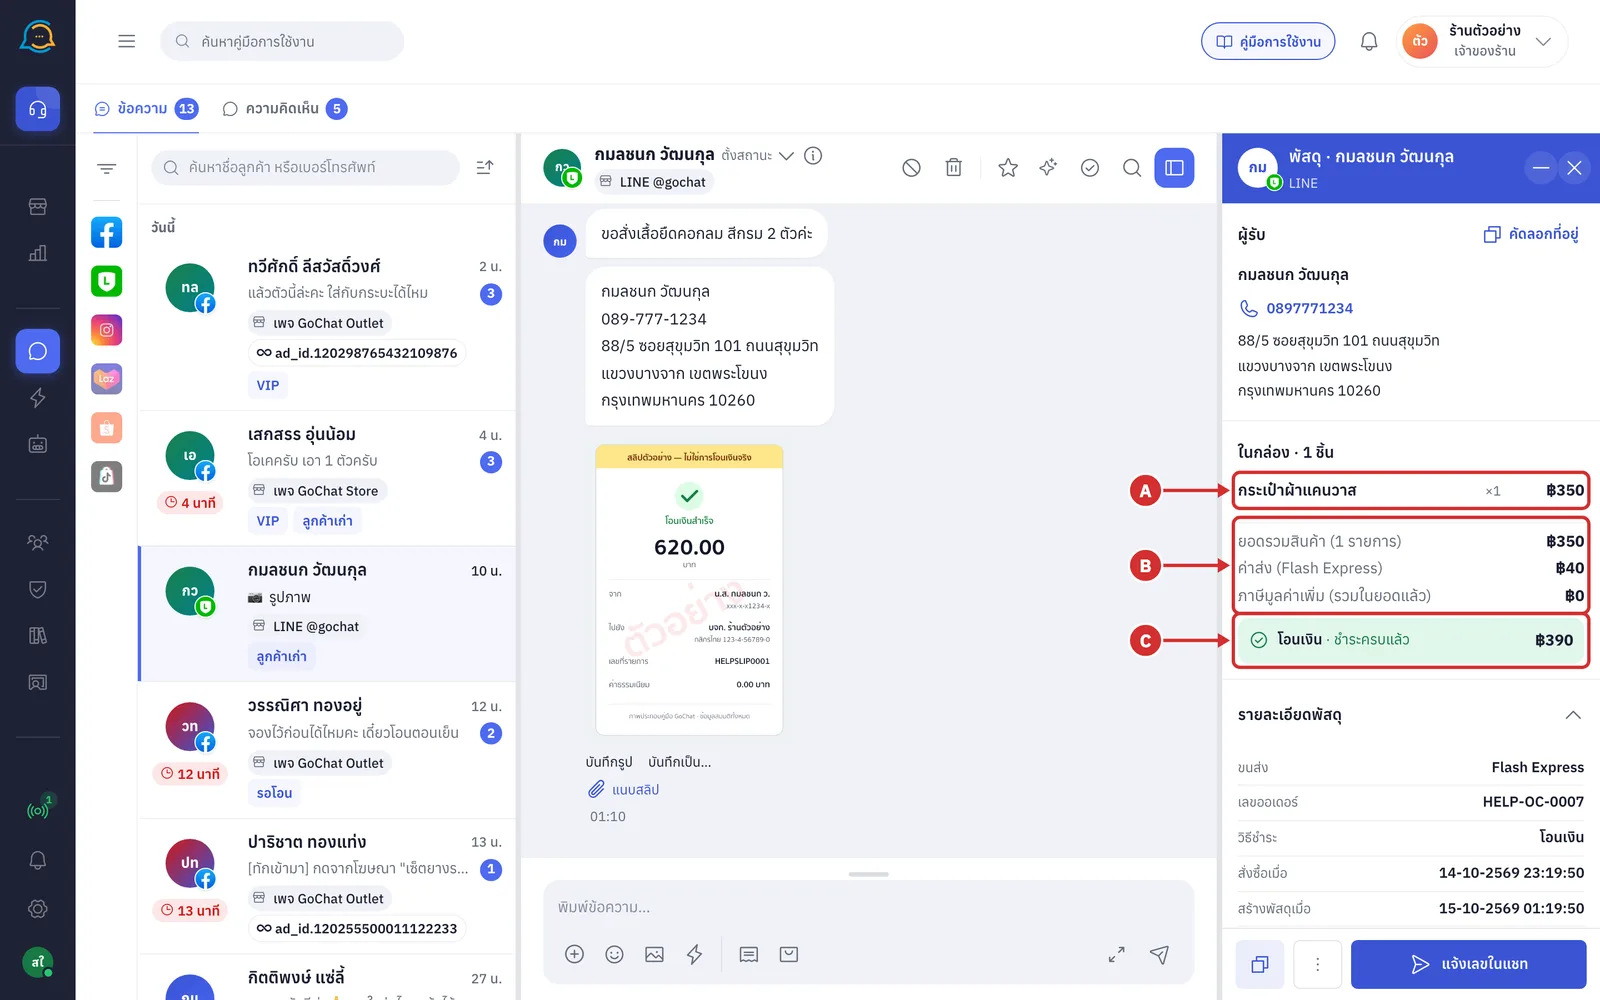
Under รายละเอียดพัสดุ (Parcel details), the system shows the order and parcel data
ขนส่ง (Carrier), เลขออเดอร์ (Order number) and วิธีชำระ (Payment method)
สั่งซื้อเมื่อ (Ordered at) and สร้างพัสดุเมื่อ (Parcel created at)
น้ำหนัก · ขนาด (Weight · size) of the parcel, when the carrier provides it
Click เปิดในระบบหลังบ้าน (Open in the back office) to open this order in GoSaaS in a new tab
Click the heading to collapse or expand this part
For orders without a parcel, this section is called รายละเอียดคำสั่งซื้อ (Order details)
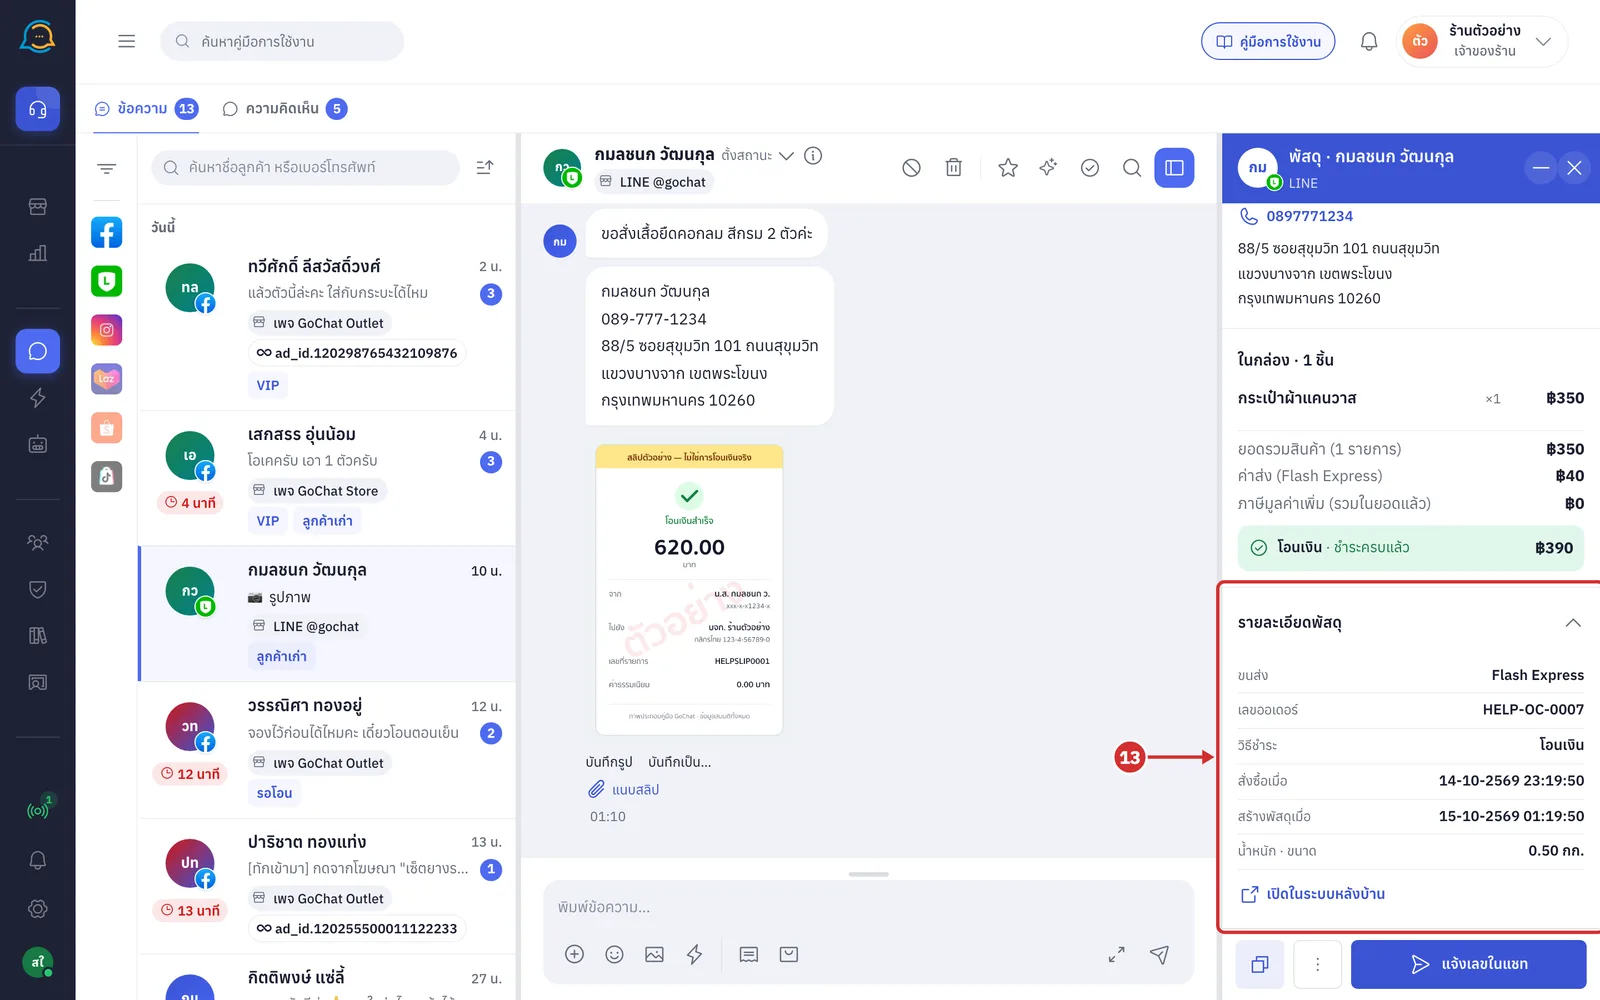
The bar at the bottom of the panel has these buttons
A copy button for the tracking number
The ⋮ button for more options (step 15)
แจ้งเลขในแชท (Send tracking in chat) puts a message with the order number, carrier, tracking number and the tracking link when there is one into this chat's message box without sending it, so you can check or edit it and send it yourself
For orders without a parcel, the main button is ส่งลิงก์ (Send link), which works like the button on the card
Cancelled orders have no main button and show ยกเลิกแล้ว — ไม่มีอะไรต้องแจ้งลูกค้า (Cancelled — nothing to tell the customer)
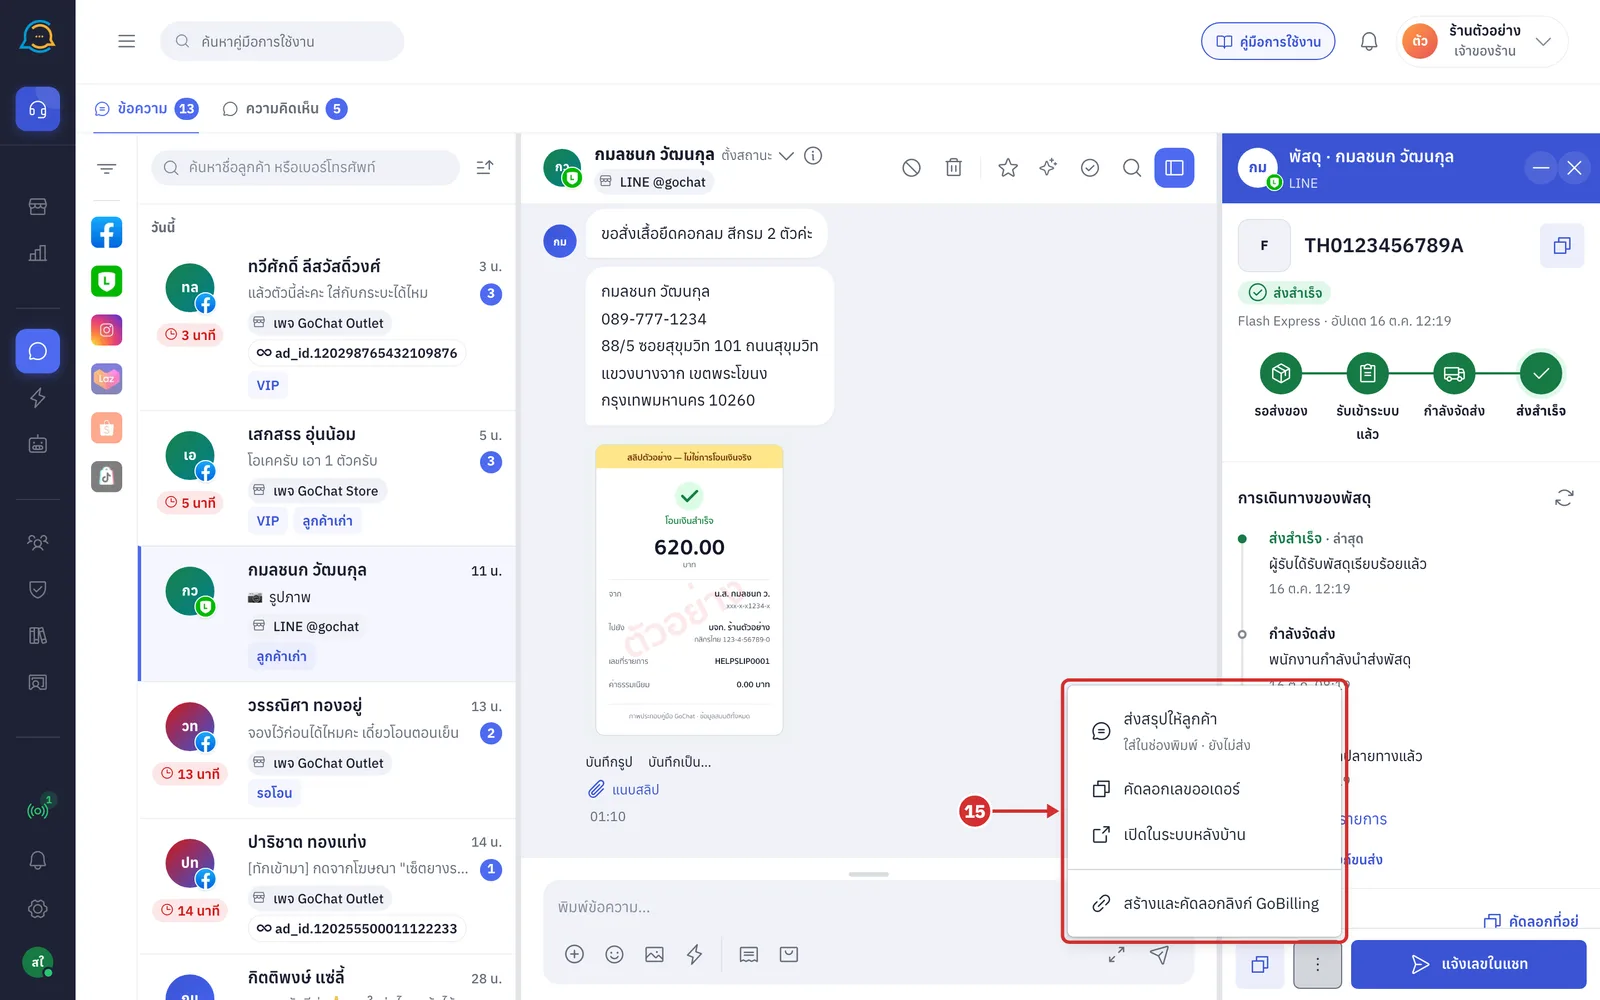
Click the ⋮ button in the bottom bar. The system shows this menu
ส่งสรุปให้ลูกค้า (Send summary to customer): puts an order summary in the message box without sending it
คัดลอกเลขออเดอร์ (Copy order number): copies the order number
เปิดในระบบหลังบ้าน (Open in the back office): opens this order in GoSaaS
สร้างและคัดลอกลิงก์ GoBilling (Create and copy GoBilling link): works like the menu on the card (step 16)
Using the card's more-options menu
Click the ⋮ button at the bottom right of the card. The system shows this menu
A แก้ไขคำสั่งซื้อ (Edit order) to open the order edit form in the right panel (step 17)
B เปิดในระบบหลังบ้าน (Open in the back office) to open this order in GoSaaS in a new tab
If the system has not received the link yet, the item shows เปิดในระบบหลังบ้าน (รอลิงก์…) (Open in the back office, waiting for link…) and cannot be clicked yet
C สร้างและคัดลอกลิงก์ GoBilling (Create and copy GoBilling link) to create a link to this order's GoBilling page and copy it
When it is created, the system shows สร้างและคัดลอกลิงก์ GoBilling แล้ว (GoBilling link created and copied)
For orders that already have a link, the item is คัดลอกลิงก์ GoBilling (Copy GoBilling link)
If it cannot be created, the system shows a message such as สร้างลิงก์ไม่สำเร็จ — ลองใหม่อีกครั้ง (Could not create the link — try again)
If your shop's plan has no GoBilling, the system shows แพ็กเกจของร้านยังไม่มีลิงก์ GoBilling (Your shop's plan does not include GoBilling links)
Cancelled orders do not have this item
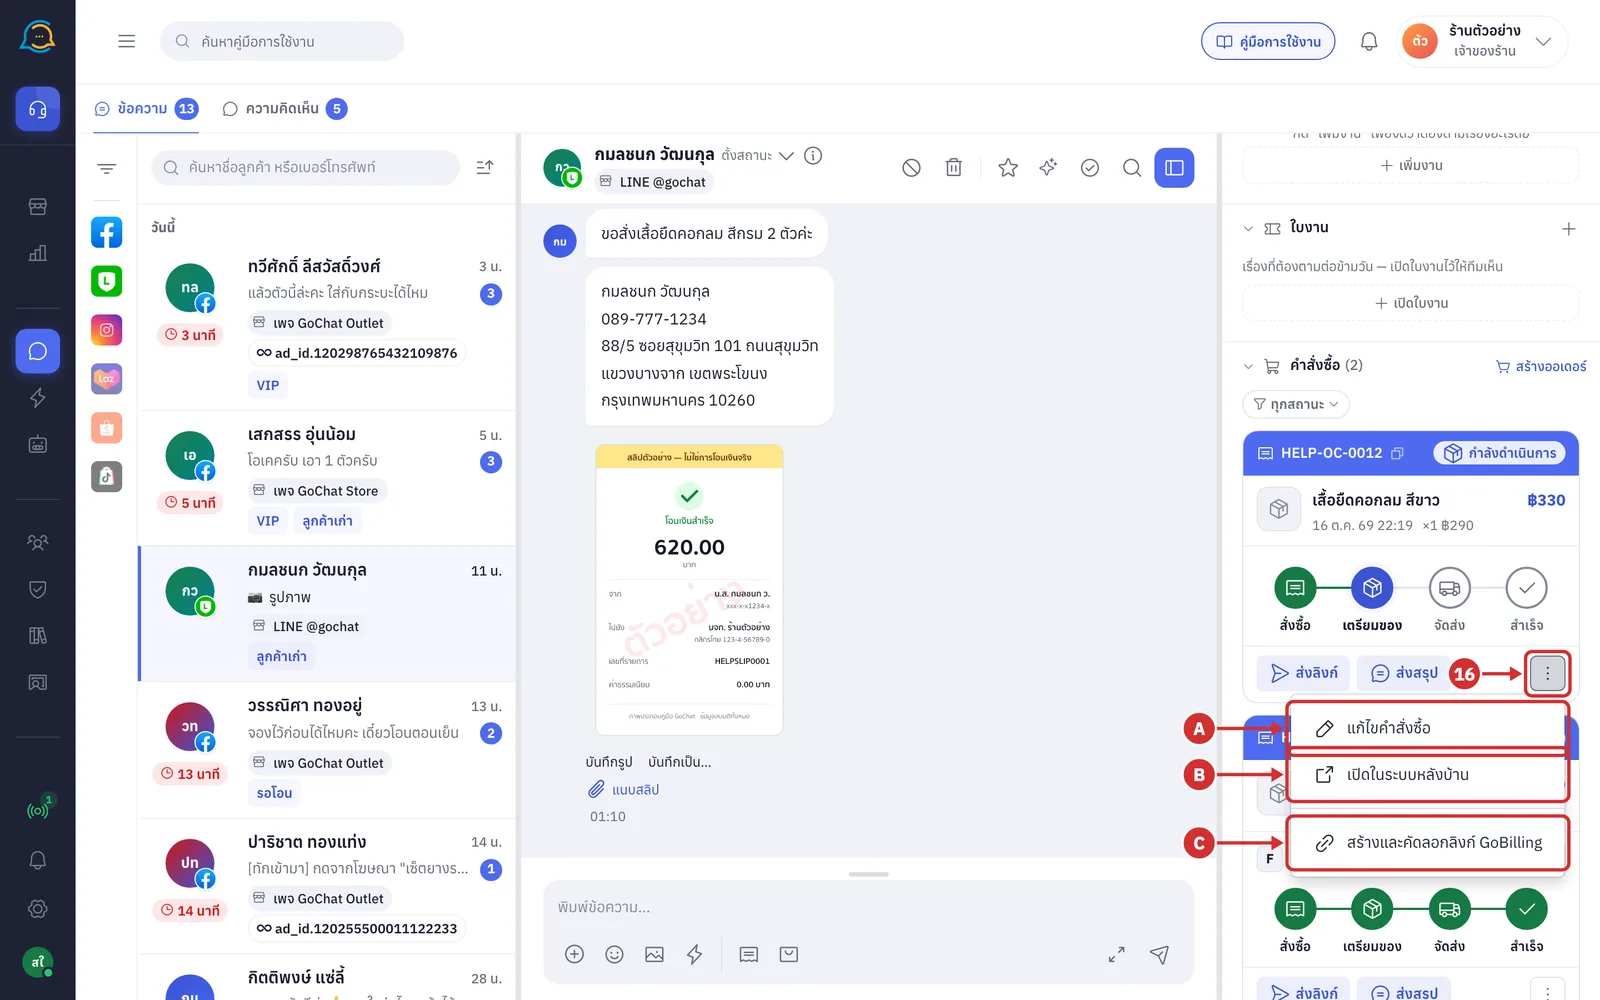
16.1 Orders that are สำเร็จ (Completed), returned or cancelled, and orders that already have a tracking number, do not have the แก้ไขคำสั่งซื้อ (Edit order) item because they can no longer be edited
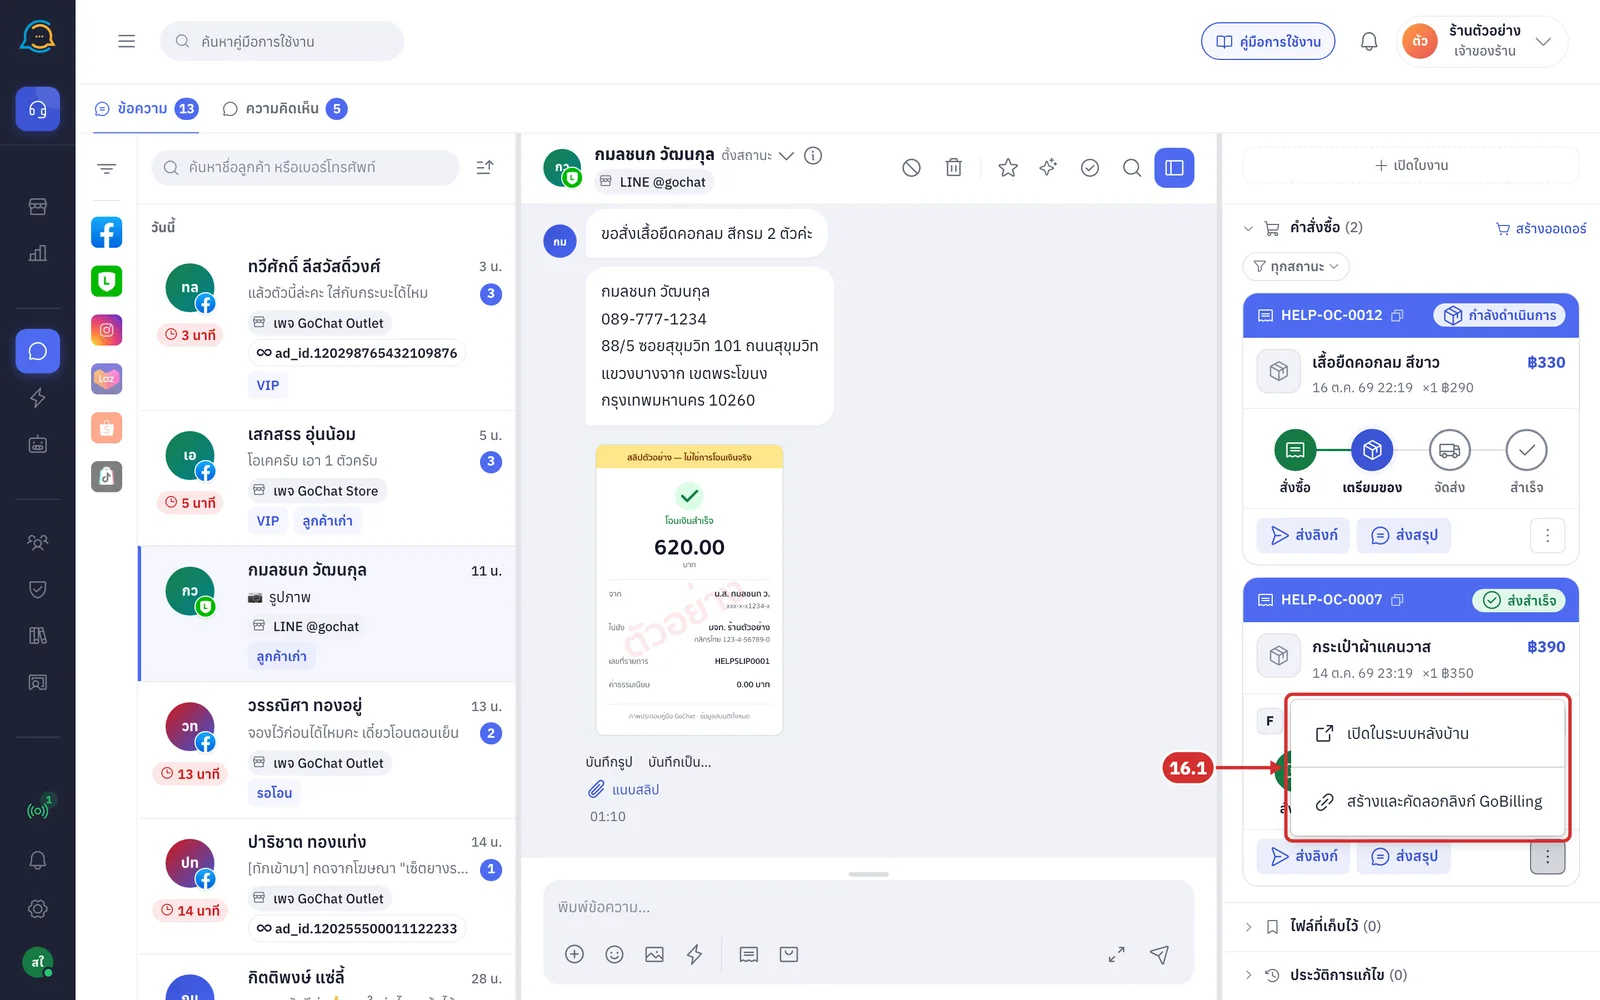
Opening the order edit form
In the ⋮ menu of the card you want to edit, choose แก้ไขคำสั่งซื้อ (Edit order). The system opens the edit form in place of the list in the right panel, with the order's current values from GoSaaS
While loading, the form shows grey placeholders
If it cannot be opened, the system shows the cause, with a ลองใหม่ (Try again) button when it is a connection problem that can be retried
If the shop's GoSaaS sign-in has expired, the system shows เข้าสู่ระบบ GoSaaS ใหม่ (Sign in to GoSaaS again)
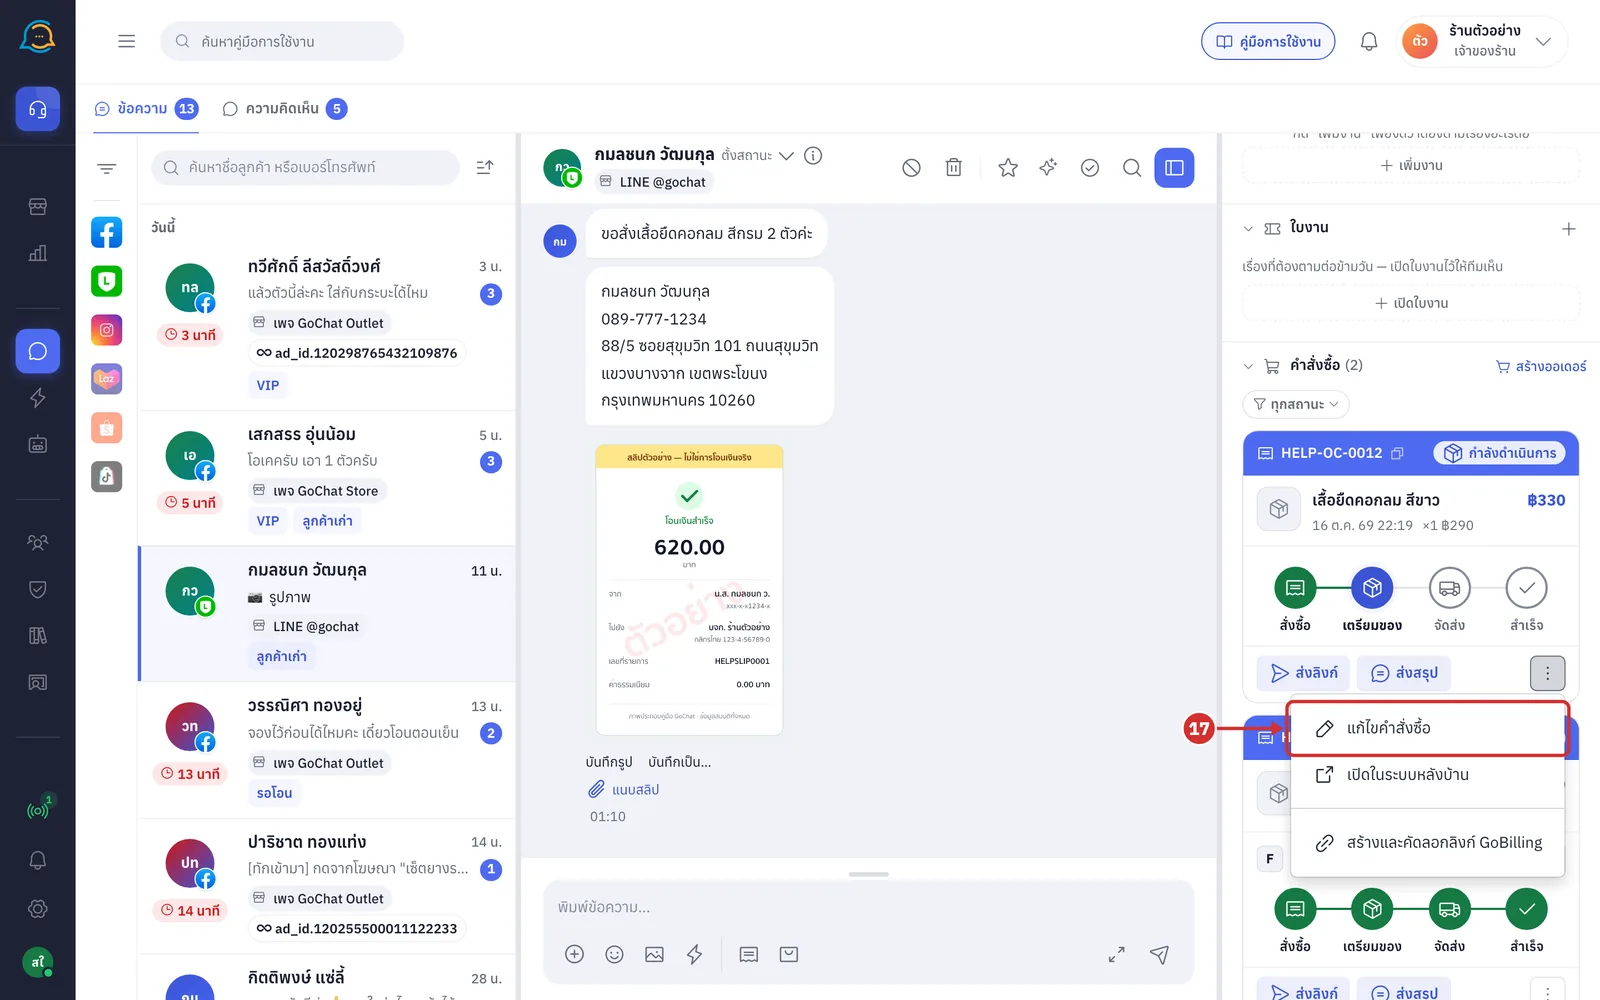
How the order edit form works
The form is filled in with the order's current values, so you only change what you need
Only the groups you change are sent for saving: recipient, products and amounts, payment, tags or the packing note. Groups you do not touch keep their values
GoSaaS decides which parts of each order can be edited, using the same conditions as editing in the back office. Parts that cannot be edited show a lock icon with the reason
Edits are only saved when you click บันทึกการแก้ไข (Save changes)
All amounts are recalculated by GoSaaS every time you change products, carrier, shipping or discounts
The edit form has no minimise button. If you close the form or refresh the page before saving, your changes are lost
Parts of the order edit form
The form header shows แก้ไขคำสั่งซื้อ · order number (Edit order · order number), and the second line shows the chat's channel and the customer name
Click × to close the form (step 28)
If your internet drops, the system shows ออฟไลน์ — แก้ต่อได้ ค่าที่แก้ไม่หาย · บันทึกได้เมื่อกลับมาออนไลน์ (Offline — keep editing, nothing is lost · you can save when back online) under the header, and you cannot save until you are back online
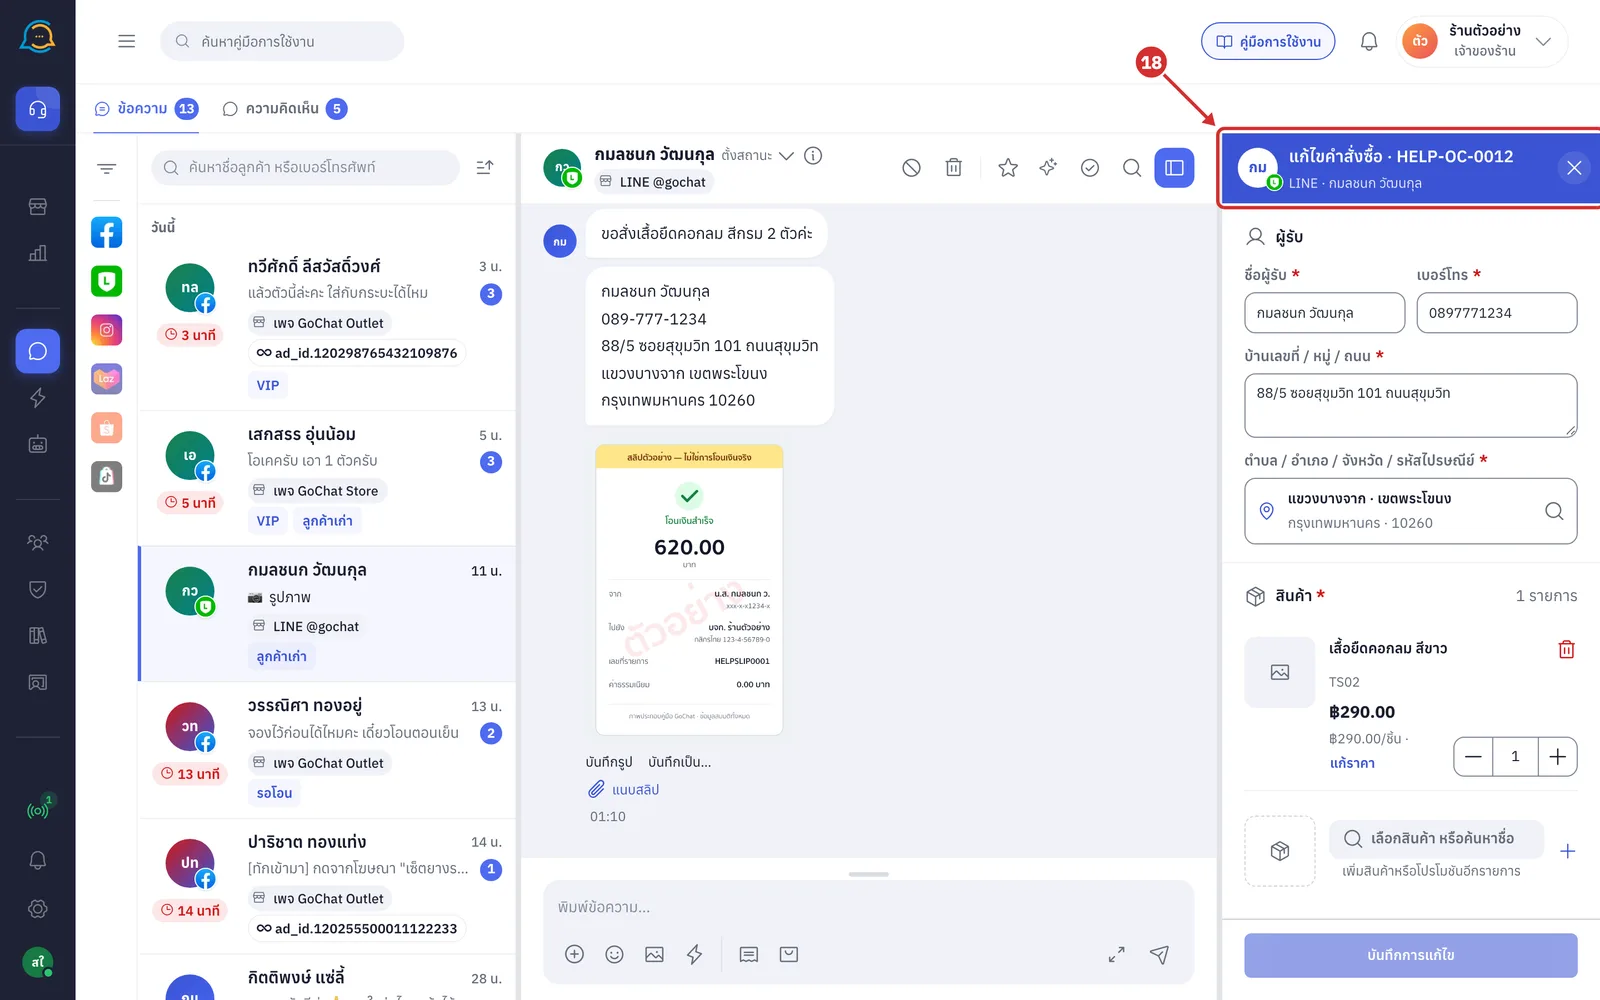
The ผู้รับ (Recipient) card edits the order's recipient name, phone number and delivery address, with these fields
ชื่อผู้รับ (Recipient name): required, up to 120 characters
เบอร์โทร (Phone): required. If the format is wrong, the system shows เบอร์ผิด เช่น 0812345678 (Invalid number, e.g. 0812345678)
บ้านเลขที่ / หมู่ / ถนน (House no. / village / road): required, up to 255 characters
ตำบล / อำเภอ / จังหวัด / รหัสไปรษณีย์ (Subdistrict / district / province / postcode): click the field to search for and choose the delivery area, the same way as the new order form in Keying an order in a chat room
If you choose to type the area yourself, the fields ตำบล / แขวง (Subdistrict), อำเภอ / เขต (District), จังหวัด (Province) and รหัสไปรษณีย์ (Postcode) appear, and ค้นหาแทน (Search instead) takes you back to searching
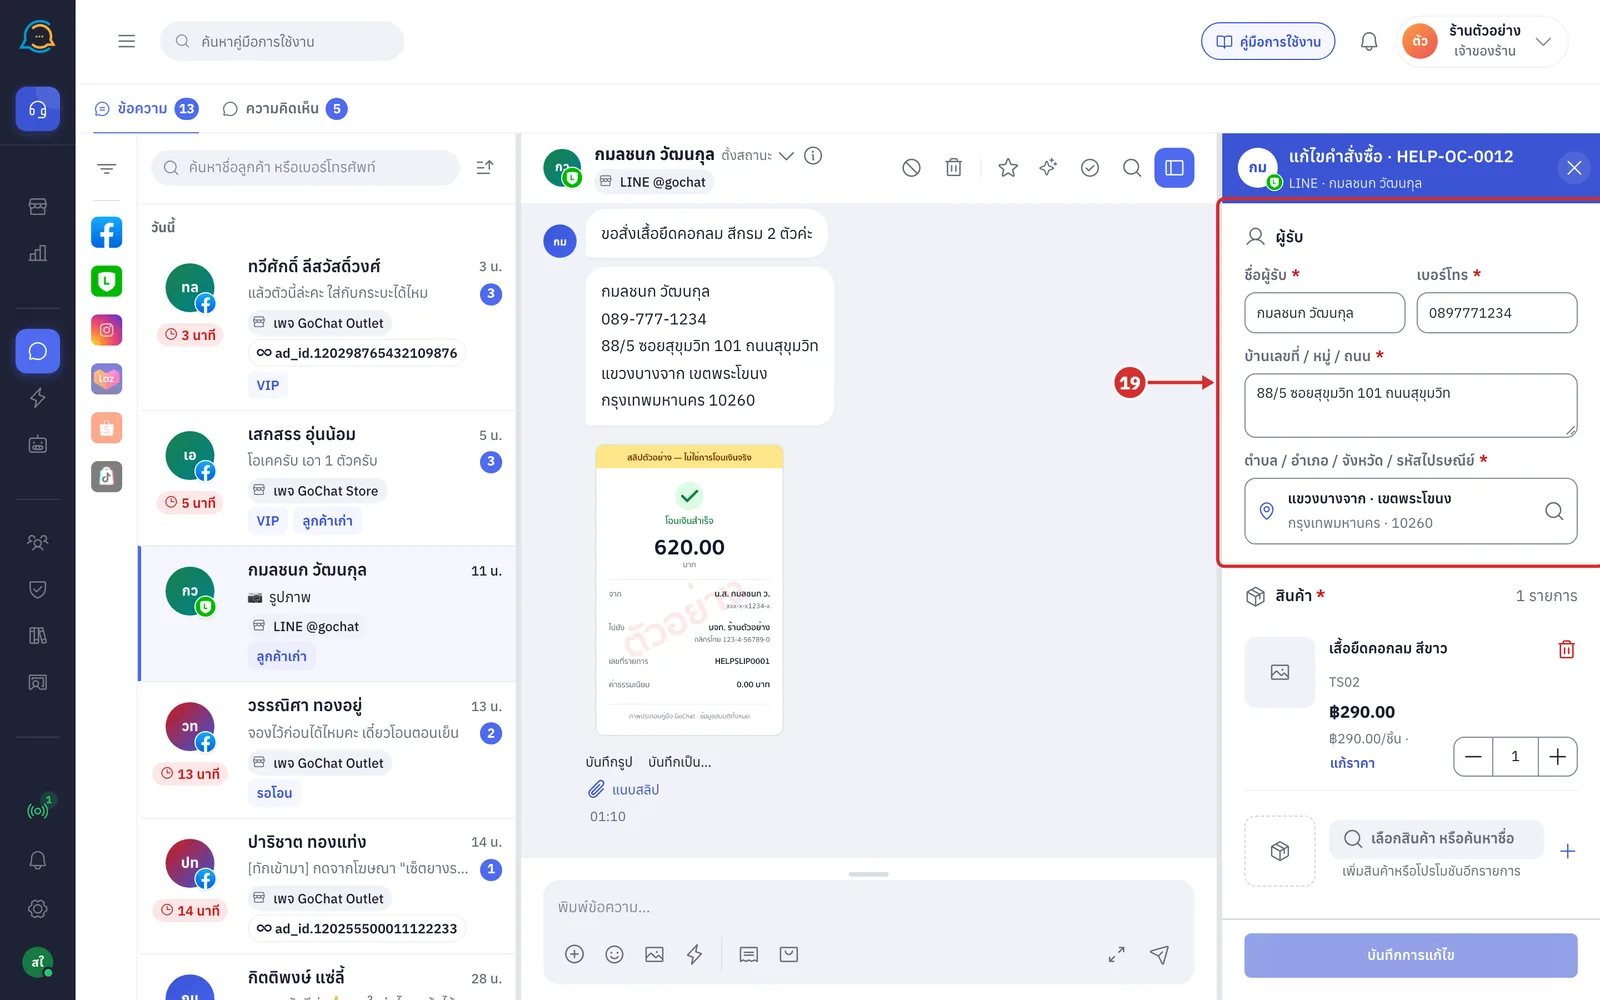
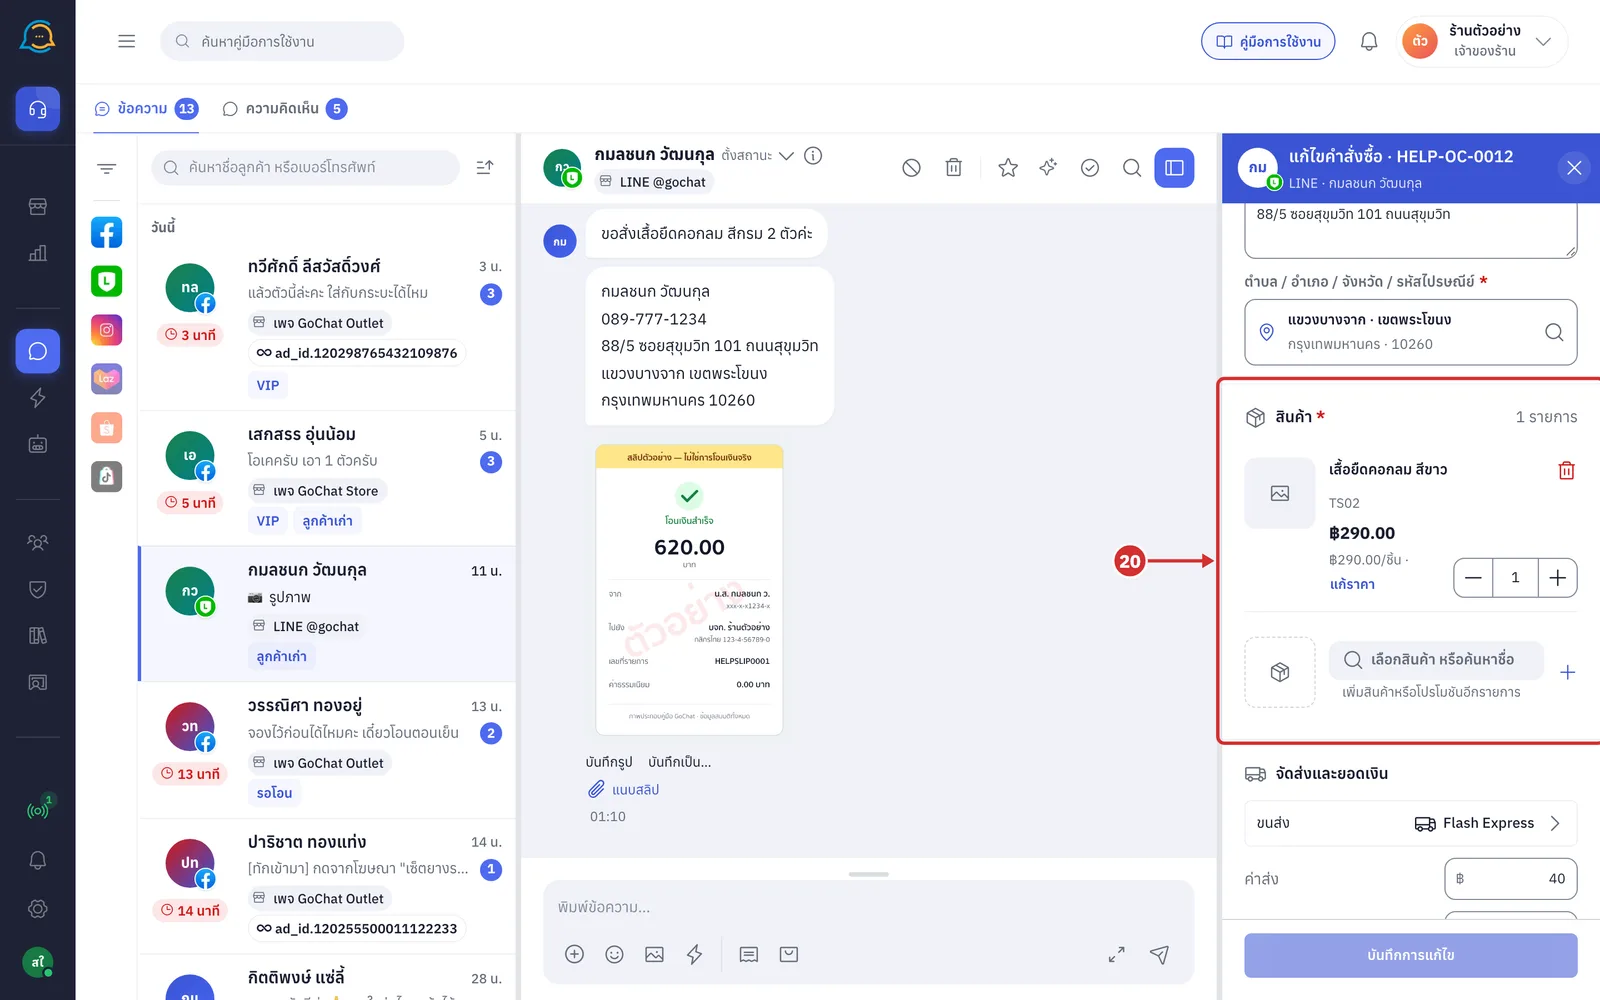
The สินค้า (Products) card edits the products in the order. The number on the right of the card header is the number of items. Each row has these parts
The product name, SKU, row amount and price per piece
The – and + buttons, or typing a number, change the quantity. If the system knows the remaining stock, you cannot go above it, and when you reach or go over it the system shows คงเหลือ N ชิ้น (N left in stock)
Click แก้ราคา (Edit price) to change the row's ราคา/ชิ้น (Price/piece) and ส่วนลด (Discount) in baht, and ซ่อน (Hide) to fold the fields back
Click the bin icon to remove the product
Rows that GoSaaS records as upsell items have an อัปเซลล์ (Upsell) label before the product name
The order's promotions appear as boxes with a โปร (Promo) label, the promotion name and the discount. Click × on the box to remove the promotion. To change the products in a promotion, remove it and choose it again
The คลังสินค้า (Warehouse) row shows the order's warehouse, which cannot be changed in this form; moving warehouses is done in the back office
Click เลือกสินค้า หรือค้นหาชื่อ (Choose a product or search by name) to add products or promotions, which opens the same product picker as the new order form
An order must have at least 1 product or promotion
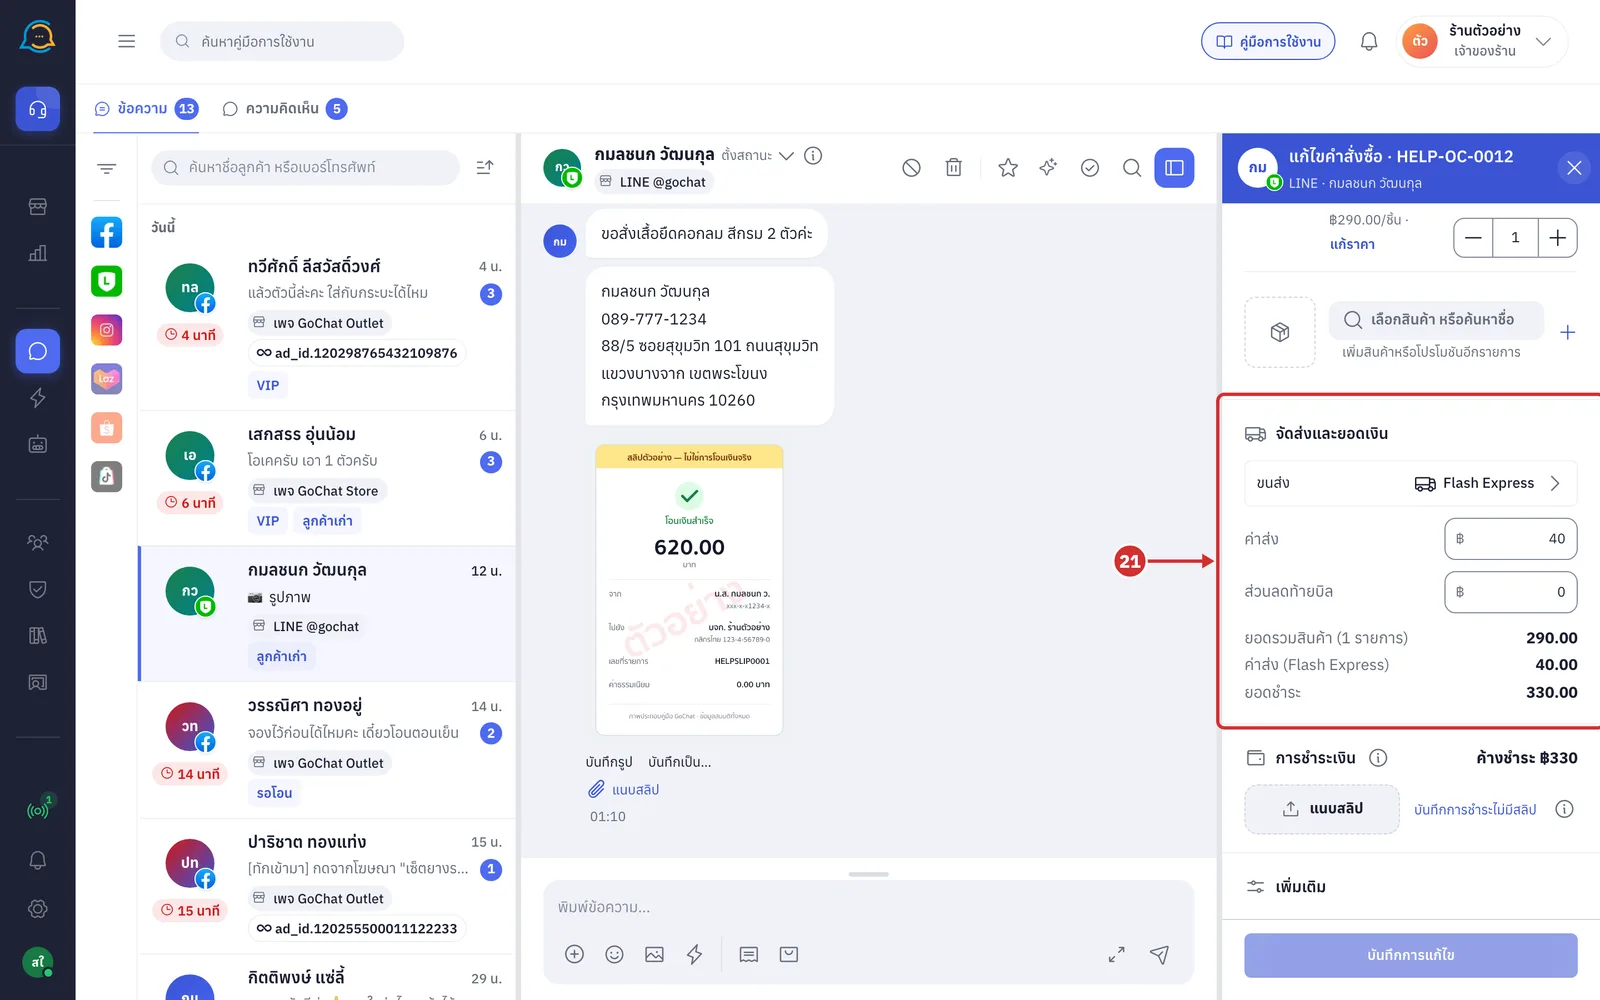
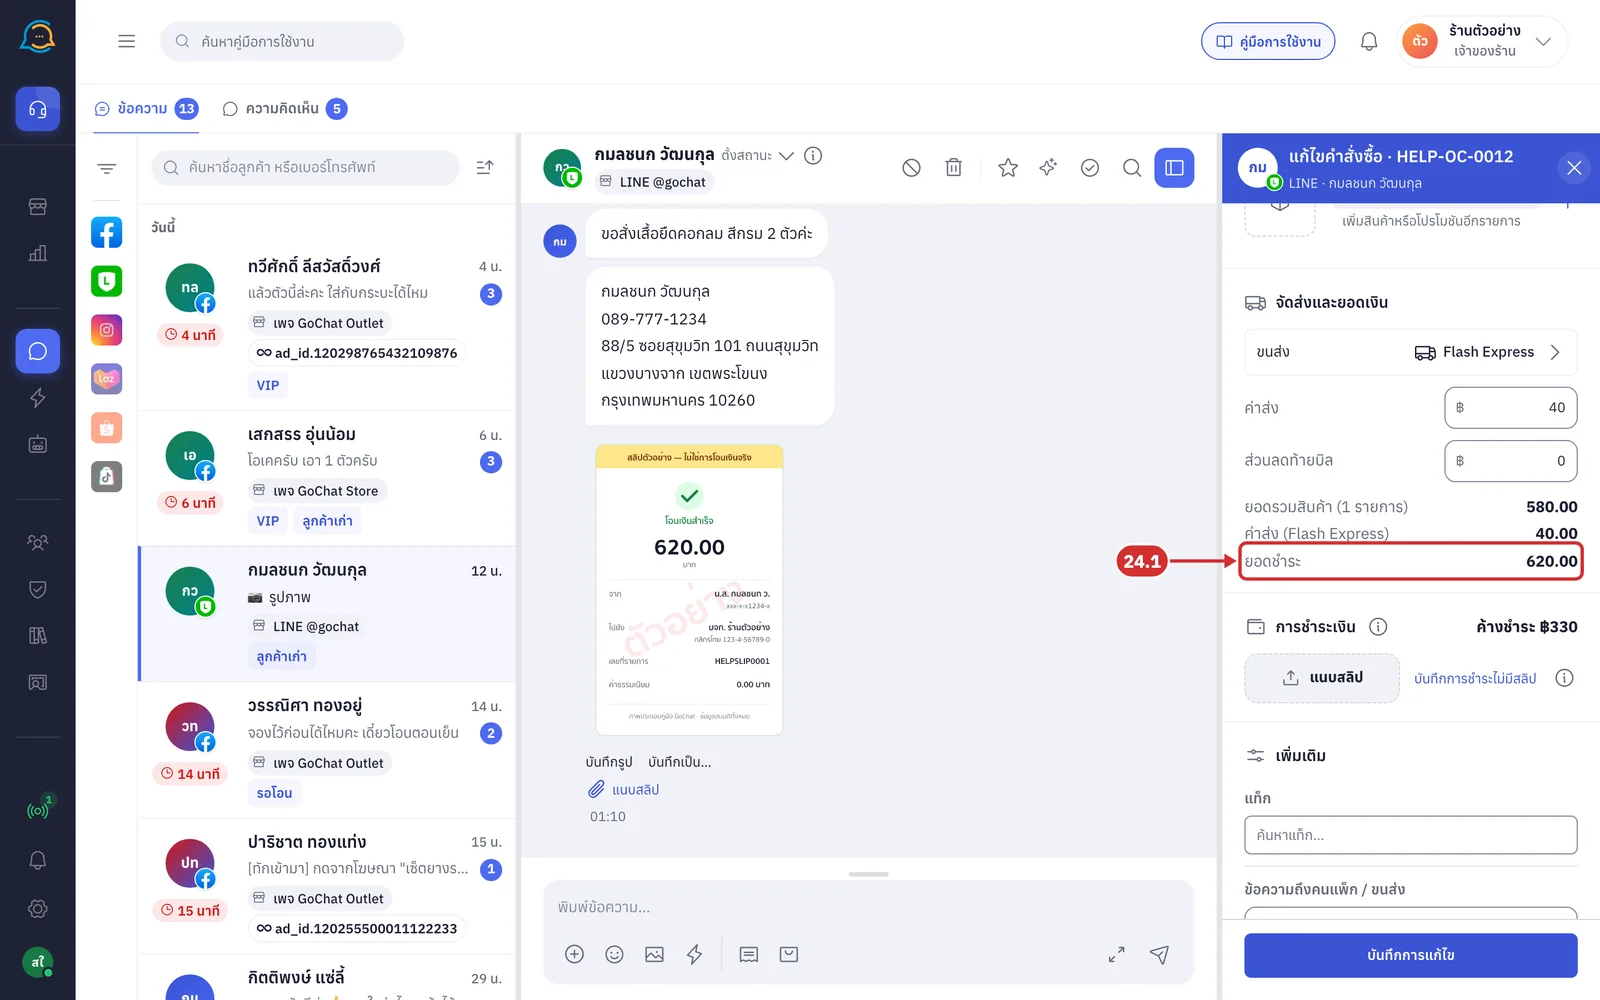
The จัดส่งและยอดเงิน (Shipping and amounts) card edits the carrier and charges and shows the amounts calculated by GoSaaS
ขนส่ง (Carrier): click to choose another carrier; the system changes ค่าส่ง (Shipping) to that carrier's rate
ค่าส่ง (Shipping) and ส่วนลดท้ายบิล (Bill discount): editable in baht
ค่าบริการเก็บเงินปลายทาง (COD service fee): only shown for cash-on-delivery orders of shops that charge this fee
The amount lines ยอดรวมสินค้า (Products subtotal), ค่าส่ง (Shipping) and ยอดชำระ (Amount due), plus ส่วนลด (Discount) and ภาษีมูลค่าเพิ่ม (VAT) when there is an amount, all come from GoSaaS's calculation
While calculating, the amounts are dimmed. If the calculation fails, the system shows a message with a คำนวณใหม่ (Recalculate) button
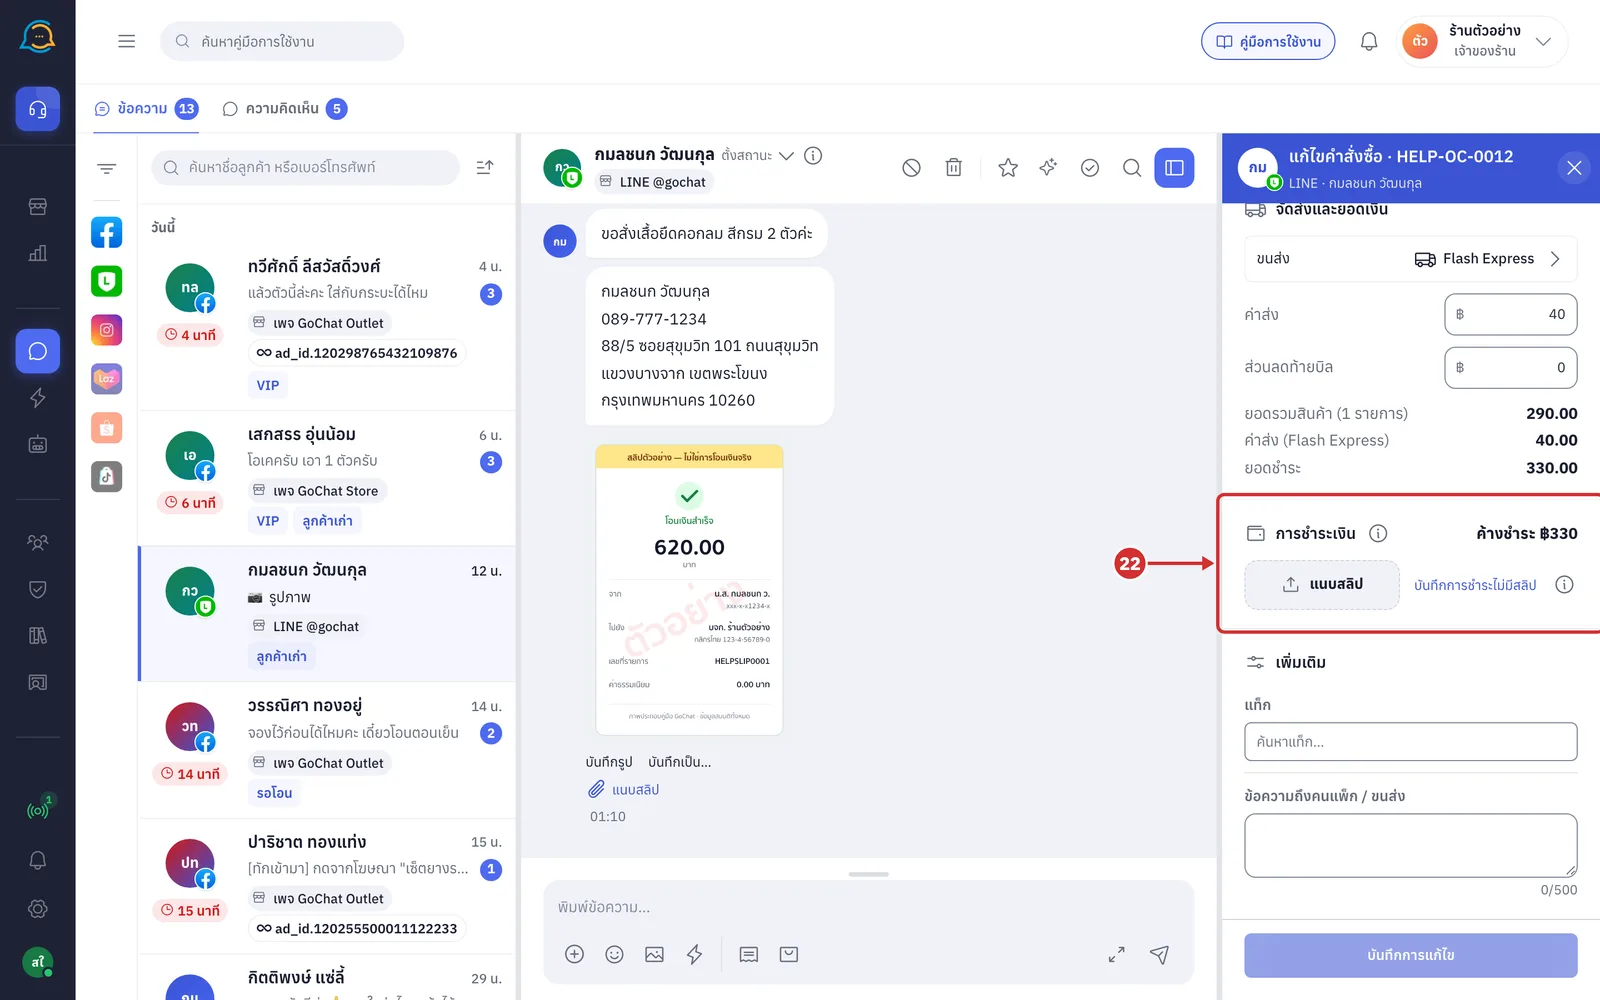
The การชำระเงิน (Payment) card adds a payment to the order, for example when the customer transfers more after the total changes
Payments added from this form are always recorded as bank transfers; other payment methods are edited in the back office, as the (i) button after the card name explains
If the order still has an outstanding amount, the right of the card header shows ค้างชำระ ฿x (Outstanding ฿x)
Click แนบสลิป (Attach slip) or drag a slip picture onto it. Only JPG, PNG, GIF or WEBP pictures up to 7 MB are accepted. Once attached, it shows the slip picture, amount and date, with a bin button to remove the slip
Click บันทึกการชำระไม่มีสลิป (Record a payment without a slip) to record an amount without a slip (step 22.1)
While the edit form is open, clicking แนบสลิป (Attach slip) under a picture the customer sent in the chat attaches that picture to this card
The edit form does not read the amount from the slip; check the amount and date yourself
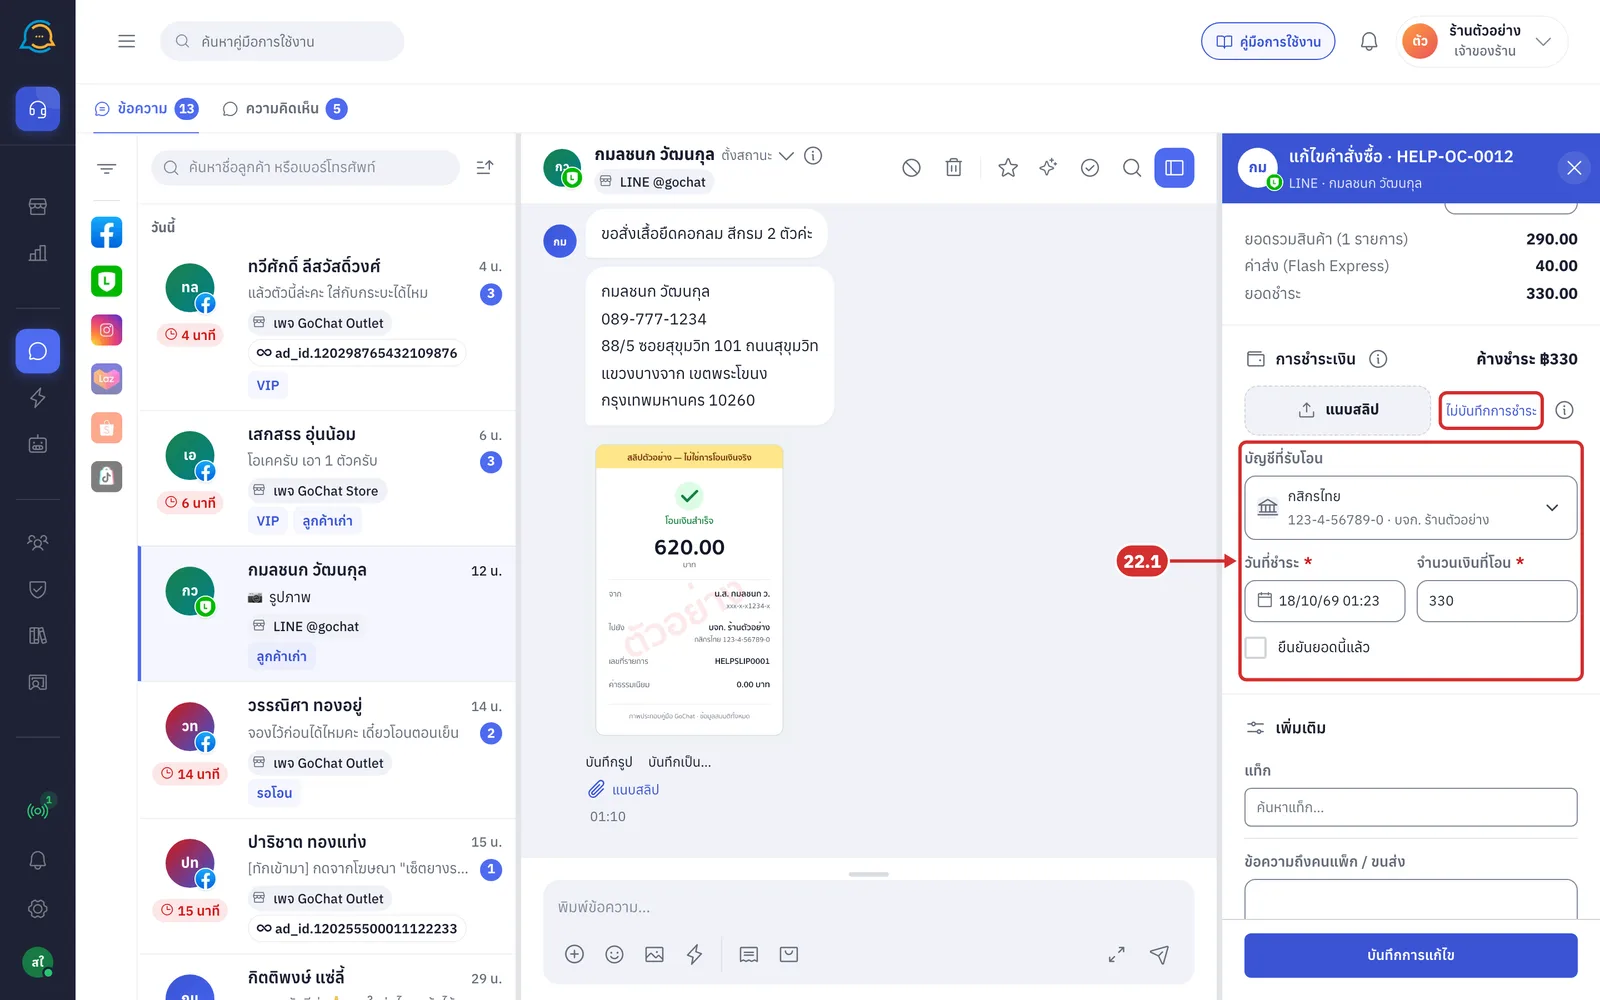
22.1 When you attach a slip or click บันทึกการชำระไม่มีสลิป (Record a payment without a slip), the system shows the payment fields, filled in with the outstanding amount if any, the current time and the shop's main account. The fields are
บัญชีที่รับโอน (Receiving account): the shop account that received the money
วันที่ชำระ (Payment date): required; you cannot choose a date after today
จำนวนเงินที่โอน (Amount transferred): required and must be more than 0. If it is not, the system shows ใส่ยอดมากกว่า 0 (Enter an amount above 0)
ยืนยันยอดนี้แล้ว (Amount confirmed): tick to confirm the paid amount; only shown to users who can confirm orders in GoSaaS
If no slip is attached yet, click ไม่บันทึกการชำระ (Do not record a payment) to cancel adding the payment
If the receiving accounts cannot be loaded, the account field is not shown and the system says โหลดบัญชีรับโอนไม่สำเร็จ — บันทึกได้โดยไม่ระบุบัญชี (Could not load receiving accounts — you can save without an account)
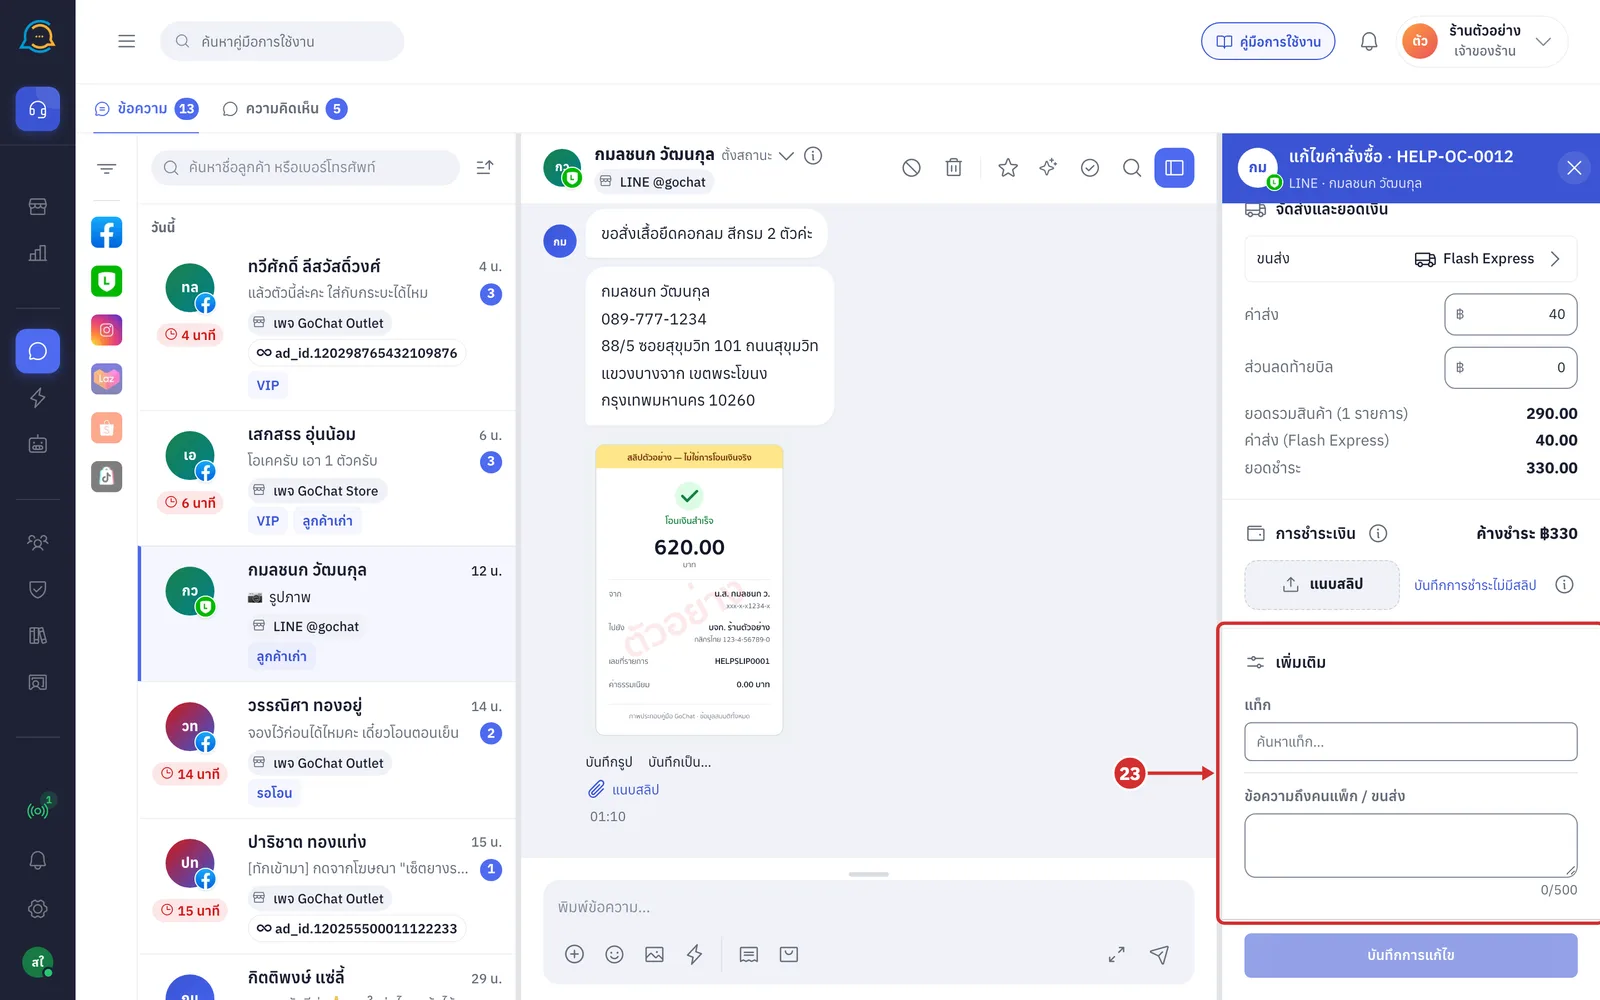
The เพิ่มเติม (More) card edits the order's tags and note
แท็ก (Tags): choose the shop's order tags, or type a new name and choose สร้างแท็ก “…” (Create tag “…”) to create a new tag. Tag names can be up to 50 characters
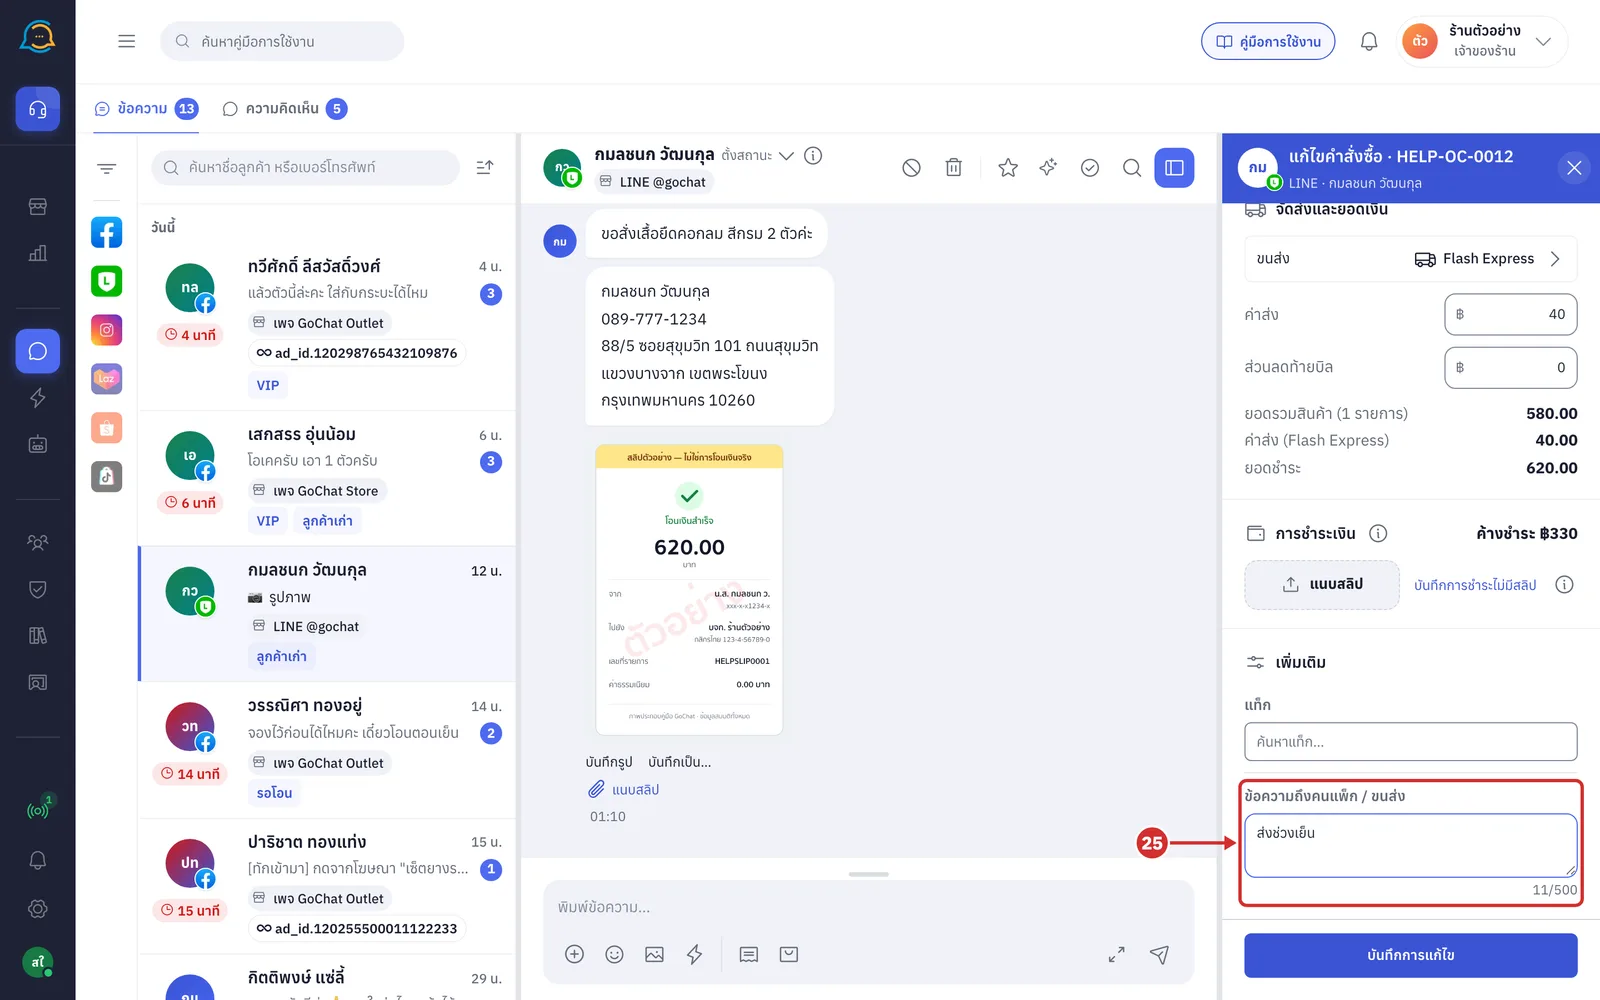
ข้อความถึงคนแพ็ก / ขนส่ง (Note to packer / carrier): up to 500 characters. The number under the field shows how many characters are used. This text appears as หมายเหตุ (Note) in the order details panel
Editing and saving an order
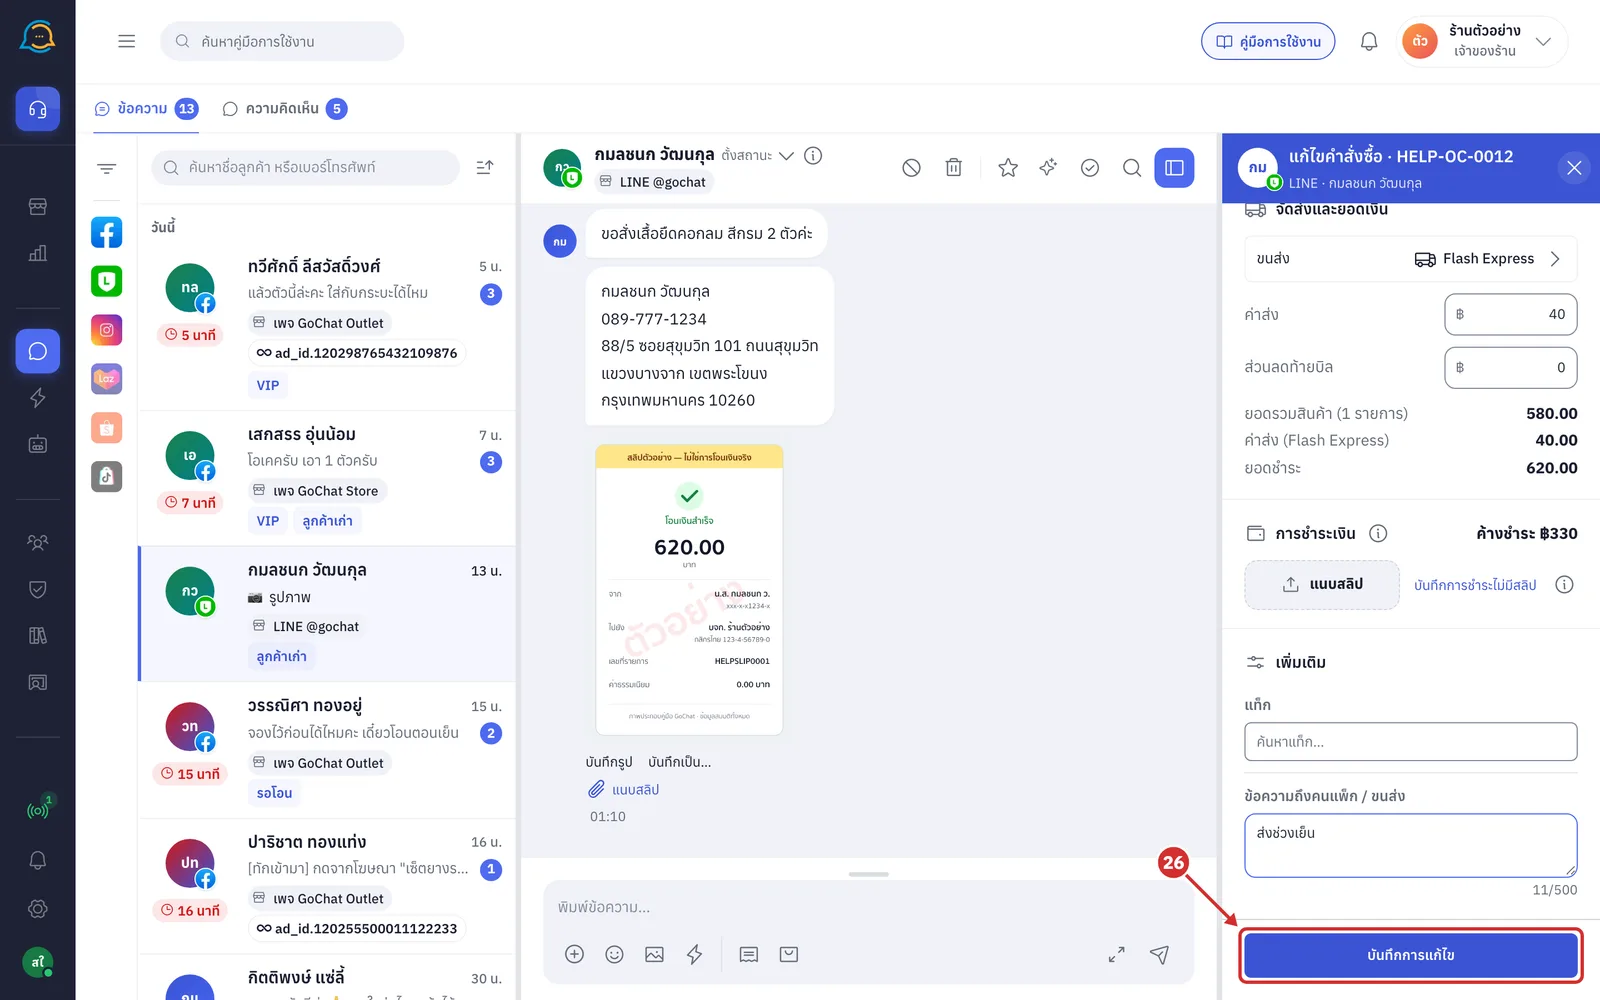
The example in this section changes the white crew-neck T-shirt from 1 to 2 pieces and adds the packing note "ส่งช่วงเย็น" (deliver in the evening).
In the product row of the สินค้า (Products) card, click + to change the quantity from 1 to 2
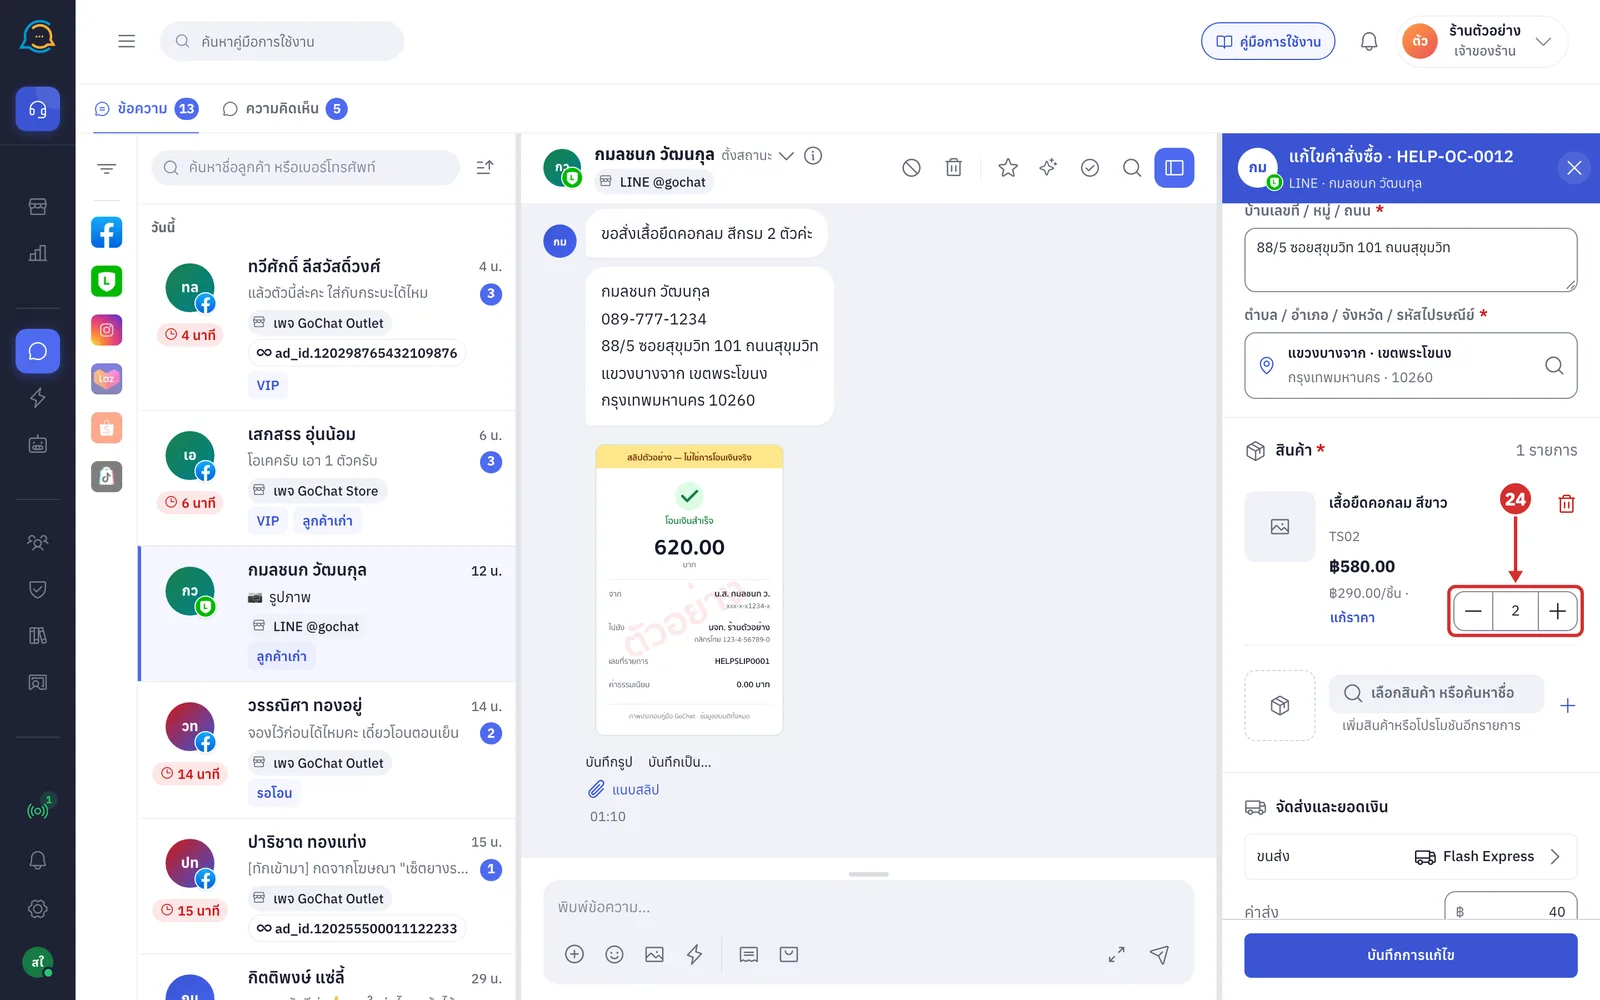
24.1 The system recalculates the amounts with GoSaaS. While calculating, the amounts are dimmed. When it is done, ยอดชำระ (Amount due) changes to the new total; in this example 290 × 2 plus 40 shipping equals 620.00
In ข้อความถึงคนแพ็ก / ขนส่ง (Note to packer / carrier), type ส่งช่วงเย็น
Click บันทึกการแก้ไข (Save changes) to save the changes to GoSaaS
The button can be clicked once you have changed at least 1 thing
While saving, the button shows กำลังบันทึก… (Saving…) and the form cannot be closed
If you type more changes while waiting, the form stays open after saving; click save again to save what you typed
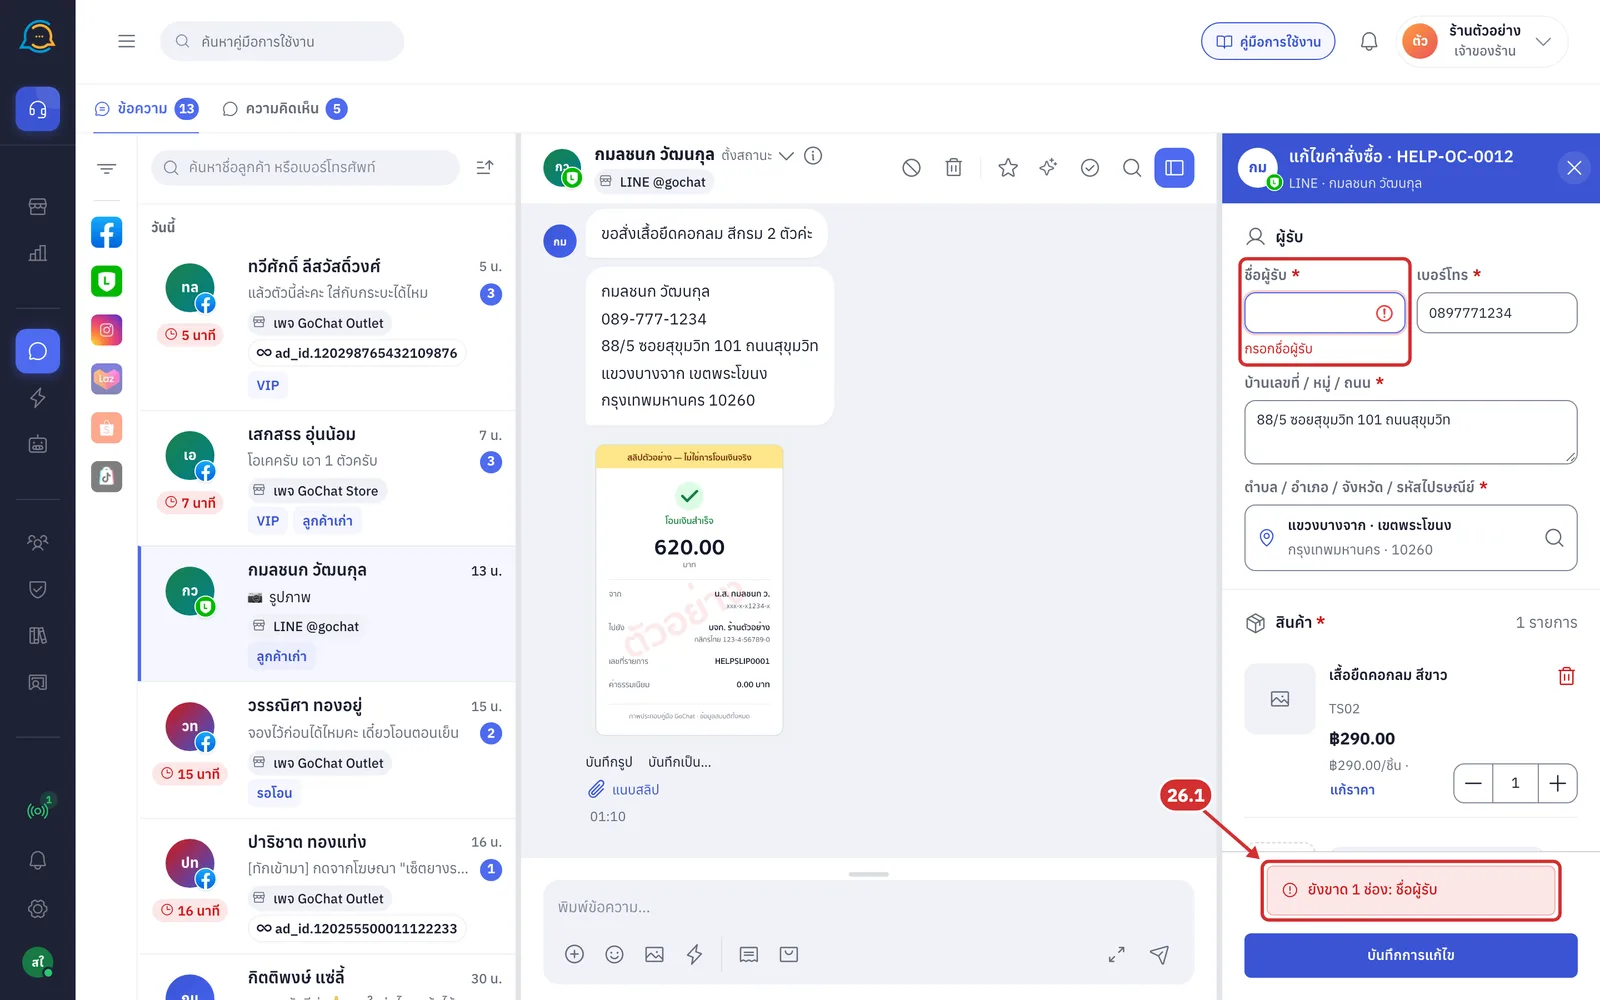
26.1 If a required field in a group you changed is empty or invalid, for example you deleted the recipient name, clicking save does not save. The system shows a ยังขาด N ช่อง: … (N fields missing: …) bar above the button and a red border on that field. If the amounts are still being calculated, the bar shows ยอดเงิน (กำลังคำนวณ) (Amounts, calculating)
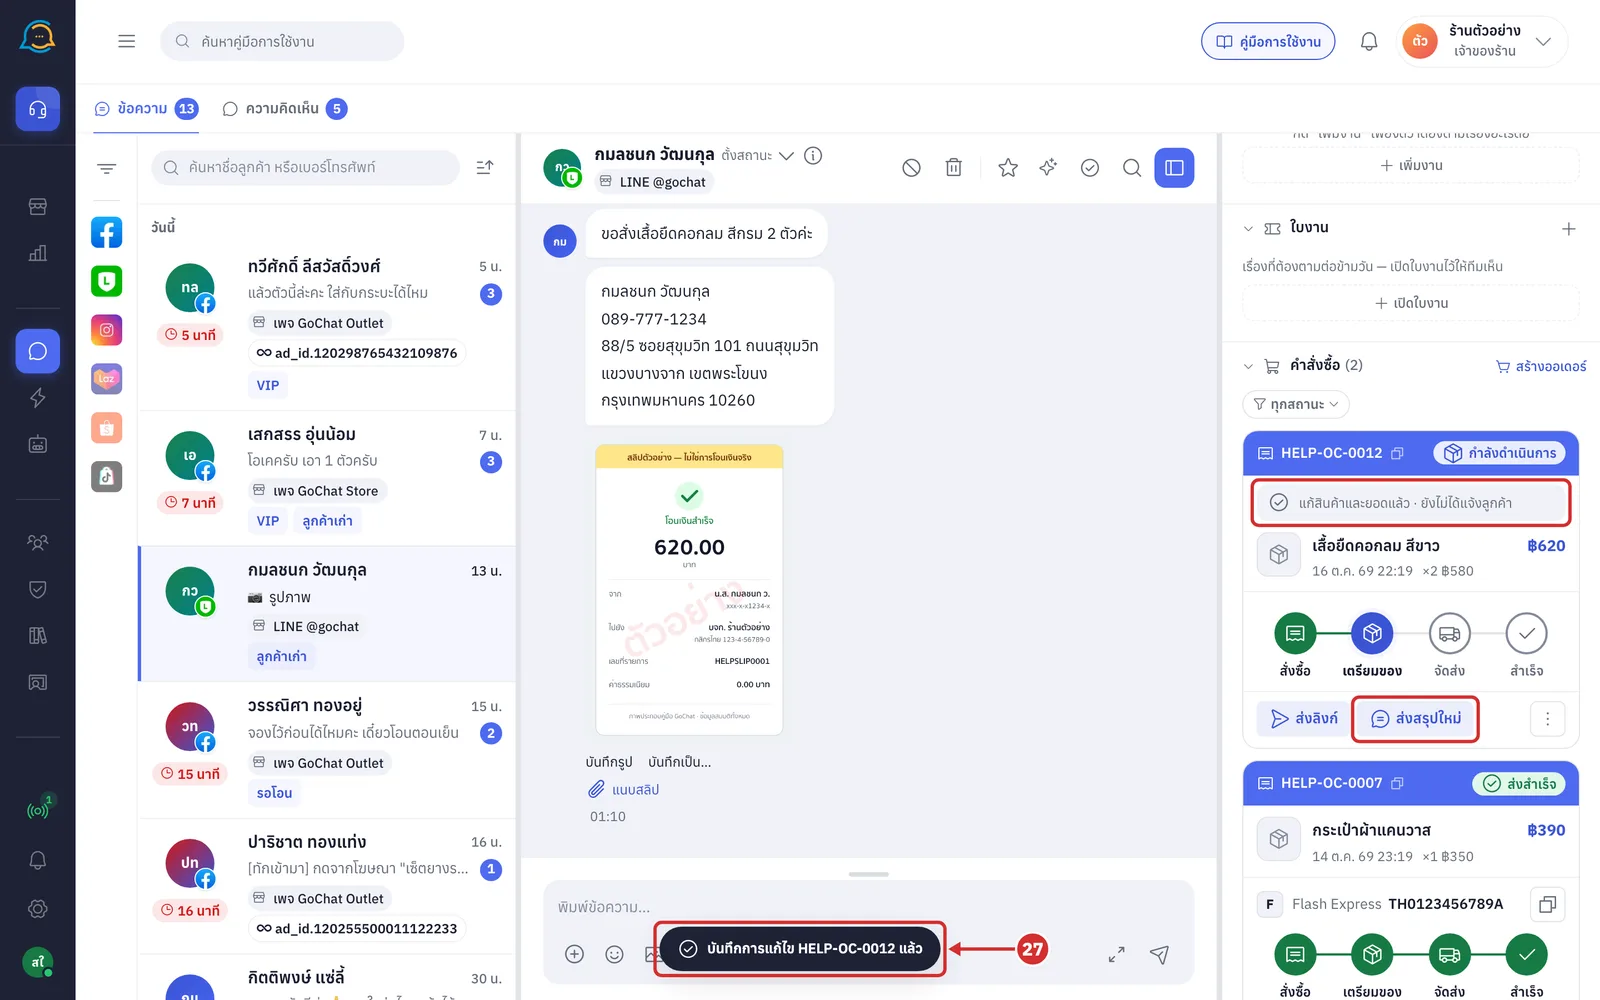
Once saved, the system shows บันทึกการแก้ไข HELP-OC-0012 แล้ว (Changes to HELP-OC-0012 saved), the form closes, and you return to the same card under คำสั่งซื้อ (Orders), which shows the new data straight away
The card shows the line แก้สินค้าและยอดแล้ว · ยังไม่ได้แจ้งลูกค้า (Products and amounts edited · customer not told yet) as a reminder that the customer has not been told. The text depends on the groups you changed, such as แก้ที่อยู่แล้ว (Address edited) or แก้ที่อยู่และการชำระแล้ว (Address and payment edited)
This line appears when you change the address, payment, or products and amounts. Changing only tags or the packing note does not add it
The card's ส่งสรุป (Send summary) button becomes ส่งสรุปใหม่ (Send new summary). Click it to put a summary with the new total in the message box and send it yourself; the reminder line then disappears
If GoSaaS returns a warning, the system shows it on the card under this line
The reminder line is only kept in this browser tab. If you refresh the page, it disappears
Closing the edit form without saving
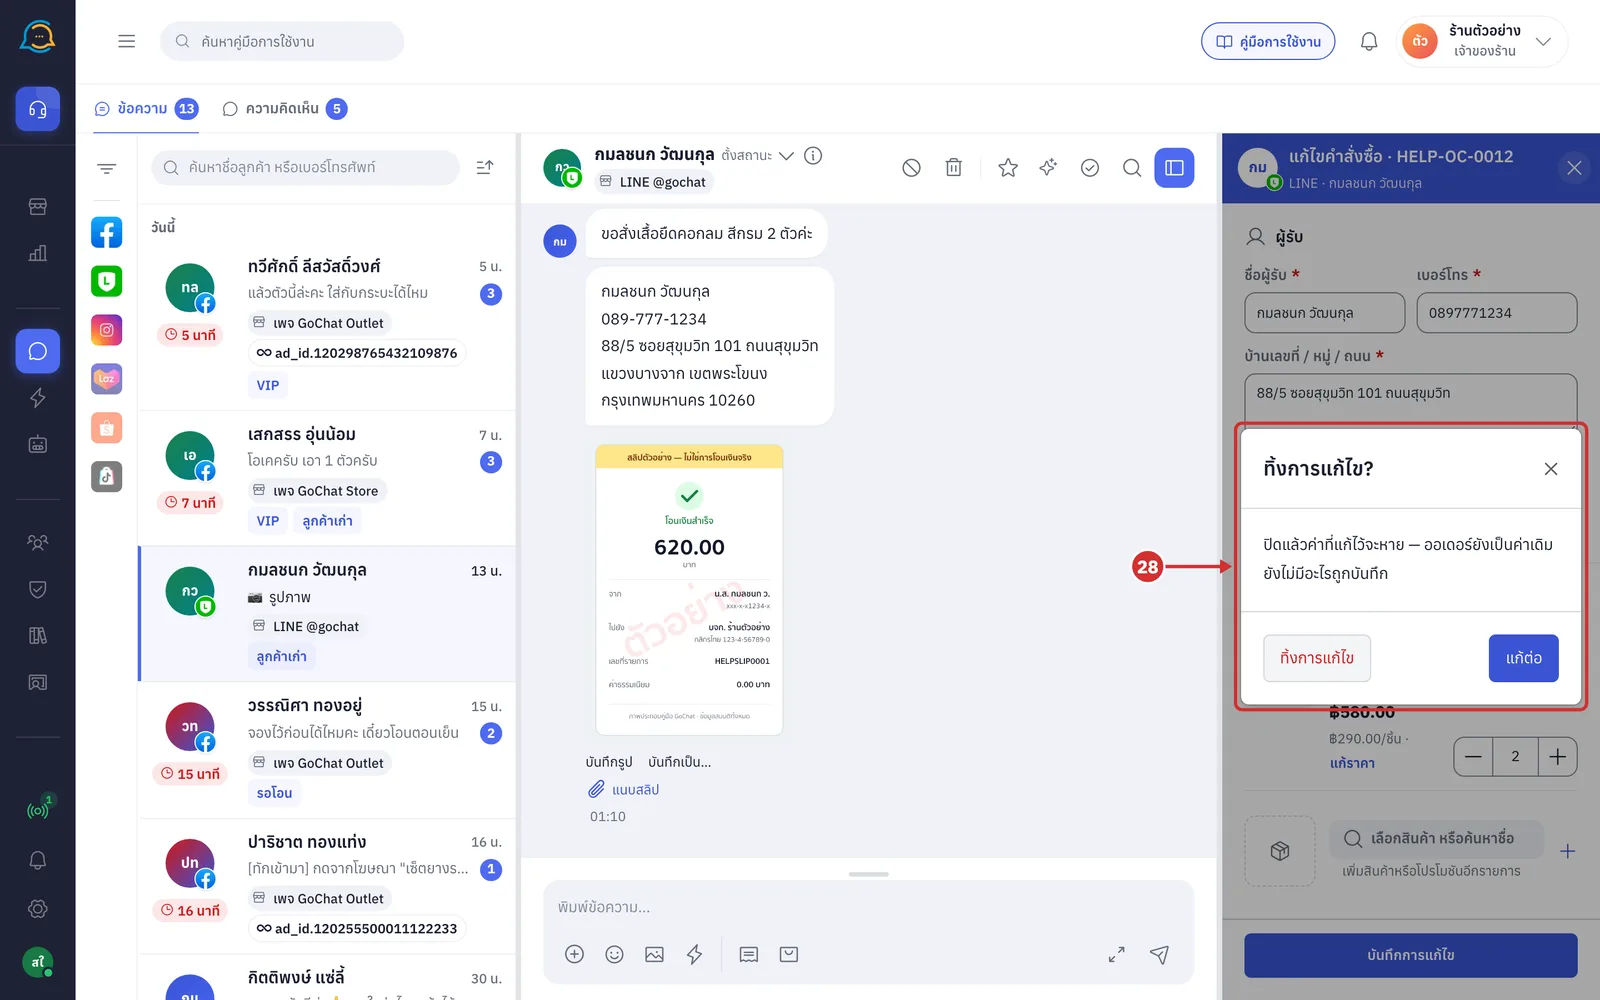
Click × on the form header or press Esc. If you have unsaved changes, the system shows ทิ้งการแก้ไข? (Discard changes?) saying ปิดแล้วค่าที่แก้ไว้จะหาย — ออเดอร์ยังเป็นค่าเดิม ยังไม่มีอะไรถูกบันทึก (Closing loses your changes — the order keeps its current values and nothing has been saved)
ทิ้งการแก้ไข (Discard changes): closes the form and throws away your changes; the order keeps its current values
แก้ต่อ (Keep editing): goes back to the form
Clicking × in the box or pressing Esc also goes back to the form
If you have not changed anything, the form closes straight away without asking
While you have unsaved changes, clicking สร้างออเดอร์ (Create order) or another shortcut that opens the new order form also asks before discarding your changes
When an order cannot be edited
For parts that cannot be edited, the system shows the reason in the form
Some groups locked: the group shows a box with a lock icon and the reason, and its fields are read-only. Example reasons
พัสดุสร้างแล้ว แก้ที่อยู่ไม่ได้ — ยกเลิกพัสดุในระบบหลังบ้านก่อน (A parcel has been created, so the address cannot be edited — cancel the parcel in the back office first) with an เปิดในระบบหลังบ้าน (Open in the back office) button
ออเดอร์ชำระครบแล้ว หรือถูกยกเลิกแล้ว (The order is fully paid or has been cancelled) on the Payment card
A locked products-and-amounts group shows the items and amounts read-only
Whole order locked: the system shows the GoSaaS reason once with an เปิดในระบบหลังบ้าน (Open in the back office) button, with no fields to edit and no save button
This happens for orders that are cancelled, transfers confirmed in full, confirmed cash-on-delivery orders, orders with a parcel, or orders from a marketplace or the shop website
Orders from a marketplace or the shop website have no Open in the back office button
If the order becomes locked while you are editing, the system shows the reason with ค่าที่แก้ไว้ยังไม่ได้บันทึก (Your changes have not been saved)
Shops using chat assignment: for chats held by another admin, you can see the orders, but when you open the edit form the system says แชทนี้อยู่กับ … — กดดึงแชทแล้วรอเขายอมรับก่อนจึงจะแก้ไขได้ (This chat is with … — request the chat and wait for them to accept before you can edit)
Team leads can edit as usual for chats held by their team members
In shops that turn on พิมพ์ตอบแชทของคนอื่นได้ (Reply to others' chats), everyone can edit as usual
If your GoChat account is not linked to a GoSaaS account, the system says the order cannot be edited and asks you to sign in to GoChat with your GoSaaS account
When saving fails
ออเดอร์นี้ถูกแก้จากที่อื่นแล้ว — โหลดค่าล่าสุดให้แล้ว ตรวจอีกครั้งก่อนบันทึก (This order was edited elsewhere — the latest values have been loaded; check again before saving): someone edited this order elsewhere, such as in the back office, while the form was open
Groups you did not change switch to the latest values, while groups you changed keep what you typed
The button changes to บันทึกทับค่าล่าสุด (Save over the latest values); check the values and click it again
If the latest values cannot be loaded, the system shows ออเดอร์นี้ถูกแก้จากที่อื่นแล้ว — โหลดค่าล่าสุดไม่สำเร็จ กดโหลดใหม่ก่อนบันทึก (This order was edited elsewhere — could not load the latest values; reload before saving) with a โหลดใหม่ (Reload) button
เชื่อมต่อไม่สำเร็จ — กดบันทึกอีกครั้งได้ ไม่เกิดการแก้ซ้ำ (Could not connect — you can save again, the edit will not be applied twice): save again with the same values and the edit is applied only once
บันทึกไม่สำเร็จที่ระบบจัดการออเดอร์ — ลองใหม่อีกครั้ง หรือแก้ที่ระบบหลังบ้าน (Saving failed in the order management system — try again or edit in the back office): shown with an เปิดในระบบหลังบ้าน (Open in the back office) button
บันทึกสินค้าและยอดแล้ว แต่ส่วนอื่นยังไม่ได้บันทึก — โหลดค่าล่าสุดให้แล้ว ตรวจแล้วกดบันทึกส่วนที่เหลืออีกครั้ง (Products and amounts saved, but the rest was not — the latest values have been loaded; check and save the rest again): this orange bar means part was saved; check the values and save again
If stock is not enough, the system lists the products short of stock in the bottom bar and highlights those product rows
มีสินค้าในใบนี้ถูกปิดการขายแล้ว จึงบันทึกสินค้าไม่ได้ — แก้สินค้าได้ที่ระบบหลังบ้าน (A product in this order is no longer for sale, so the products cannot be saved — edit the products in the back office): a product already in the order has been taken off sale
If your GoSaaS sign-in has expired, the system shows เข้าสู่ระบบ GoSaaS ใหม่ (แท็บใหม่) (Sign in to GoSaaS again, new tab). After signing in, come back to the original tab and save again; your changes are still there
Notifying the customer with a template from an order card
In a Facebook chat (one-to-one), you can notify the customer about a specific order with a customer notification message approved by Meta, right from the order card, even if the customer has been quiet for more than 24 hours — for example, to say it has shipped with its tracking number (create messages in the ข้อความแจ้งเตือนลูกค้า (Utility) (Customer notification messages) menu; see การใช้ข้อความแจ้งเตือนลูกค้า)
Click the ⋮ button on the order card and choose แจ้งลูกค้าด้วยเทมเพลต (Notify customer with a template) (the first item in the menu · not on cancelled orders)
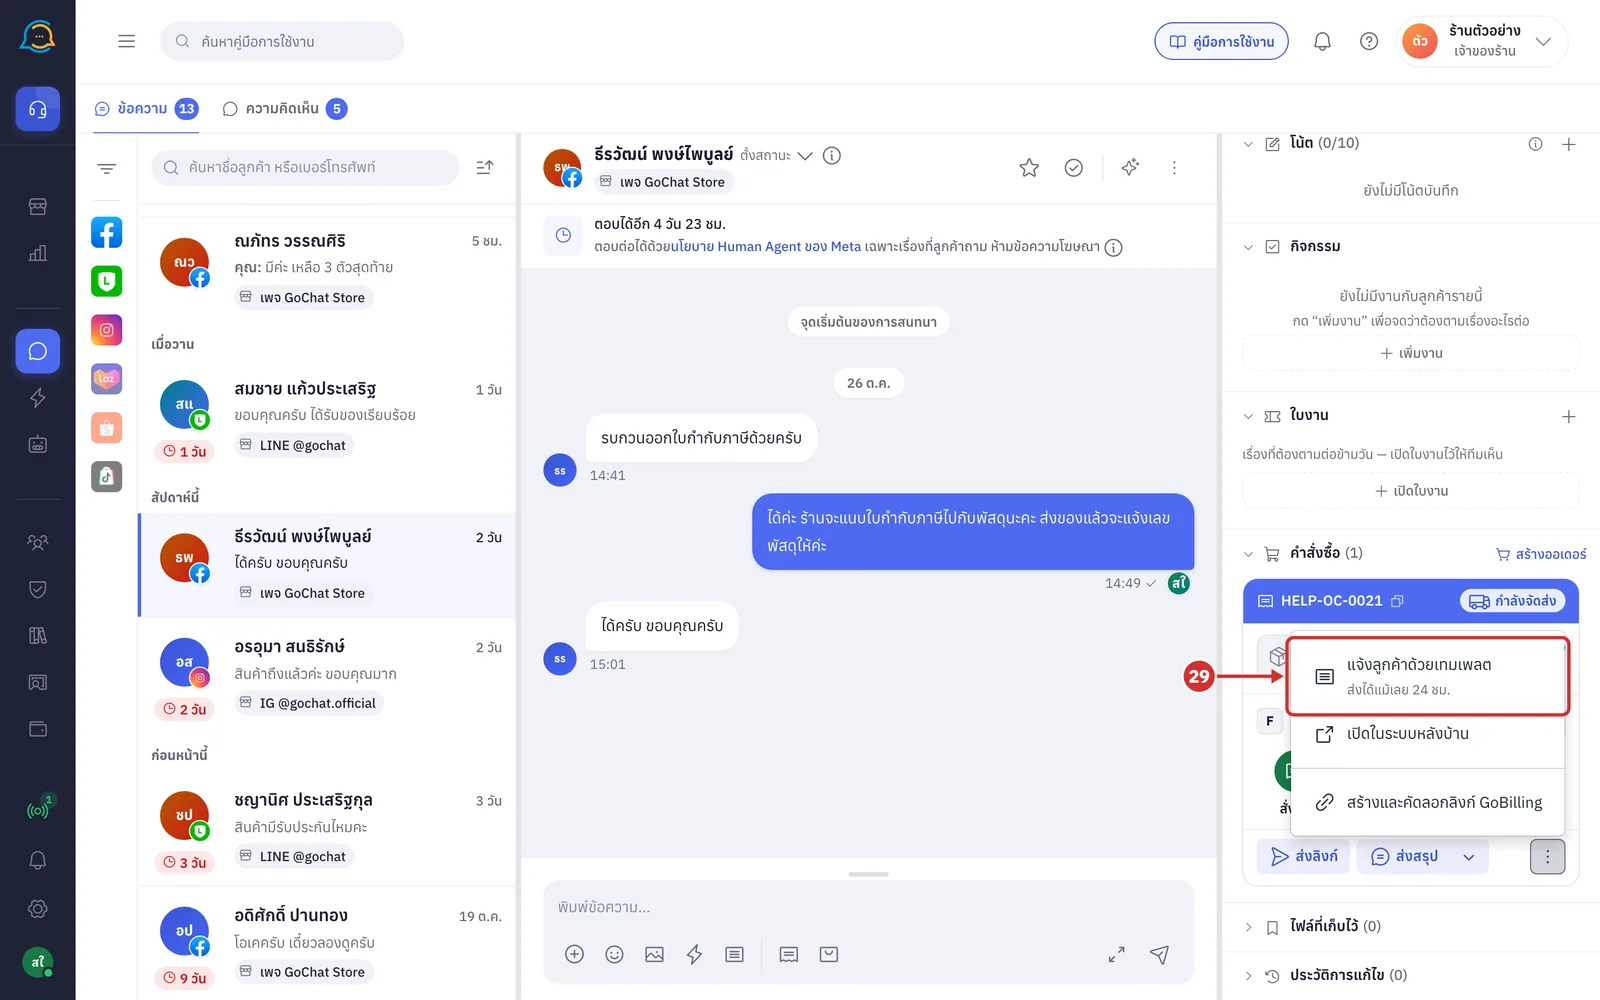
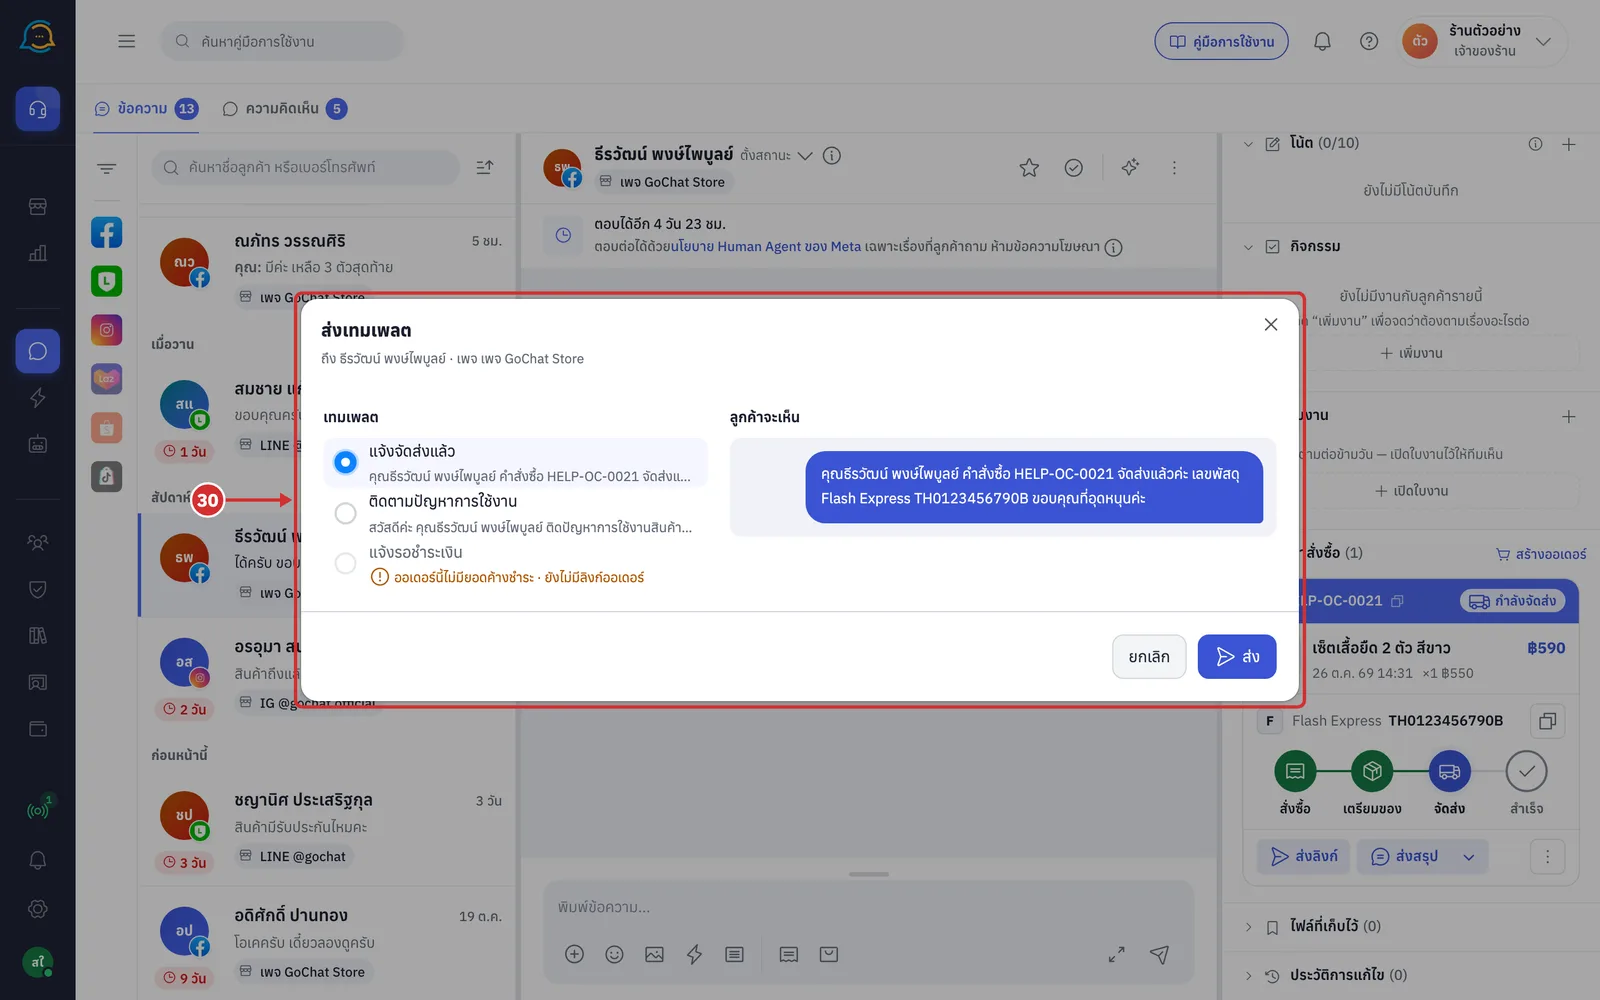
The ส่งเทมเพลต (Send template) window opens for this order. Choose a message, check what the ลูกค้าจะเห็น (Customer will see), then click ส่ง (Send)
Messages that use order data are filled from this order; you do not choose an order
A message whose values this order does not have cannot be chosen, and the reason is shown under its name
If this order was already notified with the same message, the window warns แจ้งคำสั่งซื้อนี้ไปแล้ว … · ส่งอีกครั้งลูกค้าจะได้ซ้ำ (This order was already notified … · sending again gives the customer a duplicate) and the button becomes ส่งซ้ำ (Send again)
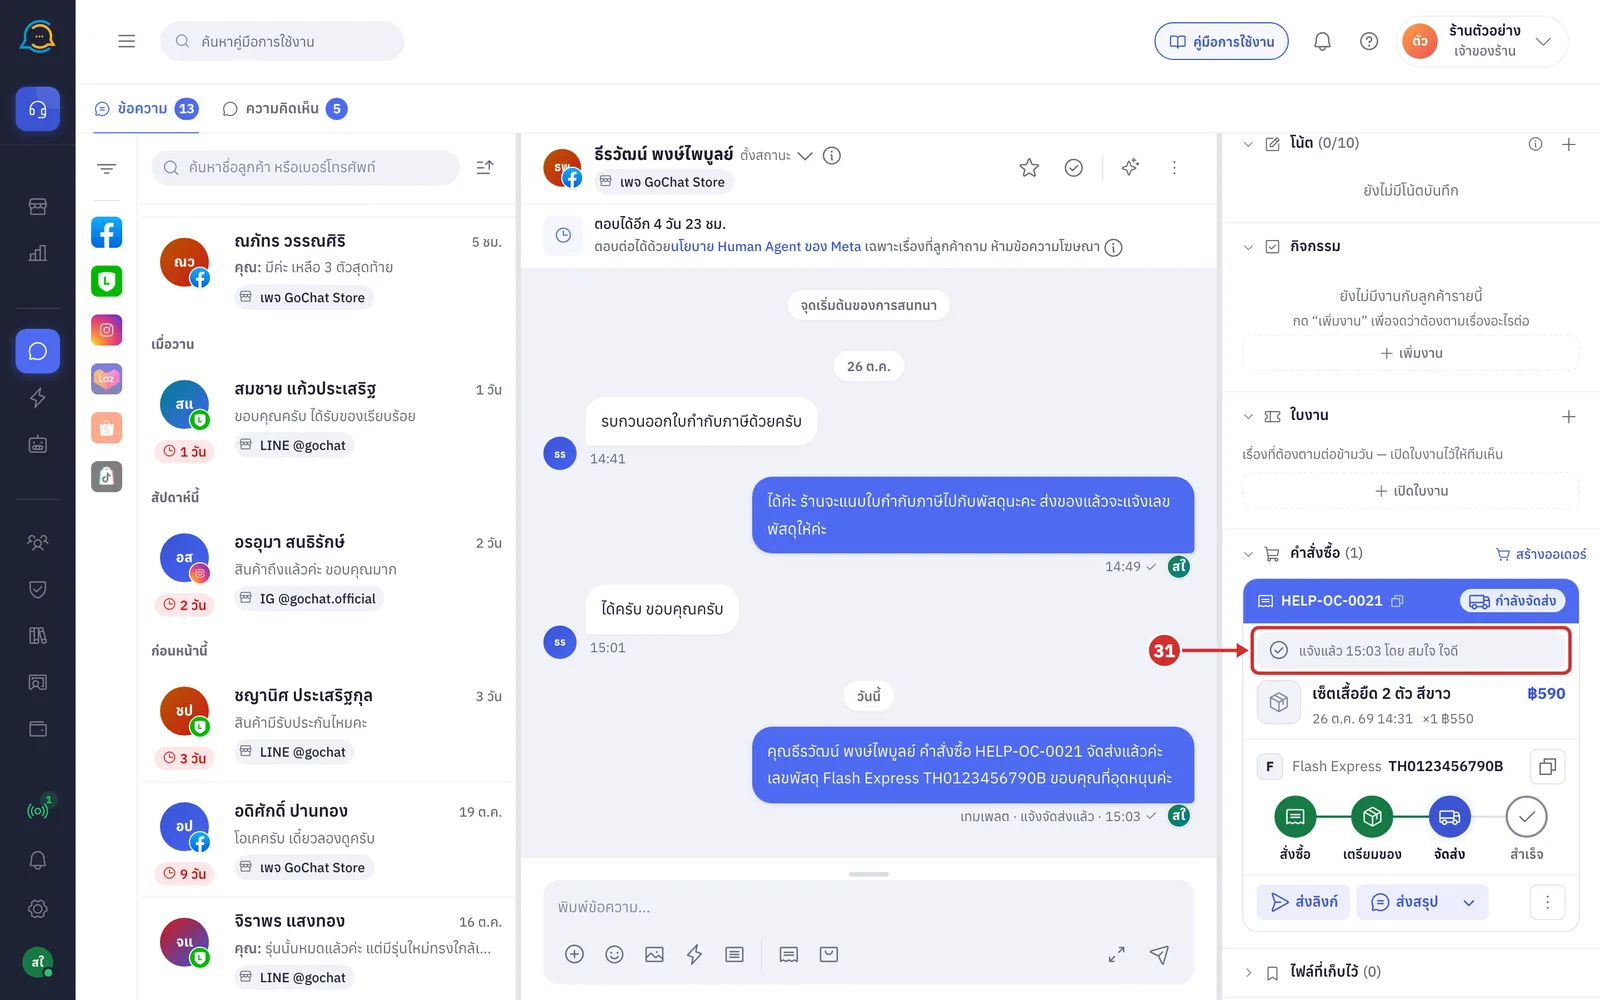
Once sent, the message appears in the chat, and the order card shows แจ้งแล้ว time โดย sender (Notified at time by sender) so your team knows the customer was notified
About editing orders
All prices, discounts, tax and totals are recalculated by GoSaaS; the form never calculates amounts itself
Editing an order does not send any message or card to the customer, even if your shop has the สรุปคำสั่งซื้อ (Order summary) auto-reply set turned on. To tell the customer, click ส่งสรุปใหม่ (Send new summary) on the card and send the message yourself
There is no cancel-order option in the chat. Cancelled orders appear in this section for viewing only