

Keying an order in a chat room
The คำสั่งซื้อใหม่ (New order) form in a chat lets you key a customer's order without leaving the chat. For example, when a customer tells you what they want, sends their name, phone number and address, and sends a transfer slip in the chat, you can pull the address and slip from those messages into the form, choose products, shipping and payment, and save it as an order in your GoSaaS order management system straight away.
Everyone in your shop who can open the chat can key orders from it. Saved orders are stored in your shop's GoSaaS and appear under คำสั่งซื้อ (Orders) in the right panel of that chat. All prices, discounts and totals are calculated by GoSaaS.
Chats that can use the order form
Your shop must be connected to GoSaaS order management. Shops that are not connected do not see the คำสั่งซื้อ (Orders) section or any way into the form
It works in 1:1 chats on Messenger, Instagram and LINE. Shopee and Lazada chats have their own platform order section
LINE group chats have no order form
The คำสั่งซื้อ (Orders) section still shows orders created in the group with an order command, but there is no สร้างออเดอร์ (Create order) button and the cards have no send buttons
Taking orders in groups is covered in Taking orders in LINE groups and sales teams
Shops using chat assignment: in a chat held by another admin, you can open and fill in the form, but when you save, the system says แชทนี้อยู่กับ … — กดดึงแชทแล้วรอเขายอมรับก่อนจึงจะแก้ไขได้ (This chat is with … — request the chat and wait for them to accept before editing)
Team leads can save as usual for chats of people in their team
In shops that turned on พิมพ์ตอบแชทของคนอื่นได้ (Can reply to others' chats), everyone can save as usual
See Turning on chat assignment for details
Opening the order form
On the ข้อความ (Messages) page, choose the customer's chat you want to key an order for
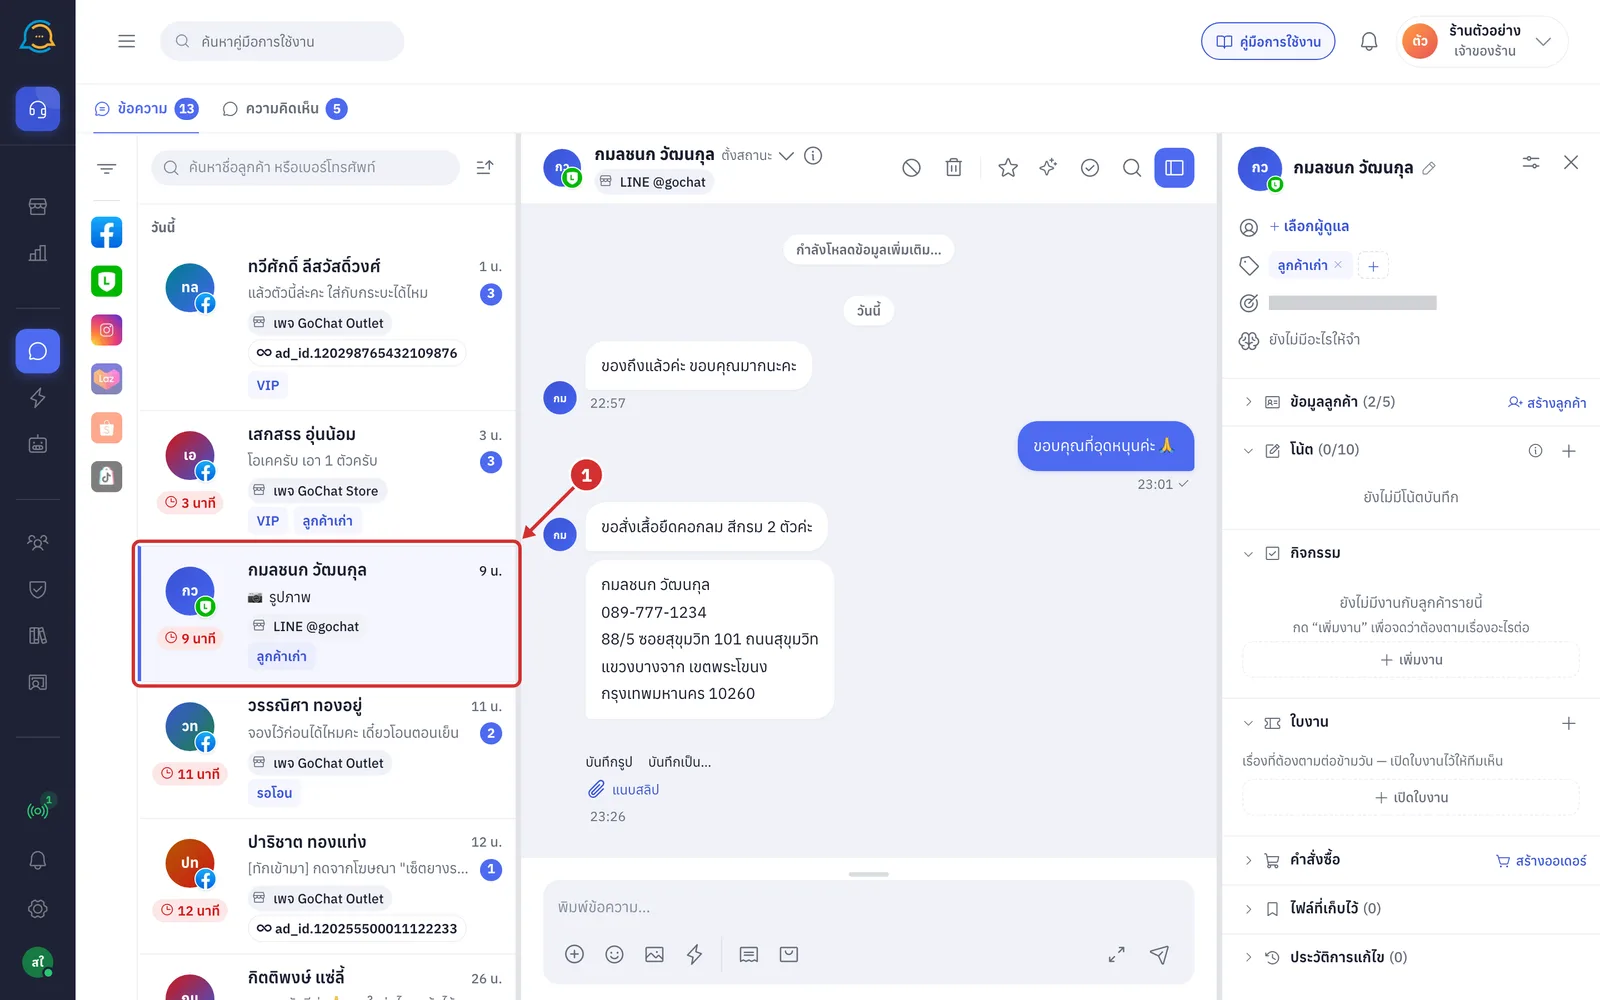
In the right panel of the chat, under คำสั่งซื้อ (Orders), click สร้างออเดอร์ (Create order). The คำสั่งซื้อใหม่ (New order) form opens in the right panel without covering the chat
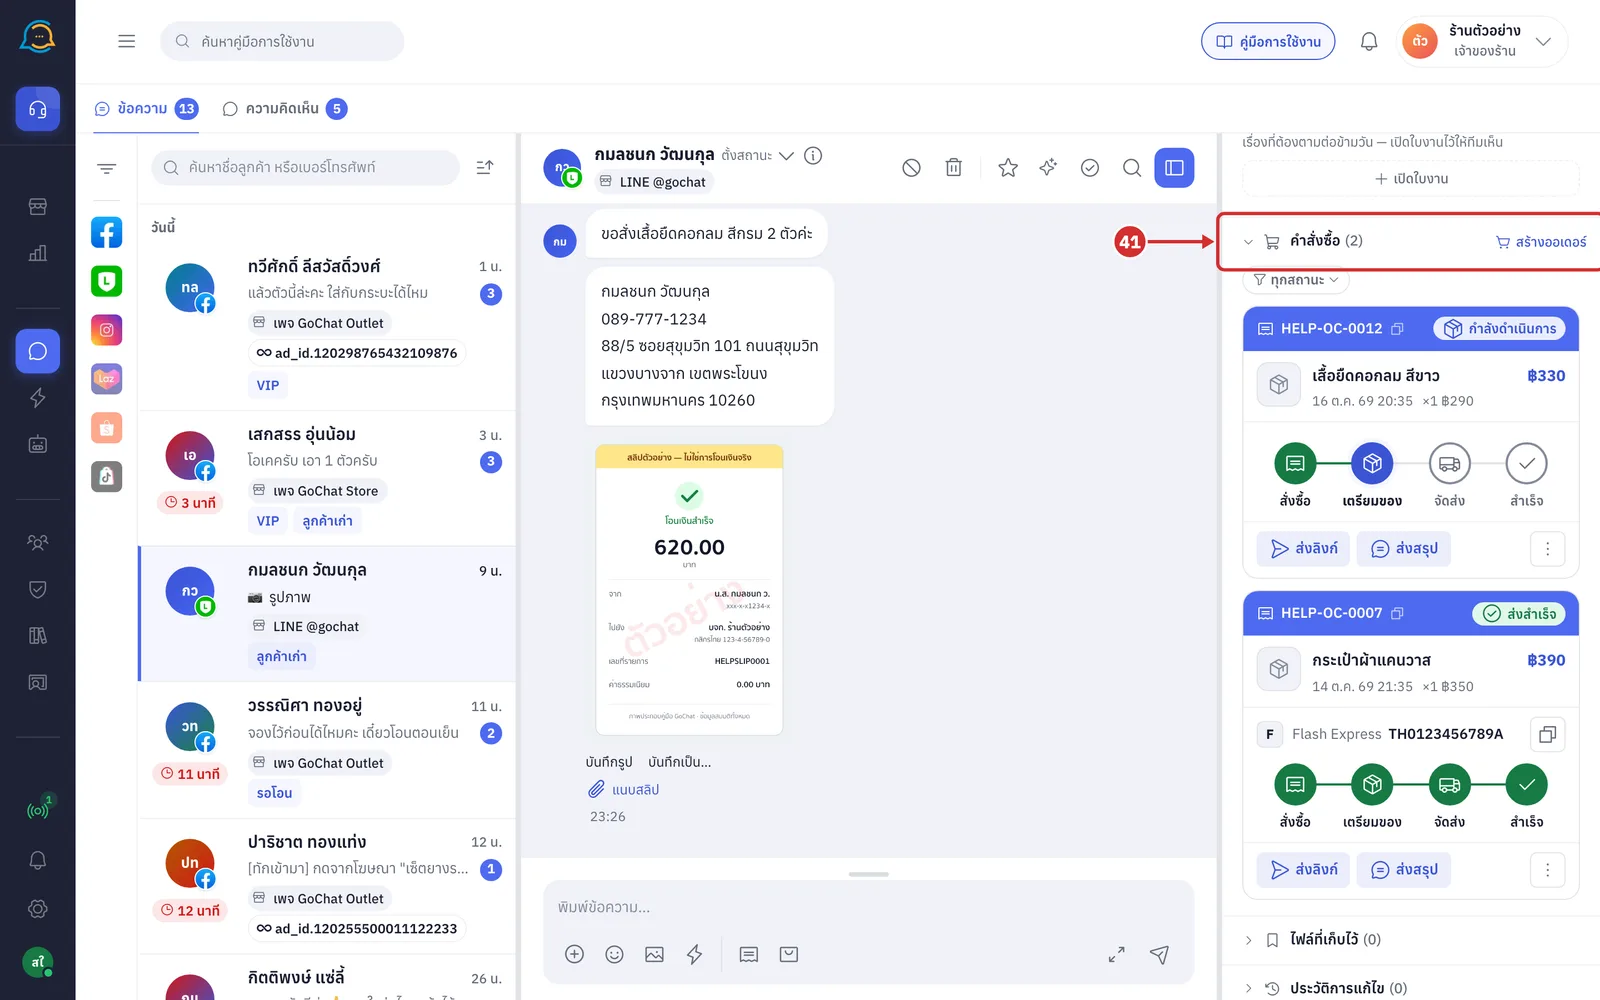
The สร้างออเดอร์ (Create order) button is always on the section heading, whether the section is folded or expanded
If this chat has a minimised form, the same form opens again with what you entered
Other ways to open the form
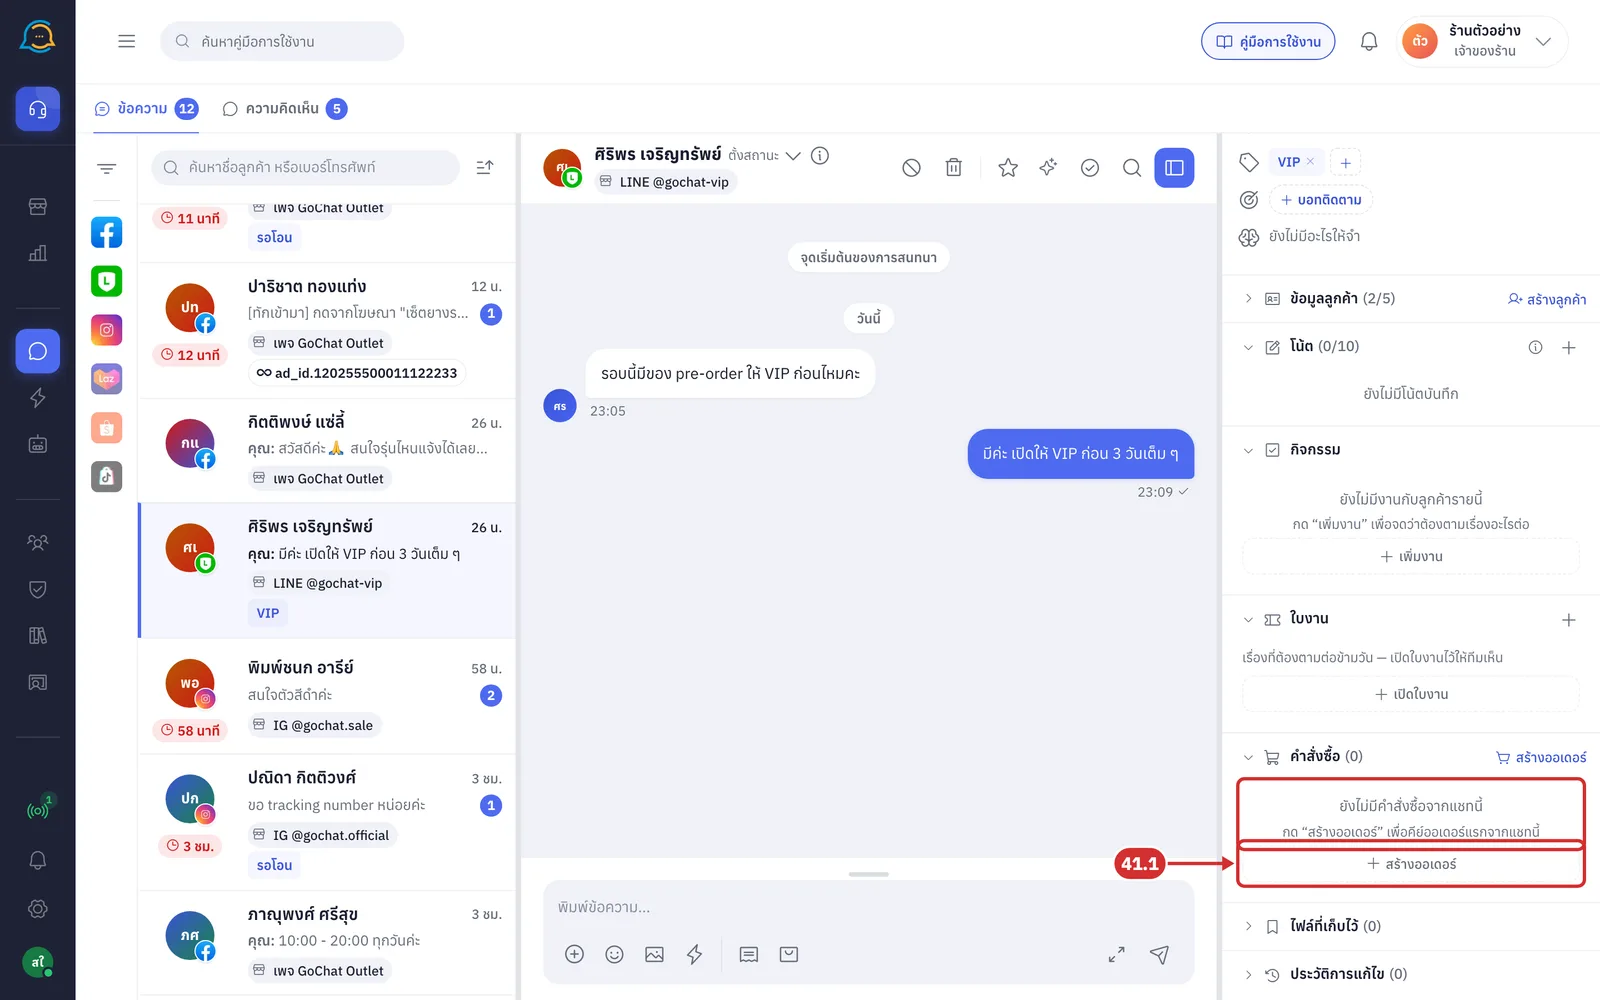
The dashed สร้างออเดอร์ (Create order) button under คำสั่งซื้อ (Orders) when the chat has no orders yet (step 41.1)
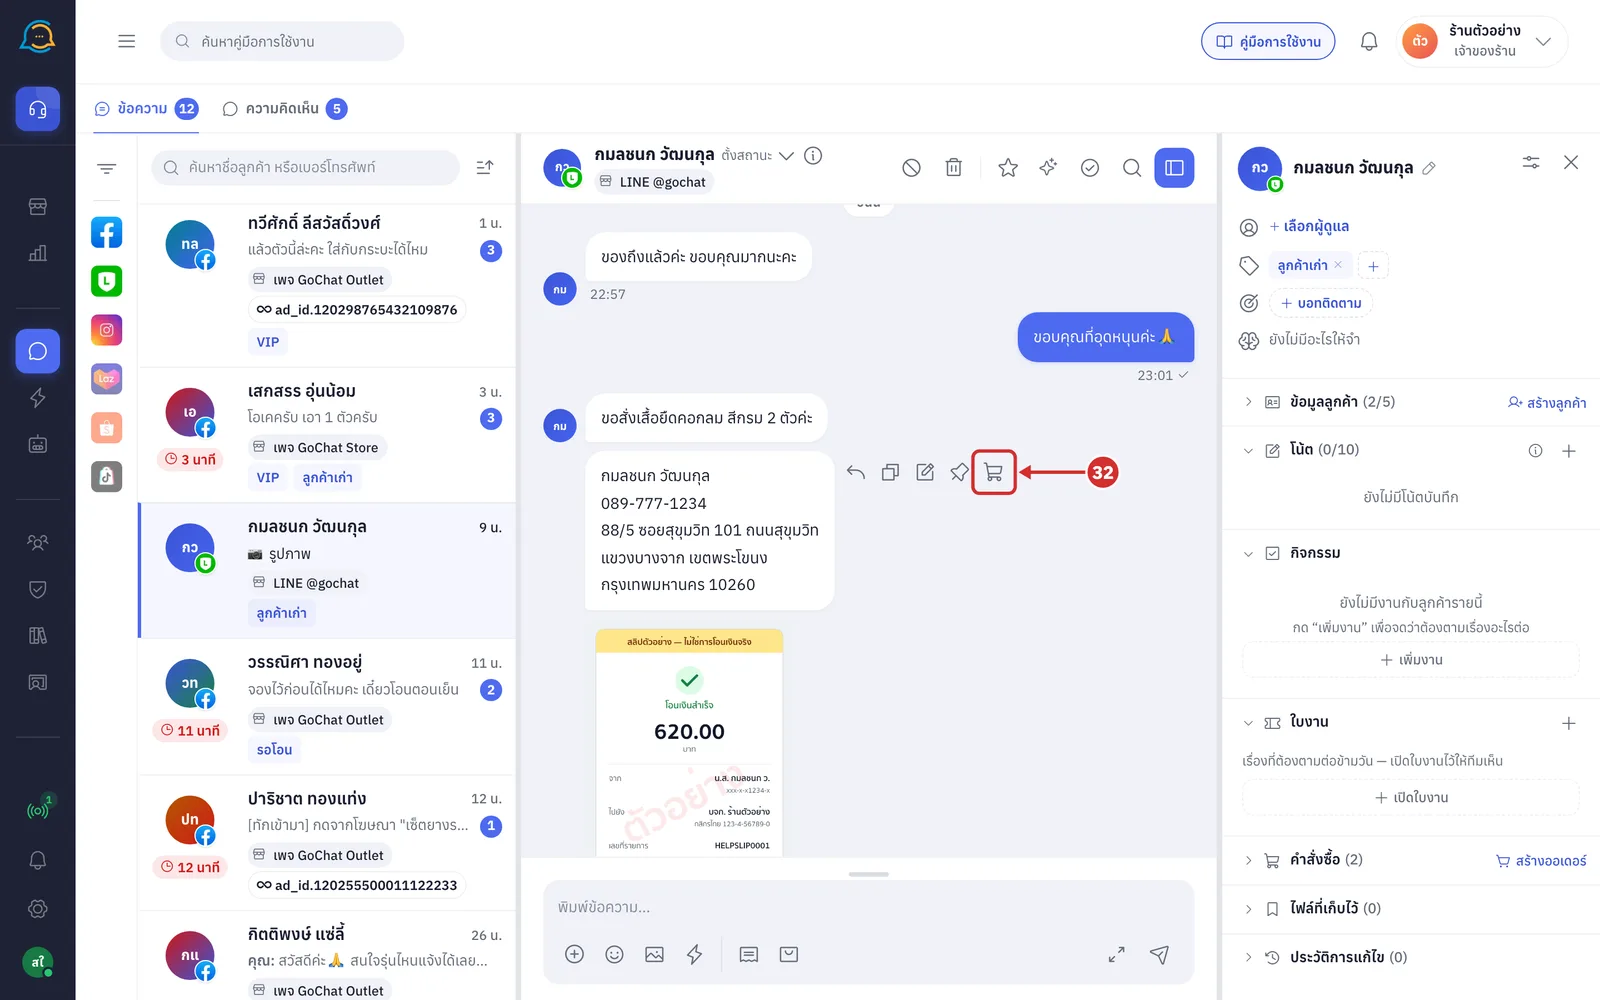
The cart icon ใช้ที่อยู่นี้ลงออเดอร์ (Use this address in an order) on the customer's address message (step 32)
The แนบสลิป (Attach slip) link under a picture the customer sent (step 33)
On screens narrower than 1,200 pixels, a cart icon สร้างออเดอร์ (Create order) is on the message box toolbar
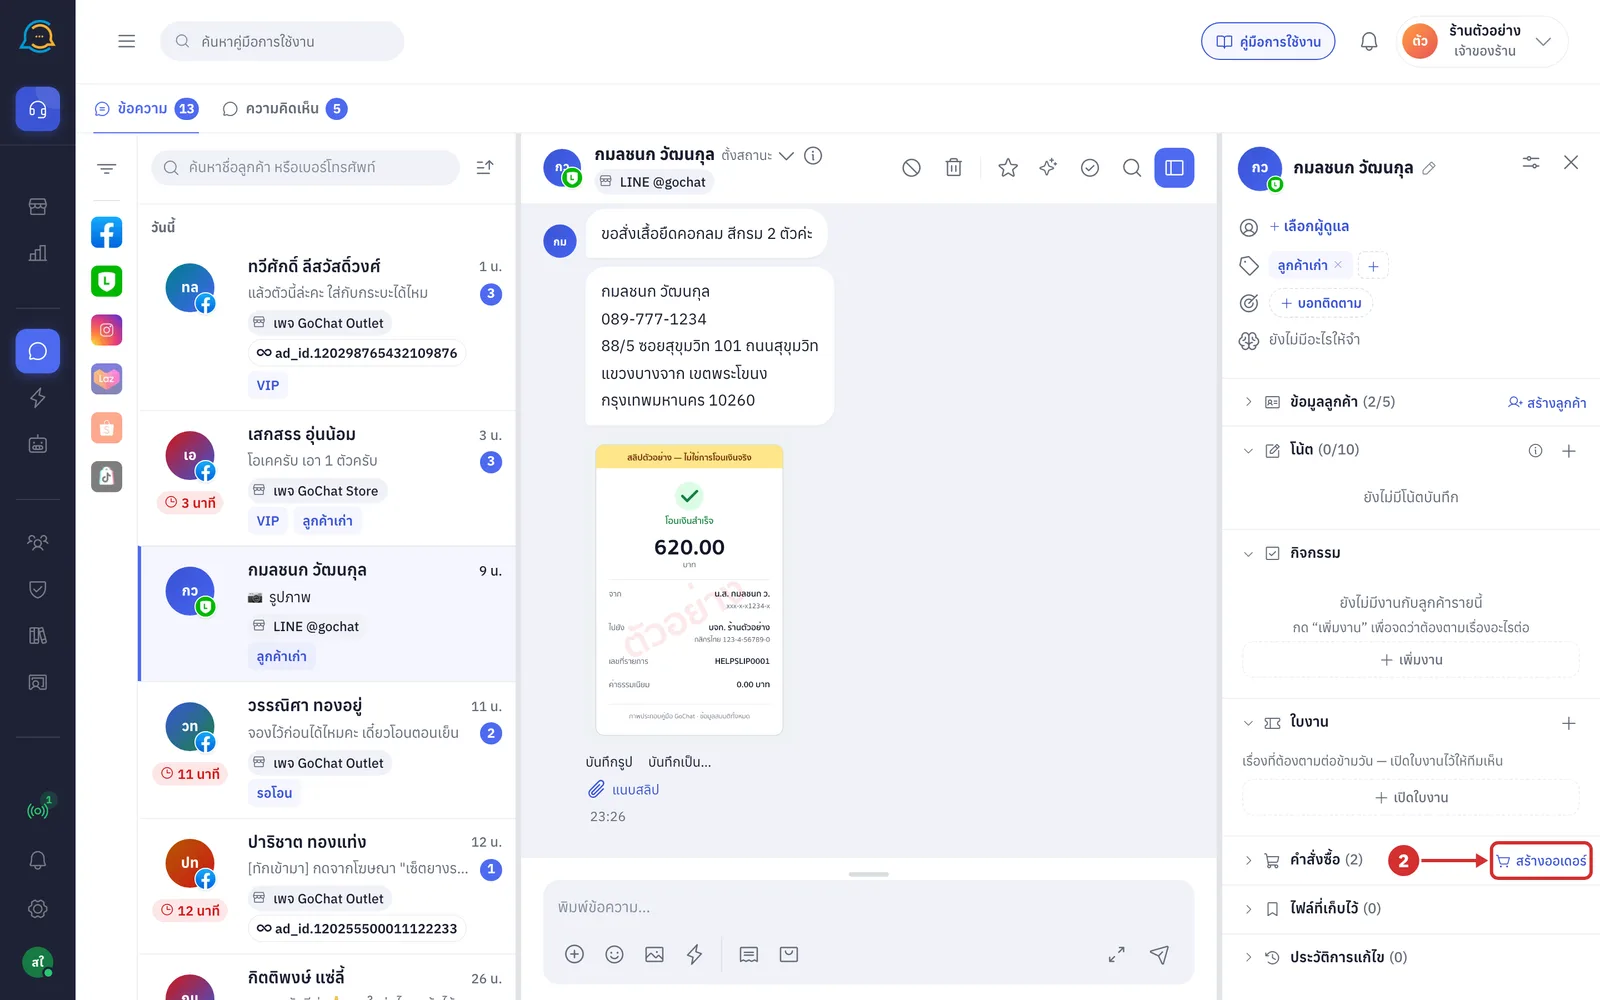
Parts of the order form
The form header shows คำสั่งซื้อใหม่ · customer name (New order · customer name). The second line shows the chat's channel and the status of the customer that will be saved
กำลังค้นหาลูกค้า… (Looking up customer…) the system is searching for an existing customer by phone number
ยังไม่ได้เลือกลูกค้า (No customer chosen) an existing customer uses this number, but you have not chosen them yet
ลูกค้าเดิม (Existing customer) followed by the customer code: linked to an existing customer in GoSaaS
ลูกค้าใหม่ (New customer) the system will save a new customer with the name and number entered
Buttons on the right of the header, from left to right
ขยาย (Expand) widens the form into two columns (step 4)
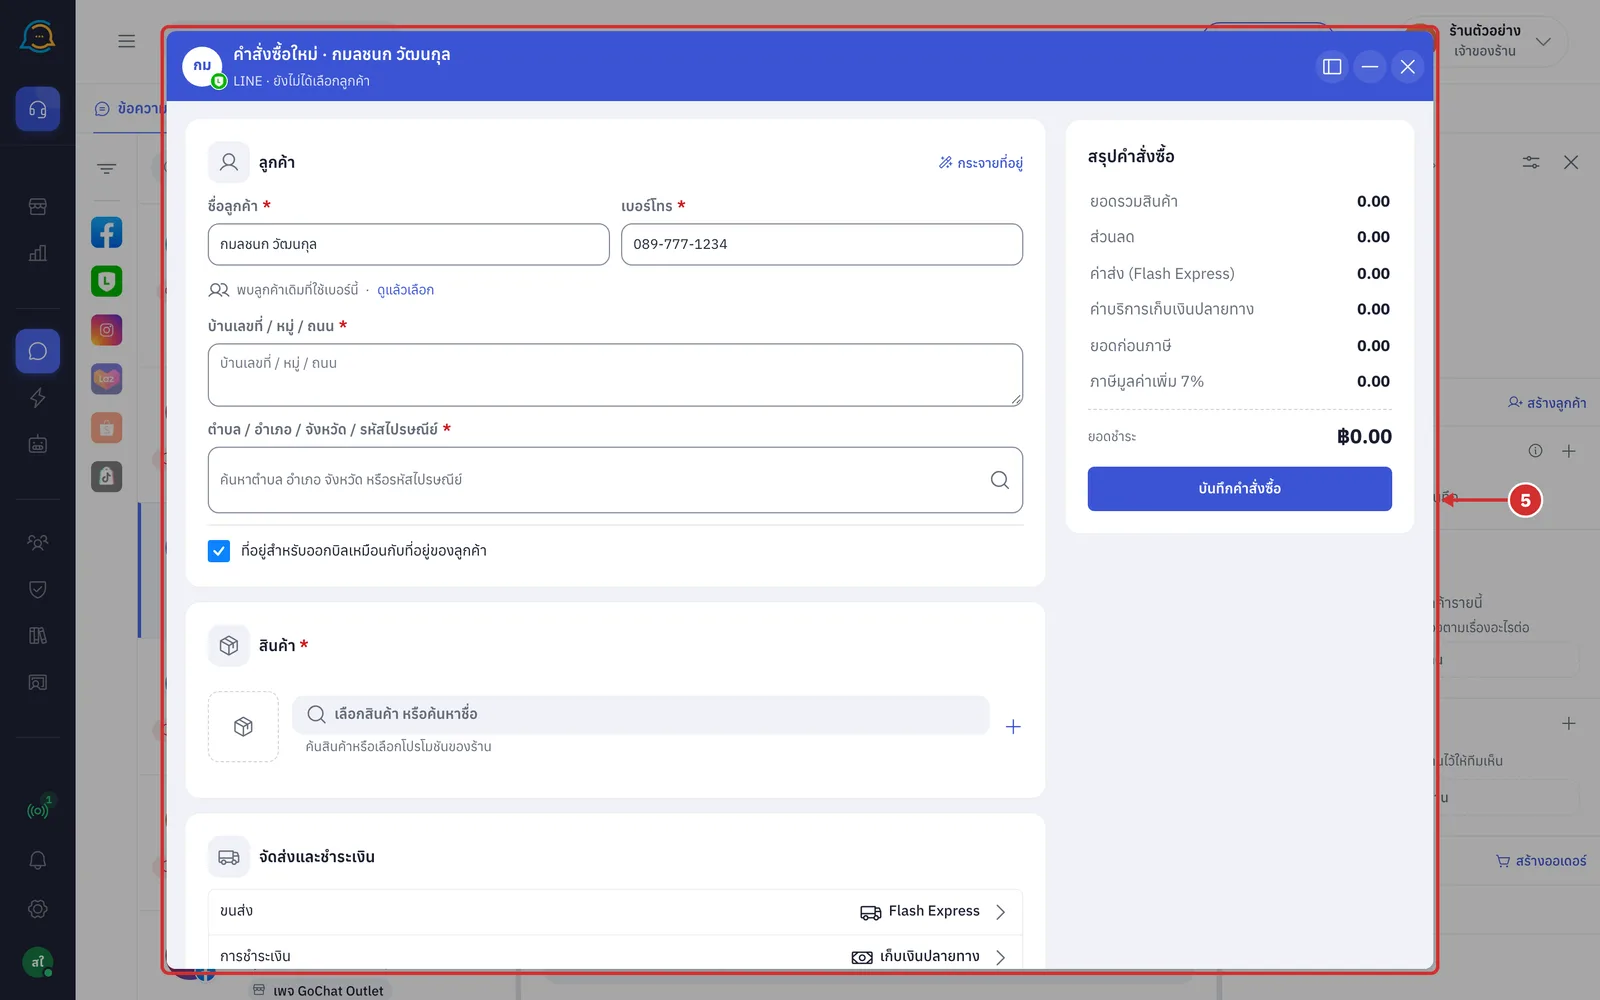
เปิดกลางจอ (Open in the centre) opens the form as a window in the centre of the screen (step 5)
ย่อเก็บไว้ (Minimise) keeps the form aside to finish later (step 45)
ปิด (Close) closes the form (step 47)
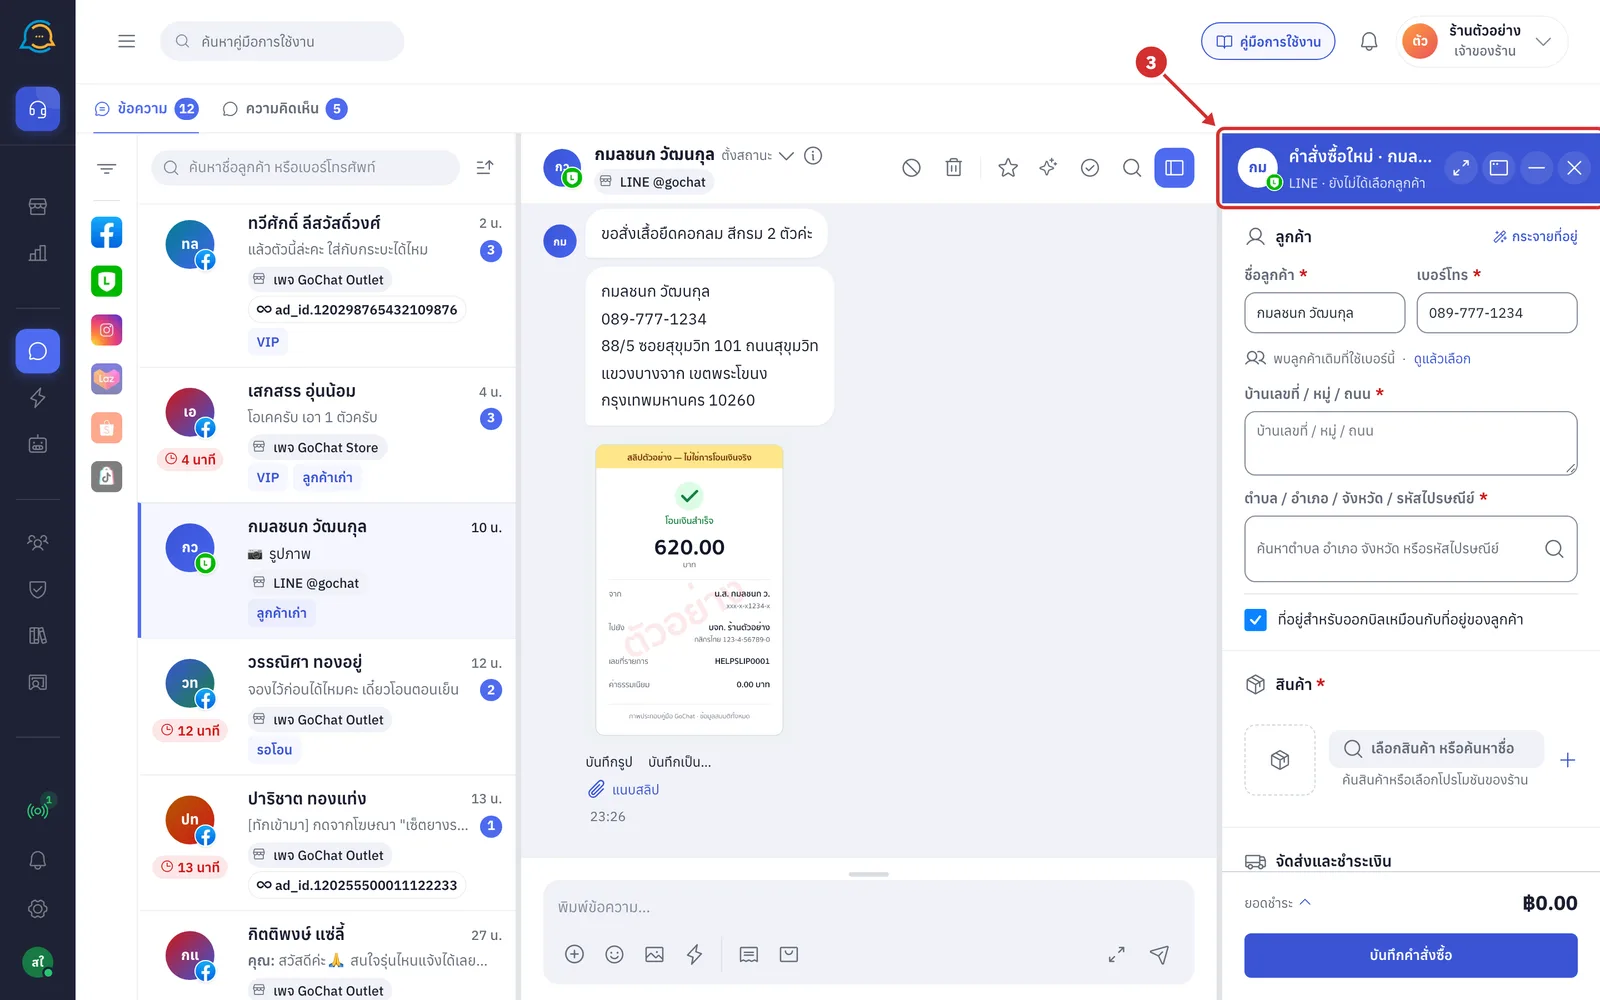
Click ขยาย (Expand) to stretch the form to the left in two columns: customer details on the left, and products, shipping and more details on the right. The chat gets narrower but stays readable
Click the same button again (ย่อกลับ (Shrink back)) to return to the right panel
This button only appears on screens at least 1,440 pixels wide
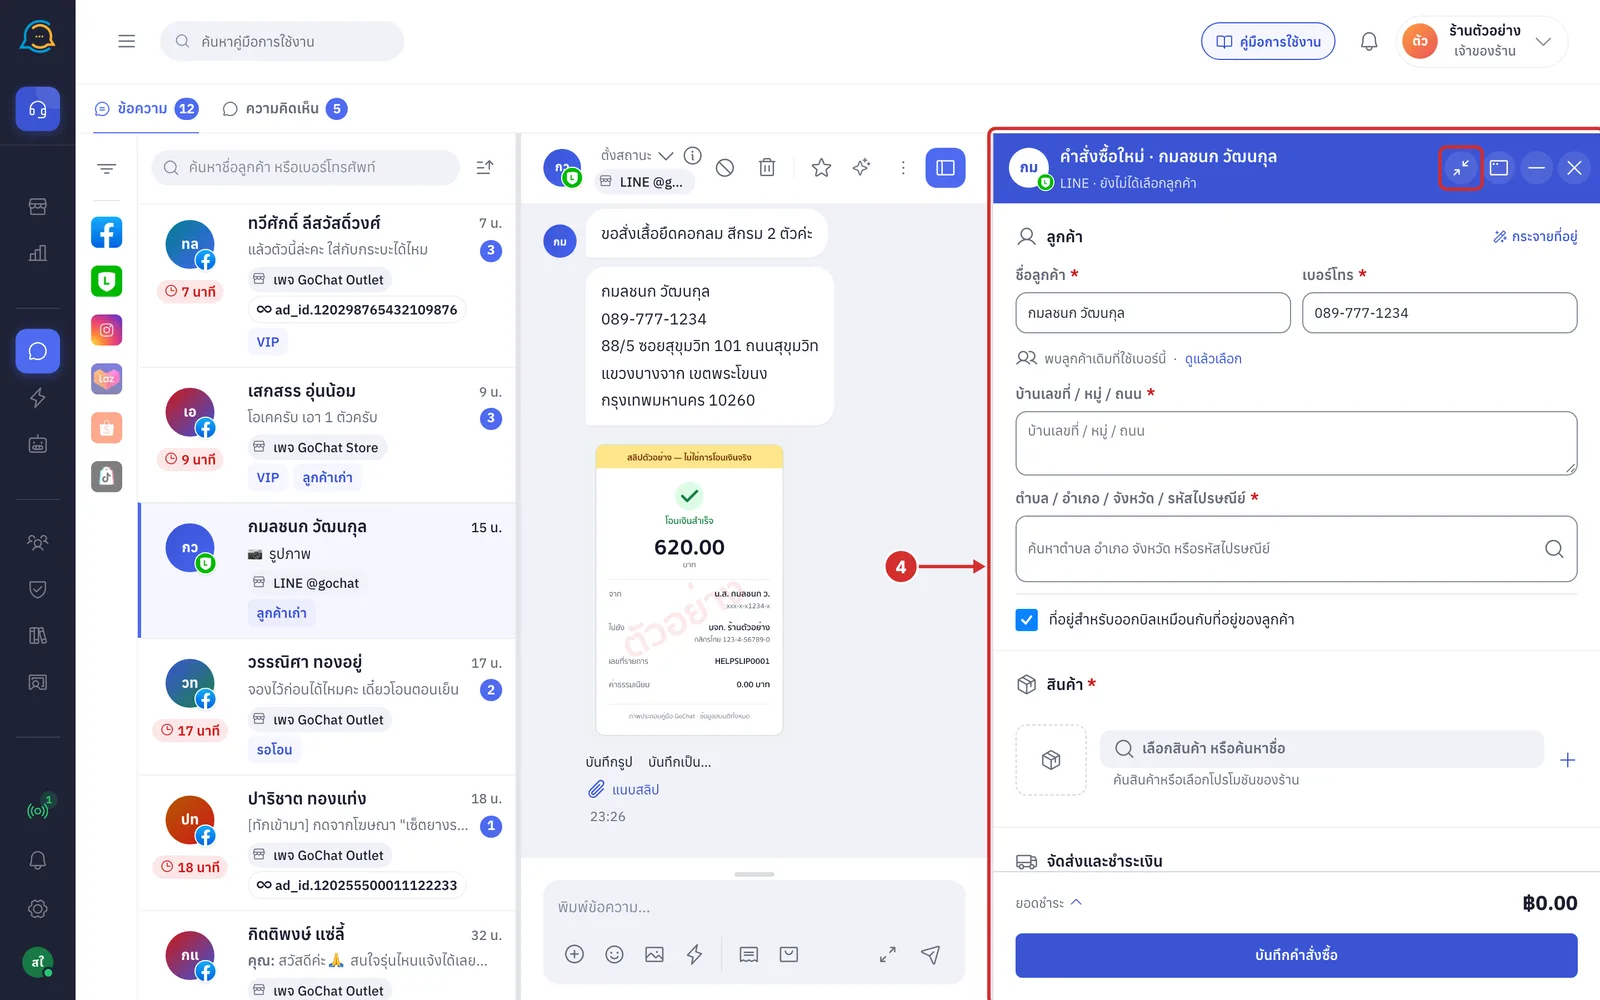
Click เปิดกลางจอ (Open in the centre) to open the form as a window in the centre of the screen. The right side of the window is an สรุปคำสั่งซื้อ (Order summary) card that always shows the money breakdown
Clicking the backdrop does not close the window, so what you entered is not lost by accident
Click the same button (กลับเป็นแผงขวา (Back to right panel)) to show the form in the right panel again
This button only appears on screens at least 1,200 pixels wide
How the order form works
Each form belongs to one chat. If you switch to another chat and come back, everything you entered is still there
The form appears straight away. You can type the customer and address right away, while fields that need your shop's data, such as products, shipping and payment, become available once the shop data has loaded. Until then the save button shows กำลังโหลดตัวเลือกร้าน… (Loading shop options…)
Prices, discounts, shipping, tax and totals are calculated by GoSaaS every time you change something. While waiting for the real totals, the amounts are shown faded and the save button shows รอยอดจริง… (Waiting for real totals…)
Fields marked * must be filled in before saving
The system picks the ช่องทางการขาย (Sales channel) from the chat's page or account, so it is not shown in the form. The exception is a chat that does not match any of your shop's sales channels: the system then shows a ช่องทางการขาย (Sales channel) field with ห้องนี้ไม่ตรงกับช่องทางการขายของร้าน — เลือกช่องทางที่จะลงออเดอร์นี้ (This chat does not match a sales channel of the shop — choose the channel for this order)
The form size you used last, right panel, expanded or centre window, is remembered in the browser on your device and used for every chat
While you fill in the form, nothing is sent to the customer
Entering the customer
On the ลูกค้า (Customer) card, the ชื่อลูกค้า (Customer name) field is filled in from the chat. You can change it to the recipient's name
This field is required, up to 120 characters
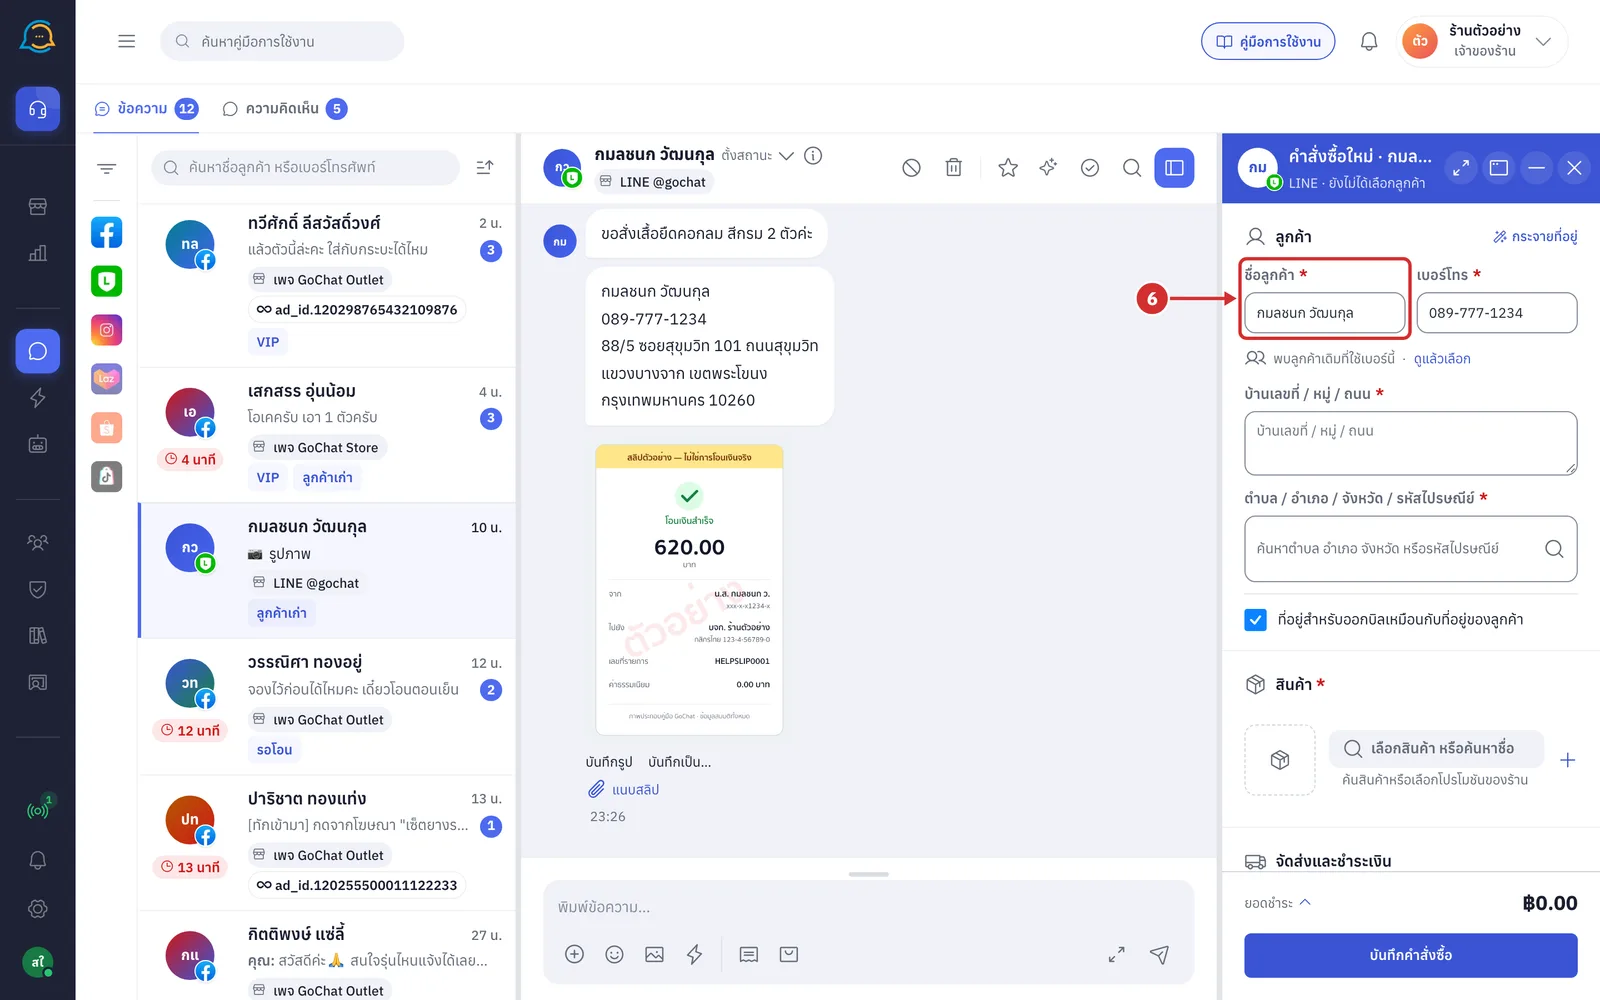
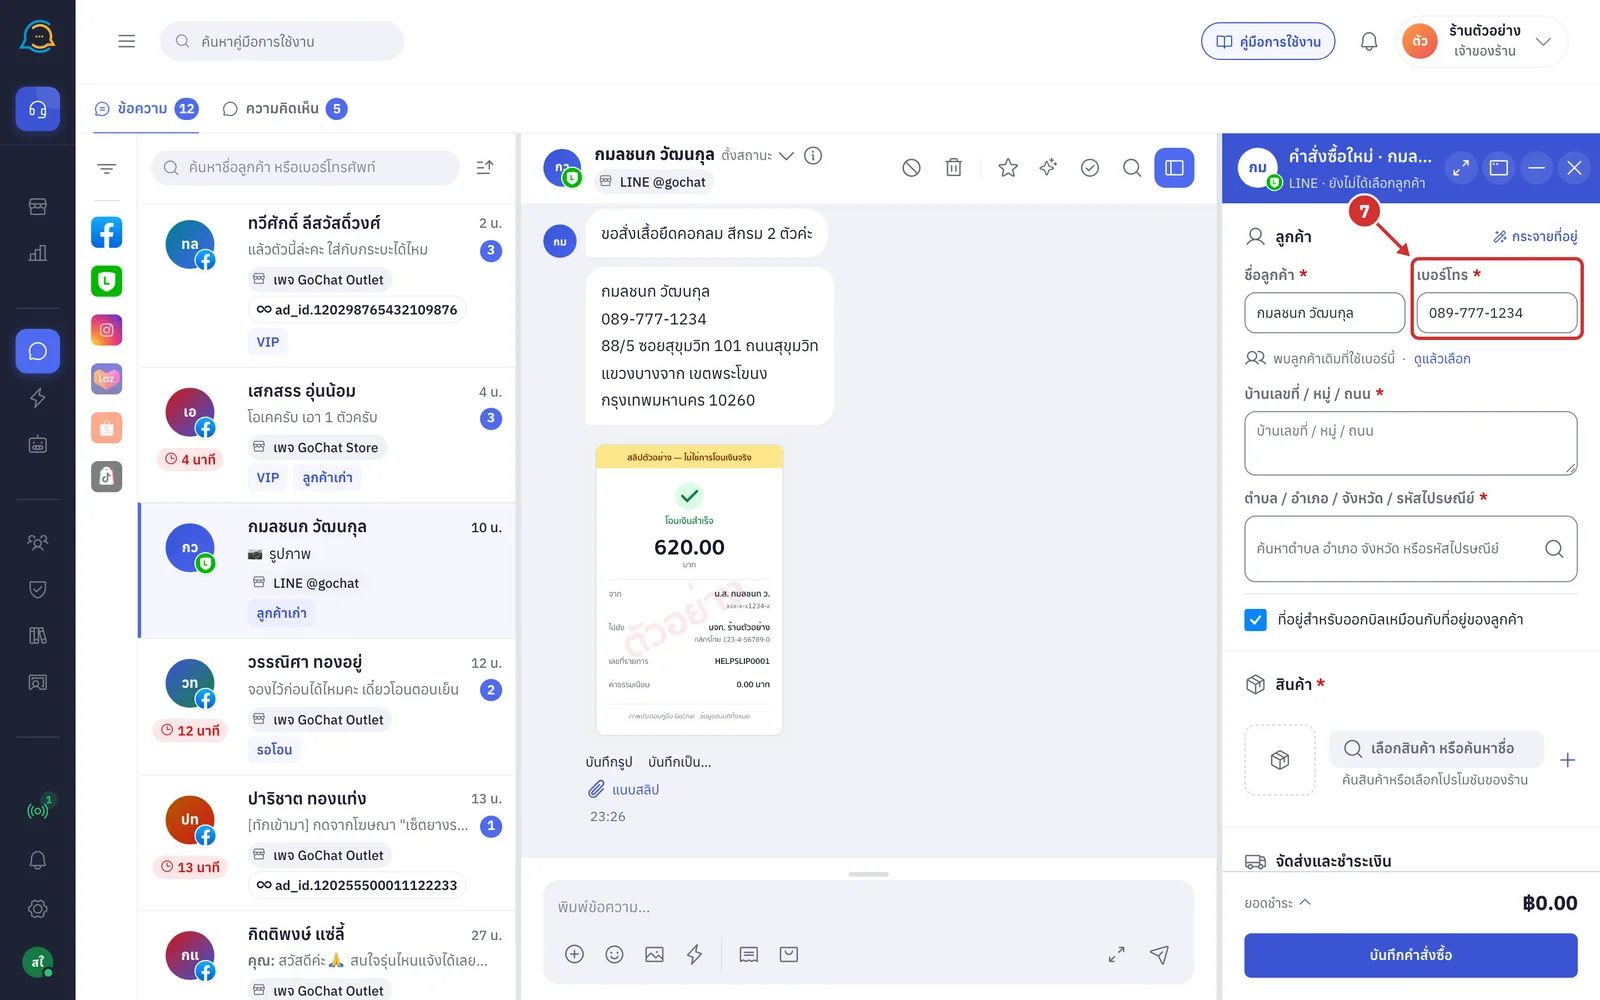
In เบอร์โทร (Phone), check or enter the customer's phone number. If the chat's customer details already have a number, it is filled in
Mobile numbers need 10 digits and landlines 9 digits. Otherwise the system shows เบอร์ผิด เช่น 0812345678 (Wrong number, e.g. 0812345678)
When you leave the field, the system tidies the number, for example 874453719 becomes 0874453719
Once the number has 9 digits or more, the system looks for existing GoSaaS customers with this number
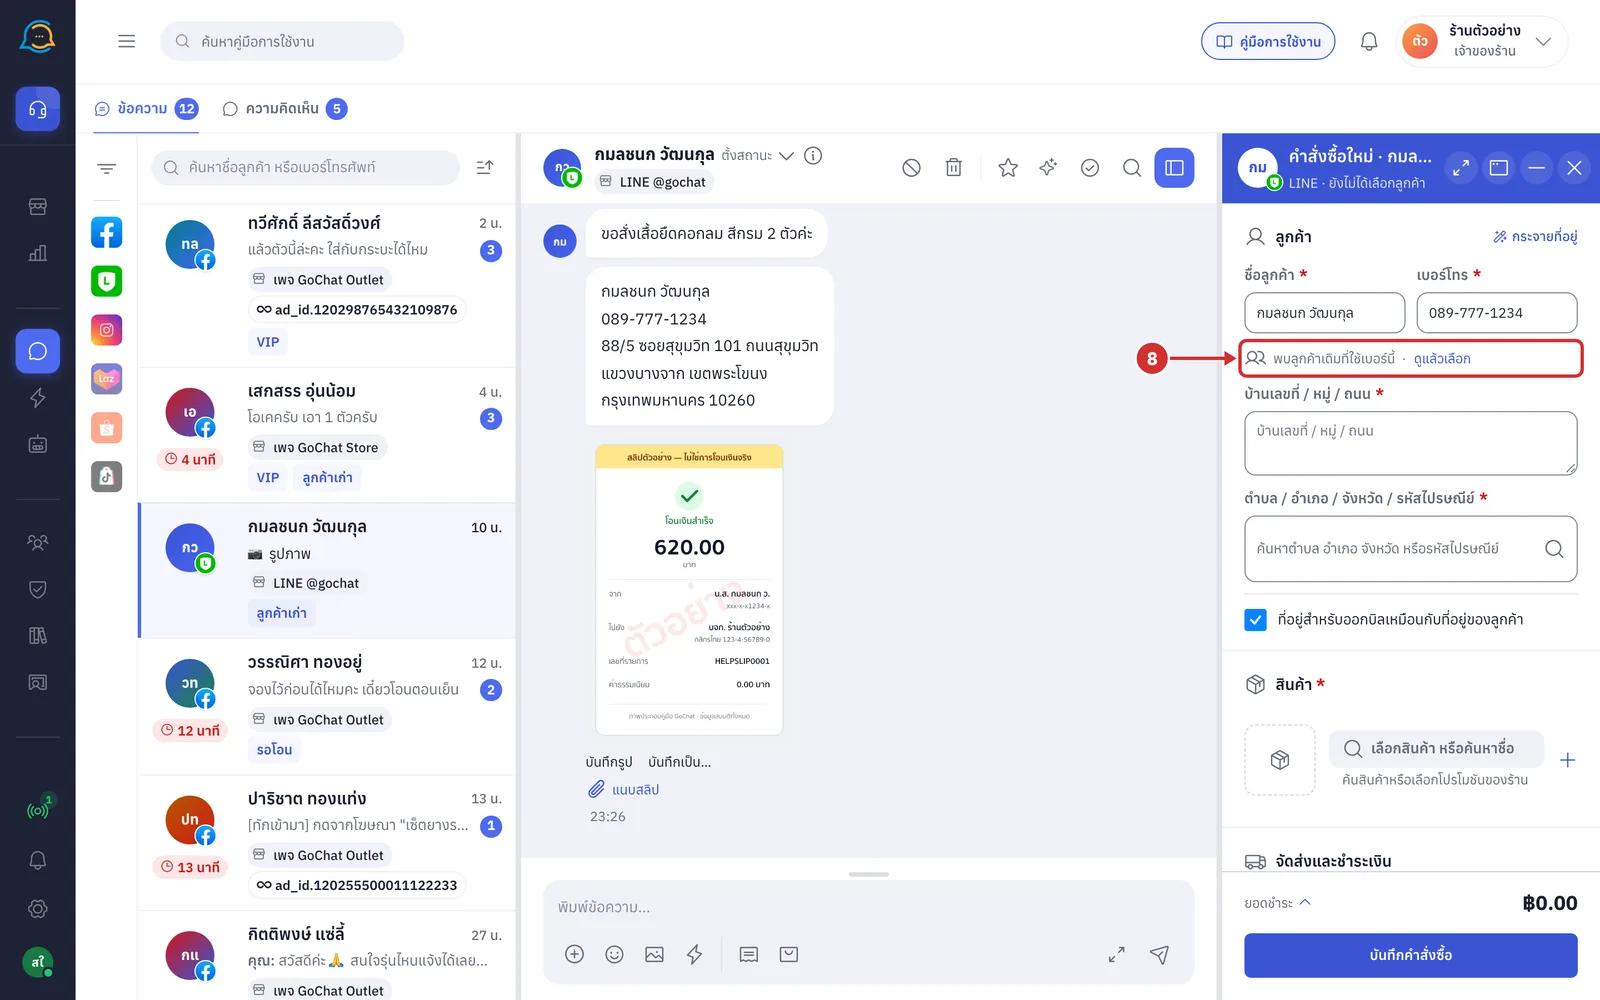
If an existing customer uses this number, พบลูกค้าเดิมที่ใช้เบอร์นี้ · ดูแล้วเลือก (Existing customer found with this number · Review and choose) appears under the phone field. Click ดูแล้วเลือก (Review and choose)
While searching, the system shows กำลังค้นหาลูกค้า… (Looking up customer…)
If several customers share the number, it shows เบอร์นี้มีลูกค้าเดิม N คน · เลือกลูกค้า (N existing customers use this number · Choose customer)
The system does not link a customer by itself, because one number can belong to several customers, so you choose
Check the list of existing customers and click ใช้ข้อมูลนี้ (Use these details) on the right customer's row
Each row shows the name, social name, customer code and address to help confirm it is the same person as in the chat
The list shows up to 5 customers
If none of them is right, do not choose; the system saves a new customer with the name and number entered
Click ซ่อนรายชื่อ (Hide list) to fold the list
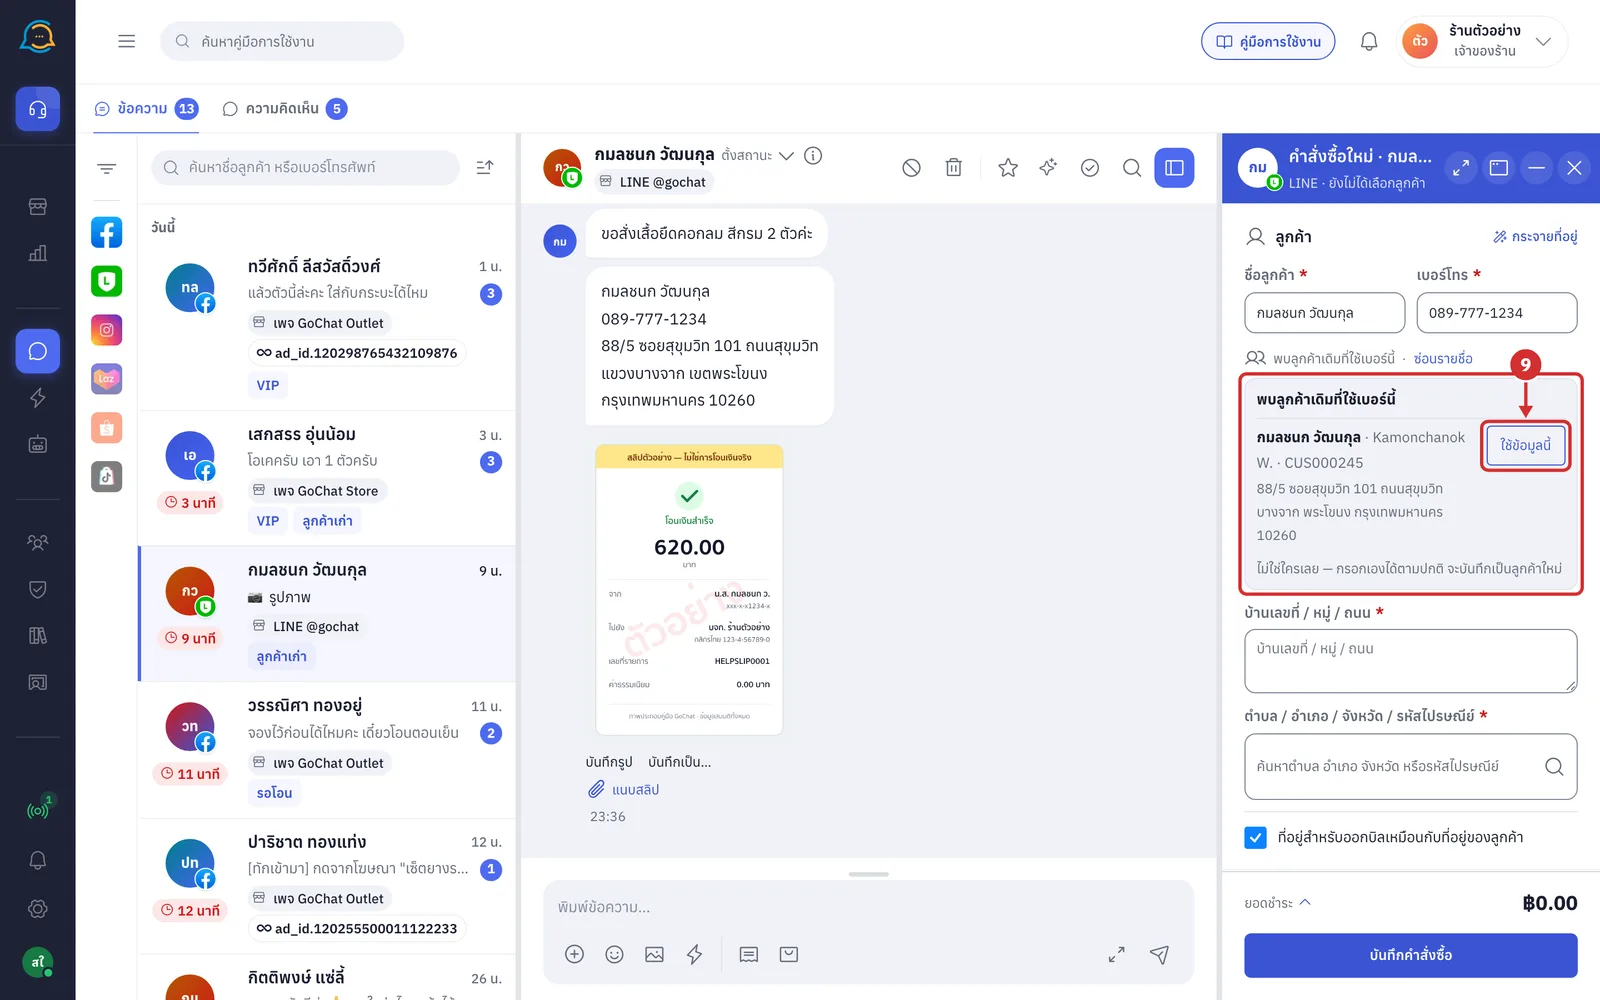
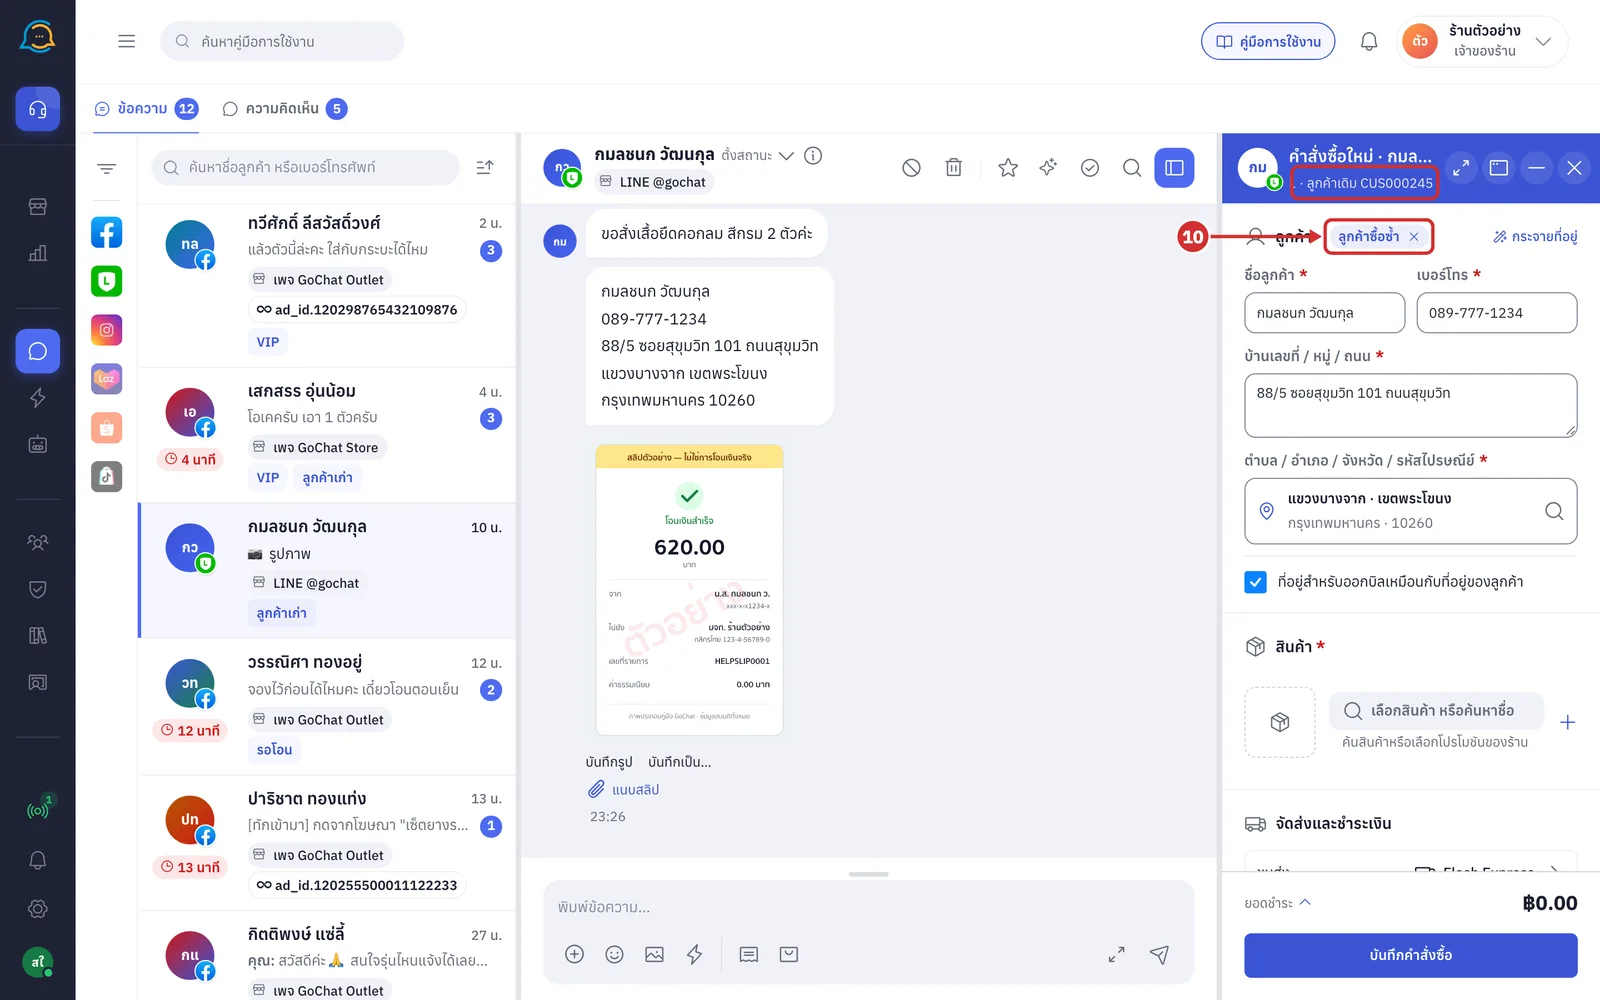
Once chosen, the existing customer's name and address fill the form, a ลูกค้าซื้อซ้ำ (Repeat customer) label appears next to the card heading, and the form header changes to ลูกค้าเดิม (Existing customer) followed by the customer code, such as CUS000245
Click × on the label (ไม่ใช่คนนี้ (Not this person)) to unlink the existing customer
If you change the name after linking, the system says ไม่ตรงกับลูกค้าเดิม … — จะบันทึกเป็นลูกค้าใหม่ตามชื่อและเบอร์ที่กรอก ไม่แก้ข้อมูลลูกค้าเดิม (Does not match the existing customer … — will save a new customer with the name and number entered and will not change the existing customer). The existing customer's details can be edited on the customer page on the web
If you change the number, the system unlinks the customer and searches again with the new number
Chats already linked to a GoSaaS customer, for example after an order was saved from this chat, are linked and filled in as soon as the form opens
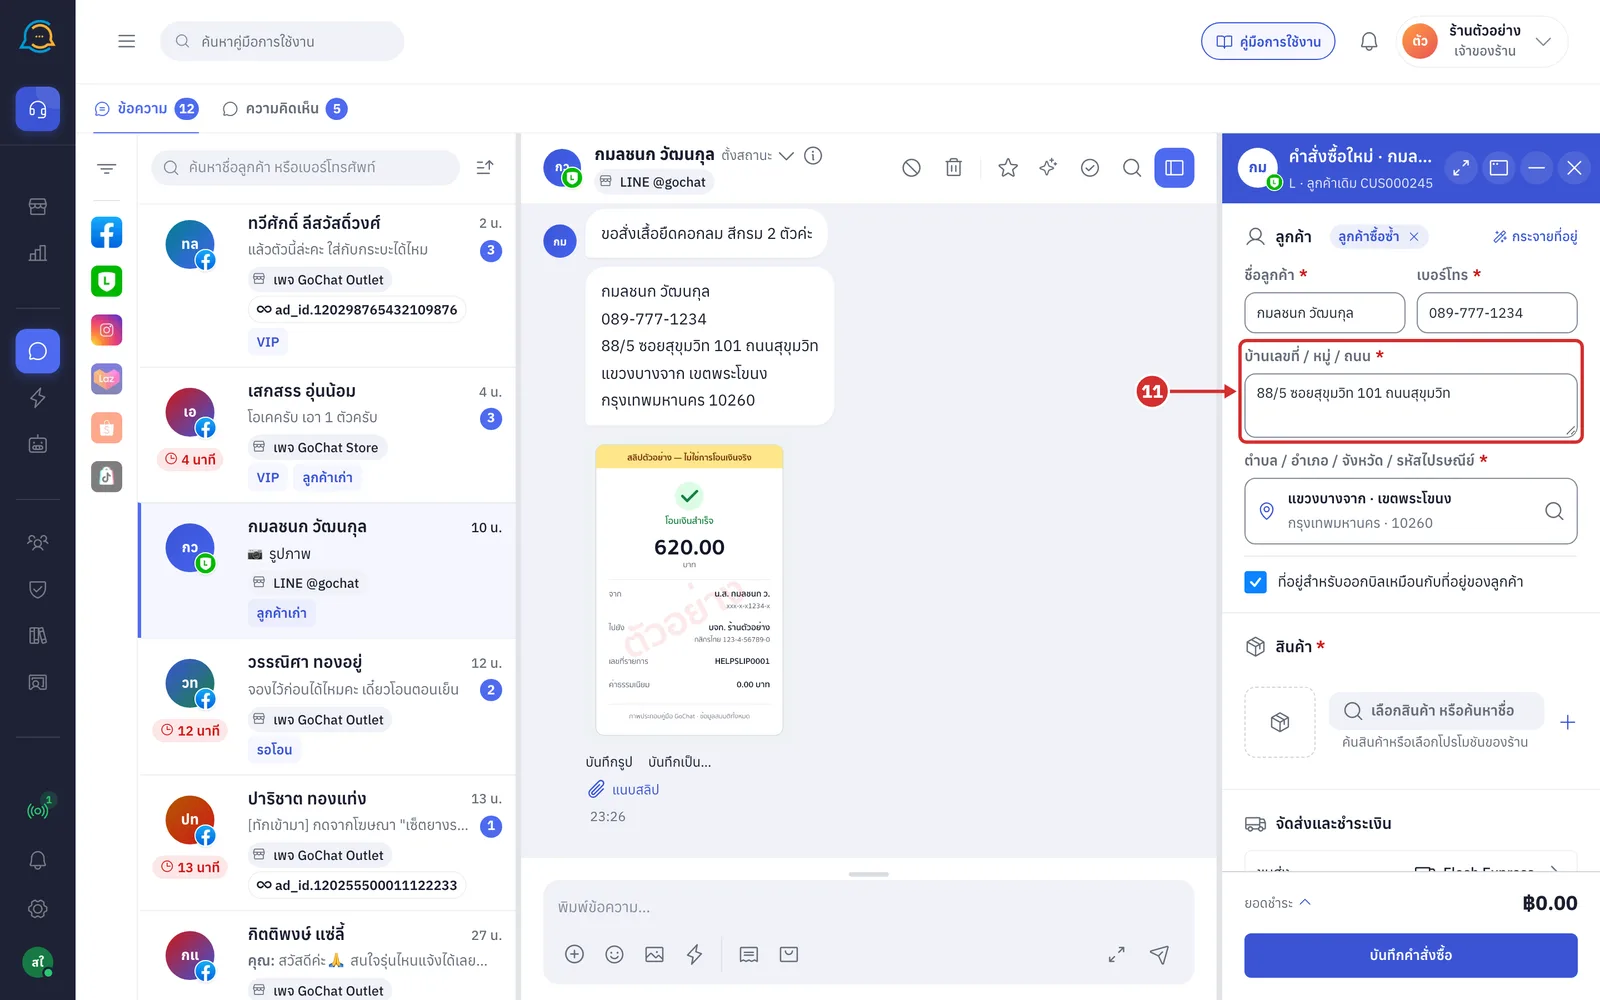
In บ้านเลขที่ / หมู่ / ถนน (House no. / Village / Road), enter the recipient's house number, village, soi and road
This field is required, up to 255 characters
Click the ตำบล / อำเภอ / จังหวัด / รหัสไปรษณีย์ (Subdistrict / District / Province / Postcode) field. The เลือกพื้นที่จัดส่ง (Choose delivery area) page opens; type a subdistrict, district, province or postcode
Type at least 2 characters, such as บางปลา or 10290
Use the up and down arrow keys to move, Enter to choose, or Esc to go back to the form
รหัสไปรษณีย์เดียวอาจมีหลายตำบล (One postcode can cover several subdistricts): choose the row that matches what the customer wrote; the system does not choose for you
If the area is not found, click ไม่มีในรายการ กรอกเองทีละช่อง (Not in the list, enter each field yourself) to type แขวง / ตำบล (Subdistrict), เขต / อำเภอ (District), จังหวัด (Province) and รหัสไปรษณีย์ (Postcode) yourself, and click ค้นหาแทน (Search instead) to go back to searching
If the search fails, the system shows ค้นหาพื้นที่ไม่สำเร็จ — ตรวจการเชื่อมต่อแล้วลองใหม่ (Area search failed — check your connection and try again) with ลองใหม่ (Try again) and กรอกเองทีละช่อง (Enter each field yourself) buttons
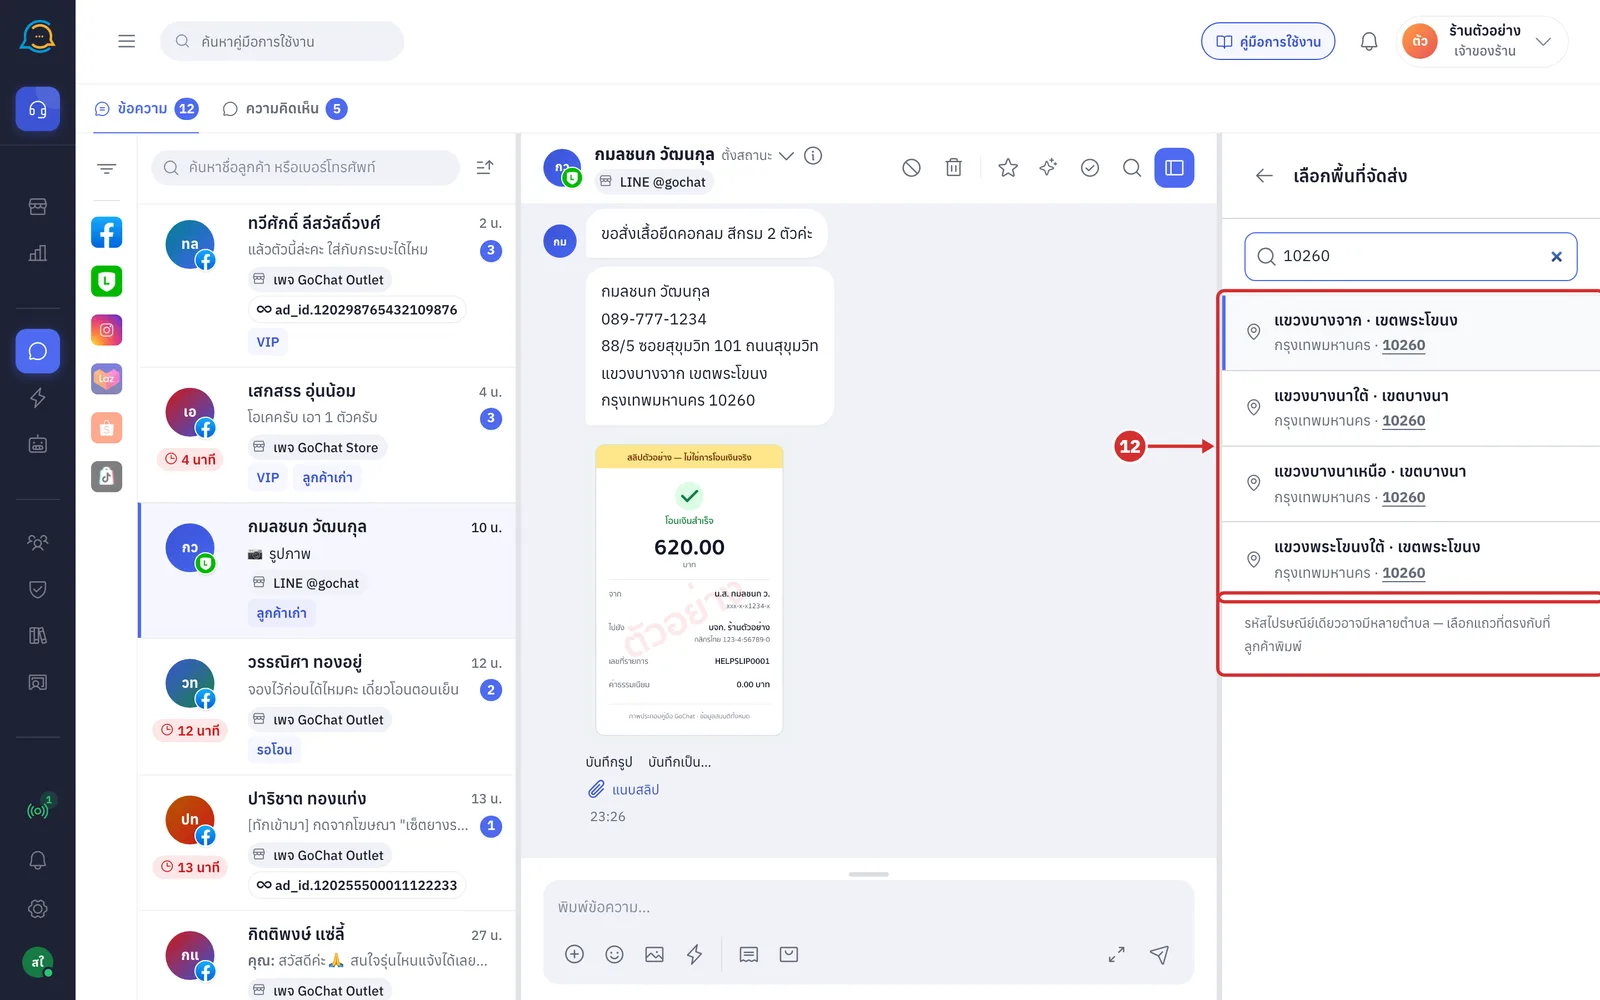
12.1 Click the row of the correct area. The subdistrict, district, province and postcode are filled in together and you return to the form
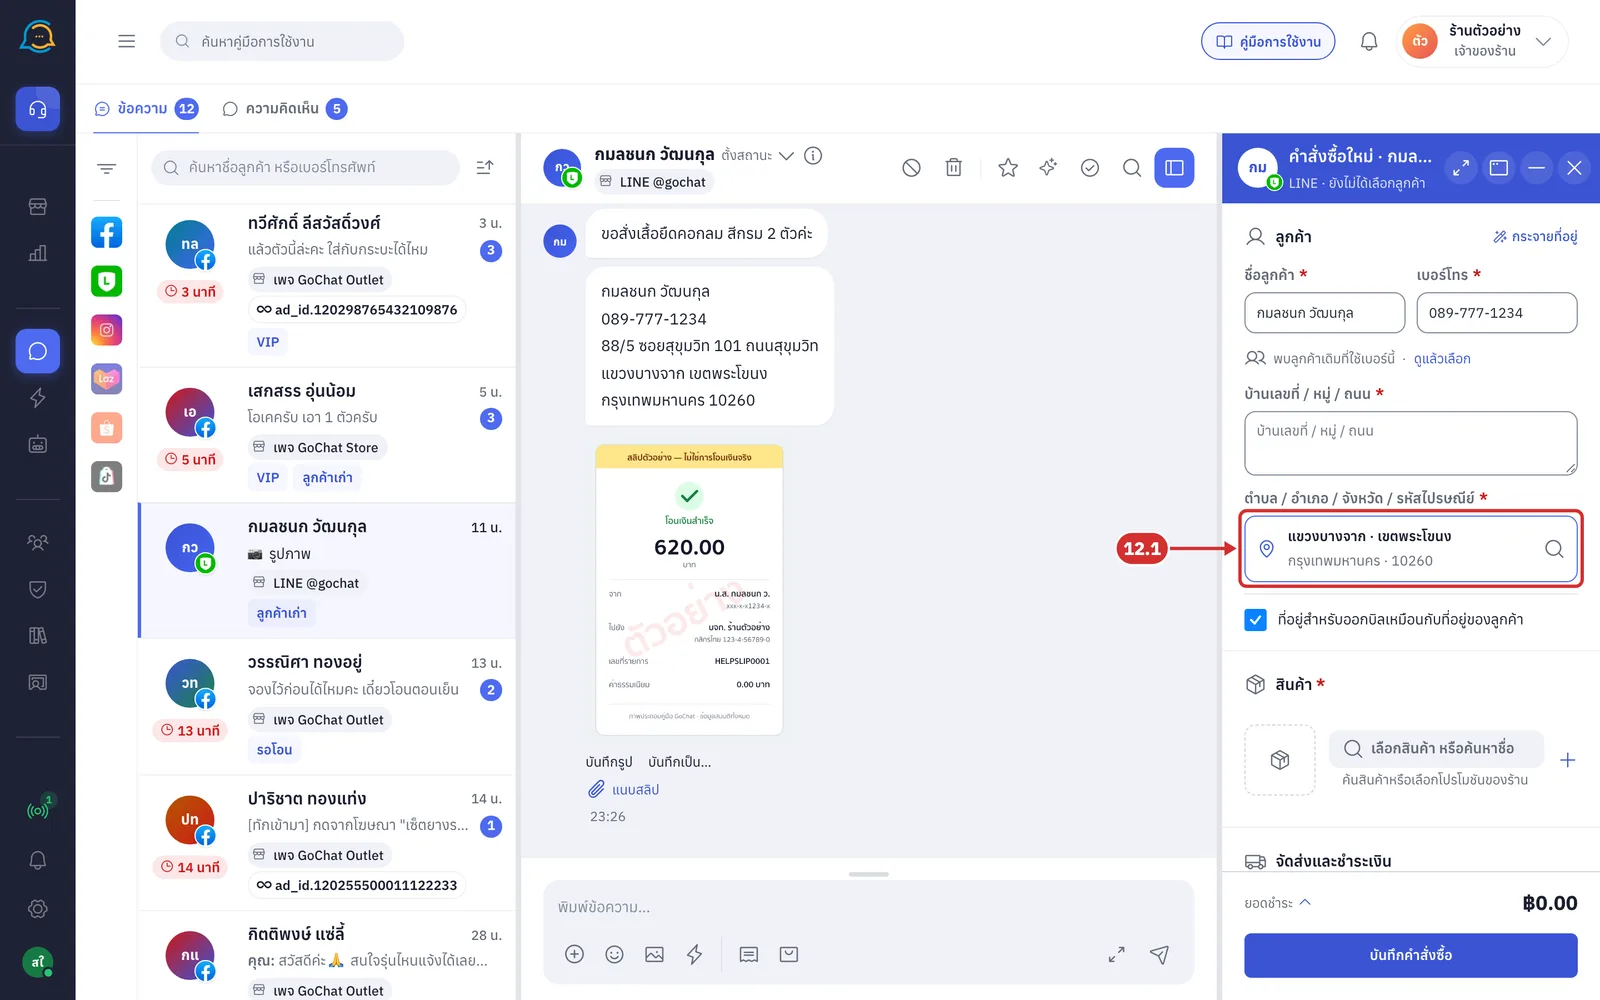
The ที่อยู่สำหรับออกบิลเหมือนกับที่อยู่ของลูกค้า (Billing address is the same as the customer's address) box is ticked by default. To bill a different name or address, untick it
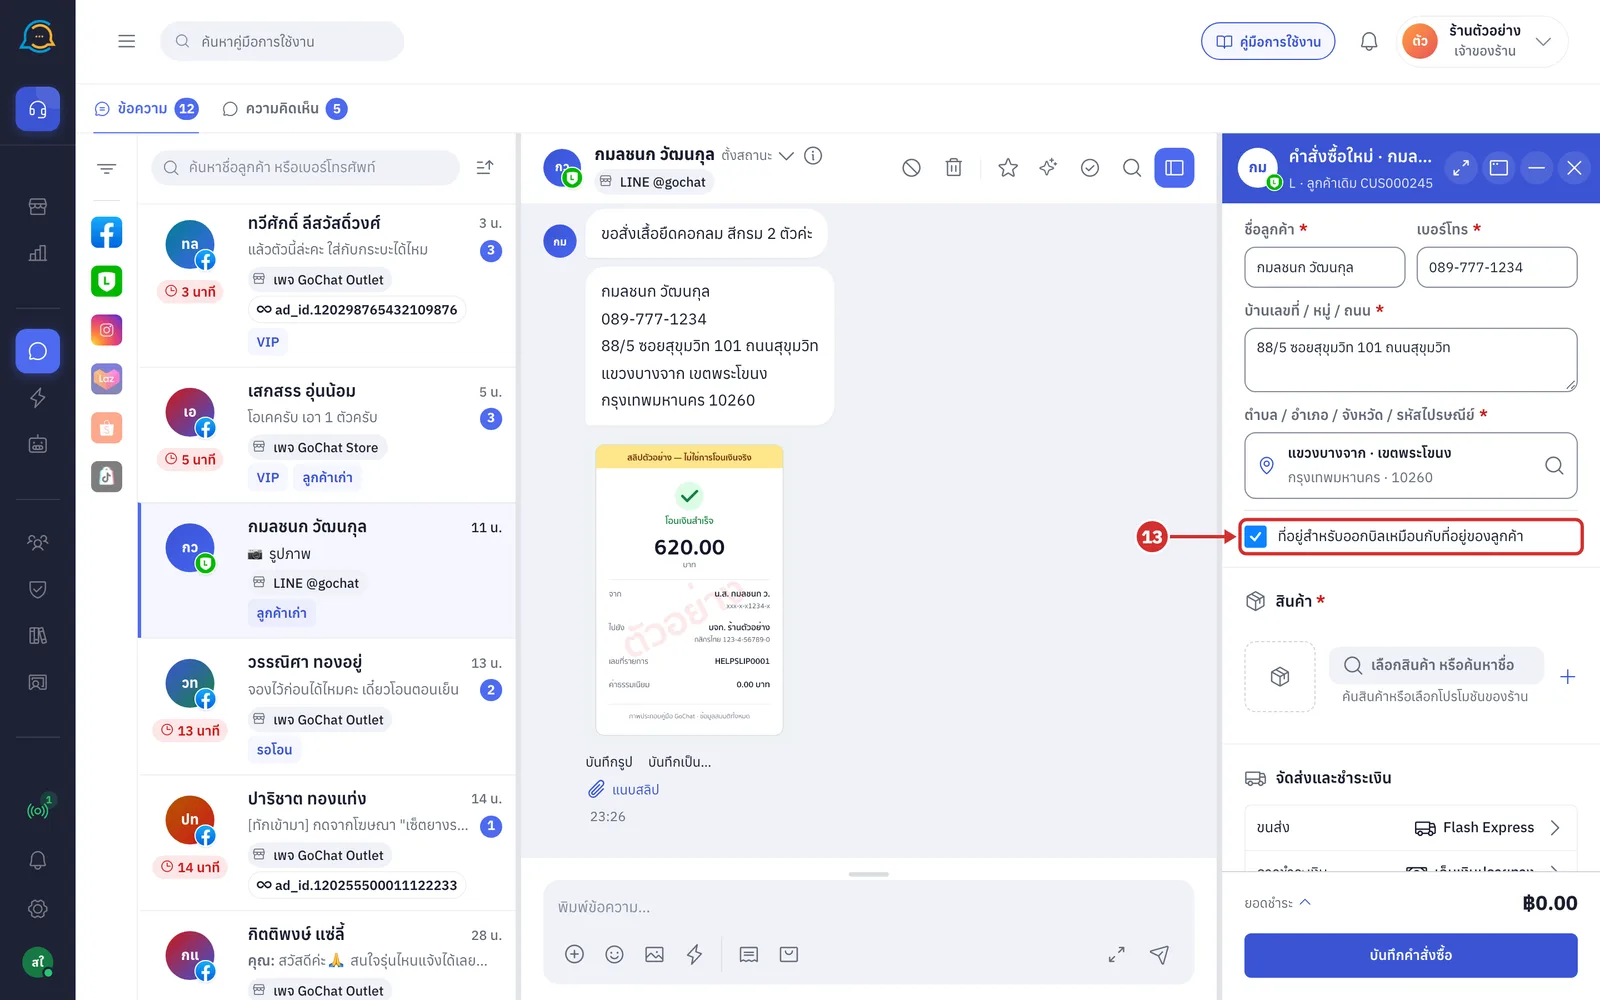
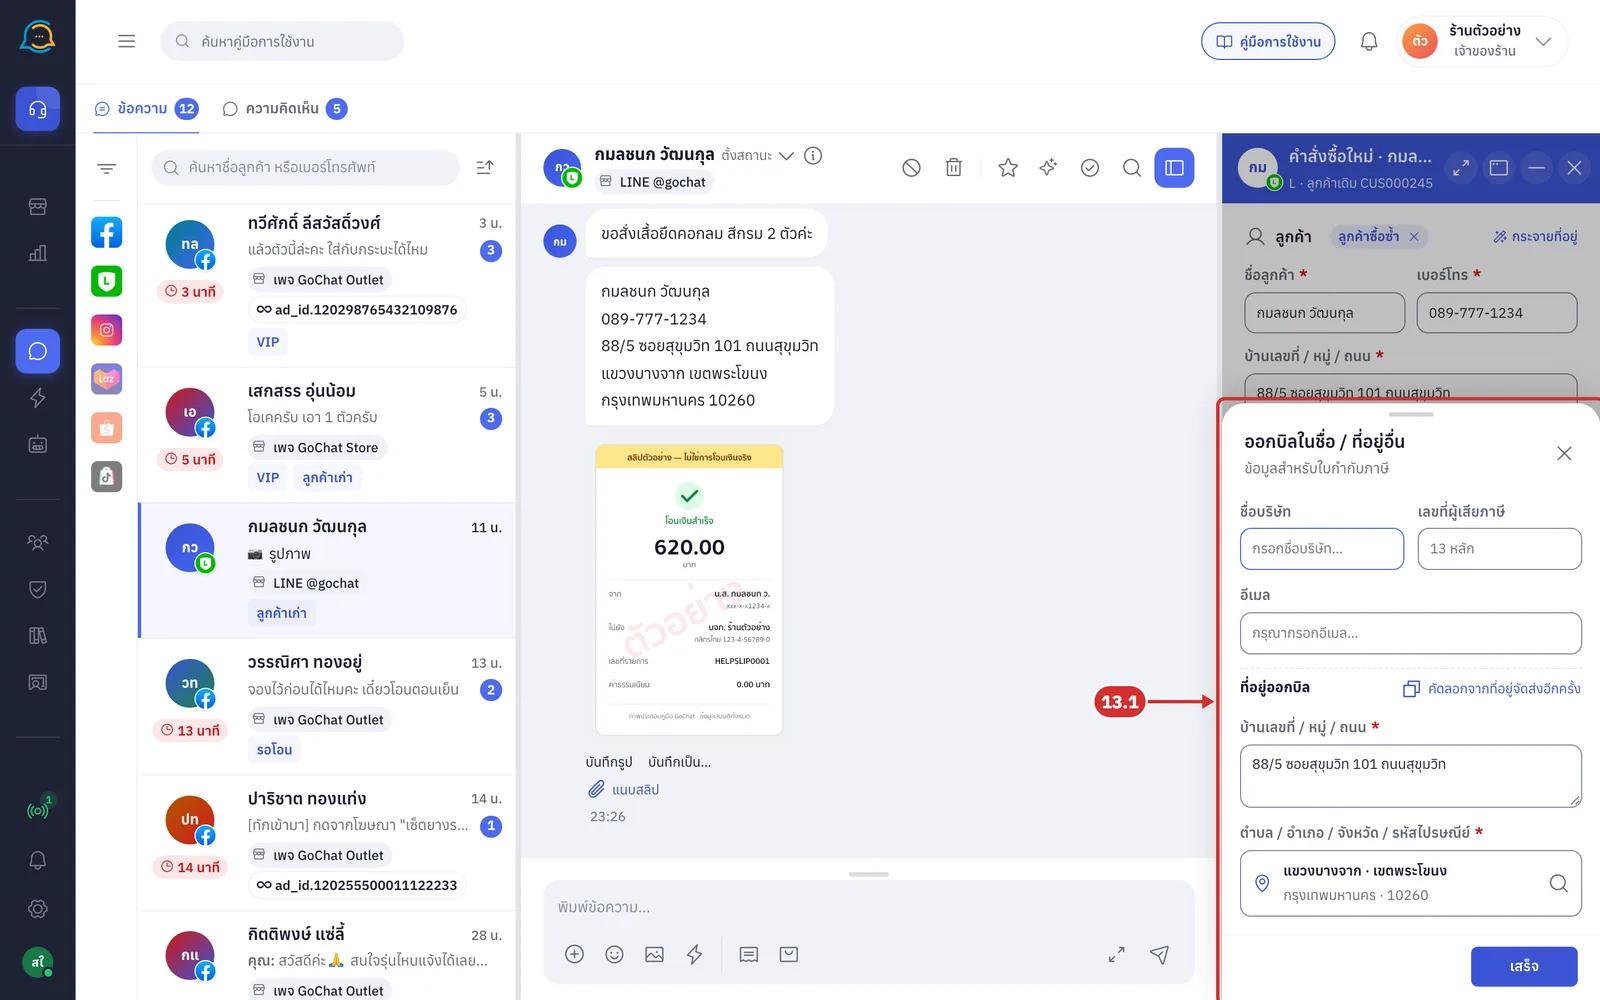
13.1 The ออกบิลในชื่อ / ที่อยู่อื่น (Bill to another name / address) sheet opens for tax invoice details, with the delivery address copied in first. The sheet has these fields
ชื่อบริษัท (Company name) the name to bill
เลขที่ผู้เสียภาษี (Tax ID) must have 13 digits. Once entered, สาขา (Branch) and a 5-digit รหัสสาขา (Branch code) appear; head office uses 00000
อีเมล (Email) must be an email address, such as [email protected]
ที่อยู่ออกบิล (Billing address) click คัดลอกจากที่อยู่จัดส่งอีกครั้ง (Copy from the delivery address again) to copy the delivery address in again
Click เสร็จ (Done) to close the sheet. The customer card shows a summary line with แก้ไข (Edit). If details are missing, the summary line shows ยังไม่ครบ — … (Incomplete — …)
Spreading an address from a message
Spreading an address fills in the name, phone number and address from the customer's message in one go, so you do not have to fill in each field.
On the ลูกค้า (Customer) card heading, click กระจายที่อยู่ (Spread address)
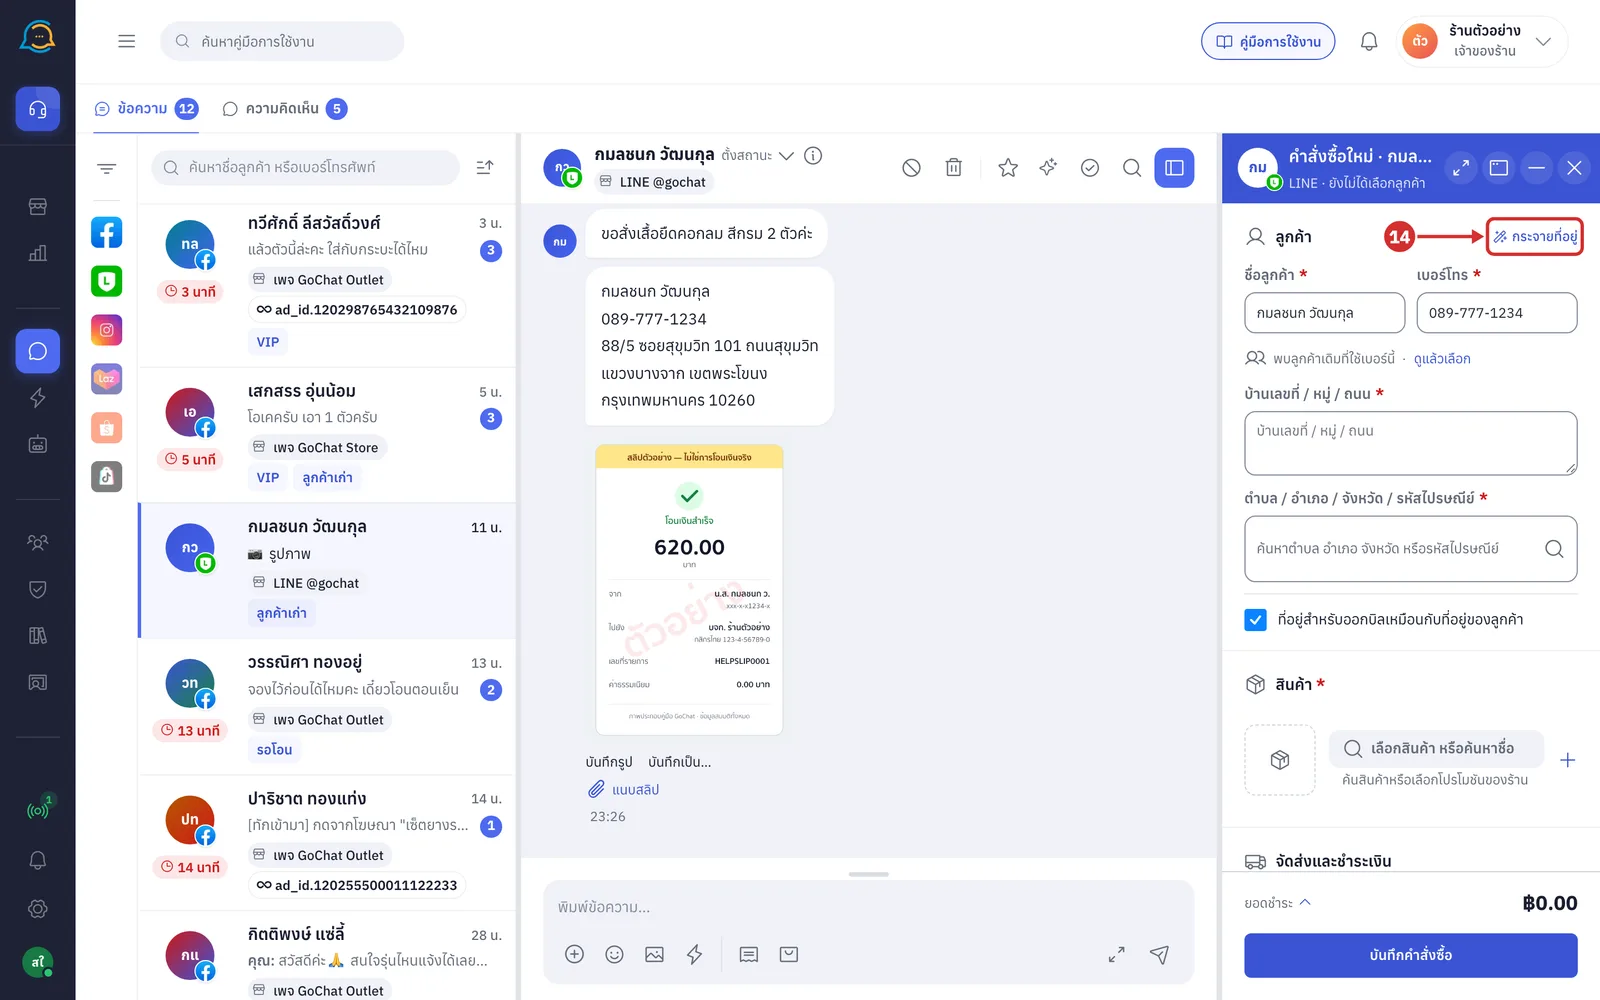
In the วางข้อความจากแชท (Paste text from chat) sheet, paste the customer's message into ข้อความที่ลูกค้าพิมพ์ (Customer's message)
Click วางจากคลิปบอร์ด (Paste from clipboard) to paste what you copied; the system splits it straight away
If you just copied text in a GoChat chat, the system shows a วางข้อความที่คัดลอกไว้ (Paste copied text) button instead
If the browser does not allow reading the clipboard, press Ctrl+V or Cmd+V in the field instead
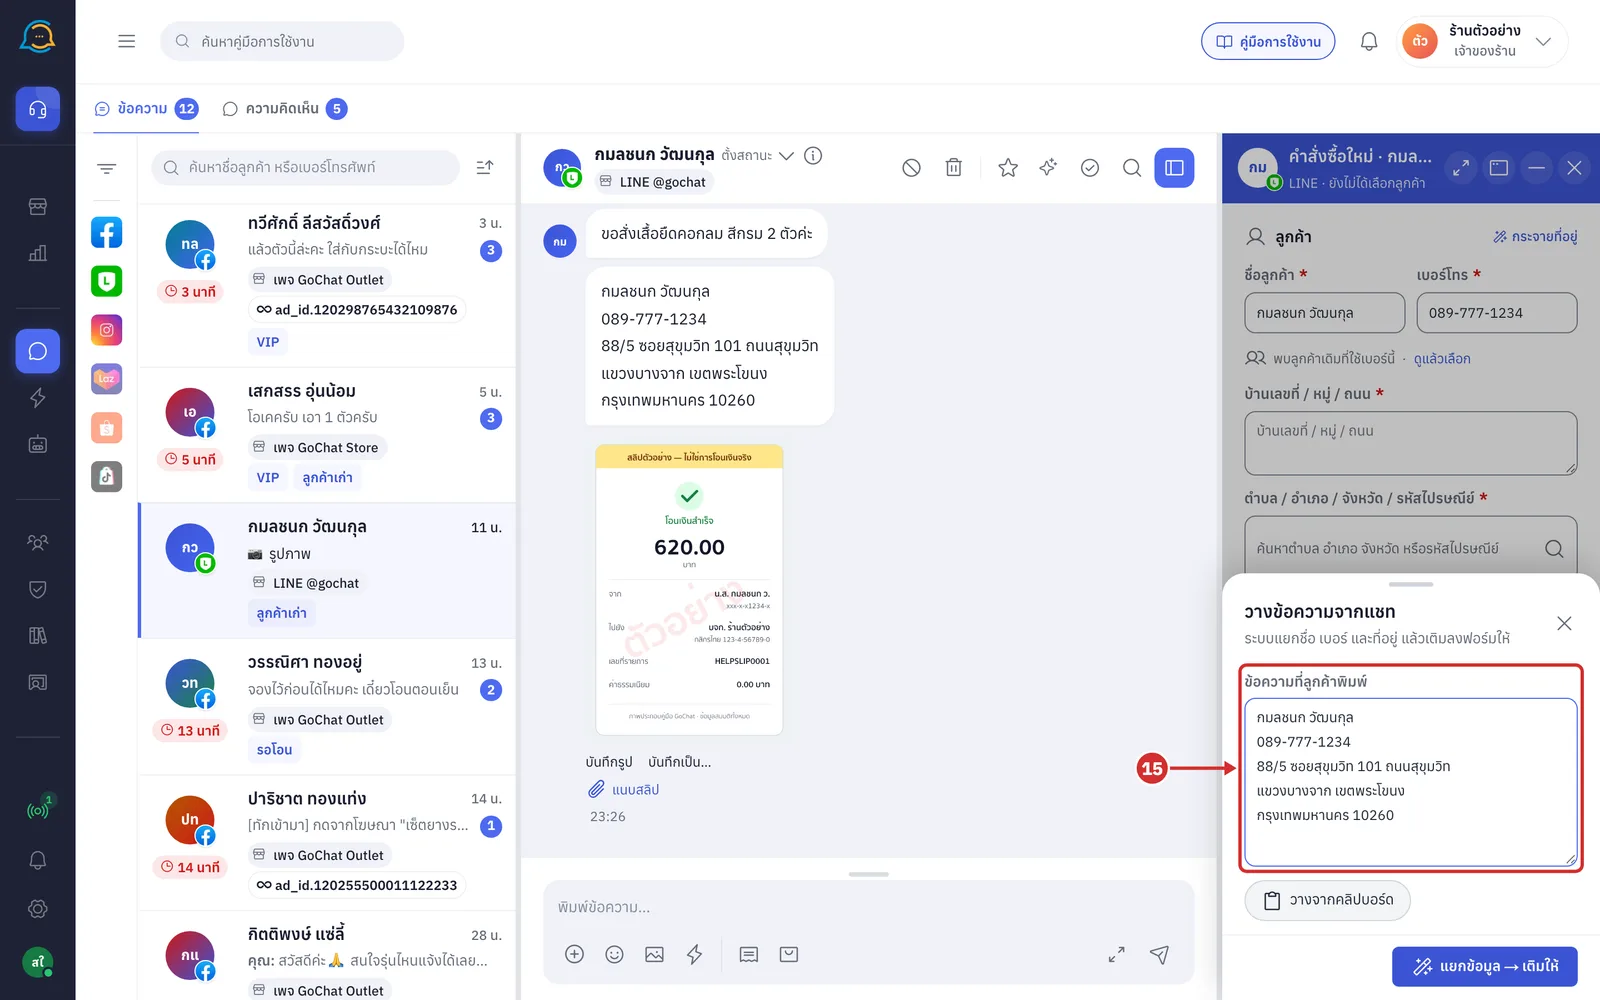
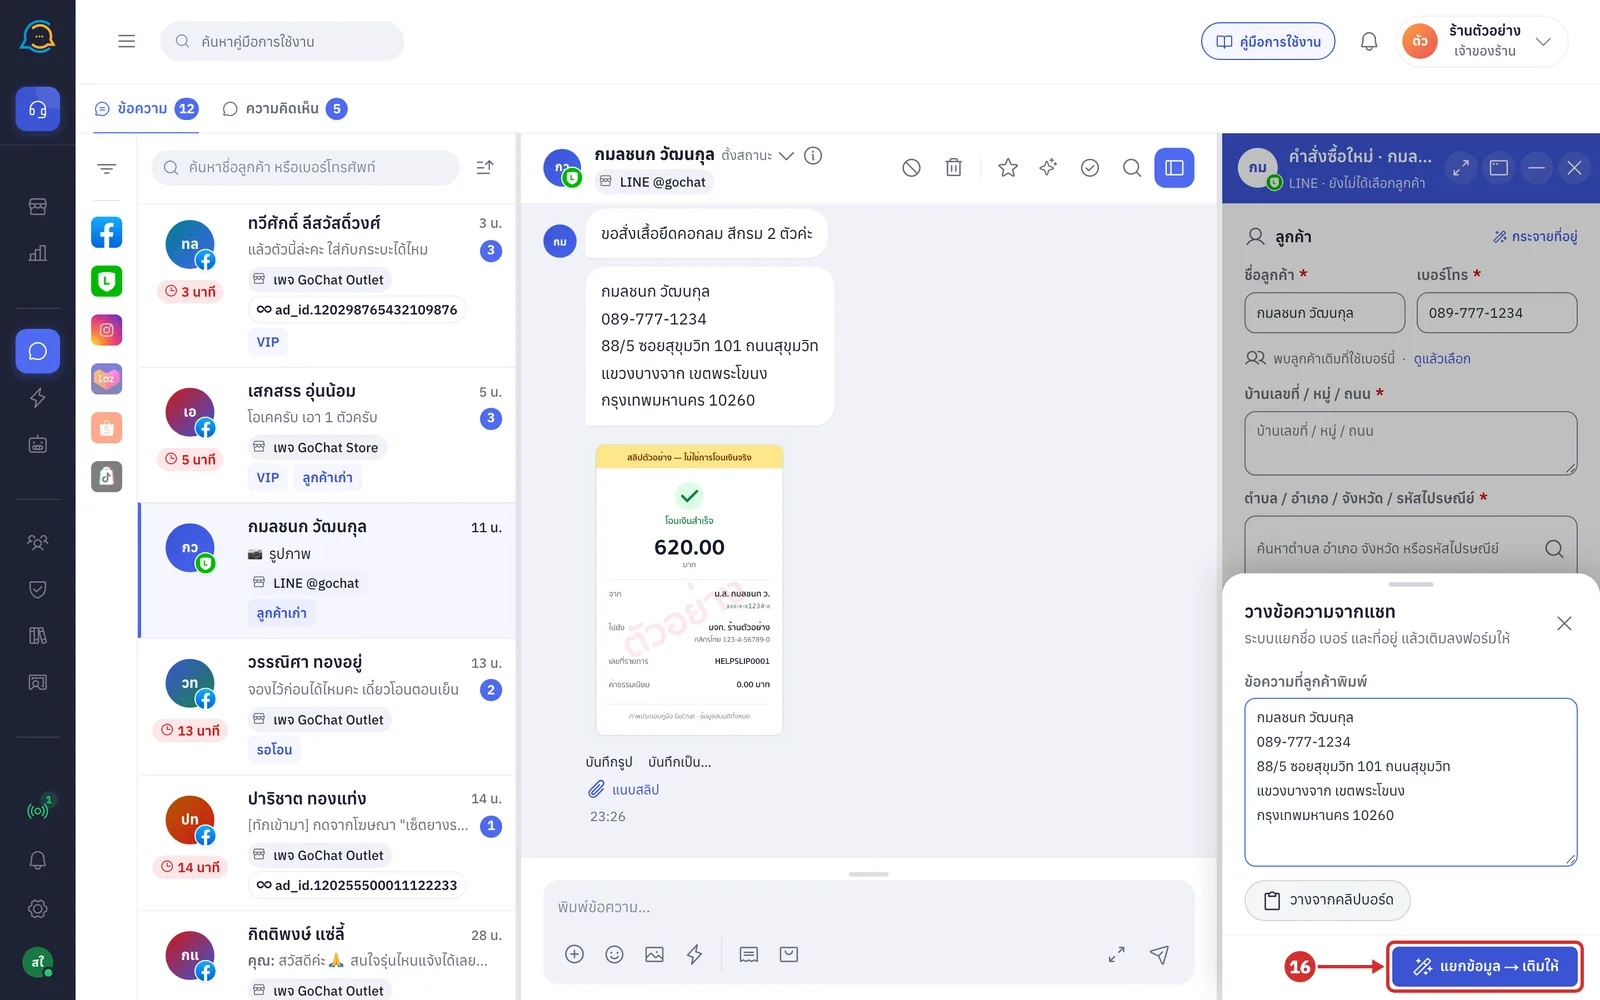
Click แยกข้อมูล → เติมให้ (Split → fill in). The system splits the name, phone number, house number, subdistrict, district, province and postcode, and fills in the form
The whole address is replaced; it is not mixed with the address already in the form
If the number in the message differs from the one in the form, the system unlinks the existing customer and searches again with the new number
If the message has no address, the system shows ไม่พบที่อยู่ในข้อความนี้ — กรอกเองได้เลย (No address found in this message — enter it yourself)
If the area cannot be split completely, it shows แยกตำบล/อำเภอ/จังหวัดได้ไม่ครบ — กดช่องพื้นที่แล้วเลือกจากรายการ (Subdistrict/district/province incomplete — click the area field and choose from the list)
Choosing products
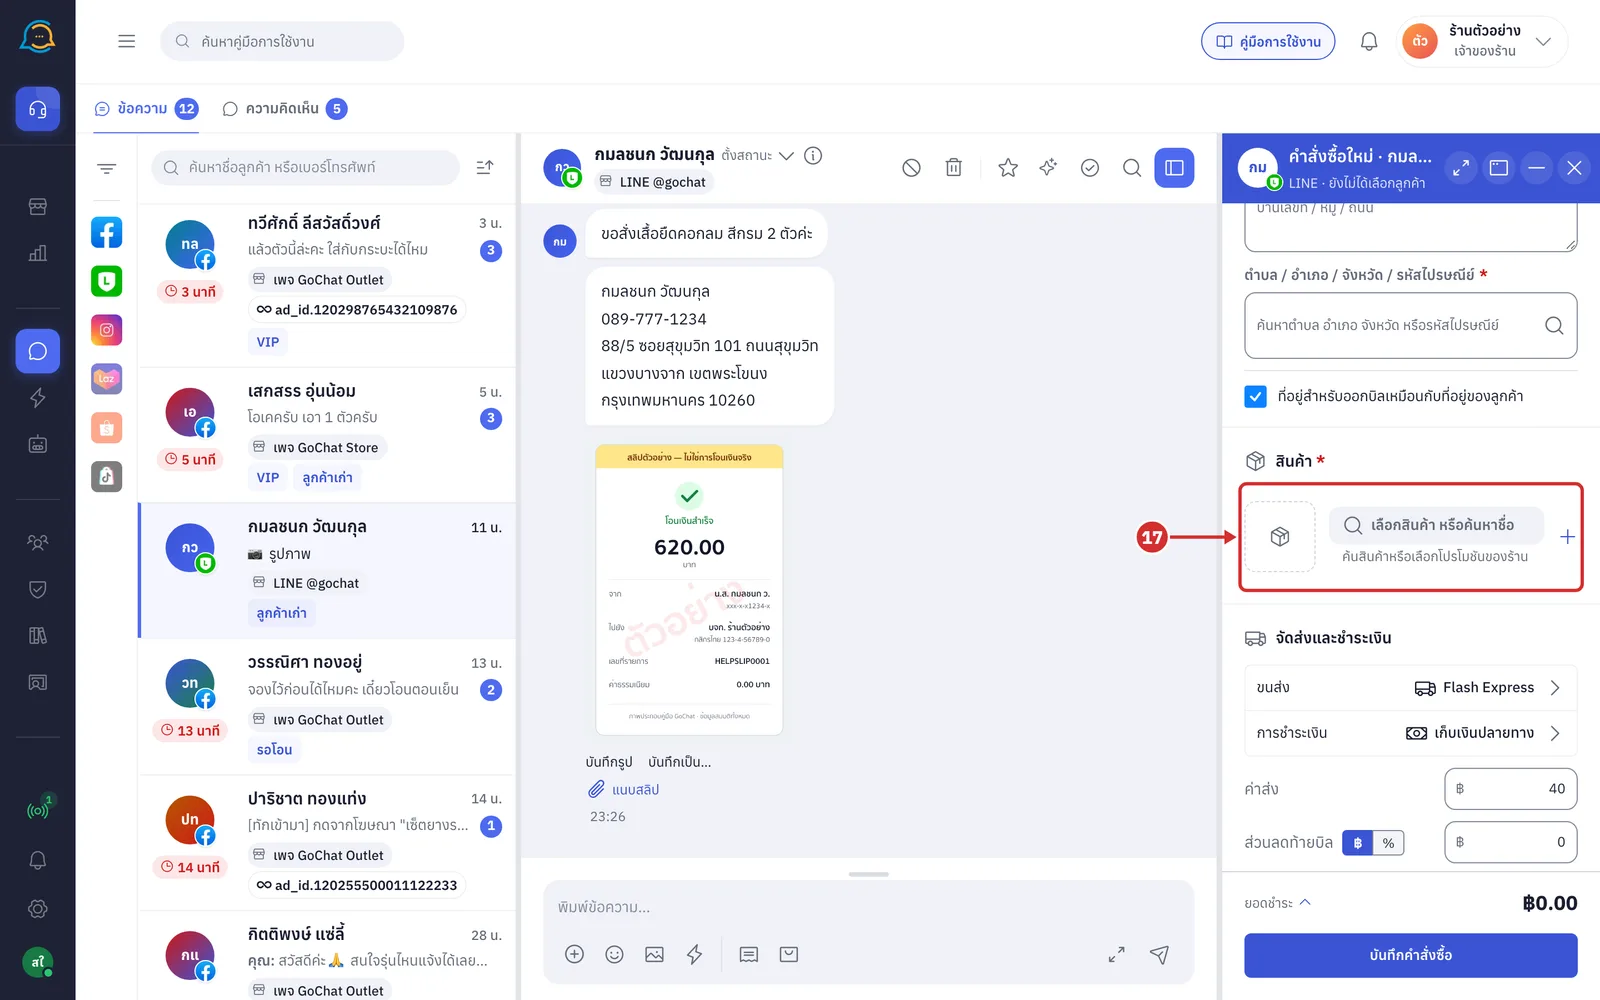
On the สินค้า (Products) card, click เลือกสินค้า หรือค้นหาชื่อ (Choose products or search by name) to open the เลือกสินค้า (Choose products) sheet
This card needs at least 1 product
This button works once the shop data has loaded
Shops that must choose a warehouse have a คลังสินค้า (Warehouse) row above the list; choose the warehouse first to see its stock
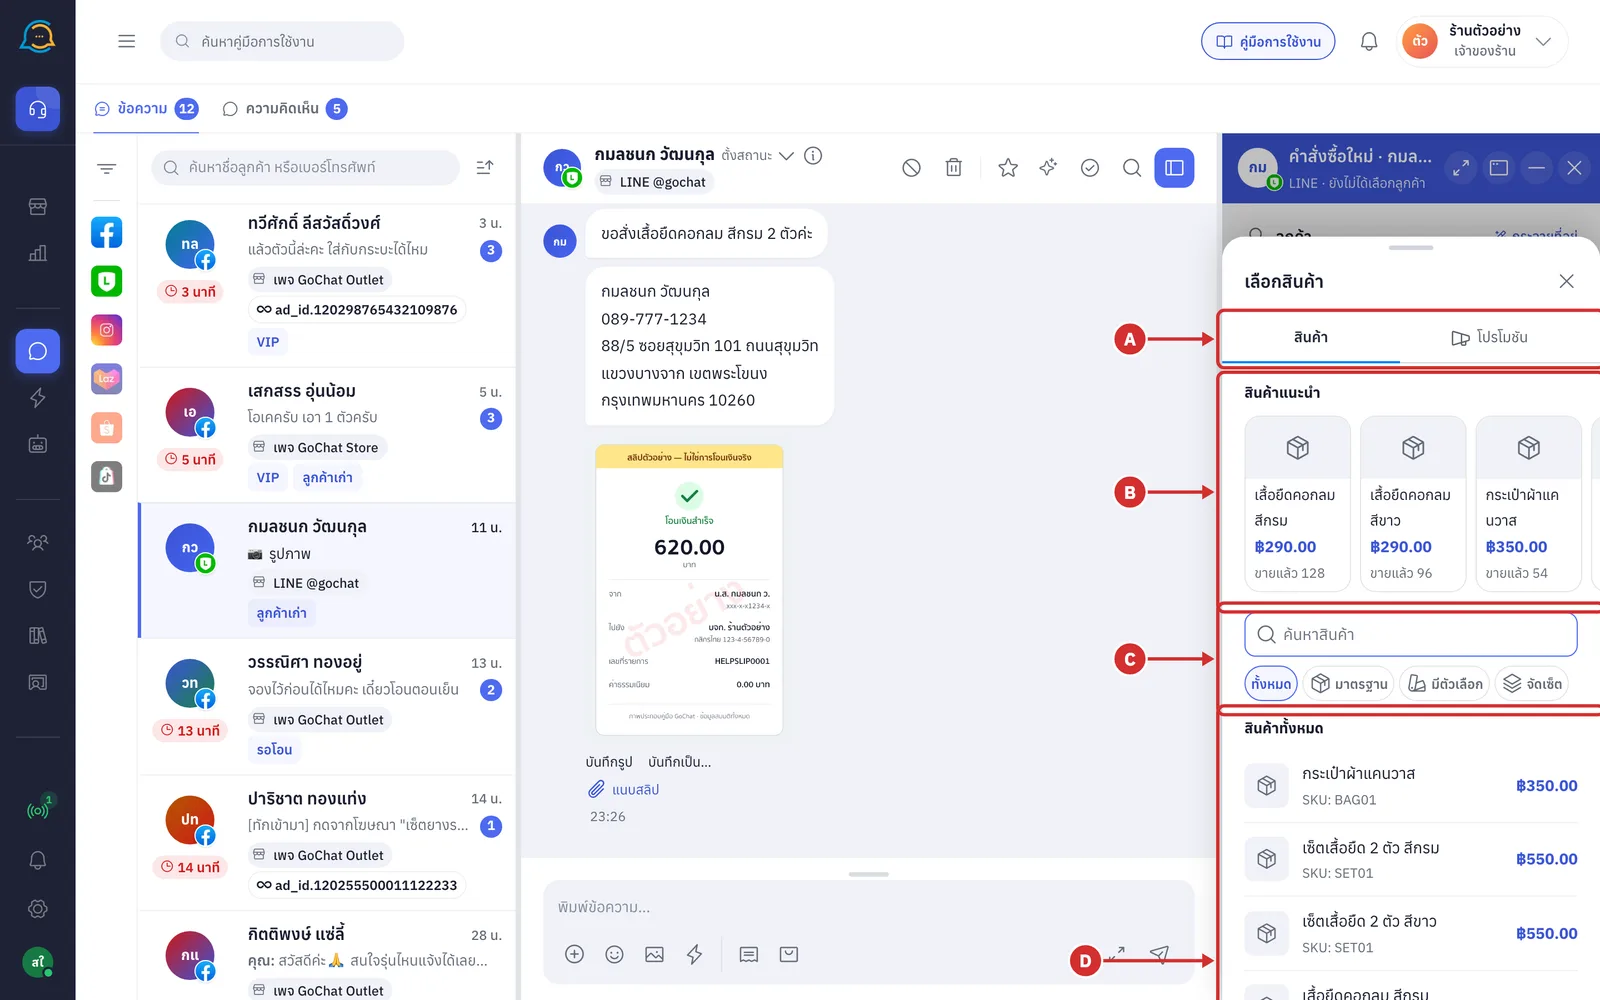
The เลือกสินค้า (Choose products) sheet has these parts
A Products and promotions tabs choose products one by one, or choose one of your shop's promotions (step 22)
B สินค้าแนะนำ (Recommended products) your shop's recommended products with how many were ขายแล้ว (sold); click a card to add it straight away. Without this data, the system shows ใช้ล่าสุด (Recently used), the products recently added from this device, instead
C Product search and type chips search by name or SKU and filter by ทั้งหมด (All), มาตรฐาน (Standard), มีตัวเลือก (With options) or จัดเซ็ต (Sets)
D Product list each row shows the name, SKU and price
Out-of-stock products show หมด (Out of stock) and cannot be chosen; shops with several warehouses may show ไม่มีในคลังนี้ (Not in this warehouse)
Products with options show the number of options and the starting price; click to see the options and choose one
Click โหลดเพิ่ม (Load more) or scroll to the end of the list to see more products
Type a product name in ค้นหาสินค้า (Search products) and click the product's row. The product is added to the สินค้า (Products) card with quantity 1 and the sheet closes
Clicking a product already on the card adds 1 to its quantity
If nothing matches, the system shows ไม่พบสินค้าที่ตรงกับ “search” (No products match “search”)
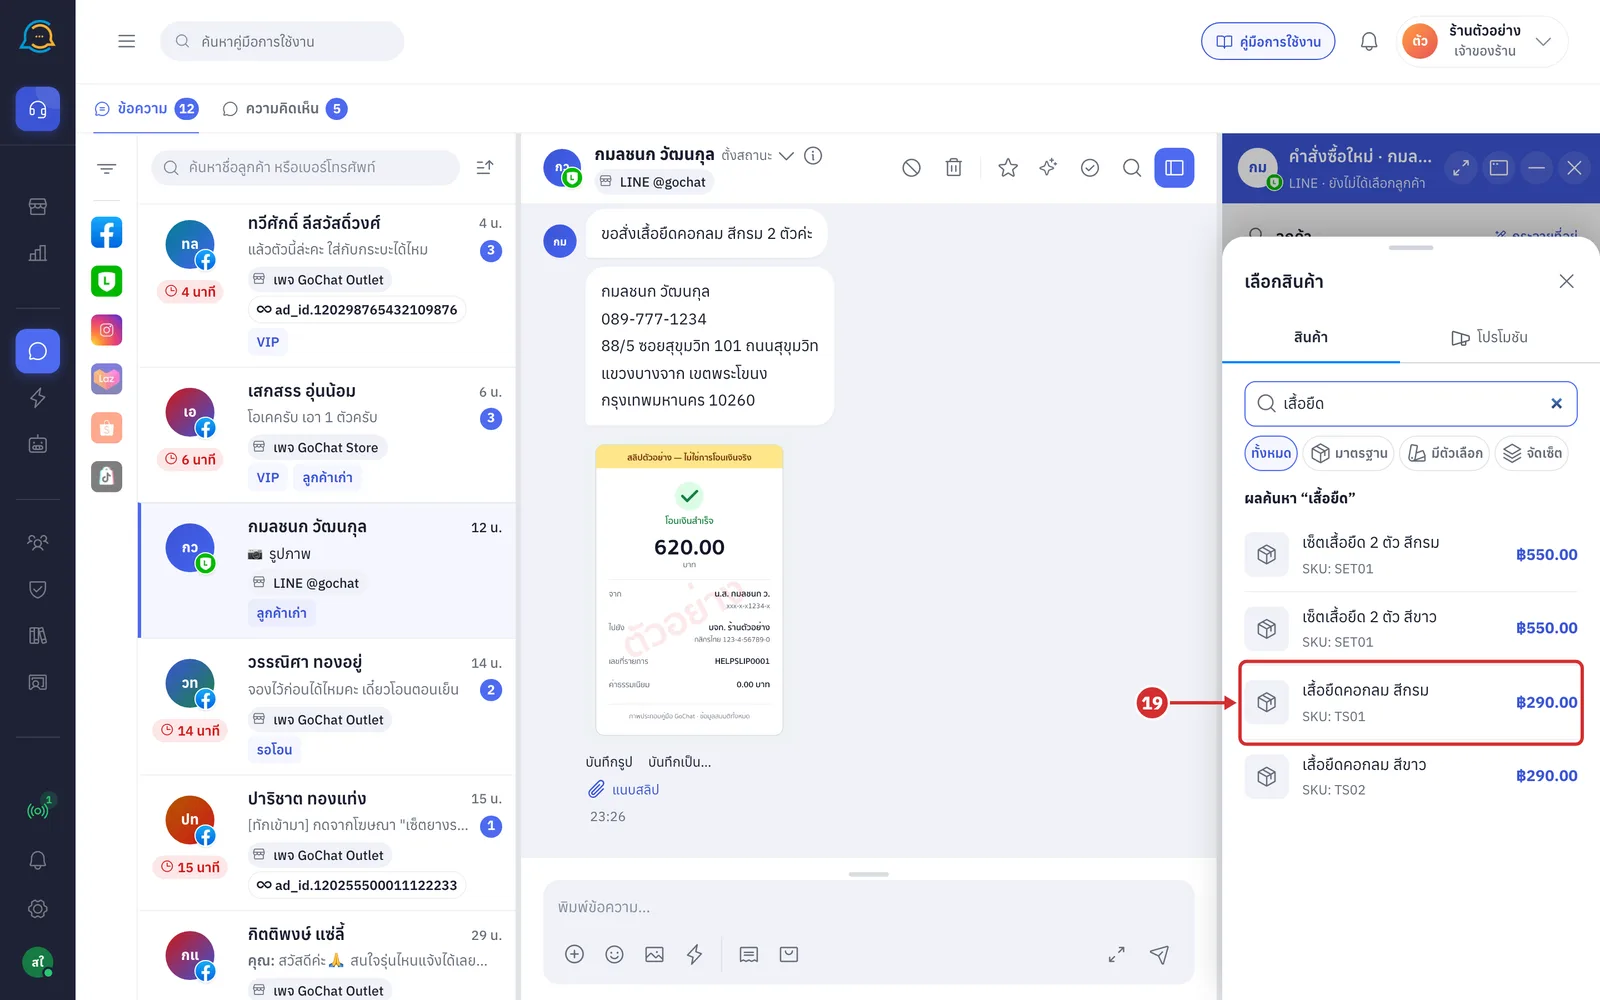
On the product row in the card, click + to increase or − to decrease the quantity
The row shows the picture, product name, SKU, row amount and price per piece, and the card heading shows the number of items, such as 1 รายการ (1 item)
Click the trash icon at the top right of the row to remove the product
The maximum quantity is the remaining stock. Above it, the system shows คงเหลือ N ชิ้น (N left)
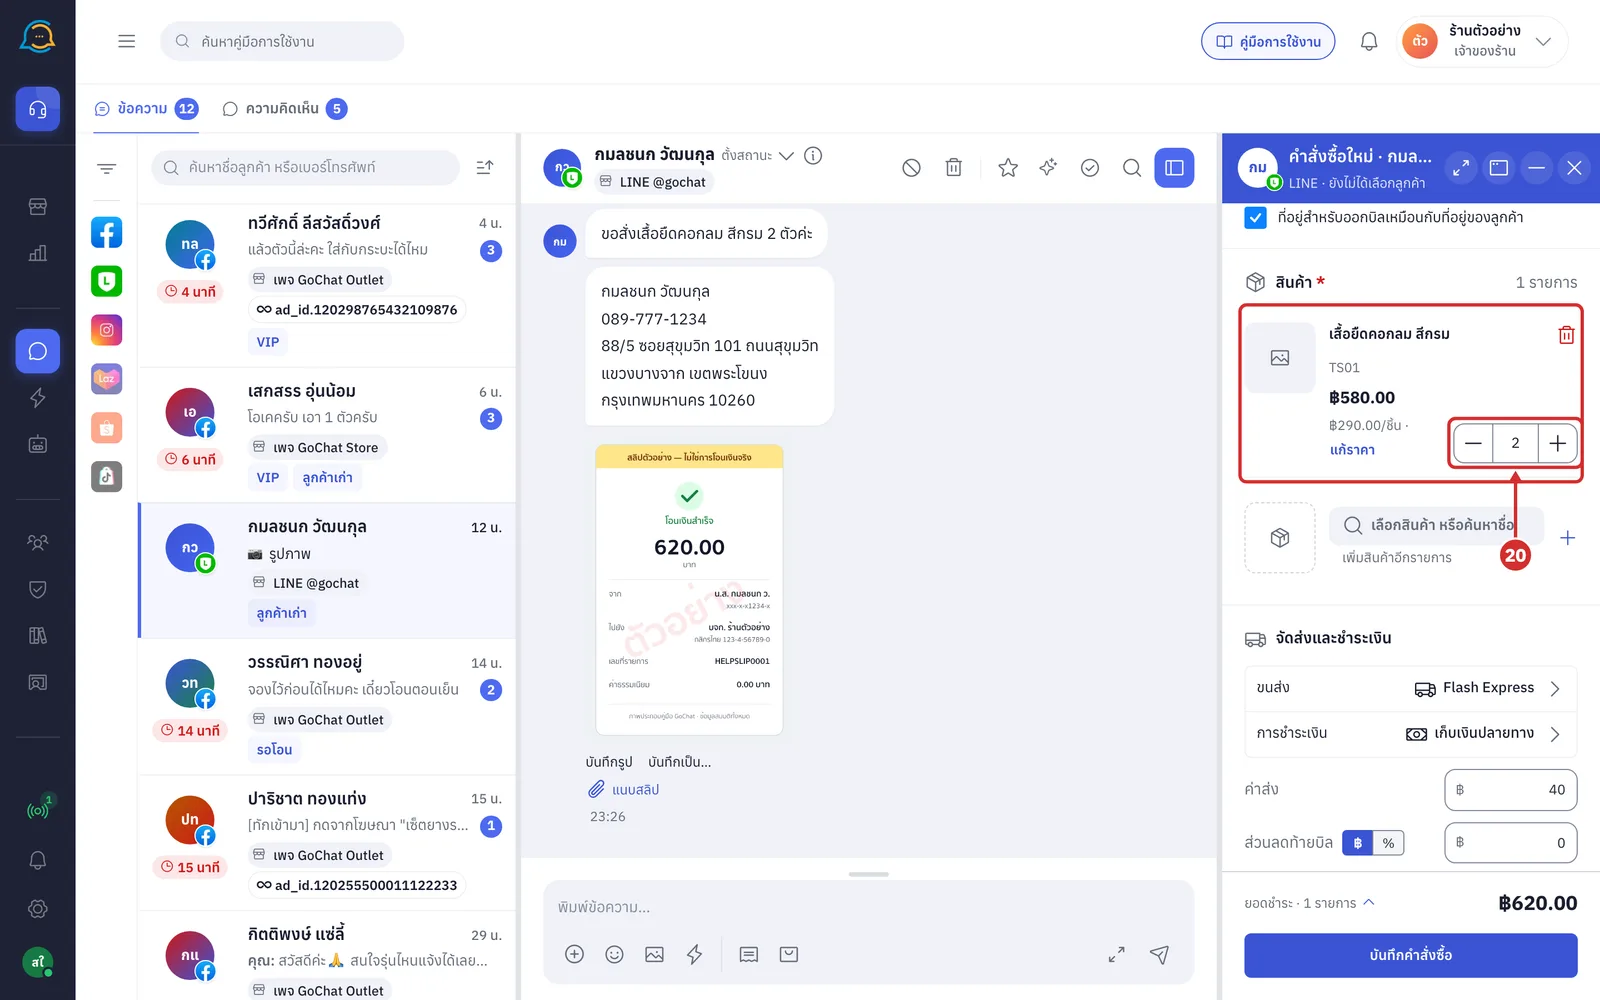
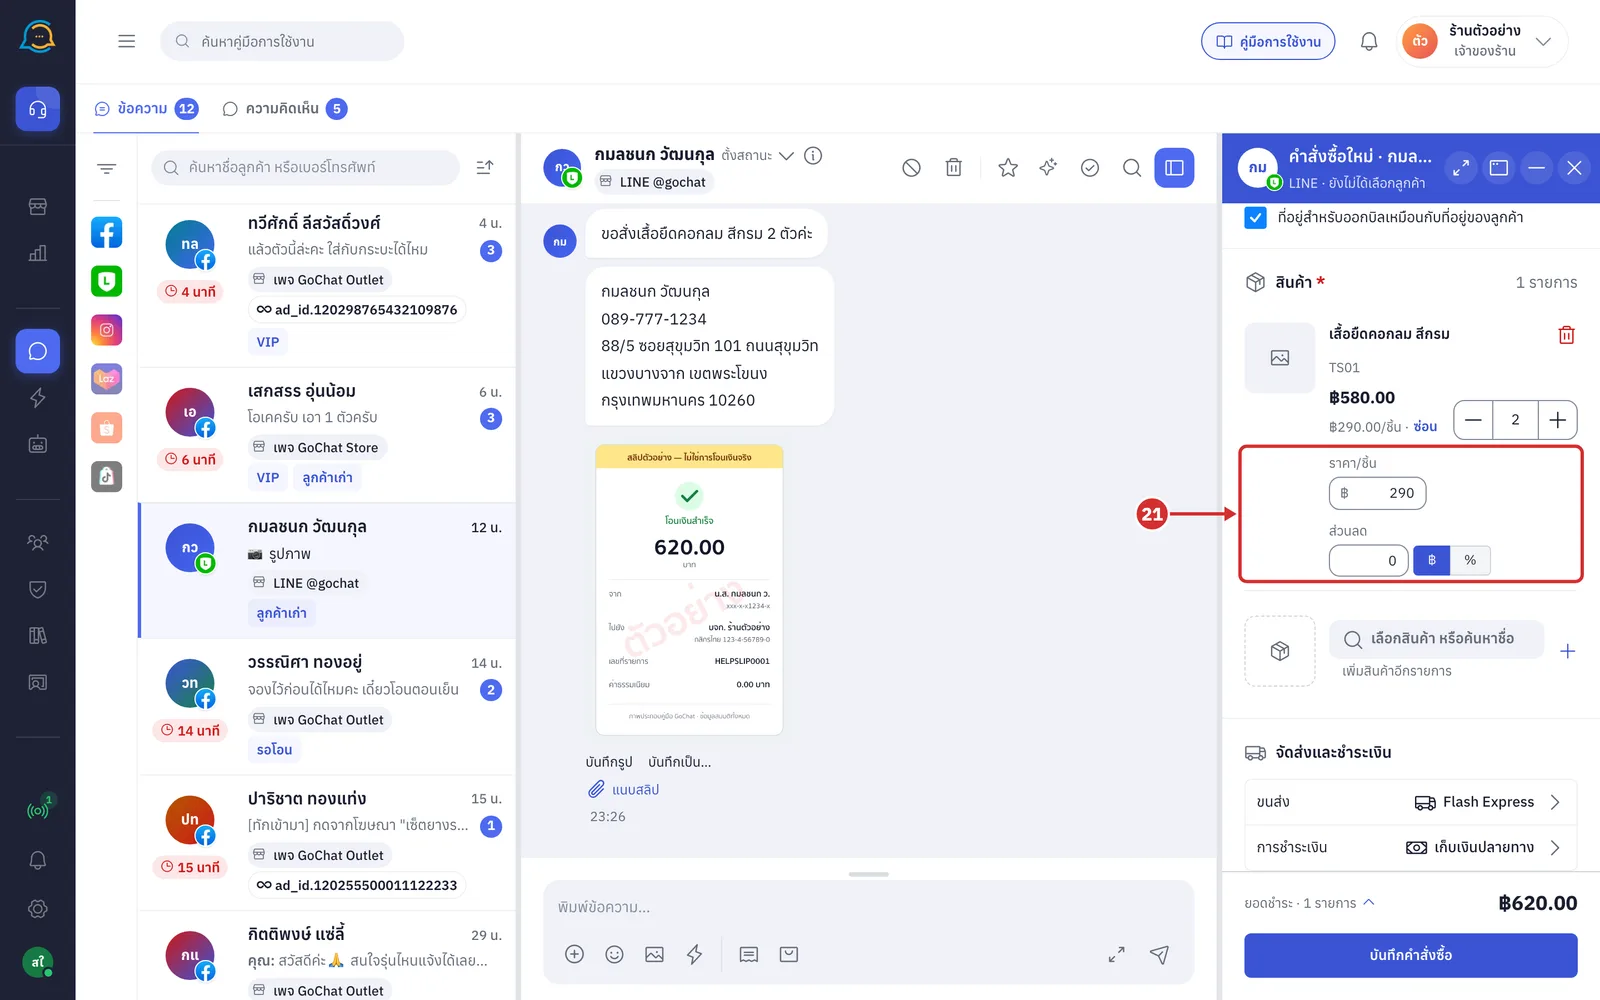
Click แก้ราคา (Edit price) to change the price per piece or give a discount on this product only
ราคา/ชิ้น (Price/piece) changes this product's price in this order
ส่วนลด (Discount) click ฿ or % to choose the discount unit
If the discount is more than the row amount, the system shows ลดได้สูงสุด … — ใช้ ฿… (Maximum discount … — using ฿…)
Click ซ่อน (Hide) to fold the fields
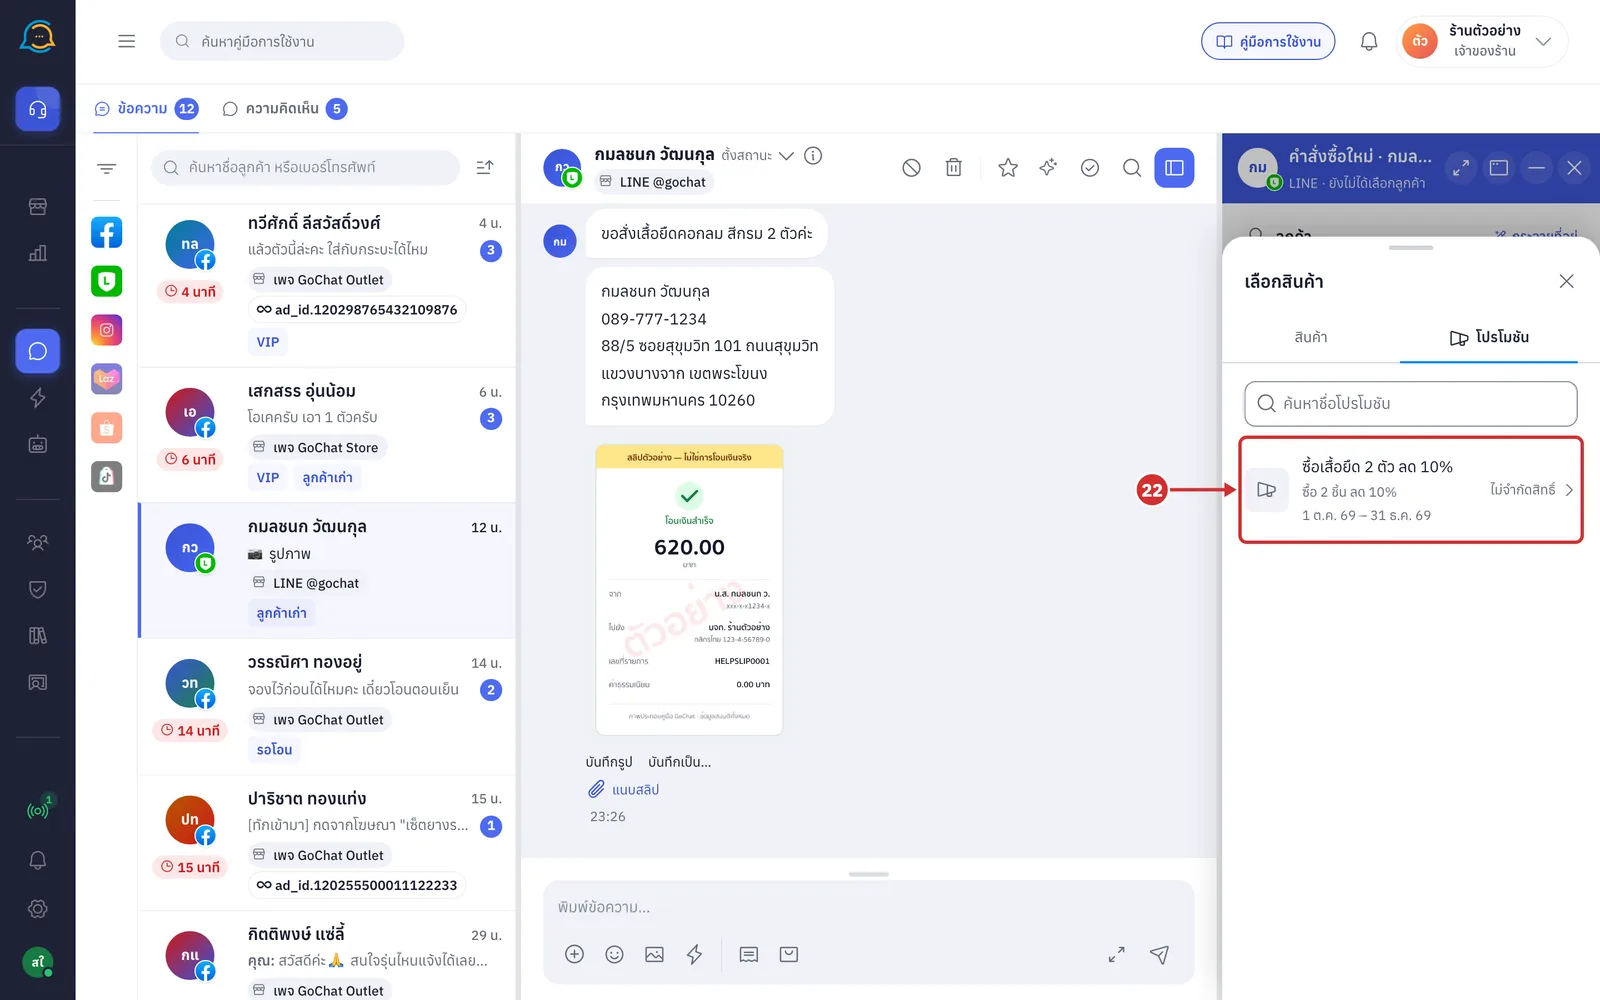
In the เลือกสินค้า (Choose products) sheet, click the โปรโมชัน (Promotions) tab to see your shop's promotions available now
Each row shows the promotion name, conditions, period and remaining uses, such as ไม่จำกัดสิทธิ์ (Unlimited) or ครบสิทธิ์แล้ว (Limit reached)
Click a promotion, choose the products in it, then click ใช้โปรนี้ (Use this promotion). The products are added to the สินค้า (Products) card as a promotion box with a โปร (Promo) label and the discount
Lines in a promotion box cannot be edited one by one. To change them, click × on the box to remove the promotion, then choose again
Choosing shipping and payment
On the จัดส่งและชำระเงิน (Shipping and payment) card, the ขนส่ง (Carrier) row has your shop's default carrier chosen. To change it, click the ขนส่ง (Carrier) row and choose from the ขนส่ง (Carrier) sheet
Each row shows that carrier's default shipping fee, such as ค่าส่ง ฿40.00 (Shipping ฿40.00), and your shop's default carrier has a ค่าตั้งต้น (Default) label
When you choose a carrier, its shipping fee is filled in
If your shop has no default carrier, the system shows ร้านยังไม่ได้ตั้งขนส่งตั้งต้น — เลือกครั้งนี้ได้เลย (The shop has no default carrier — choose one for this order)
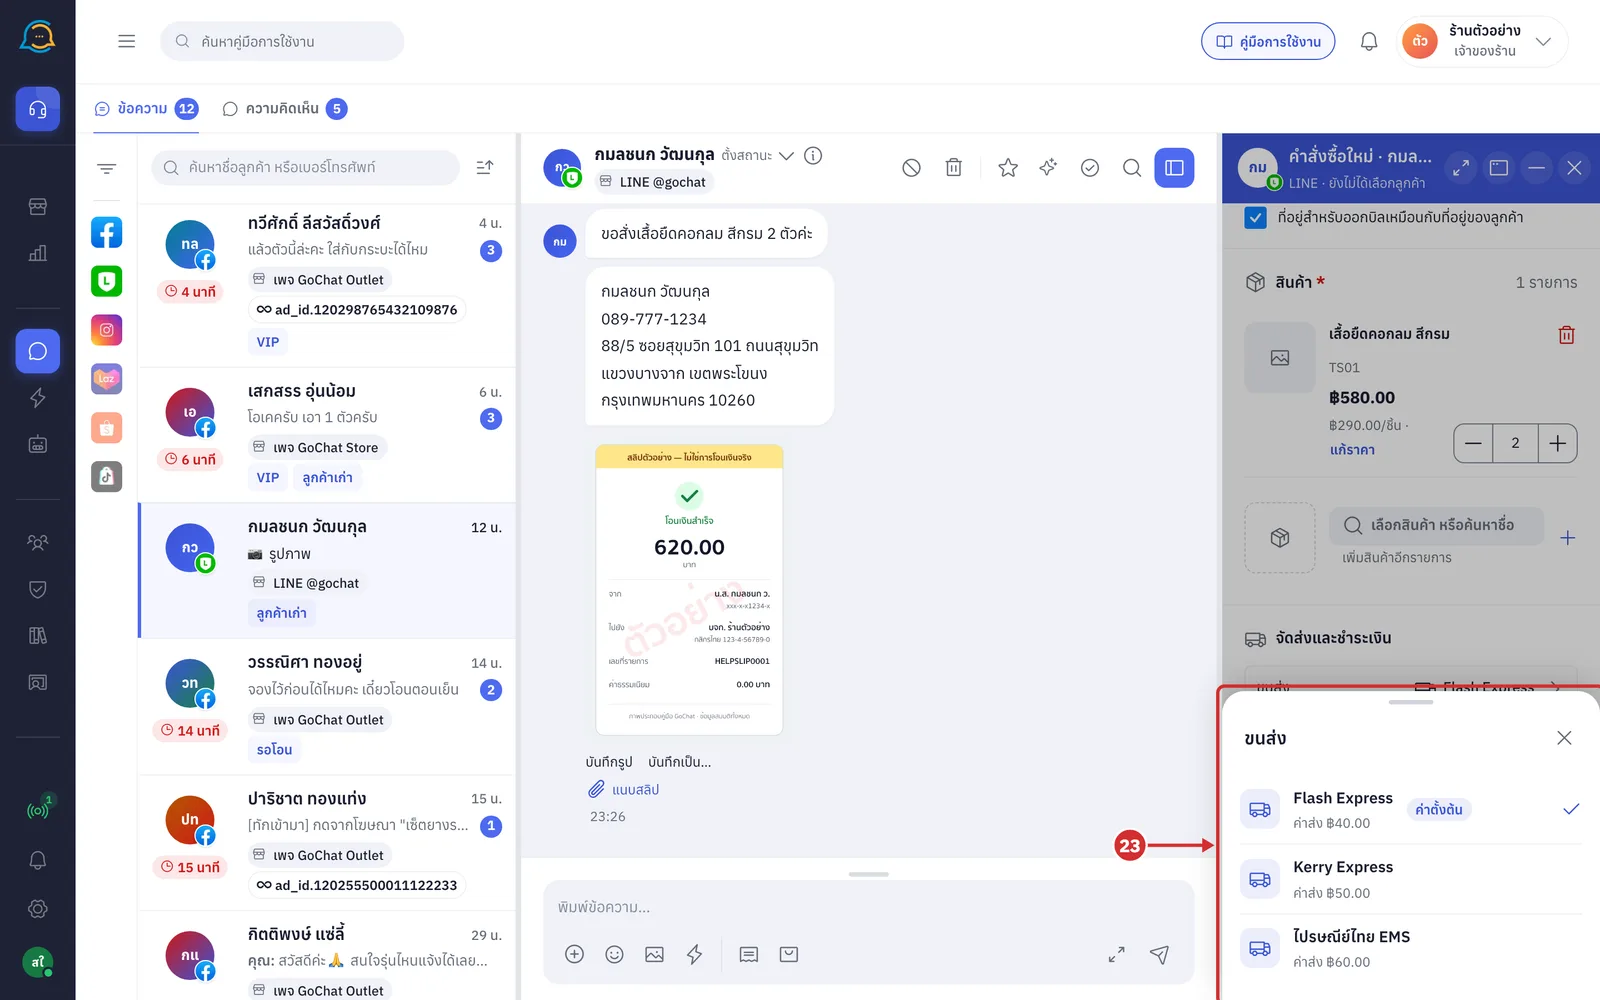
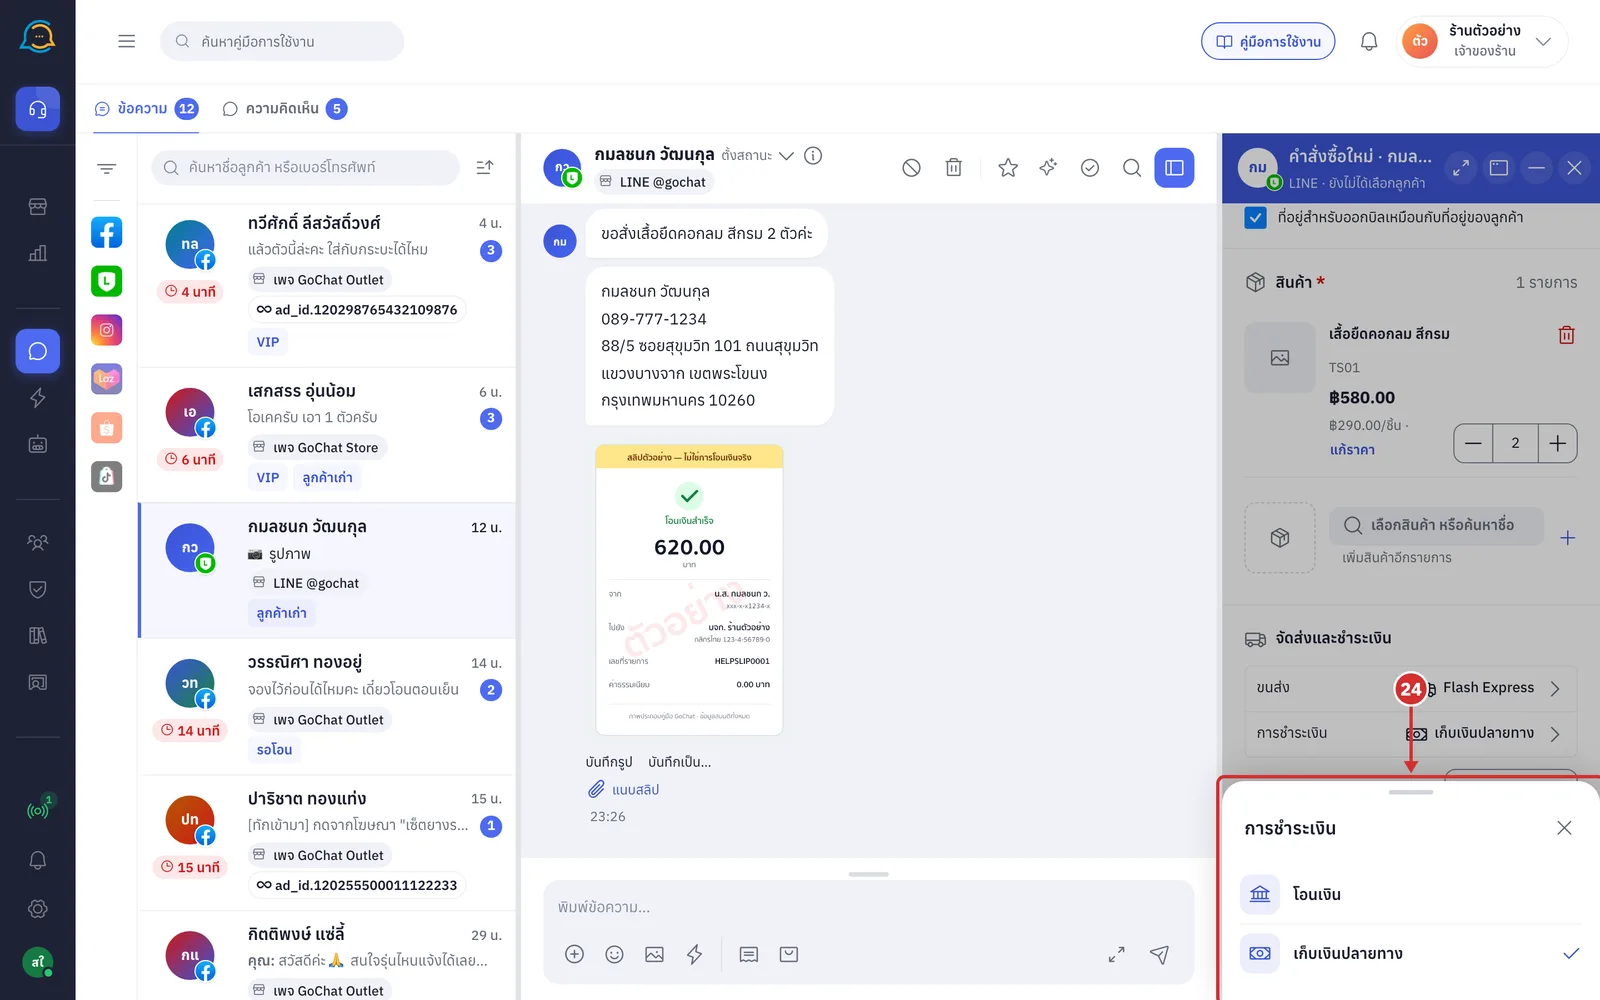
Click the การชำระเงิน (Payment) row and choose the payment method from the การชำระเงิน (Payment) sheet: โอนเงิน (Bank transfer) or เก็บเงินปลายทาง (Cash on delivery), as your shop offers
If your shop offers cash on delivery, เก็บเงินปลายทาง (Cash on delivery) is chosen by default
When you change the method, everything for the previous method is cleared, such as the slip, transfer amount and confirm boxes, so it does not end up on the order
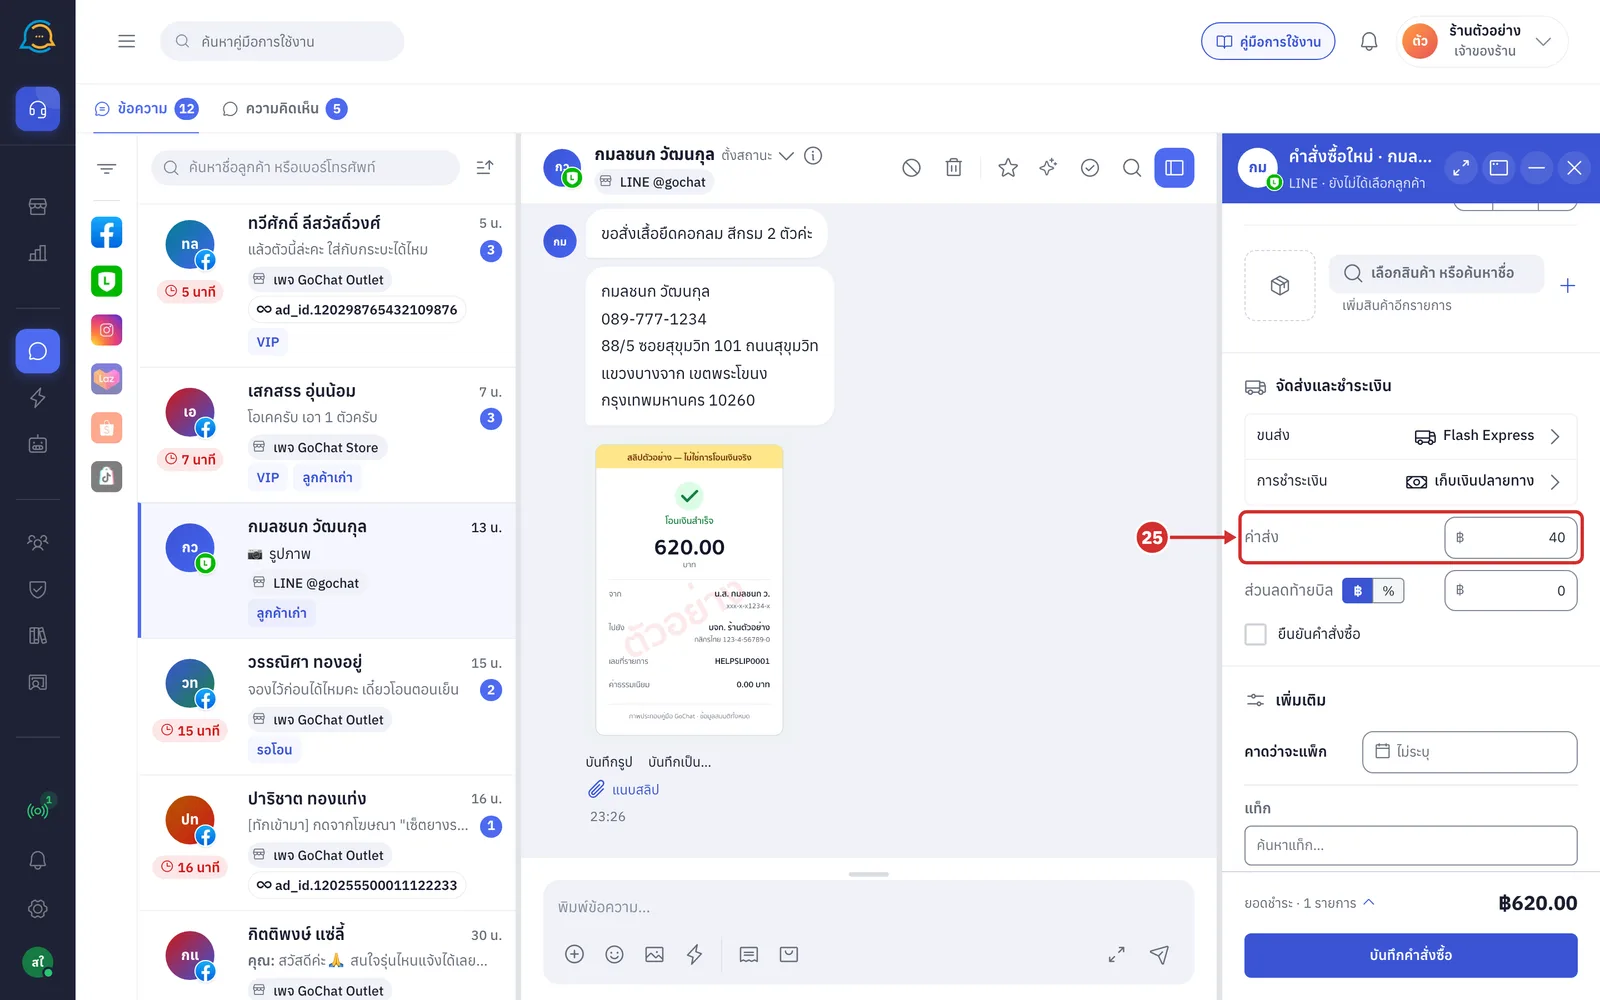
In ค่าส่ง (Shipping), check or change this order's shipping fee
This field appears after a carrier is chosen
If GoSaaS adjusts the shipping fee, the system shows ระบบปรับค่าส่งเป็น … (Shipping adjusted to …) under the field
Some shops have an extra ค่าบริการเก็บเงินปลายทาง (COD service fee) field when cash on delivery is chosen, depending on the shop's GoSaaS settings
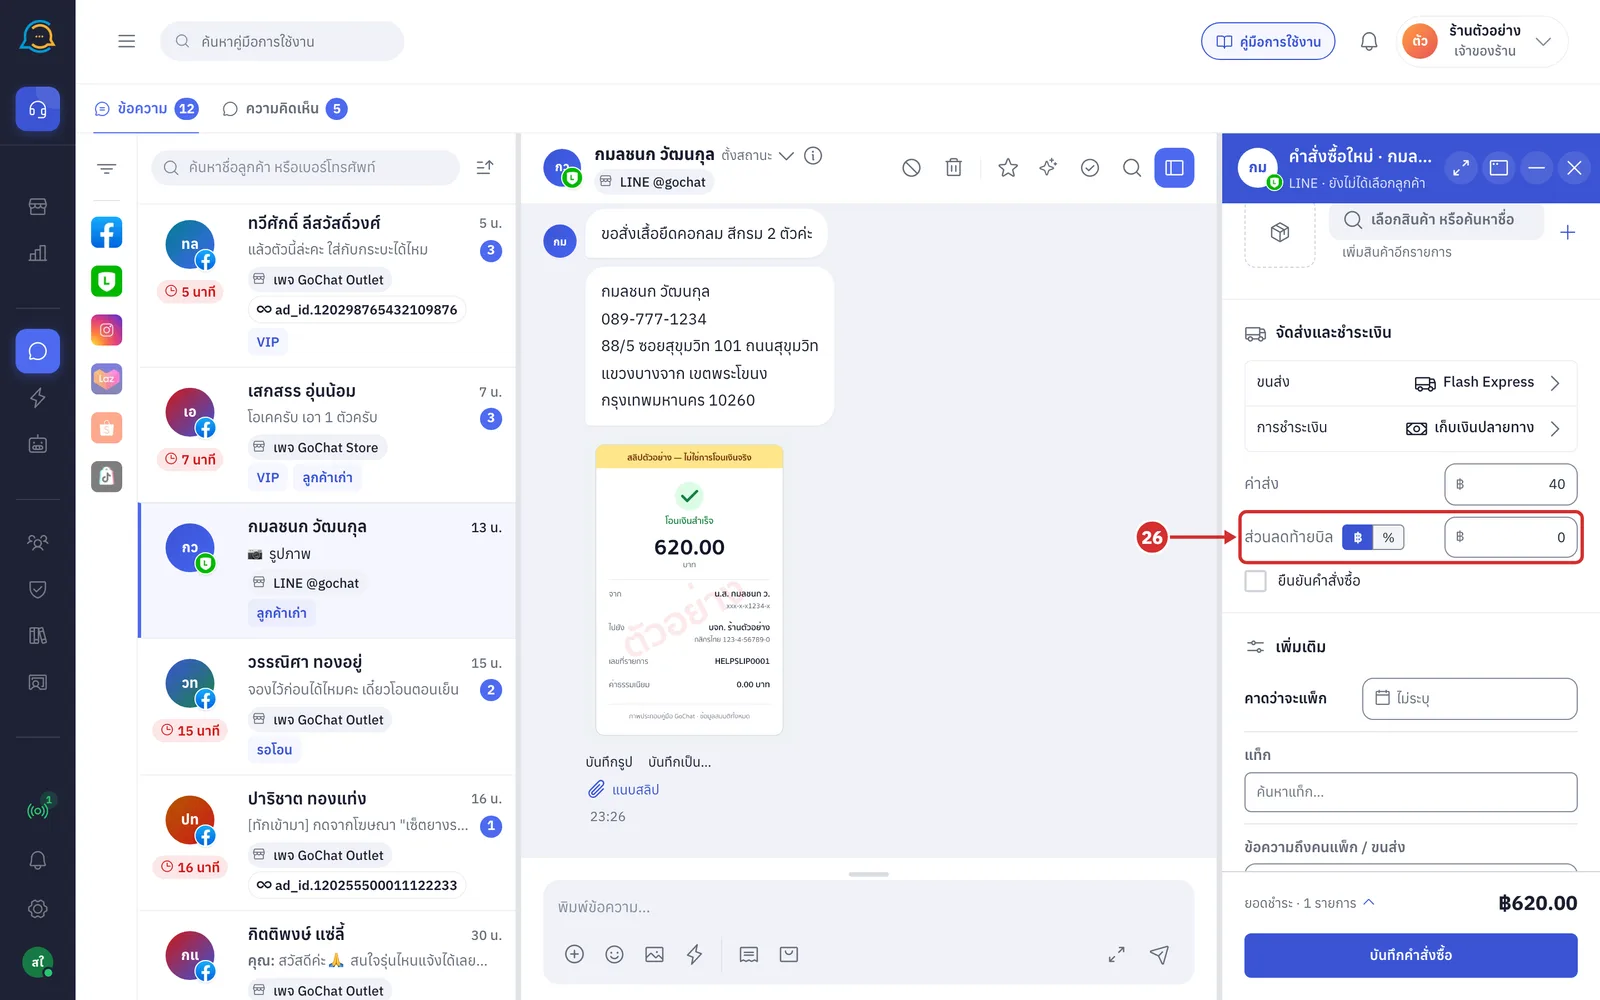
In ส่วนลดท้ายบิล (End-of-bill discount), enter a discount for the whole order, clicking ฿ or % next to the field name to choose the unit
With %, the system shows the baht amount under the field, such as = ลด ฿58.00 (= ฿58.00 off)
The discount cannot exceed the product total; the system shows ส่วนลดเกินยอดสินค้า — ลดได้สูงสุด … (Discount exceeds the product total — maximum …)
If GoSaaS calculates a different amount, the system shows ระบบปรับส่วนลดเป็น … (Discount adjusted to …)
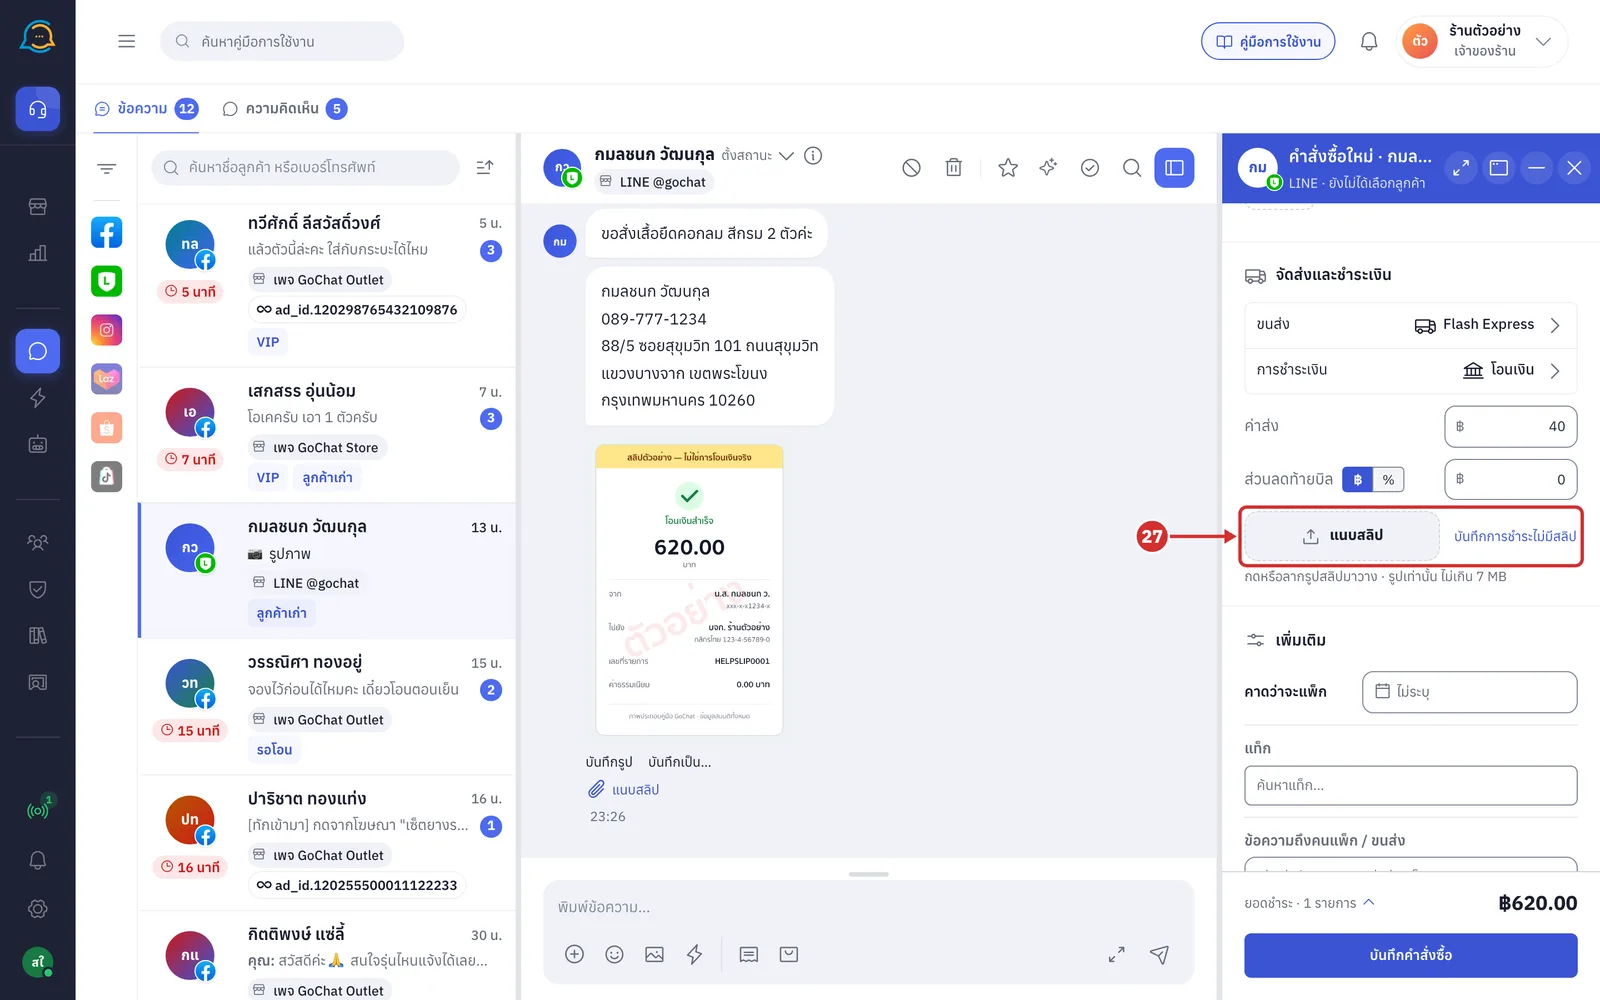
With โอนเงิน (Bank transfer), click the แนบสลิป (Attach slip) box and choose the slip picture from your device, or drag the picture onto the box
Only JPG, PNG, GIF or WEBP pictures up to 7 MB; PDF files cannot be used
While uploading, the system shows กำลังอัปโหลดสลิป… (Uploading slip…) and the save button shows รออัปโหลดสลิป… (Waiting for slip upload…)
If the customer paid but has no slip, click บันทึกการชำระไม่มีสลิป (Record payment without slip) to enter the account, date and amount yourself, or ไม่บันทึกการชำระ (Do not record payment) to cancel
Without a slip or a recorded payment, the order is saved as awaiting payment
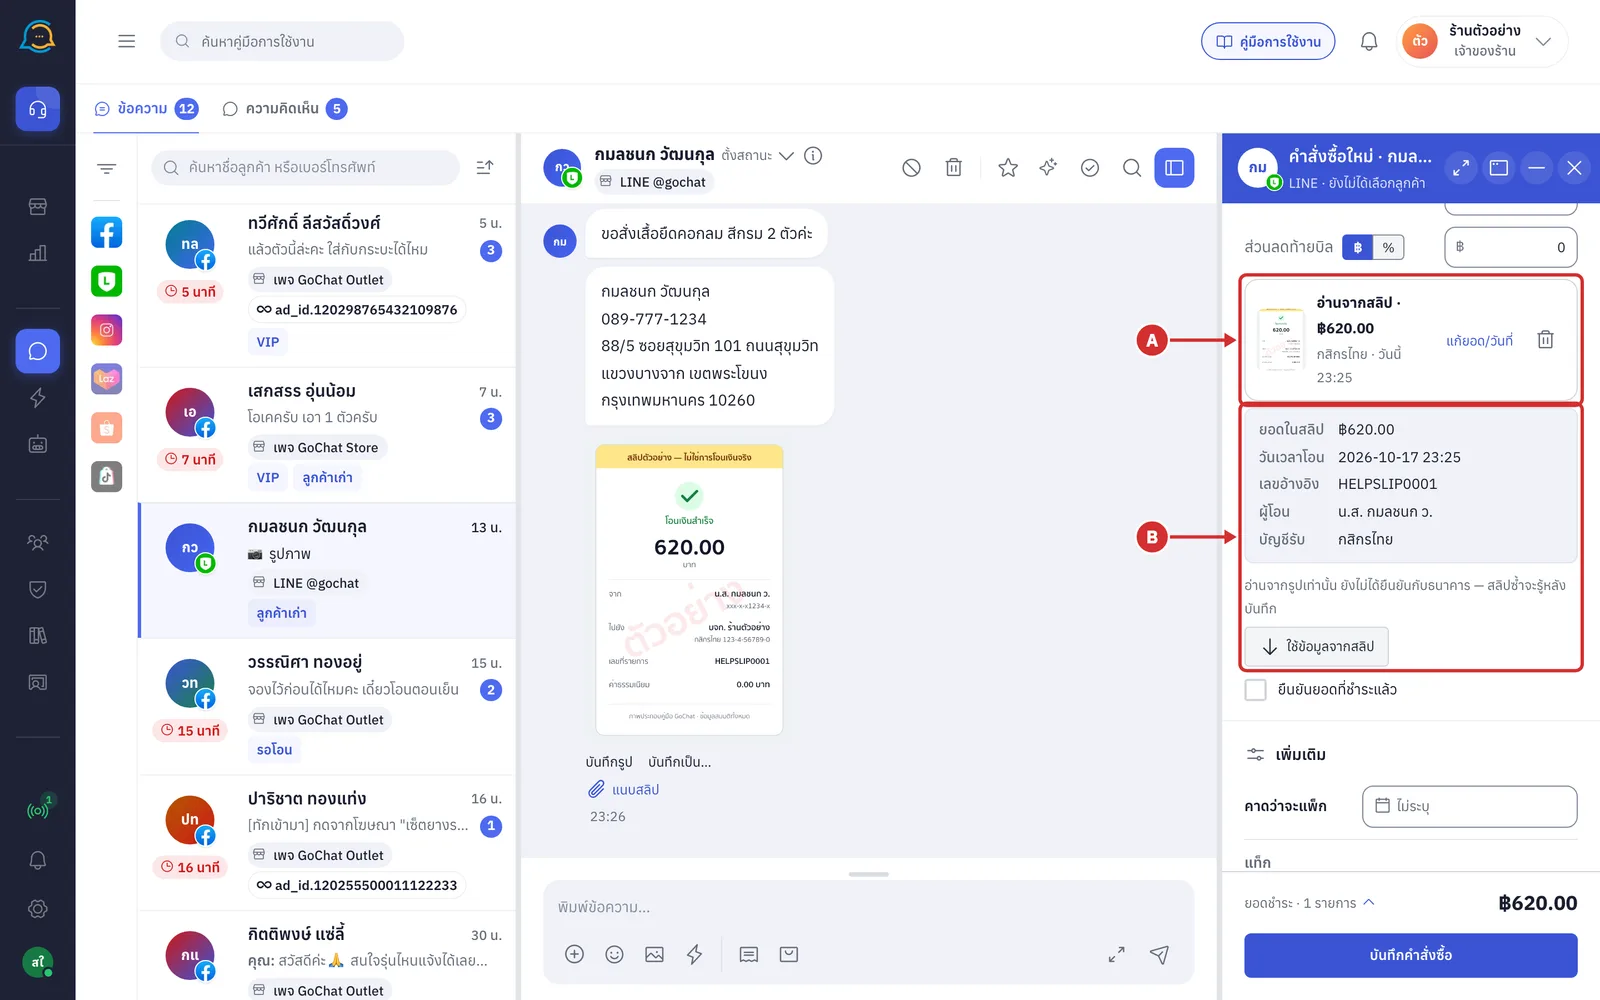
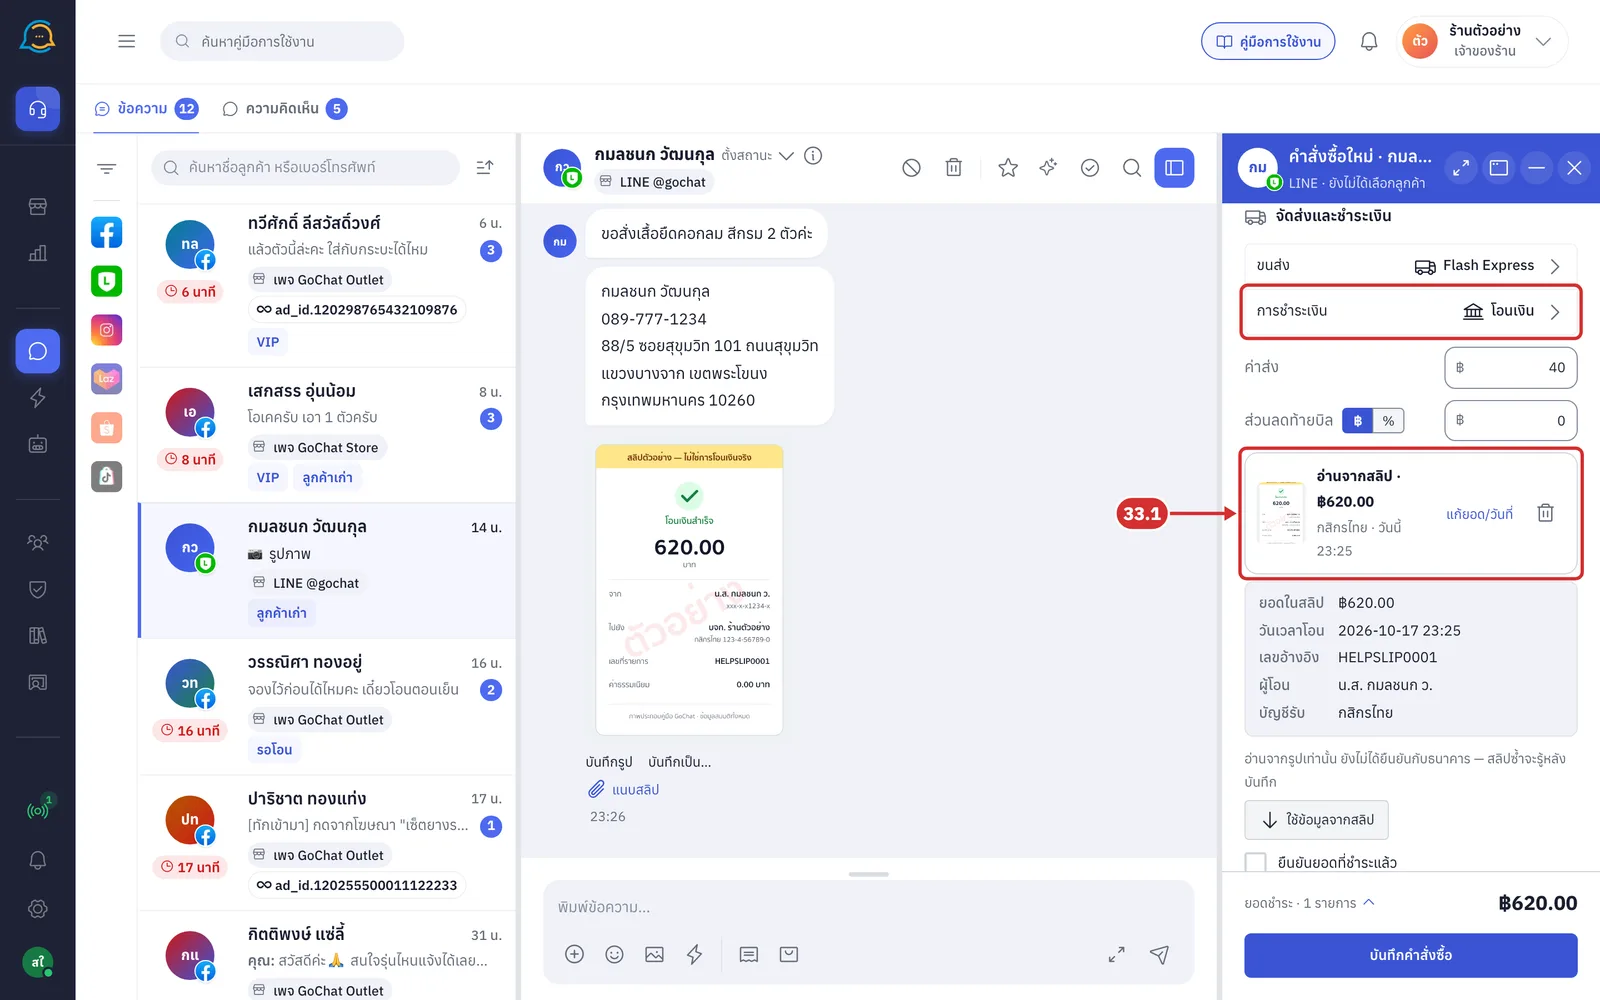
After you attach a slip, the system reads it straight away and shows
A Slip summary line shows อ่านจากสลิป (Read from slip) with the amount to be saved, the receiving account and the transfer date and time
Click the slip picture to see it full size
Click แก้ยอด/วันที่ (Edit amount/date) to edit the transfer details (step 29)
Click the trash icon (เอาสลิปออก (Remove slip)) to remove the slip
If the slip cannot be read, the system shows อ่านสลิปไม่ออก — ตรวจยอดและวันที่ก่อนบันทึก (Could not read the slip — check the amount and date before saving)
B Slip reading result shows ยอดในสลิป (Amount on slip), วันเวลาโอน (Transfer time), เลขอ้างอิง (Reference no.), ผู้โอน (Sender) and บัญชีรับ (Receiving account)
The system fills in the amount, date and time, and receiving account from the slip, only in fields you have not changed yourself
Click ใช้ข้อมูลจากสลิป (Use slip details) to fill them in from the slip again
If the amount or account does not match, the system shows a warning such as ยอดในสลิปไม่ตรงกับยอดรวม ฿… (Slip amount does not match the total ฿…) or เลขบัญชีรับในสลิปไม่ตรงกับบัญชีไหนของร้าน (The receiving account on the slip does not match any shop account)
These details are read from the picture only and are not verified with the bank; duplicate slips are only detected after saving
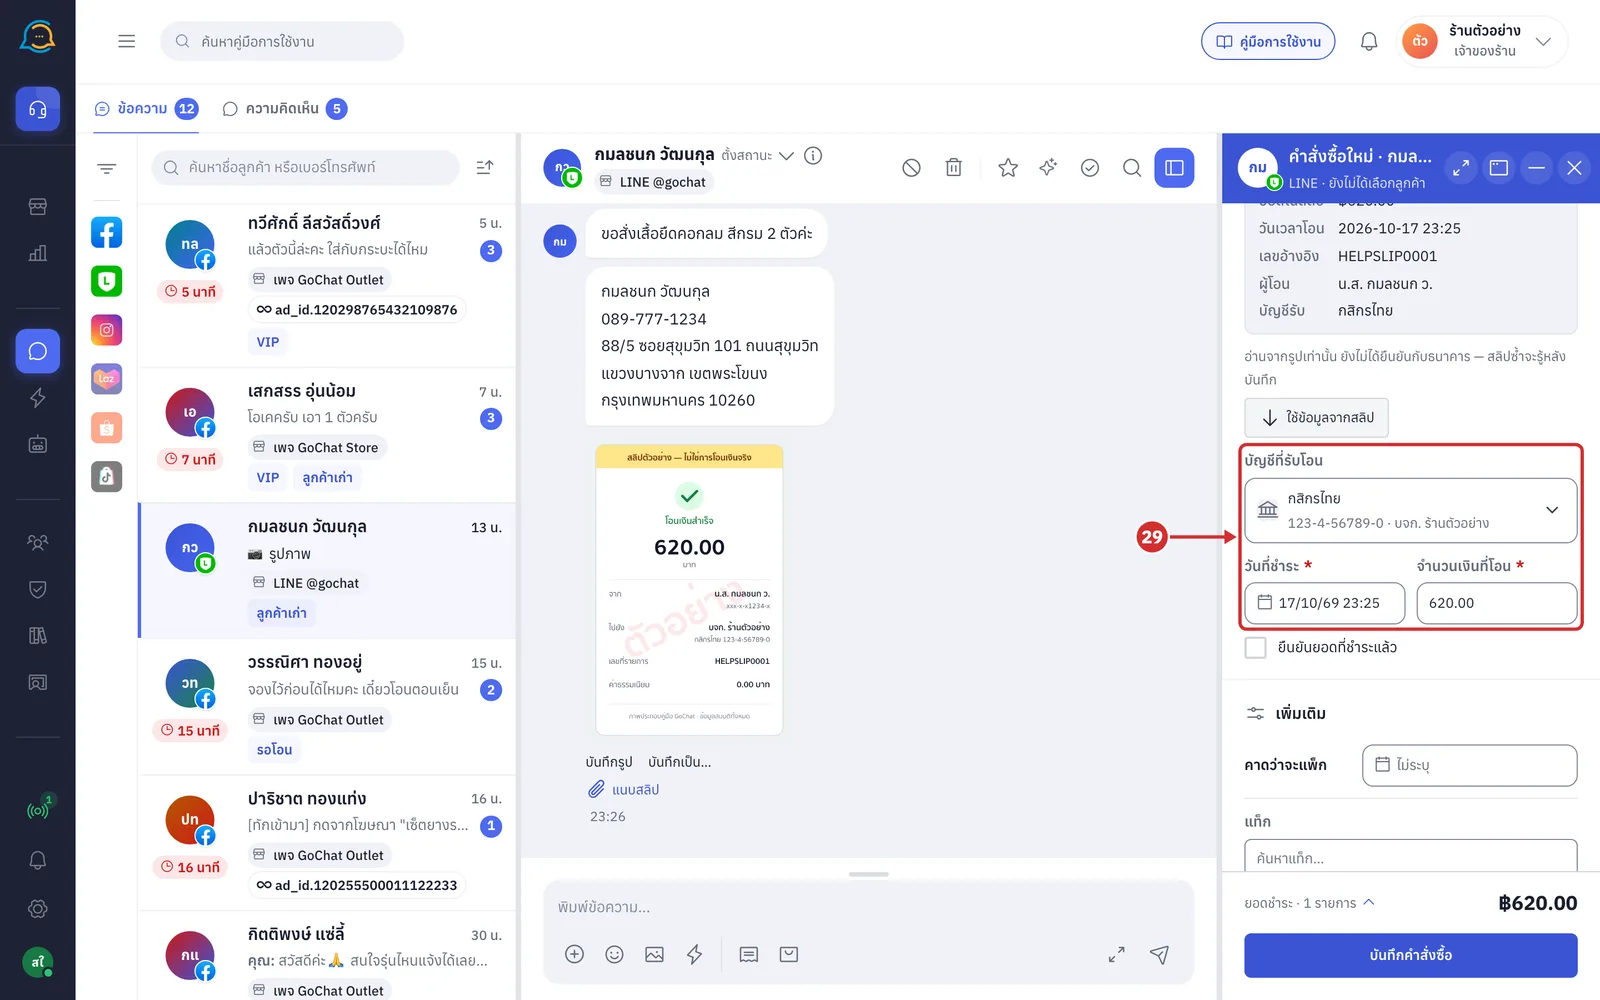
Click แก้ยอด/วันที่ (Edit amount/date) to open the transfer fields
บัญชีที่รับโอน (Receiving account) the shop account the customer paid into, with the account number and name
วันที่ชำระ (Payment date) required, and cannot be in the future
จำนวนเงินที่โอน (Amount transferred) required; the system sets it to the order total. If you change it so it no longer matches, it shows ไม่ตรงกับยอดรวม ฿… (Does not match the total ฿…) with a ใช้ยอดรวม (Use total) button
If the amount does not match the total, the date is missing, or the slip details do not match what is entered, the system keeps these fields open by itself
If the slip does not match the order, for example the slip amount differs from the order total or the transfer is more than 7 days old, the system shows a ข้อมูลสลิปไม่ตรงคำสั่งซื้อ (Slip details do not match the order) box; click แก้ยอด/วันที่ (Edit amount/date) or รับทราบ (OK)
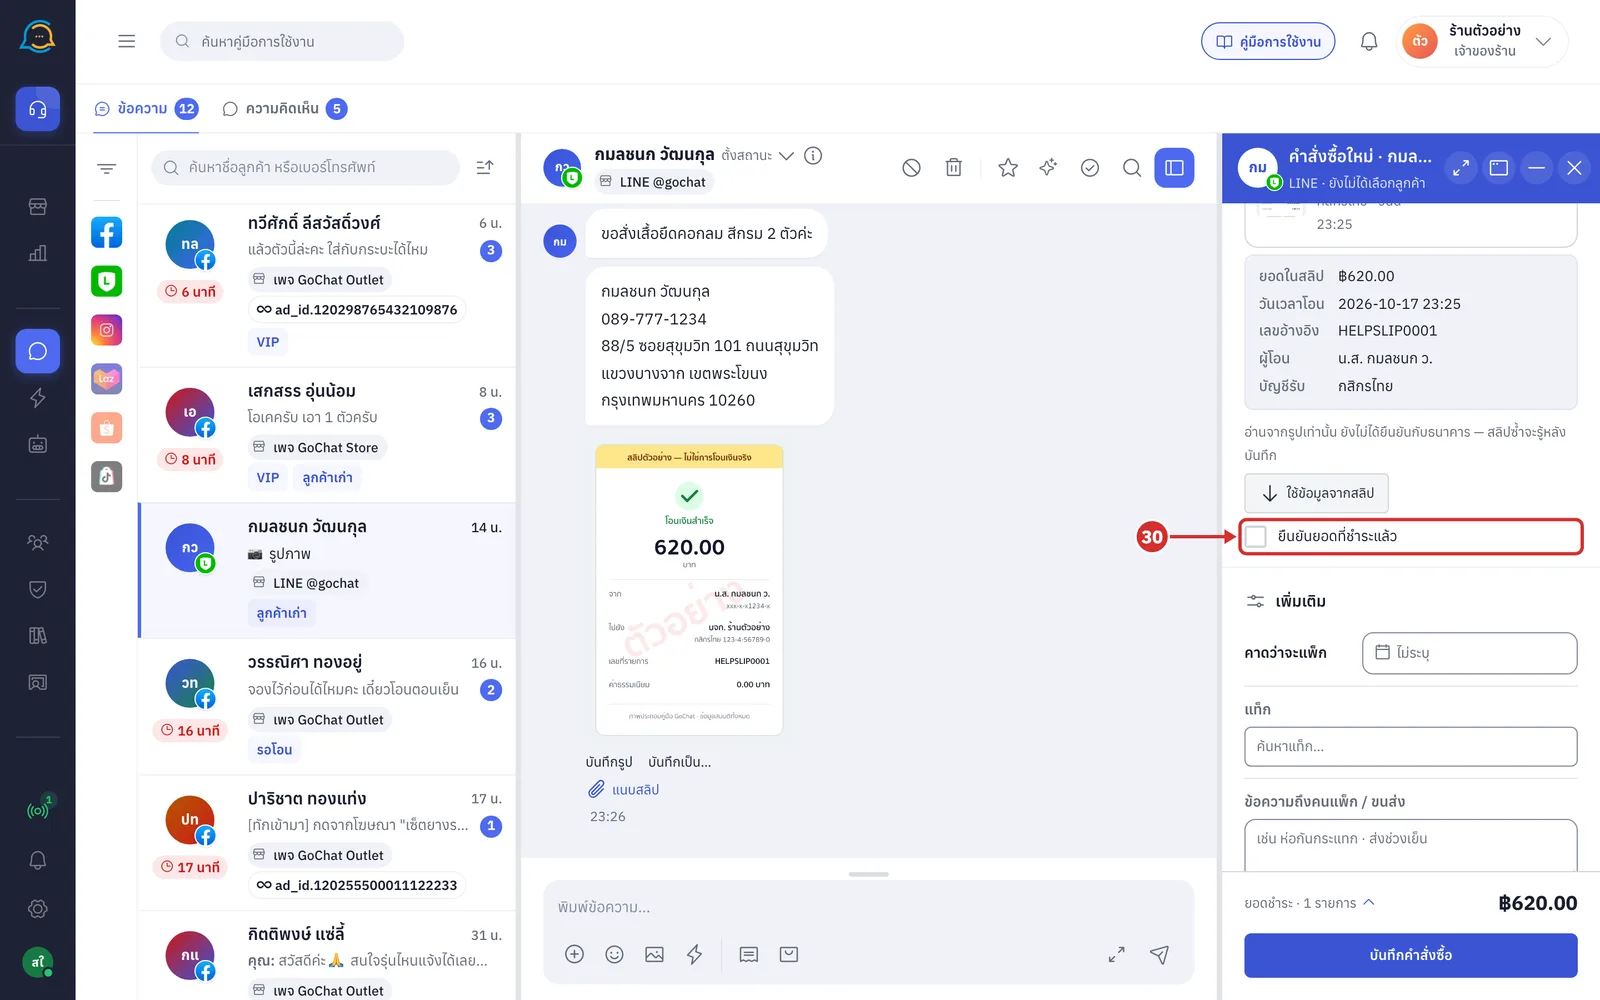
Tick ยืนยันยอดที่ชำระแล้ว (Confirm the paid amount) once you have checked the transfer is correct, to record the payment as confirmed
This box appears when a slip is attached or after clicking บันทึกการชำระไม่มีสลิป (Record payment without slip)
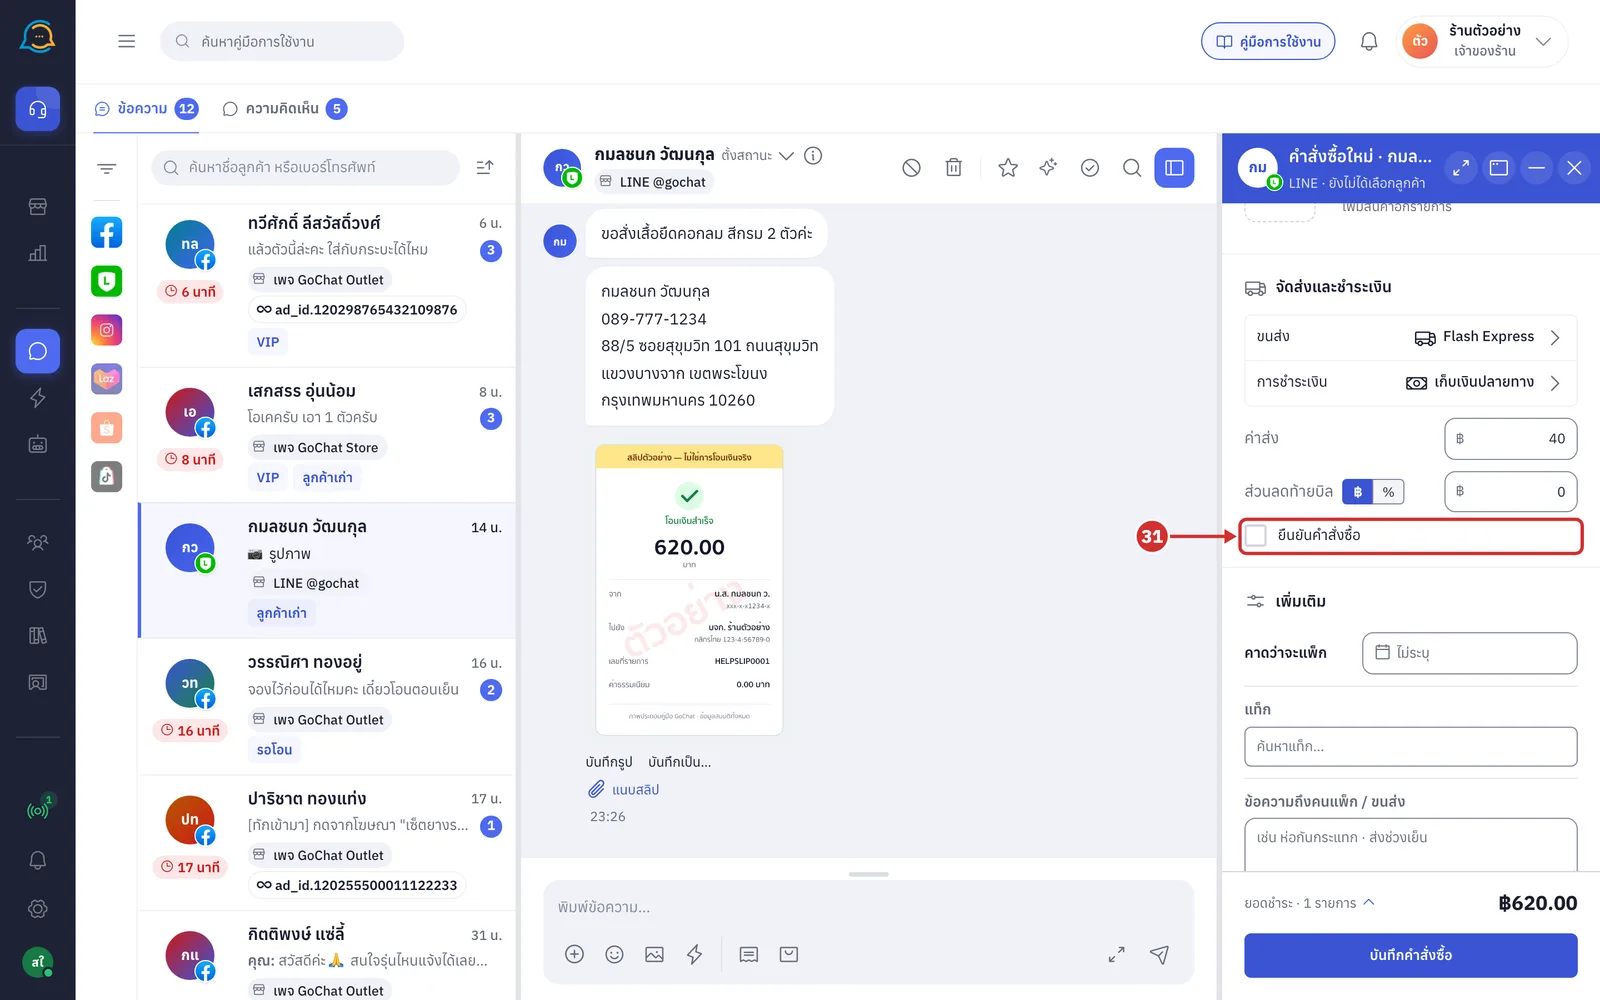
With เก็บเงินปลายทาง (Cash on delivery), users who may confirm orders in GoSaaS see a ยืนยันคำสั่งซื้อ (Confirm order) box. Tick it to confirm the cash-on-delivery order as you save
Users without that permission do not see this box and must confirm the order in GoSaaS later
Pulling the address and slip from chat messages
You can pull the address and slip picture the customer sent straight into the form, without copying the text or saving the picture first. If the form is not open yet, the system opens it.
Hover over the customer's address message and click the cart icon ใช้ที่อยู่นี้ลงออเดอร์ (Use this address in an order) in the buttons next to the bubble
The icon appears on the last bubble of customer messages the system detects as an address
If the customer sent the address in several messages in a row, each no more than 2 minutes apart, the system combines up to 5 messages and the button name says (รวม N ข้อความ) (N messages combined)
Messages the customer deleted or that were hidden do not have this icon
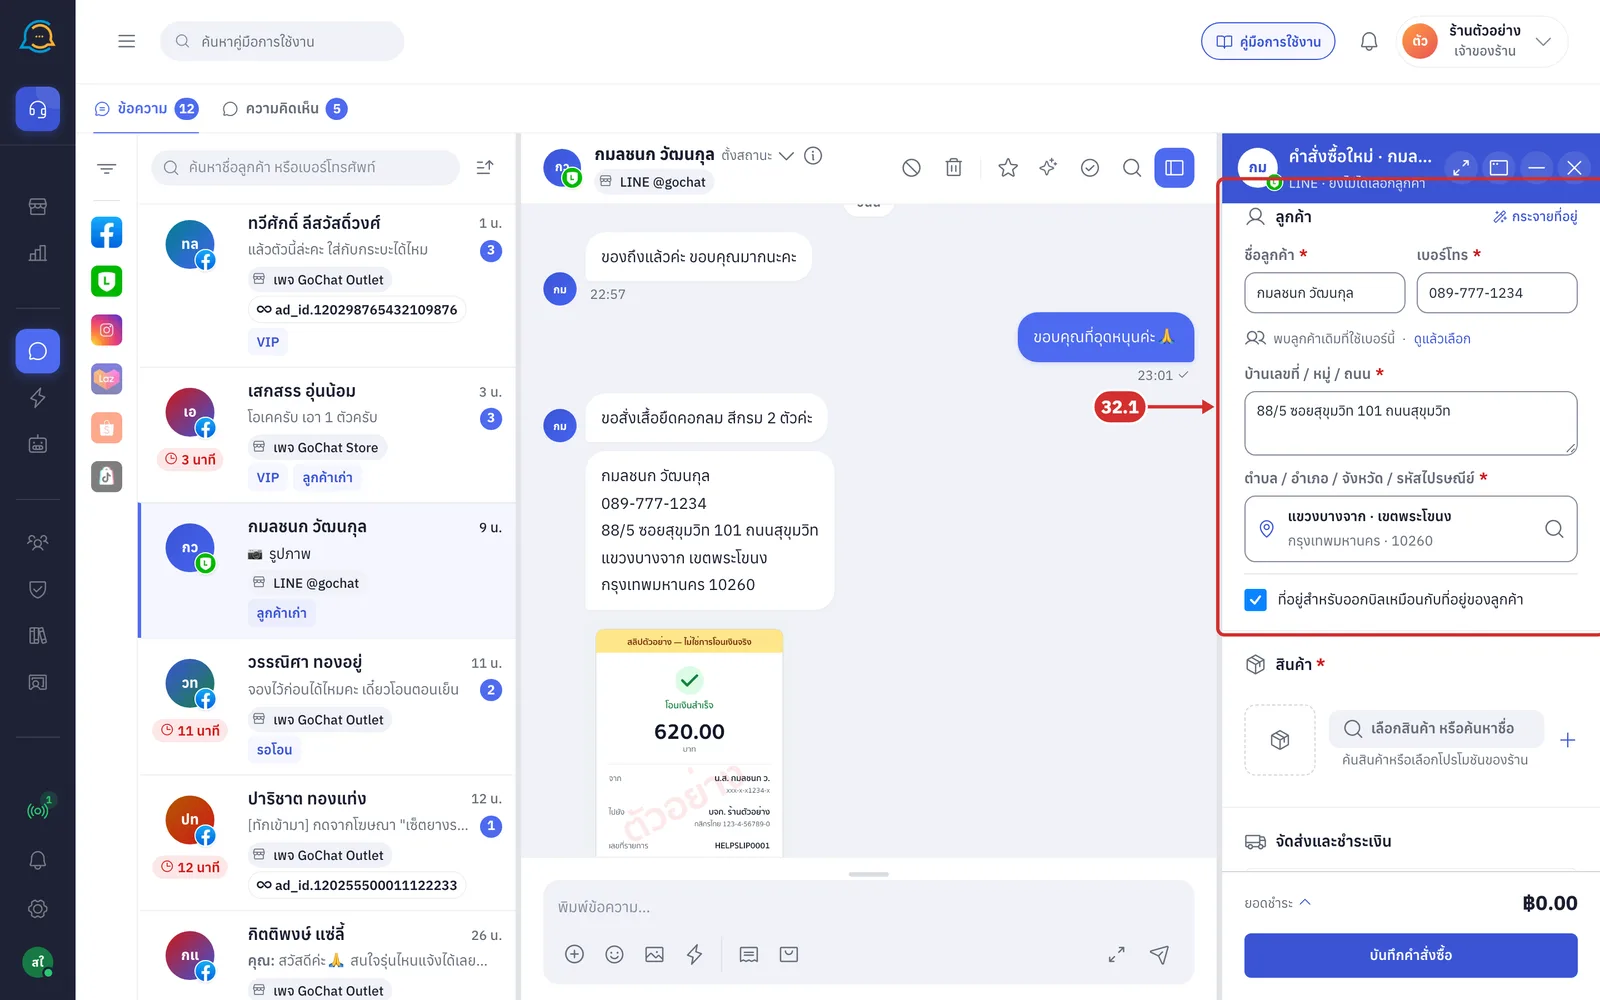
32.1 The system splits the name, phone number and address from the message. If everything is found, it fills the ลูกค้า (Customer) card straight away. If something is missing, it opens the วางข้อความจากแชท (Paste text from chat) sheet with that text and says ยังขาด … — ตรวจข้อความข้างบน เติมให้ครบ แล้วกด “แยกข้อมูล” (Missing … — check the text above, complete it, then click “Split”) without filling in any field
Under a picture the customer sent, click แนบสลิป (Attach slip) to use that picture as the order's slip
The link only appears on pictures the system has kept a copy of
If a message has several pictures, each has its own แนบสลิป (รูปที่ N) (Attach slip (picture N))
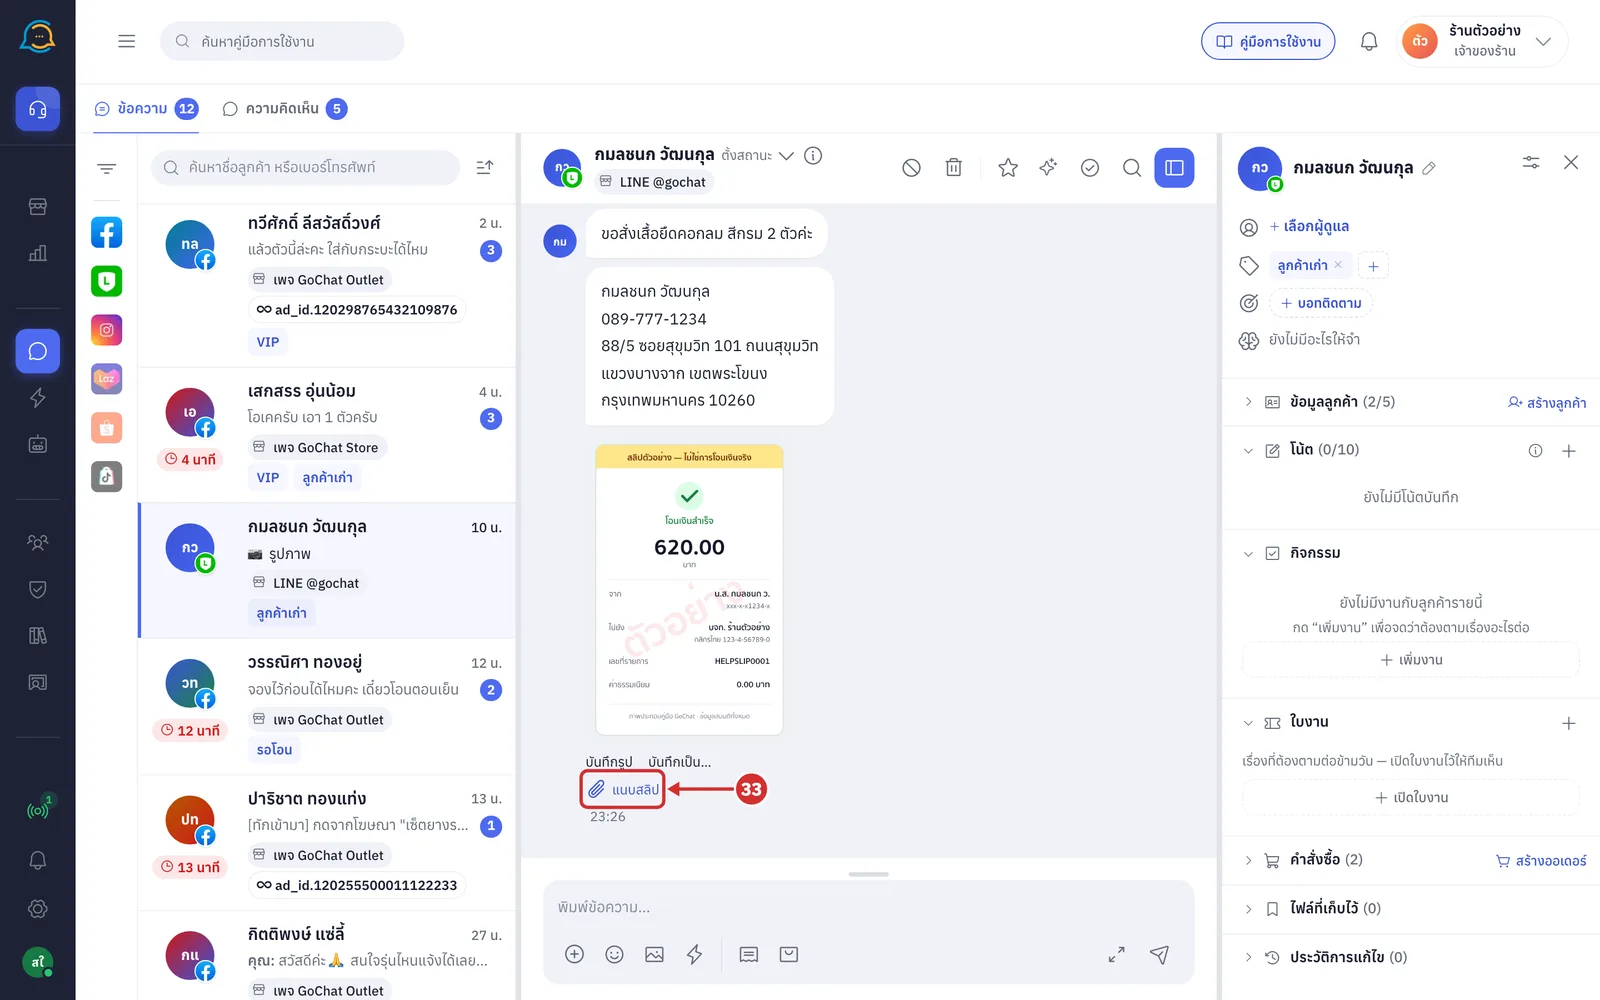
33.1 The system switches the payment to โอนเงิน (Bank transfer), attaches the picture as the slip, reads it, and scrolls to the จัดส่งและชำระเงิน (Shipping and payment) card. The summary line shows สลิปจากแชท (Slip from chat), or อ่านจากสลิป (Read from slip) once the slip is read
Entering more details
The เพิ่มเติม (More) card holds extra order details. Every field here can be left empty except วันที่สร้าง (Created date), which the system sets for you.
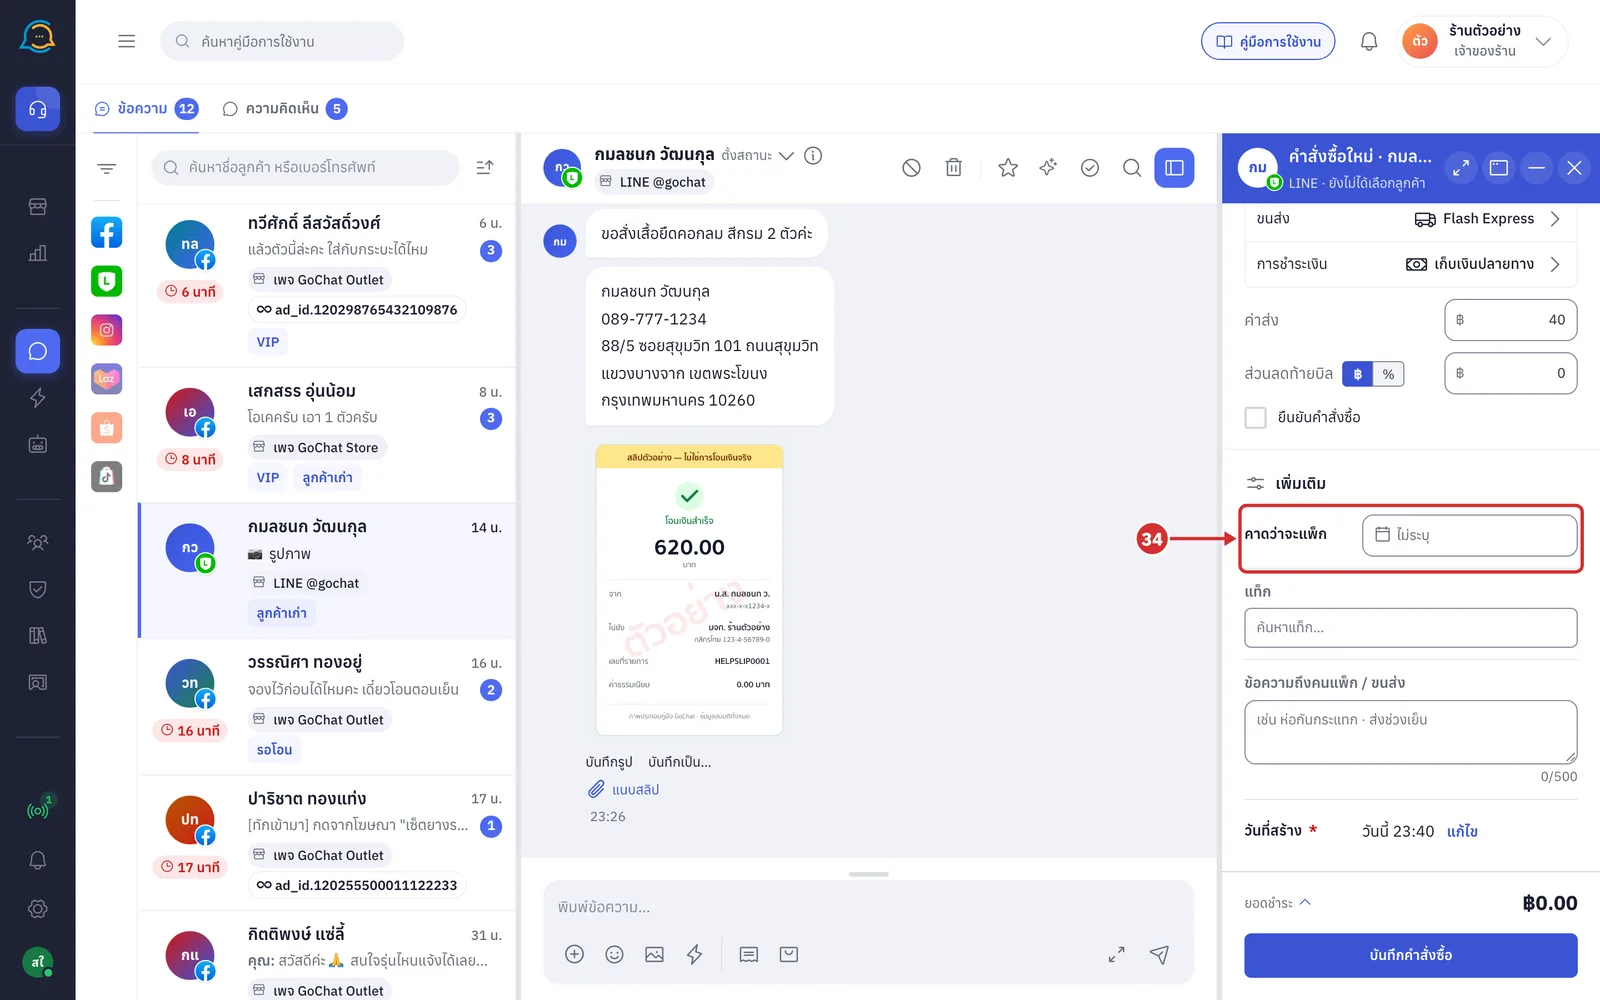
In คาดว่าจะแพ็ก (Expected packing), choose when you expect to pack the order
You can leave it empty; it shows ไม่ระบุ (Not set)
Past dates cannot be chosen
Click × in the field to clear it
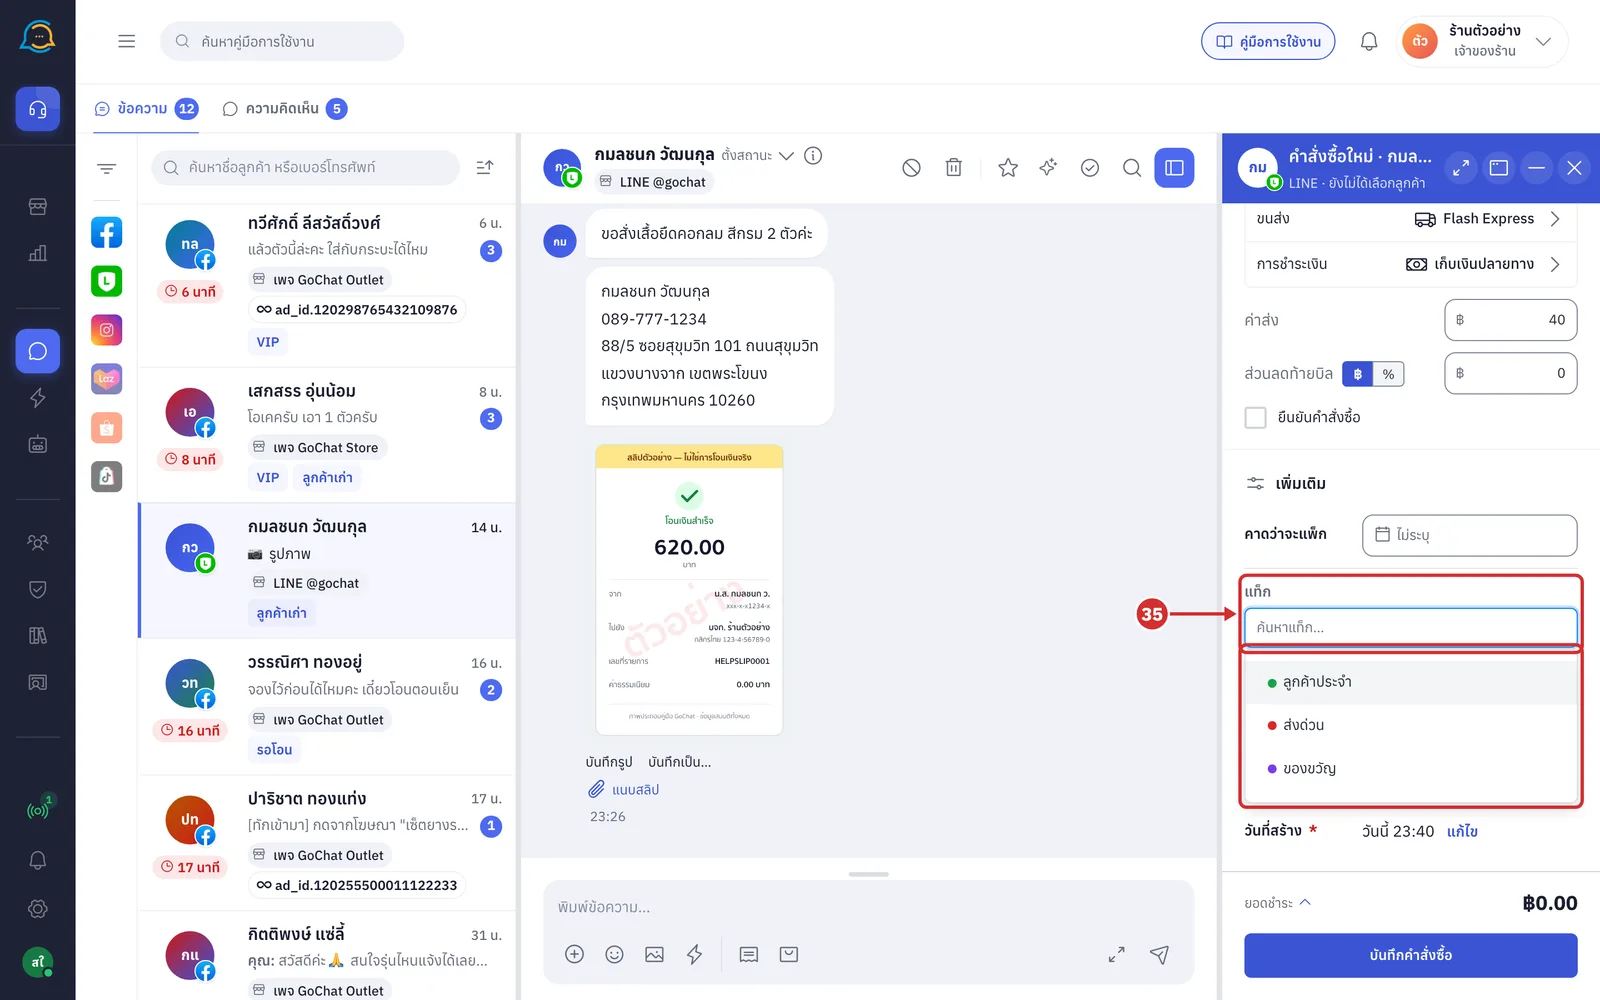
In แท็ก (Tags), click the field and choose one of your shop's order tags, or type a new tag name and choose สร้างแท็ก “…” (Create tag “…”)
Tag names can be up to 50 characters
Click × on a tag to remove it
This field is hidden if your shop's GoSaaS package has no order tags
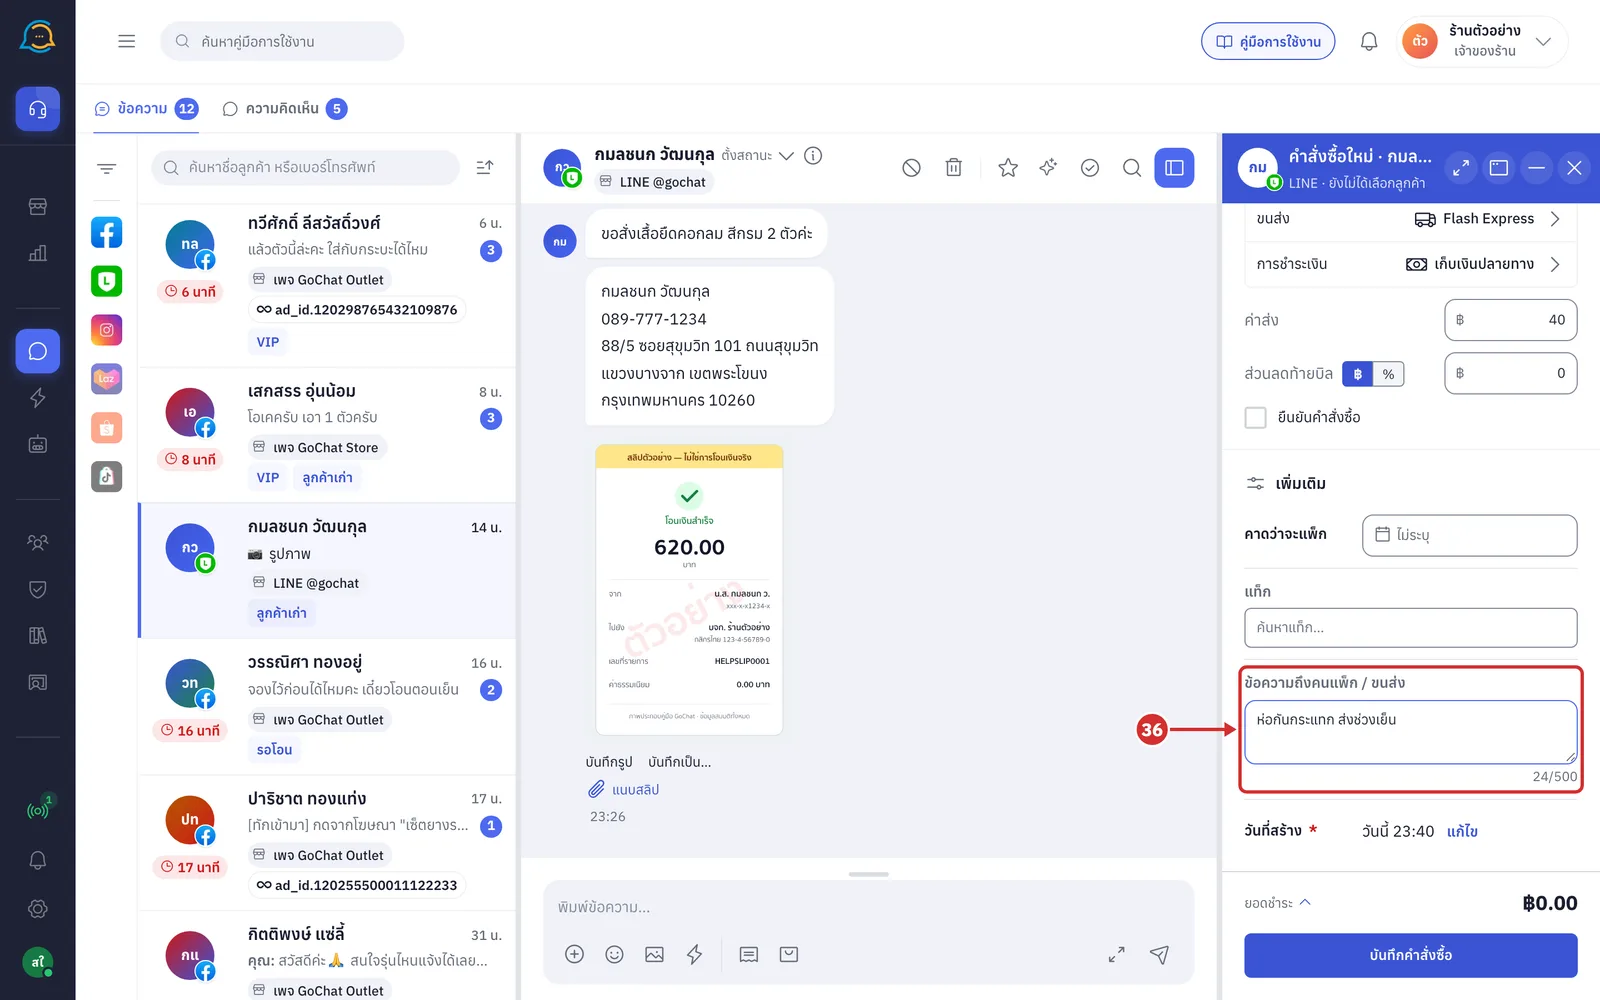
In ข้อความถึงคนแพ็ก / ขนส่ง (Note to packer / carrier), type a note for the packer or carrier, such as ห่อกันกระแทก ส่งช่วงเย็น (wrap with bubble wrap, deliver in the evening)
Up to 500 characters, with a counter under the field
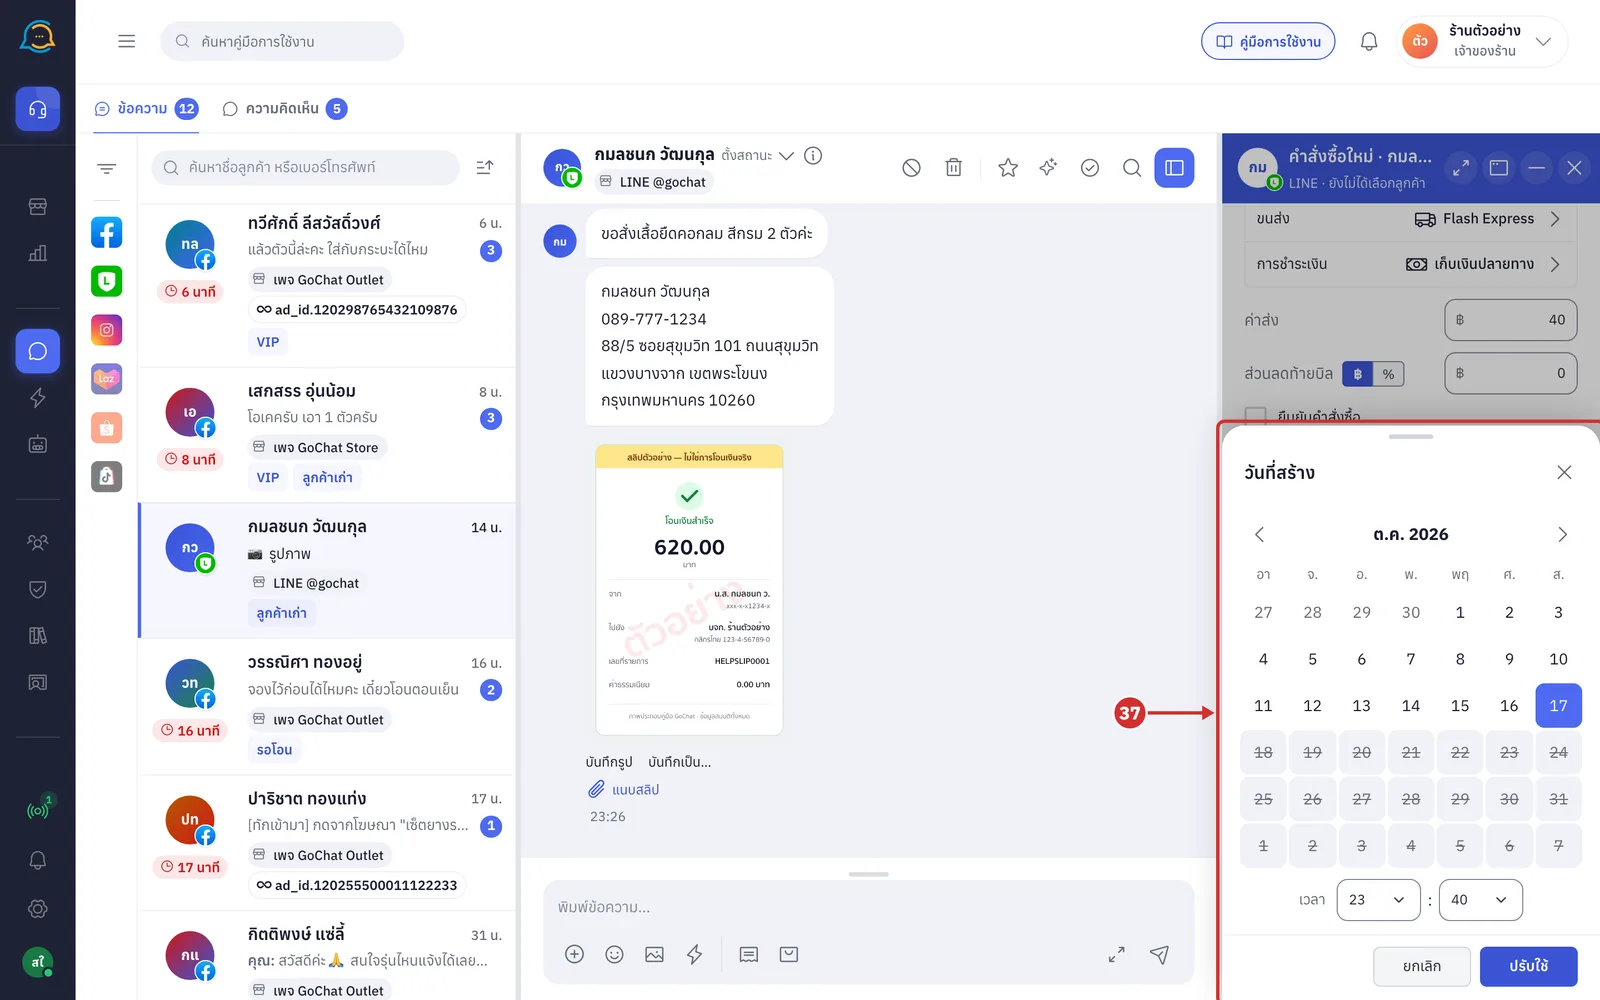
วันที่สร้าง (Created date) is set to now. To change it, click แก้ไข (Edit), choose the date and time in the calendar sheet, then click ปรับใช้ (Apply)
Past dates are allowed, but not a future time; the system shows วันที่สร้างเป็นเวลาในอนาคตไม่ได้ (The created date cannot be in the future)
Click ยกเลิก (Cancel) to close the calendar without changing it
Saving the order
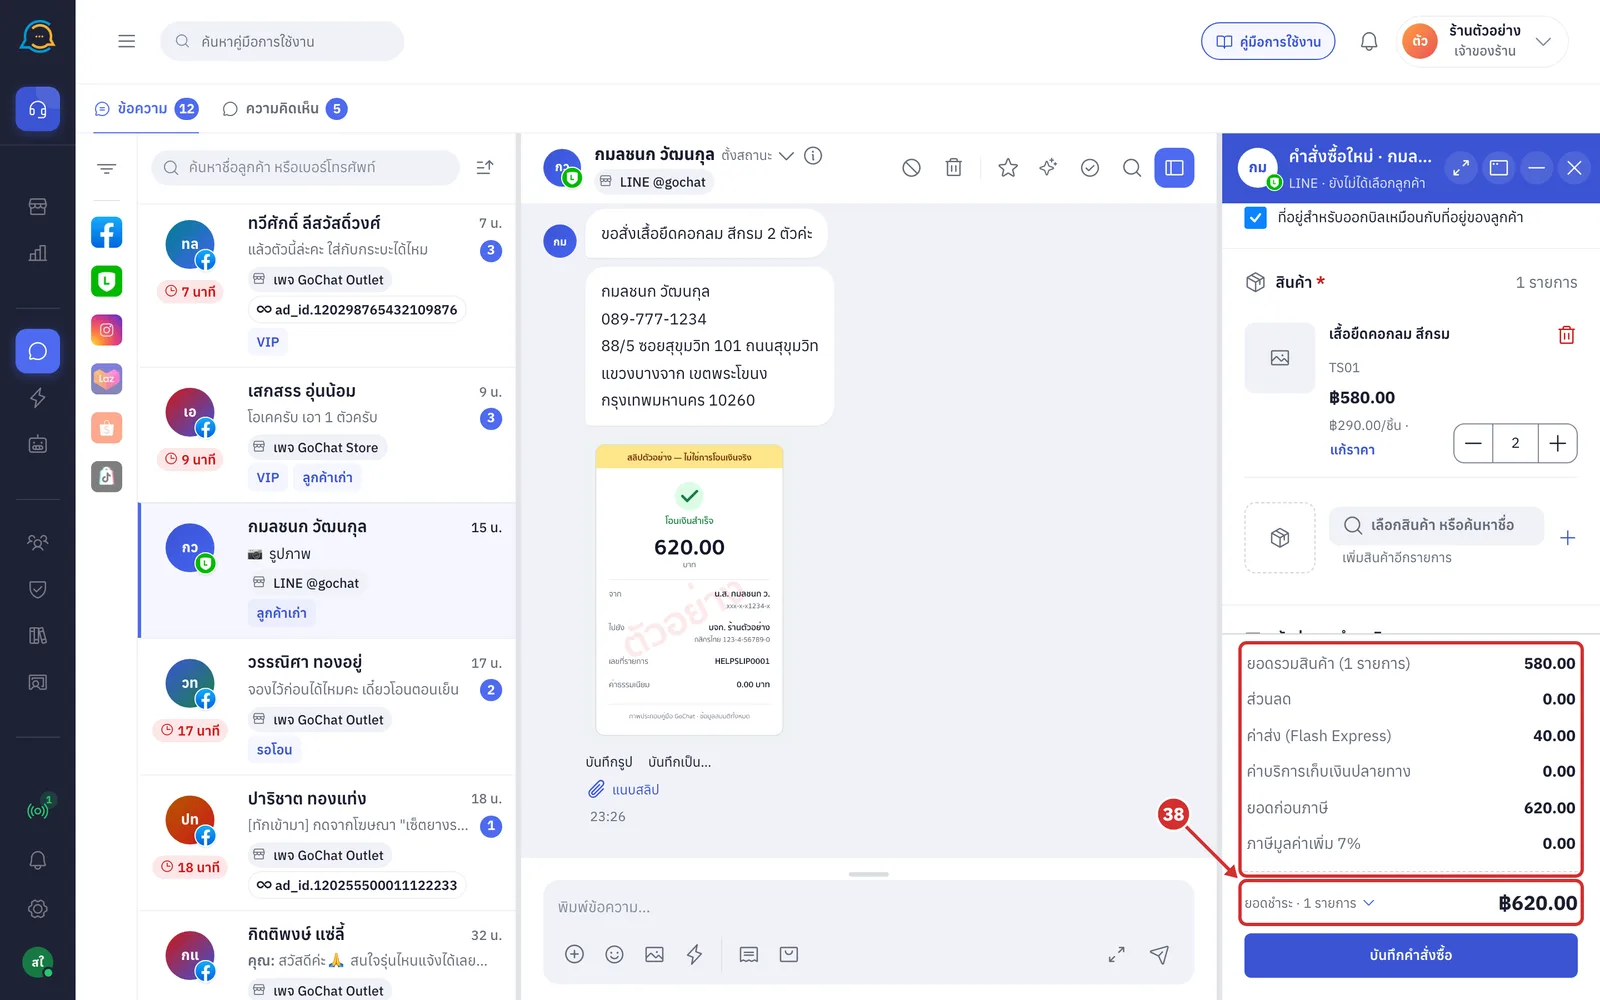
On the bar at the bottom of the form, click ยอดชำระ (Amount due) to expand the money breakdown
ยอดรวมสินค้า (Product total) with the number of items
ส่วนลด (Discount) as calculated by GoSaaS
ค่าส่ง (Shipping) with the carrier name
ค่าบริการเก็บเงินปลายทาง (COD service fee) shown when cash on delivery is chosen
ยอดก่อนภาษี (Before tax) and ภาษีมูลค่าเพิ่ม (VAT) at your shop's rate
Click again to fold it; the centre window always shows this breakdown
If the totals cannot be calculated, the system shows ยอดประมาณ — ยังคำนวณไม่สำเร็จ (Estimate — calculation failed) with a คำนวณใหม่ (Recalculate) button, and you cannot save until real totals arrive
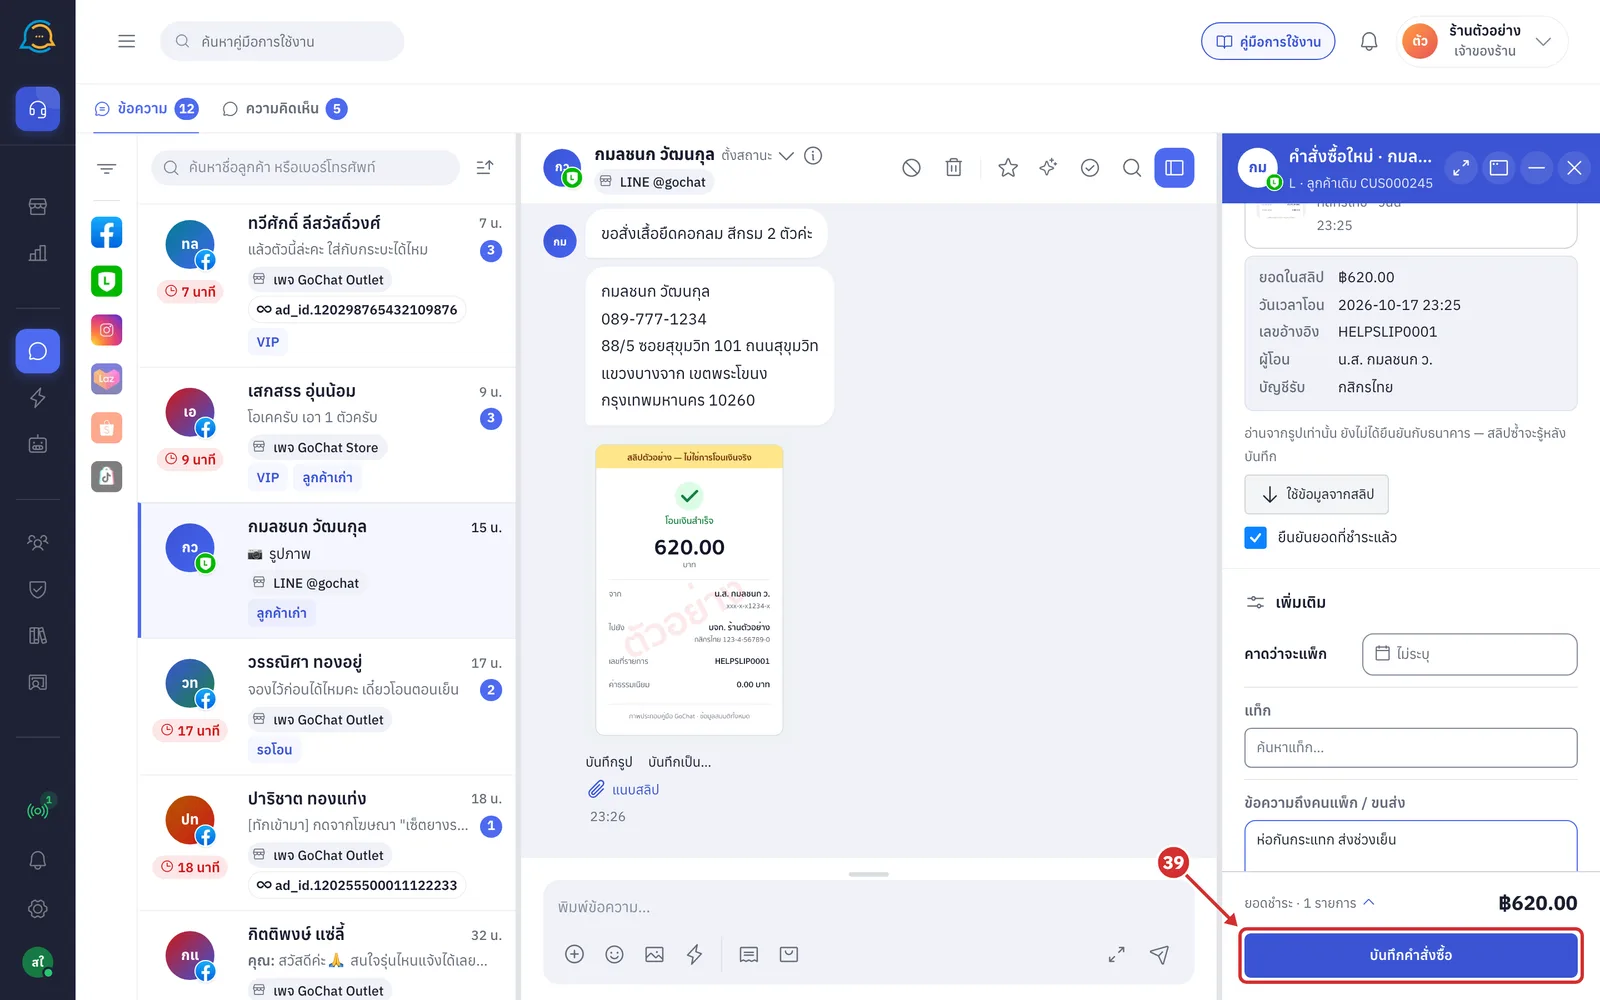
Click บันทึกคำสั่งซื้อ (Save order) to create the order in GoSaaS
While saving, the button shows ตรวจซ้ำ… (Checking for duplicates…) and กำลังสร้าง… (Creating…)
If an order with the same total came from the same number moments ago, the system asks เพิ่งมีออเดอร์ยอดเท่ากันจากเบอร์นี้ (…) — จะสร้างอีกใบไหม (An order with the same total just came from this number (…) — create another one?); click สร้างอีกใบ (Create another) if you mean to
If stock runs short when saving, the order is not created and the short product rows get a red border; everything you entered stays
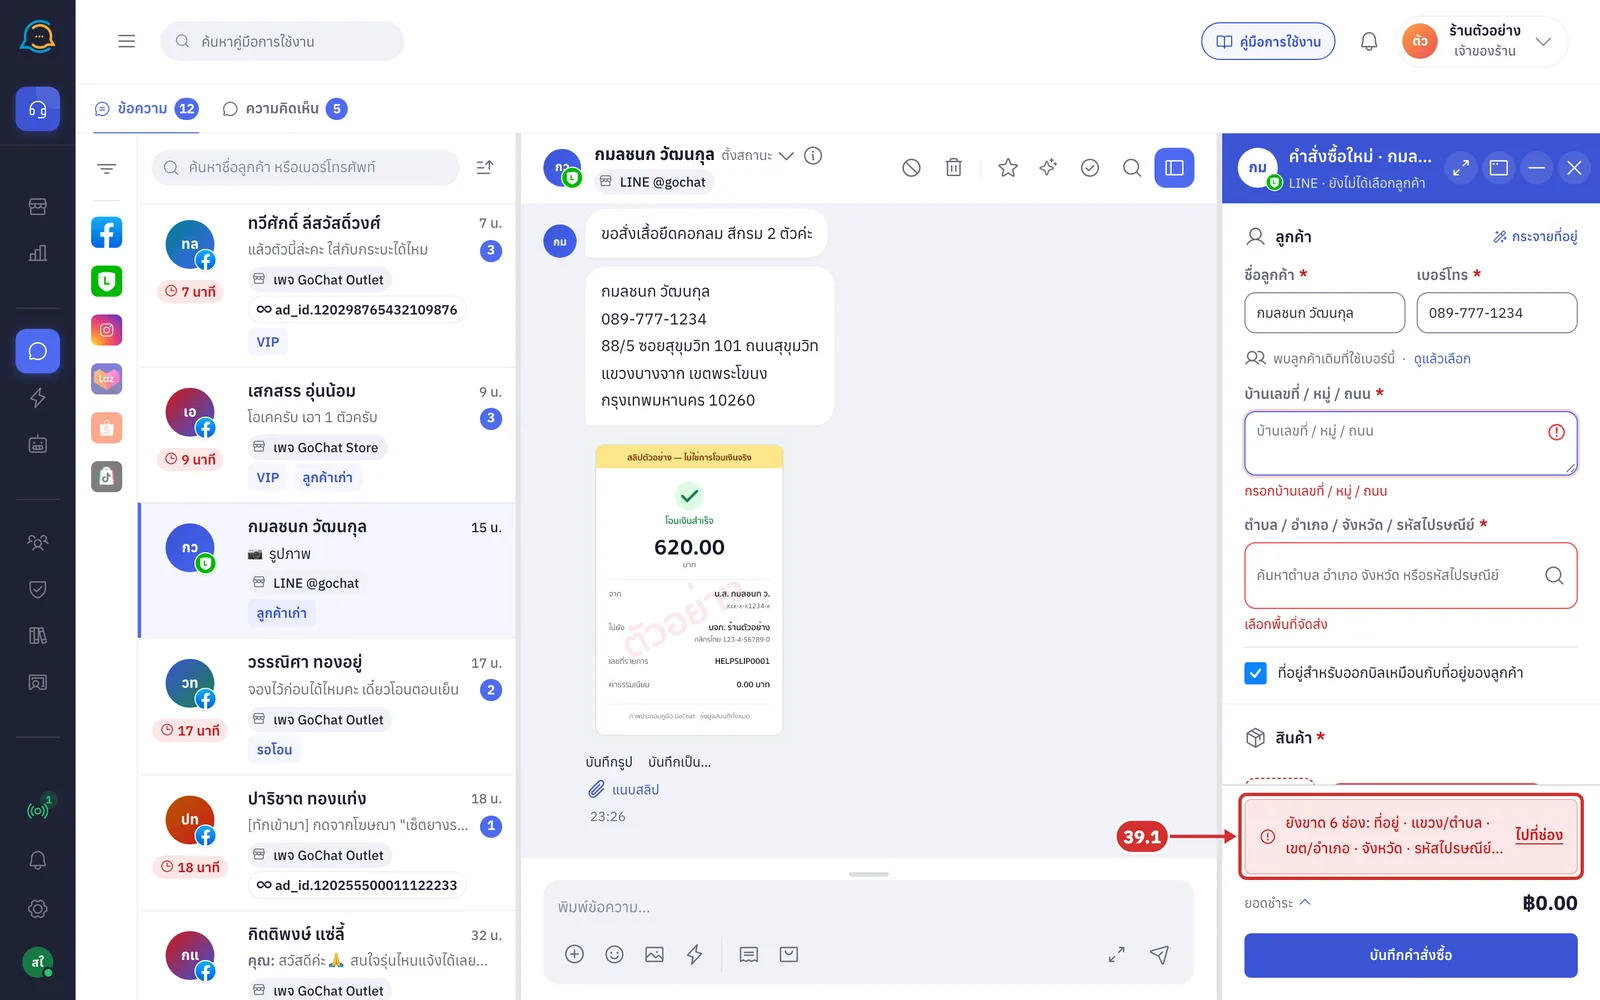
39.1 If something is missing, the system shows a red bar ยังขาด N ช่อง: … (N fields missing: …) above the amount due and red borders on the missing fields. Click ไปที่ช่อง (Go to field) to jump to the first missing field
Once saved, the form closes and the new order appears as the first card under คำสั่งซื้อ (Orders) in the right panel, with its order number
There is no notification or summary page after saving
Nothing is sent to the customer automatically. You can send it yourself with ส่งลิงก์ (Send link) or ส่งสรุป (Send summary) on the card (steps 43 and 44)
The exception is accounts with the สรุปคำสั่งซื้อ (Order summary) auto-reply turned on: the system sends the summary according to that set. See Setting up order summaries
If the order number is not issued yet, the card shows กำลังออกเลขออเดอร์… (Issuing order number…) first
If GoSaaS returns a warning, for example the packer note could not be saved, the system shows it on the card
The system links the customer to the chat and saves the address to the chat's customer details, so it is filled in next time
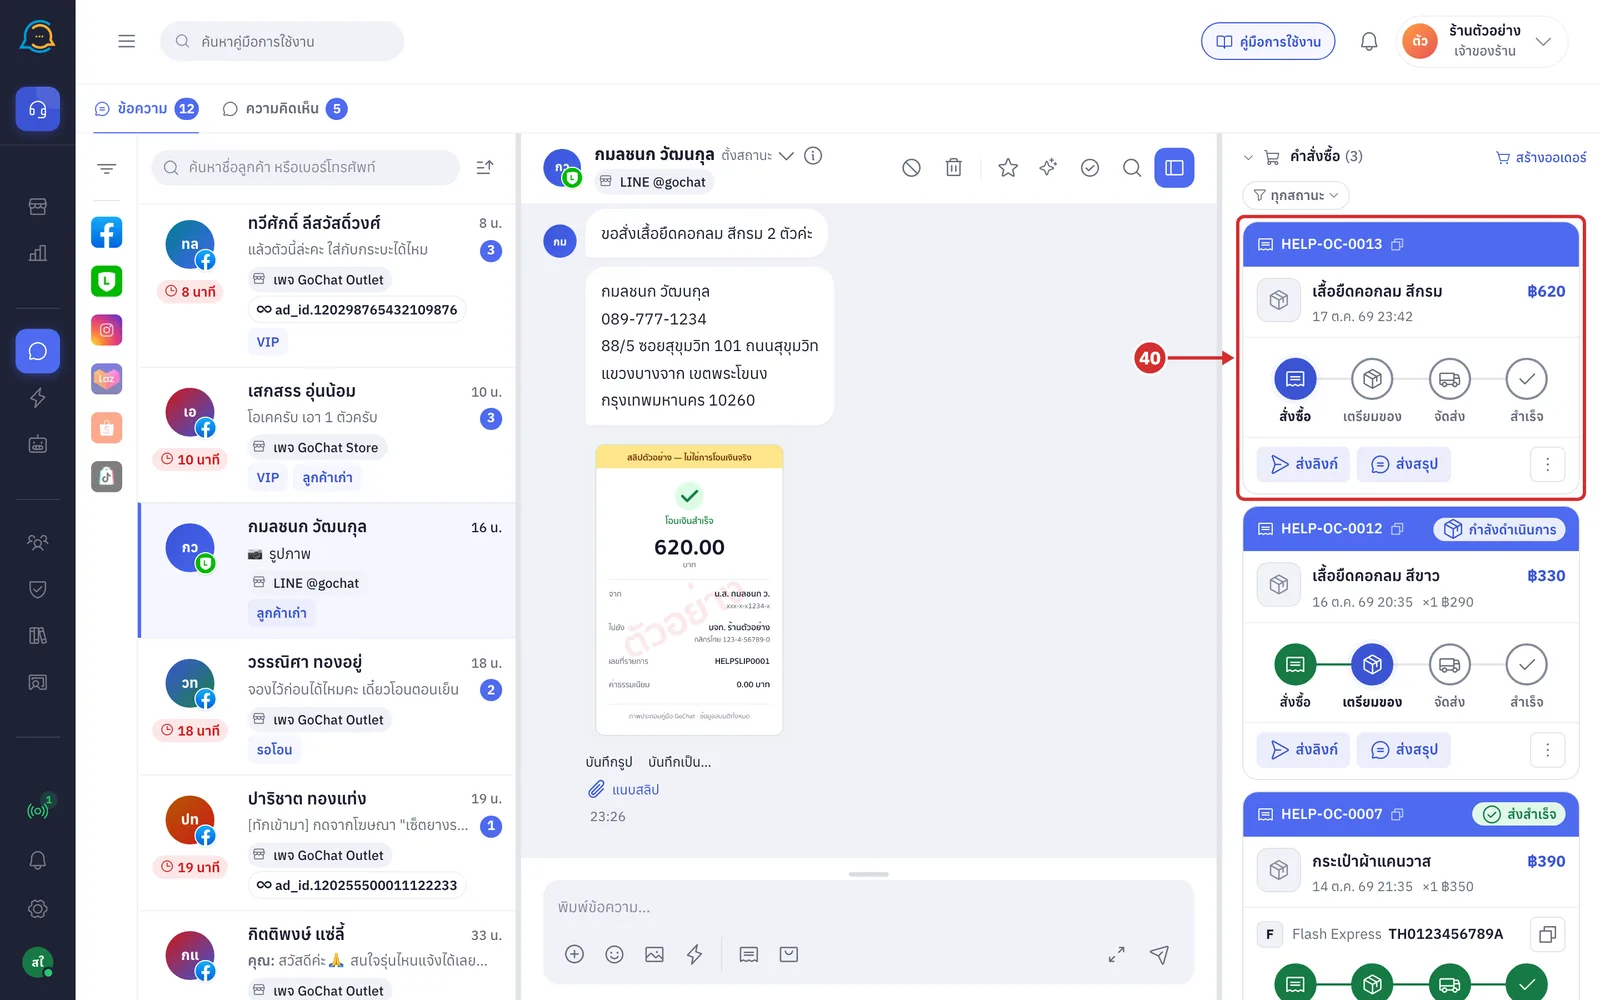
Reading the order cards
Under คำสั่งซื้อ (Orders), click the section name to expand this chat's orders
Only orders created from this chat are shown, from the form and from order commands; orders created in the back office or from other chats are not included
The number in brackets is how many orders this chat has
5 orders are shown at a time; click โหลดเพิ่ม (Load more) to see more
When offline, the system shows ออฟไลน์ — สถานะที่เห็นอาจไม่ล่าสุด (Offline — statuses may be out of date)
41.1 If the chat has no orders yet, the system shows ยังไม่มีคำสั่งซื้อจากแชทนี้ (No orders from this chat yet) with a dashed สร้างออเดอร์ (Create order) button that opens the form just like step 2
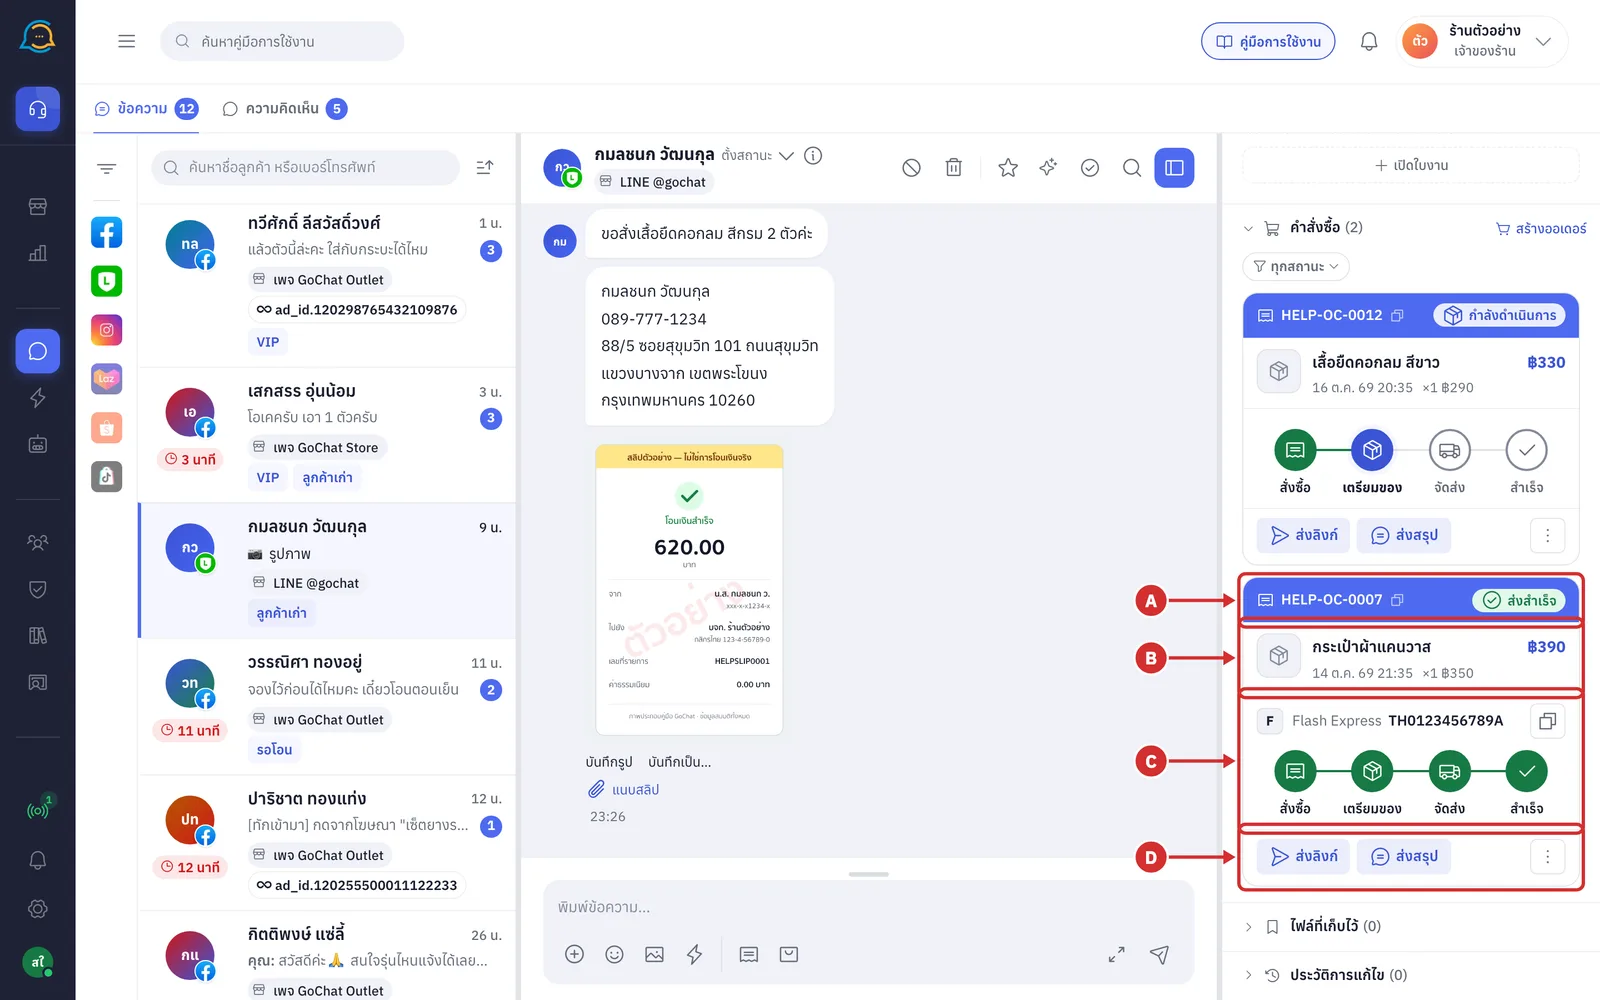
Each order card has these parts
A Card header shows the order number and a status label
Click the order number to copy it; the system shows คัดลอกเลขออเดอร์แล้ว (Order number copied)
The label on the right shows the order status from GoSaaS, such as รอดำเนินการ (Pending) or กำลังดำเนินการ (Processing)
Once there is a parcel, the label shows the current delivery step instead, and cancelled orders show ยกเลิกแล้ว (Cancelled)
B Product row shows the picture and name of the first product, when it was ordered, the quantity and price, the order total, and + อีก N รายการ (+ N more items) when there are several. Orders with a promotion also show the promotion name
C Parcel row and order steps shows the steps สั่งซื้อ (Ordered), เตรียมของ (Preparing), จัดส่ง (Shipping) and สำเร็จ (Done)
Once there is a parcel, it shows the carrier and tracking number; click the copy icon to copy the tracking number
Returned parcels show พัสดุกำลังตีกลับไปยังต้นทาง (Parcel is being returned to the sender)
D Card buttons ส่งลิงก์ (Send link), ส่งสรุป (Send summary) and ⋮ for more options, such as เปิดในระบบหลังบ้าน (Open in back office). ส่งลิงก์ (Send link) and ส่งสรุป (Send summary) work once the order has a number
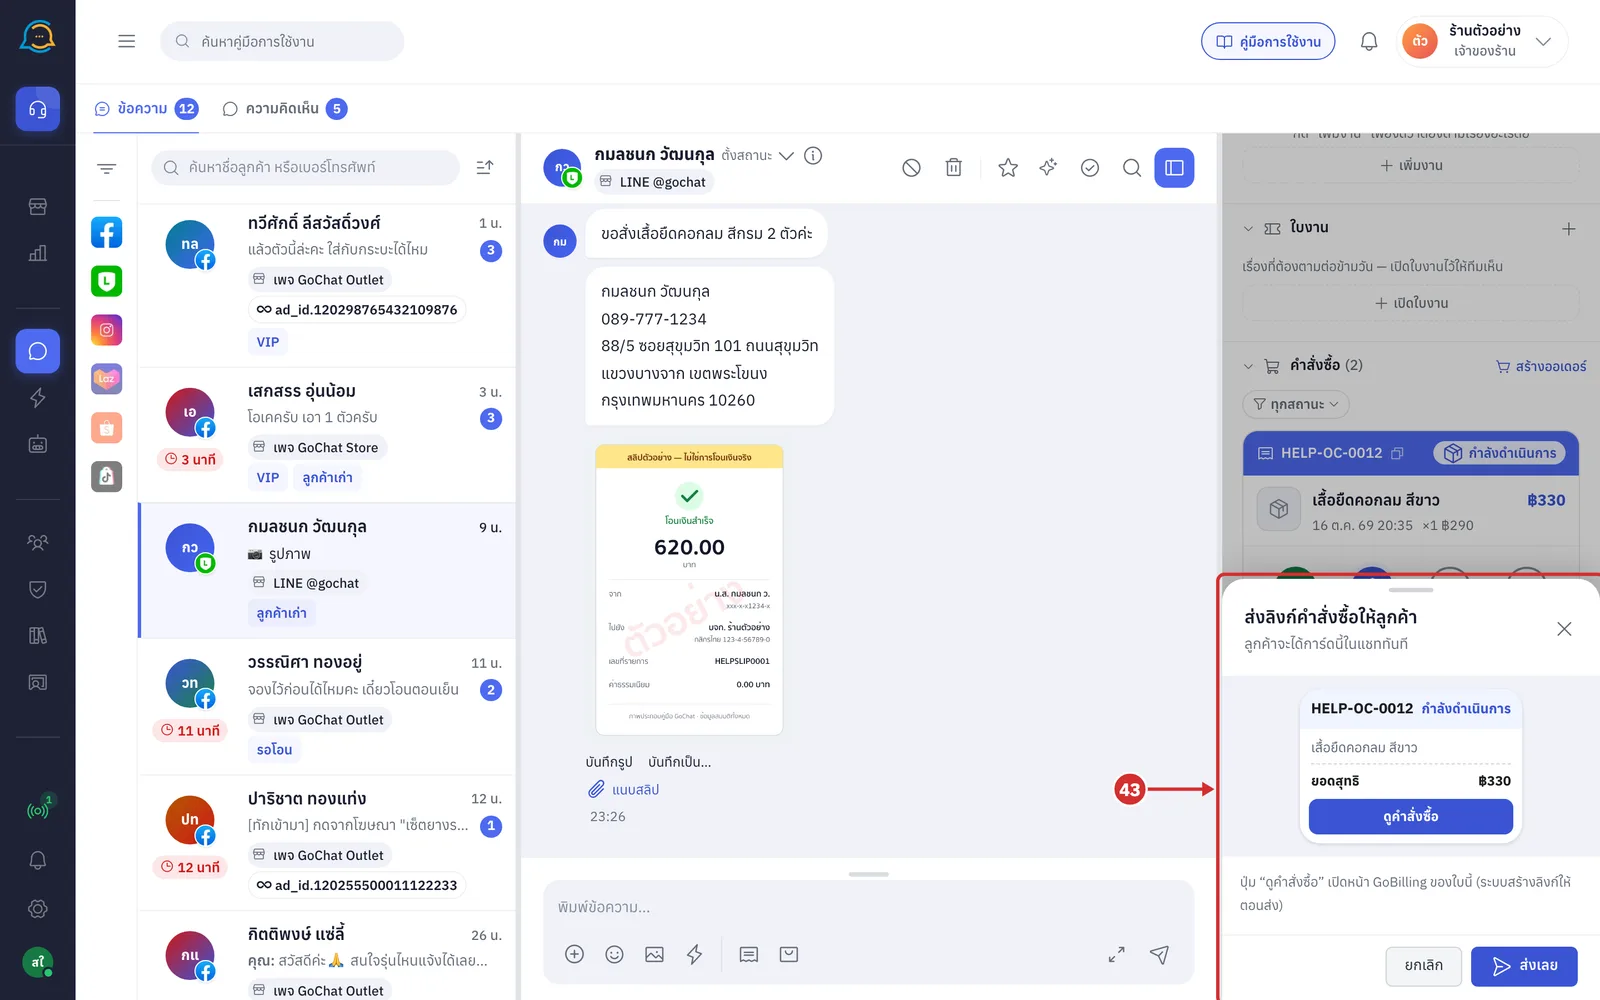
Click ส่งลิงก์ (Send link). The ส่งลิงก์คำสั่งซื้อให้ลูกค้า (Send order link to customer) sheet opens with a preview of the card the customer will get in the chat
The ดูคำสั่งซื้อ (View order) button on the card opens this order's GoBilling page; if there is no link yet, the system creates one when sending
Click ส่งเลย (Send now) to send the card to the customer's chat straight away, or ยกเลิก (Cancel) to close the sheet
If the chat's phone number belongs to several customers, the sheet says whose order this is
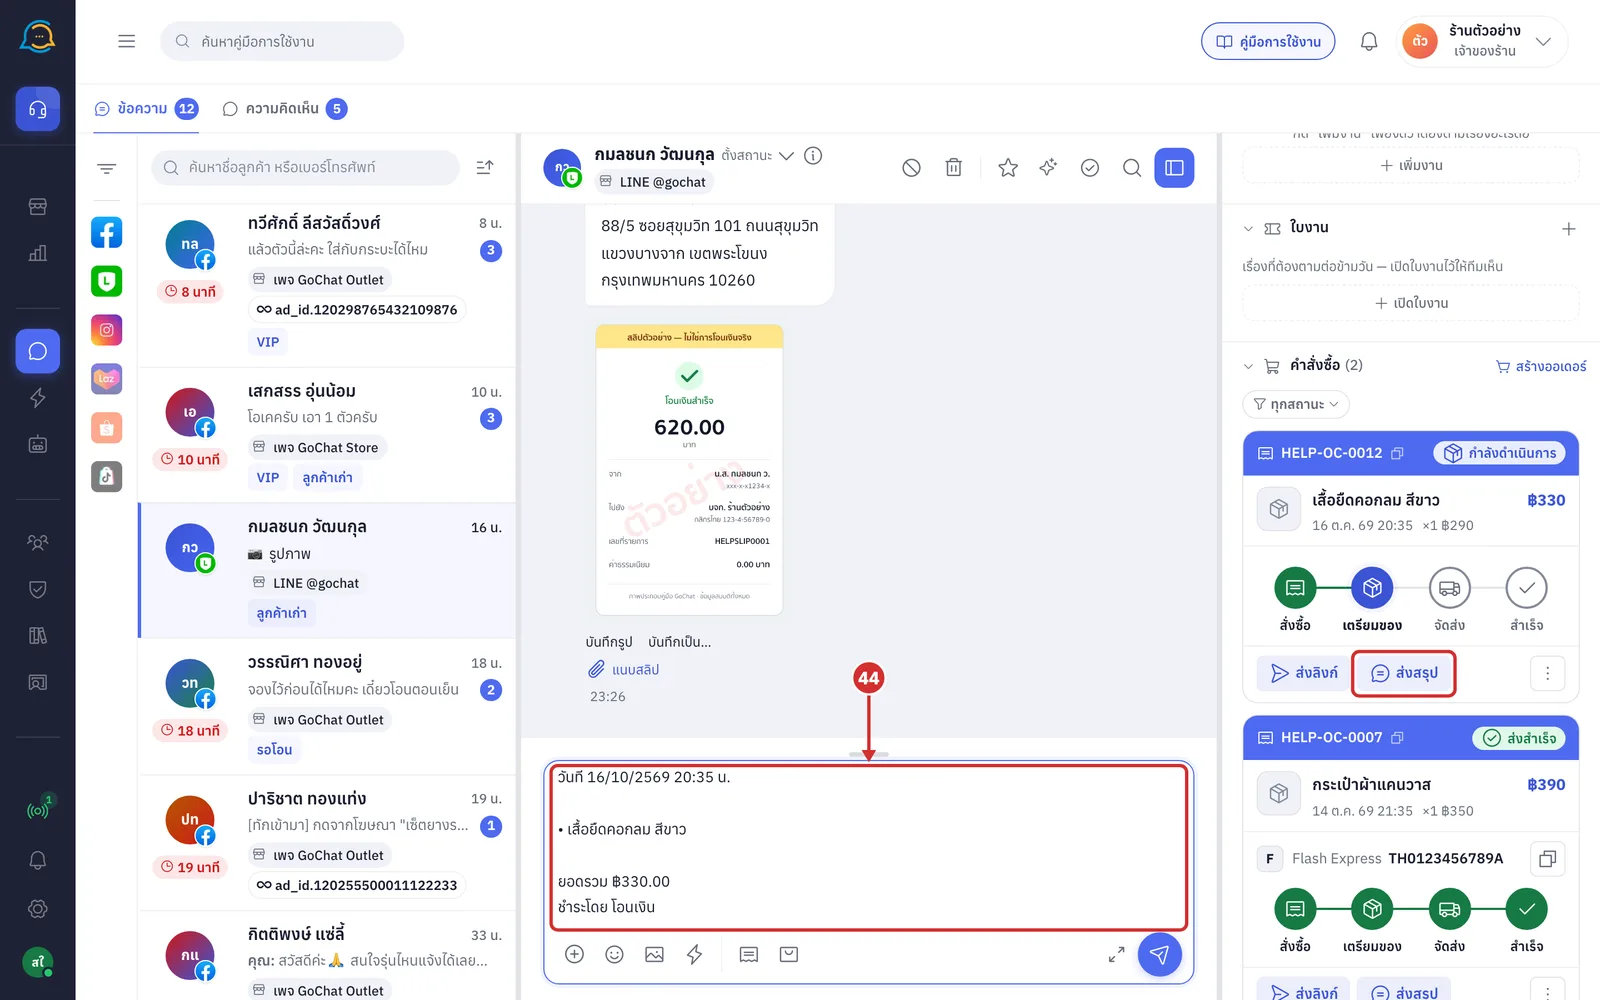
Click ส่งสรุป (Send summary). The system puts an order summary in this chat's message box without sending it, so you can edit it before you send
The summary has the order number, date, products, total and payment method, plus the tracking number when there is one
Orders you just keyed in this browser tab get the full summary, which also has shipping, discount, amount paid and balance
If the message box already has text, the summary is added after it
Orders just saved on an account whose สรุปคำสั่งซื้อ (Order summary) auto-reply sends the summary do not have this button
Minimising and closing an unsaved form
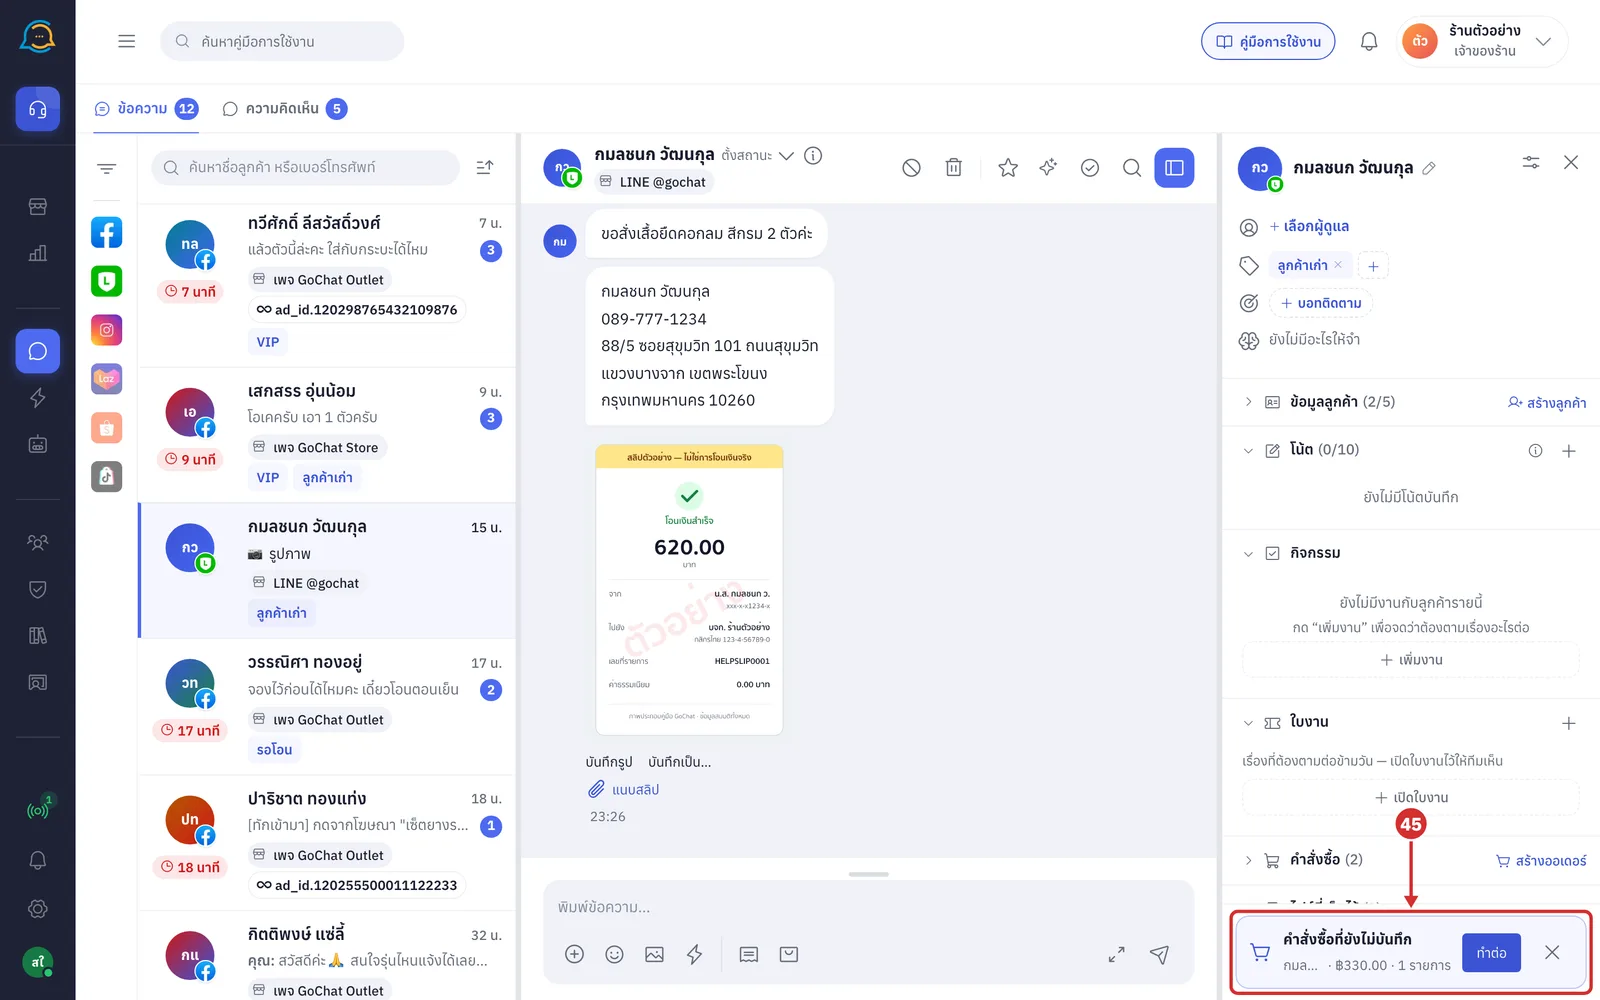
Click ย่อเก็บไว้ (Minimise) on the form header to set the form aside and go back to the other sections of the right panel. A คำสั่งซื้อที่ยังไม่บันทึก (Unsaved order) bar appears at the bottom of the panel with the customer name, amount and number of items
Click × on the bar (ทิ้งคำสั่งซื้อที่ยังไม่บันทึก (Discard unsaved order)) to discard the form. If you have entered details, the system opens the form again and asks before discarding
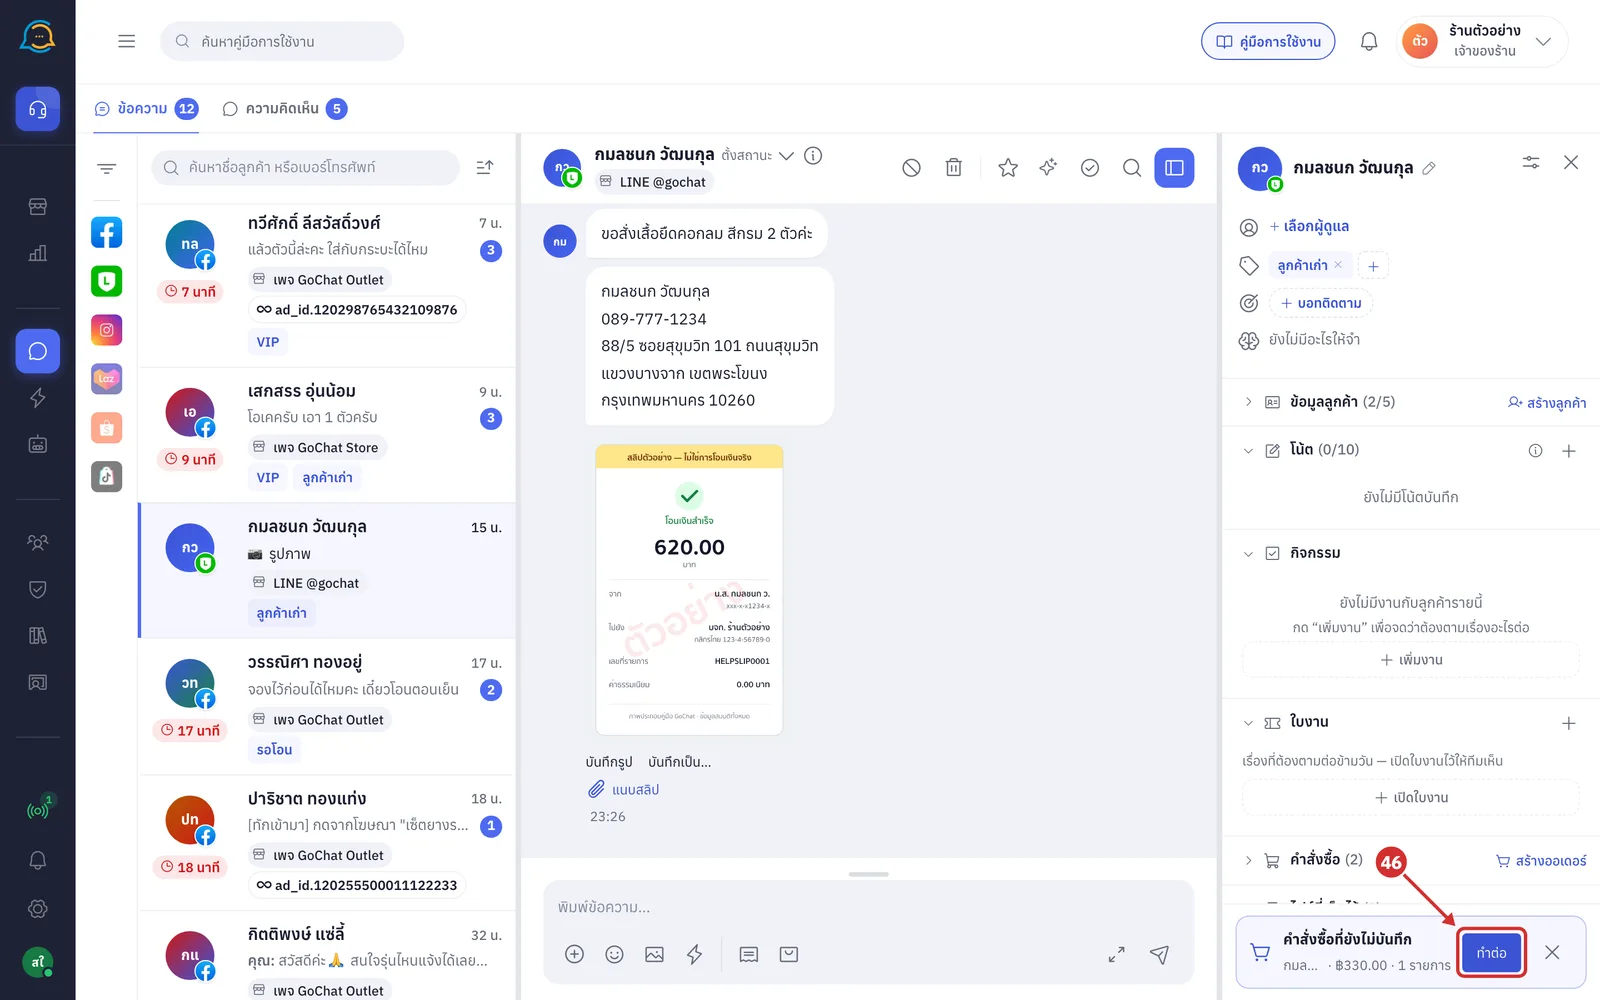
Click ทำต่อ (Continue) on the bar to reopen the same form with everything you entered
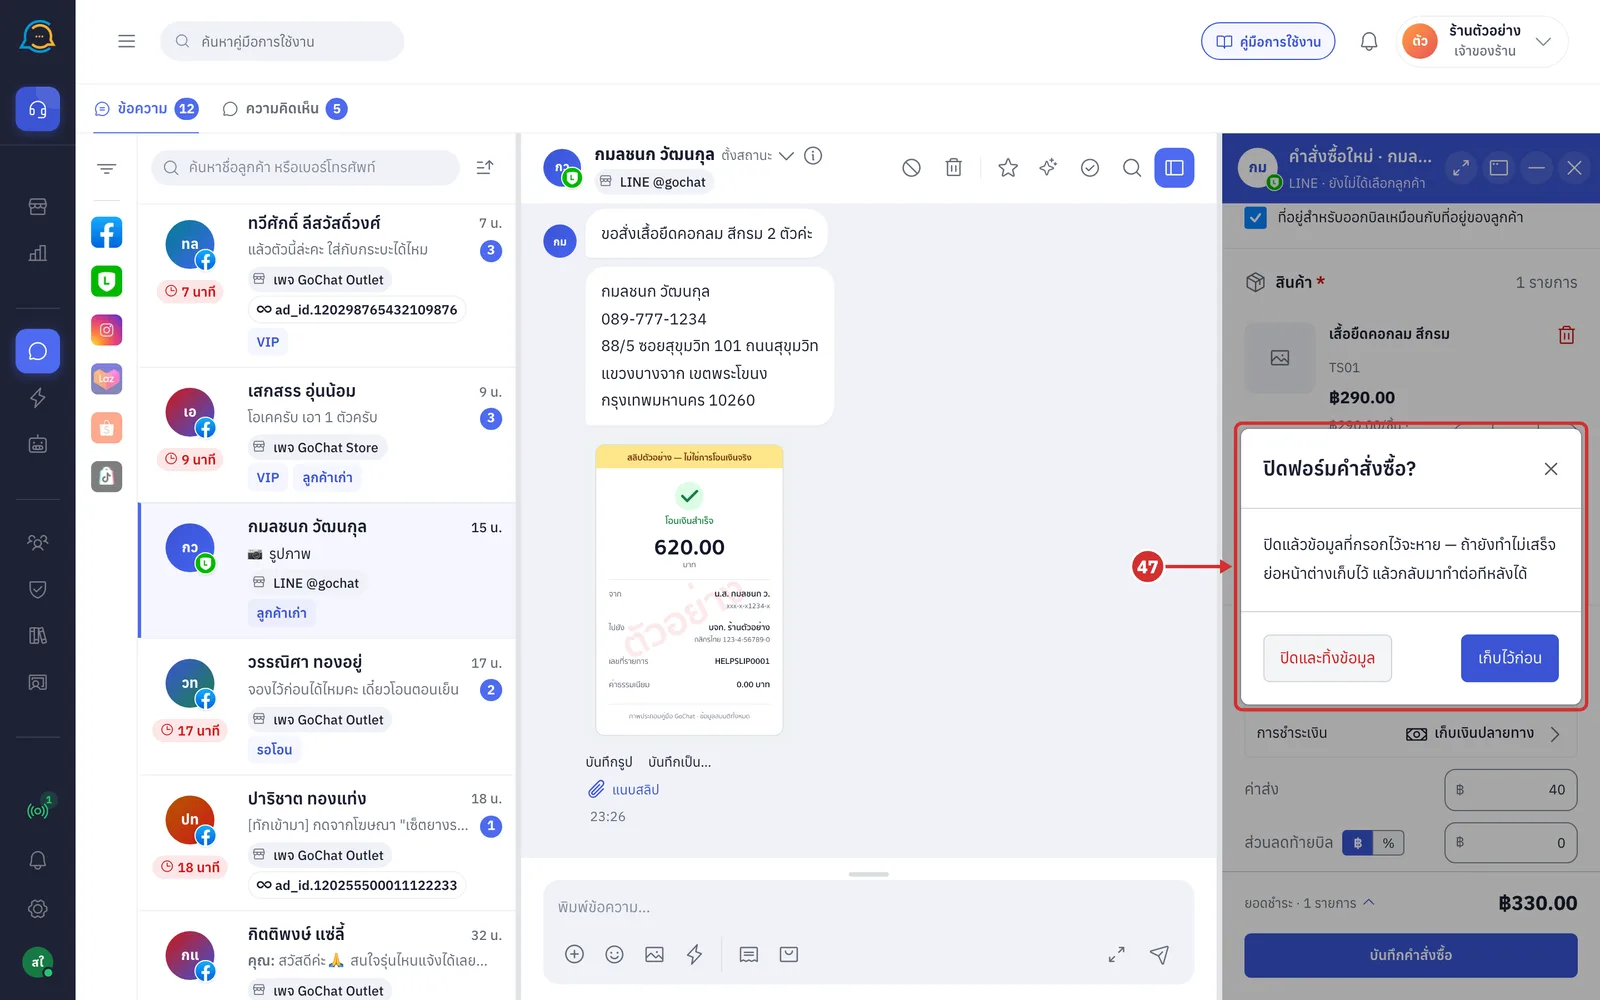
Click ปิด (Close) on the form header or press Esc. If you have entered details, the system shows ปิดฟอร์มคำสั่งซื้อ? (Close the order form?) saying ปิดแล้วข้อมูลที่กรอกไว้จะหาย — ถ้ายังทำไม่เสร็จ ย่อหน้าต่างเก็บไว้ แล้วกลับมาทำต่อทีหลังได้ (Closing loses what you entered — if you are not done, minimise it and come back later)
ปิดและทิ้งข้อมูล (Close and discard) closes the form and discards what you entered
เก็บไว้ก่อน (Keep for now) minimises the form instead of closing it
Click × in the box or press Esc to go back to the form
If you have not entered anything beyond what the system filled in, the form closes straight away without asking
About keying orders
All prices, discounts, tax and totals come from GoSaaS; the system never saves an order with an estimate
If your internet drops while filling in, the system shows ออฟไลน์ — กรอกต่อได้ ค่าที่กรอกไม่หาย · คำนวณยอดและบันทึกได้เมื่อกลับมาออนไลน์ (Offline — keep filling in, nothing is lost · totals and saving work when back online)
If the connection fails when you save, the system shows เชื่อมต่อไม่ได้ — กดบันทึกอีกครั้งได้ ไม่เกิดออเดอร์ซ้ำ (Could not connect — save again, no duplicate order is created); saving again does not create a second order
If your GoSaaS sign-in has expired, the system shows เข้าสู่ระบบ GoSaaS ใหม่ (แท็บใหม่) (Sign in to GoSaaS again (new tab)). After signing in, come back to the original tab and save again; what you entered is still there
If the shop data cannot be loaded, the system shows a warning at the top of the form with a ลองใหม่ (Try again) button
Slip reading reads the picture only and is not verified with the bank. Check the amount and receiving account yourself before saving; duplicate slips are only detected after saving
Slips must be JPG, PNG, GIF or WEBP pictures up to 7 MB and no more than 6,000 pixels on each side
An unsaved form is only kept while the ข้อความ (Messages) page is open. If you refresh the page or close the tab, what you entered is lost