

Setting up keyword replies
The ตอบข้อความตามคีย์เวิร์ด (Keyword replies) topic lets you have the bot send a prepared reply when a customer types a word you set, for example a customer types “ราคา” (price) and the bot sends product images with prices, or types “วิธีสั่งซื้อ” (how to order) and the bot sends the ordering steps. Each set can include text and up to 5 images.
The shop owner and every admin can set up keyword sets. One account can be in many keyword sets. Keyword sets have no date range; the bot keeps answering until you change the set's status to ปิด (Off). Parts every topic shares, such as status, testing and history, are explained in Using the auto-reply bot.
Creating a keyword set
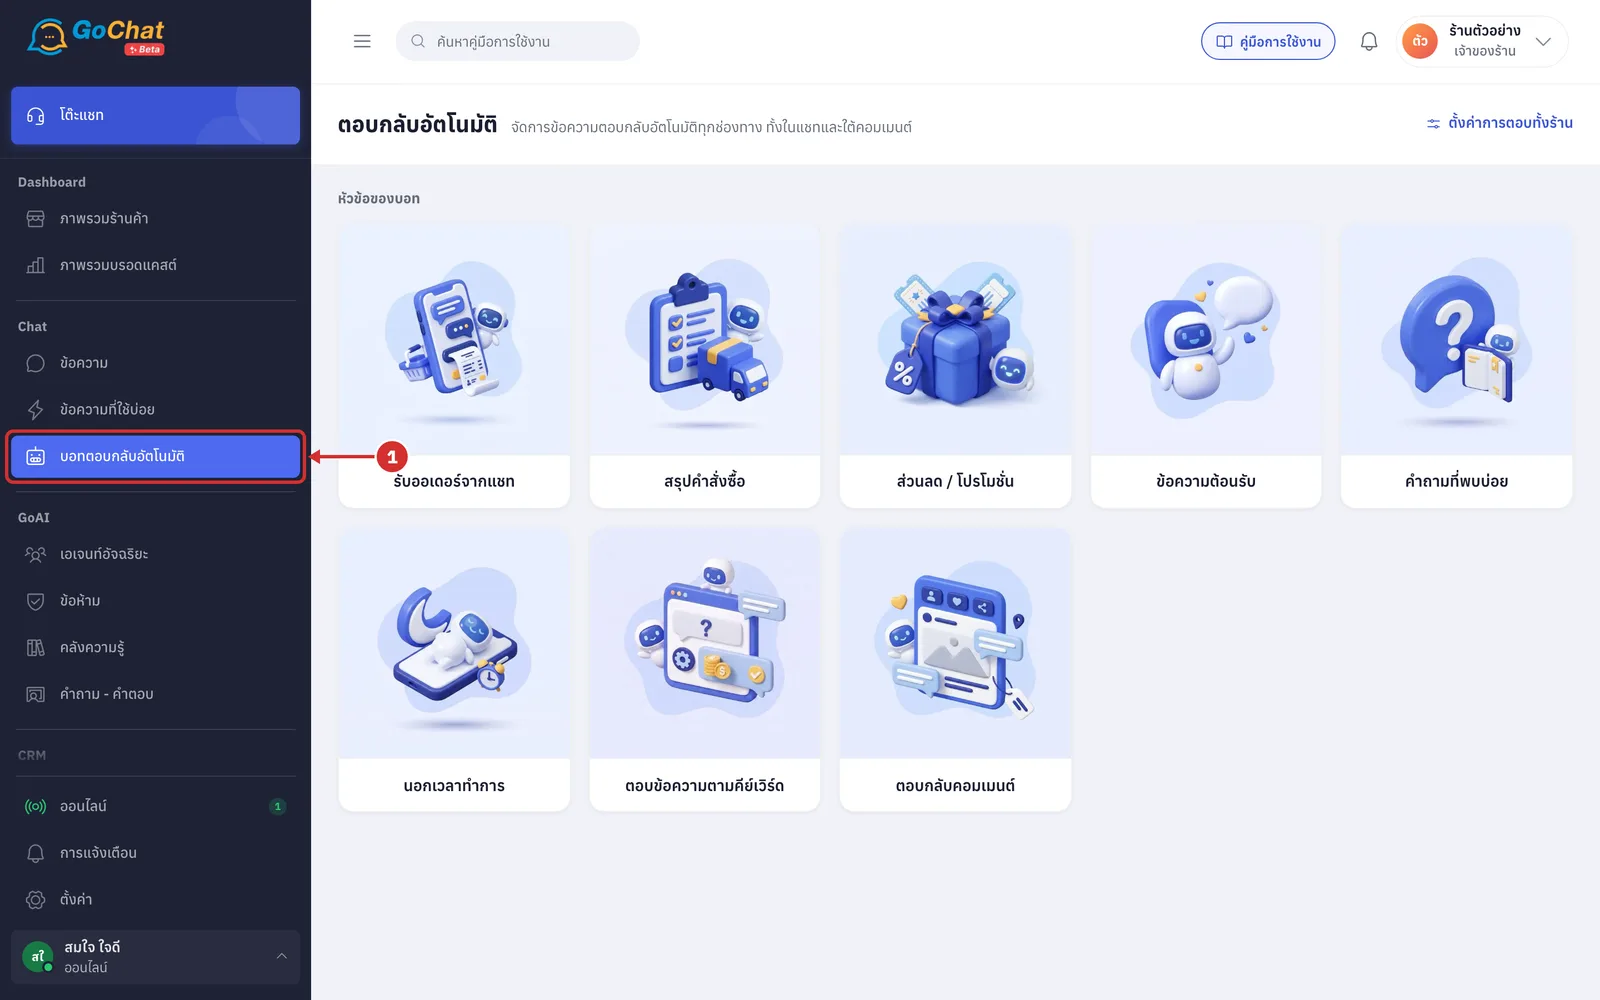
Go to the บอทตอบกลับอัตโนมัติ (Auto-reply bot) menu under Chat in the left menu bar
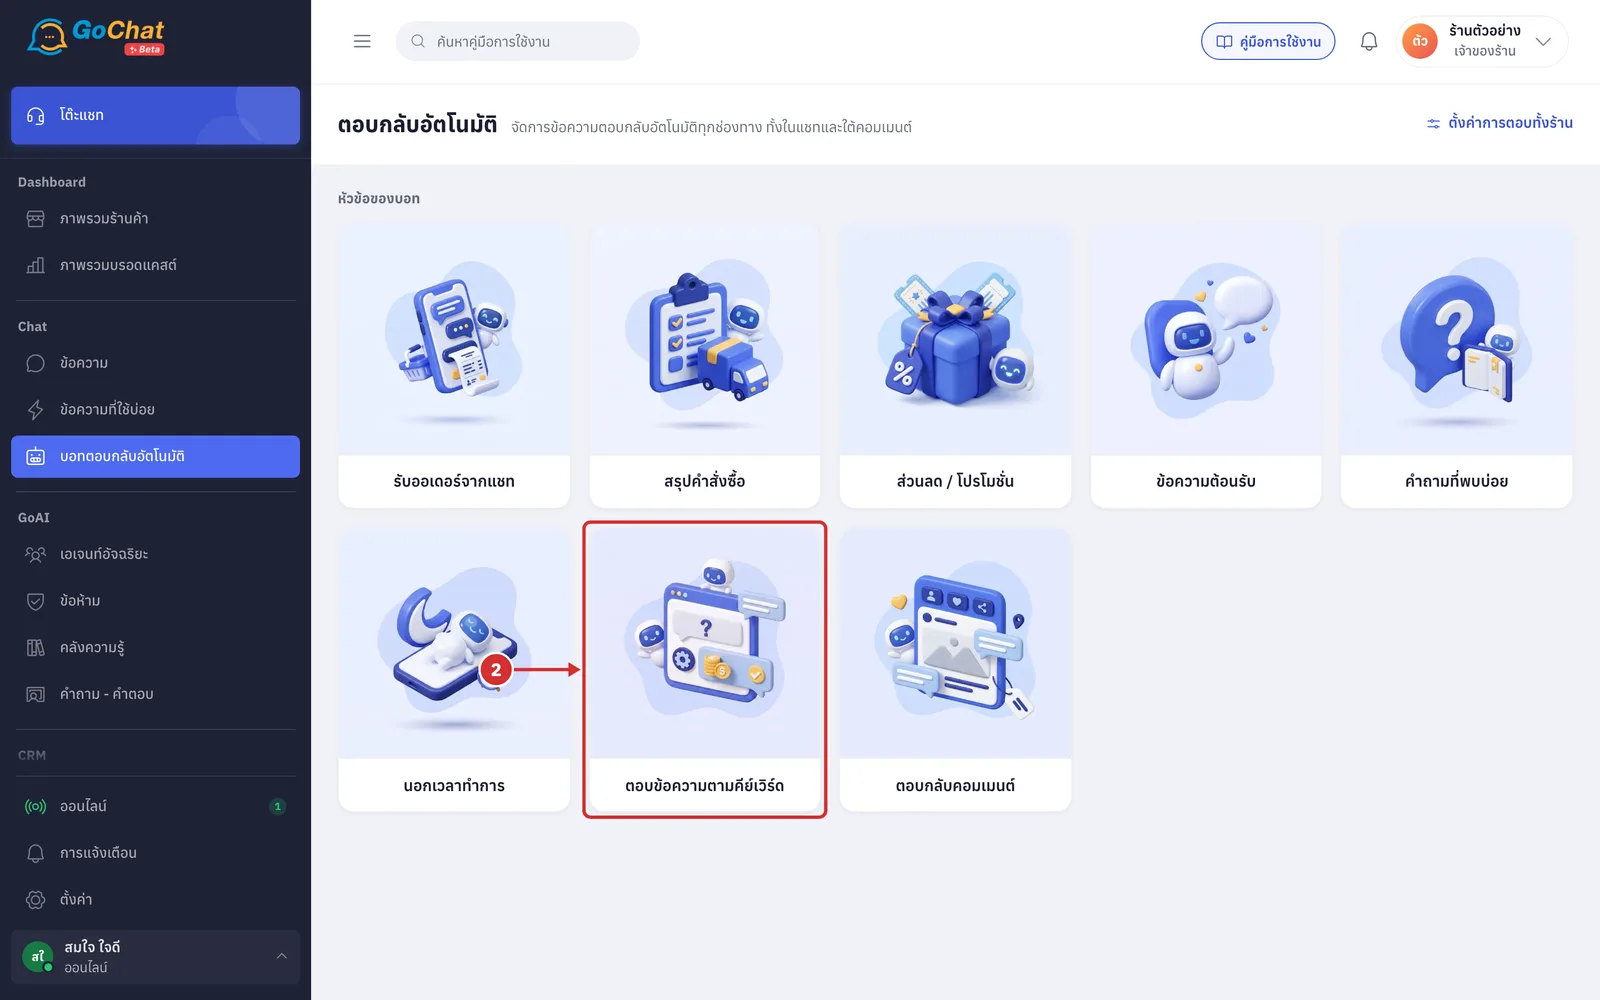
Click the ตอบข้อความตามคีย์เวิร์ด (Keyword replies) card
If your shop has no keyword sets yet, the app opens a new set straight away; skip to step 6
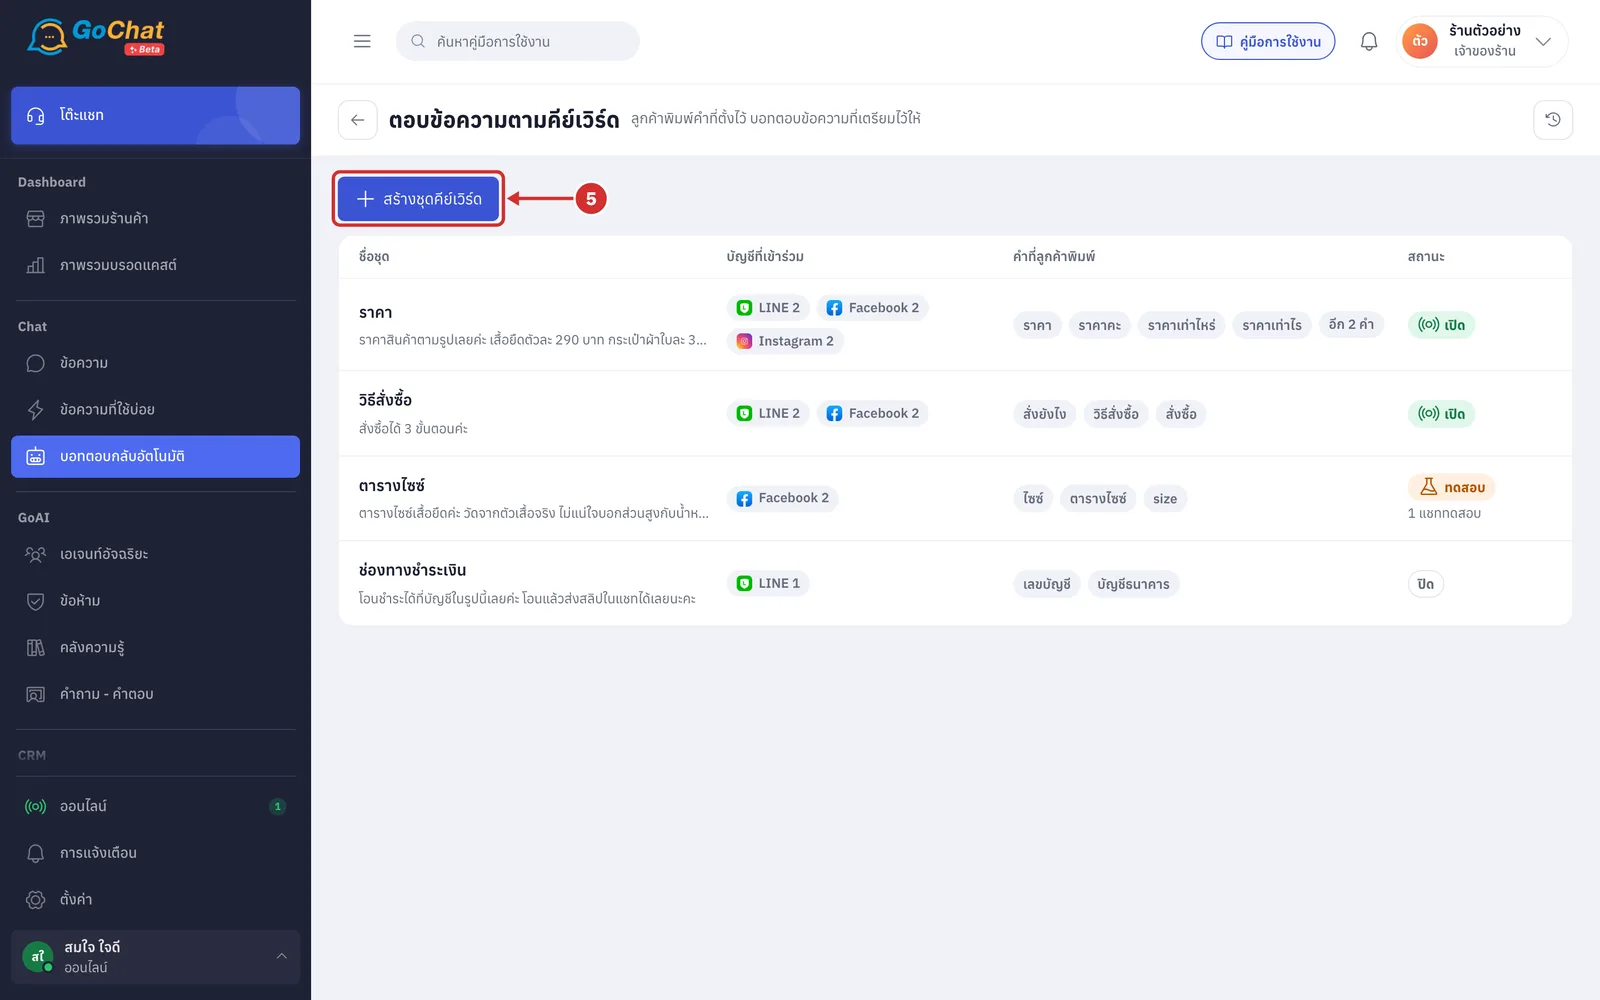
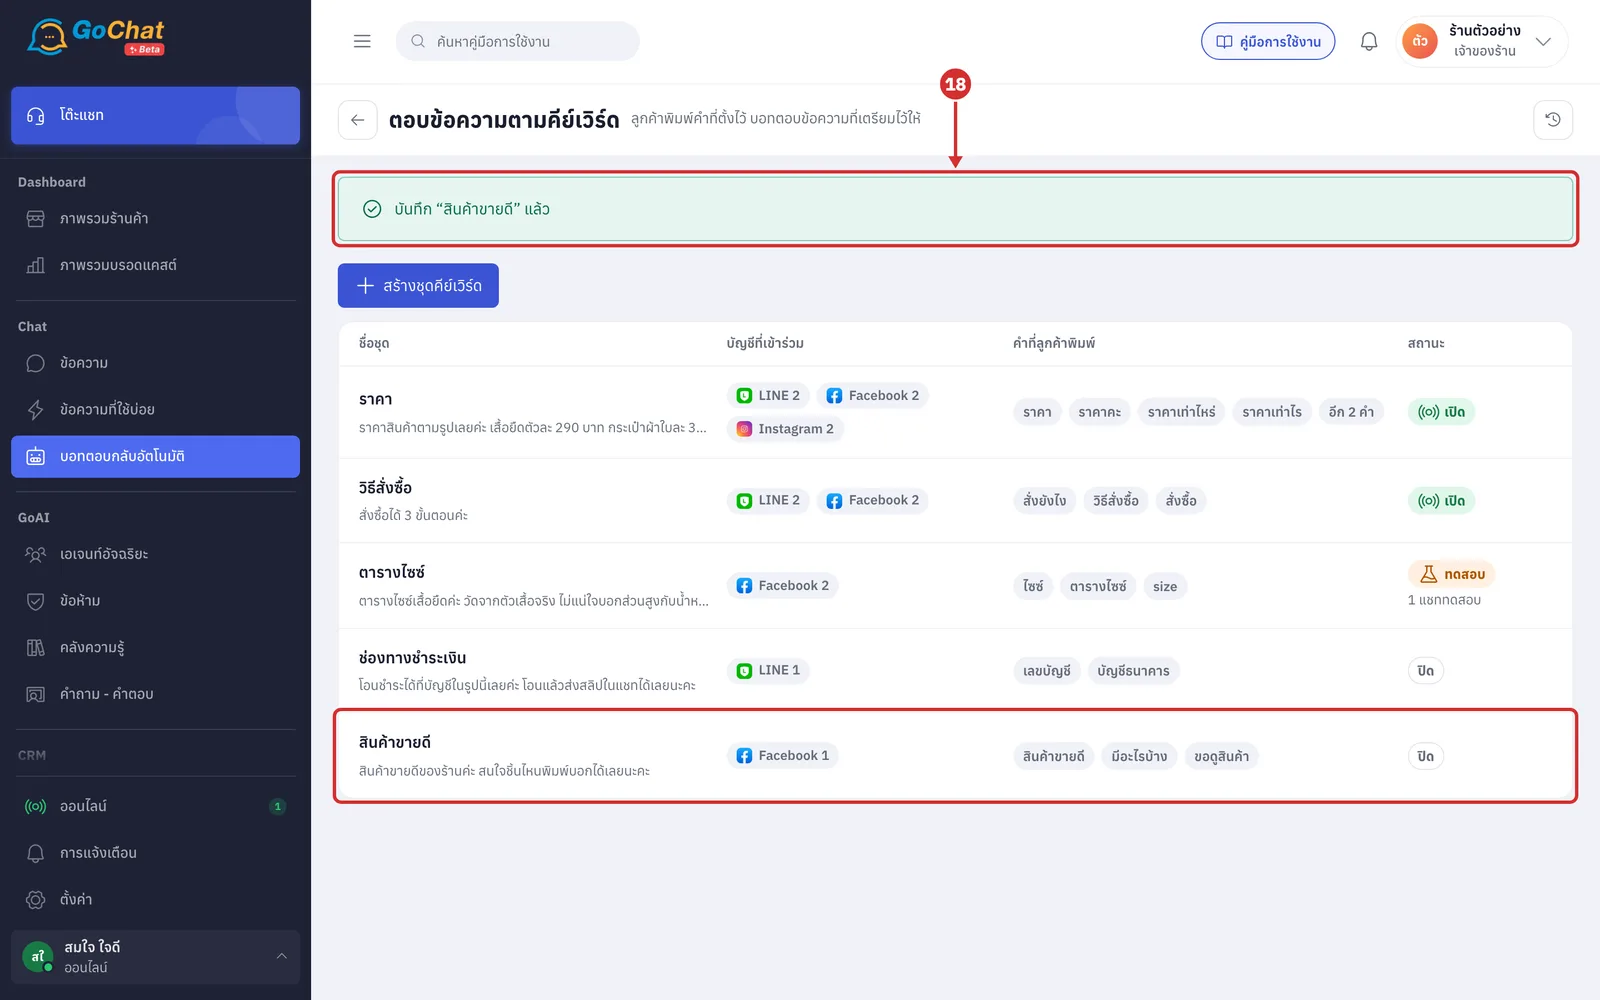
The list page for this topic shows these topic-specific details
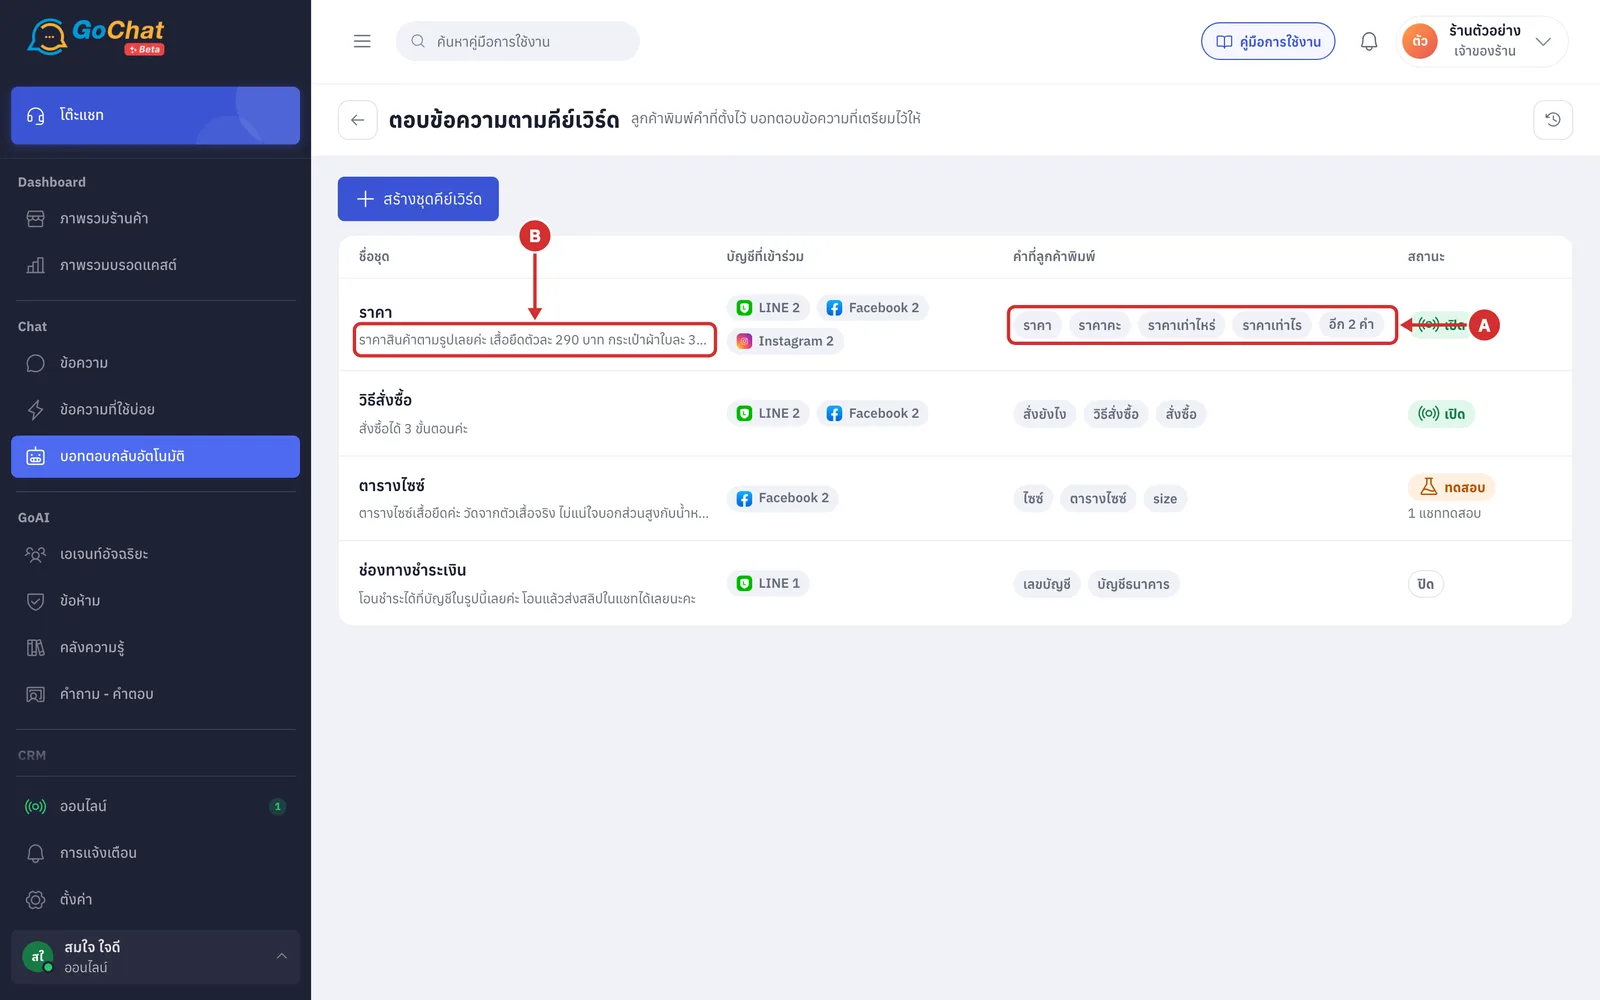
A คำที่ลูกค้าพิมพ์ (Words customers type) — each set's words appear as one chip per word
Up to 4 words are shown; the rest are grouped into an อีก … คำ (… more words) chip
Sets with no words show ยังไม่มีคำ (No words yet)
B Grey line under the set name — the first line of the message the bot sends. Sets with only images show the image count, such as รูป 1 รูป (1 image)
Other parts of the list page, such as accounts and status, are explained in Using the auto-reply bot
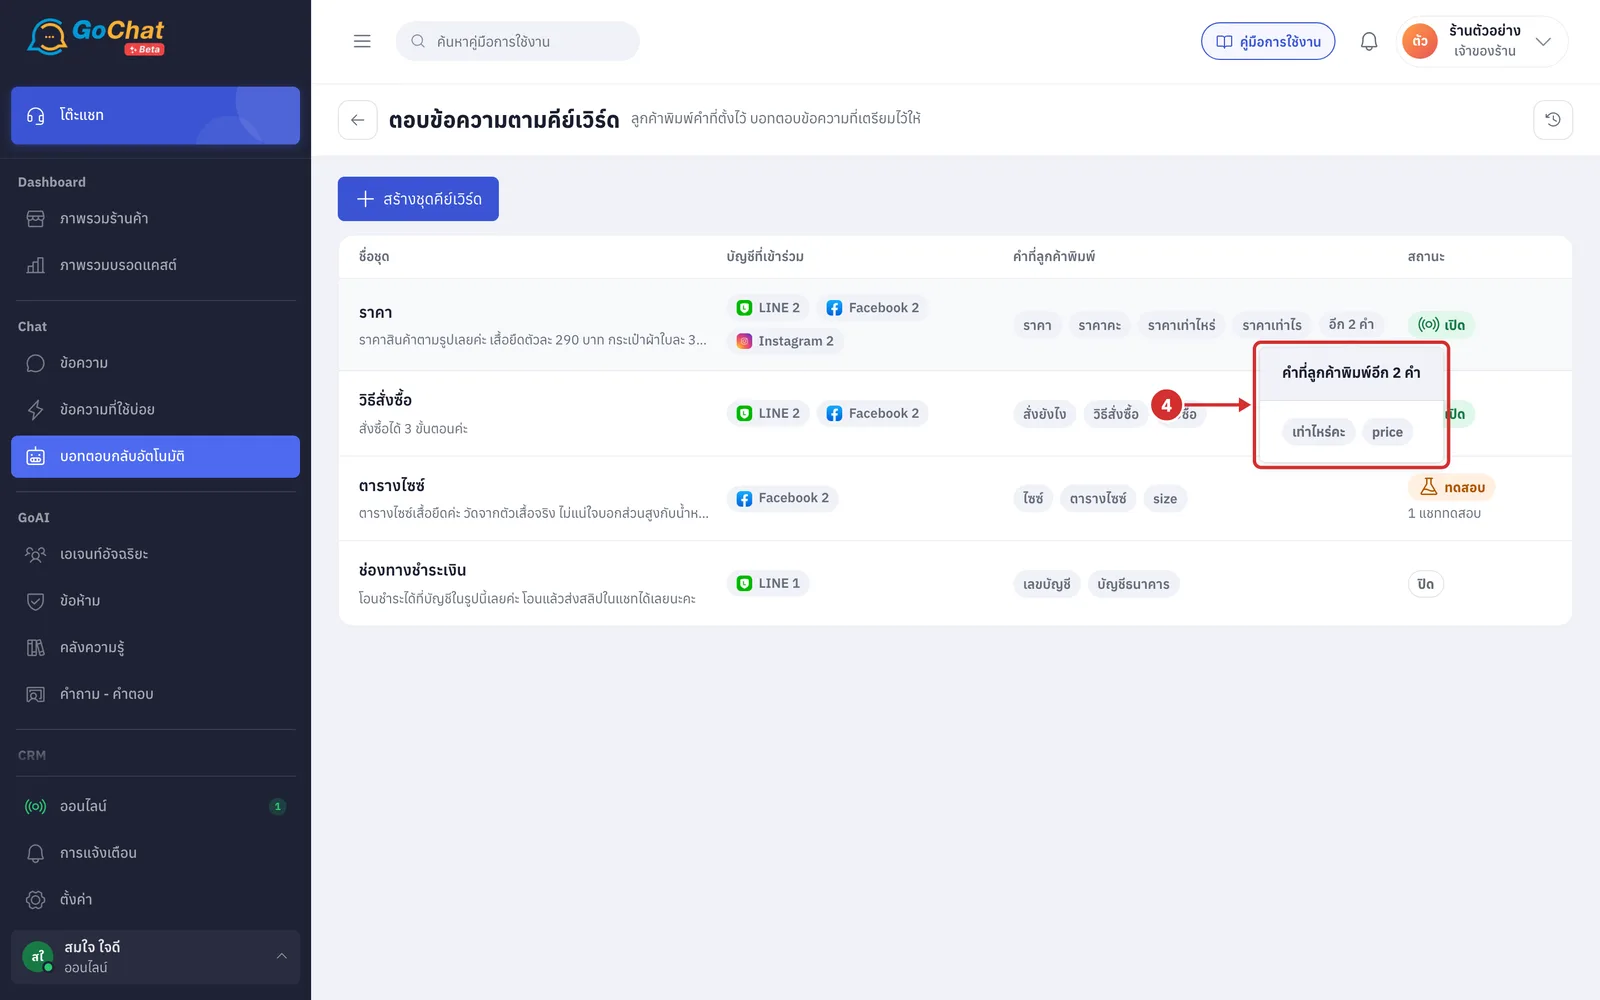
Point to or click the อีก … คำ (… more words) chip to see the set's remaining words (press Esc to close)
Click สร้างชุดคีย์เวิร์ด (Create keyword set) (to edit an existing set, click its name in the list instead)
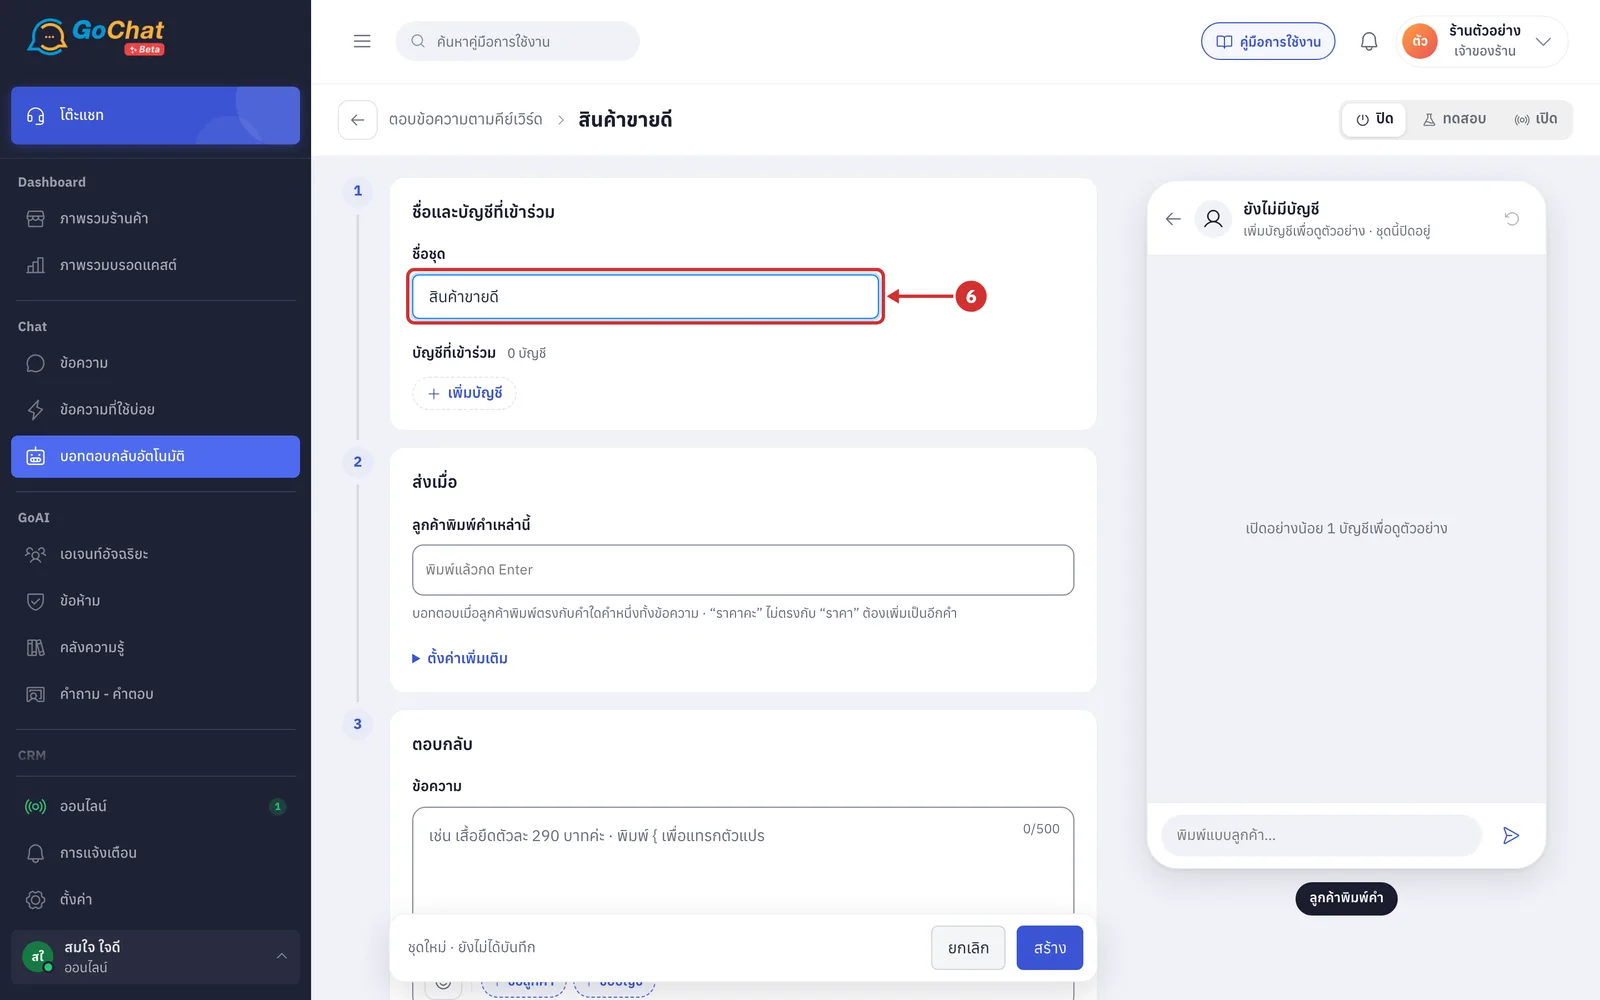
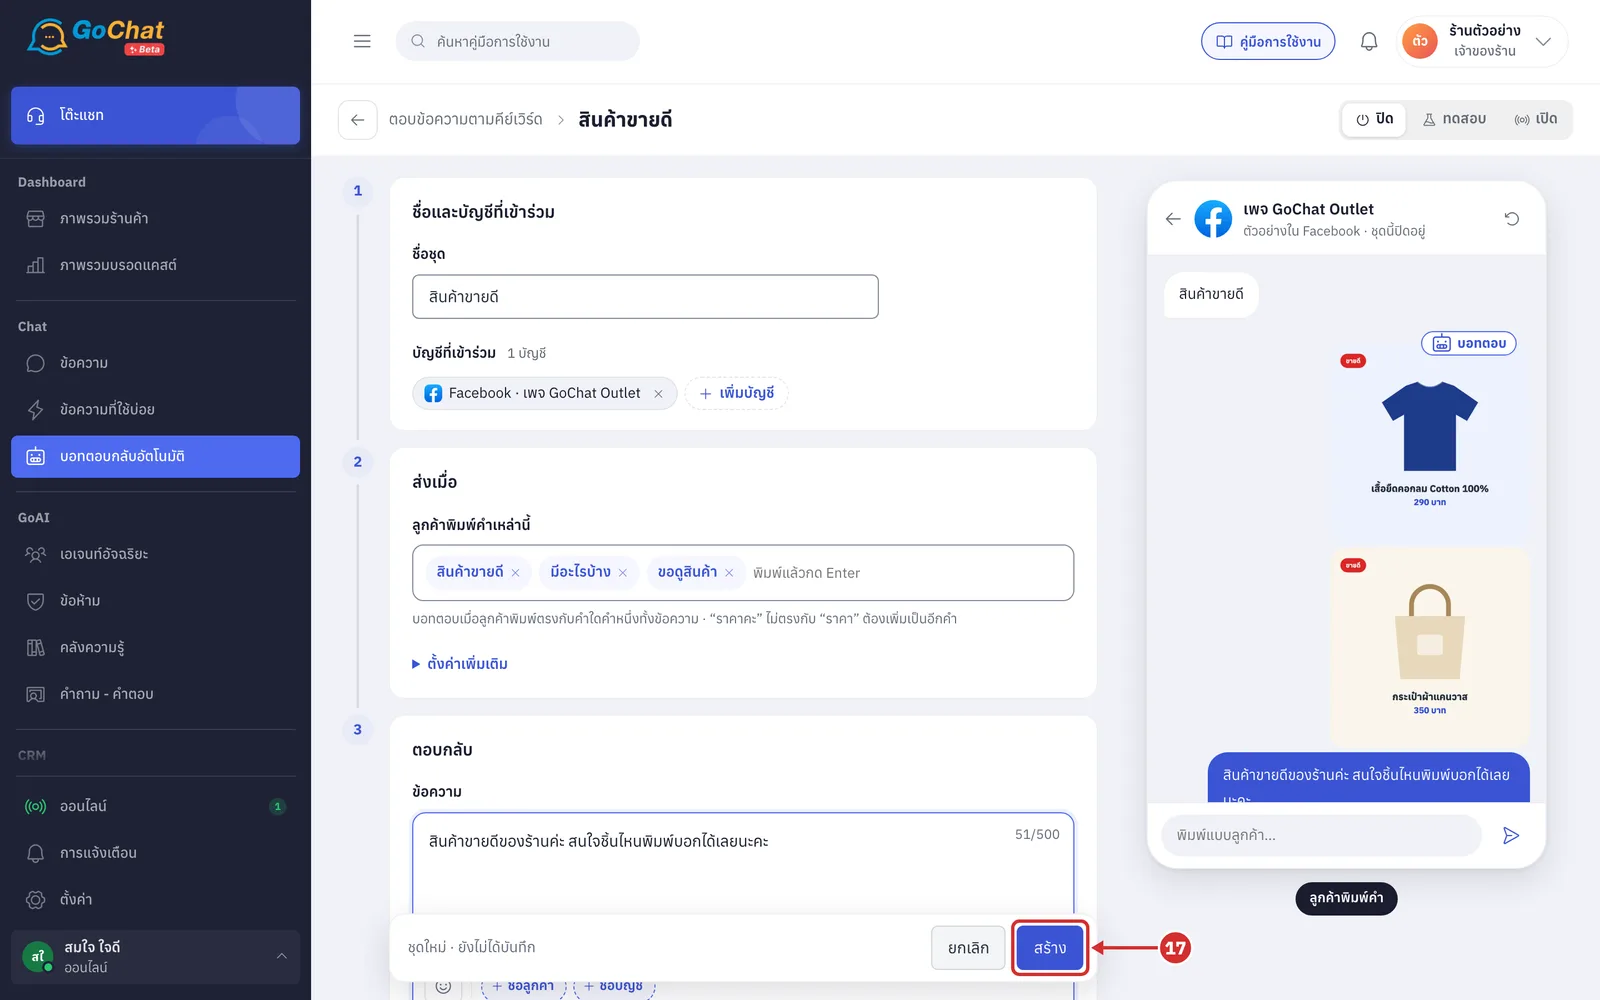
In ชื่อชุด (Set name), enter a name for the set, such as สินค้าขายดี (Best sellers)
This field is required, up to 60 characters
Your team sees the set name in the list; customers do not
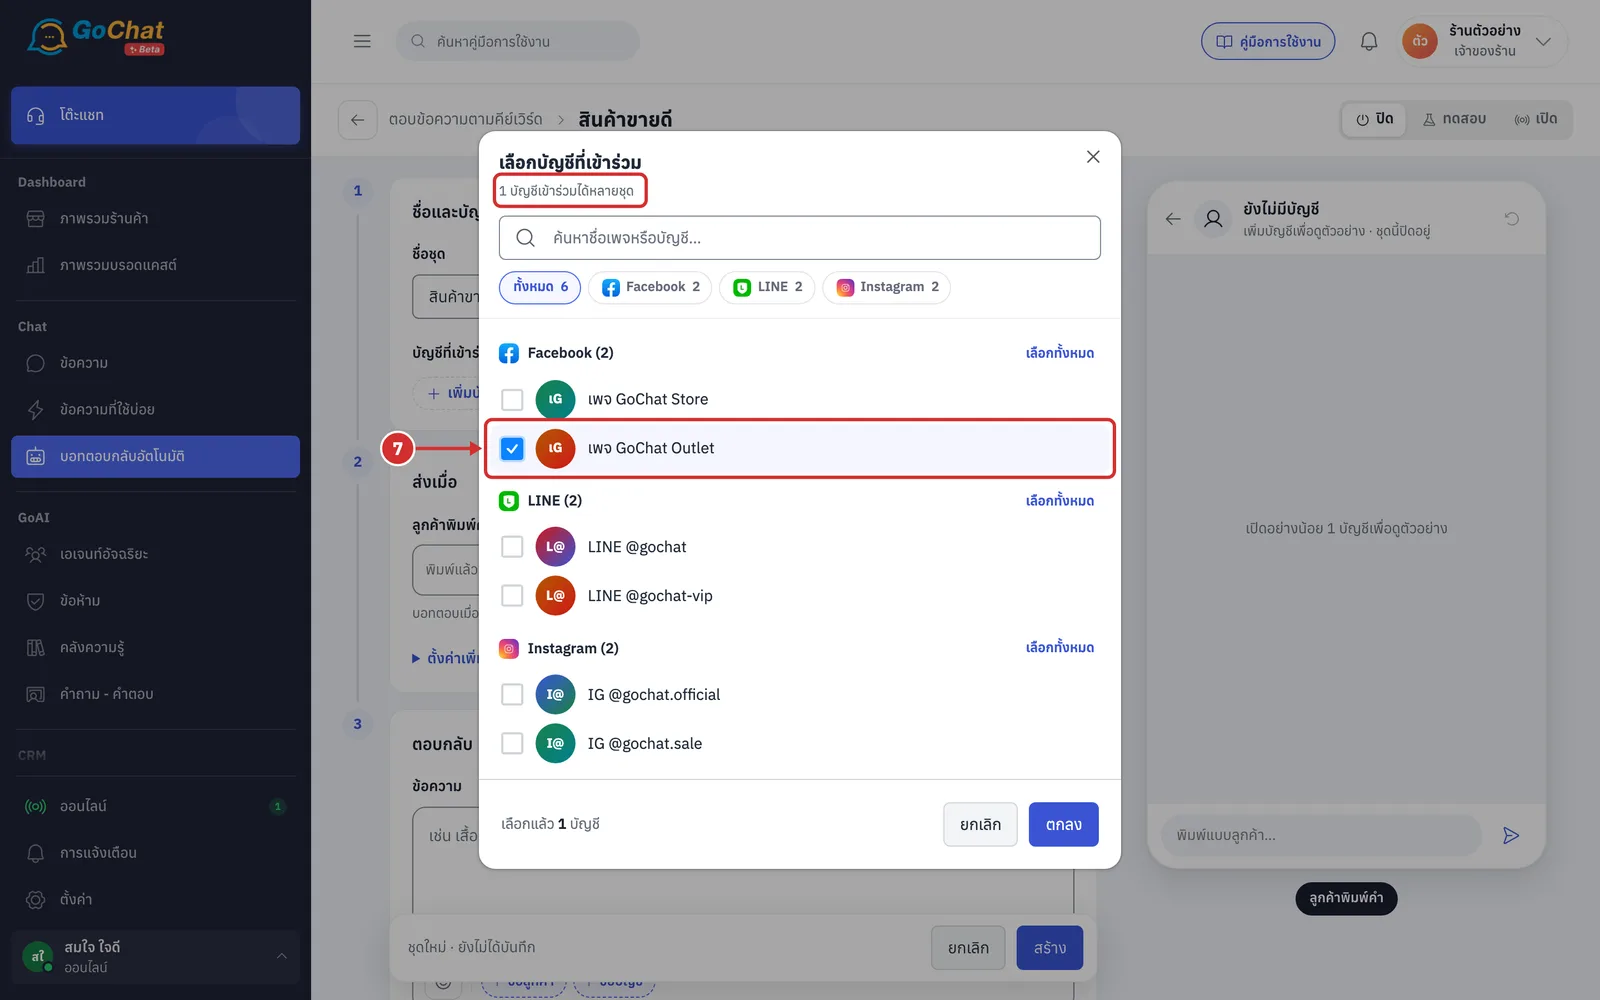
Click เพิ่มบัญชี (Add account) and tick the pages or accounts that will use this set
The window shows 1 บัญชีเข้าร่วมได้หลายชุด (One account can join many sets), so accounts already in another keyword set can still be chosen
Keyword sets work on every channel
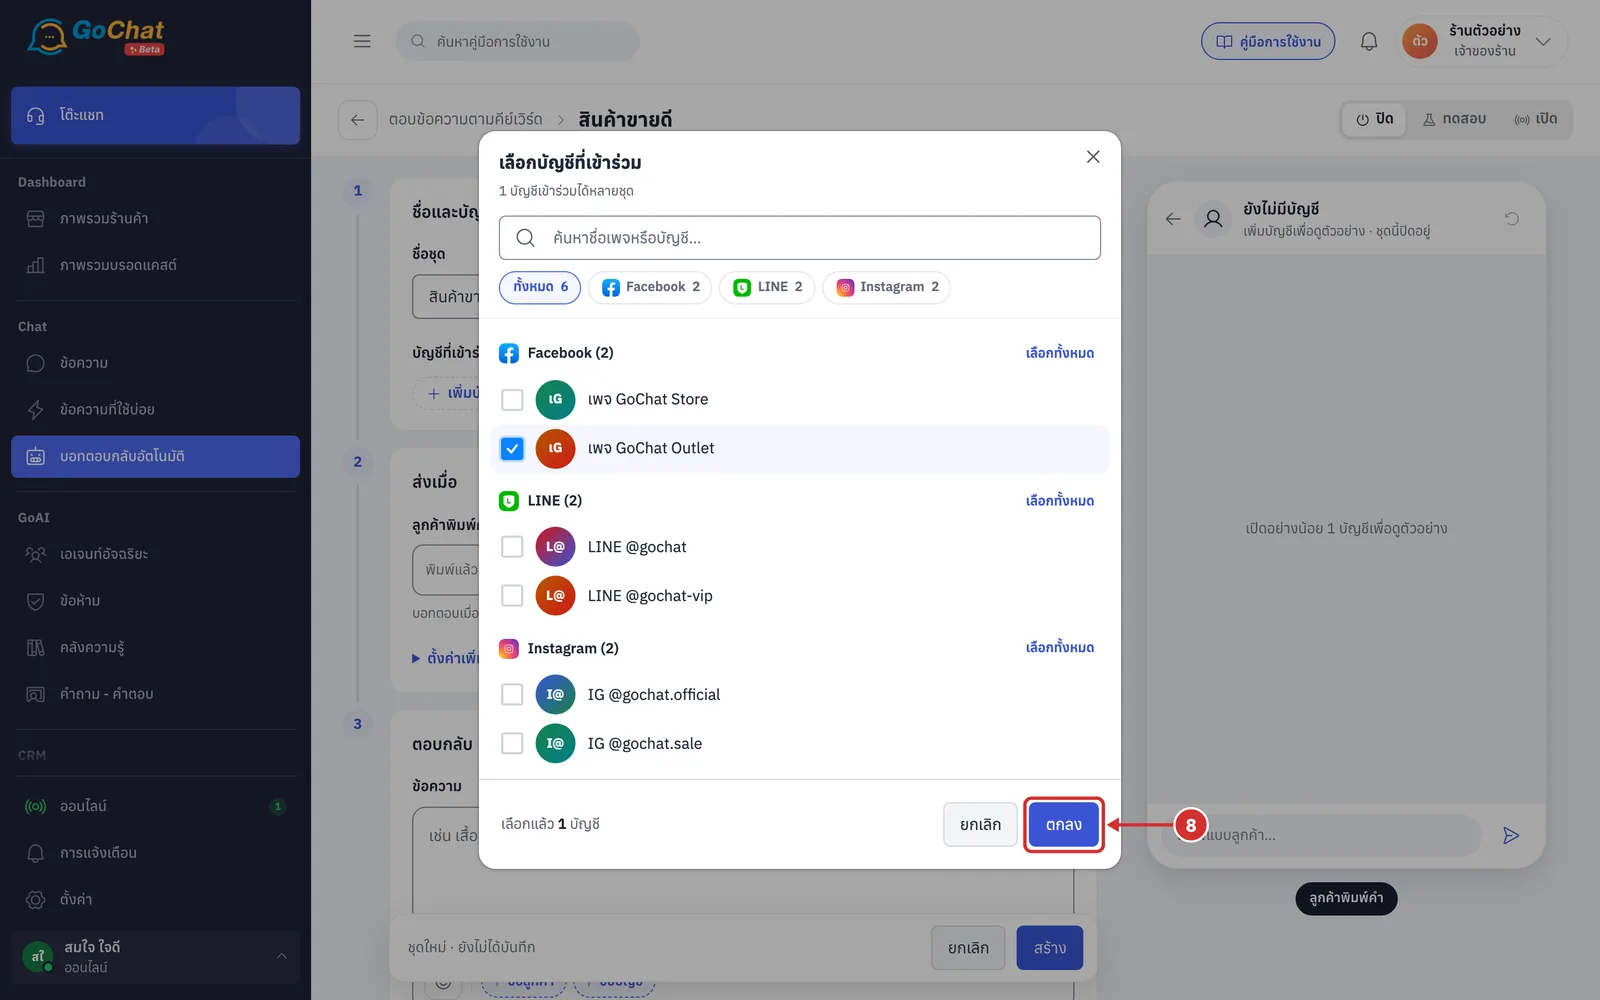
Click ตกลง (OK). The chosen accounts appear under บัญชีที่เข้าร่วม (Accounts)
How keyword matching works
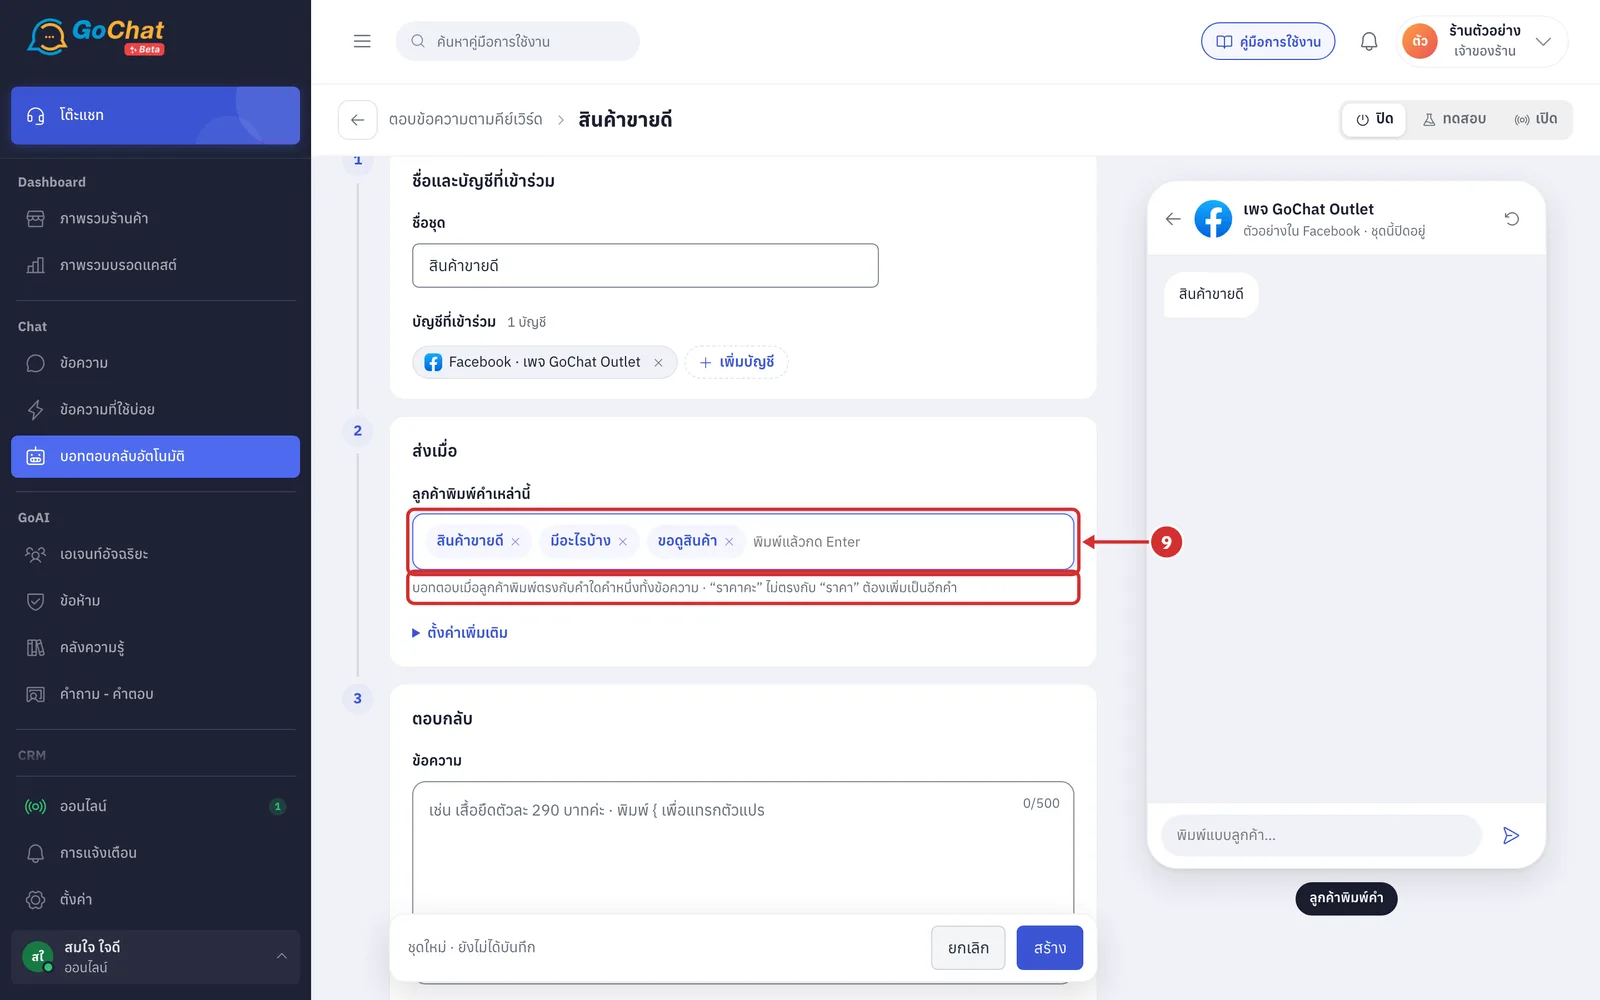
The bot replies when the customer's whole message matches one of the set's words, not when the word only appears somewhere in the message. The line under the field says บอทตอบเมื่อลูกค้าพิมพ์ตรงกับคำใดคำหนึ่งทั้งข้อความ · “ราคาคะ” ไม่ตรงกับ “ราคา” ต้องเพิ่มเป็นอีกคำ (The bot replies when the whole message matches one of the words · “ราคาคะ” does not match “ราคา”; add it as another word). It works like this
With the word ราคา (price), a customer who types “ราคา” gets a reply, but one who types “ราคาคะ” (price, please) or “ราคาเท่าไหร่” (how much) does not
To answer several ways of asking, add each common form as a word of the set, such as ราคา, ราคาคะ and ราคาเท่าไหร่
Spaces before and after the message are ignored, and upper and lower case are treated the same, for example a customer typing “Price” matches the word price
Extra letters or spaces inside the word stop a match, for example “ราคาา” or “รา คา” do not match ราคา
The bot waits for the customer to finish typing (5 seconds of quiet) before it replies. If a customer types “ราคา” and then “ค่ะ” within that time, both are read as one message, so it does not match ราคา
Setting when it is sent
In the ส่งเมื่อ (Sends when) step, type a word customers will type into ลูกค้าพิมพ์คำเหล่านี้ (Customer types these words), then press Enter to add it, one word at a time
Typing a comma (,) or clicking outside the box also adds the word
A word that is already in the list is not added again
Click × on a word to remove it
At least 1 word is required. Without one, you see ใส่คำที่ลูกค้าพิมพ์อย่างน้อย 1 คำ (Add at least 1 word customers type) when you save
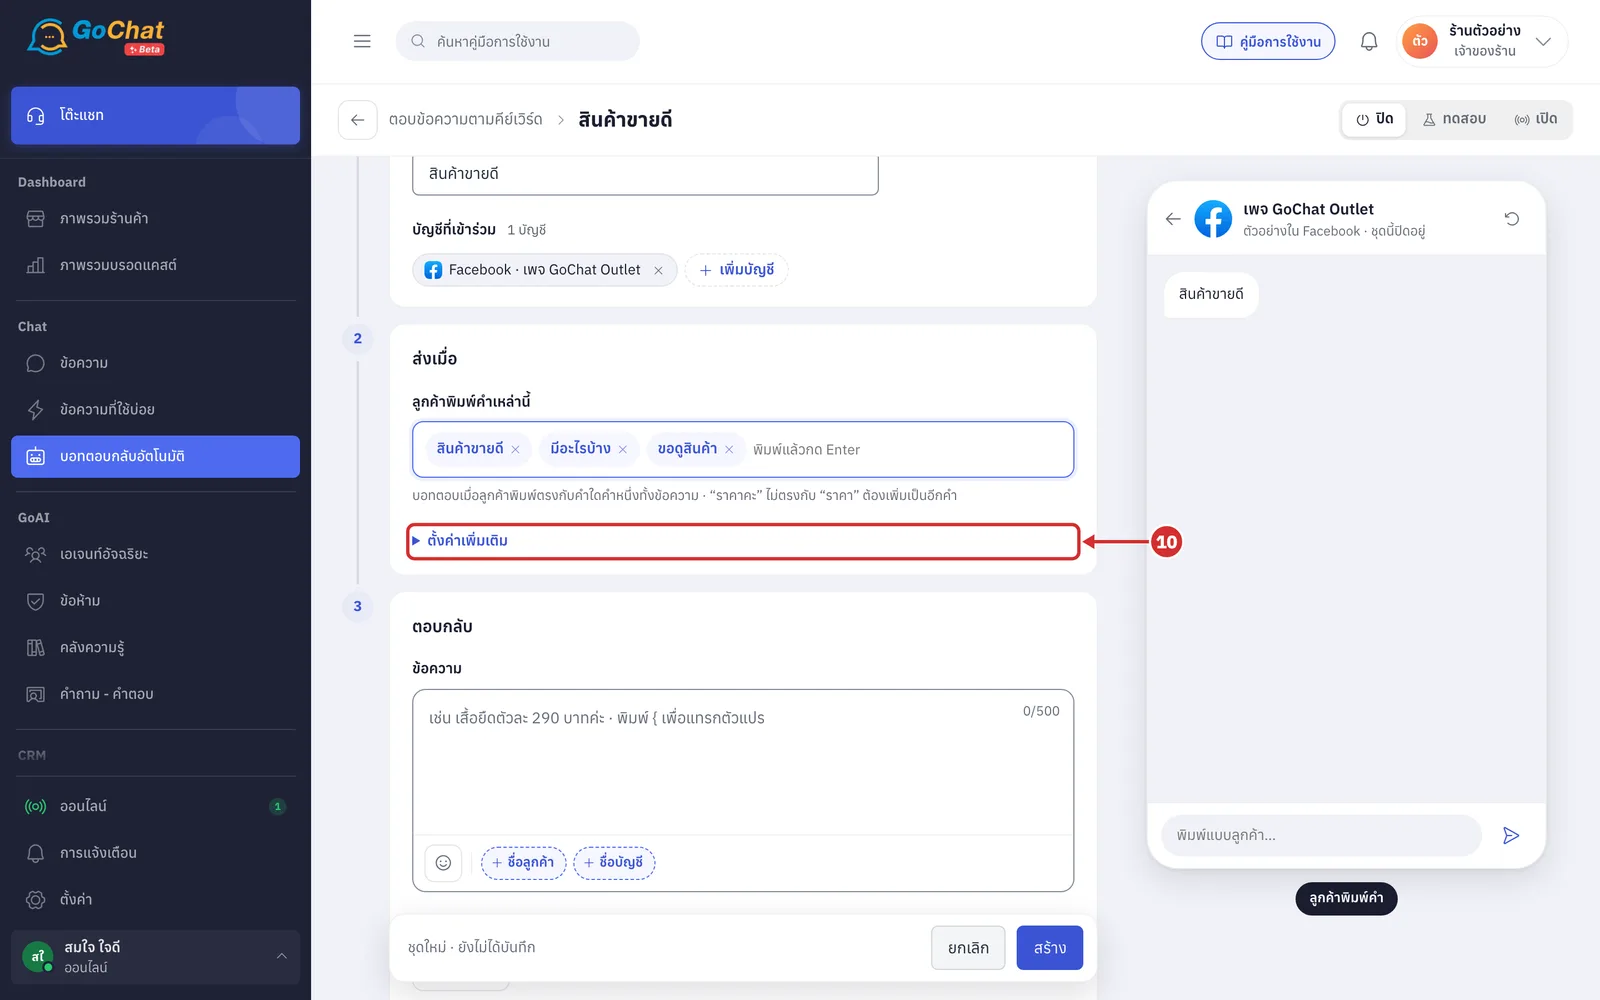
Click ตั้งค่าเพิ่มเติม (More settings) to open the rest of this step
Both fields start at the recommended value; a field at the recommended value shows an แนะนำ (Recommended) badge
If a value is out of range, saving shows ต้องอยู่ระหว่าง … (Must be between …) and opens this part for you
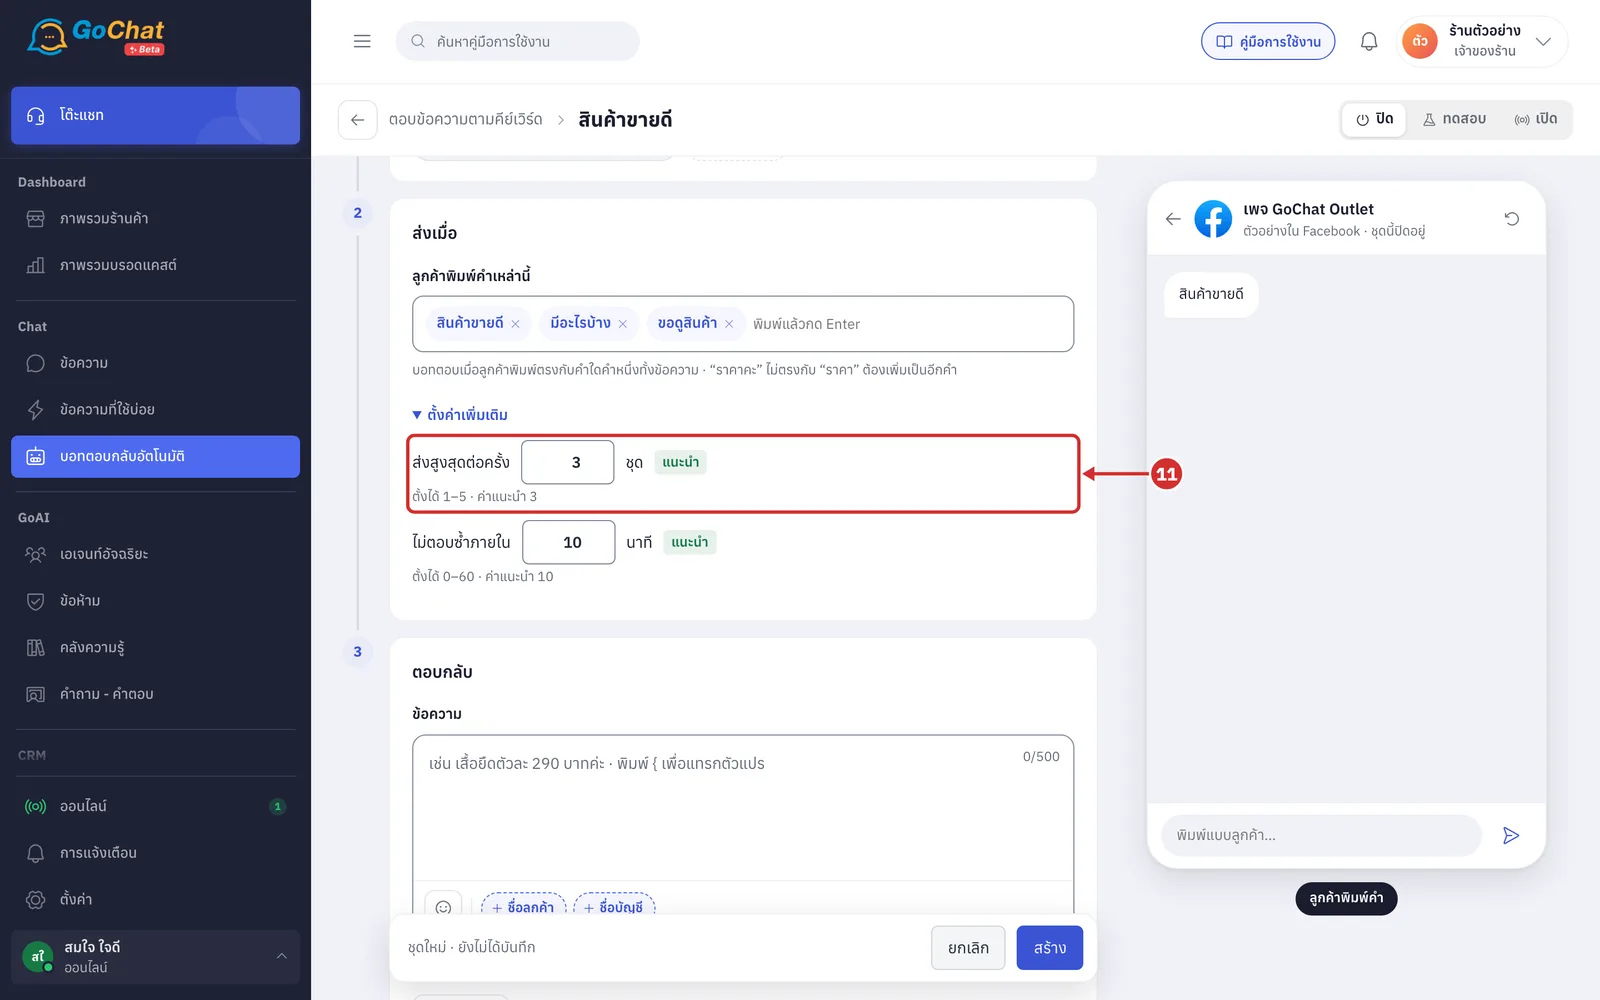
In ส่งสูงสุดต่อครั้ง (Max per reply), enter the number of sets
When a customer's message matches several sets at once, the bot sends no more than this number in one go
Set 1–5 sets; the recommended value is 3
If the matching sets have different values, the bot uses the smallest
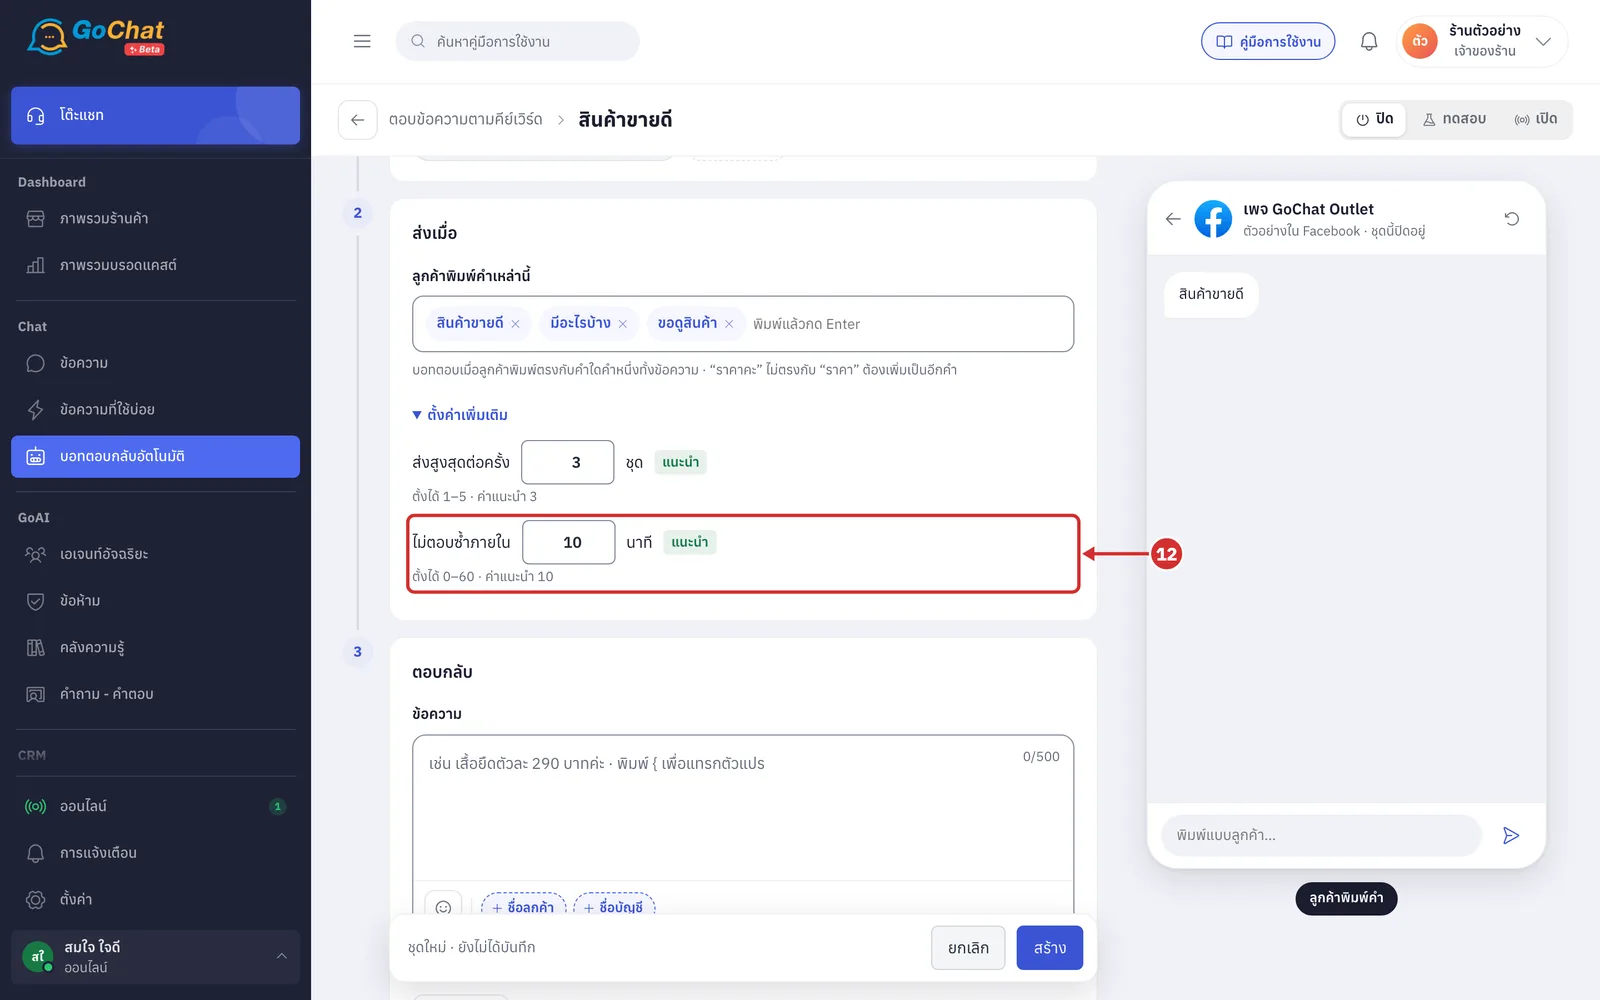
In ไม่ตอบซ้ำภายใน (Don't repeat within), enter the number of minutes
The bot does not send the same set to the same chat again within this time, even if the customer types the word again
Set 0–60 minutes; the recommended value is 10. With 0, the bot sends every time
Sets in test status use the test chats' ส่งซ้ำได้ทุก (Can resend every) gap instead
Setting the reply
In the ตอบกลับ (Reply) step, type the message the bot will send into ข้อความ (Message). You can use these variables
ชื่อลูกค้า (Customer name) — “คุณลูกค้า” (Dear customer) is used when there is no name
ชื่อบัญชี (Account name) — the page or LINE OA the customer messaged
More details
A message or an image is required, so a set with images can leave the message empty
The message can be up to 500 characters
How to insert variables is explained in Using the auto-reply bot
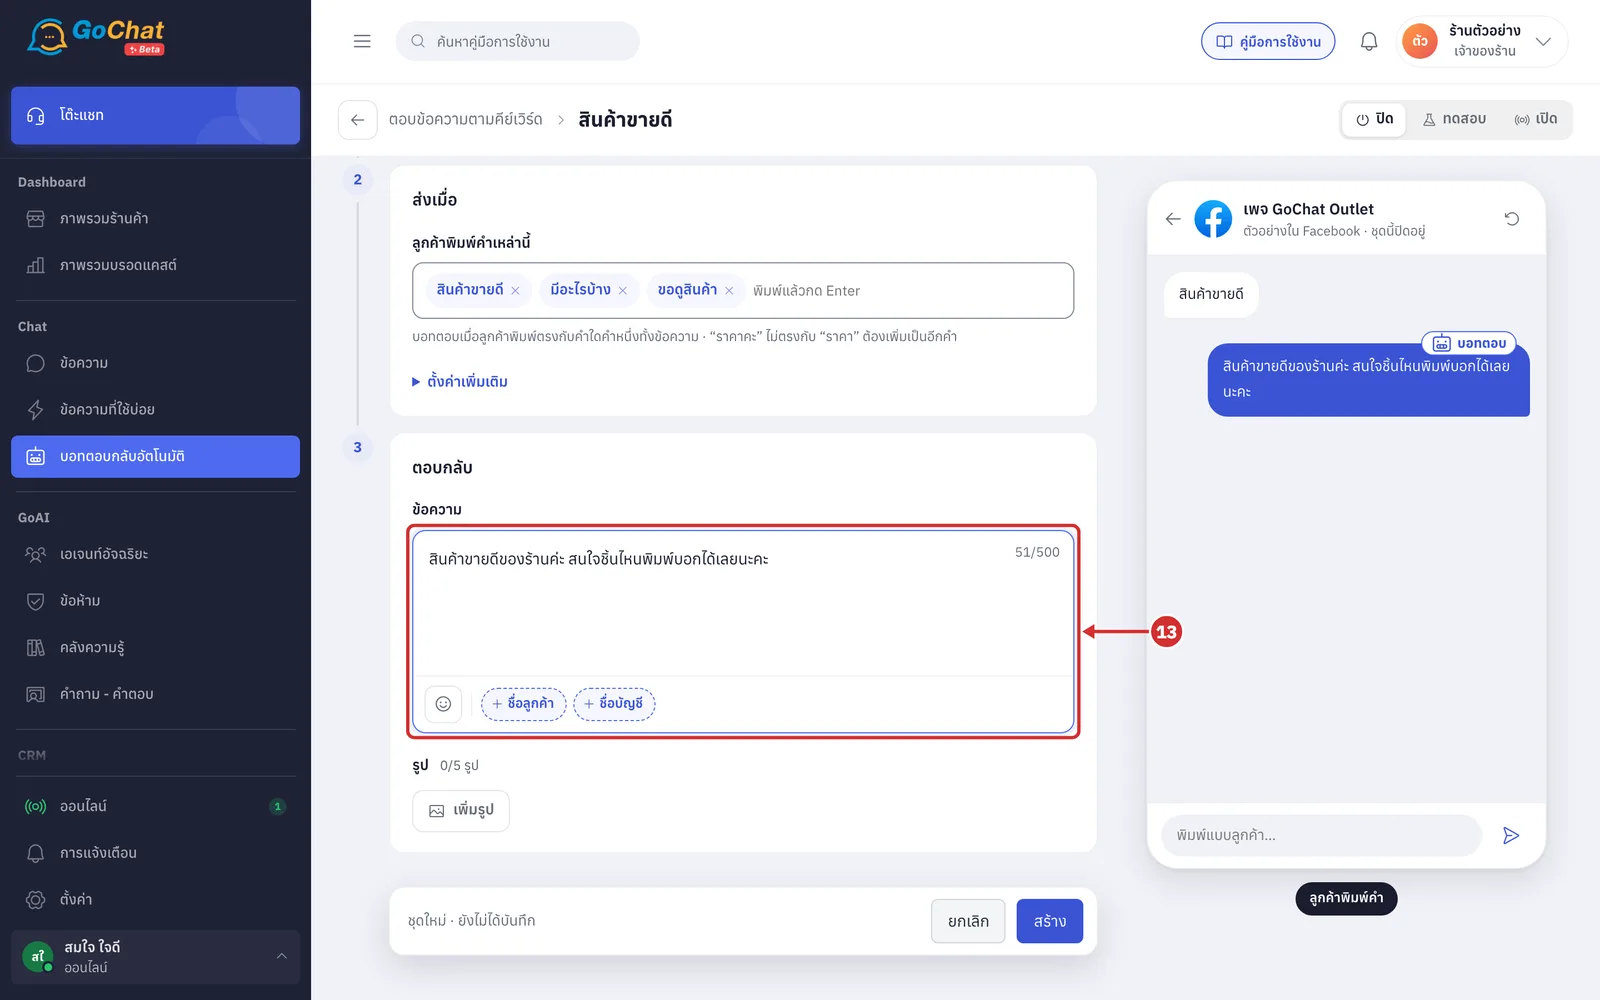
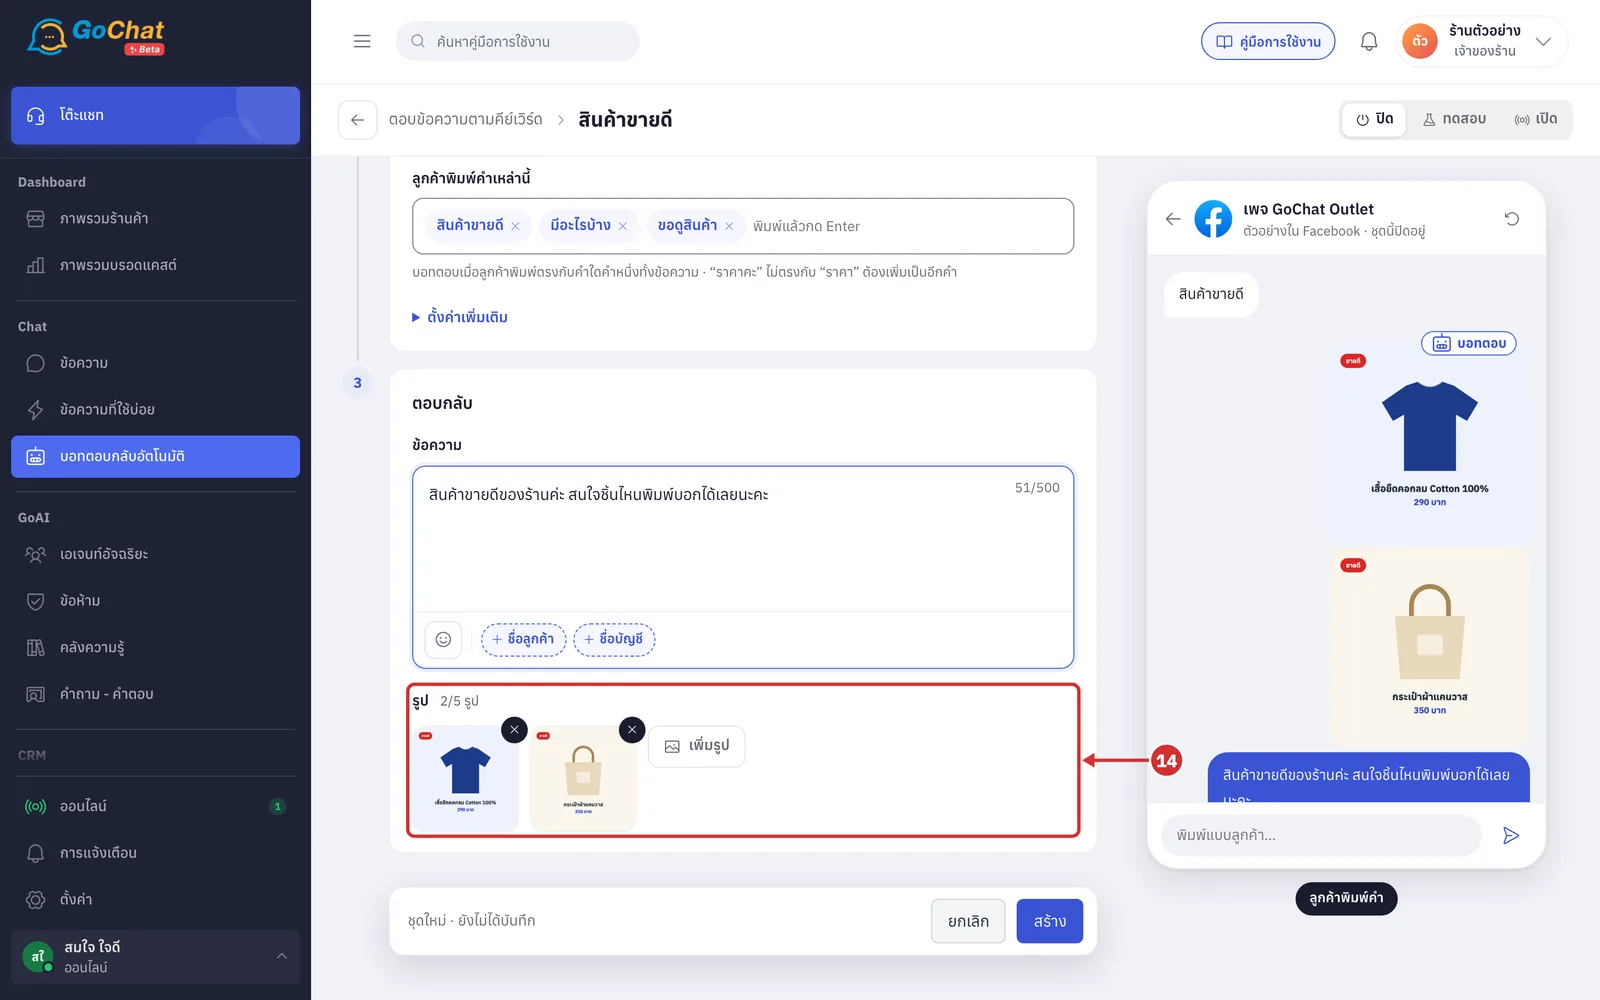
Under รูป (Images), click เพิ่มรูป (Add image) and choose images from your computer; you can choose several at once
Attach up to 5 images. The counter next to รูป (Images) shows how many are attached, such as 2/5 รูป (2/5 images)
When there are 5 images, the เพิ่มรูป (Add image) button disappears
If you choose more than the space left, the app adds as many as fit and shows เลือกมา … รูป แนบได้อีก … รูป (Chose … images, … more can be attached)
The bot sends the images in the order attached, then the message
To remove an image, click × on its corner
Images go into your shop's image library as soon as you choose them, but are linked to the set when you save
Trying it in the chat preview
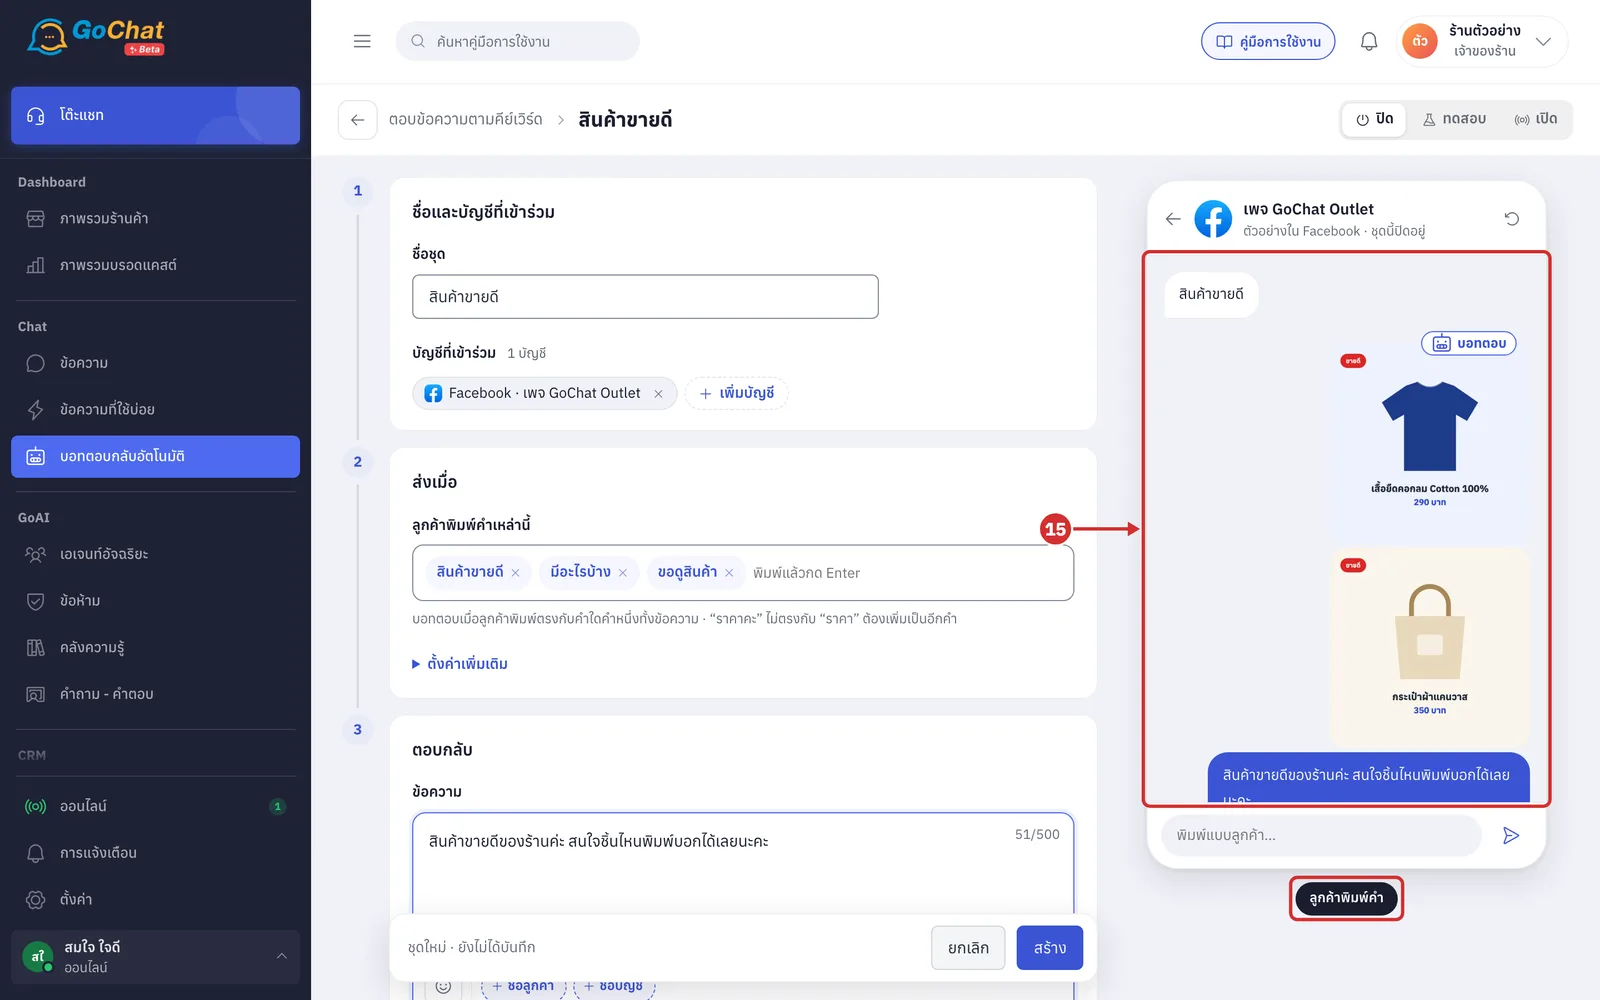
The chat preview on the right shows how the bot would reply, using the form's values even before you save. This topic has one scenario, ลูกค้าพิมพ์คำ (Customer types a word), where the sample customer types the set's first word straight away.
Check the bot's reply in the chat preview. The bot sends all the set's images in order, followed by the message
If you have not added any words yet, the preview shows เพิ่มคำที่ลูกค้าพิมพ์เพื่อดูตัวอย่าง (Add words customers type to see a preview)
The preview also includes the same account's other keyword sets, promotions, FAQs and order summaries whose status is เปิด (On). If the message matches one of those topics, you see the replies in the order customers really get them
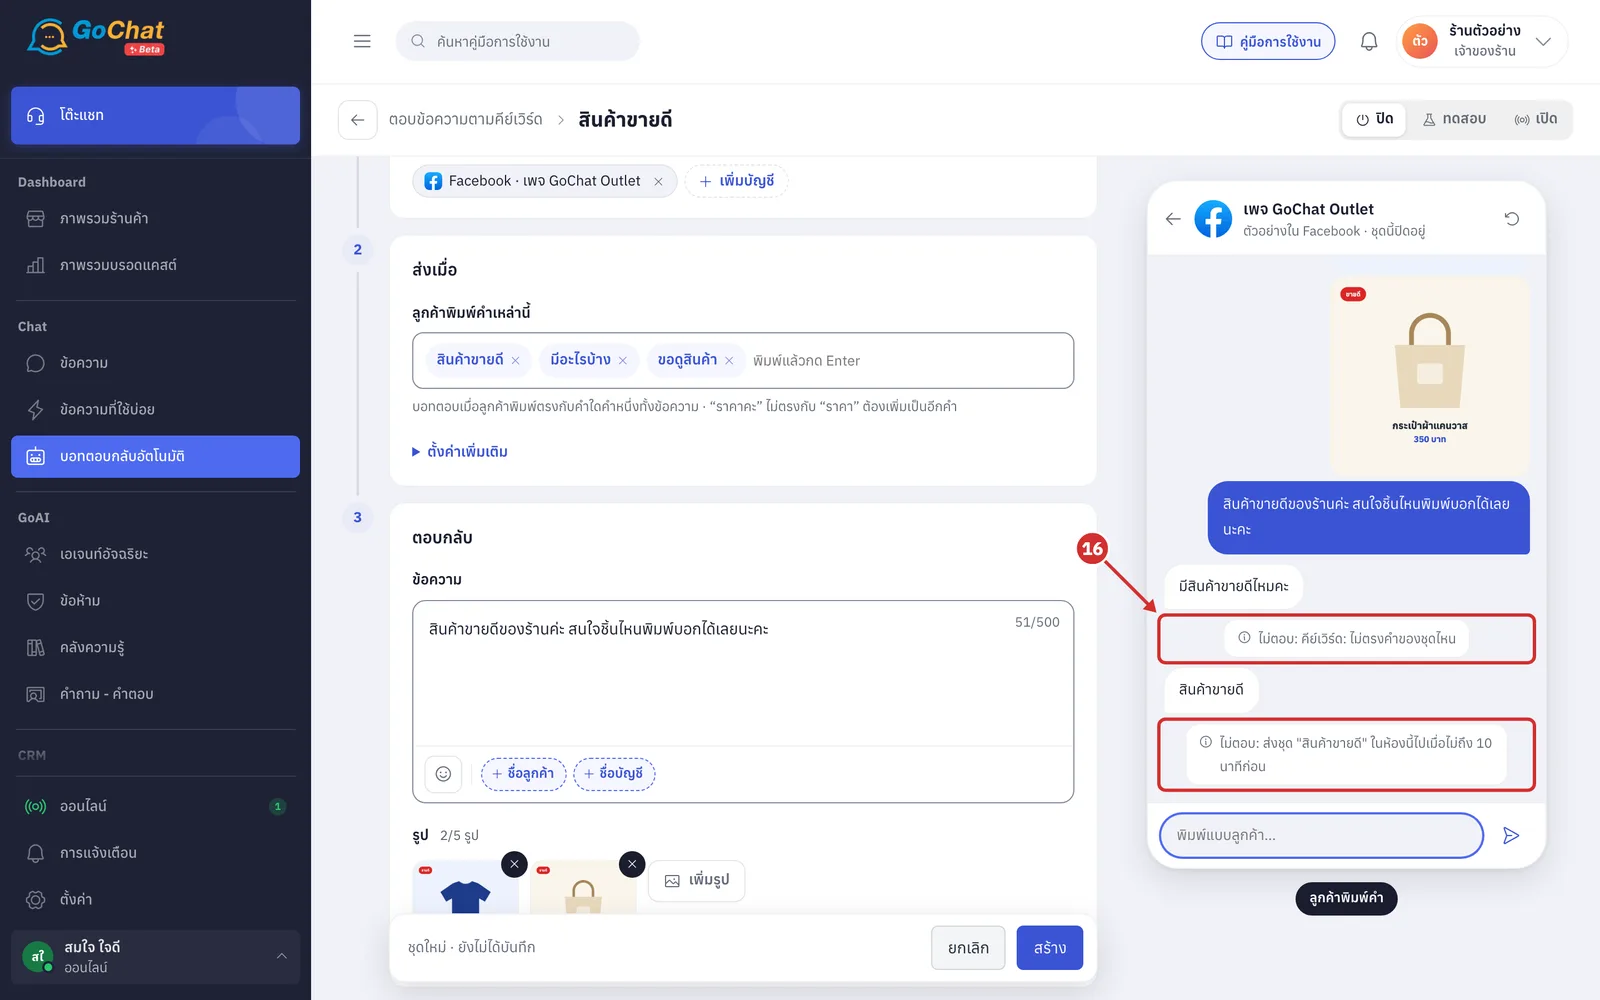
Type a message into พิมพ์แบบลูกค้า… (Type as a customer…) and press Enter to try other cases. When the bot does not reply, the preview shows ไม่ตอบ: (No reply:) and the reason, for example
ไม่ตอบ: คีย์เวิร์ด: ไม่ตรงคำของชุดไหน (No reply: Keyword: doesn't match any set's word) — the whole message does not match a word, for example the customer types “มีสินค้าขายดีไหมคะ” (Do you have best sellers?)
ไม่ตอบ: ส่งชุด "สินค้าขายดี" ในห้องนี้ไปเมื่อไม่ถึง 10 นาทีก่อน (No reply: set "สินค้าขายดี" was sent in this chat less than 10 minutes ago) — the customer typed the same word again within ไม่ตอบซ้ำภายใน (Don't repeat within)
Each message in the preview is 1 minute after the previous one
Saving
Choose a status at the top right, then click สร้าง (Create)
New sets are ปิด (Off)
ทดสอบ (Test) — try it with your team's chats
เปิด (On) — go live
The statuses are explained in Using the auto-reply bot
The app goes back to the list, shows บันทึก “สินค้าขายดี” แล้ว (Saved “สินค้าขายดี”) and the new set appears in the list
How keyword replies work
When the customer's whole message matches a word of the set, the bot sends all the set's images in order, then the message
Each image is sent as a separate message, so a set with 5 images and a message sends 6 messages to the customer
Keyword replies are the last answer the bot considers. If the same message matches สรุปคำสั่งซื้อ (Order summary), ส่วนลด / โปรโมชั่น (Discounts / promotions) or คำถามที่พบบ่อย (FAQ), the bot answers with that topic instead
If the message matches several sets, the bot sorts them by set name and sends no more than the smallest ส่งสูงสุดต่อครั้ง (Max per reply) among the matching sets
ไม่ตอบซ้ำภายใน (Don't repeat within) is counted separately for each set and each chat
Customers messaging for the first time or after hours get the welcome or after-hours message before the reply, if the account has a set for that topic that is on
While the shop is closed under an after-hours set, the bot only answers keywords if that account's after-hours set has ตอบข้อความตามคีย์เวิร์ด (Keyword replies) chosen under นอกเวลา บอทยังช่วยตอบ (After hours, the bot still answers). New after-hours sets have it chosen already (set it in Setting up after-hours messages)
About keyword sets
One account can be in many sets, so you can split sets by what customers often ask, such as price, how to order and size chart, for the same account
This topic's chat preview does not show the welcome or after-hours message a customer may get before the reply in a real chat
When you delete a set, the confirmation says … บัญชีในชุดนี้จะไม่ได้รับข้อความนี้อีก (… accounts in this set will no longer get this message). Deleting is explained in Using the auto-reply bot
Messages the bot has sent are shown in Viewing auto-reply chat history