

Using customer notification messages
The ข้อความแจ้งเตือนลูกค้า (Utility) (Customer notification messages) page lets you create messages about something a customer did or asked for on Facebook Messenger and submit them to Meta for review. Once Meta approves a message, you can send it even if the customer has been quiet for more than 24 hours — for example, to say an order has shipped with its tracking number, remind them of an amount due, or confirm a pickup appointment (Meta calls these Utility Messages).
Everyone in the shop can create, edit and delete messages, but you can add or remove only the pages you manage. Approved messages can be used in 3 places: sent from a chat room, used as a step in a sales follow-up bot, and sent from an order card.
How customer notification messages work
When Facebook lets you send: the shop can type replies within 7 days of the customer's last message, and bots can send within 24 hours. After that, only customer notification messages approved by Meta can be sent
What Meta approves: the message must be about something the customer did or asked for, and it must be clear what it is about, such as an order, an account, an appointment, or a problem the customer reported. Promotions, discounts or invitations to buy are not approved
Submitted page by page: Meta reviews the message separately for each page, usually within a few minutes
The page needs permission first: a Facebook page must accept the permission to send customer notification messages when it is connected. Pages connected earlier must be reconnected once (see การเชื่อมต่อช่องทาง Facebook)
Facebook Messenger only: Instagram and LINE cannot use these messages, and they cannot be sent in group rooms
Opening the Customer notification messages page
Go to the ข้อความแจ้งเตือนลูกค้า (Utility) (Customer notification messages) menu under Management in the left menu bar
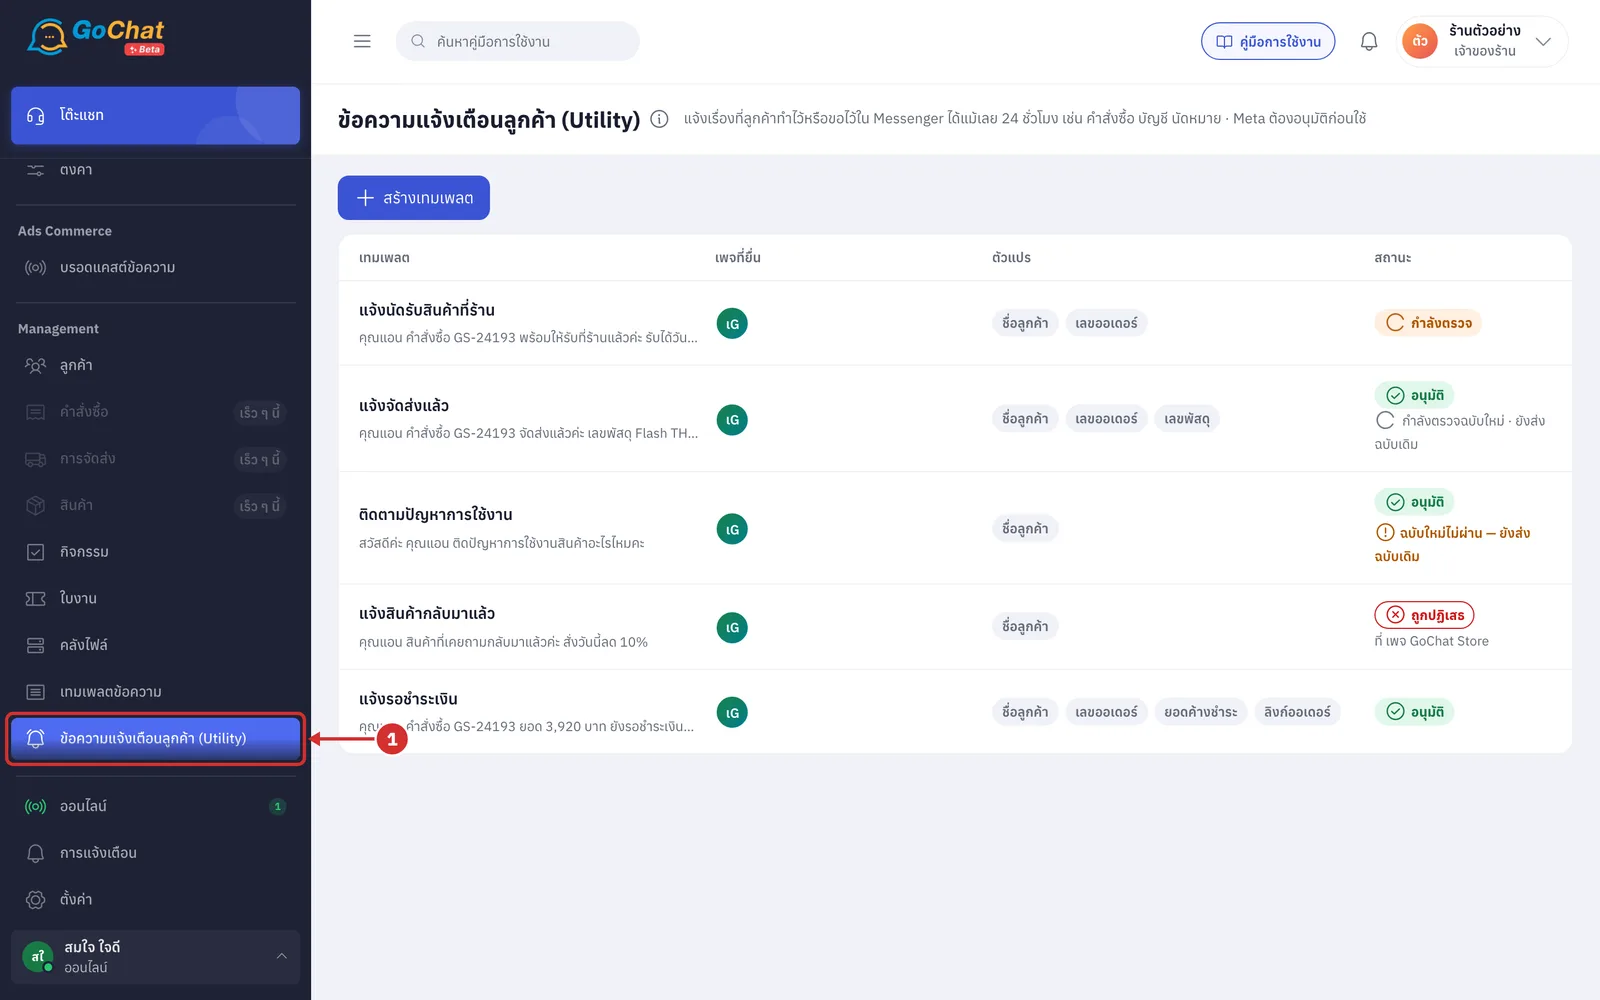
See your shop's messages in the table, which has 4 columns:
เทมเพลต (Template): the message name and a preview of what customers see (variables shown as sample values). Click the name to open it for editing
เพจที่ยื่น (Submitted pages): pictures of the pages this message was submitted to, up to 3; the rest show as a +number circle. Point at or tap the pictures to see page names
ตัวแปร (Variables): the variables the message uses; a message without variables shows ไม่มีตัวแปร (No variables)
สถานะ (Status): Meta's review result (see the next step)
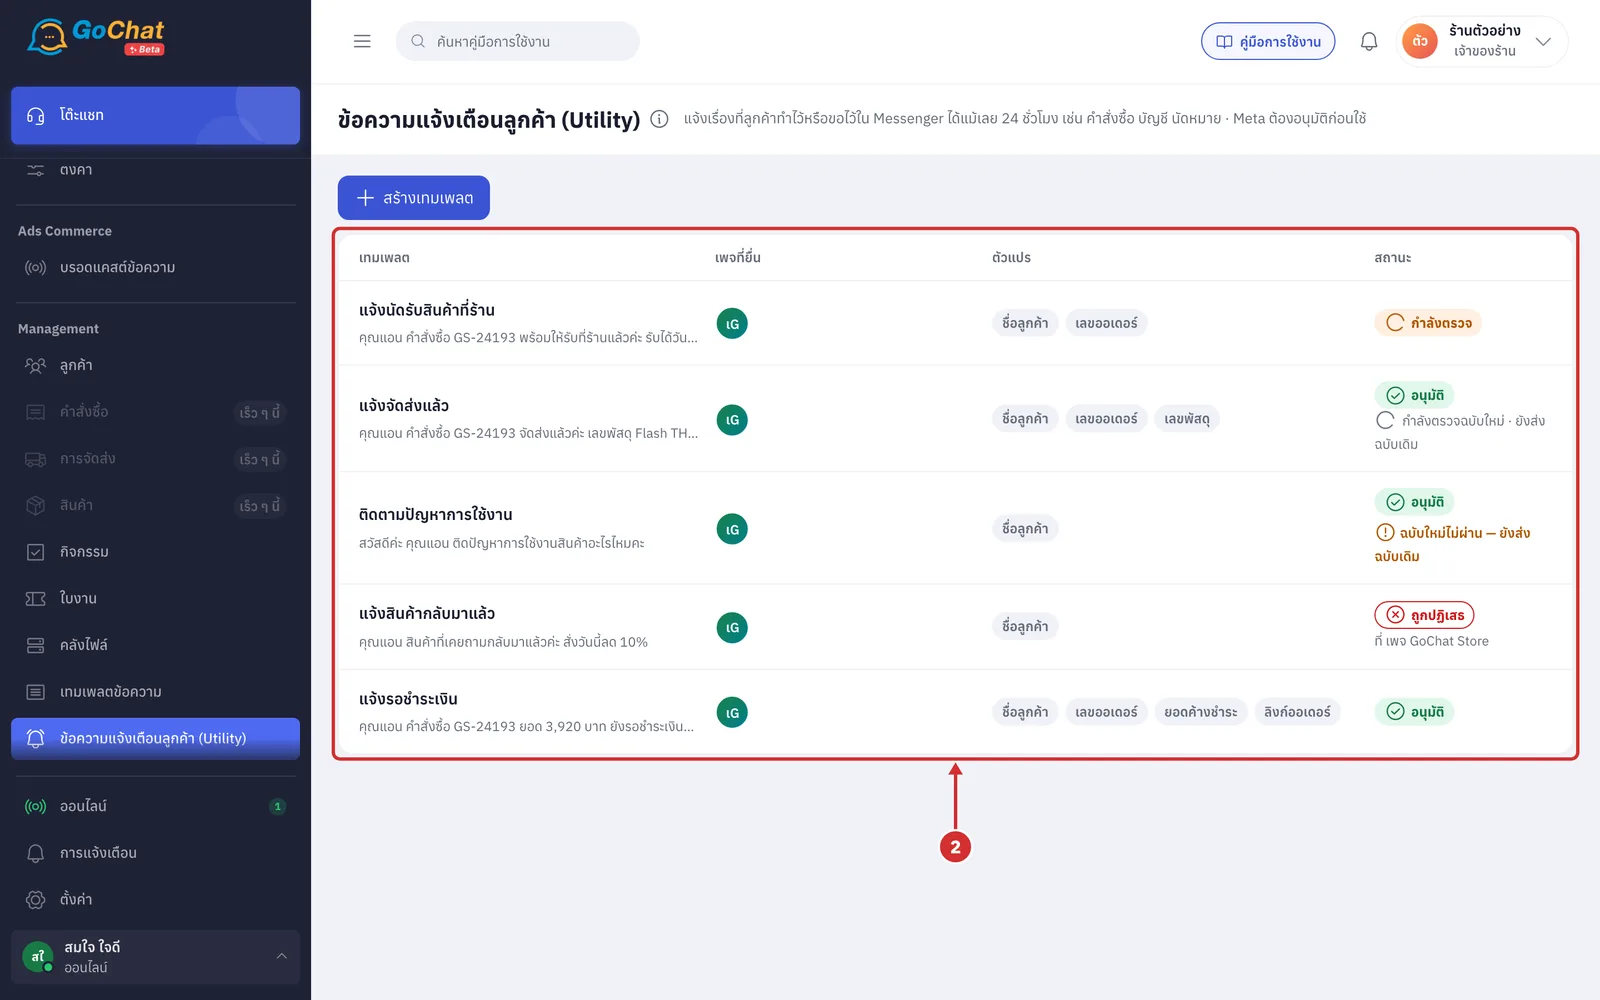
Check the สถานะ (Status) column to see which messages can be sent. The number after a label is how many pages have that status, and pages with a problem are named under the label, such as ที่ เพจ GoChat Store (at GoChat Store page)
อนุมัติ (Approved): Meta approved it; you can send it to customers
กำลังตรวจ (Reviewing): Meta is reviewing it. The page asks Meta for the result every 5 seconds for up to 2 minutes, and the label changes by itself without reloading
ถูกปฏิเสธ (Rejected): Meta did not approve it; open the message to see why and how to fix it
ยื่นไม่ผ่าน (Submission failed): the message could not be sent to Meta, for example because the page connection dropped. Click ลองใหม่ (Try again) under the label to submit again
Meta ระงับชั่วคราว (Paused by Meta): customers blocked or reported this message many times, so Meta paused it
ใช้ไม่ได้ (Unavailable): Meta disabled this message
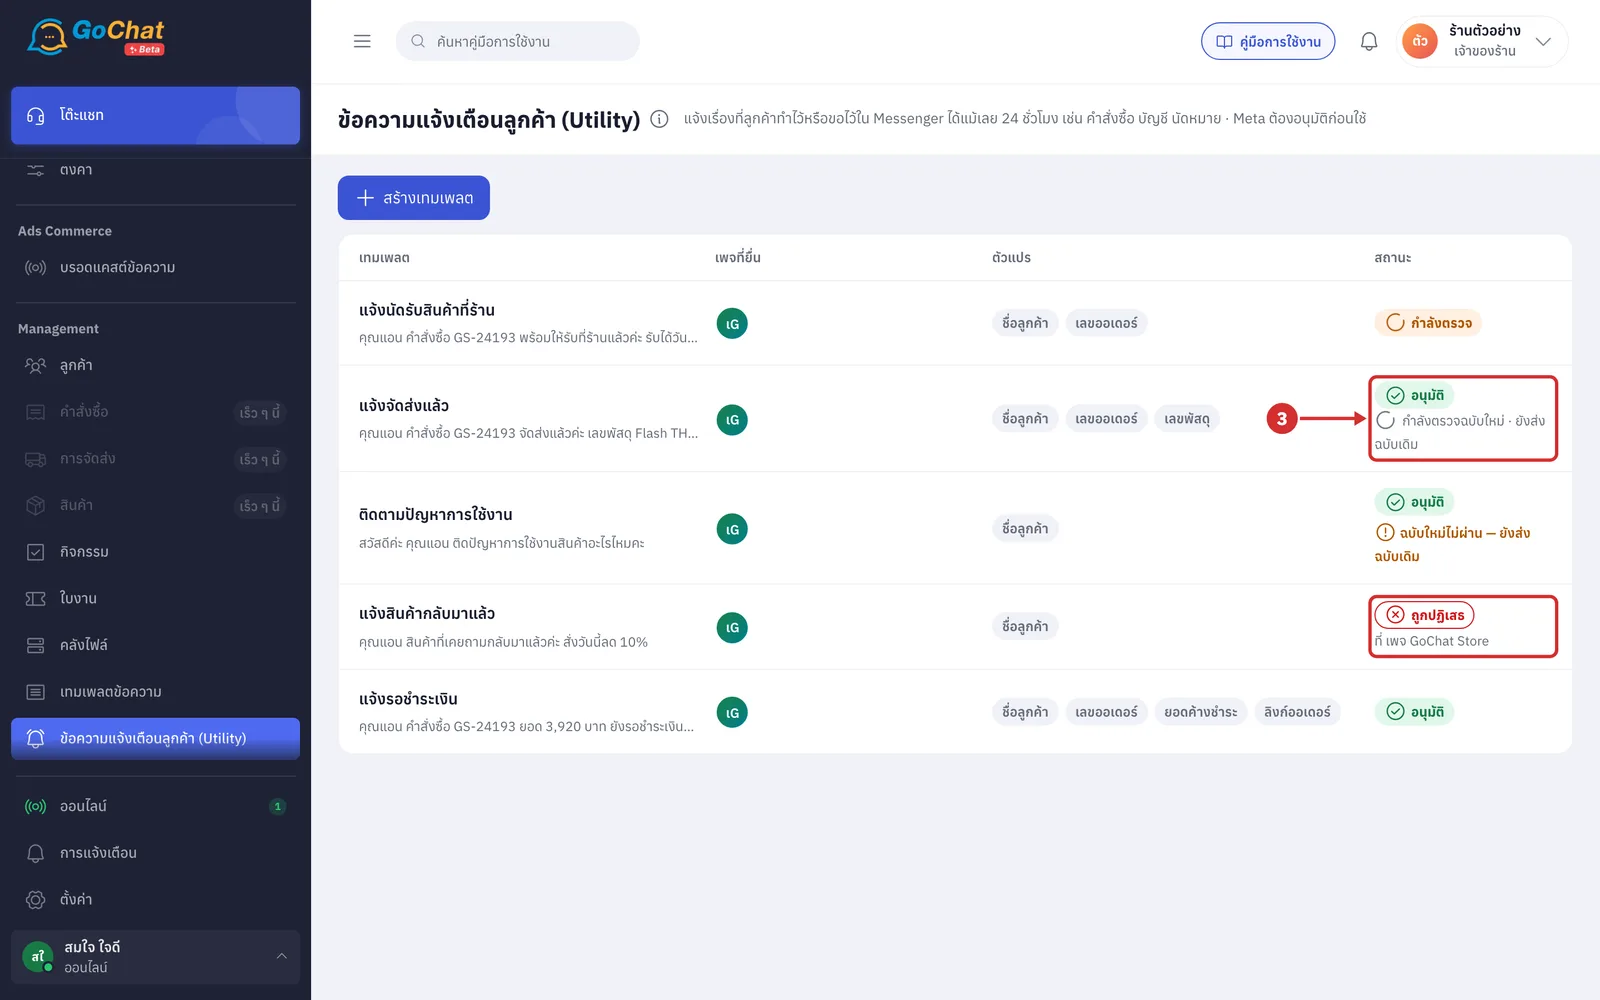
A line กำลังตรวจฉบับใหม่ · ยังส่งฉบับเดิม (Reviewing the new version · still sending the old one) or ฉบับใหม่ไม่ผ่าน — ยังส่งฉบับเดิม (New version rejected — still sending the old one) under the label means the message was edited and the new version is not in use yet (see Editing a message in use below)
Creating a customer notification message
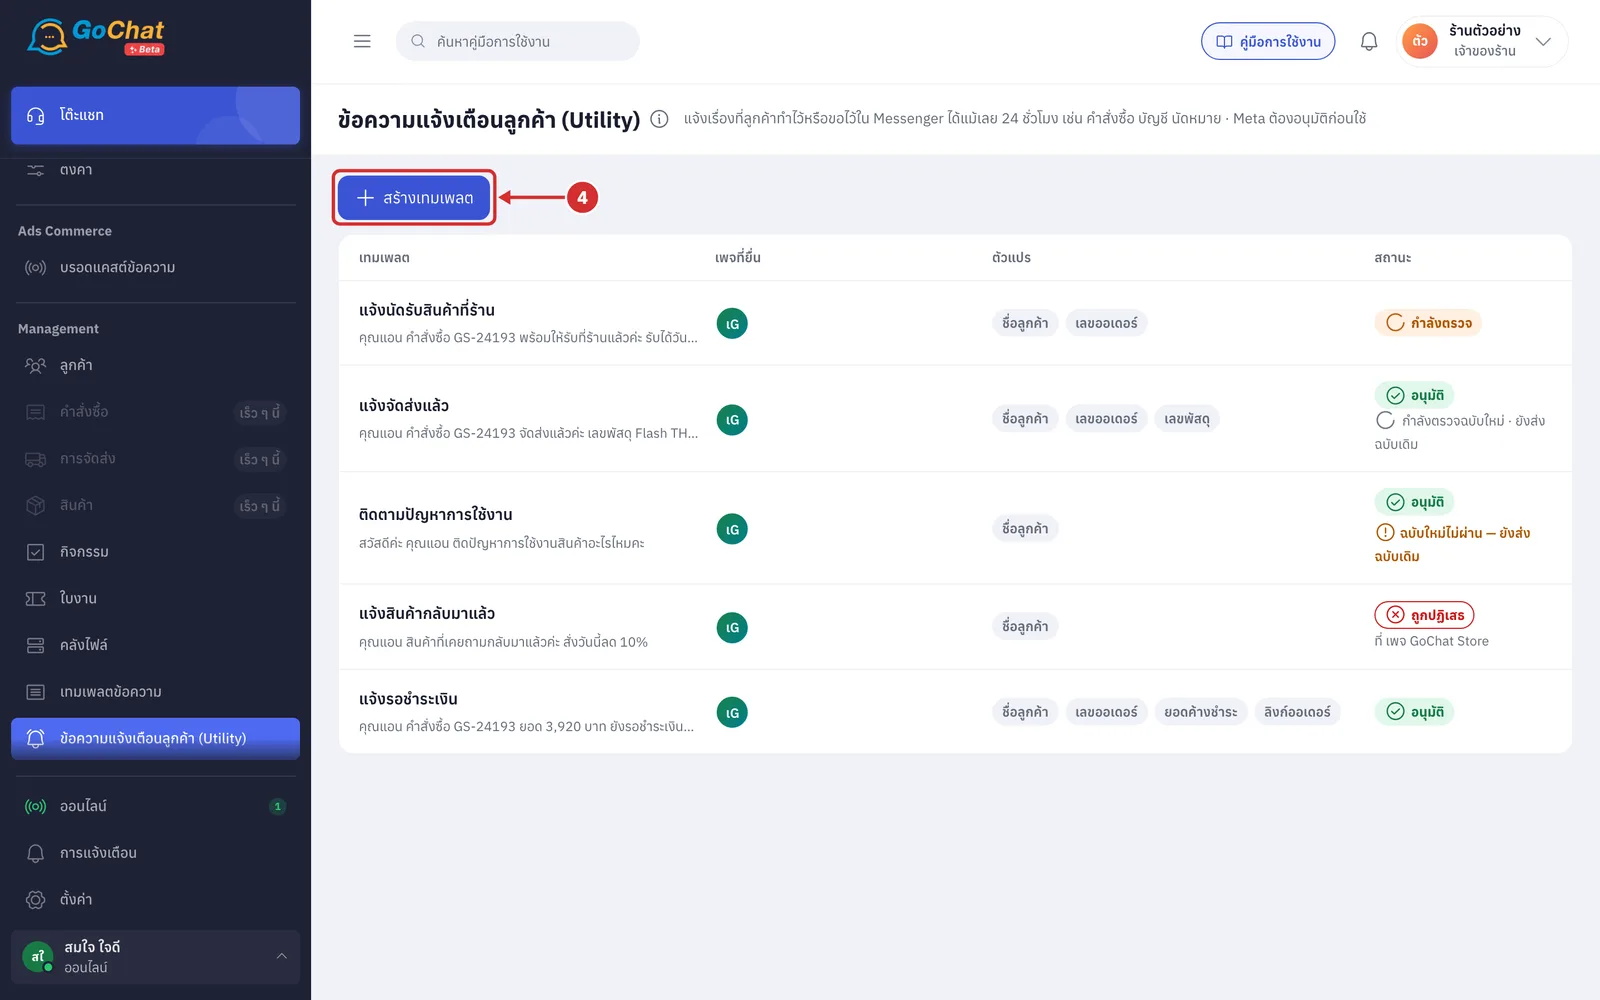
Click สร้างเทมเพลต (Create template) above the table (if no page in your shop has permission to send customer notification messages yet, this button is disabled and a banner asks you to reconnect a page)
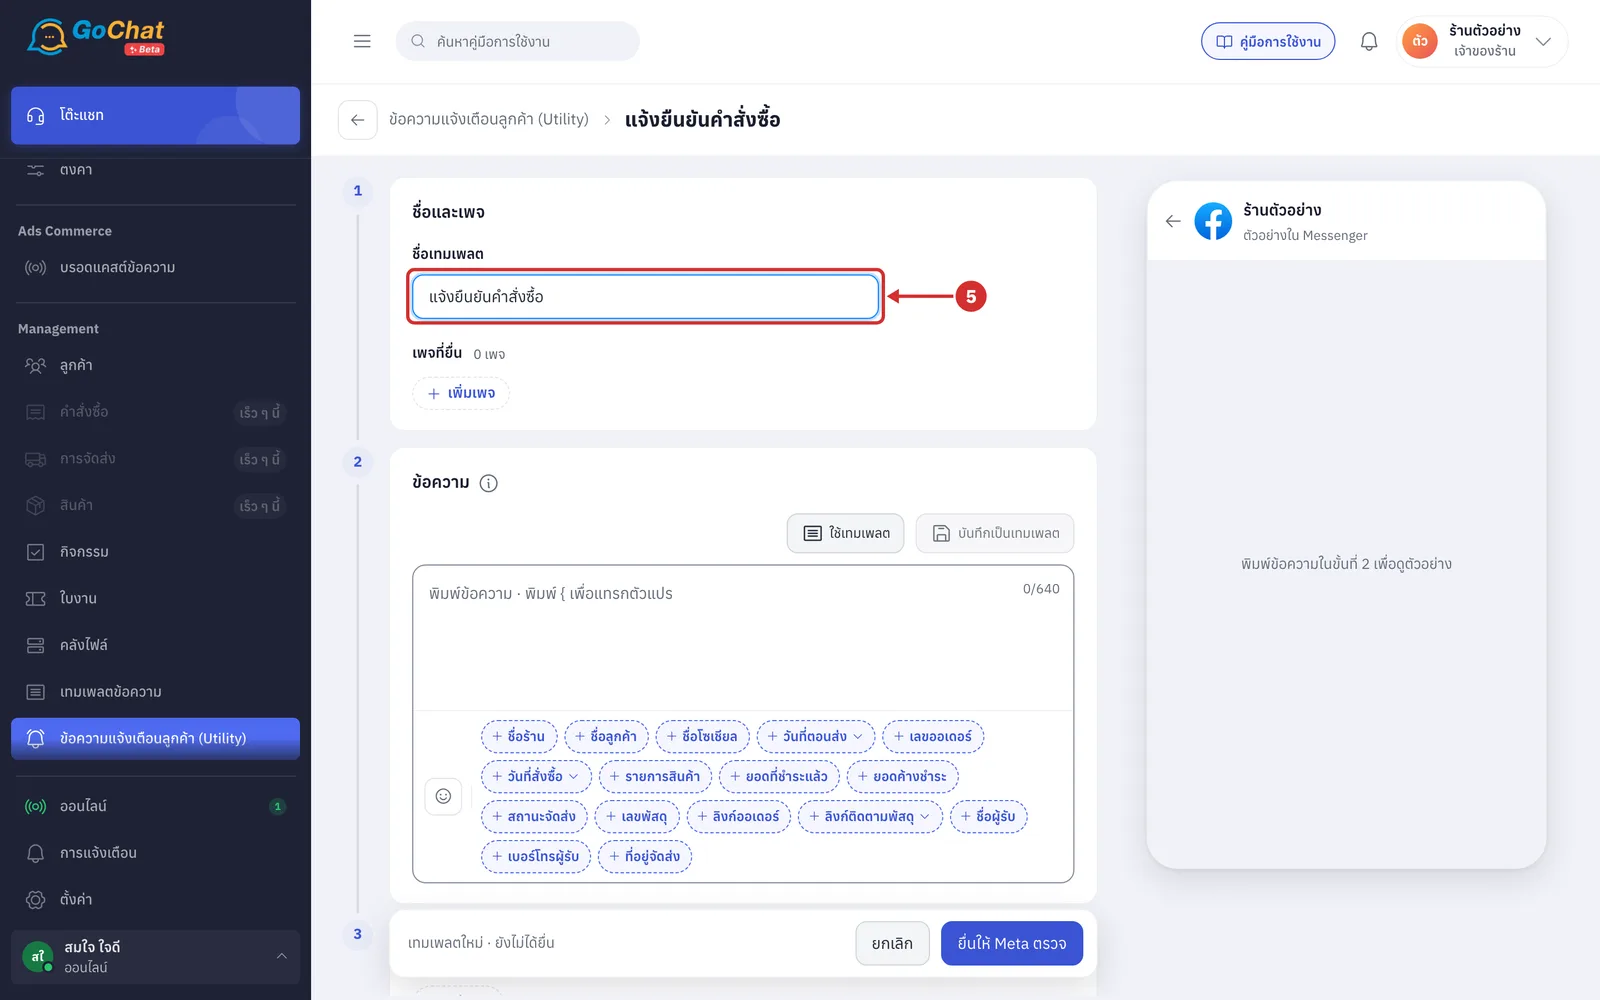
In step 1 ชื่อและเพจ (Name and pages), enter a name in ชื่อเทมเพลต (Template name), such as "แจ้งยืนยันคำสั่งซื้อ"
Required, up to 80 characters
This name is used only inside GoChat; customers do not see it
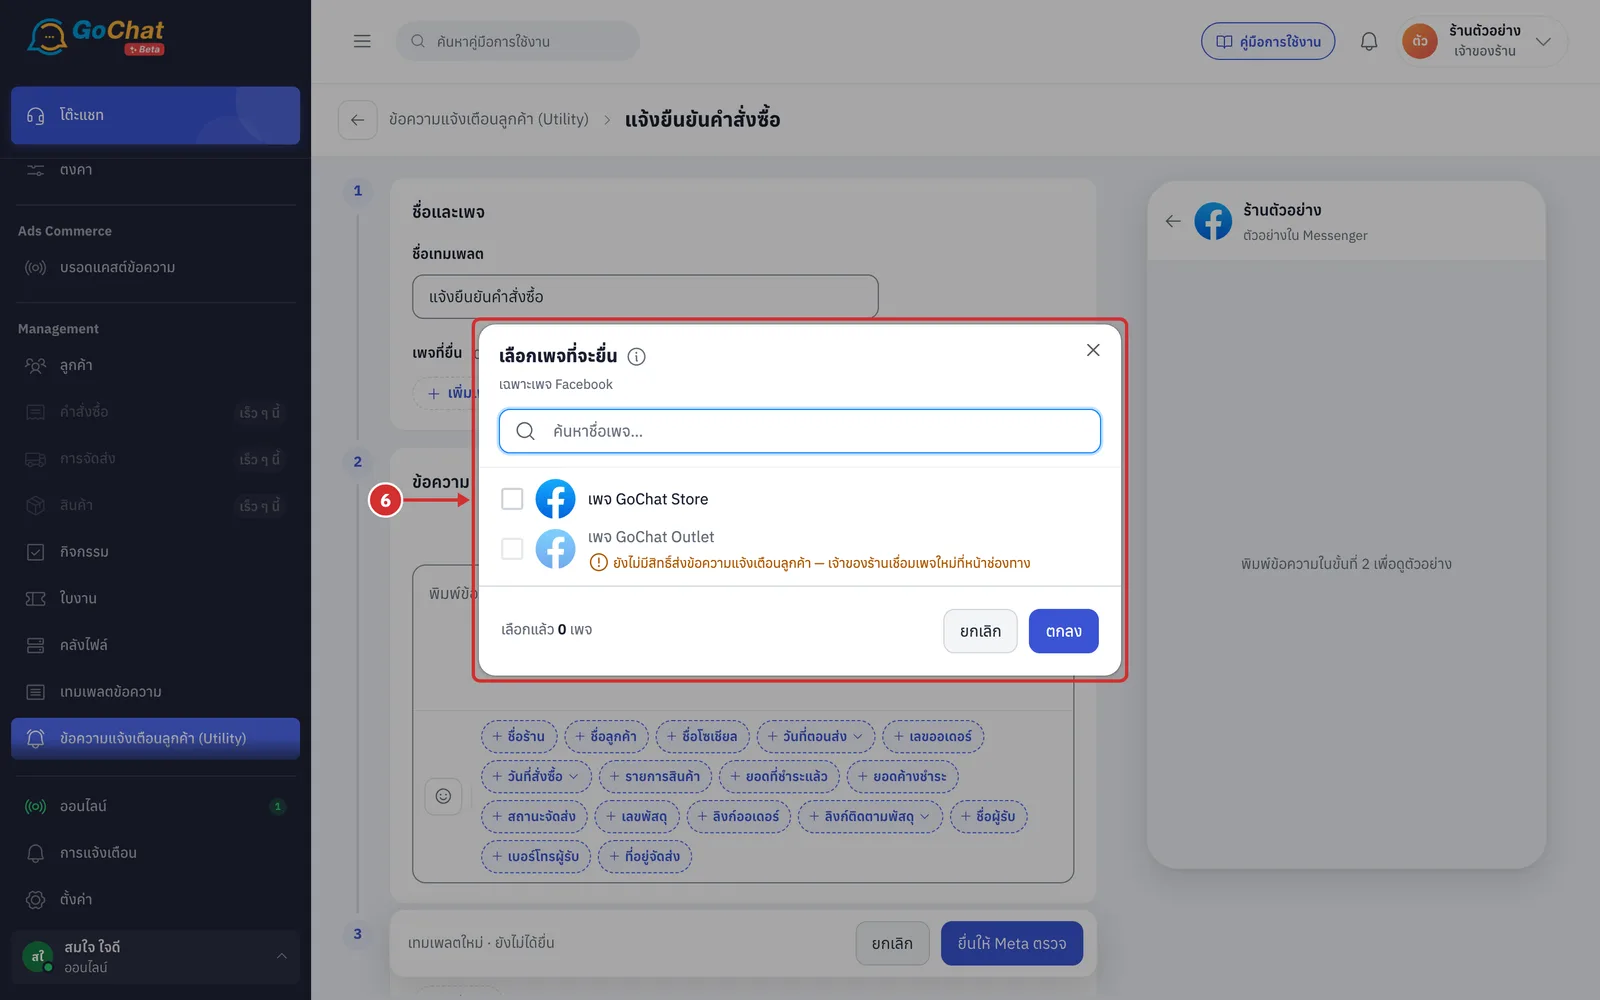
Click เพิ่มเพจ (Add page). The เลือกเพจที่จะยื่น (Choose pages to submit to) window opens. Tick the pages you want and click ตกลง (OK)
Only Facebook pages you manage are listed; search by page name in the box at the top
Pages without permission to send customer notification messages, or whose connection dropped, cannot be ticked, and the reason is shown under the page name
The bottom shows how many pages are selected
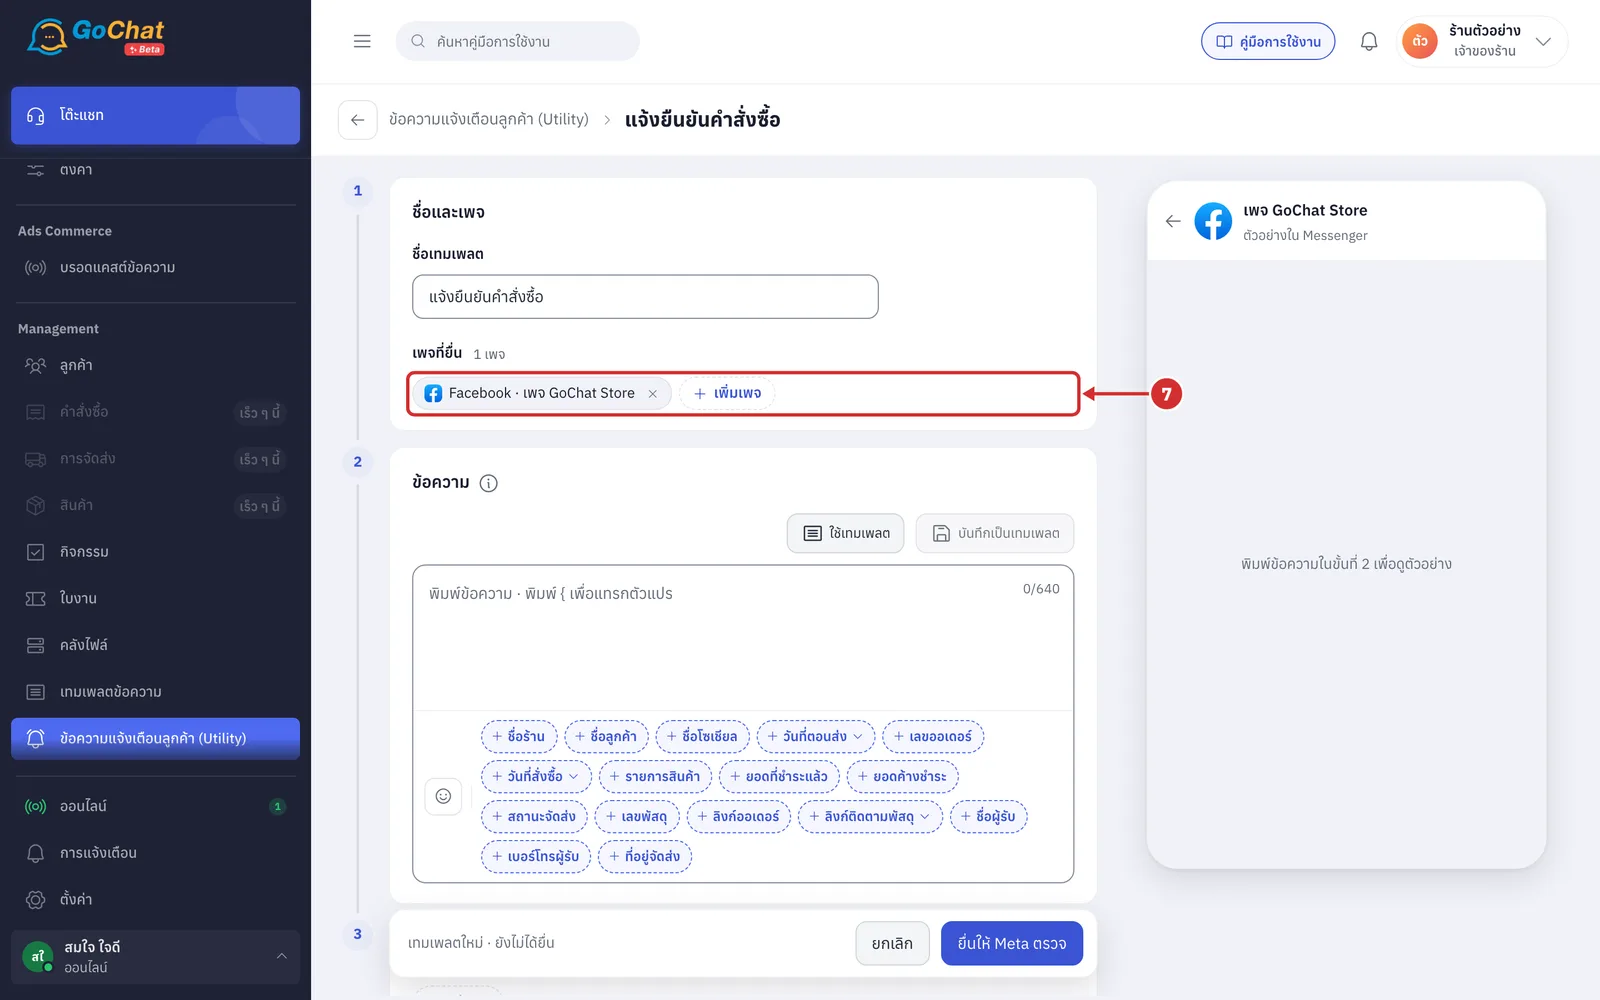
The chosen pages appear under เพจที่ยื่น (Submitted pages) with the number of pages. Click × on a page to remove it
Pages you do not manage show as a lock, อีก … เพจที่คุณไม่ได้ดูแล (… more pages you do not manage). Only the people who manage those pages can add or remove them
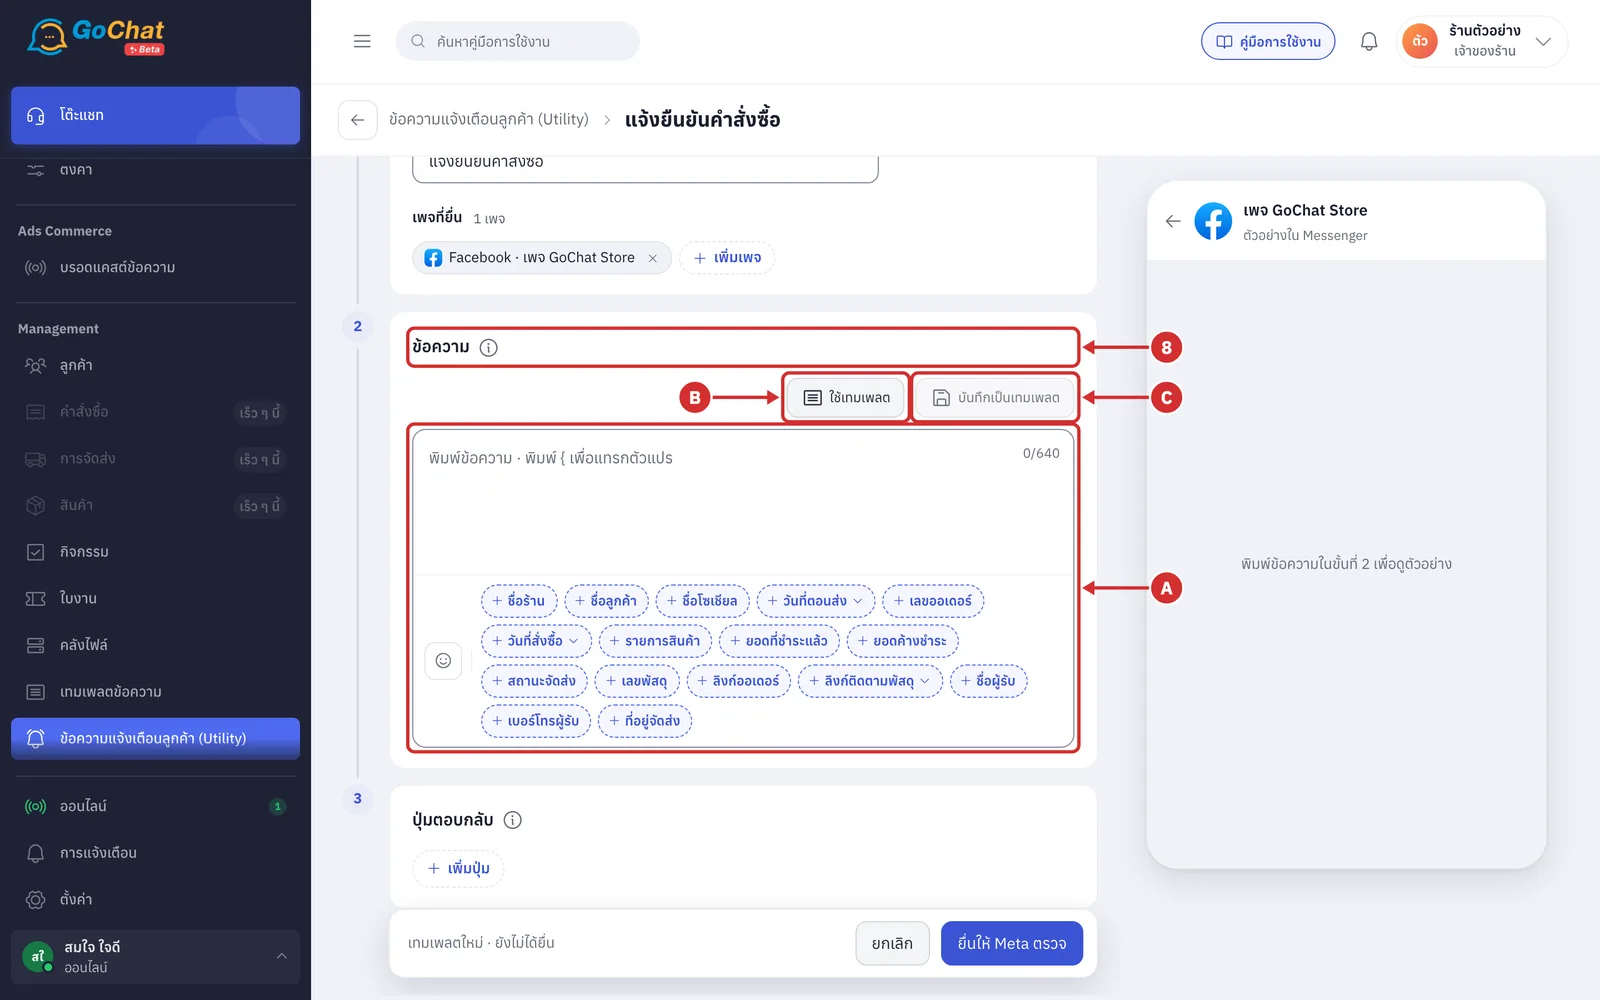
In step 2 ข้อความ (Message), enter the message to send to customers. There are 3 options:
A Type it yourself in the message box (see step 9)
B ใช้เทมเพลต (Use template): choose a message template from your shop; the message is linked to that template (see steps 10–11)
C บันทึกเป็นเทมเพลต (Save as template): keep the message you typed as a new message template and link to it (see step 12)
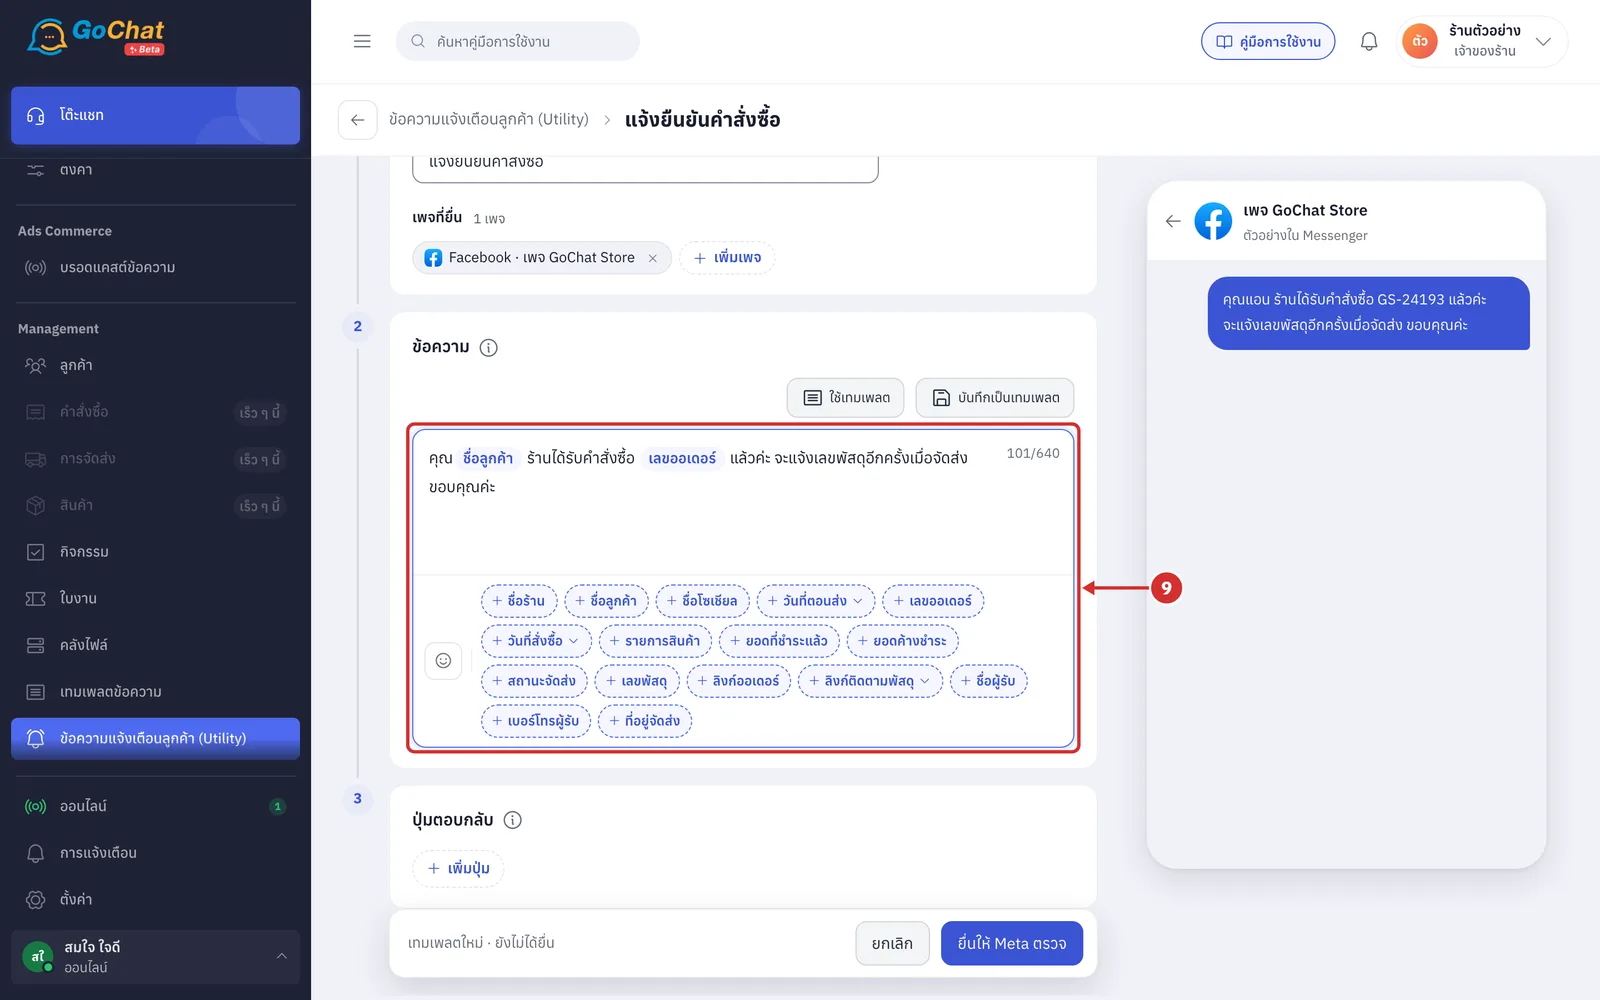
Type the message in the box, and click variable names under the box to insert customer or order data
Up to 640 characters (the character count is at the top right of the box)
Shops connected to an order management system can use order variables such as เลขออเดอร์ (Order number) · ยอดค้างชำระ (Amount due) · เลขพัสดุ (Tracking number) · ลิงก์ออเดอร์ (Order link). Shops not connected can use only ชื่อร้าน (Shop name) · ชื่อลูกค้า (Customer name) · ชื่อโซเชียล (Social name) · วันที่ตอนส่ง (Send date)
A message cannot start or end with a variable because Facebook rejects it; add a word before, such as "คุณ", and a closing phrase, such as "ขอบคุณค่ะ"
Click the (i) button after the ข้อความ (Message) heading to see Meta's rules
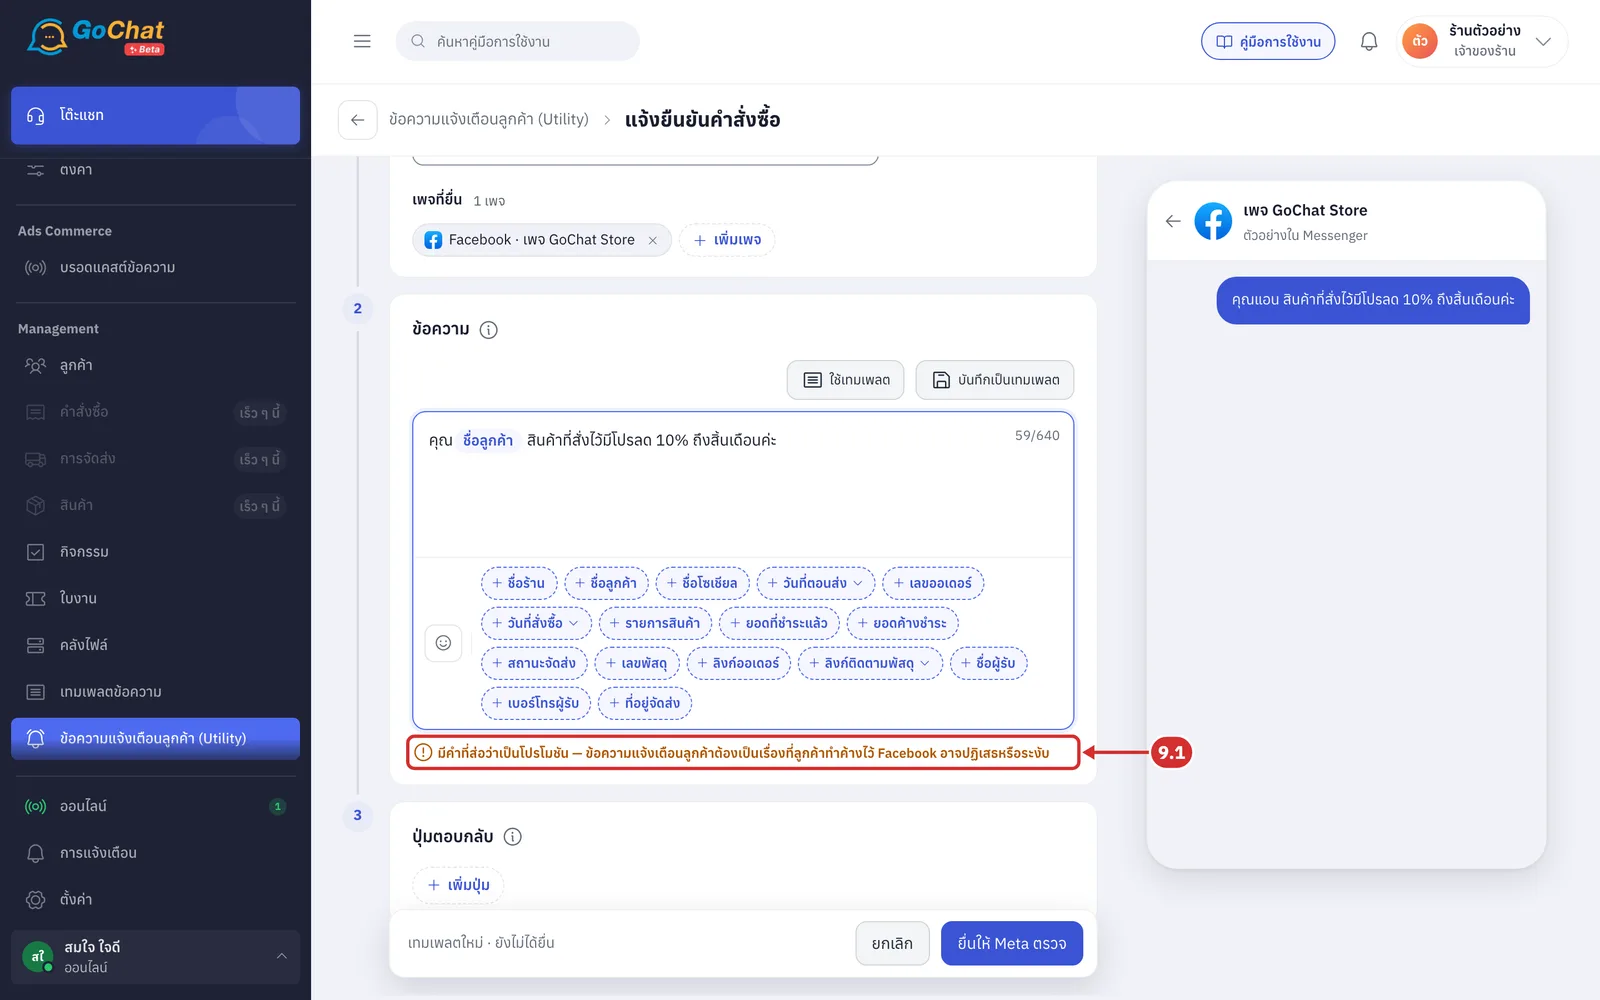
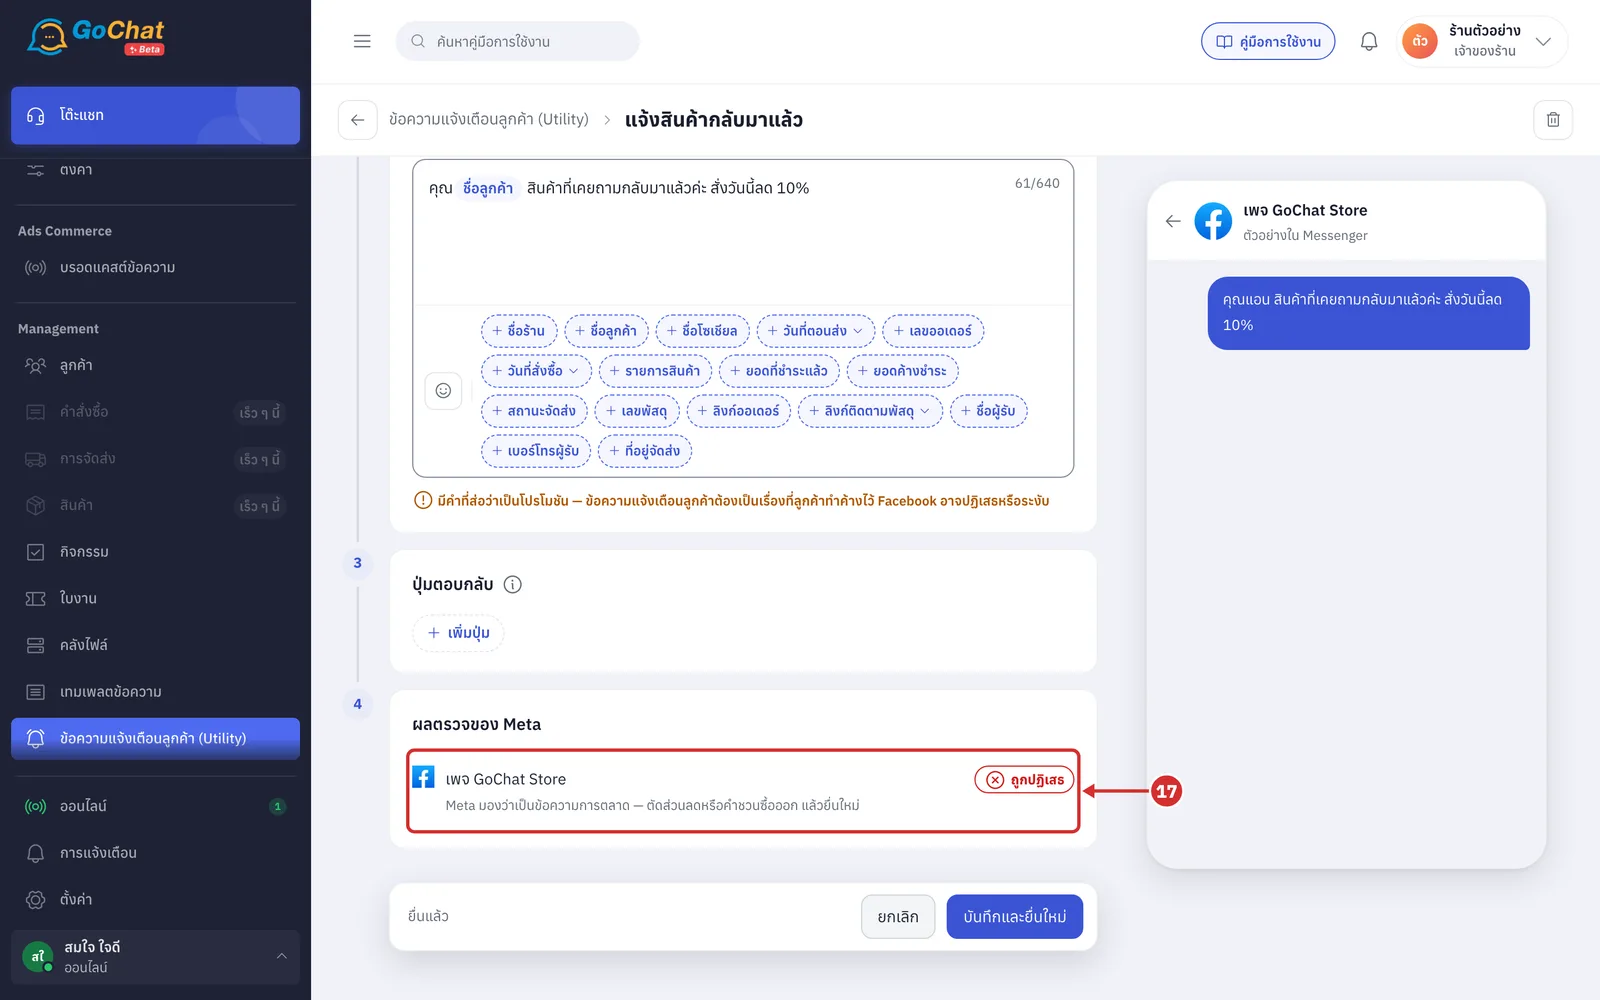
9.1 If the message is at risk of being rejected, a warning appears under the box, such as มีคำที่ส่อว่าเป็นโปรโมชัน (Contains words that suggest a promotion — words like ลด, ส่วนลด, ฟรี, โปร, แถม or the % sign) or ตัวแปรเยอะเมื่อเทียบกับข้อความ (Too many variables for the amount of text). You can still submit, but Meta may not approve it
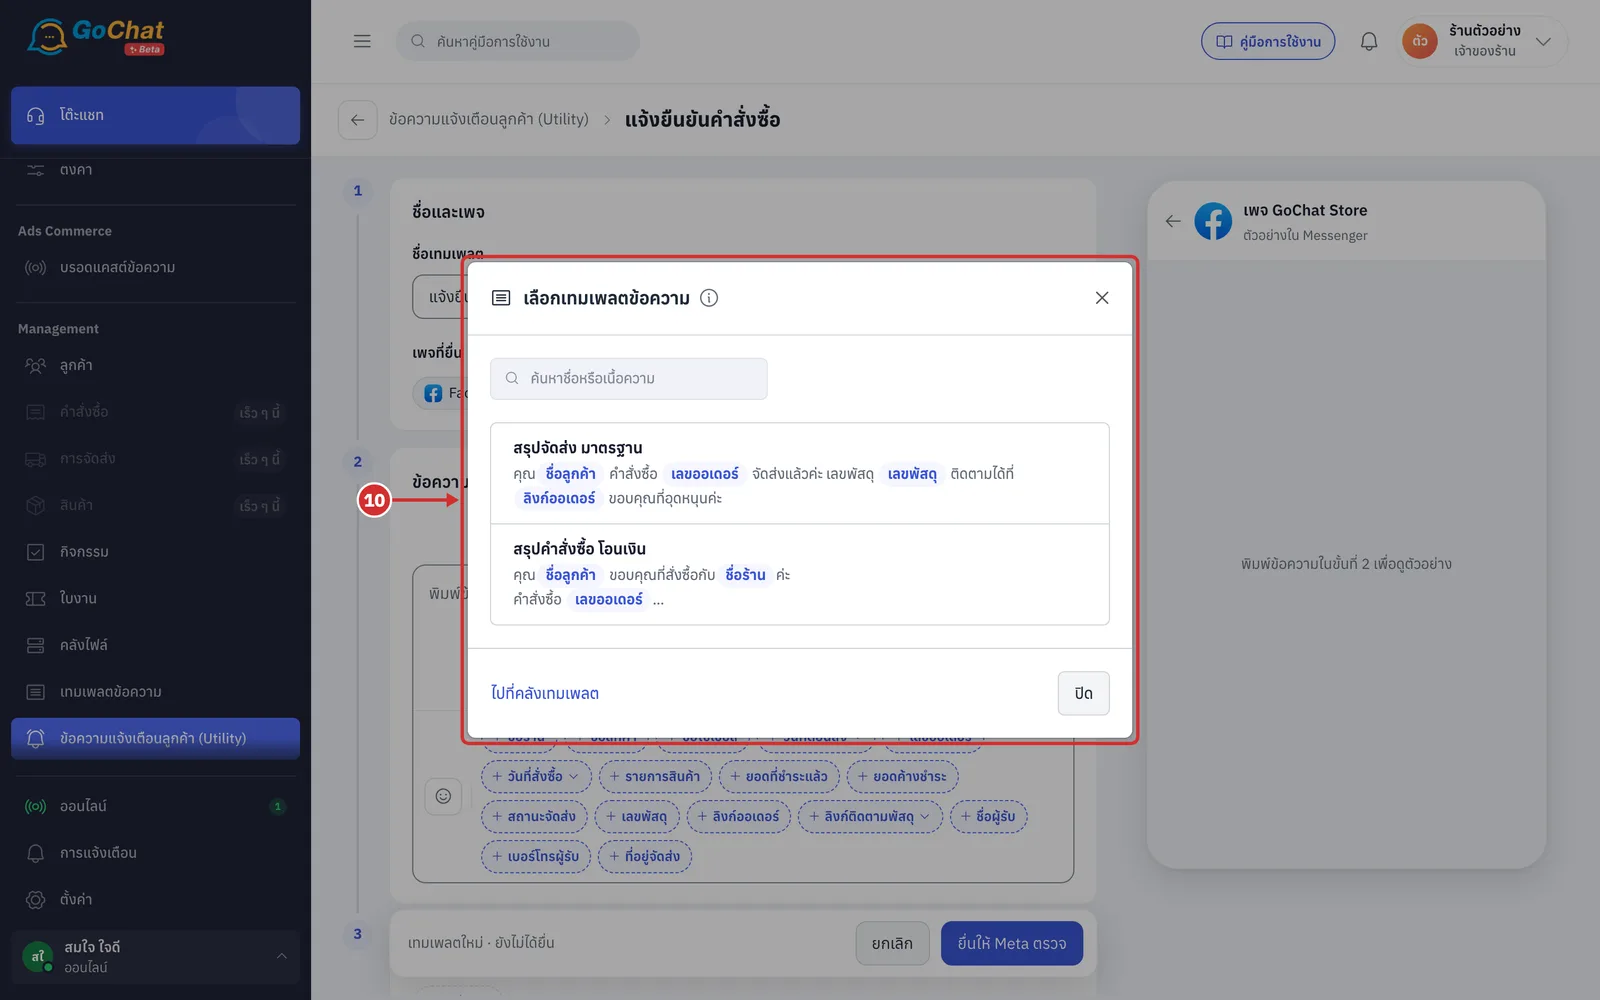
To use a template, click ใช้เทมเพลต (Use template). The เลือกเทมเพลตข้อความ (Choose a message template) window opens; click the template you want
You can choose order summary or shipping summary templates; search by name or message in the box at the top
A template with variables that customer notification messages cannot use shows an orange warning under it
Click ไปที่คลังเทมเพลต (Go to the template library) to create or edit templates (see การจัดการเทมเพลตข้อความ)
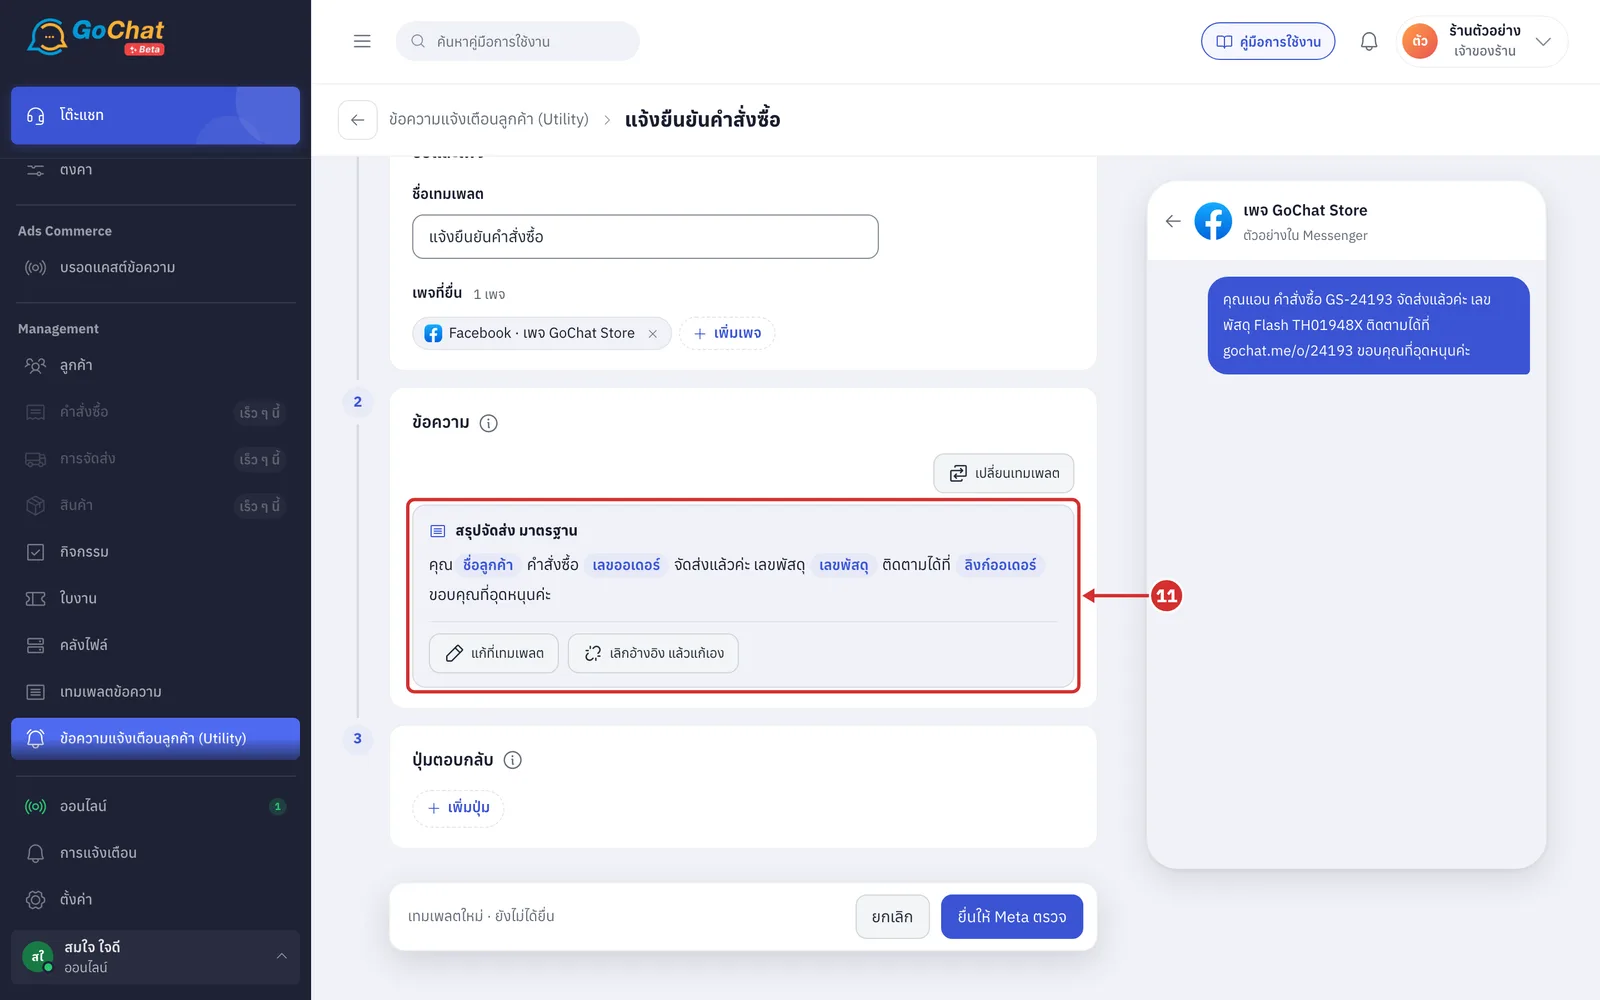
The box shows the template name and its message. It cannot be edited here
แก้ที่เทมเพลต (Edit the template): opens the template for editing. After you edit it, linked customer notification messages change too, and the system resubmits them to Meta for you
เลิกอ้างอิง แล้วแก้เอง (Unlink and edit yourself): copies the message into the box so you can edit it; it is no longer linked to the template
เปลี่ยนเทมเพลต (Change template): choose another template
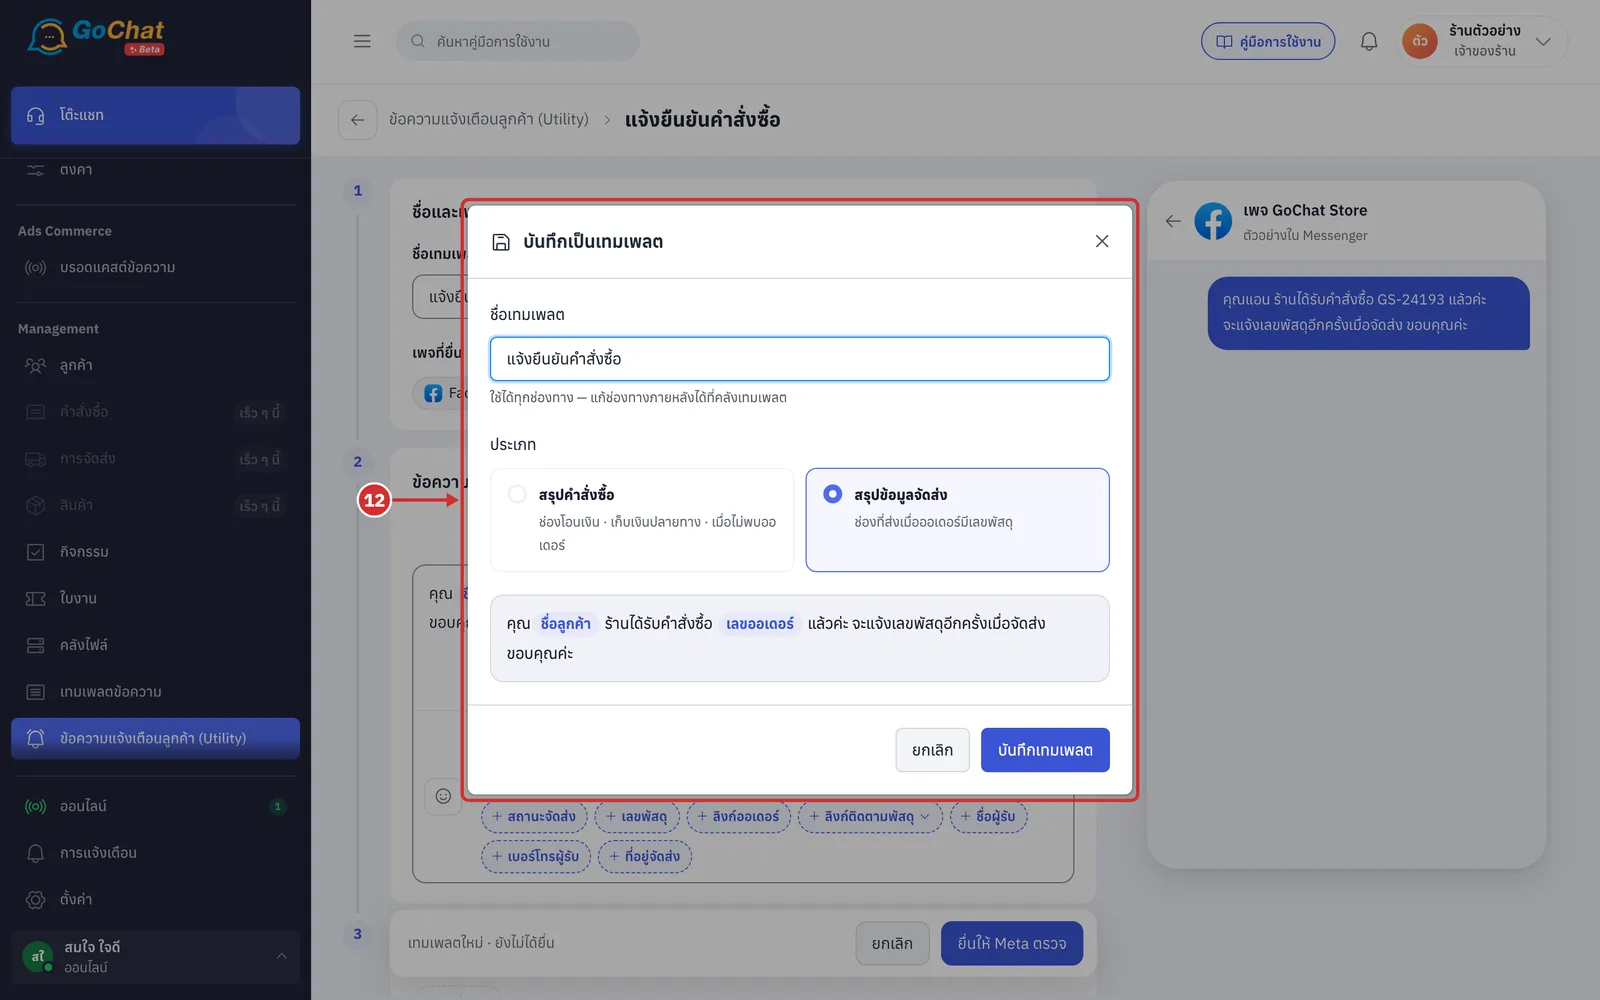
To keep the message you typed as a template, click บันทึกเป็นเทมเพลต (Save as template). In the บันทึกเป็นเทมเพลต (Save as template) window, enter a name, choose a ประเภท (Type), and click บันทึกเทมเพลต (Save template)
The default type is สรุปข้อมูลจัดส่ง (Shipping summary); you can change it to สรุปคำสั่งซื้อ (Order summary)
The new template can be used on all channels; change its channels later in the template library
After saving, the system shows สร้างเทมเพลต “…” แล้ว · ช่องนี้ใช้เทมเพลตแล้ว (Template “…” created · this field now uses the template)
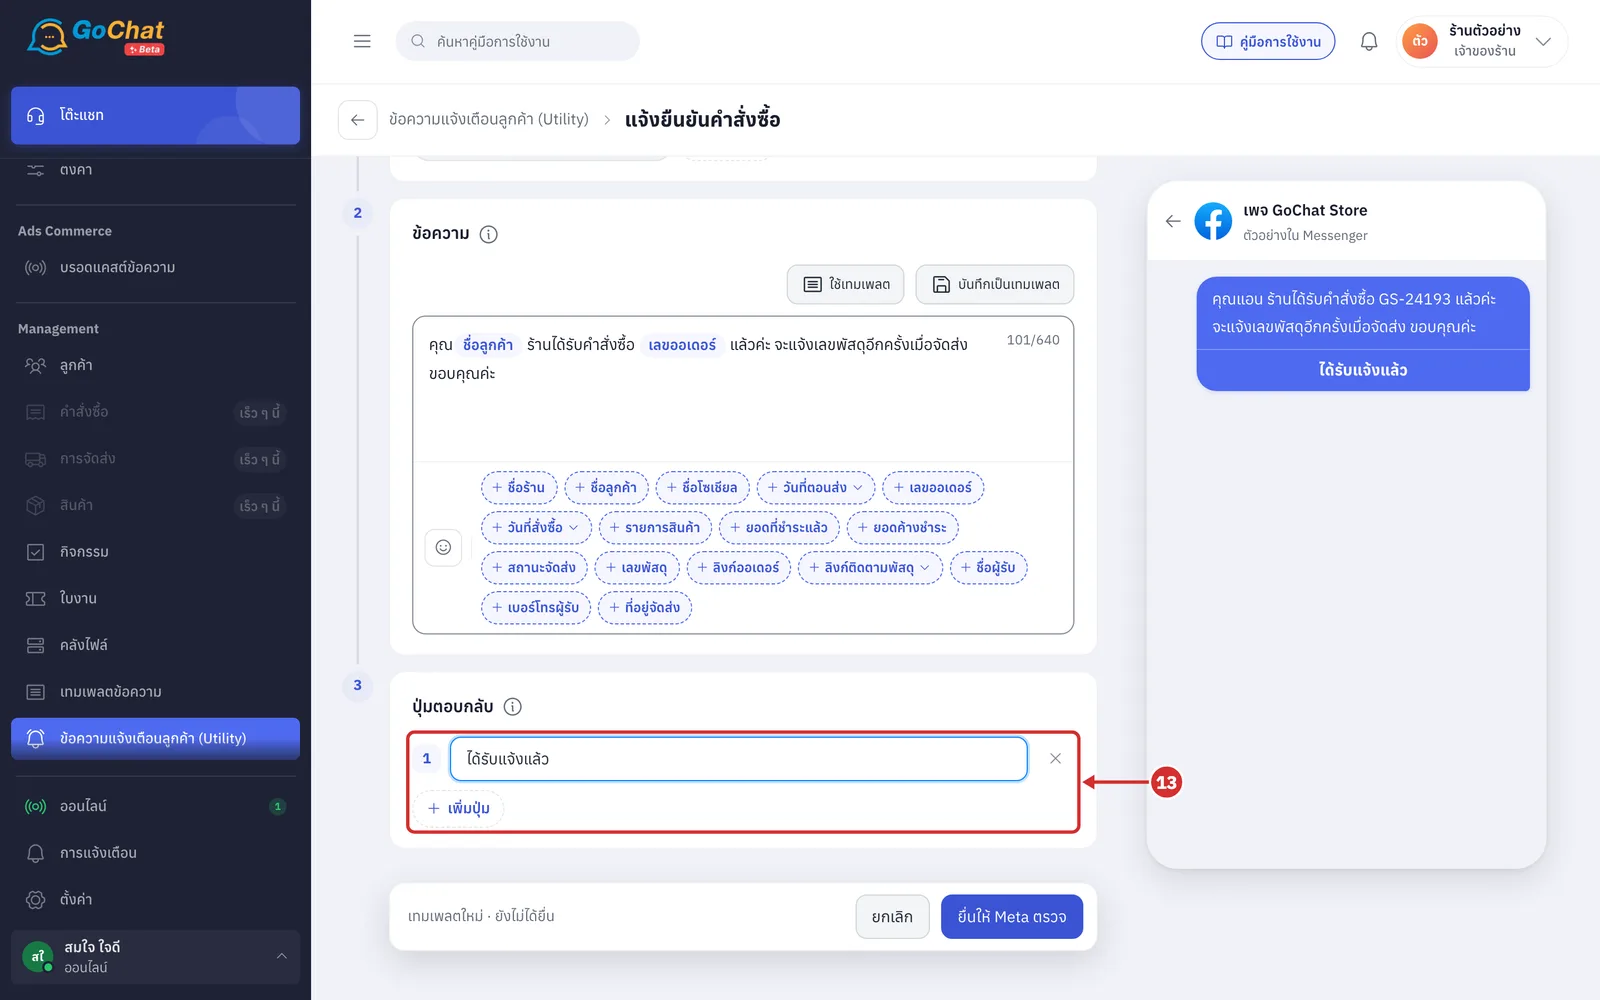
In step 3 ปุ่มตอบกลับ (Reply buttons) (optional), click เพิ่มปุ่ม (Add button) and type the button text
Up to 3 buttons, each up to 20 characters, with no duplicate text. Click × to remove a button
When the customer taps a button, its text comes into the chat as if the customer typed it, the bot replies as your shop set up, and admins can type replies for another 24 hours
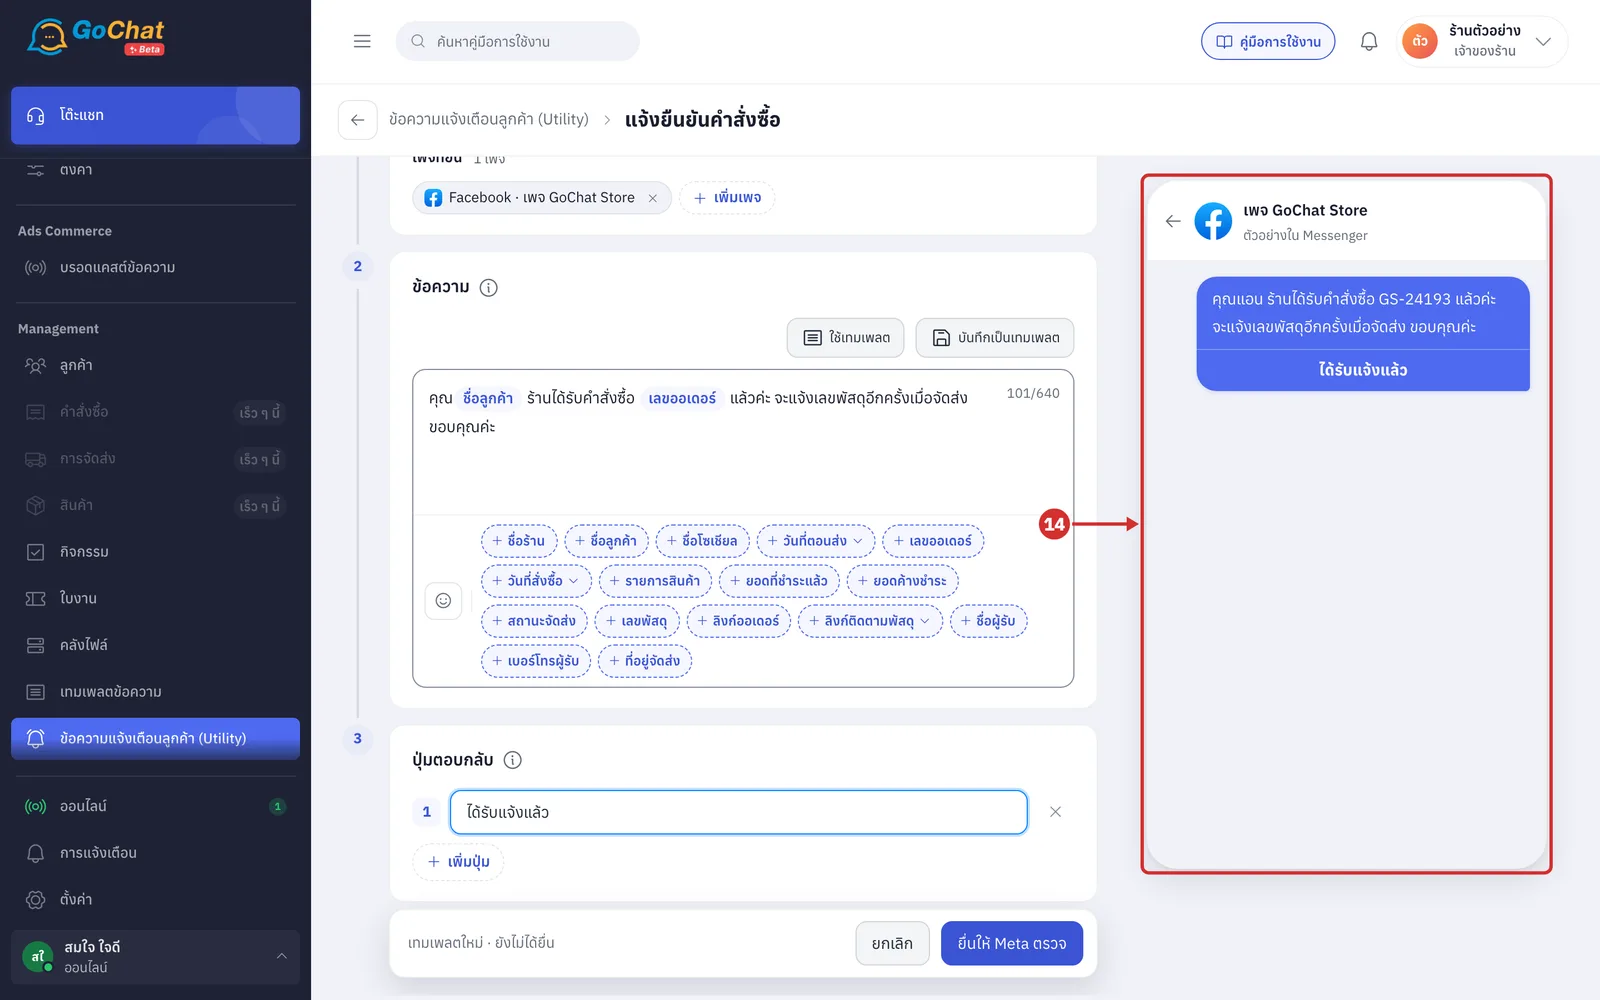
Check what the customer will see in the ตัวอย่างใน Messenger (Messenger preview) frame on the right (variables show sample values, the shop name is your real shop name, and a message with buttons shows as a card with the buttons below)
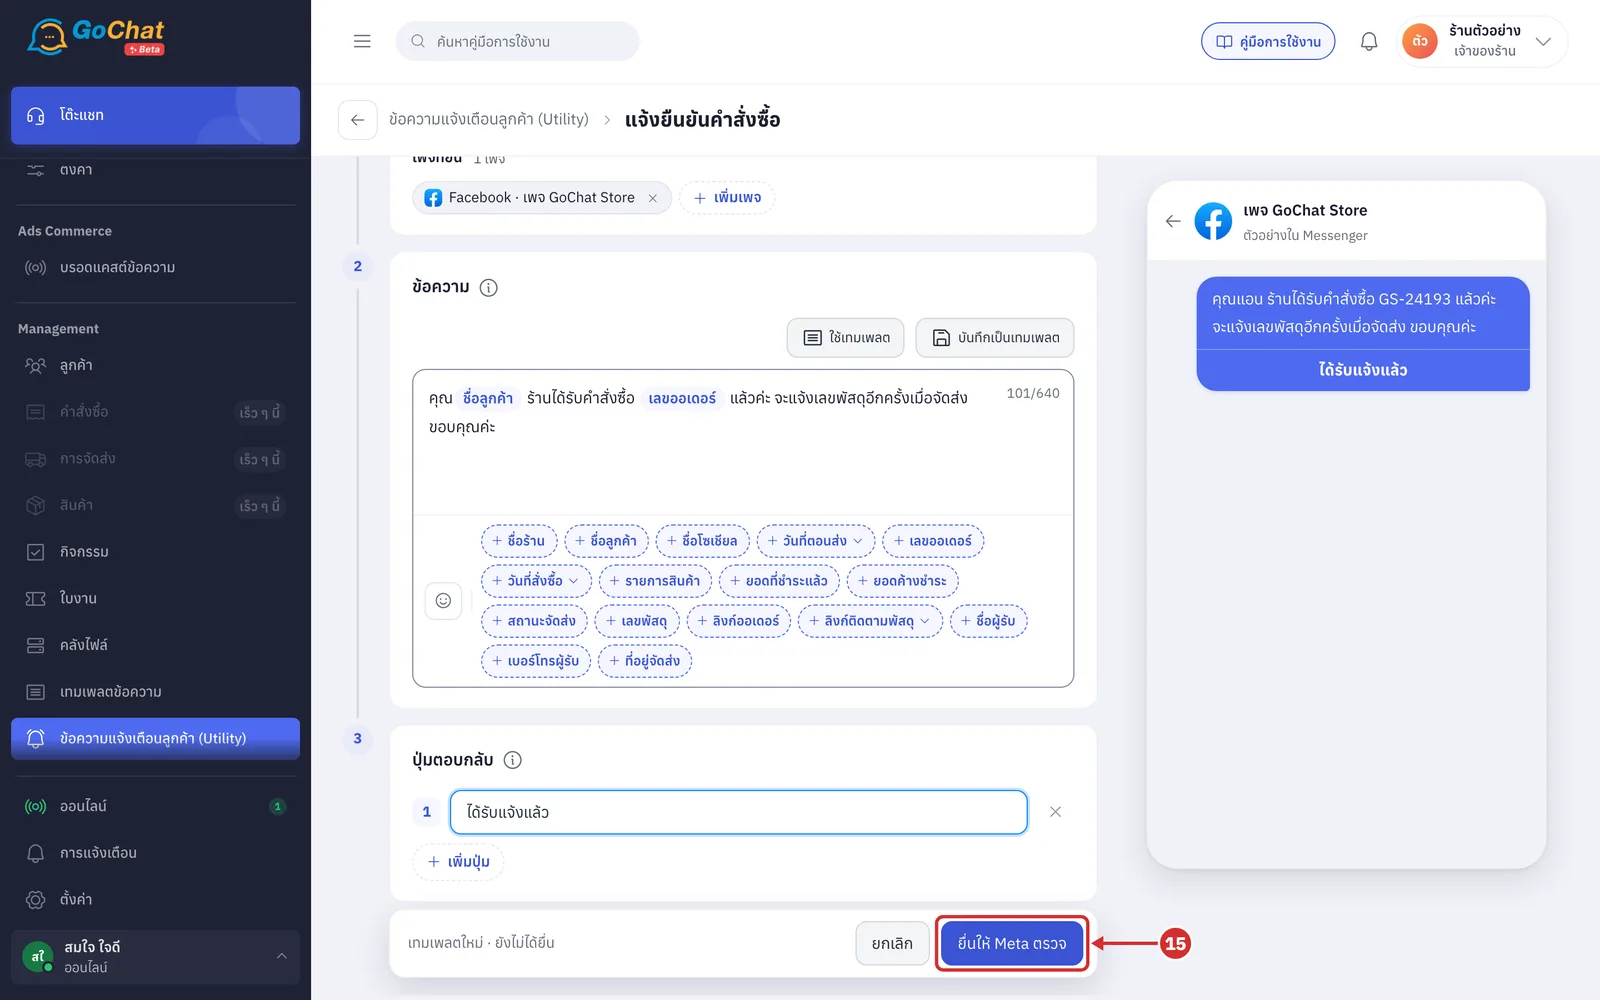
Click ยื่นให้ Meta ตรวจ (Submit to Meta) in the bar at the bottom
15.1 If something is missing, the bar at the bottom shows แก้ … จุดก่อนยื่น (Fix … items before submitting) and each field says what to fix, such as ใส่ชื่อข้อความ (Enter a name) · ใส่ข้อความ (Enter a message) · เลือกอย่างน้อย 1 เพจ (Choose at least 1 page)
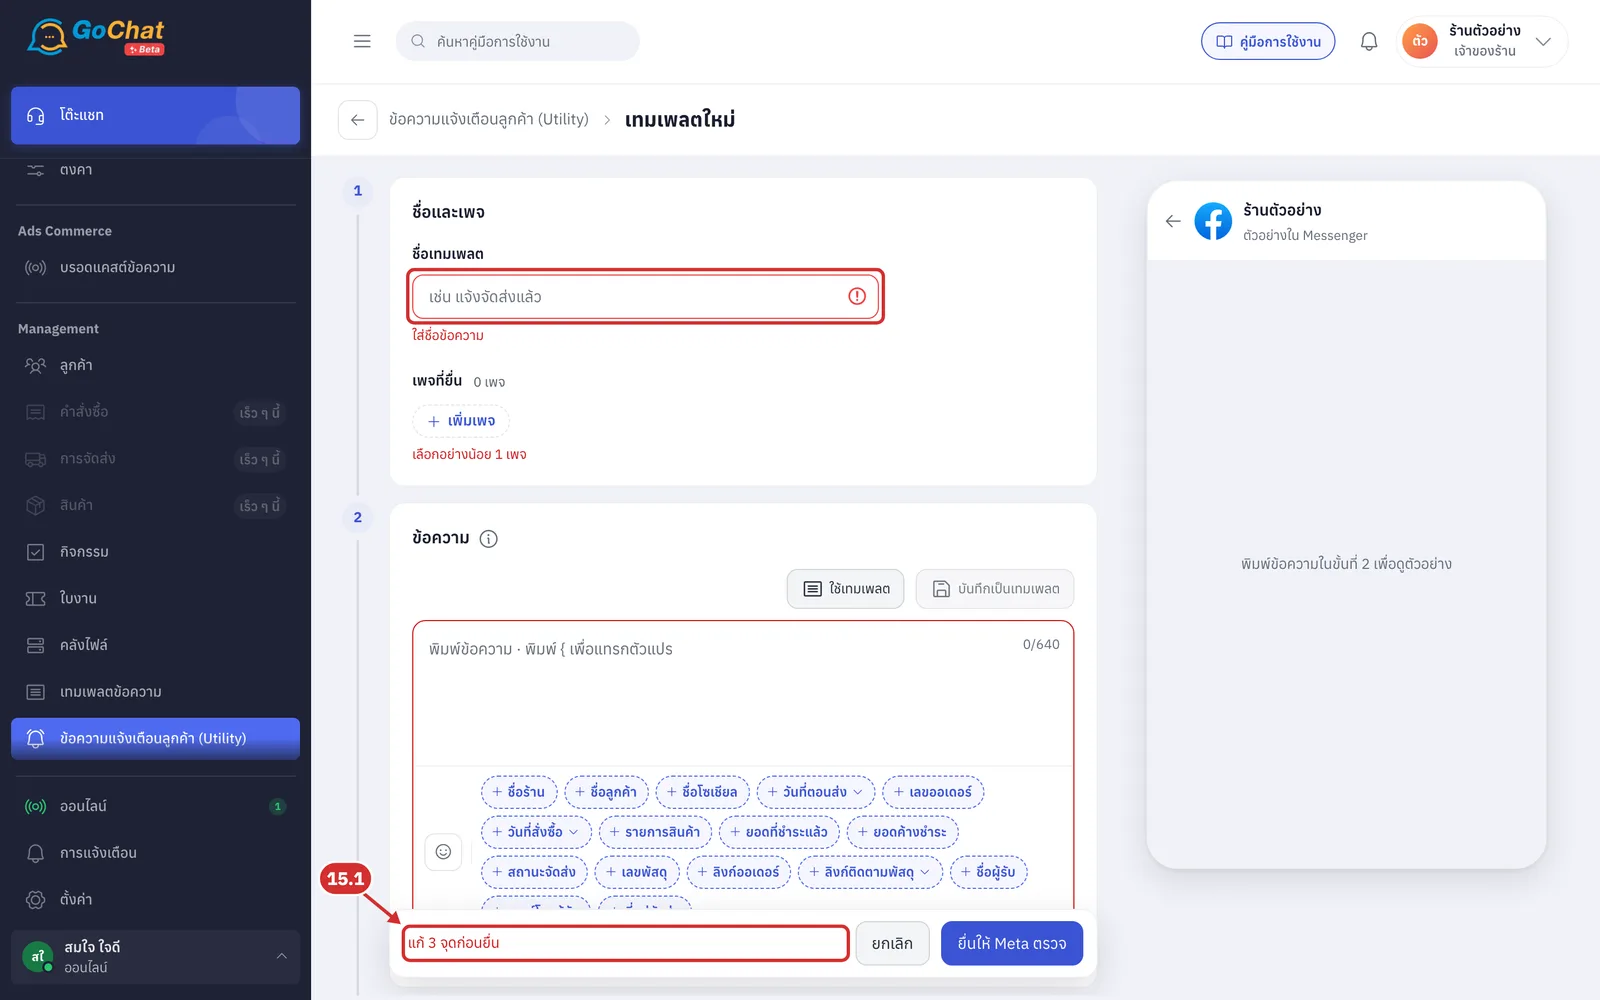
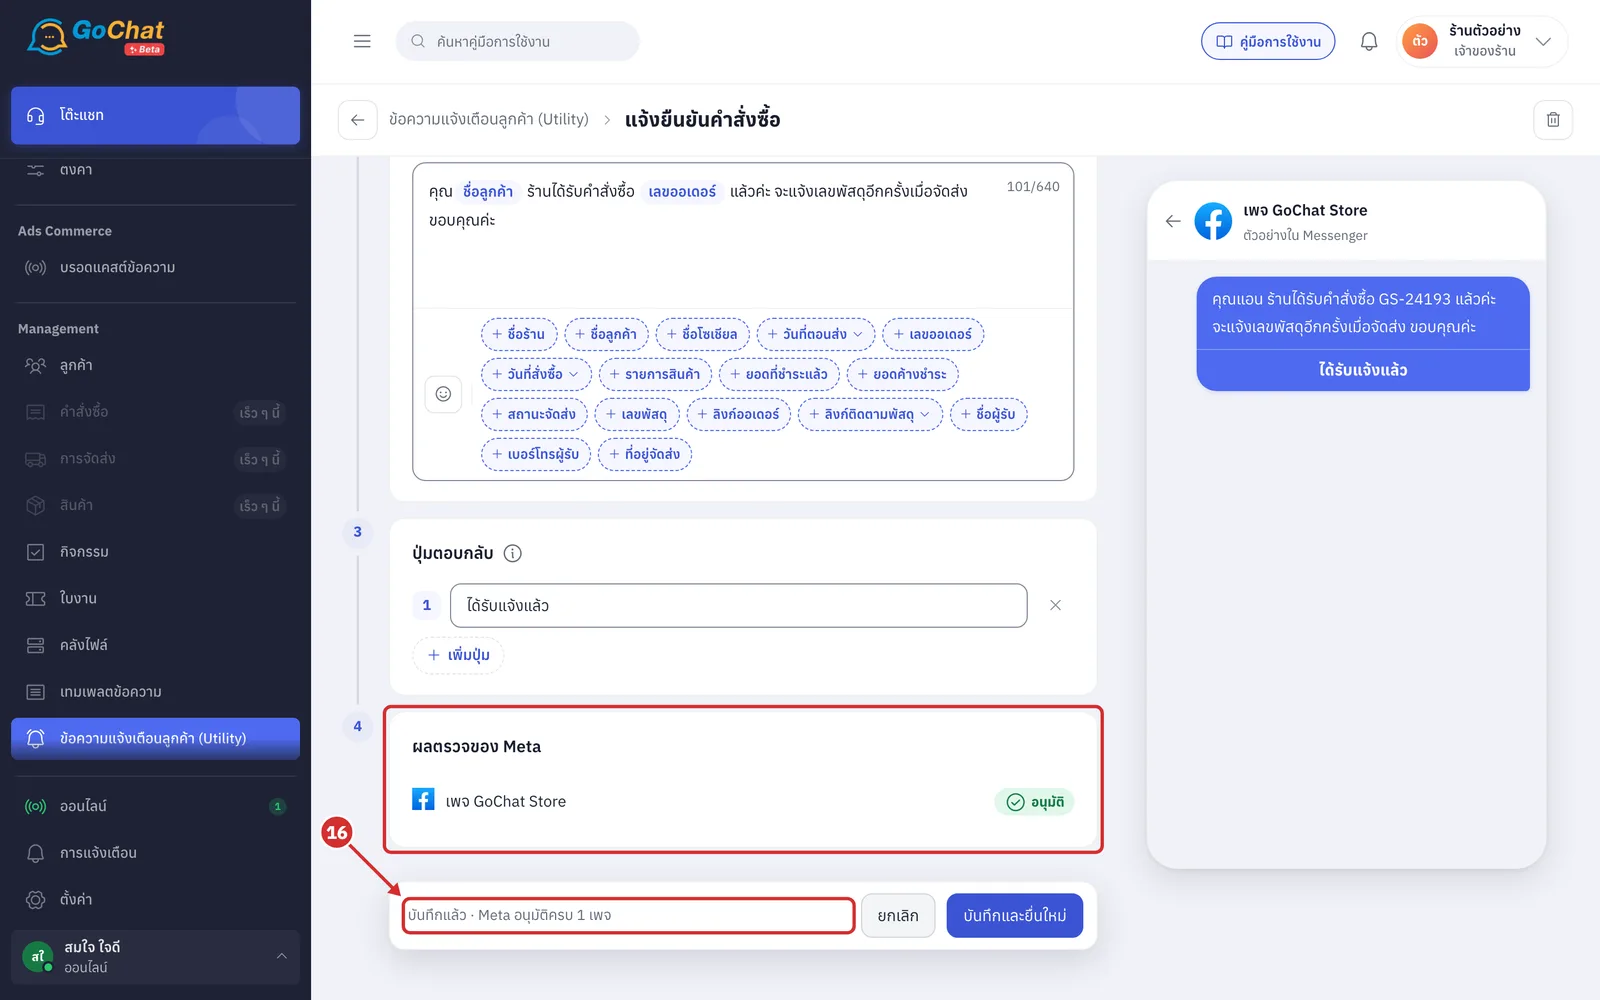
The system submits the message to Meta and stays on the page. Step 4 ผลตรวจของ Meta (Meta review results) shows the status for each page, and the bar at the bottom shows the result
บันทึกแล้ว · Meta อนุมัติครบ … เพจ (Saved · Meta approved all … pages): it can be sent on every page
บันทึกแล้ว · Meta อนุมัติ … จาก … เพจ · กำลังรอผลอีก … เพจ (Saved · Meta approved … of … pages · waiting for … more): the system keeps asking for up to 2 minutes. If there is still no result, it shows Meta ยังตรวจอีก … เพจ — ออกจากหน้านี้ได้ ผลจะขึ้นที่หน้ารายการ (Meta is still reviewing … pages — you can leave; the result will appear on the list page)
บันทึกแล้ว · ถูกปฏิเสธ … เพจ — ดูเหตุผลในขั้นที่ 4 (Saved · rejected on … pages — see the reasons in step 4): see how to fix it in the next section
Reading why Meta did not approve
Open a message with the ถูกปฏิเสธ (Rejected) status. Step 4 ผลตรวจของ Meta (Meta review results) shows the reason and how to fix it under the page name. Edit the message accordingly and click บันทึกและยื่นใหม่ (Save and resubmit)
Meta มองว่าเป็นข้อความการตลาด (Meta sees it as marketing): remove discounts or invitations to buy
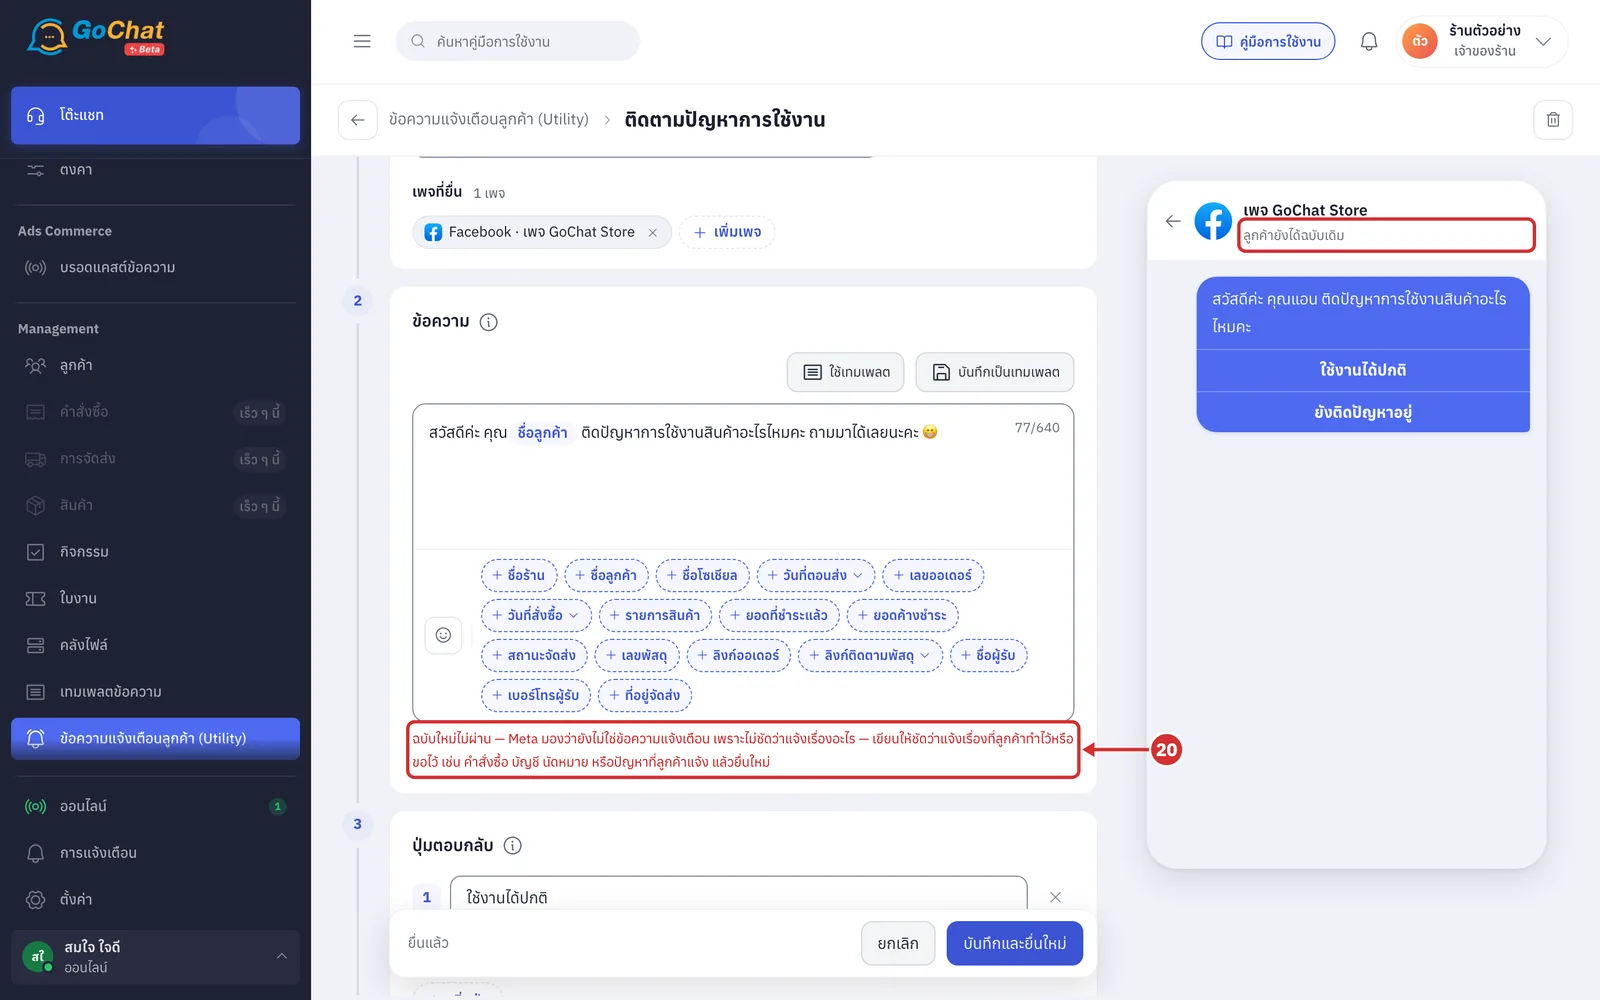
Meta มองว่ายังไม่ใช่ข้อความแจ้งเตือน เพราะไม่ชัดว่าแจ้งเรื่องอะไร (Meta does not see it as a notification because it is unclear what it is about): make it clear the message is about something the customer did or asked for, such as an order, an account, an appointment, or a problem they reported
ตัวแปรเยอะเกินเมื่อเทียบกับข้อความ (Too many variables for the text): add more text
รูปแบบตัวแปรไม่ถูกต้อง (Variable format is wrong): check that the message does not start or end with a variable
Meta ไม่อนุญาตเนื้อหานี้ (Meta does not allow this content): change the message
การเชื่อมต่อเพจหลุด (Page connection dropped) or เพจนี้ยังไม่มีสิทธิ์ส่งข้อความแจ้งเตือนลูกค้า (This page has no permission to send customer notification messages): ask the shop owner to reconnect the page on the Channels page
Examples from real submissions
Approved: "คุณ{ชื่อลูกค้า} คำสั่งซื้อ {เลขออเดอร์} ส่งแล้ว เลขพัสดุ {เลขพัสดุ} ขอบคุณที่อุดหนุนค่ะ" (clearly about the customer's order)
Approved: "สวัสดีค่ะ {ชื่อลูกค้า} ติดปัญหาการทำงานอะไรไหมคะ" (following up on the customer's problem)
Rejected: "ทักค่ะ" (unclear what it is about)
Rejected: the second example with "ถามมาได้เลยนะคะ" (feel free to ask) added, or with an emoji at the end (Meta sees it as inviting a chat, so it counts as marketing)
Editing a message in use
An approved message keeps working while you edit it. The system submits the new version to Meta separately, and customers keep getting the old message until the new version is approved on every page. Then it switches to the new message on all pages at once.
Open the message, change the text or reply buttons. The bar at the bottom shows แก้แล้วต้องรอ Meta ตรวจใหม่ · ระหว่างรอยังส่งข้อความเดิม (Edited — needs Meta review again · the old message is sent meanwhile). Click บันทึกและยื่นใหม่ (Save and resubmit)
Changing only the name, or only removing pages, does not need a new review
Adding a page submits the message to that page
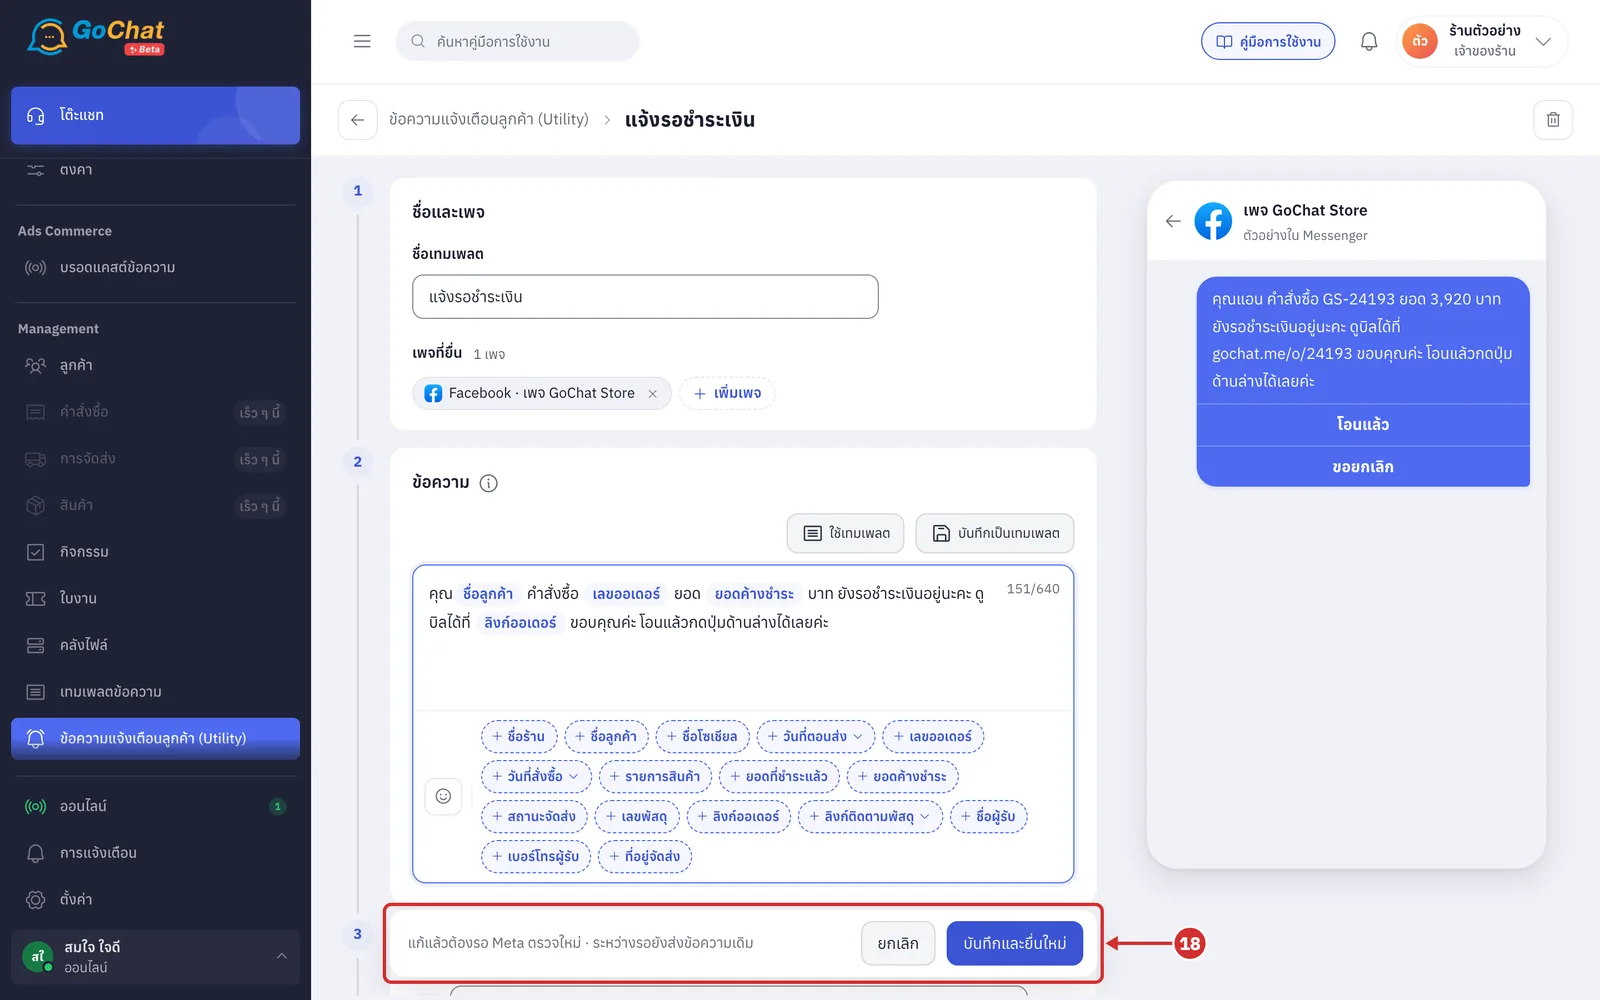
While Meta reviews the new version, the line กำลังตรวจฉบับใหม่ · ยังส่งฉบับเดิม (Reviewing the new version · still sending the old one) appears under the message box (the list page shows the same line under the status label). For a message linked to a template, editing the template on the message templates page resubmits the new version for you in the same way
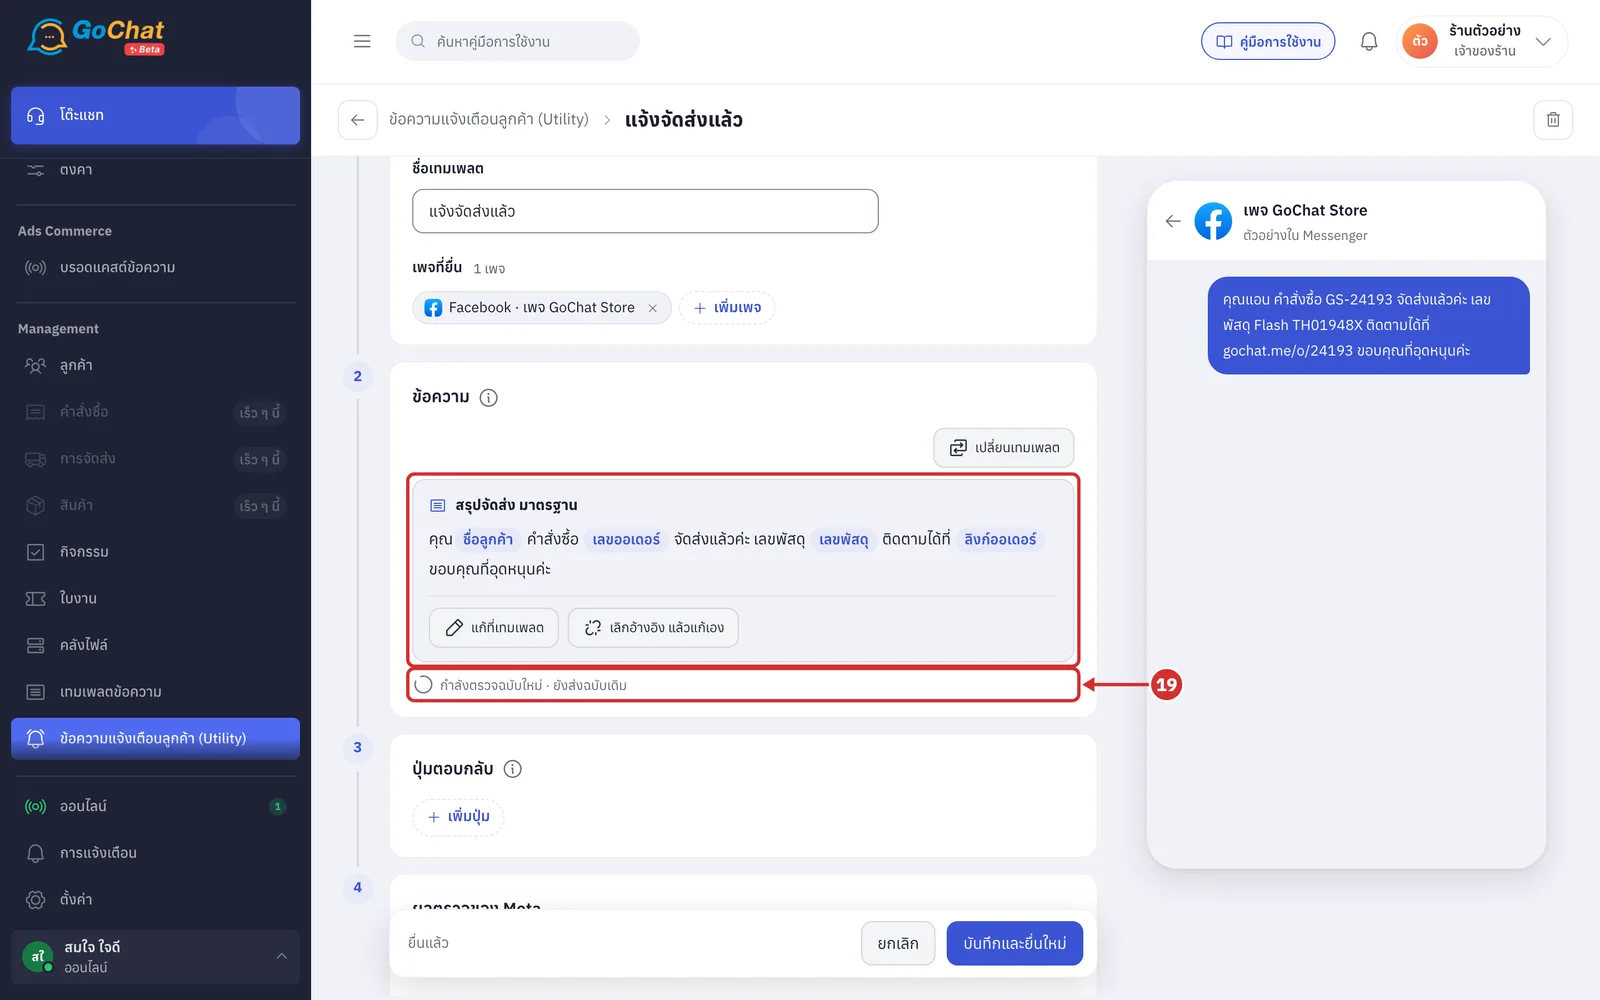
If the new version is rejected, ฉบับใหม่ไม่ผ่าน (New version rejected) appears under the message box with the reason, and the preview on the right becomes ลูกค้ายังได้ฉบับเดิม (Customers still get the old version) with the message being sent
A message you typed: edit it according to the reason and click บันทึกและยื่นใหม่ (Save and resubmit)
A message linked to a template: edit the template and the system resubmits it, or click เลิกอ้างอิง ใช้ข้อความเดิม (Unlink and keep the old message) to go back to the message being sent
If it says ฉบับใหม่ยื่นไม่สำเร็จ (New version could not be submitted — it did not reach Meta, rather than Meta rejecting it), click ลองใหม่ (Try again) next to it
Deleting a customer notification message
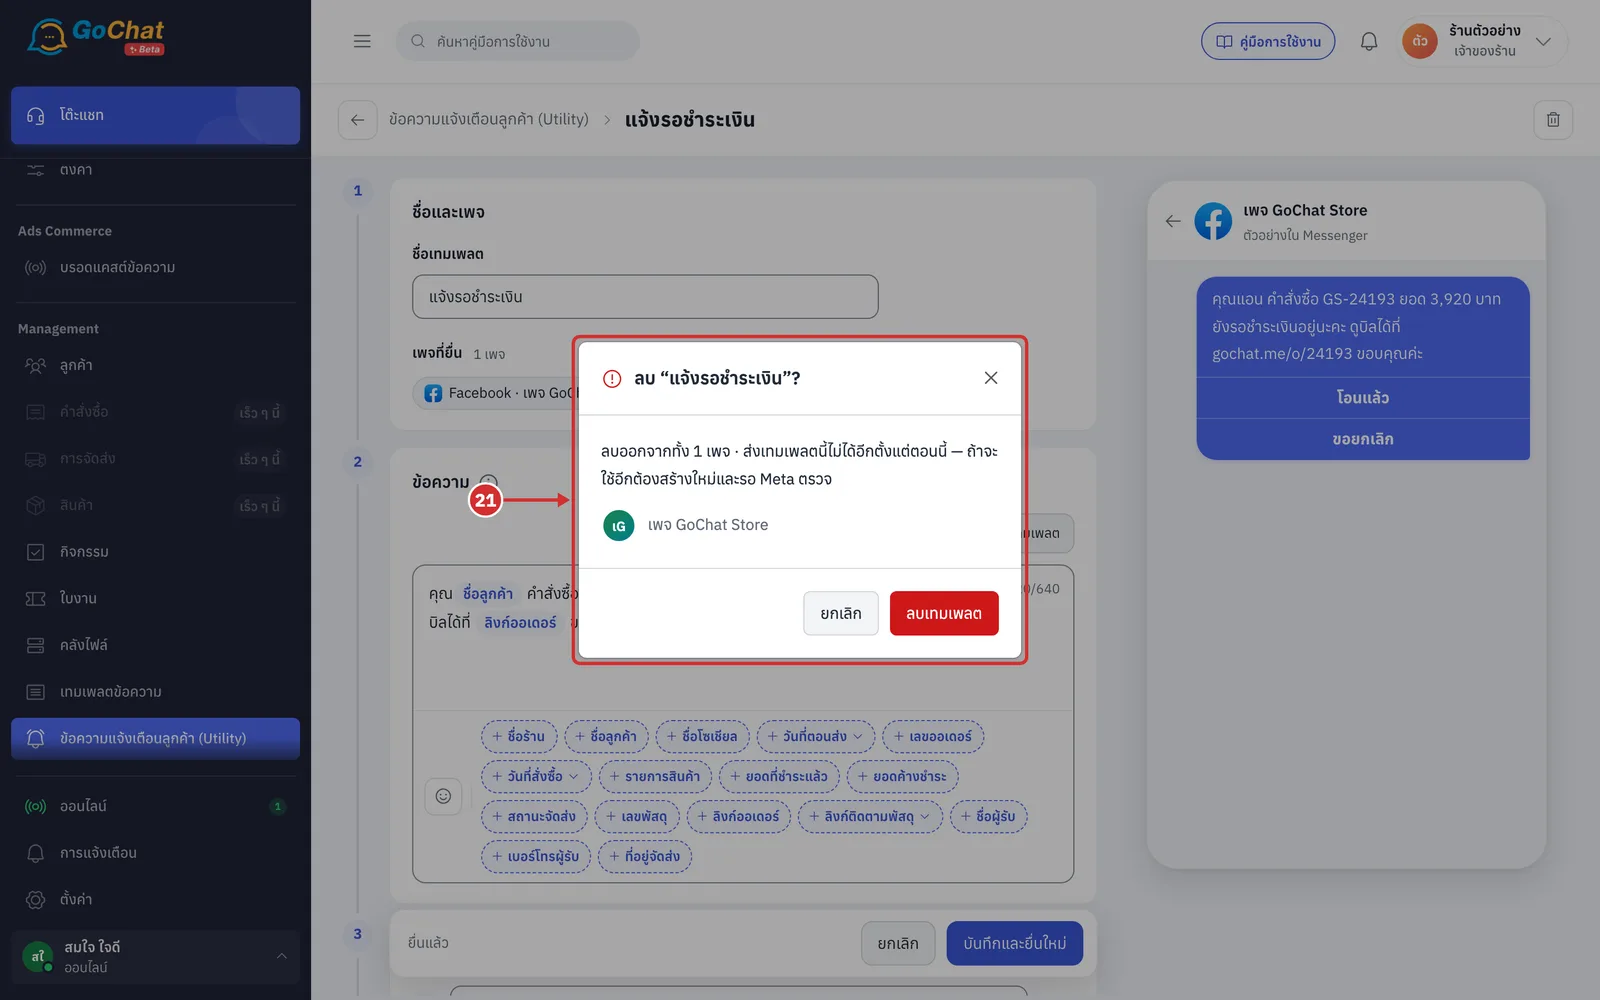
Open the message and click the trash icon at the top right. The ลบ “…”? (Delete “…”?) window says it is removed from every page it was submitted to and can no longer be sent from that moment. Click ลบเทมเพลต (Delete template) to confirm (to use it again you must create it again and wait for Meta's review)
Using customer notification messages
Sending from a chat room: see การตอบแชทลูกค้า, section on sending customer notification messages in a chat room
As a step in a sales follow-up bot: see การสร้างบอทติดตามยอดขาย, section on using customer notification messages as a bot step
Notifying the customer from an order card: see การดูและแก้ไขคำสั่งซื้อในห้องแชท, section on notifying the customer with a template from an order card
About customer notification messages
A message that uses order data can be sent only when the room has an order with all those values, for example a message with เลขพัสดุ (Tracking number) cannot be sent for an order without a tracking number yet
If the list page shows อ่านสถานะจาก Meta ไม่สำเร็จ — สถานะที่เห็นอาจไม่ล่าสุด (Could not read status from Meta — the status shown may be out of date), click ลองใหม่ (Try again) in that bar
Deleted messages cannot be restored