

Working on a single ticket
The ทำทีละใบ (One at a time) view of the ใบงาน (Tickets) page lets you follow one customer issue at a time on a single screen: its status, the progress your team has noted, the due time and the customer's chat. For example, a claim waiting for the warehouse to pack a replacement, or a tax invoice waiting for the customer to send their details.
Everyone in your shop can open and edit tickets equally. Changes are saved on the ticket, so everyone in your shop sees the same values, while customers do not see tickets. Opening new tickets, searching and filtering, and updating many tickets at once are explained in Managing tickets.
How tickets work
Status, owner, urgency and main issue are saved as soon as you click or choose them, with no save button. Internal notes and the due time need their own save button
Every change appears on the ticket's timeline with who made it and when, and as a grey line in the chat linked to the ticket
The นาฬิกา SLA (SLA clock) counts the time up to the ticket's due time. The due time is set from the urgency, and the clock pauses while the status is รอลูกค้าตอบ (Waiting for customer) or รอฝ่ายอื่น (Waiting on another team), except on tickets with a custom due date
The text box on a ticket is for internal notes only. You reply to the customer in the chat
Opening a ticket
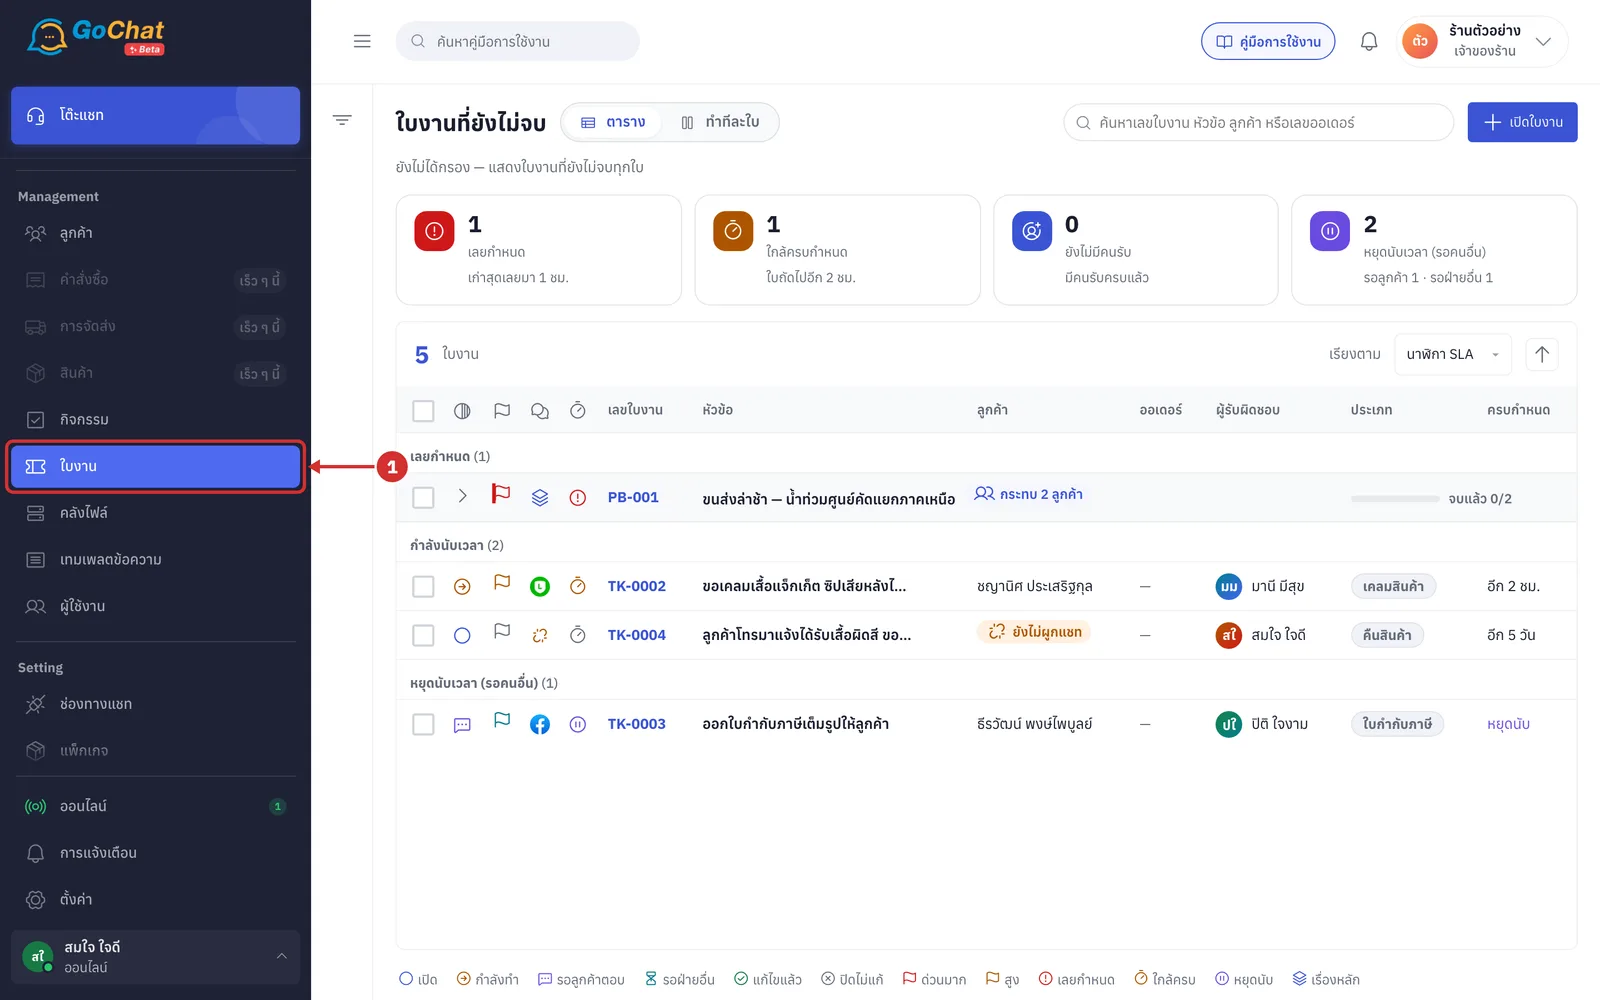
Go to the ใบงาน (Tickets) menu under Management in the left menu bar
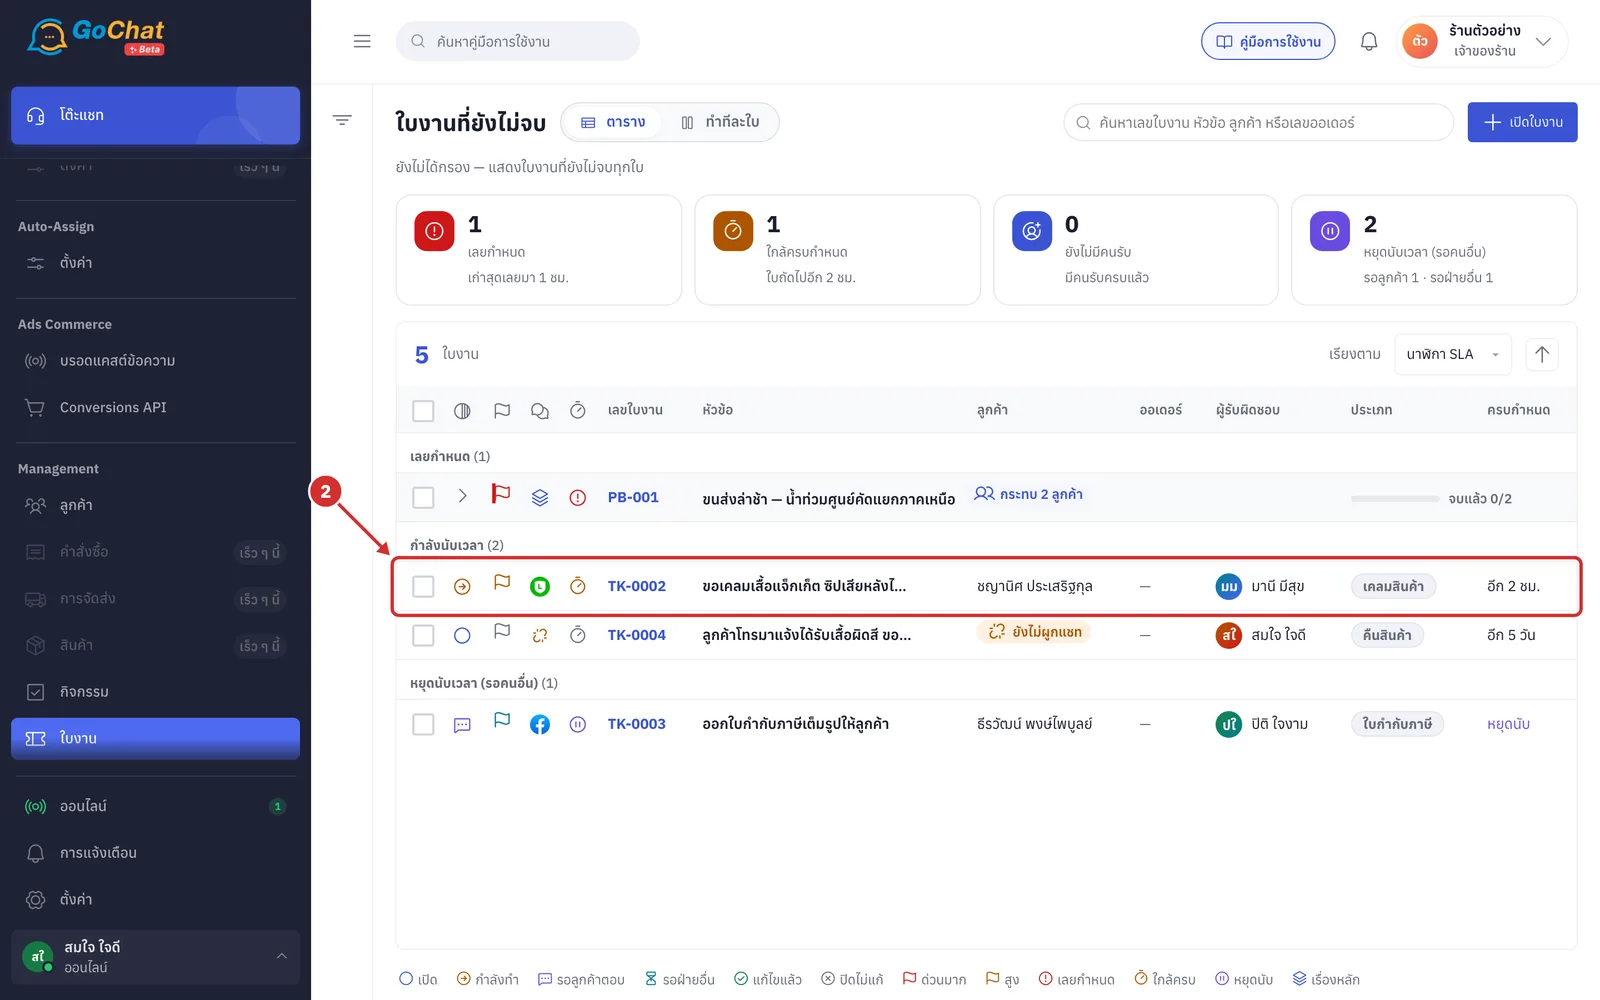
Click the ticket's row in the table. The ticket opens in ทำทีละใบ (One at a time) view
If you are already in ทำทีละใบ (One at a time) view, click the row in the list on the left instead
Each ticket has its own link ending in its number, such as /tickets/TK-0002. Anyone in your shop who opens the link sees the same ticket
The screen has 3 parts
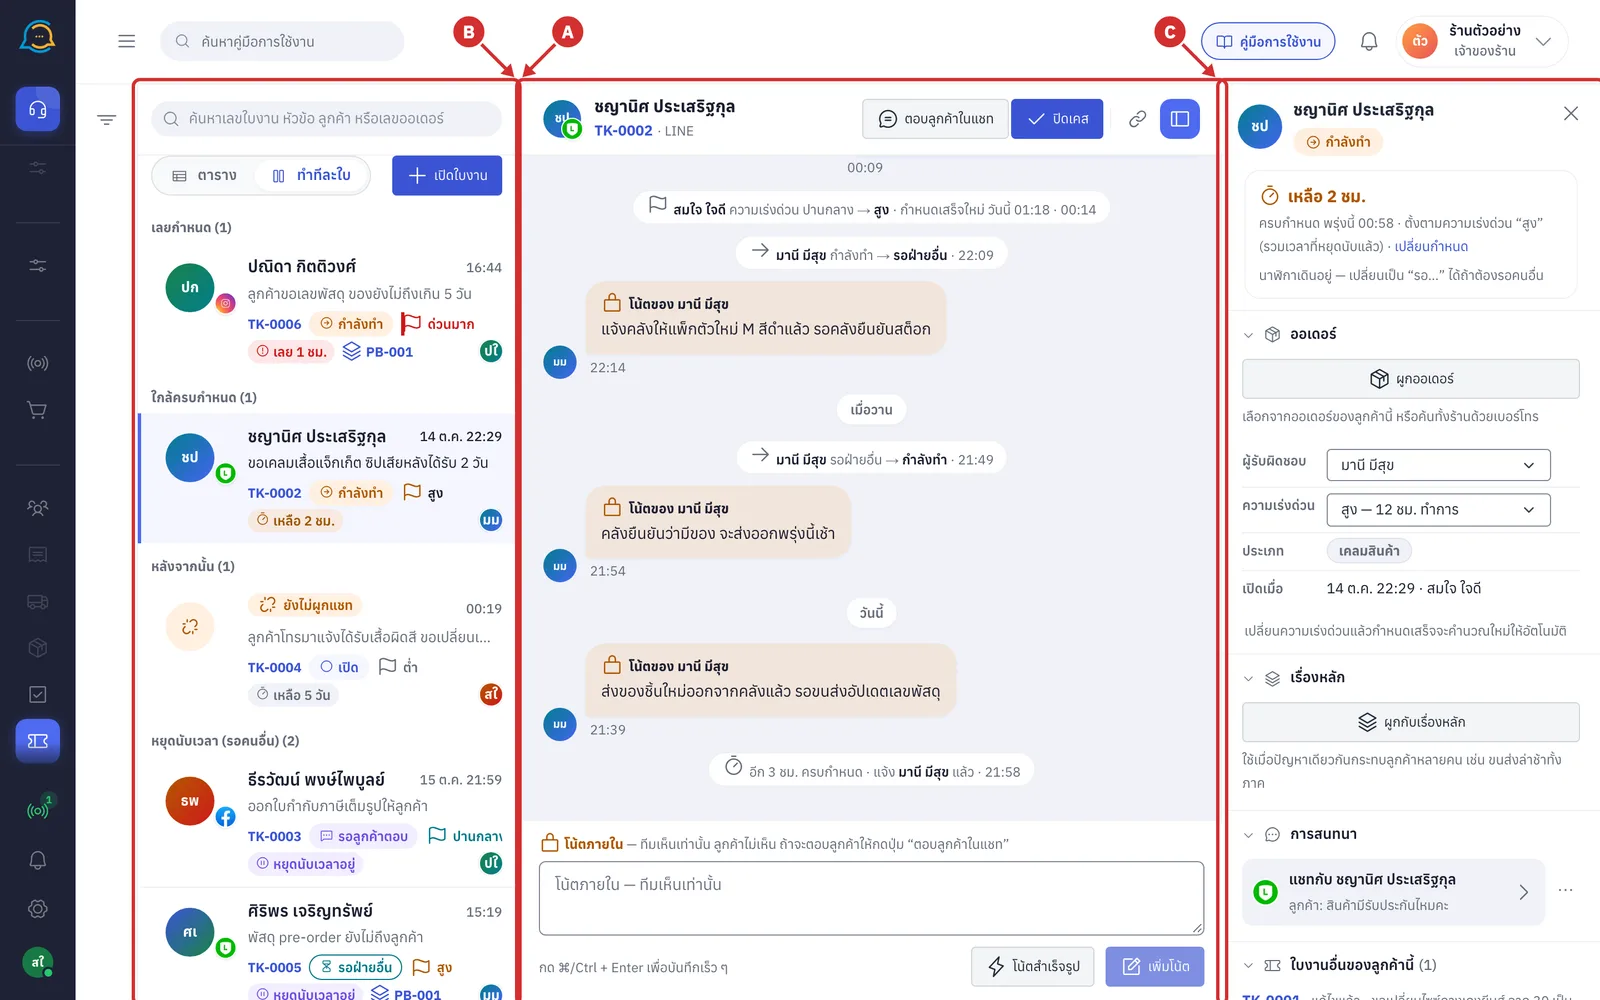
A Ticket list — open tickets grouped by due time. At the top are the search box, the ตาราง (Table) | ทำทีละใบ (One at a time) switch and the เปิดใบงาน (Open ticket) button, explained in Managing tickets
B Selected ticket — the header, summary, status bar, timeline and internal note box
C Details panel — due time, order, owner, urgency, main issue, conversation and the customer's other tickets
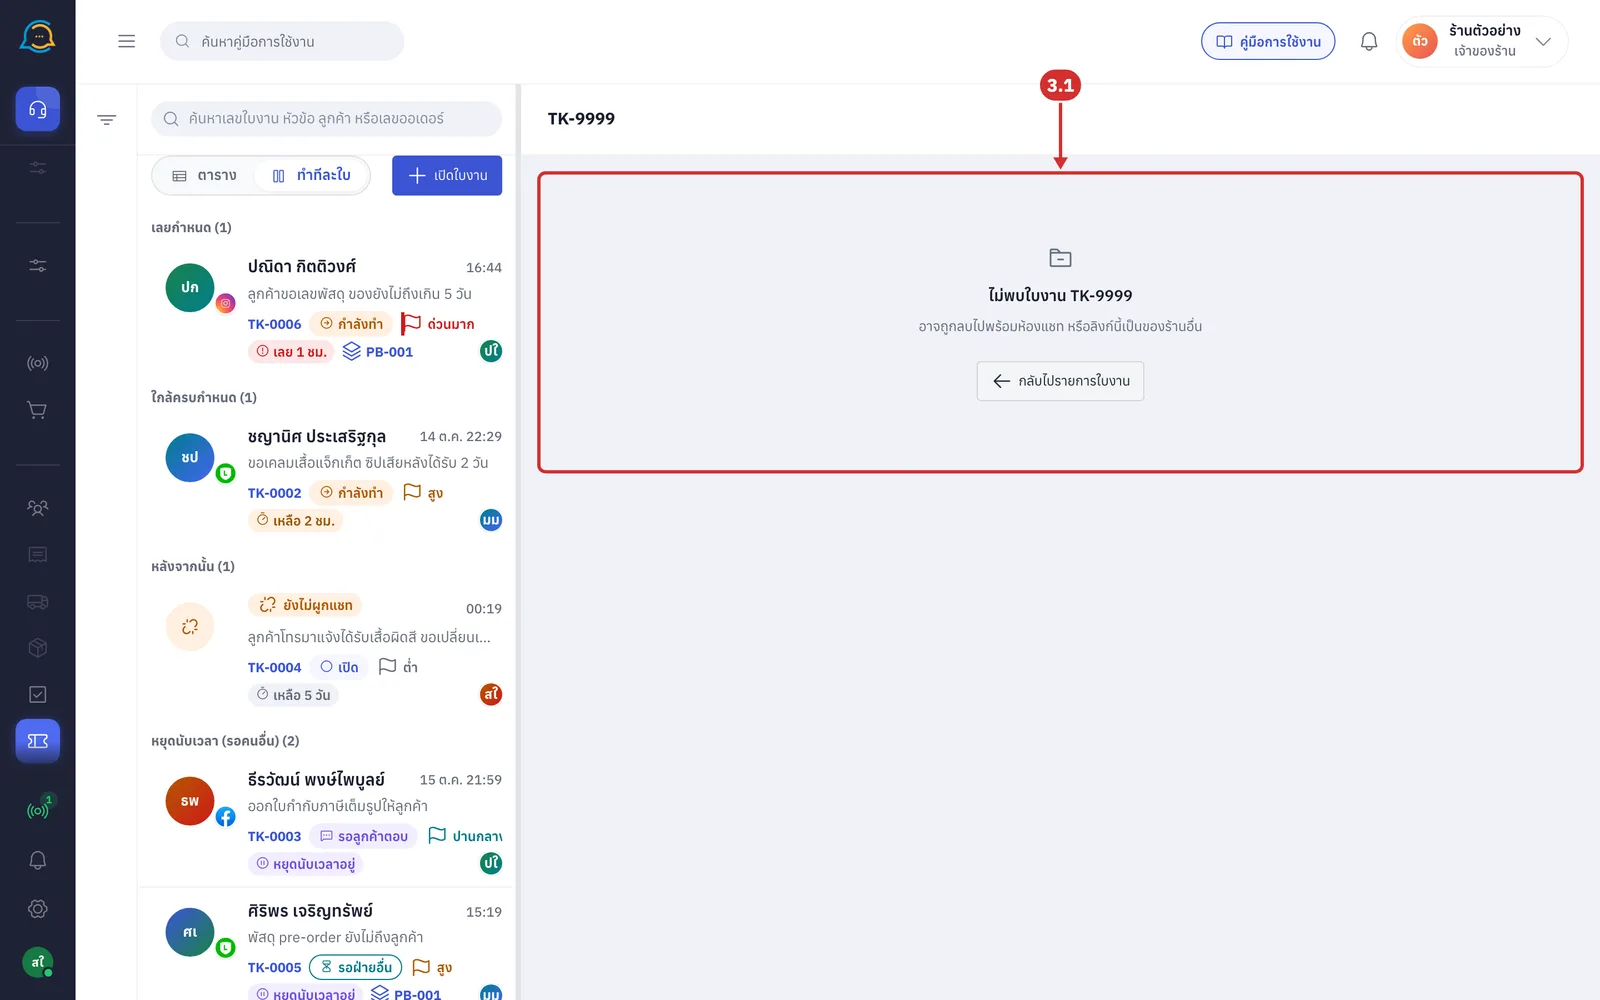
3.1 If you open a link to a ticket that does not exist, you see ไม่พบใบงาน (Ticket not found) with its number and อาจถูกลบไปพร้อมห้องแชท หรือลิงก์นี้เป็นของร้านอื่น (It may have been deleted with its chat, or this link belongs to another shop). Click กลับไปรายการใบงาน (Back to ticket list) to choose another ticket
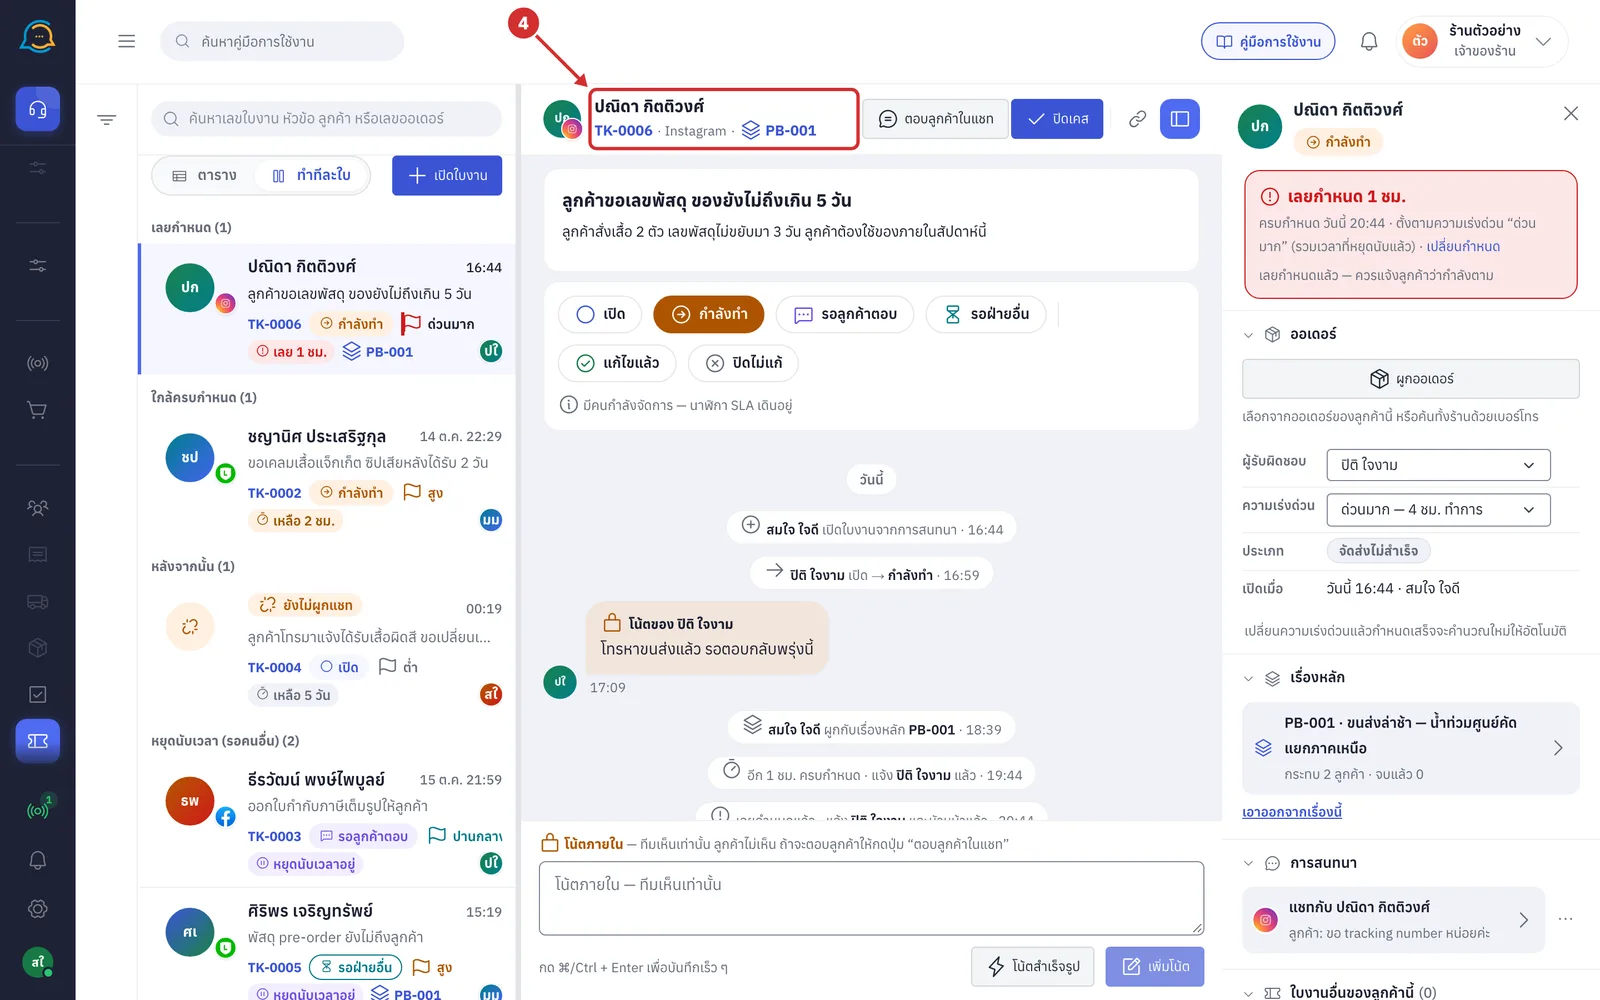
Reading the ticket header
The header shows the name of the customer in the linked chat. A ticket with no chat shows its subject instead. The line below shows
The ticket number, such as TK-0006, and the chat's channel, such as Instagram
ยังไม่ผูกแชท (No chat linked) — shown when the ticket is not linked to a chat
The main issue number, such as PB-001 — click it to open the main issue page
The linked order number with the order's status — click the number to open the order in GoSaaS in a new tab
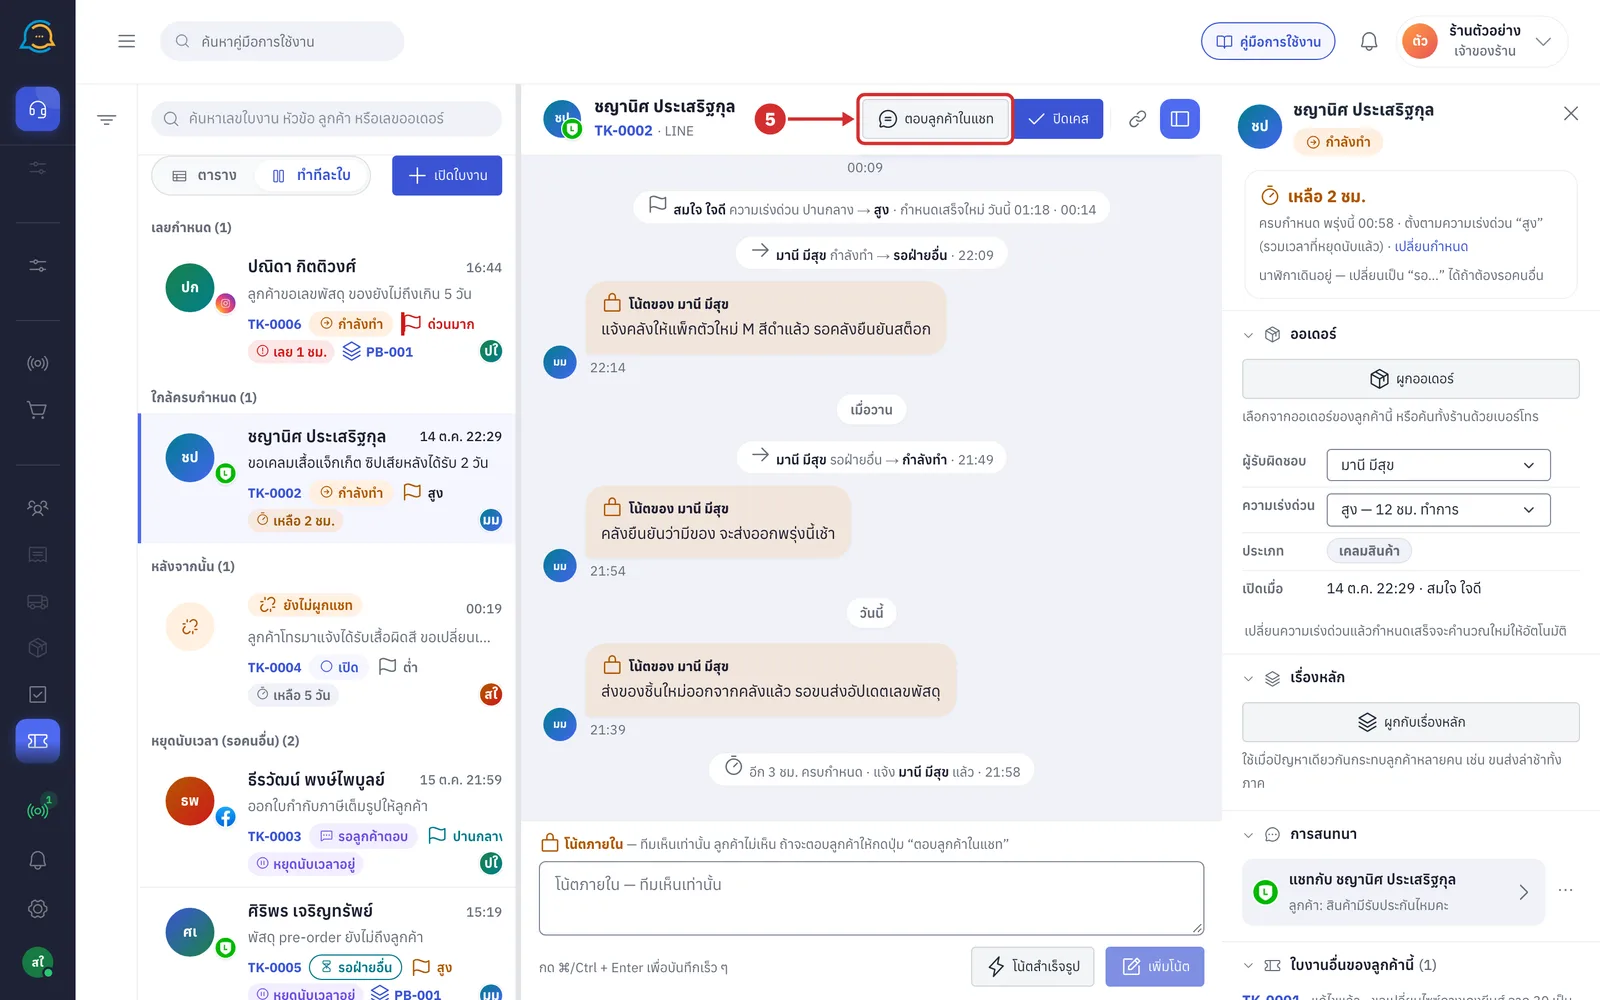
Click ตอบลูกค้าในแชท (Reply in chat) to go to the customer's chat and type your reply there
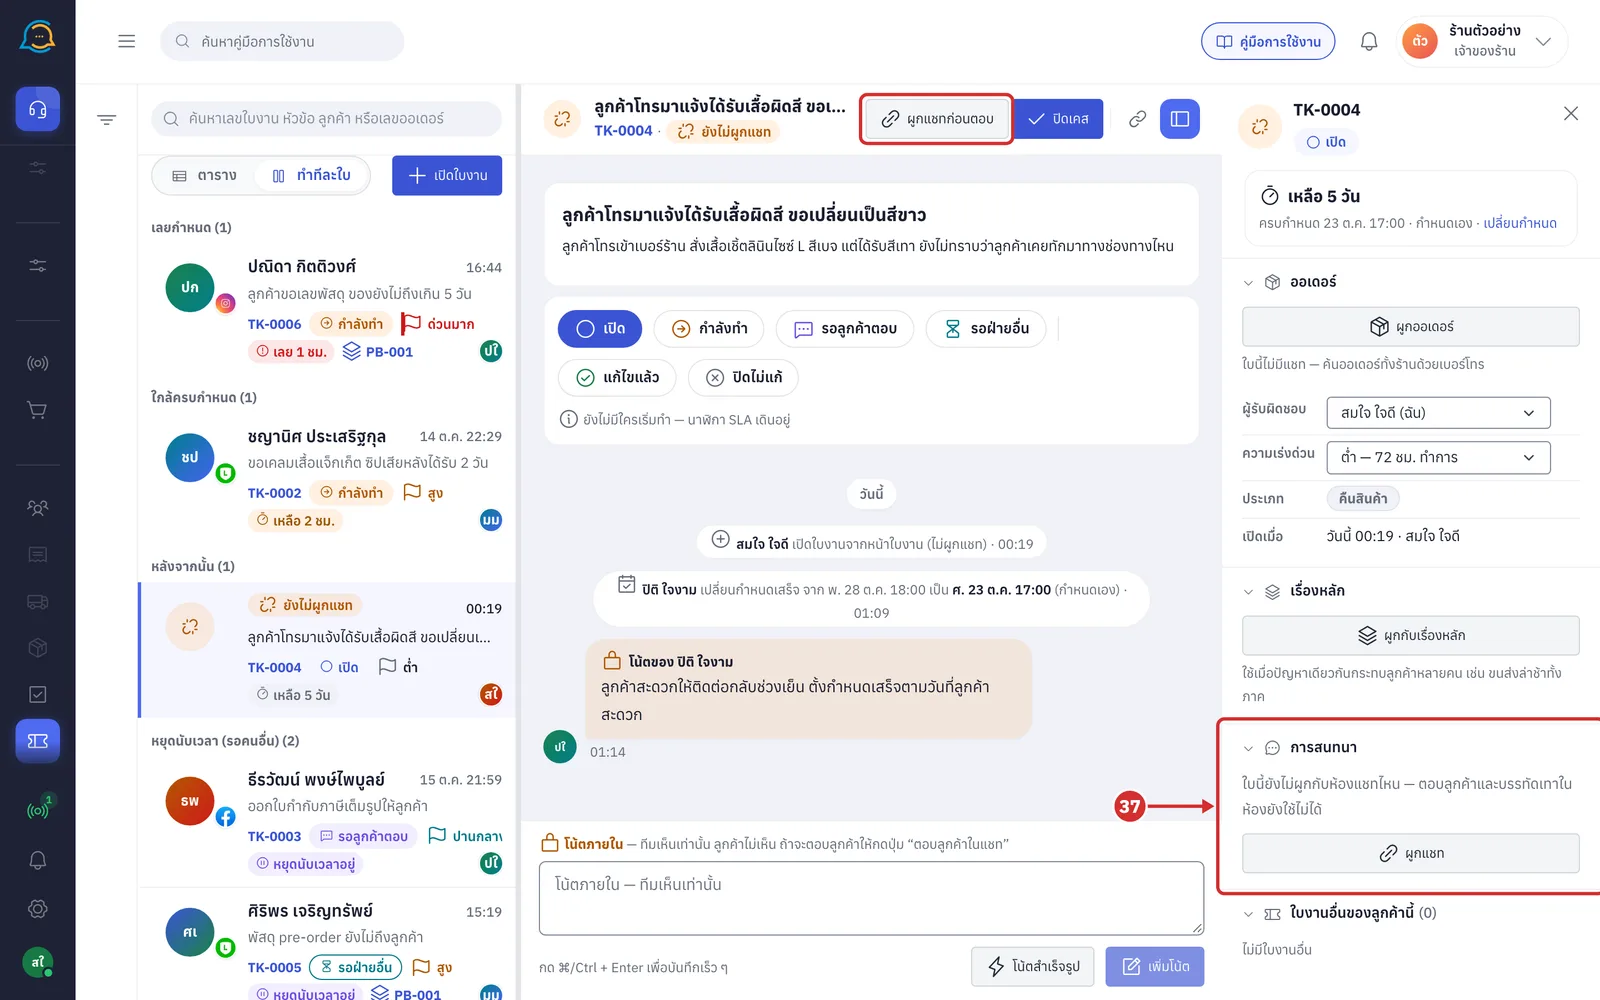
On a ticket with no chat, this button is ผูกแชทก่อนตอบ (Link a chat before replying), which opens the chat picker (see step 38)
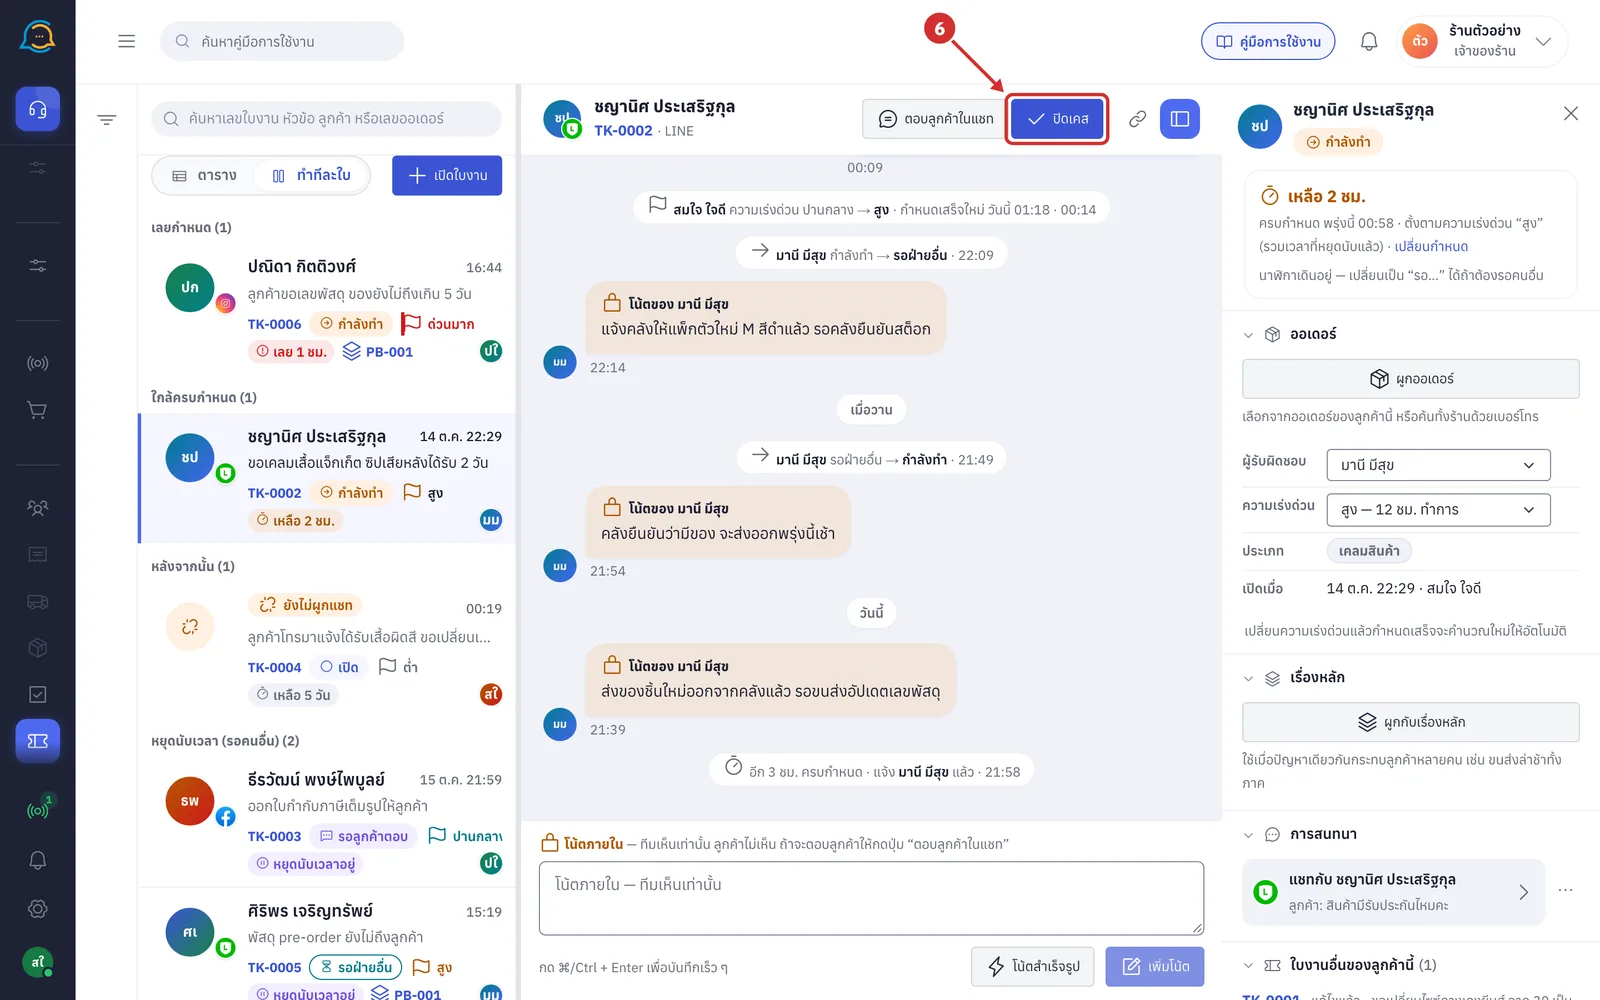
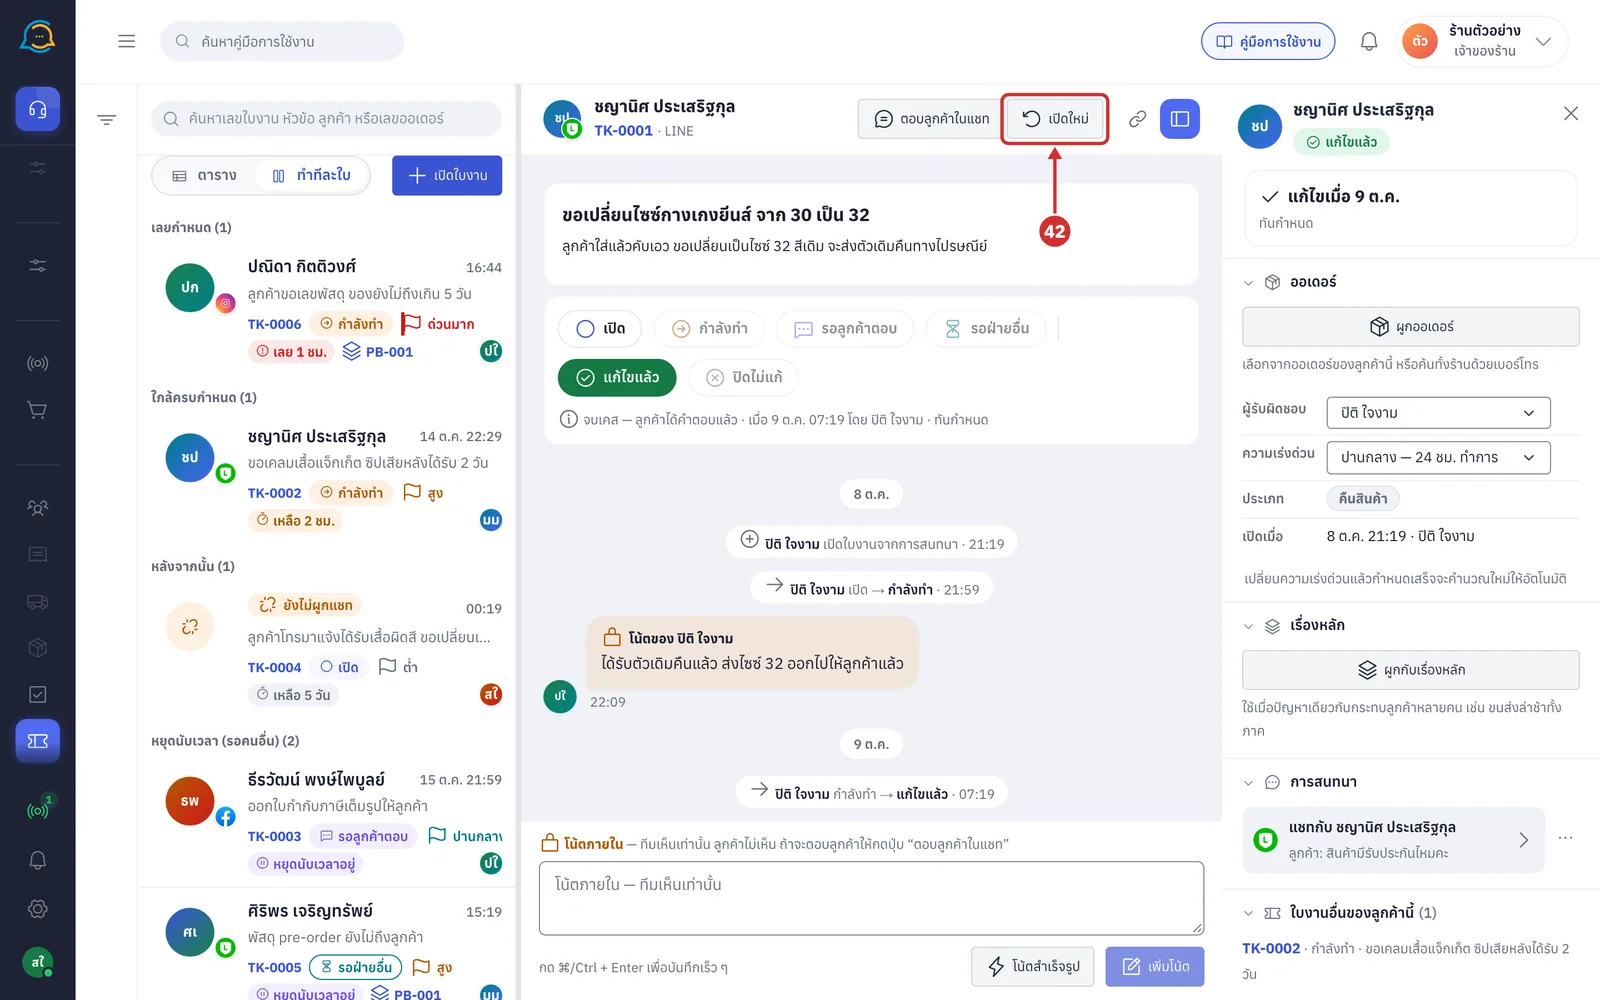
Click ปิดเคส (Close case) when the issue is fixed. The status changes to แก้ไขแล้ว (Resolved) straight away (on a finished ticket, this button is เปิดใหม่ (Reopen))
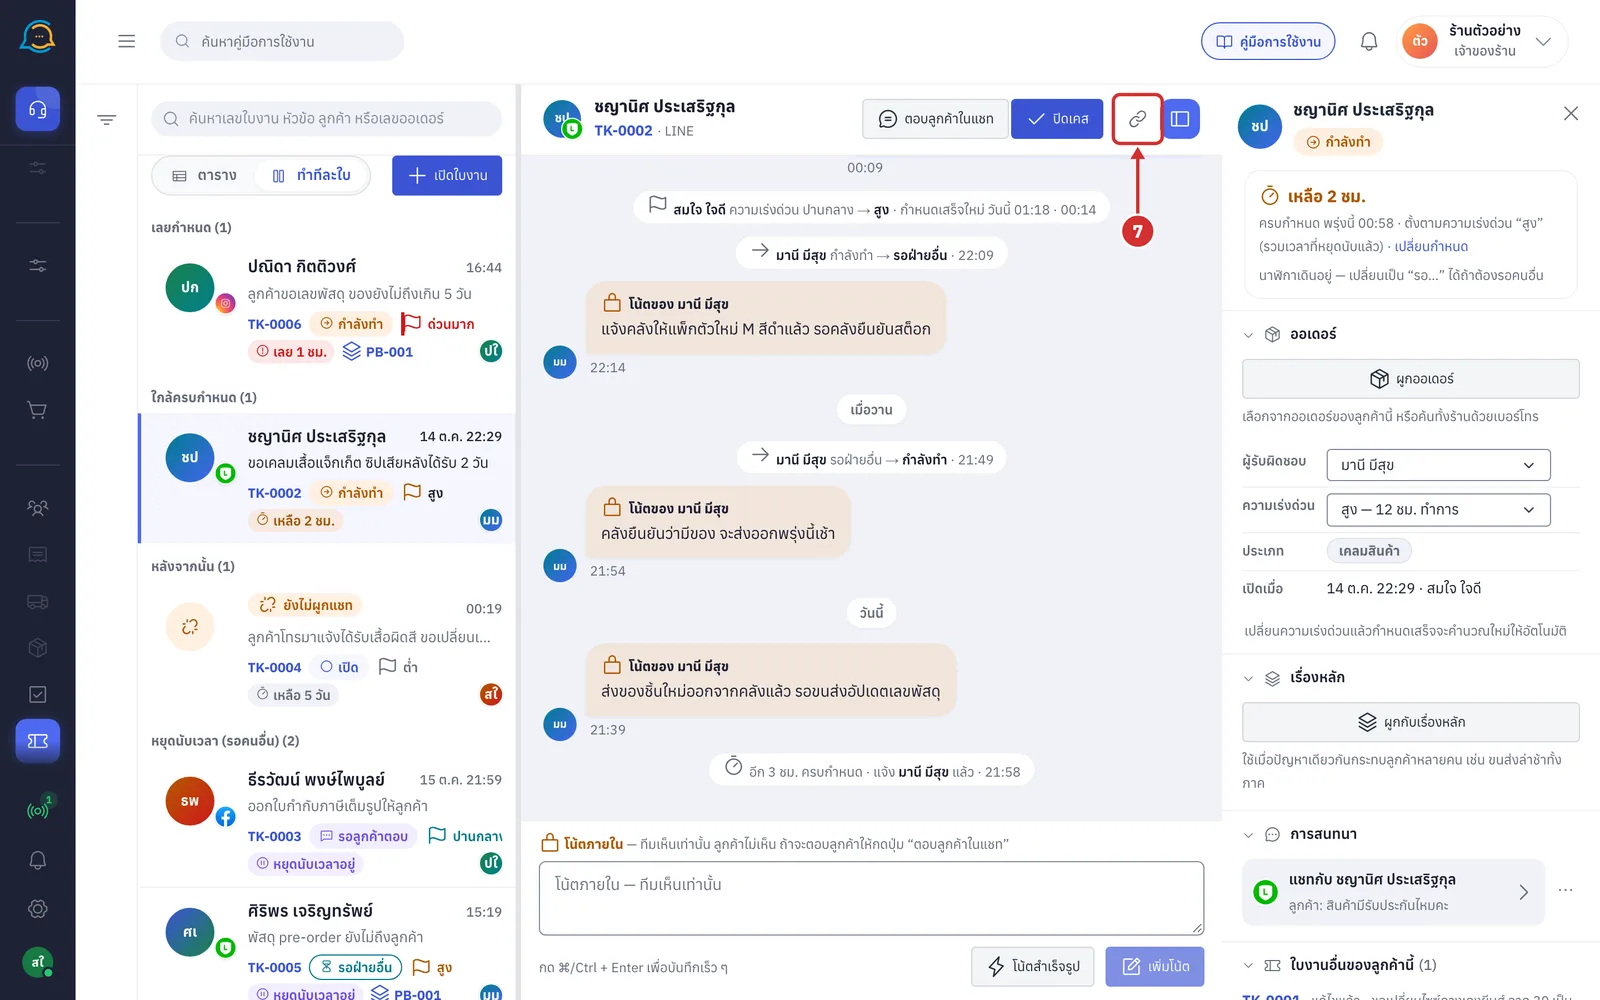
Click the link icon (คัดลอกลิงก์ใบงาน (Copy ticket link)) to copy this ticket's link and send it to your team. Once copied, the icon turns into a tick
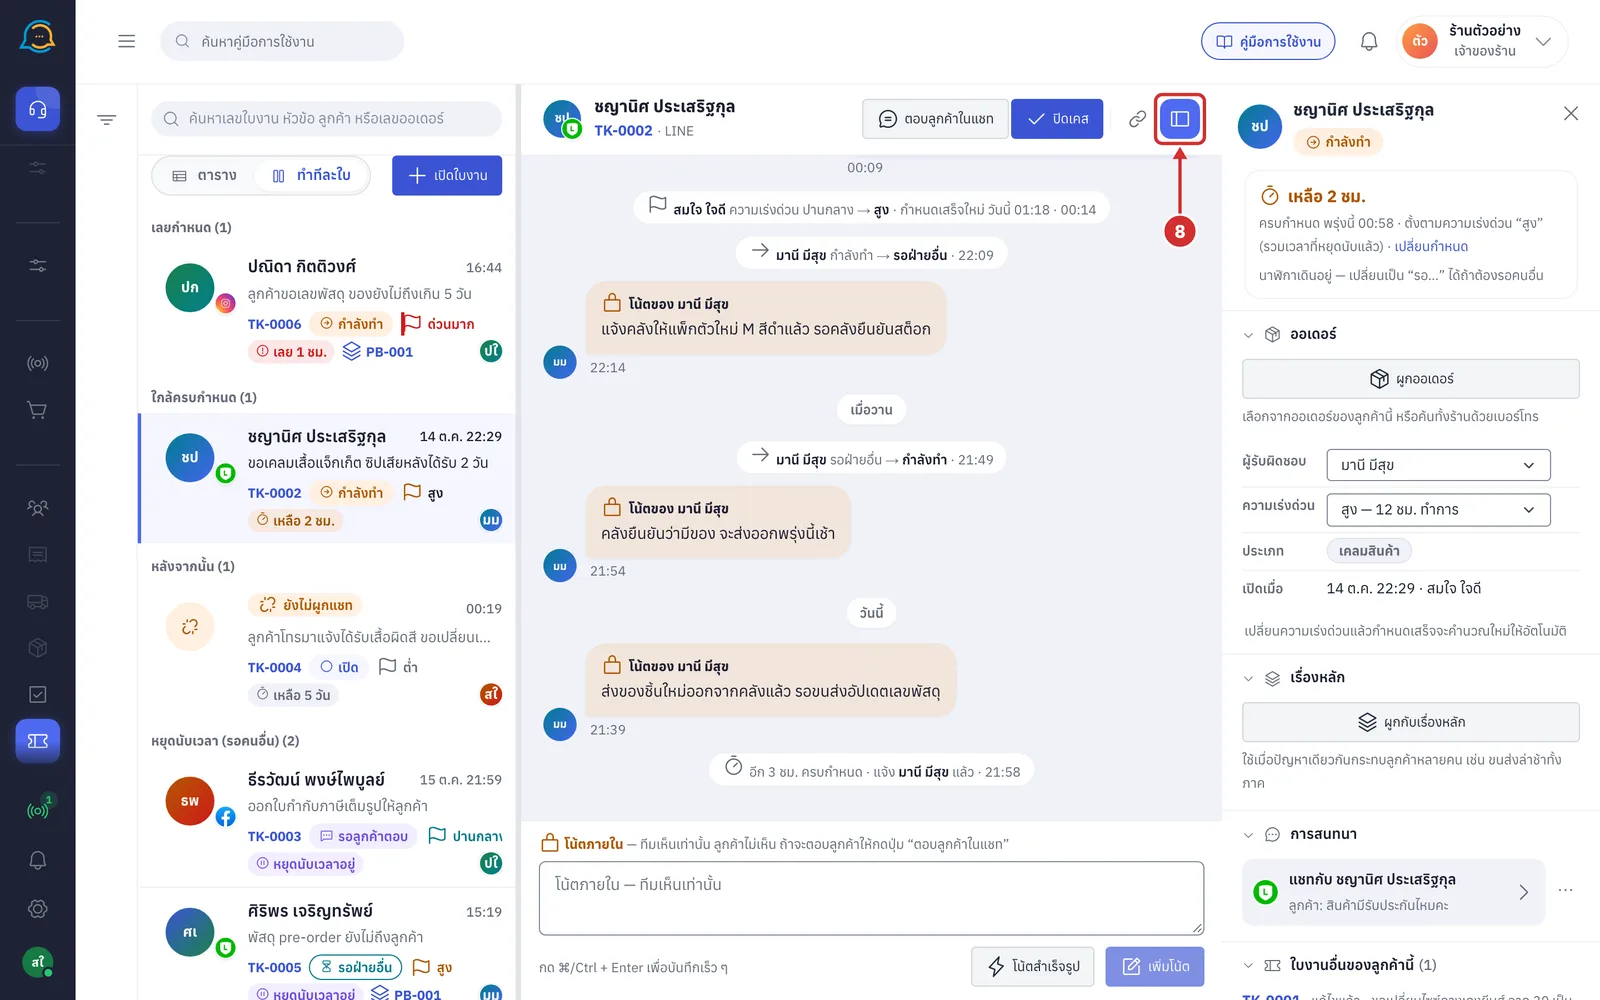
Click the far-right button (แผงรายละเอียดใบงาน (Ticket details panel)) to hide or show the details panel on the right
Reading the summary and timeline
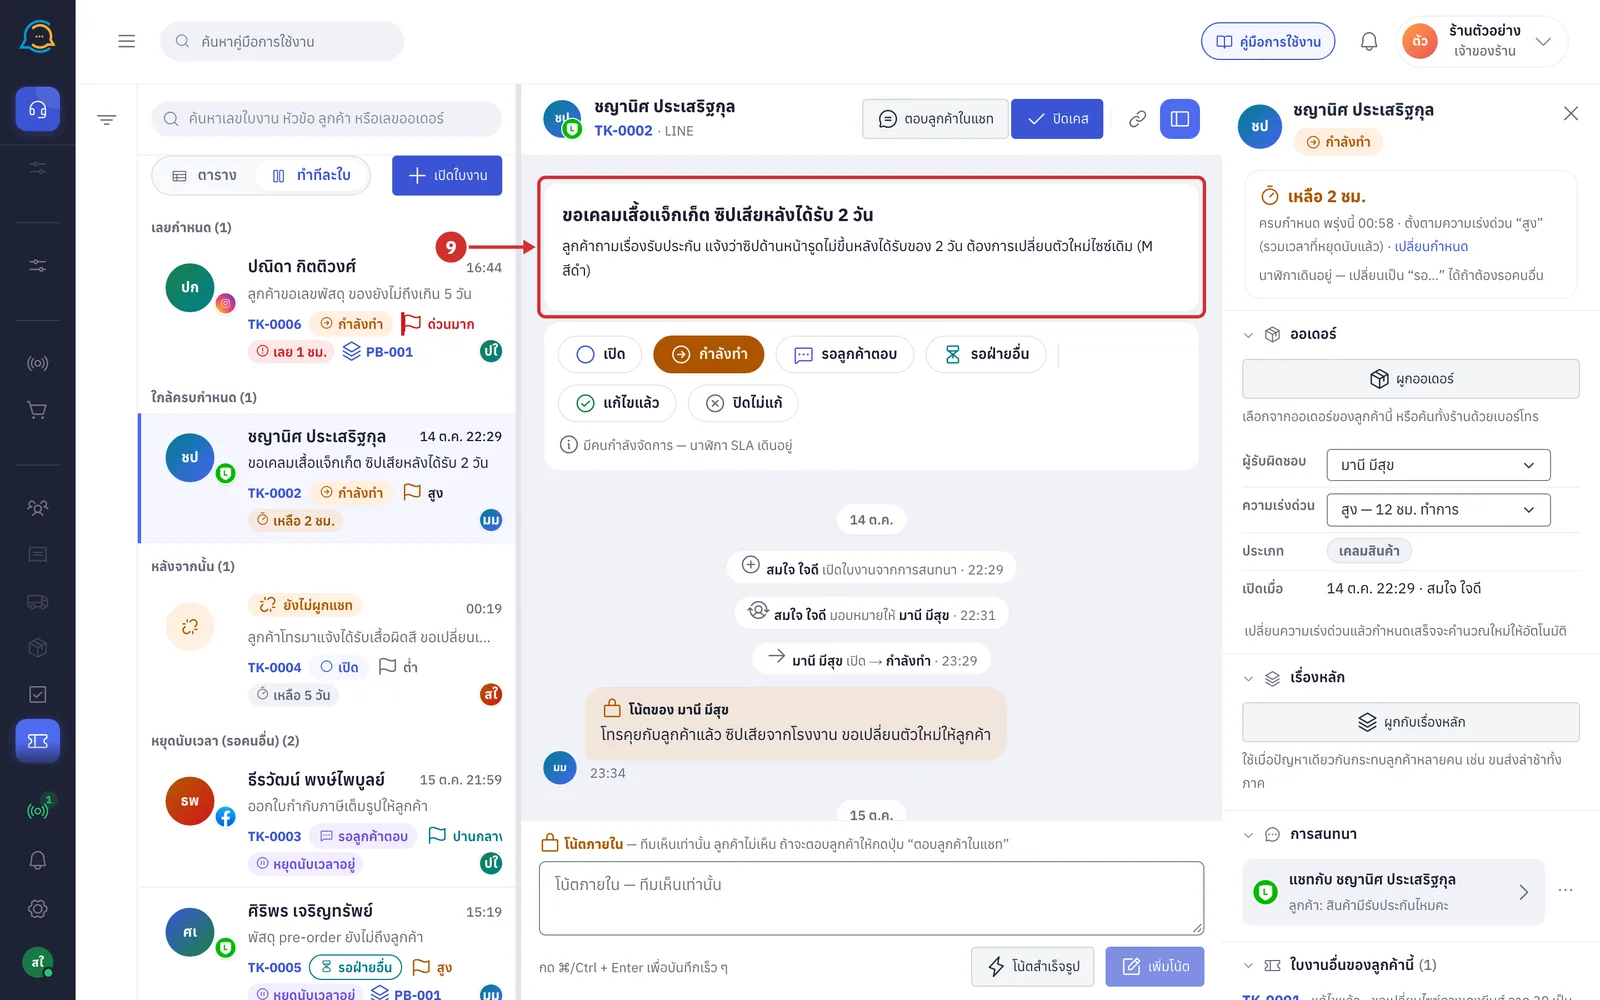
The top of the ticket shows the subject and details entered when the ticket was opened. They cannot be edited later
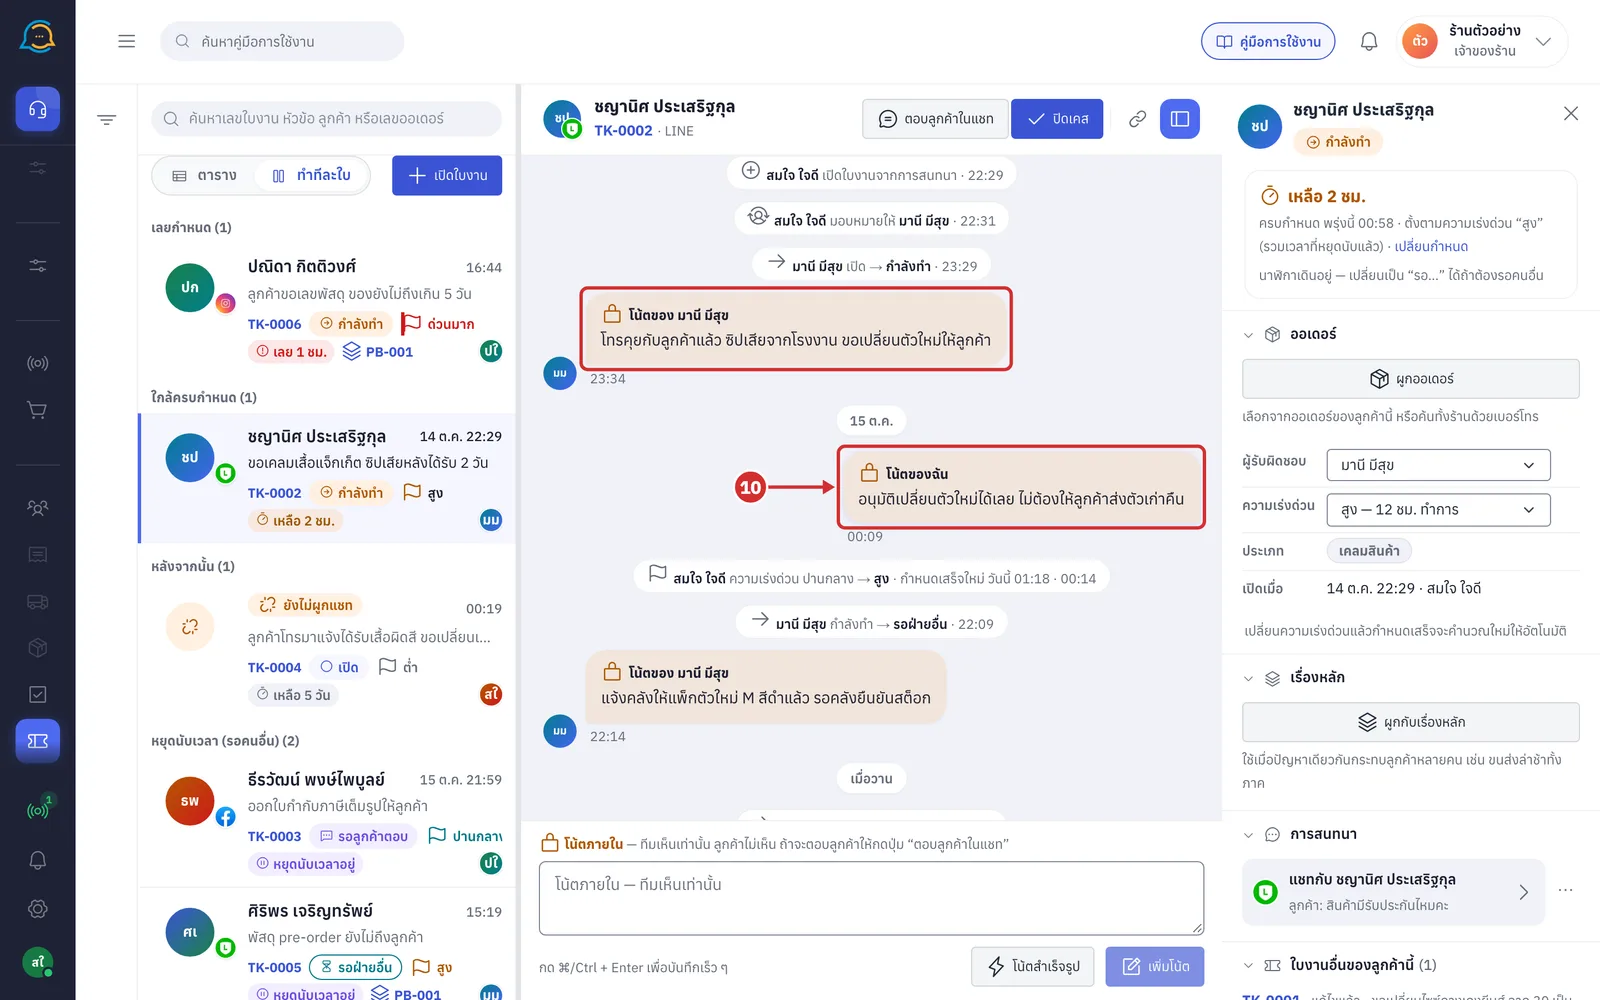
The timeline under the status bar runs from oldest to newest, separated by date. Internal notes appear as bubbles with a padlock
โน้ตของฉัน (My note) — notes you wrote, on the right
โน้ตของ (Note from) followed by a name — notes from others on your team, on the left with their initials
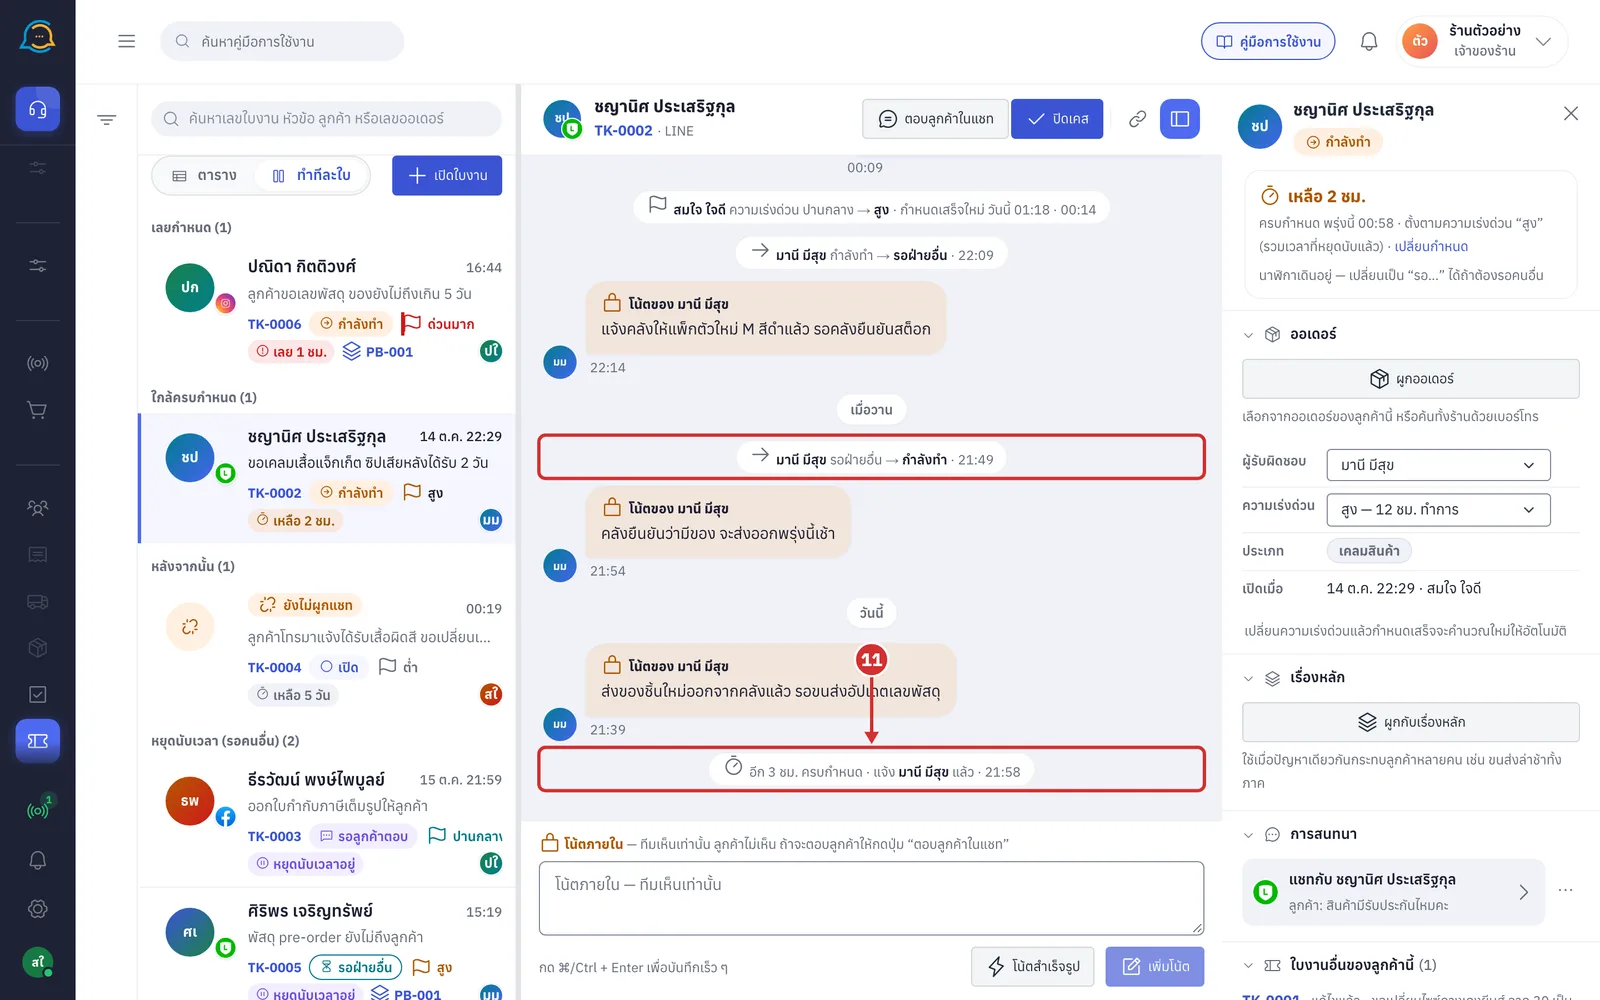
Lines in the middle of the timeline are changes the system records for you, with who made them and when. They include
เปิดใบงานจากการสนทนา (Opened the ticket from the conversation) or เปิดใบงานจากหน้าใบงาน (ไม่ผูกแชท) (Opened the ticket from the Tickets page (no chat linked))
Status changes, such as กำลังทำ → รอฝ่ายอื่น (In progress → Waiting on another team)
มอบหมายให้ (Assigned to) followed by a name, or เอาผู้รับผิดชอบออก (Removed the owner)
Urgency changes, such as ความเร่งด่วน ปานกลาง → สูง (Urgency Medium → High) followed by กำหนดเสร็จใหม่ (New due time)
เปลี่ยนกำหนดเสร็จจาก … เป็น … (กำหนดเอง) (Changed the due time from … to … (custom)) or กลับไปใช้กำหนดตามความเร่งด่วน (Went back to the due time by urgency)
Linking, changing or removing a chat, an order or a main issue, such as ผูกกับแชท (Linked to chat), ผูกออเดอร์ (Linked order) and ผูกกับเรื่องหลัก (Linked to main issue)
ส่งข้อความจากเรื่องหลัก (Sent a message from the main issue) — when someone messages customers from the main issue page
System alerts — with about a quarter of the time left, อีก … ครบกำหนด · แจ้ง … แล้ว (Due in … · notified …) appears, and once overdue, เลยกำหนดแล้ว · แจ้ง … และหัวหน้าแล้ว (Overdue · notified … and the leads). If the ticket has no owner, everyone in your shop is notified
Changing the status
On the status bar, click the status you want. The current status is the selected button, and the line under the bar explains it
เปิด (Open): nobody has started — the SLA clock is running
กำลังทำ (In progress): someone is working on it — the SLA clock is running
รอลูกค้าตอบ (Waiting for customer): waiting for the customer to send details or reply — the SLA clock is paused
รอฝ่ายอื่น (Waiting on another team): waiting for the warehouse, courier or accounts — the SLA clock is paused
แก้ไขแล้ว (Resolved): case closed — the customer has an answer
ปิดไม่แก้ (Closed without fix): closed without fixing — for example a duplicate, or the customer cancelled
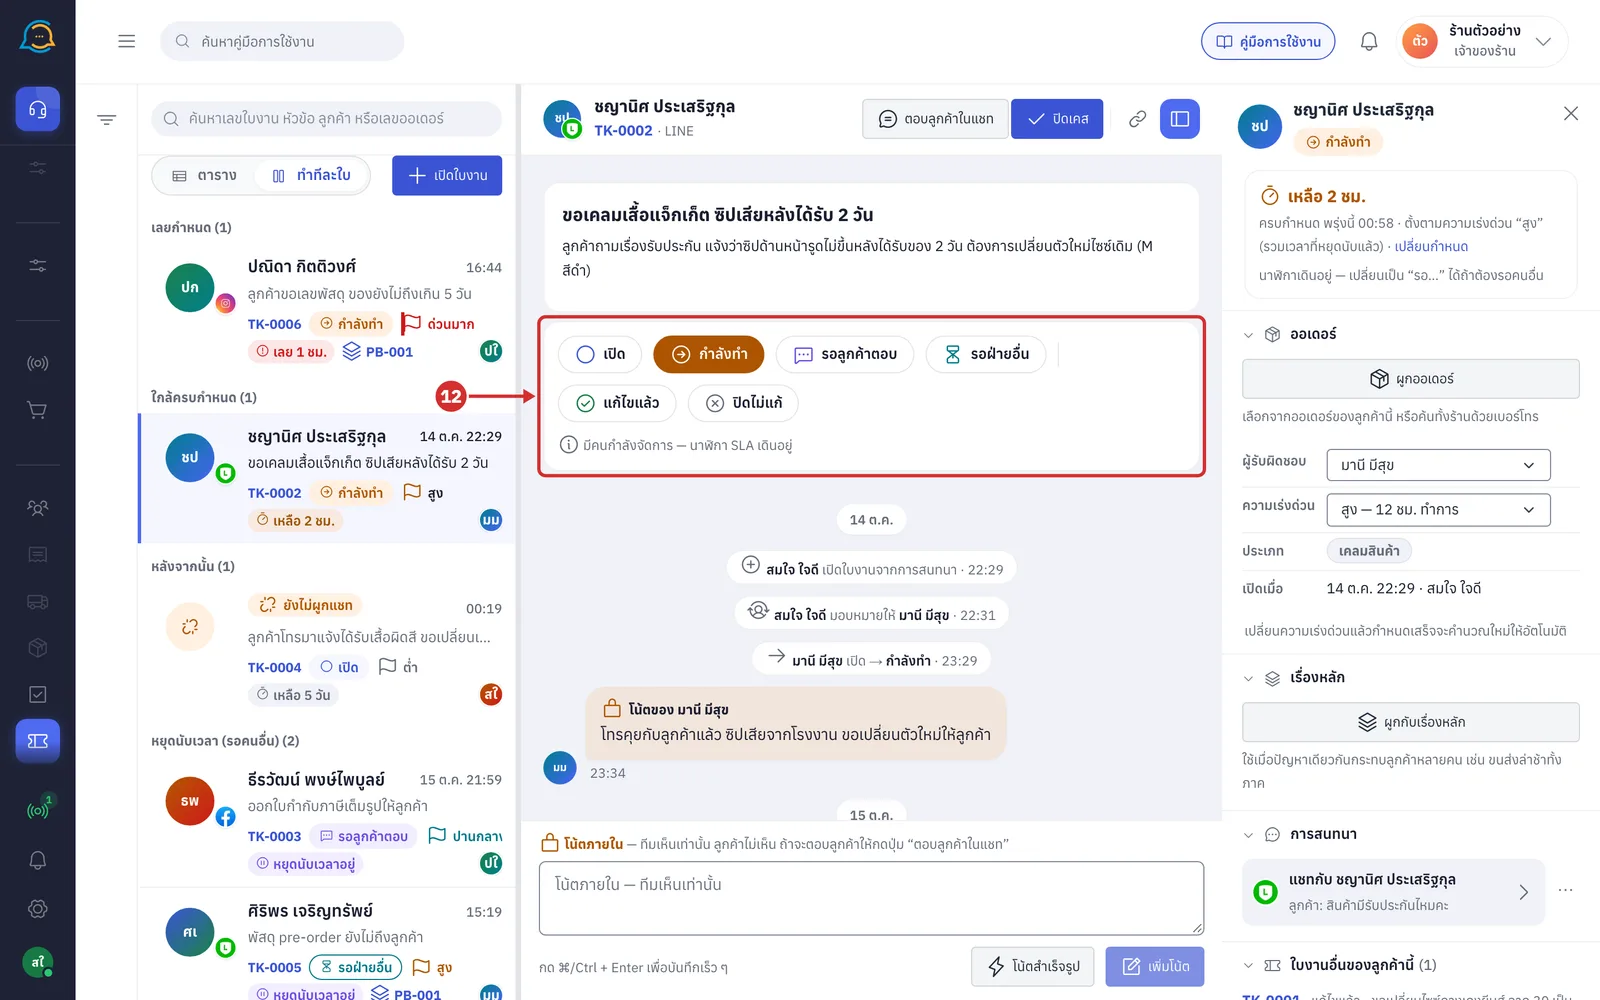
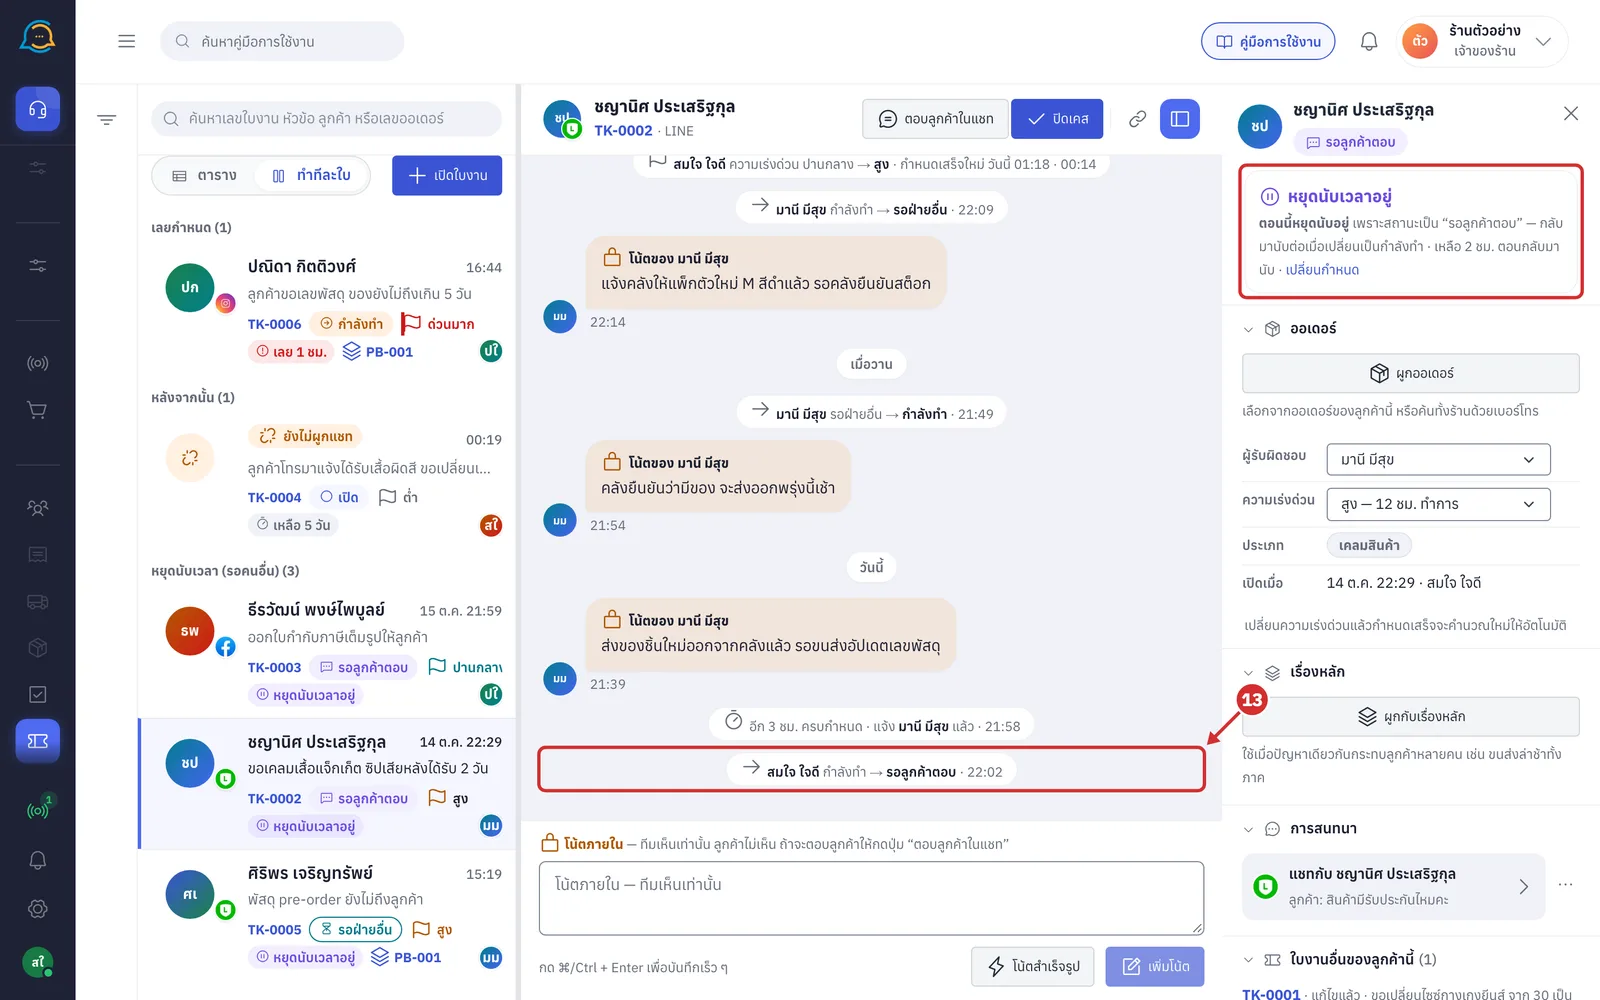
The change is saved straight away. The timeline shows a line such as สมใจ ใจดี กำลังทำ → รอลูกค้าตอบ (Somjai Jaidee In progress → Waiting for customer), and the due card on the right updates to the new status
รอลูกค้าตอบ (Waiting for customer) and รอฝ่ายอื่น (Waiting on another team) pause the clock, and the card shows หยุดนับเวลาอยู่ (Clock paused)
On a finished ticket (แก้ไขแล้ว (Resolved) or ปิดไม่แก้ (Closed without fix)), the other status buttons cannot be clicked until you click เปิดใหม่ (Reopen) (see step 42)
Adding an internal note
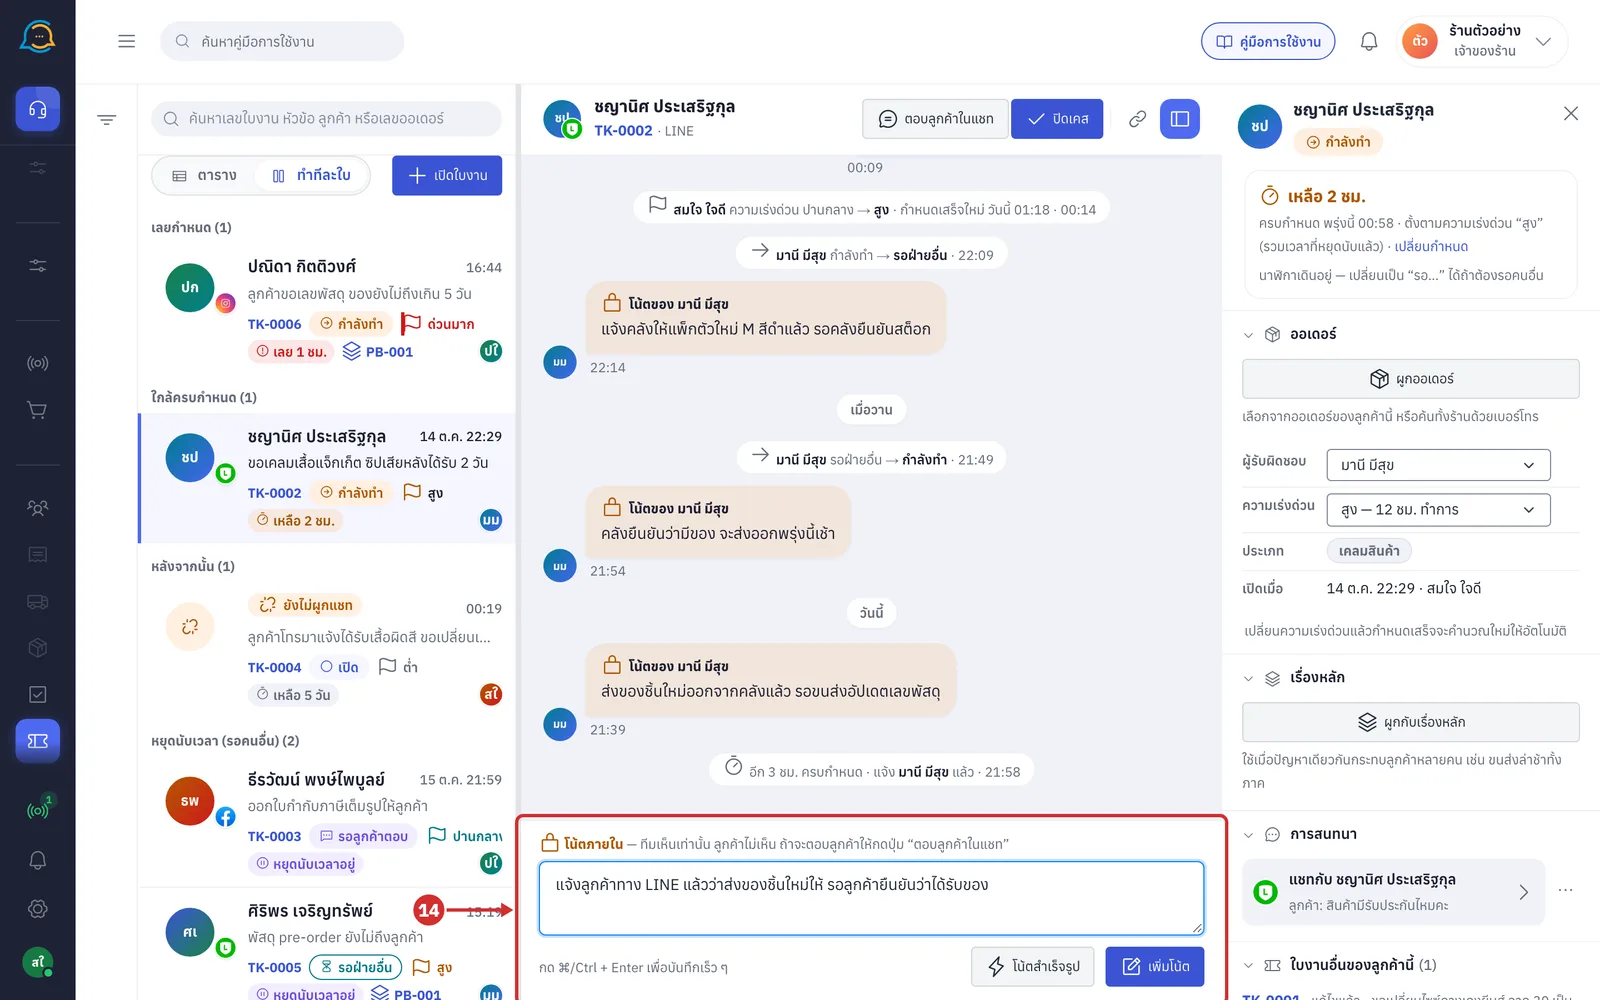
The box at the bottom of the ticket is for noting progress for your team. Its heading says โน้ตภายใน — ทีมเห็นเท่านั้น ลูกค้าไม่เห็น ถ้าจะตอบลูกค้าให้กดปุ่ม “ตอบลูกค้าในแชท” (Internal note — only your team sees it, not the customer. To reply to the customer, click “Reply in chat”).
In โน้ตภายใน (Internal note), type the progress on the issue
Up to 2,000 characters
Press Enter for a new line
Unsent text is kept per ticket in that browser tab. Switch to another ticket and back, and your text is still there
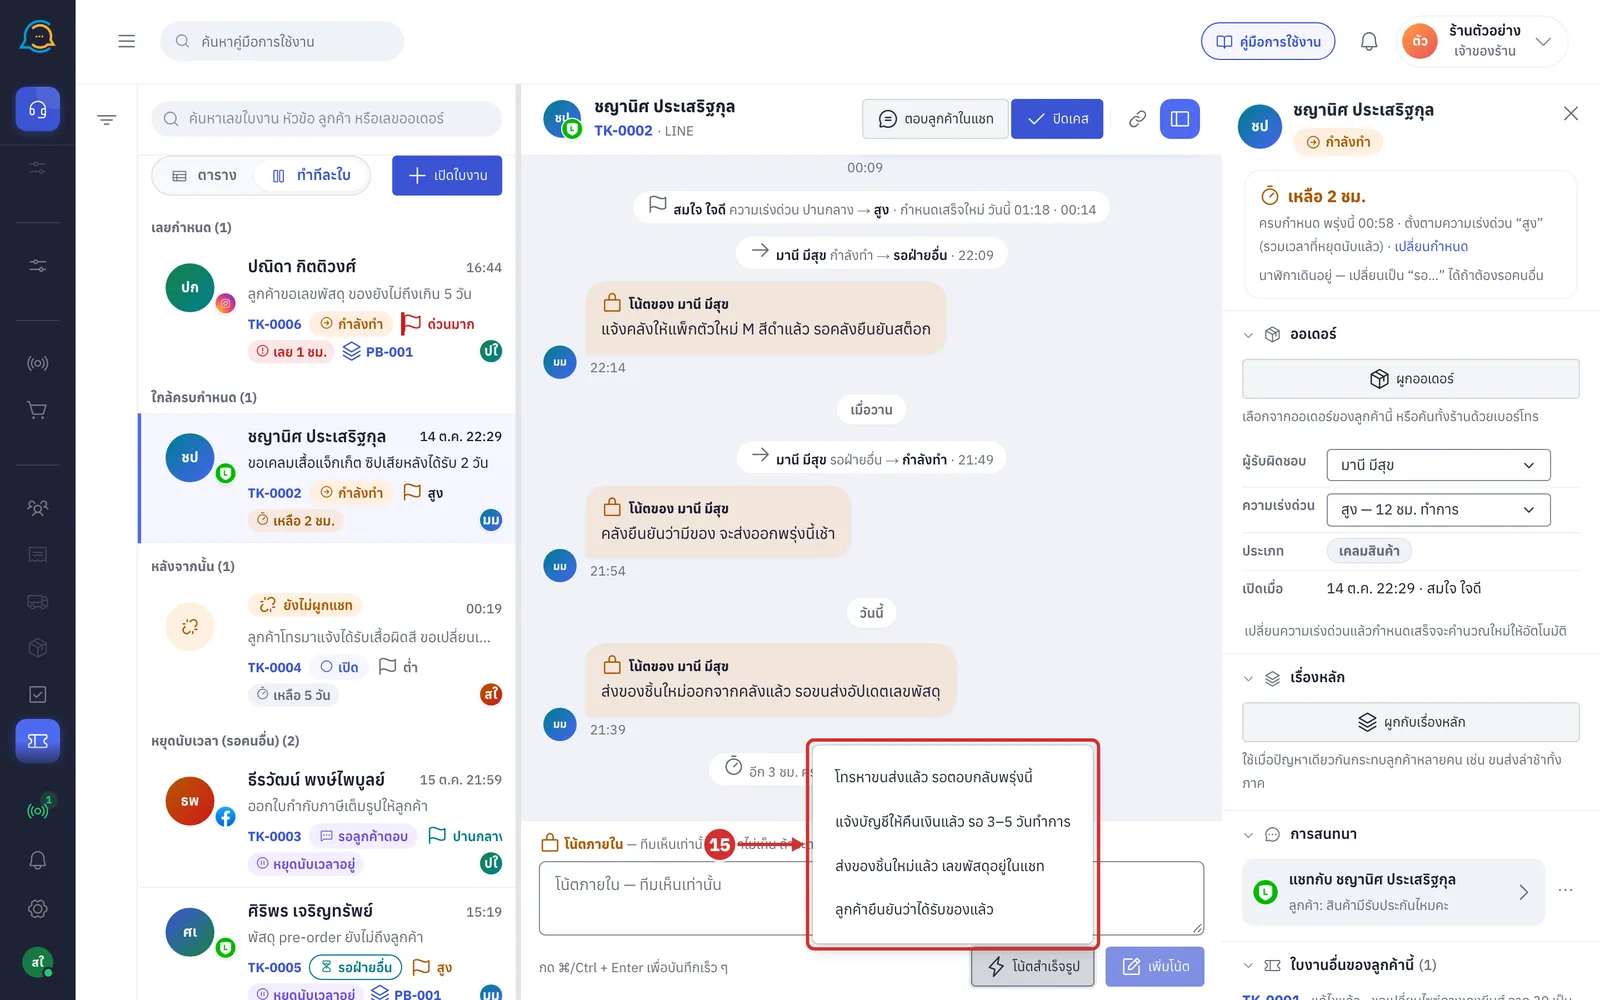
Click โน้ตสำเร็จรูป (Note templates) to pick a common note. The text goes into the box for you to edit. If the box already has text, it is added on a new line. The templates are
โทรหาขนส่งแล้ว รอตอบกลับพรุ่งนี้ (Called the courier, waiting for a reply tomorrow)
แจ้งบัญชีให้คืนเงินแล้ว รอ 3–5 วันทำการ (Asked accounts to refund, waiting 3–5 business days)
ส่งของชิ้นใหม่แล้ว เลขพัสดุอยู่ในแชท (Sent a replacement, tracking number is in the chat)
ลูกค้ายืนยันว่าได้รับของแล้ว (Customer confirmed they received it)
Click เพิ่มโน้ต (Add note) to save, or press ⌘/Ctrl + Enter in the box
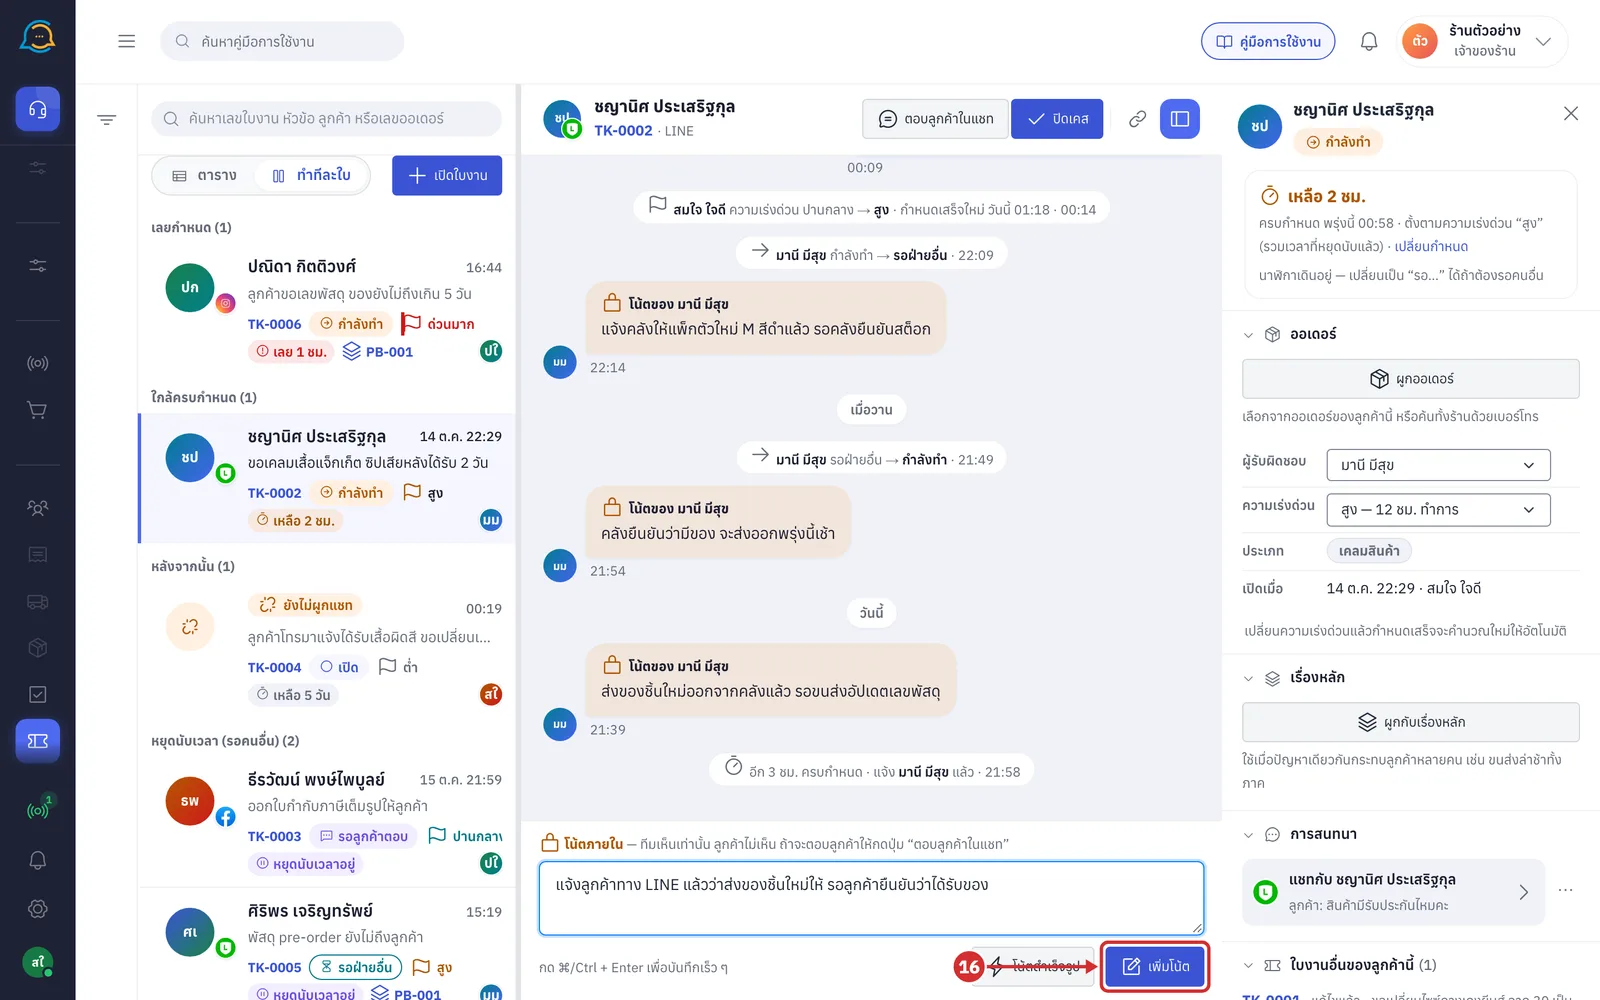
The note appears straight away as a โน้ตของฉัน (My note) bubble at the end of the timeline
While saving, กำลังบันทึก… (Saving…) shows under the bubble
If saving fails, the bubble stays with บันทึกไม่สำเร็จ (Not saved). Click ลองใหม่ (Try again) to save it again, or ลบทิ้ง (Discard) to drop the note
The chat linked to the ticket gets a grey line เพิ่มโน้ตใน (Added a note to) with the ticket number, without the note's text
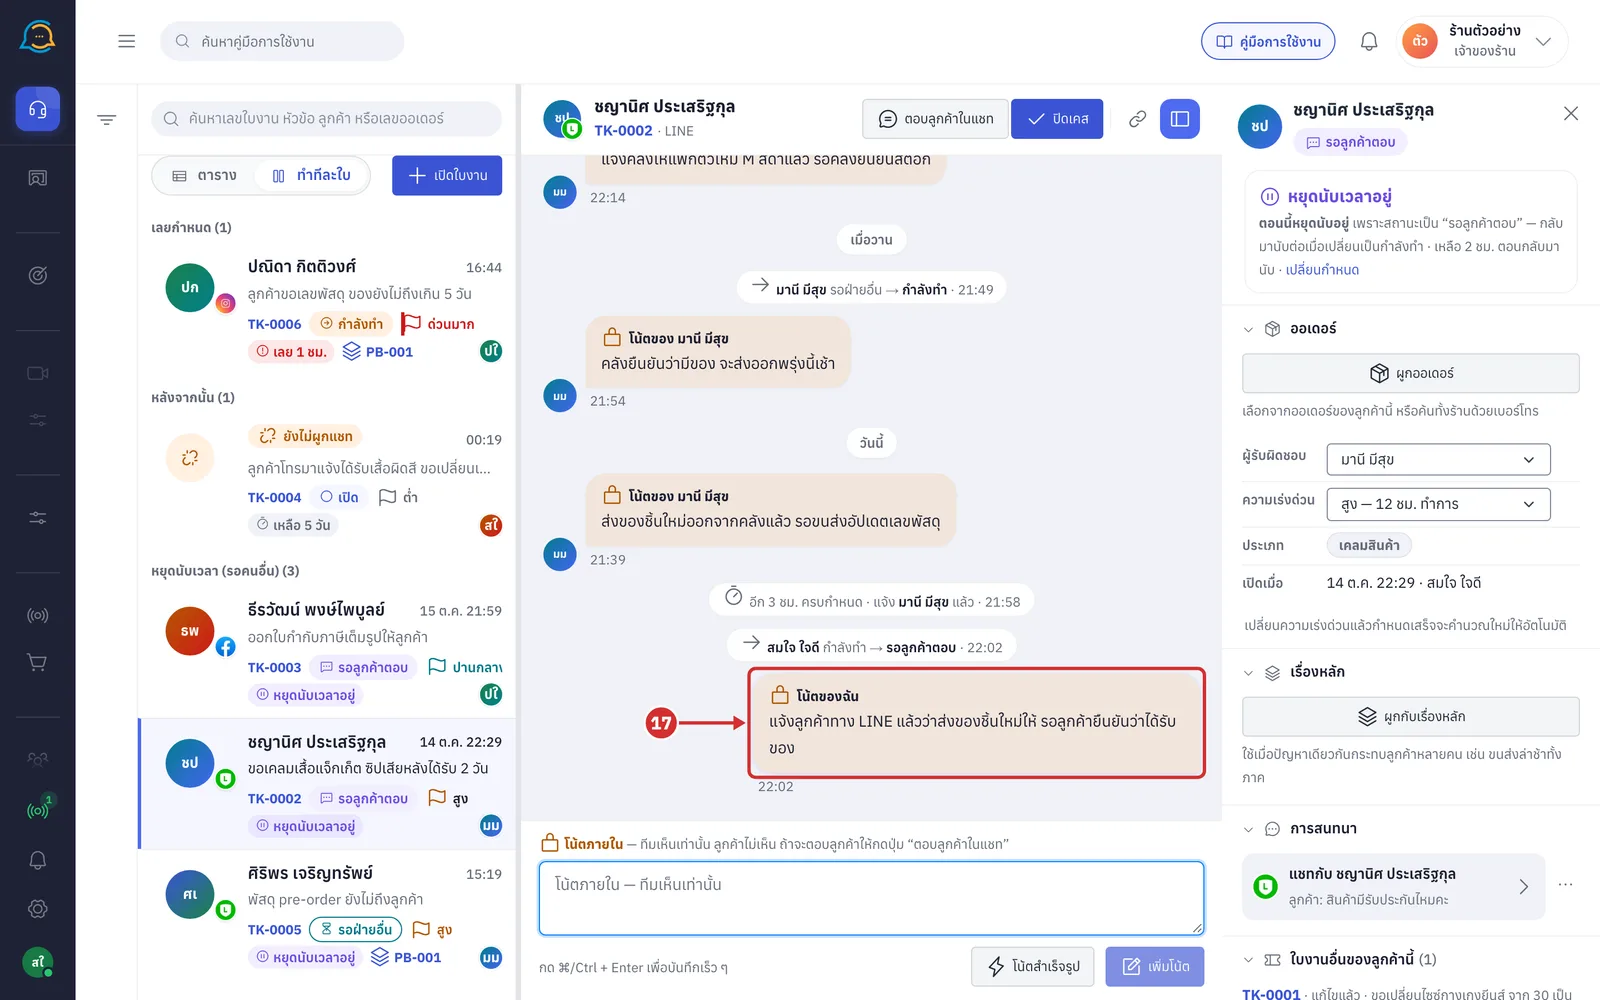
Reading the details panel
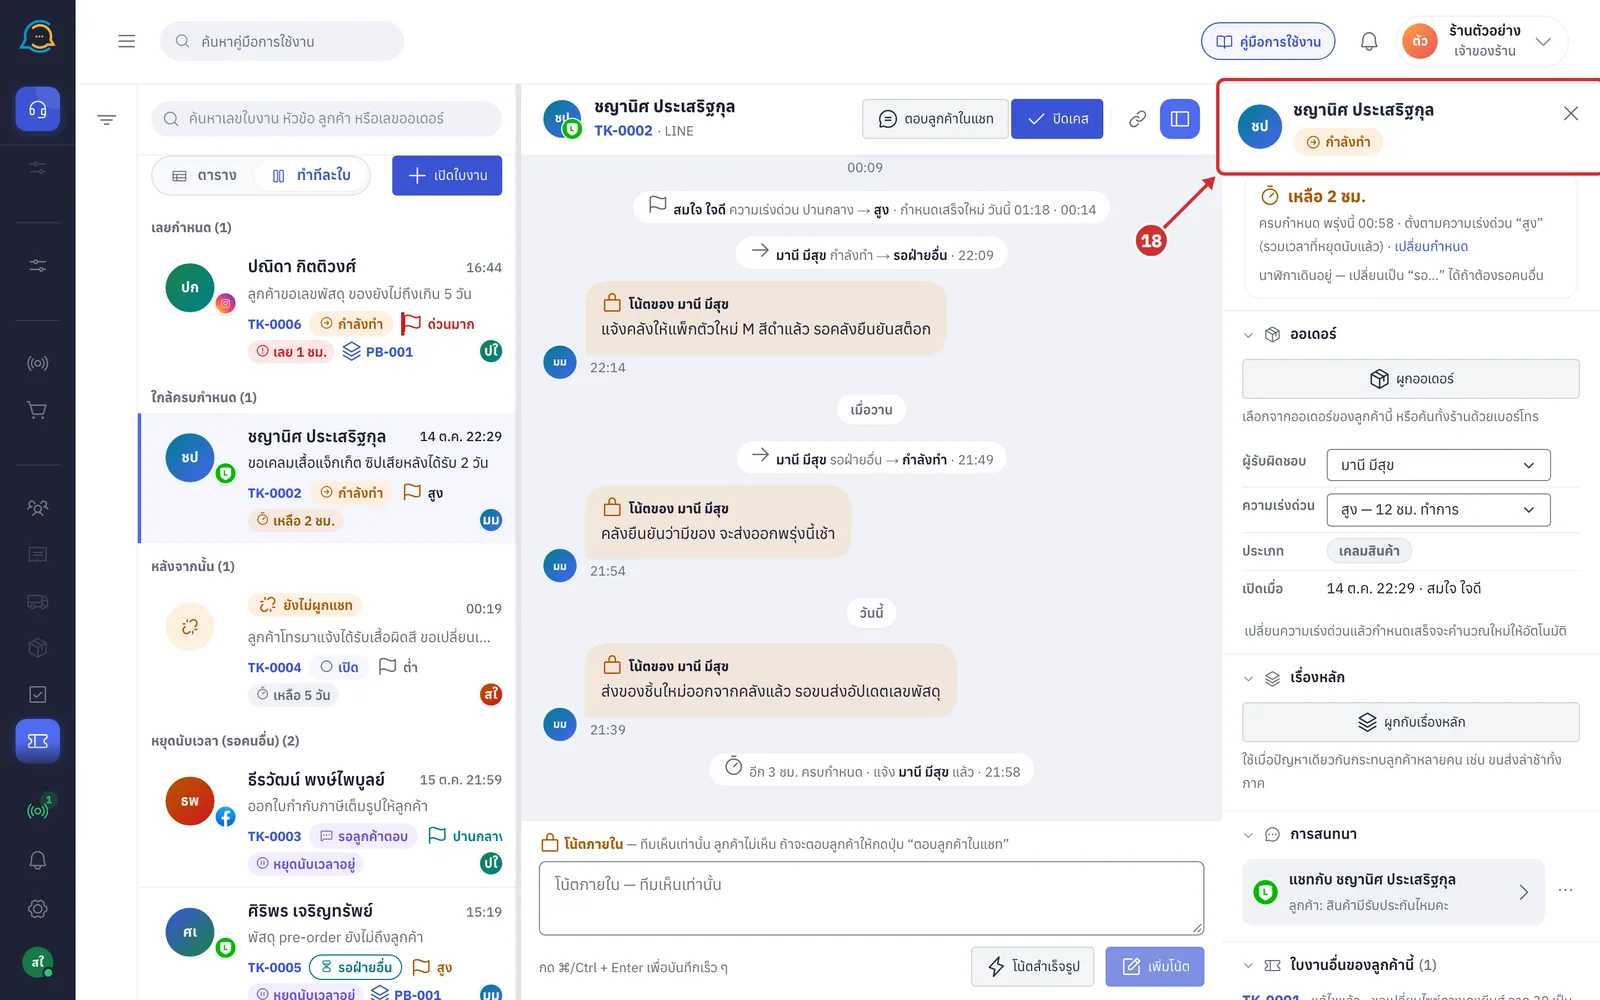
The top of the right panel shows the customer's name and the ticket's status badge. Click the name to open the customer's page (a ticket with no chat shows its number instead)
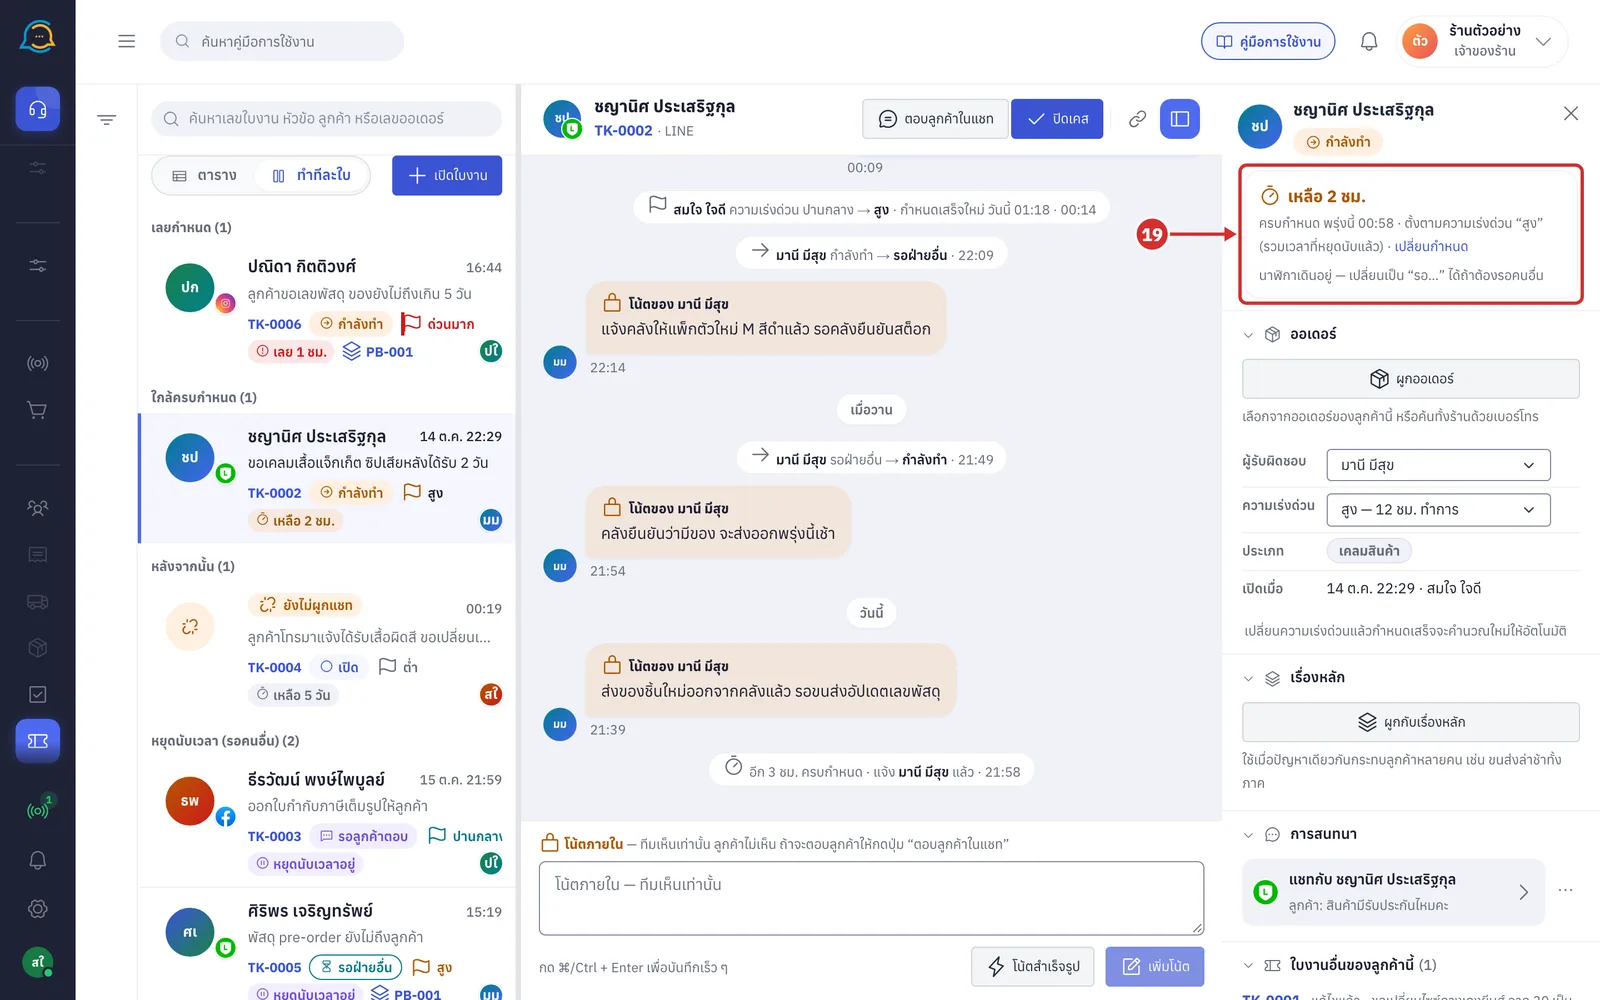
The due card shows the time left before the due time, such as เหลือ 2 ชม. (2 h left), with these details
ครบกำหนด (Due) followed by the date and time, and where it comes from: ตั้งตามความเร่งด่วน (Set by urgency) or กำหนดเอง (Custom)
(รวมเวลาที่หยุดนับแล้ว) (Paused time included) means the due time has been pushed back by the time the ticket was paused
The bottom line นาฬิกาเดินอยู่ — เปลี่ยนเป็น “รอ…” ได้ถ้าต้องรอคนอื่น (The clock is running — change to “Waiting…” if you are waiting on someone)
With less than a quarter of the time left, the figure on the card changes colour and the ticket moves to the ใกล้ครบกำหนด (Due soon) group
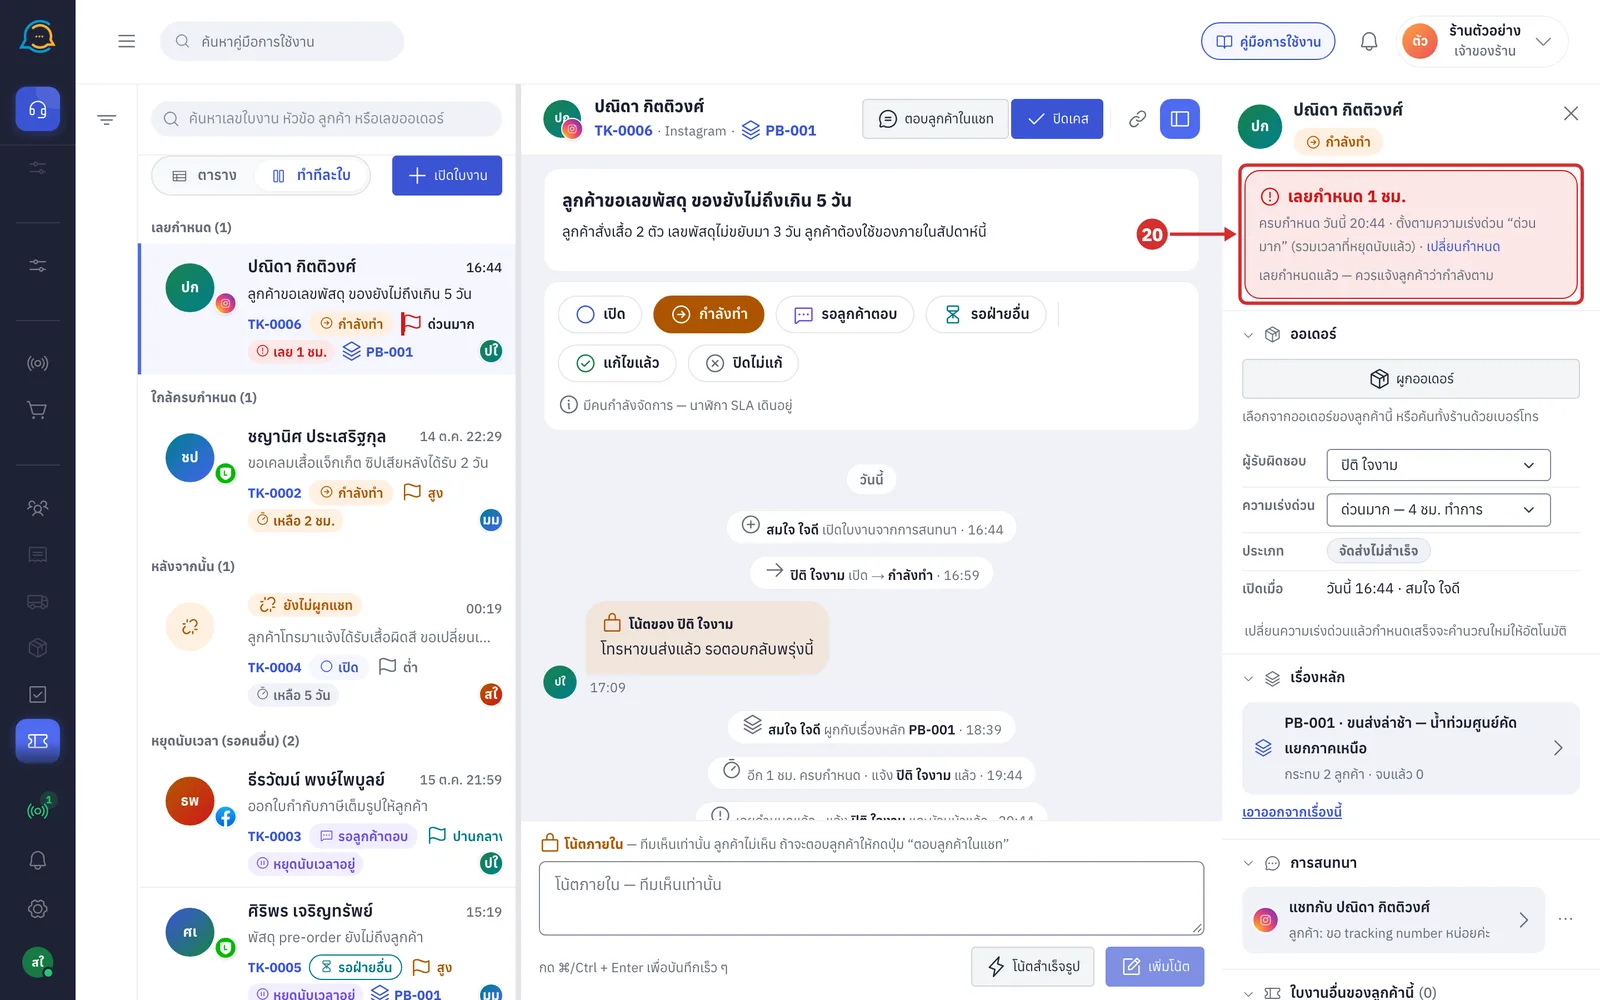
On an overdue ticket, the card turns red and shows เลยกำหนด (Overdue) with how long it is overdue, and เลยกำหนดแล้ว — ควรแจ้งลูกค้าว่ากำลังตาม (Overdue — let the customer know you are following up)
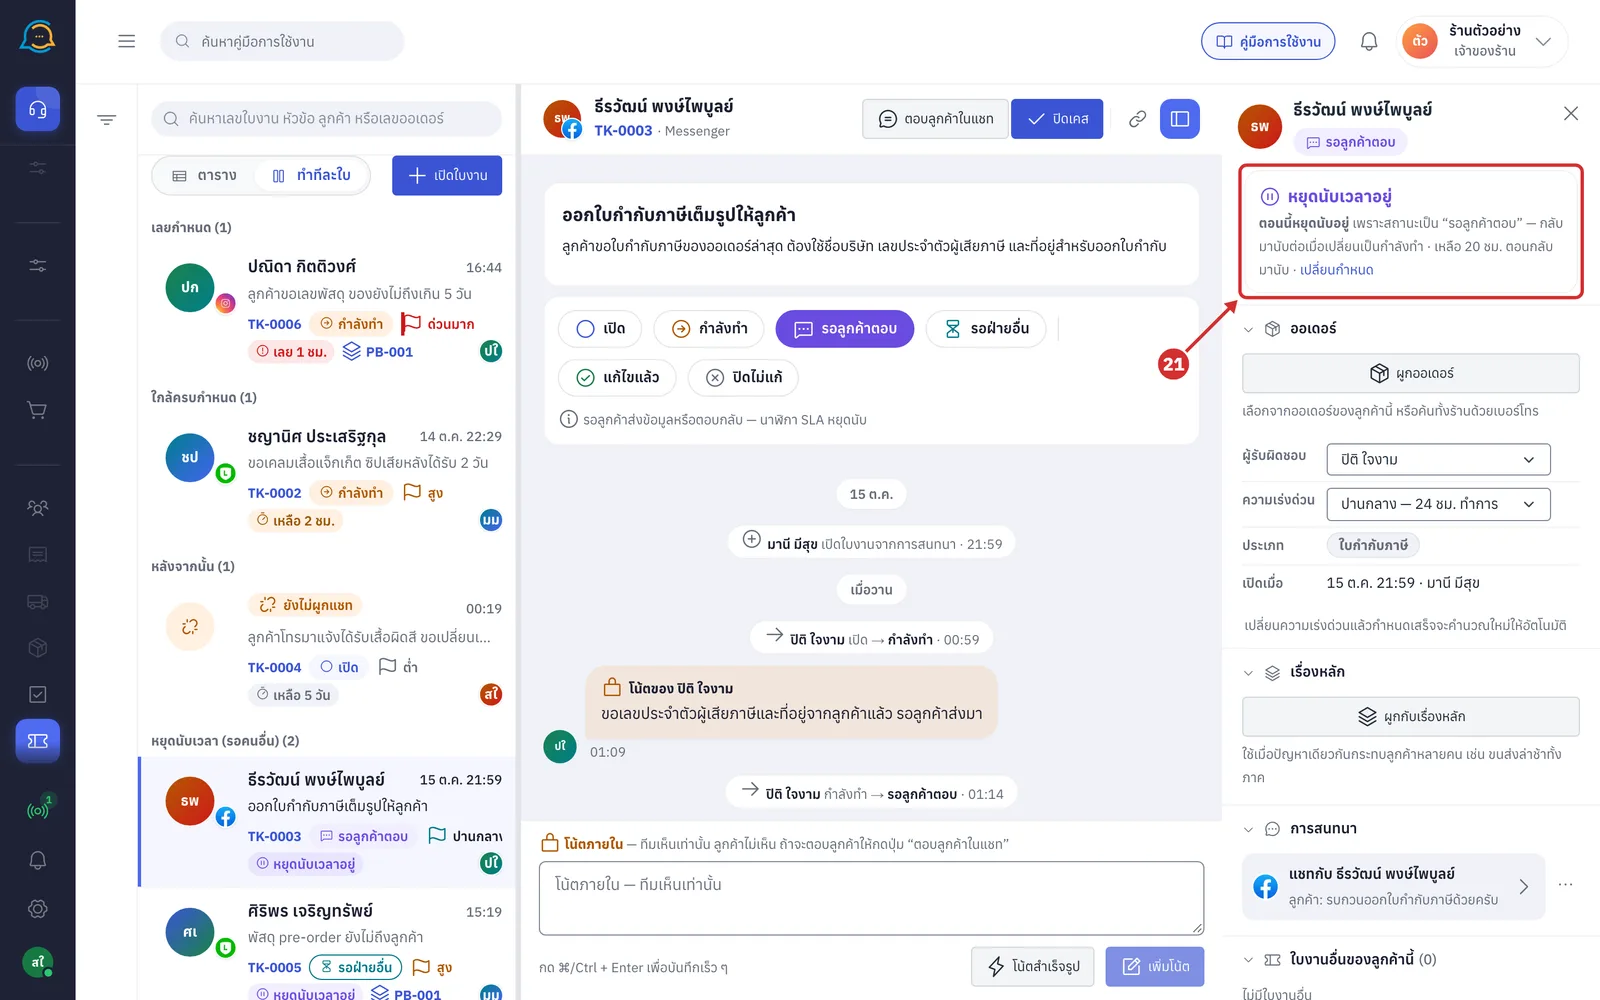
On a ticket set to รอลูกค้าตอบ (Waiting for customer) or รอฝ่ายอื่น (Waiting on another team), the card shows หยุดนับเวลาอยู่ (Clock paused) with ตอนนี้หยุดนับอยู่ เพราะสถานะเป็น “…” — กลับมานับต่อเมื่อเปลี่ยนเป็นกำลังทำ (Paused now because the status is “…” — counting resumes when it changes to In progress)
The end of the line says how much time will be left when the clock restarts, such as เหลือ 20 ชม. ตอนกลับมานับ (20 h left when it restarts)
Changing the due time
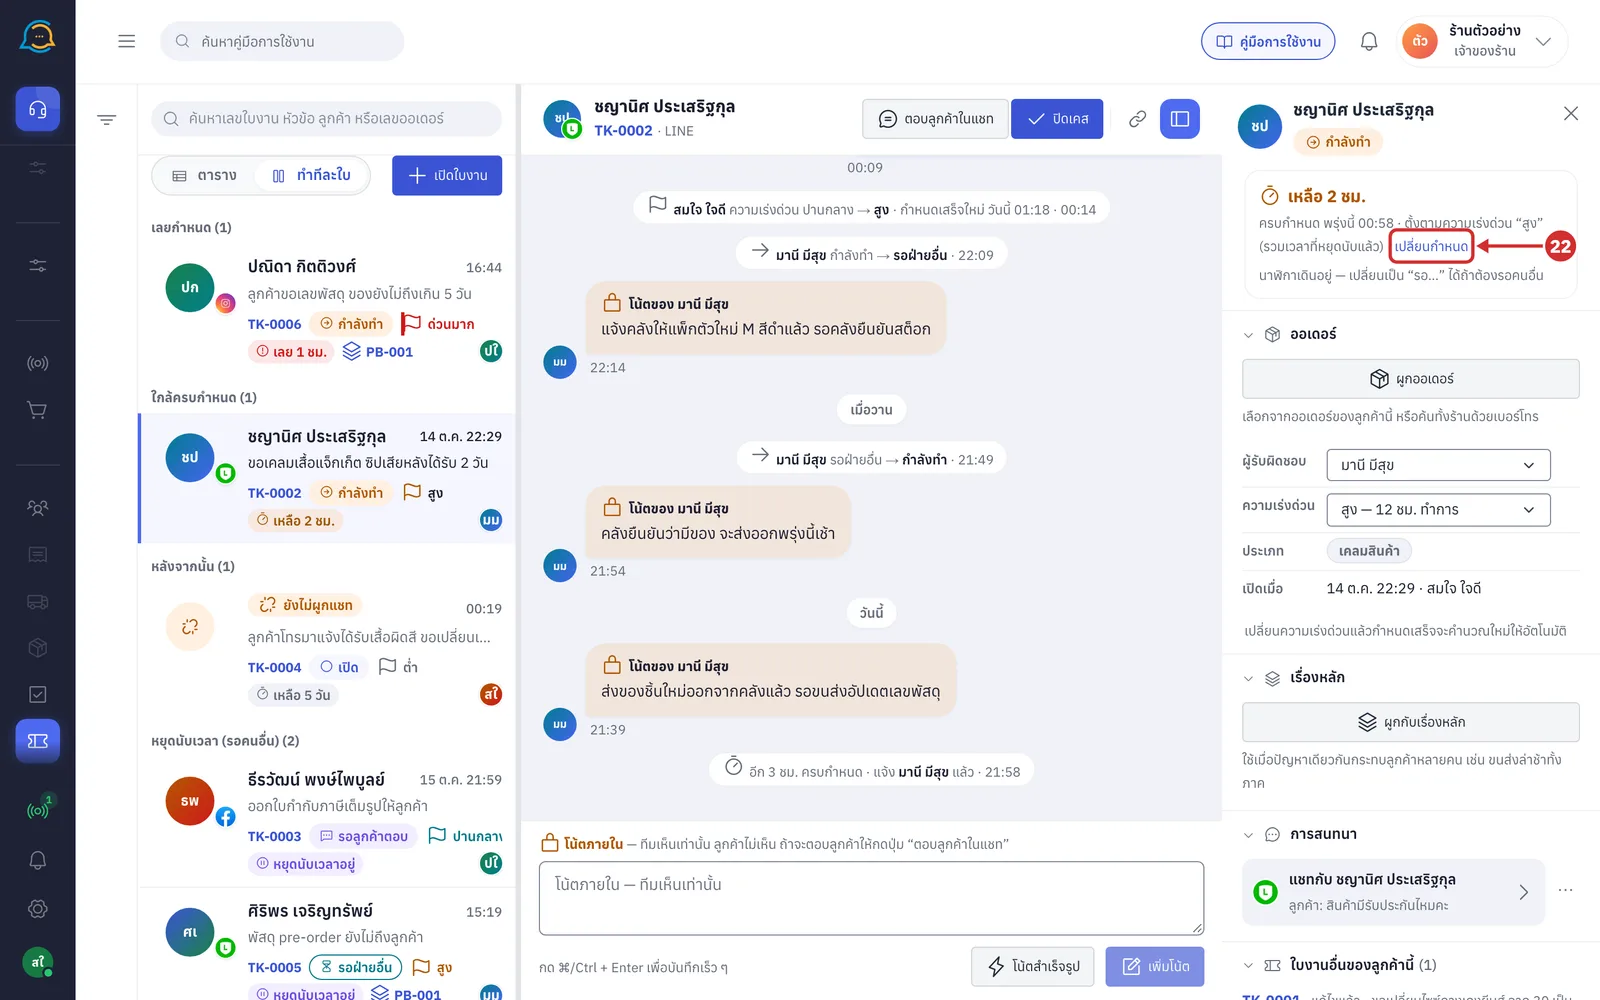
To set your own due date, click เปลี่ยนกำหนด (Change due) at the end of the ครบกำหนด (Due) line
Finished tickets do not have this link; click เปิดใหม่ (Reopen) first
Pick a date from the calendar, then type a time in the next box, such as 17:30
Leave the time empty to use the shop's closing time that day. If the shop is closed that day or has no business hours set, 18:00 is used
It must be later than now and no more than 1 year from today
If something is wrong, a message appears under the box, such as ใส่เวลาแบบ 17:30 หรือเว้นว่างไว้ (= เวลาปิดร้าน) (Enter a time like 17:30 or leave it empty (= closing time)) or เวลานี้ผ่านไปแล้ว — เลือกเวลาหลัง … (This time has passed — choose a time after …)
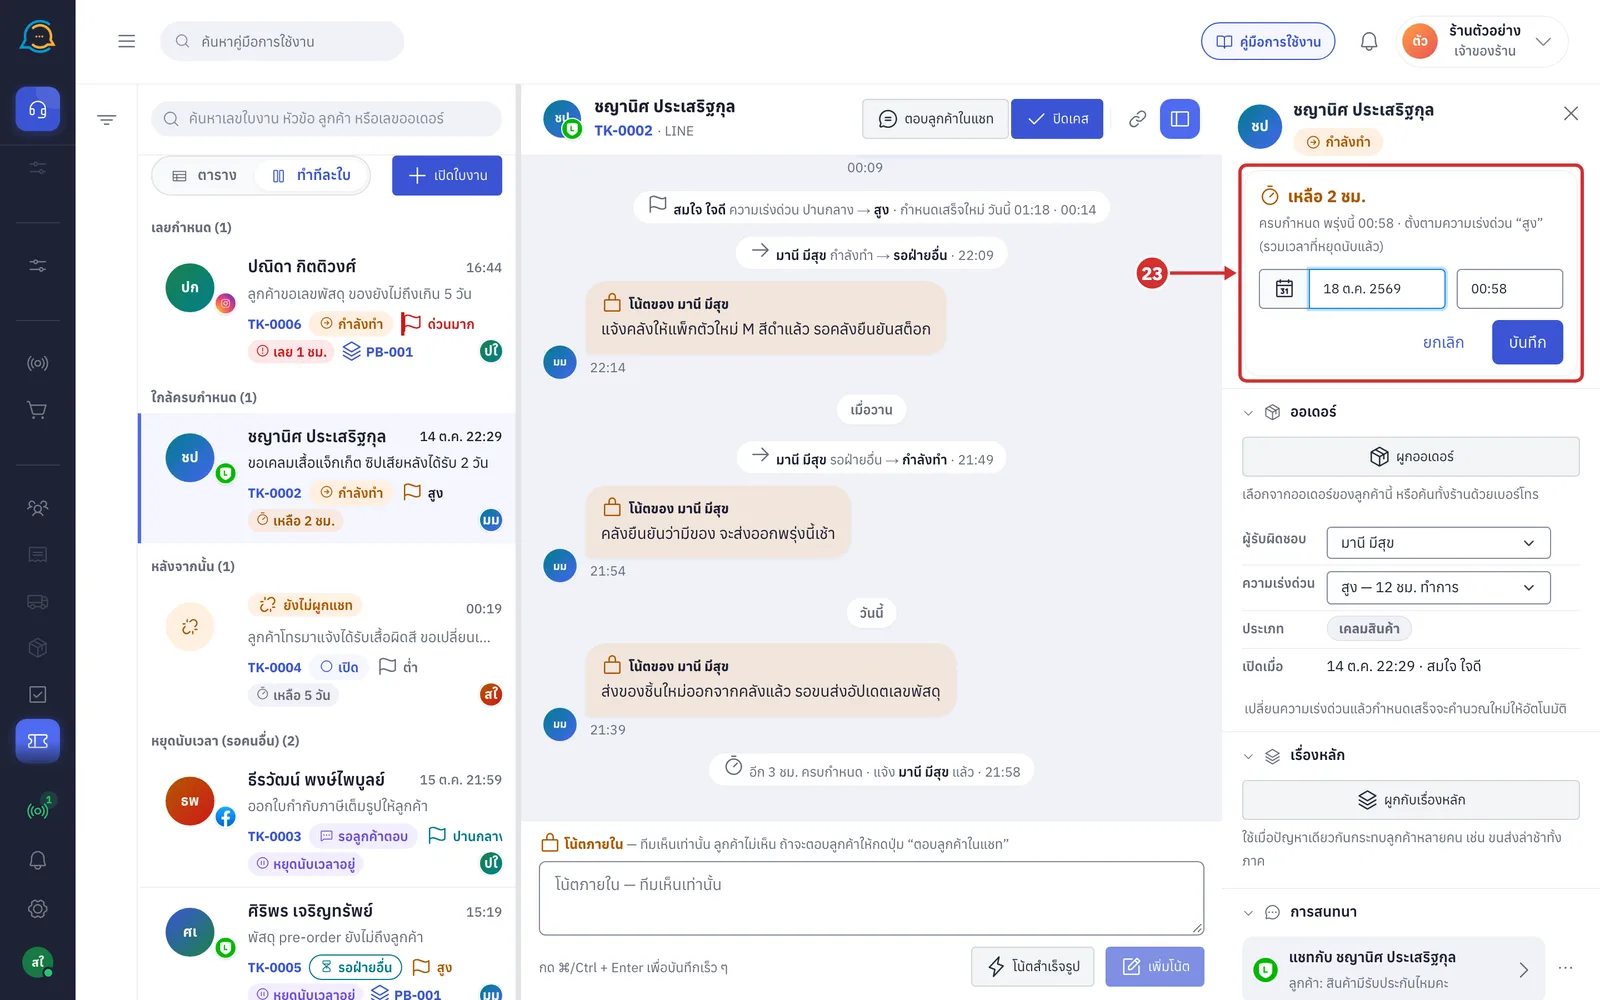
Click บันทึก (Save) to save the new due time (click ยกเลิก (Cancel) to leave without changing)
If saving fails, the card shows บันทึกไม่สำเร็จ — กำหนดเดิมยังอยู่ ลองกด “บันทึก” อีกครั้ง (Not saved — the old due time is kept. Click “Save” again)
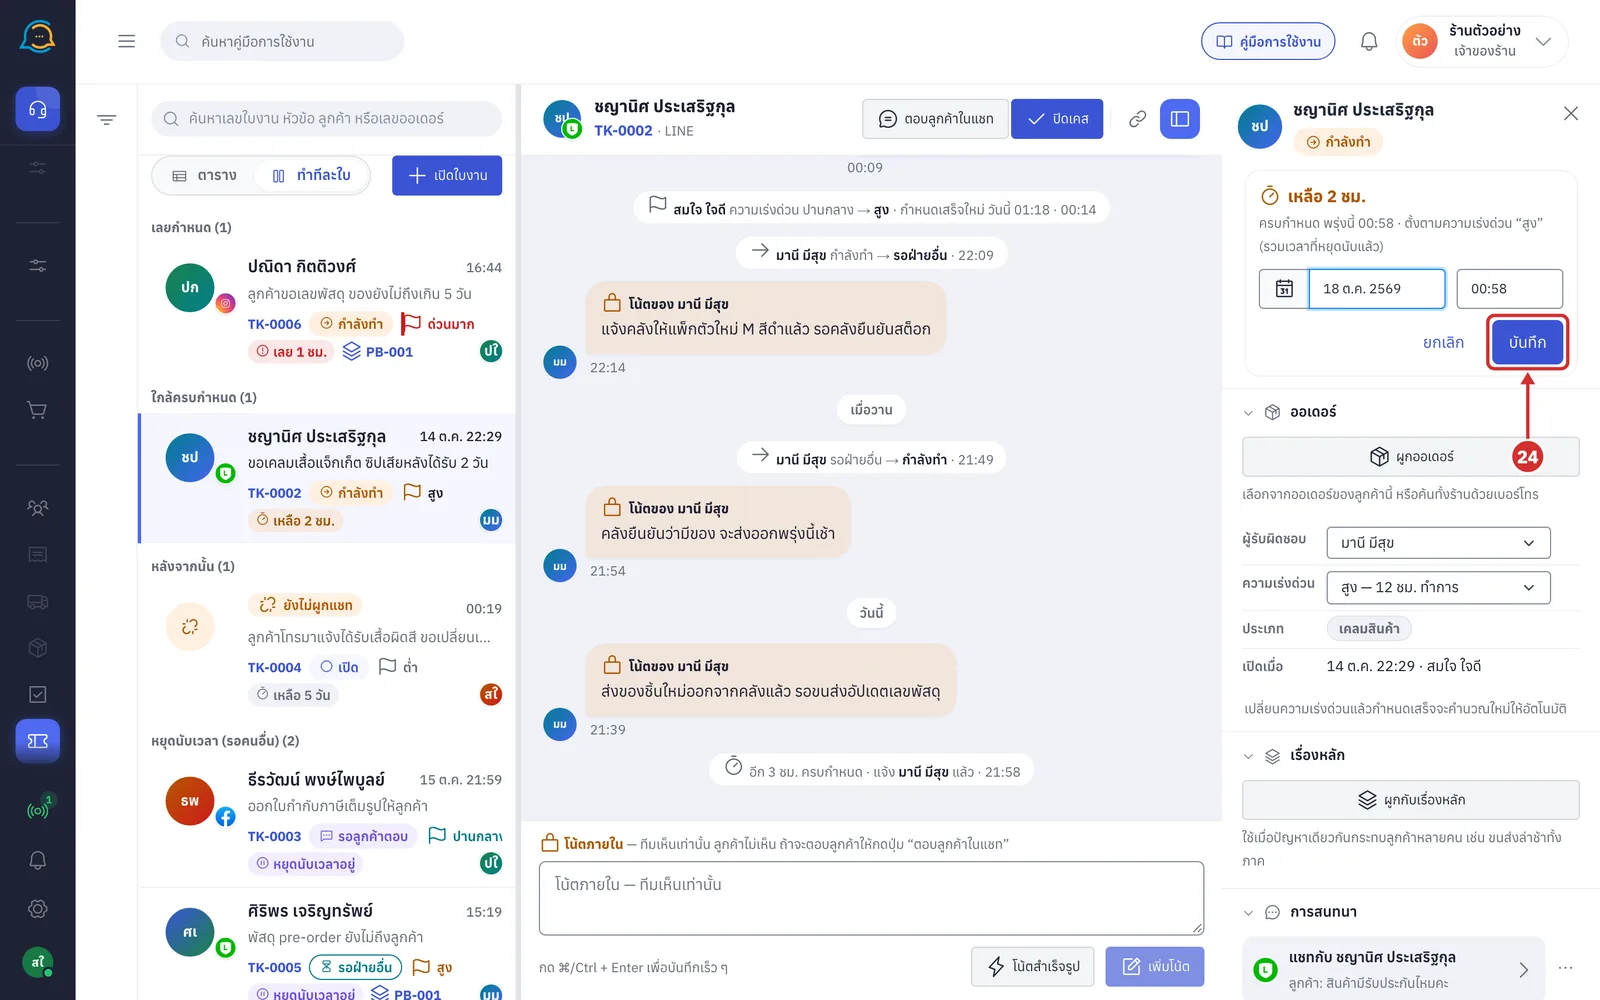
The card shows กำหนดเอง (Custom) after the due date and time, and the timeline shows เปลี่ยนกำหนดเสร็จจาก … เป็น … (กำหนดเอง) (Changed the due time from … to … (custom))
On a custom-due ticket, changing the urgency does not change the due date
On a custom-due ticket, รอลูกค้าตอบ (Waiting for customer) and รอฝ่ายอื่น (Waiting on another team) do not pause the clock, and the card shows สถานะ “…” — วันที่กำหนดเองไม่เลื่อนตาม (Status “…” — the custom date does not move)
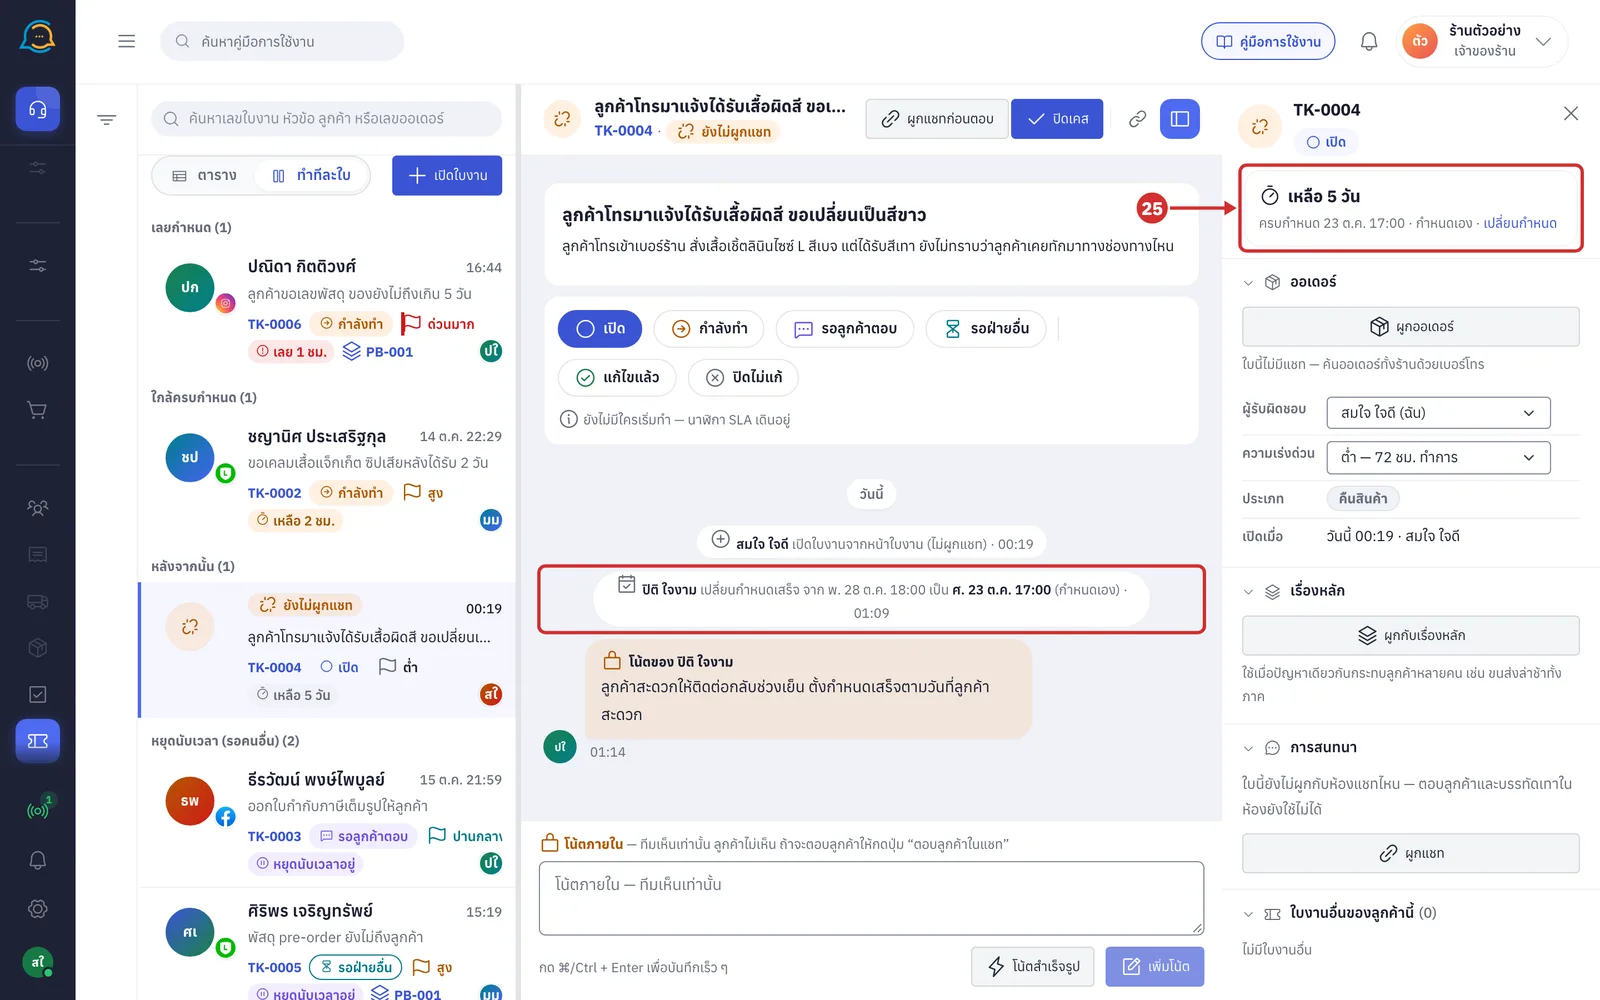
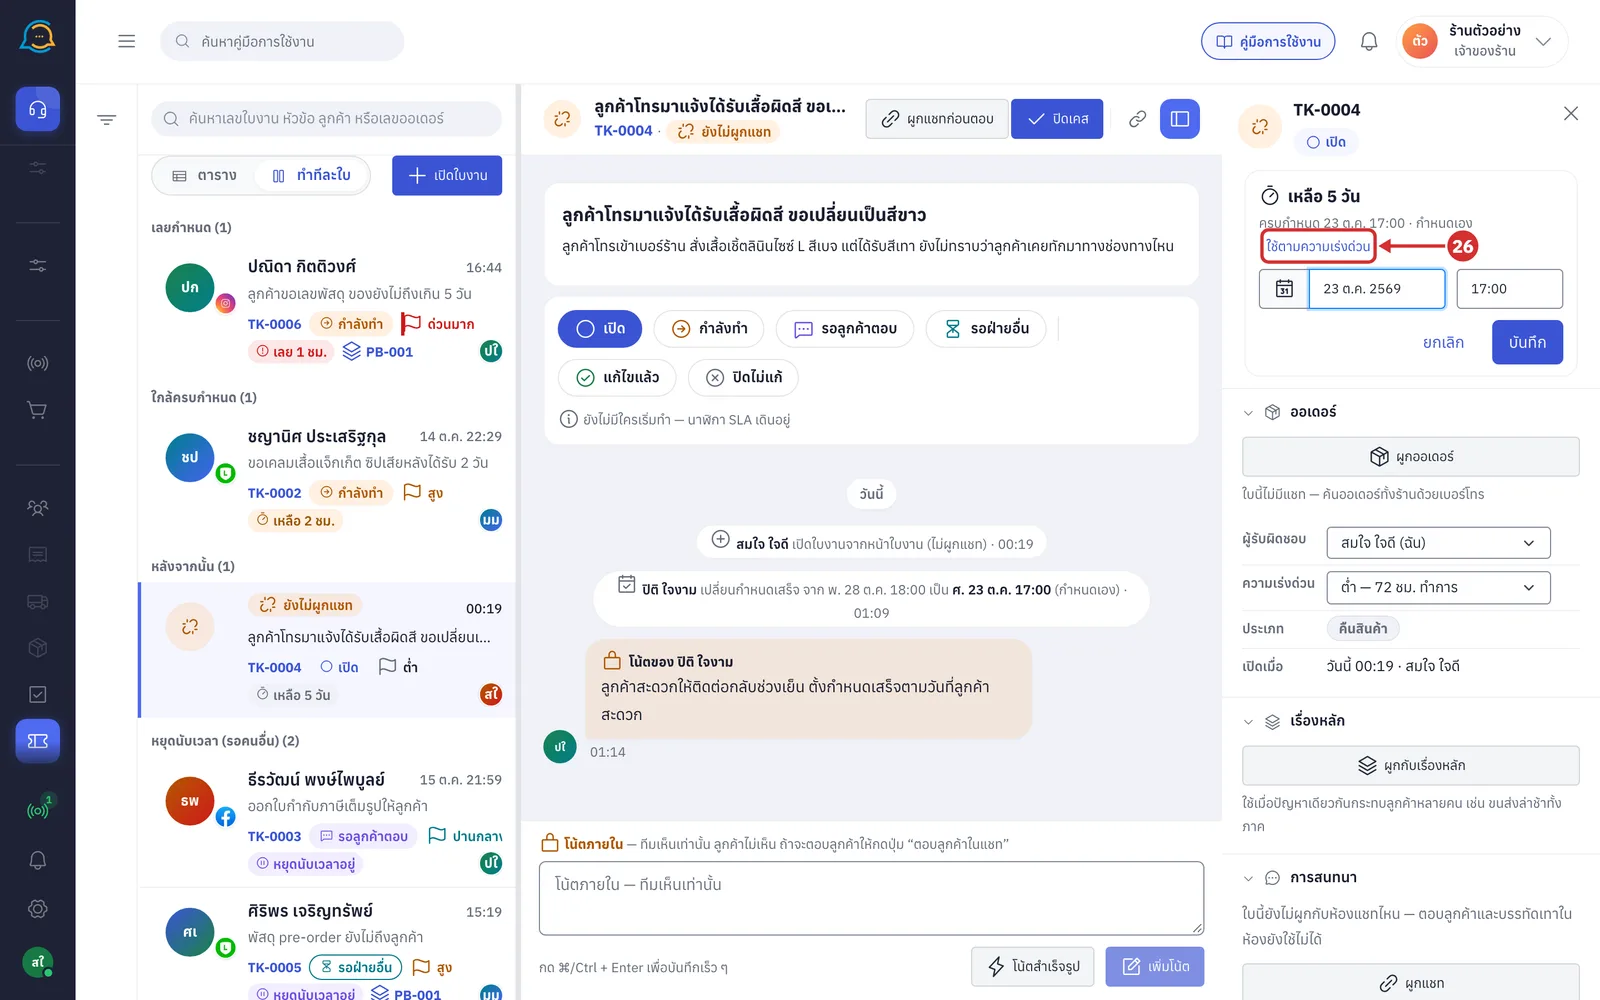
To go back to the due time worked out from the urgency, click เปลี่ยนกำหนด (Change due), then click ใช้ตามความเร่งด่วน (Use urgency). It is saved straight away, and the timeline shows กลับไปใช้กำหนดตามความเร่งด่วน (Went back to the due time by urgency)
Linking an order
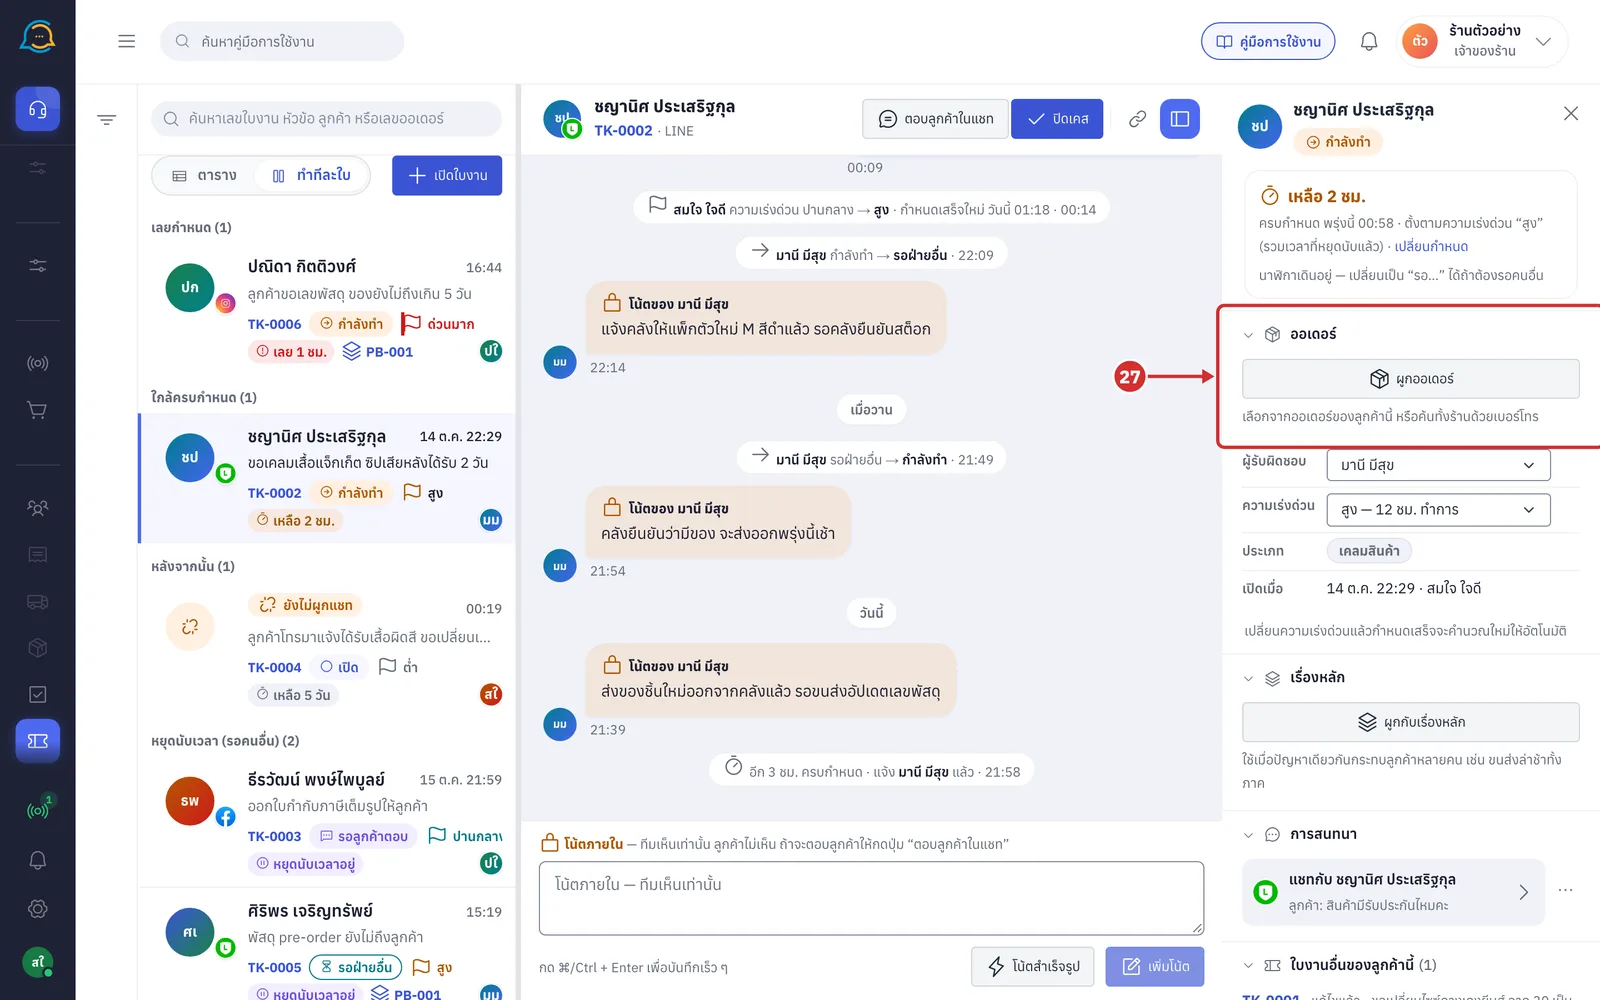
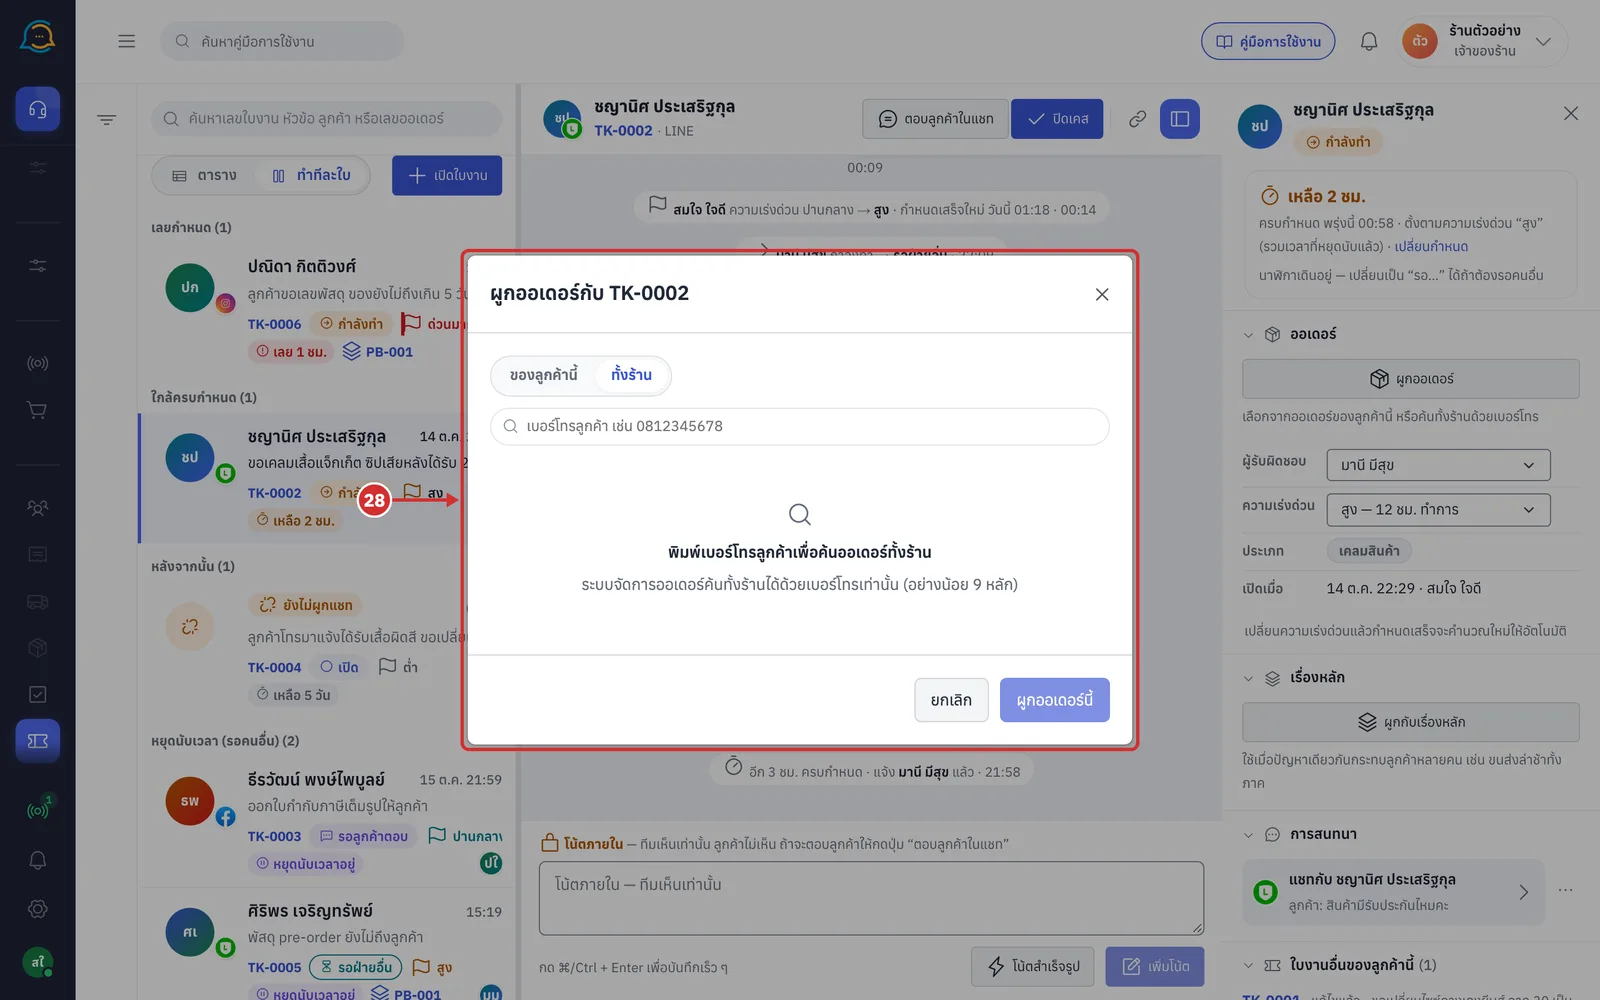
Under ออเดอร์ (Order), click ผูกออเดอร์ (Link order) to link an order in GoSaaS to this ticket. A ticket can have 1 order
The line under the button says how to search: เลือกจากออเดอร์ของลูกค้านี้ หรือค้นทั้งร้านด้วยเบอร์โทร (Choose from this customer's orders, or search the whole shop by phone number)
A ticket with no chat can only search the whole shop by phone number
In the ผูกออเดอร์กับ (Link order to) window followed by the ticket number, choose where to search, click the order you want, then click ผูกออเดอร์นี้ (Link this order)
ของลูกค้านี้ (This customer) — this customer's orders; type an order number or product name to filter
ทั้งร้าน (Whole shop) — search by the customer's phone number only, at least 9 digits
More details
Once linked, the ออเดอร์ (Order) section shows the order number, total, status and items, loaded from GoSaaS each time you open the ticket
Click ⋯ on the card to เปลี่ยนออเดอร์ (Change order) or ถอดออเดอร์ออก (Remove order). You are asked before removing, and the order in GoSaaS is not deleted
Shops not yet connected to the order system see ร้านนี้ยังไม่ได้เชื่อมกับระบบจัดการออเดอร์ (This shop is not connected to the order system yet)
Changing the owner and urgency
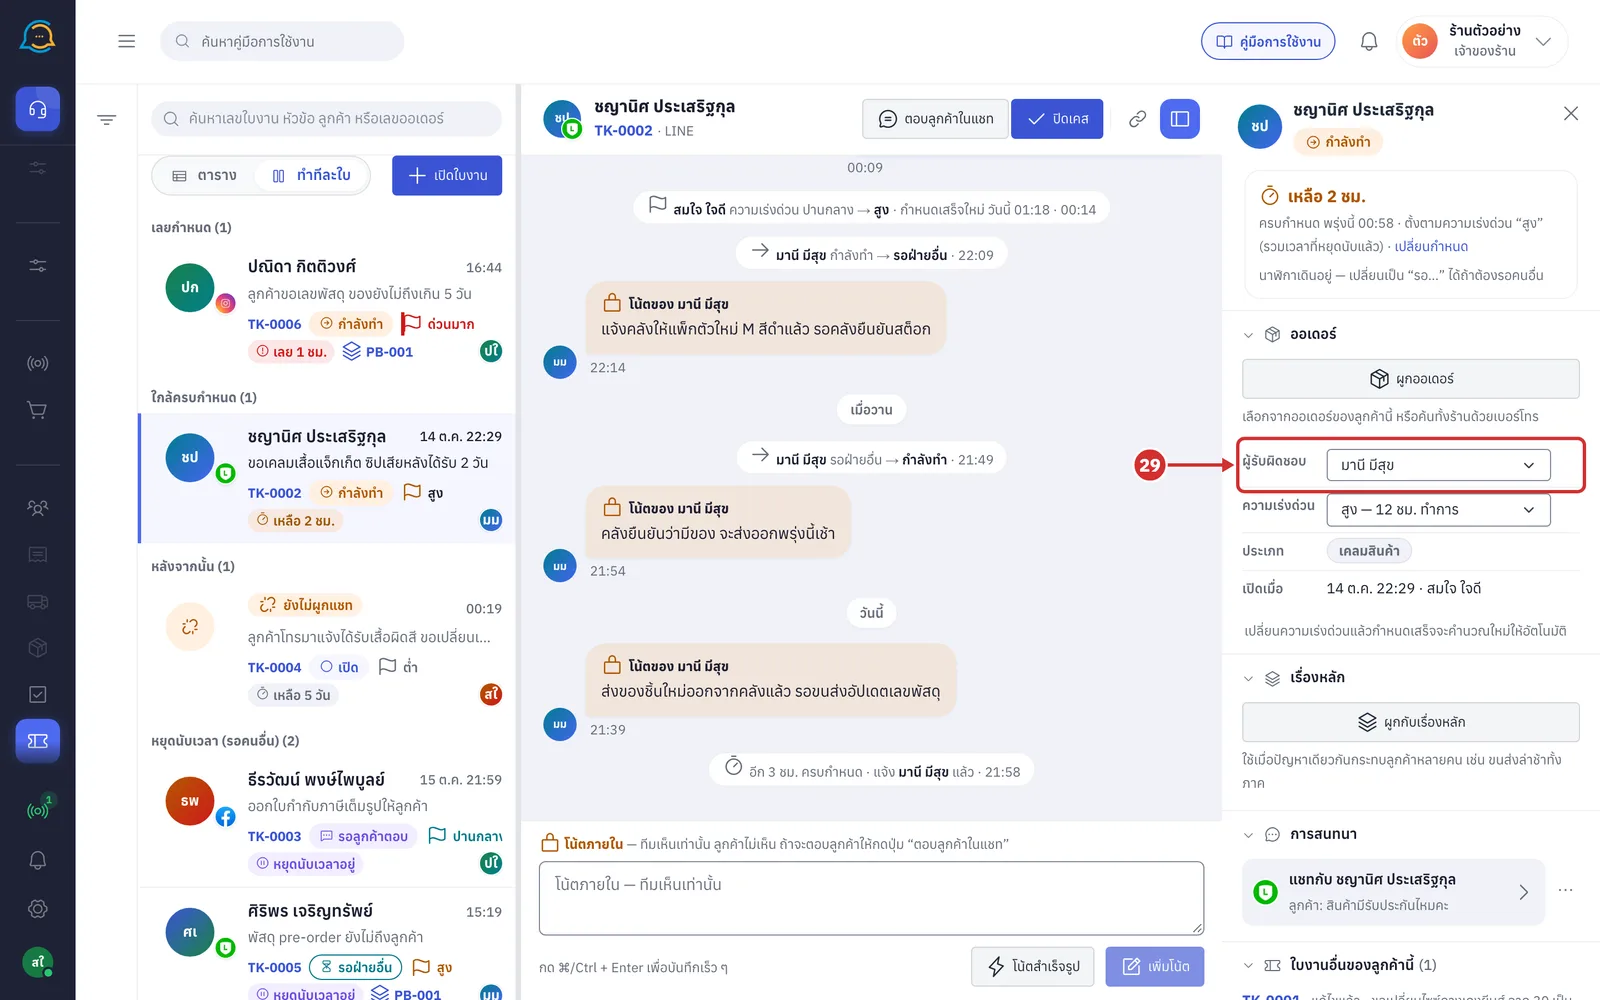
In ผู้รับผิดชอบ (Owner), choose who in your shop looks after this ticket. It is saved straight away, and the timeline shows มอบหมายให้ (Assigned to) followed by the name
Your own name has (ฉัน) (me) after it
Choose ไม่มีผู้รับผิดชอบ (No owner) to remove the owner
If the owner is no longer in your shop, the box still shows their name
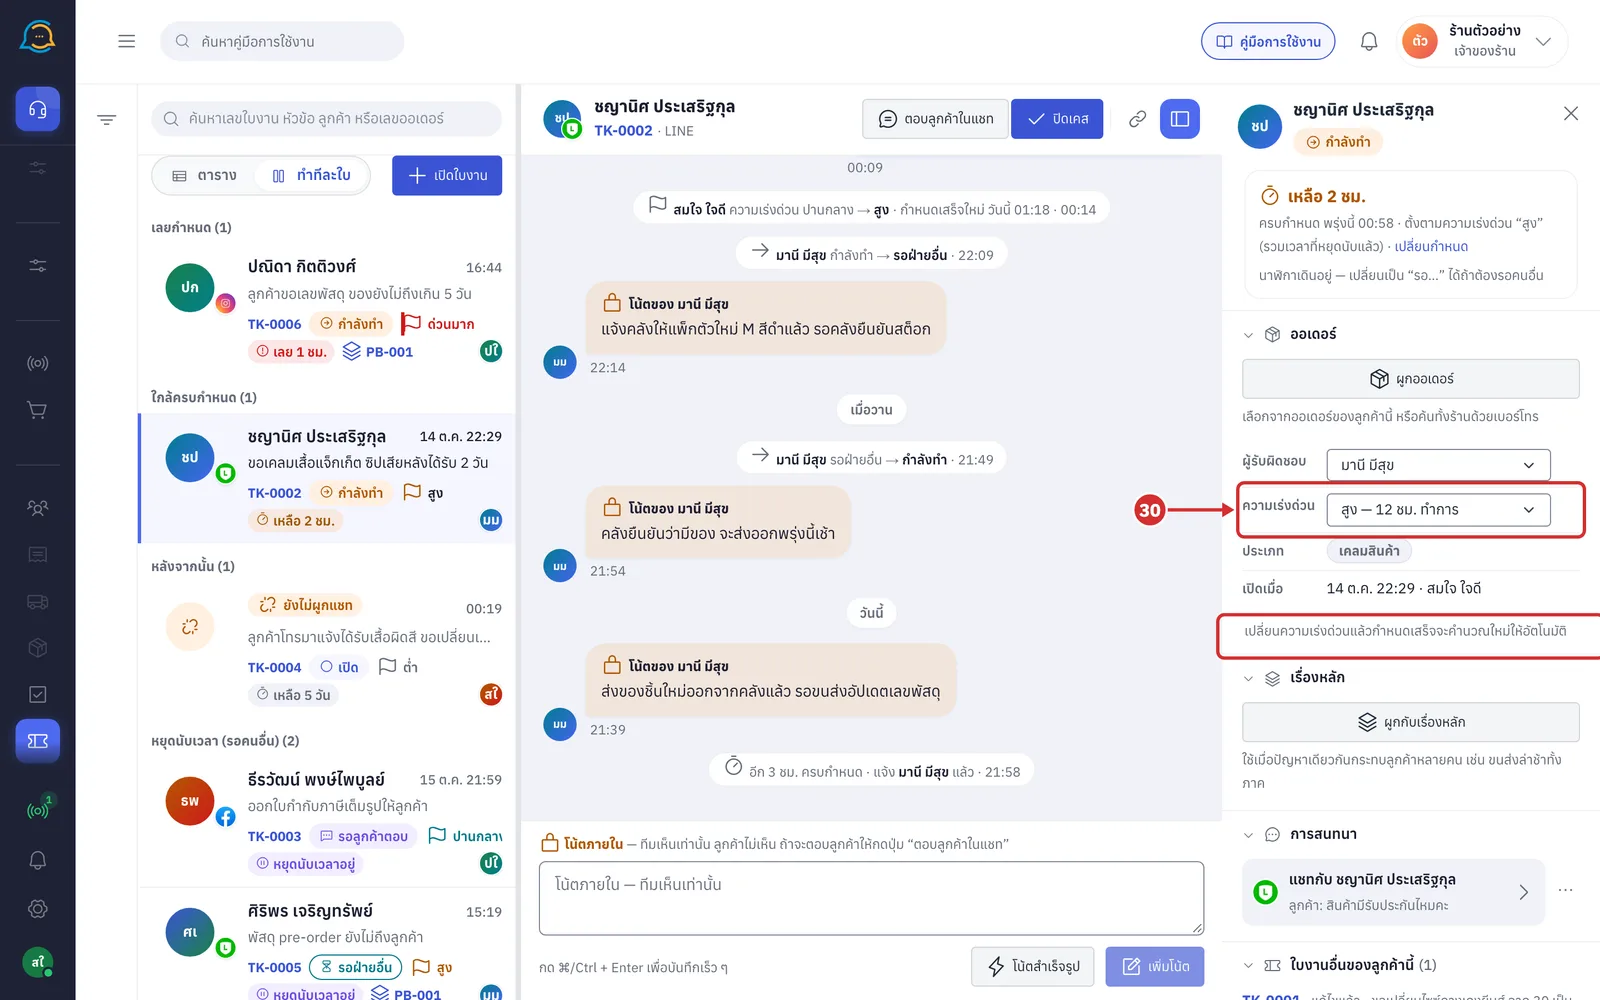
In ความเร่งด่วน (Urgency), choose the urgency. It is saved straight away, and the timeline shows the old → new urgency with กำหนดเสร็จใหม่ (New due time). Each option shows the time it gives
ด่วนมาก — 4 ชม. ทำการ (Very urgent — 4 business hours)
สูง — 12 ชม. ทำการ (High — 12 business hours)
ปานกลาง — 24 ชม. ทำการ (Medium — 24 business hours)
ต่ำ — 72 ชม. ทำการ (Low — 72 business hours)
Shops that count all 24 hours see 4 ชม. (4 h), 12 ชม. (12 h), 1 วัน (1 day) and 3 วัน (3 days)
The line under the box, เปลี่ยนความเร่งด่วนแล้วกำหนดเสร็จจะคำนวณใหม่ให้อัตโนมัติ (Changing the urgency recalculates the due time automatically), is not shown on custom-due tickets
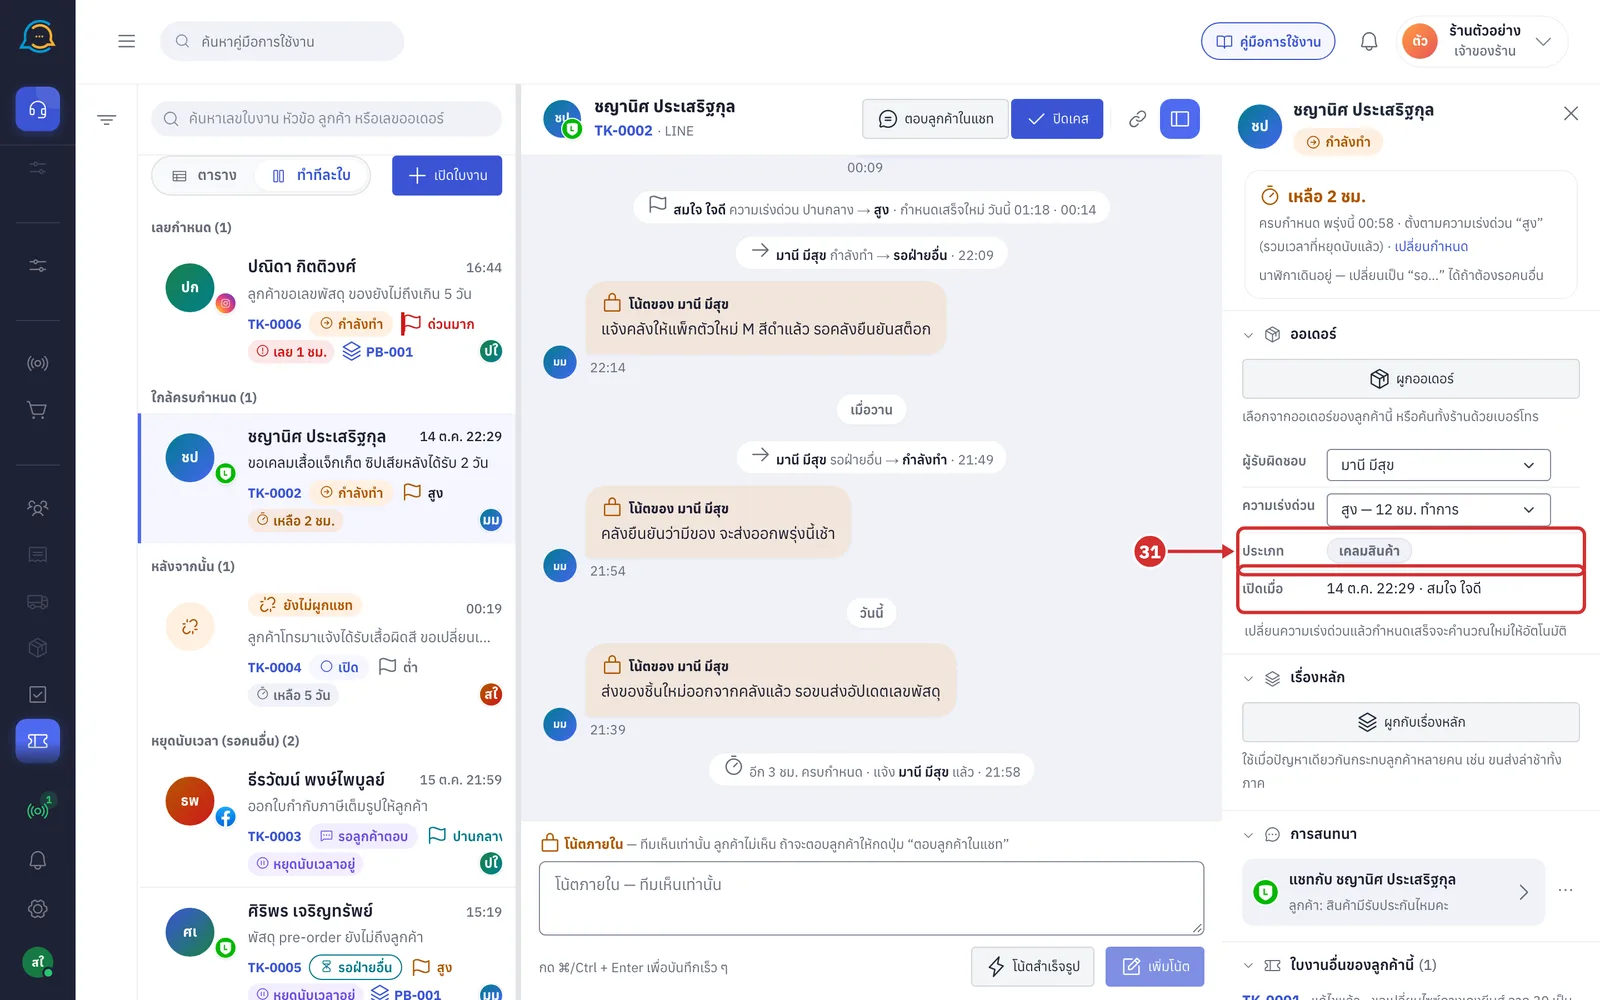
Below the urgency box is read-only information
ประเภท (Type) — the type chosen when the ticket was opened. It cannot be changed later
เปิดเมื่อ (Opened) — when the ticket was opened and by whom
Linking to a main issue
The เรื่องหลัก (Main issue) section groups tickets from several customers with the same problem, such as delayed delivery across a region. Each ticket keeps its own status.
On a ticket not yet in a main issue, click ผูกกับเรื่องหลัก (Link to main issue) and choose an existing issue, such as PB-001. It is saved straight away, and the timeline shows ผูกกับเรื่องหลัก (Linked to main issue)
Click สร้างเรื่องหลักใหม่ (Create a new main issue) to open the รวมเป็นเรื่องเดียวกัน (Group into one issue) window, explained in Managing tickets
Shops with no main issues yet see ยังไม่มีเรื่องหลัก (No main issues yet)
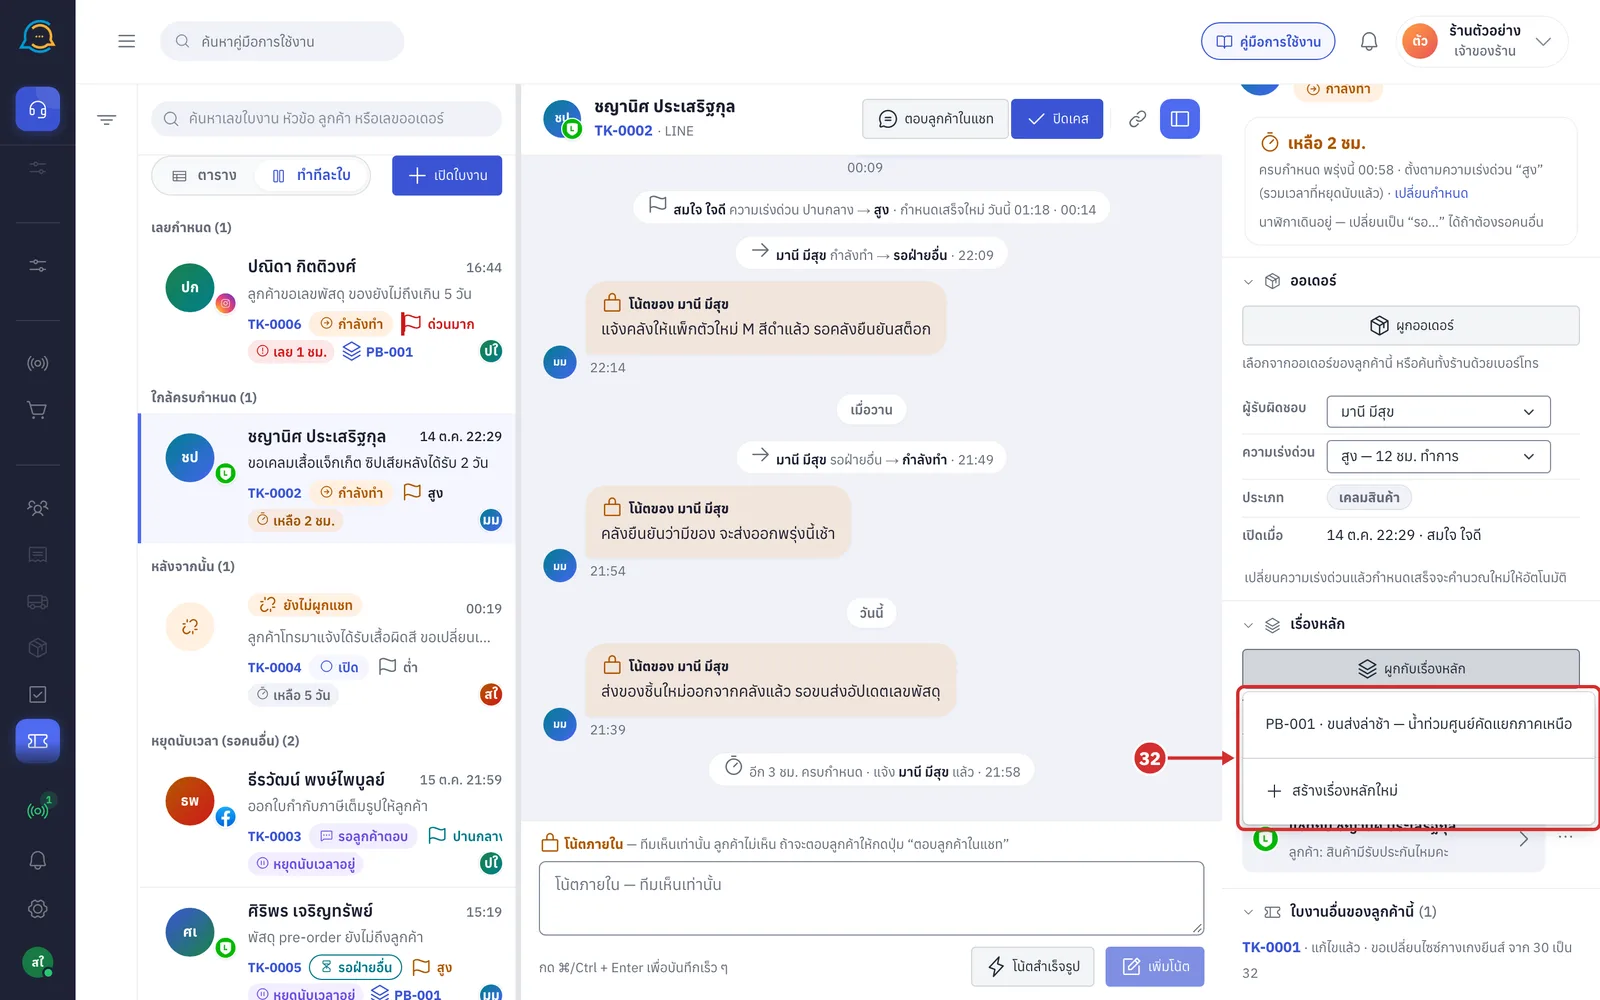
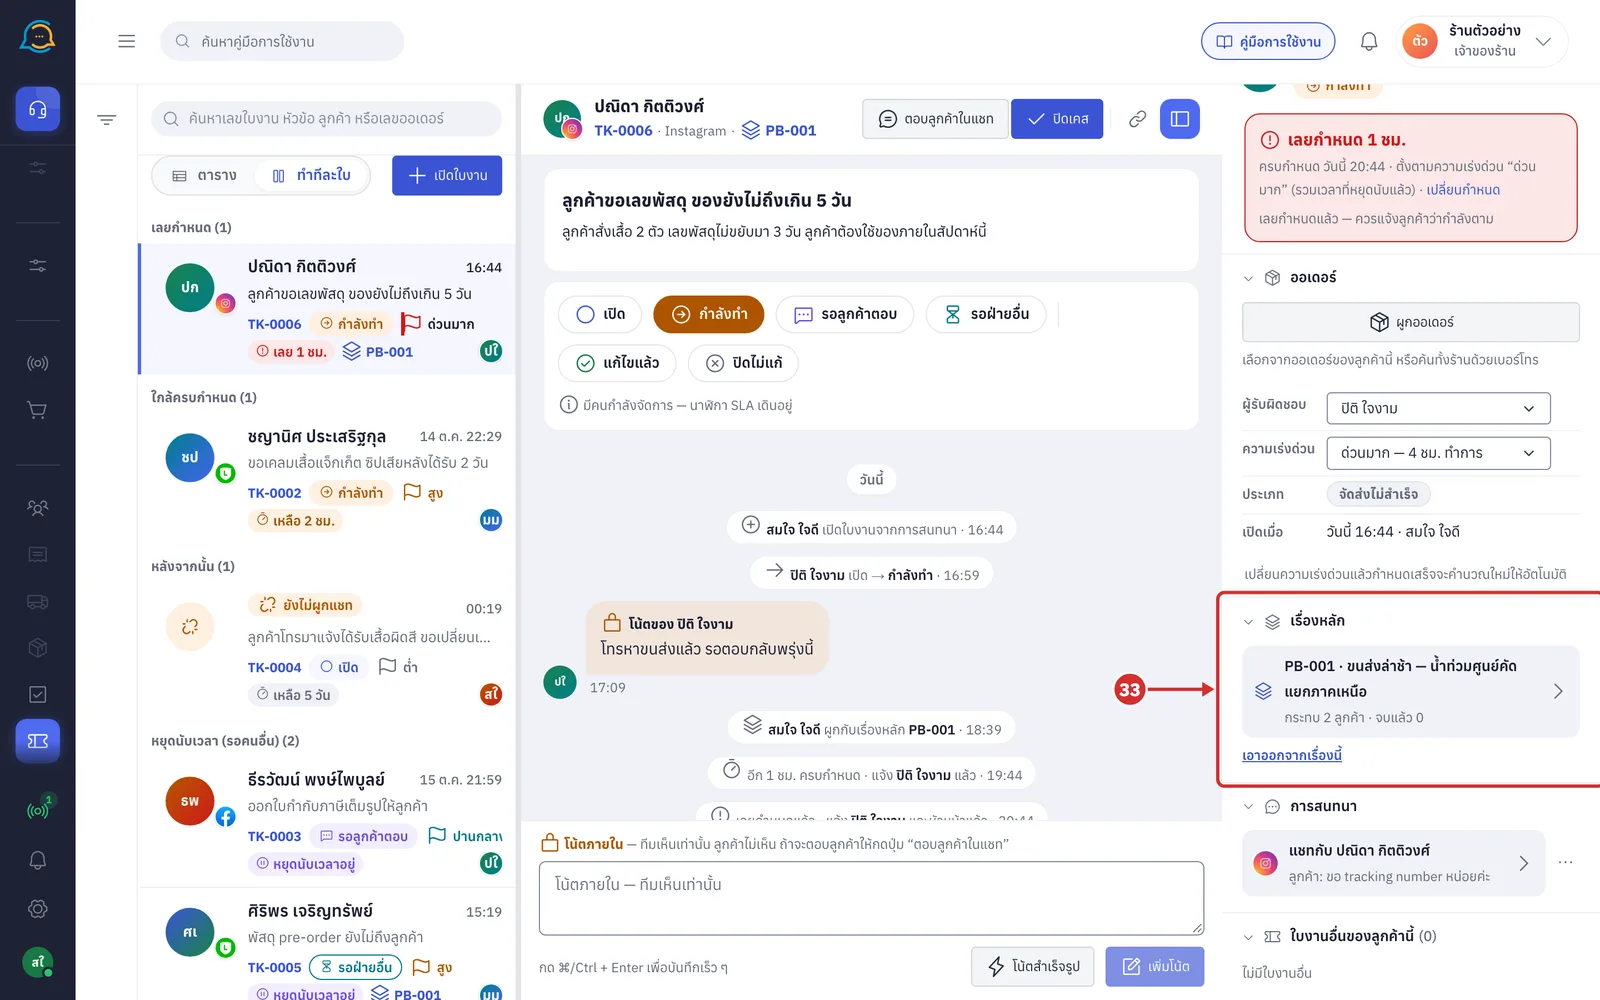
On a ticket already in a main issue, this section shows a card with the issue's number and subject and กระทบ … ลูกค้า · จบแล้ว … (Affects … customers · … finished). Click the card to open the main issue page, or click เอาออกจากเรื่องนี้ (Remove from this issue) to take this ticket out, which happens straight away without asking
Linking and changing the chat
The chat linked to a ticket is the one the ตอบลูกค้าในแชท (Reply in chat) button opens, and where the ticket's grey lines appear.
Under การสนทนา (Conversation), a ticket with a linked chat shows a แชทกับ (Chat with) card with the customer's name and their latest message after ลูกค้า: (Customer:). Click the card to open the chat
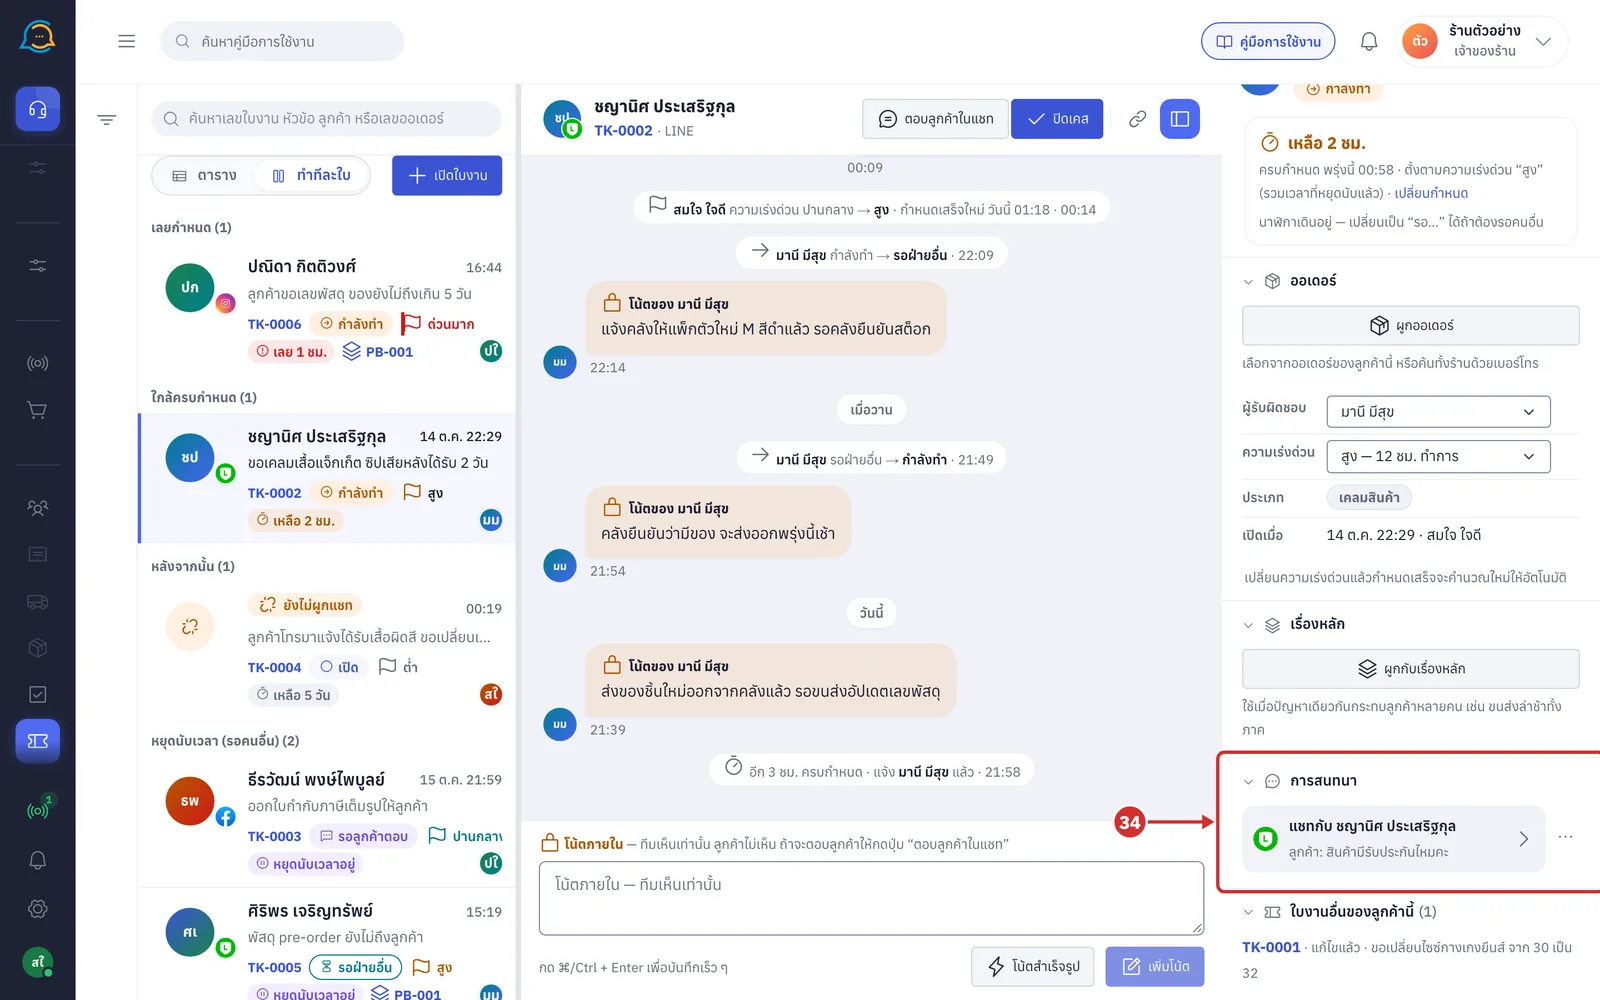
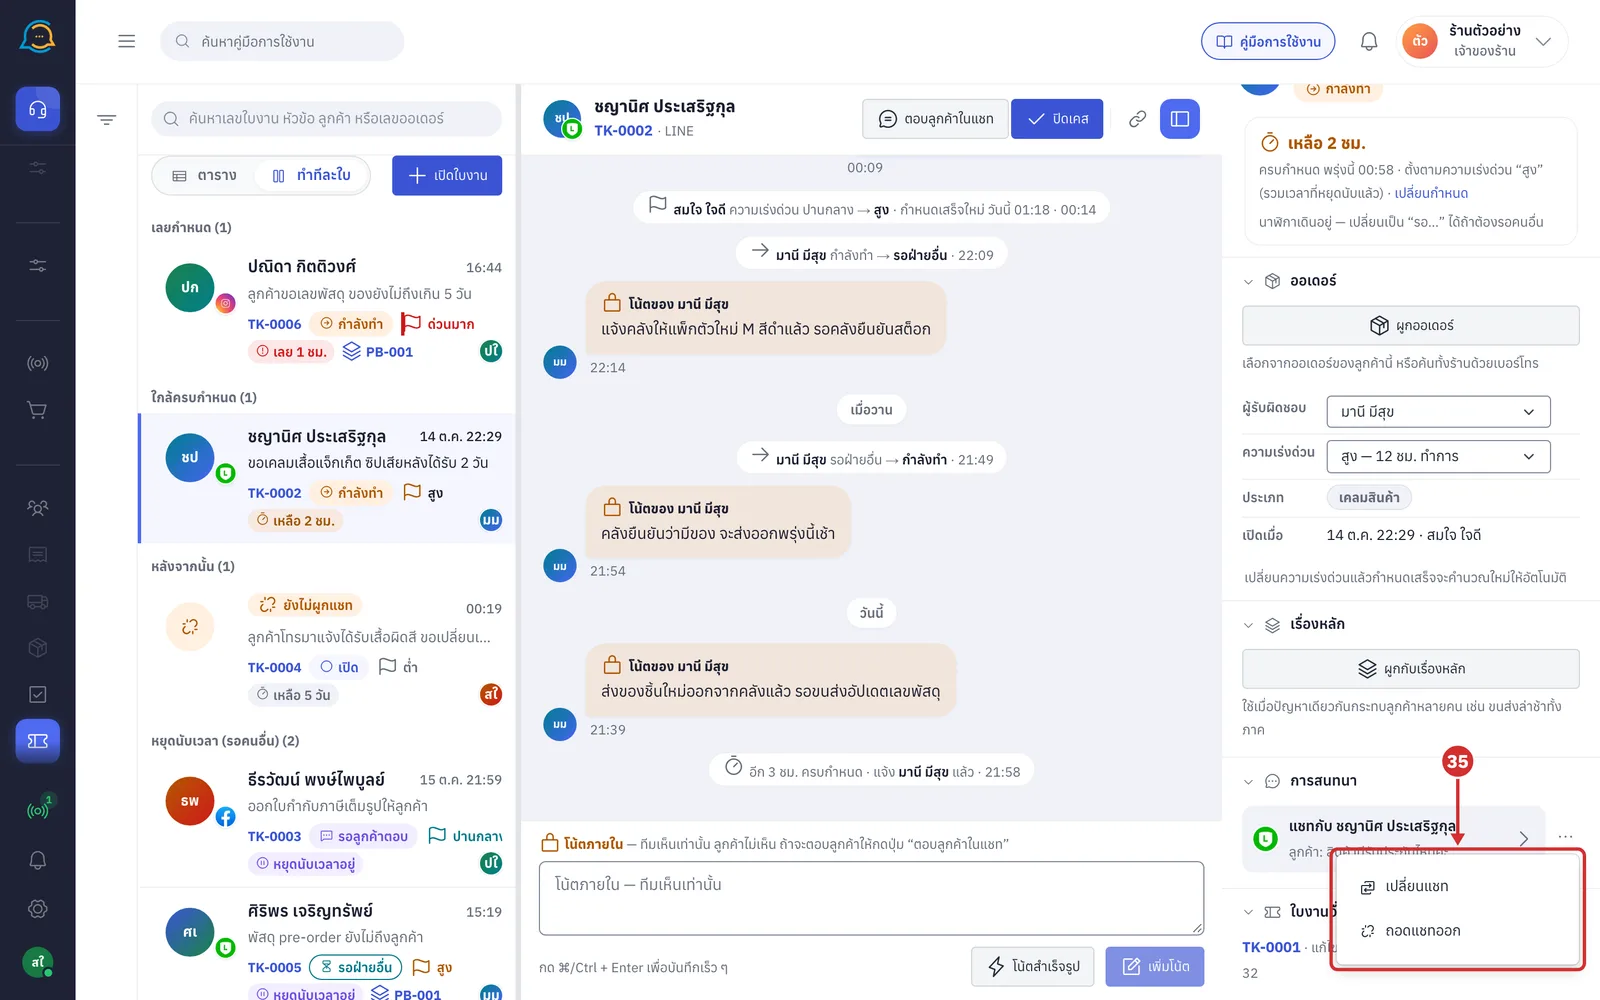
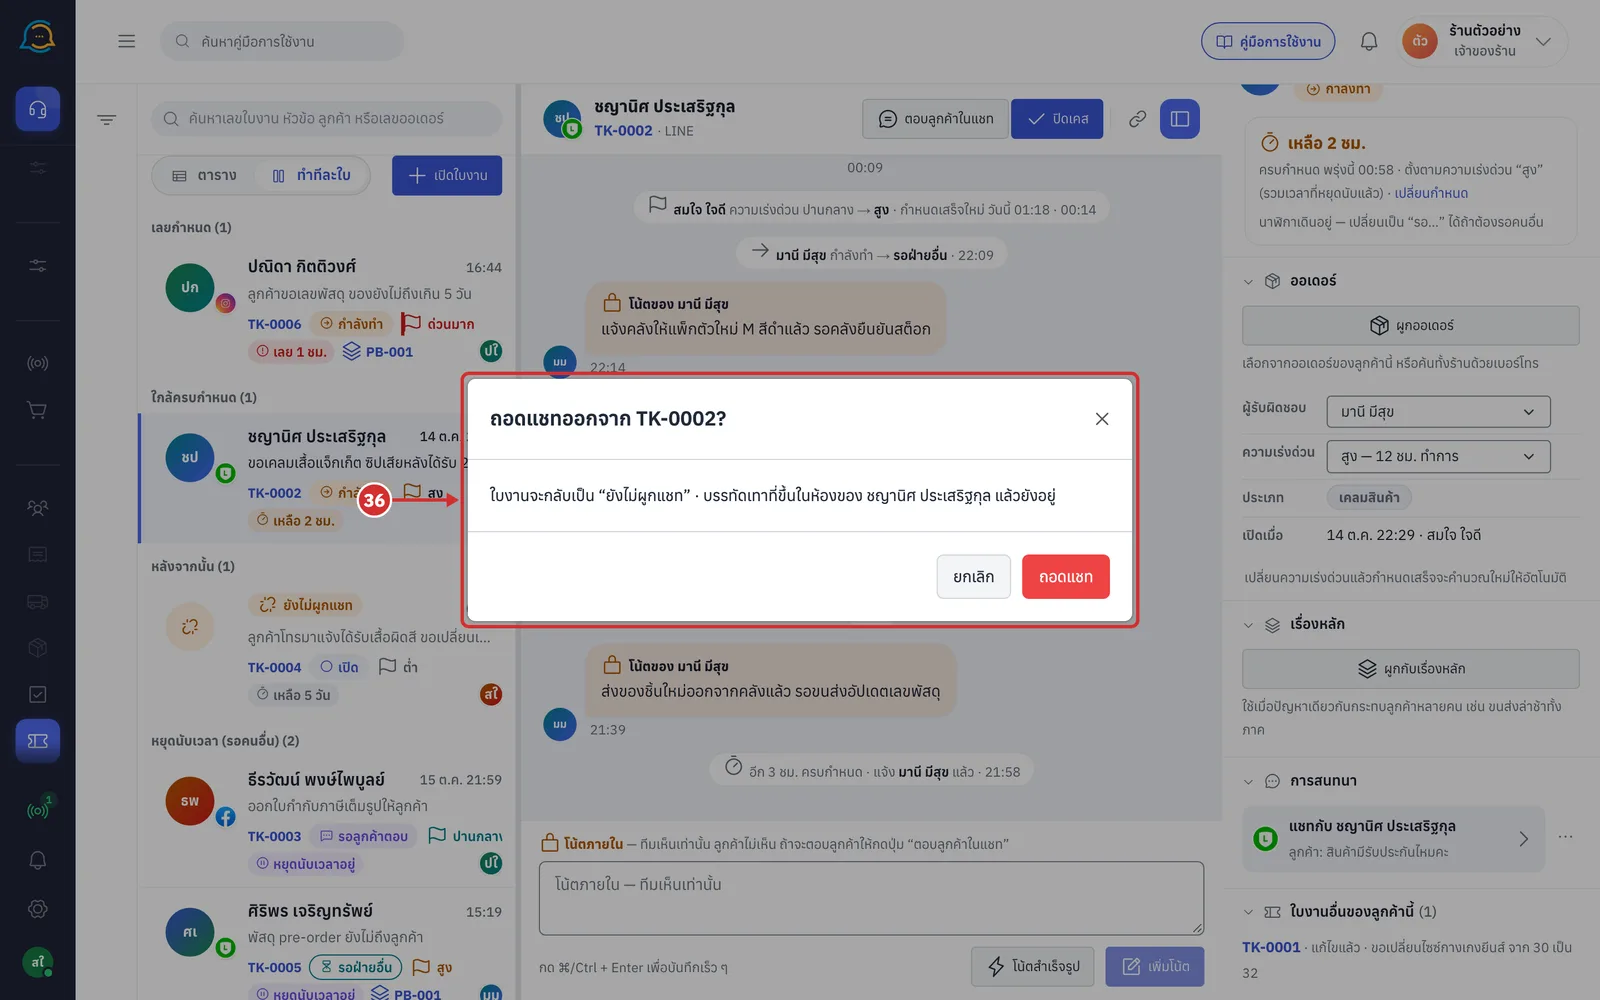
Click ⋯ at the end of the card, then choose เปลี่ยนแชท (Change chat) to pick another chat, or ถอดแชทออก (Unlink chat) to remove the chat from the ticket
If you choose ถอดแชทออก (Unlink chat), you are asked ถอดแชทออกจาก (Unlink chat from) followed by the ticket number, with what will happen: ใบงานจะกลับเป็น “ยังไม่ผูกแชท” · บรรทัดเทาที่ขึ้นในห้องของ … แล้วยังอยู่ (The ticket goes back to “No chat linked” · grey lines already in …'s chat stay). Click ถอดแชท (Unlink) to confirm, or ยกเลิก (Cancel)
On a ticket with no chat, this section shows ใบนี้ยังไม่ผูกกับห้องแชทไหน — ตอบลูกค้าและบรรทัดเทาในห้องยังใช้ไม่ได้ (This ticket is not linked to any chat — replying and grey lines in the chat are not available yet). Click ผูกแชท (Link chat) to choose a chat (or click ผูกแชทก่อนตอบ (Link a chat before replying) in the header)
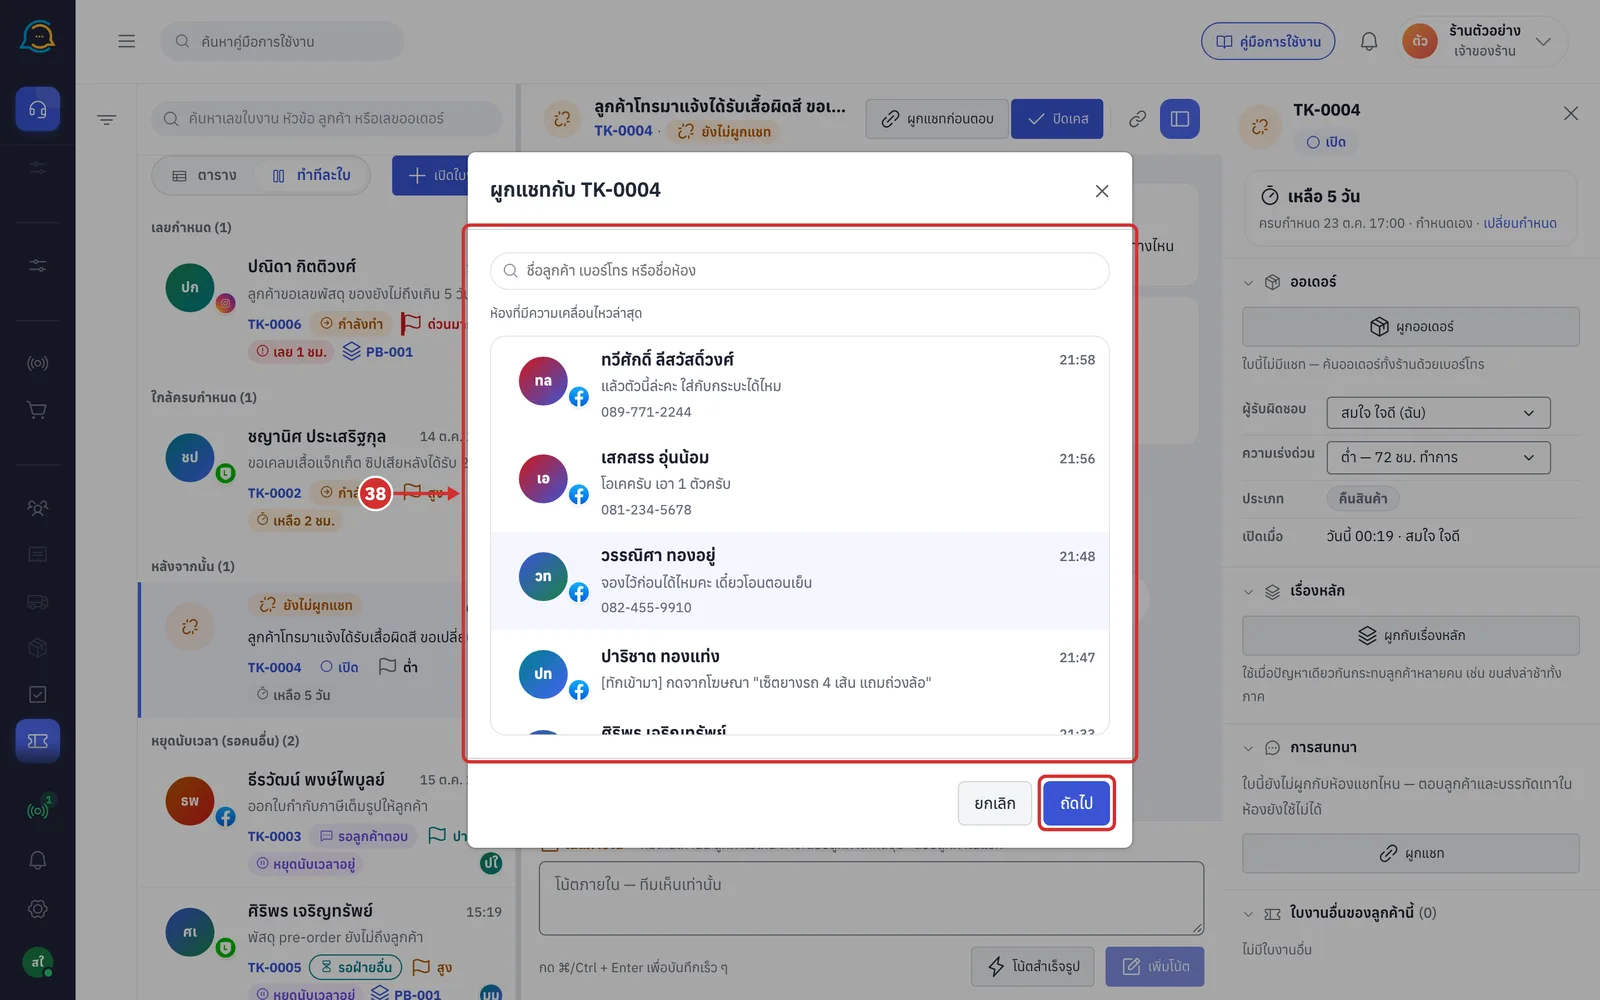
In the ผูกแชทกับ (Link chat to) window followed by the ticket number, search by customer name, phone number or chat name, click the chat you want, then click ถัดไป (Next)
Before you type, it shows ห้องที่มีความเคลื่อนไหวล่าสุด (Most recently active chats)
The change chat window is called เปลี่ยนแชทของ (Change chat of) followed by the ticket number, and works the same way
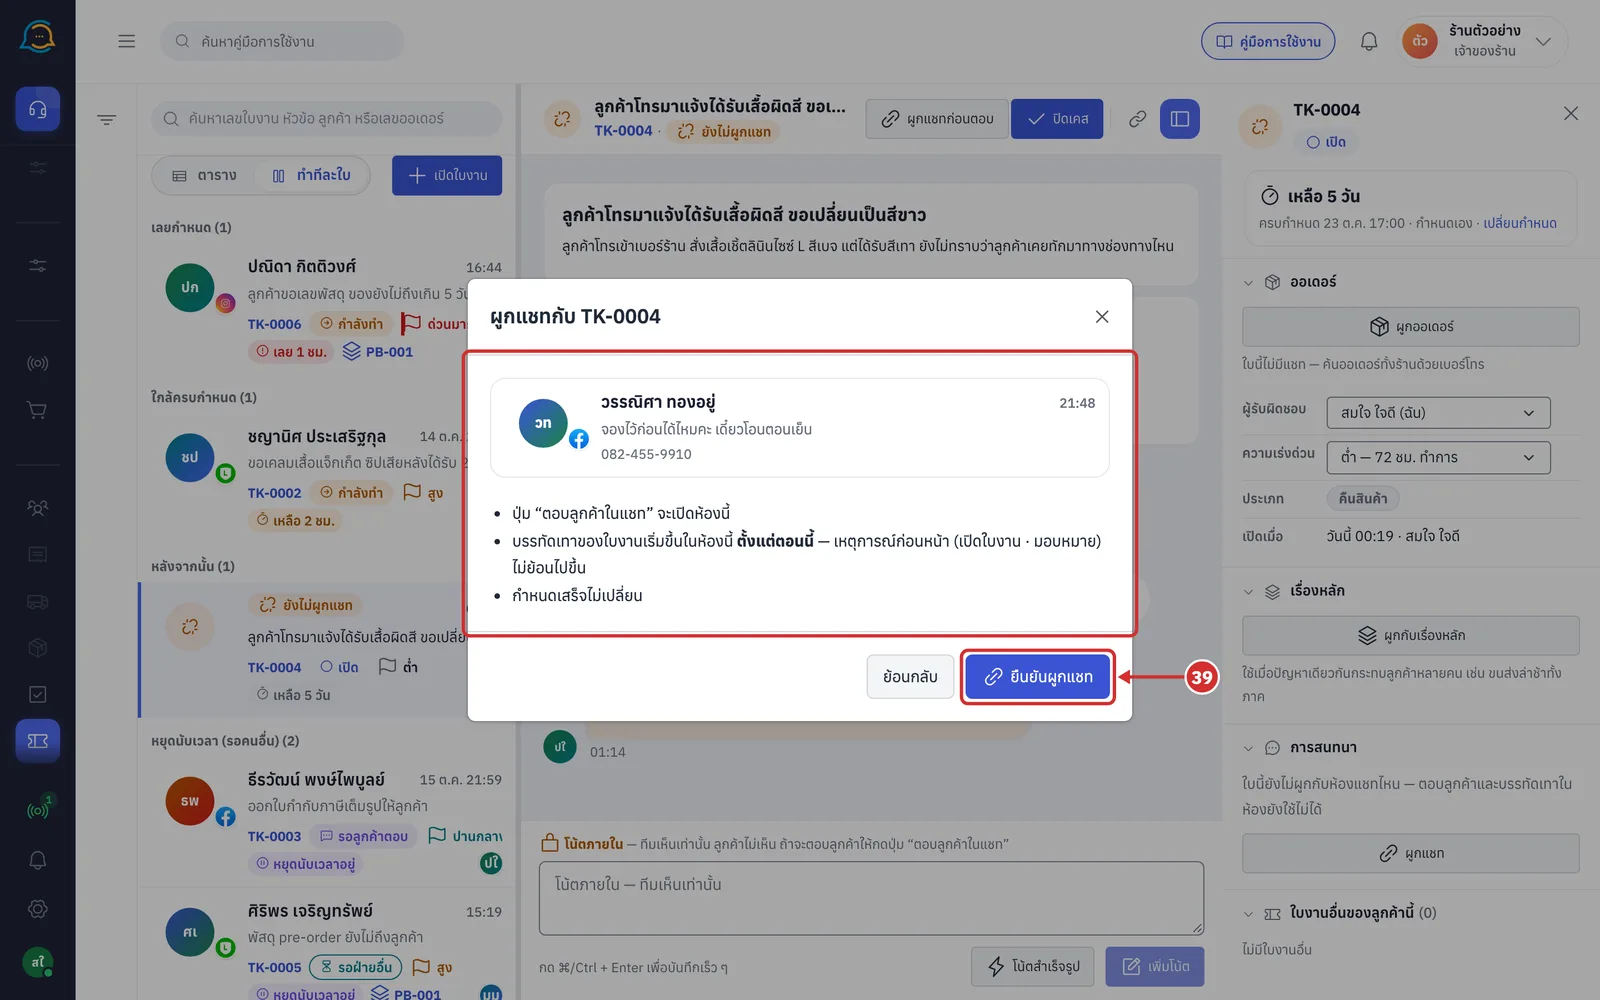
Check what will happen, then click ยืนยันผูกแชท (Confirm link) (click ย้อนกลับ (Back) to choose another chat)
ปุ่ม “ตอบลูกค้าในแชท” จะเปิดห้องนี้ (The “Reply in chat” button will open this chat)
บรรทัดเทาของใบงานเริ่มขึ้นในห้องนี้ ตั้งแต่ตอนนี้ — เหตุการณ์ก่อนหน้า (เปิดใบงาน · มอบหมาย) ไม่ย้อนไปขึ้น (The ticket's grey lines start in this chat from now — earlier events (opening, assigning) are not added)
กำหนดเสร็จไม่เปลี่ยน (The due time does not change)
Once linked, the header shows that chat's customer name, and the timeline shows ผูกกับแชท (Linked to chat) with the chat name and channel
Seeing the customer's other tickets
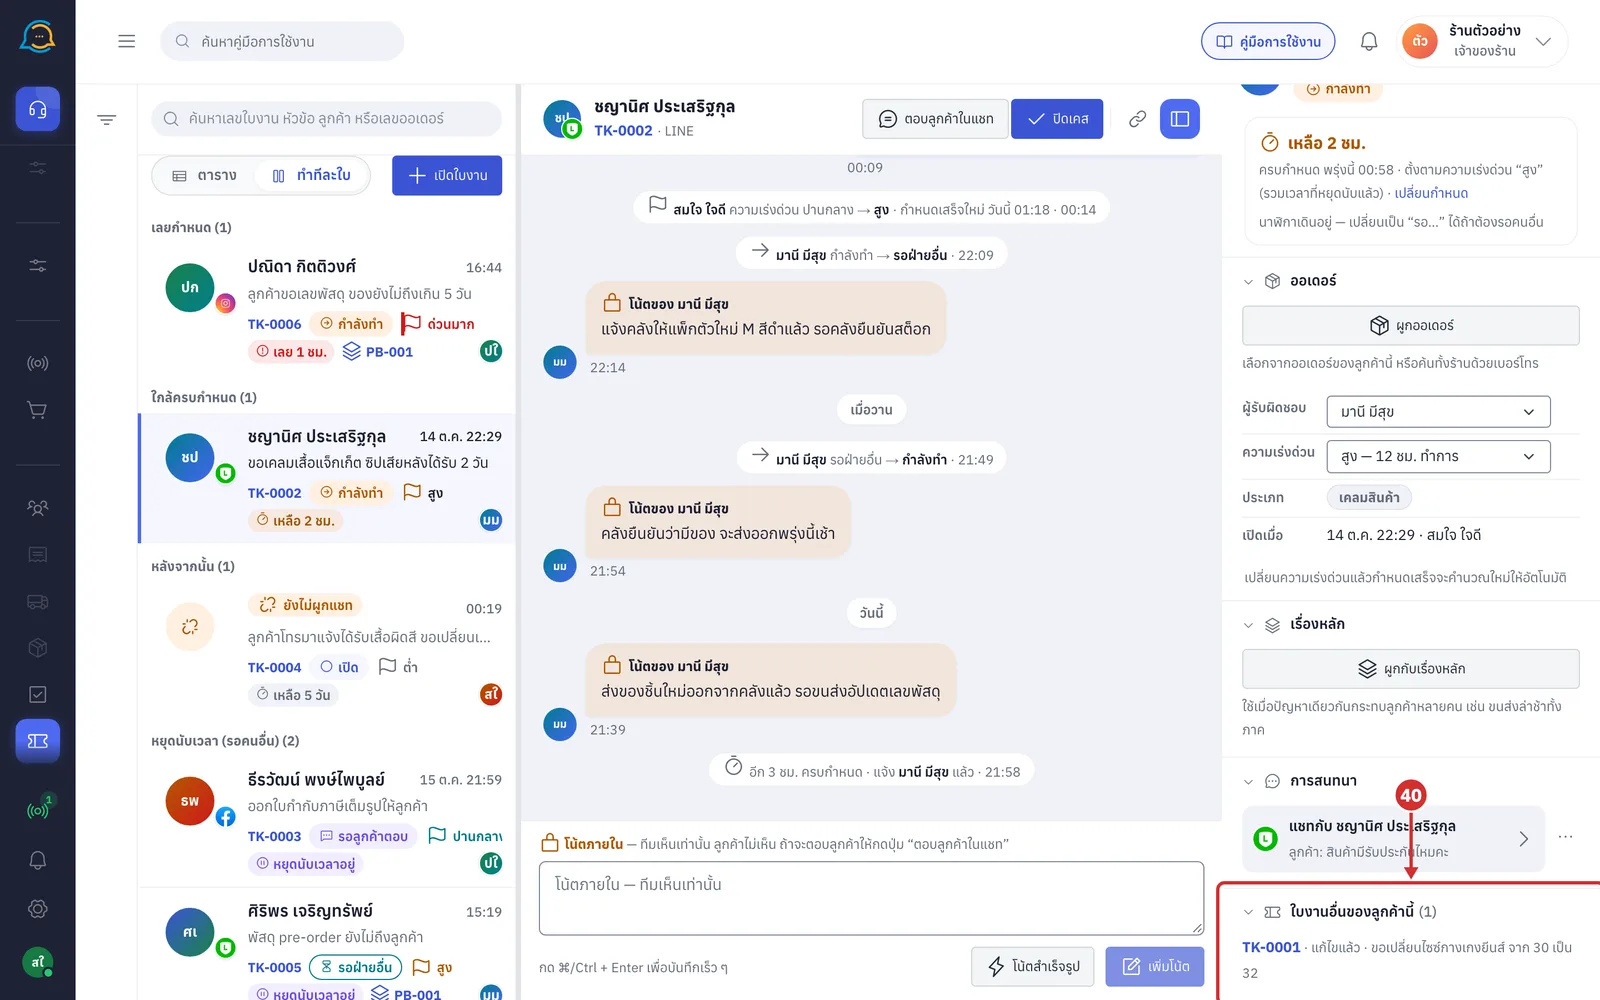
ใบงานอื่นของลูกค้านี้ (Other tickets for this customer) shows other tickets for the same customer or the same chat. Each row shows the ticket number, status and subject. Click the number to open that ticket
The number on the heading is how many tickets there are; the list shows up to 8
With no other tickets, it shows ไม่มีใบงานอื่น (No other tickets)
Reopening a finished ticket
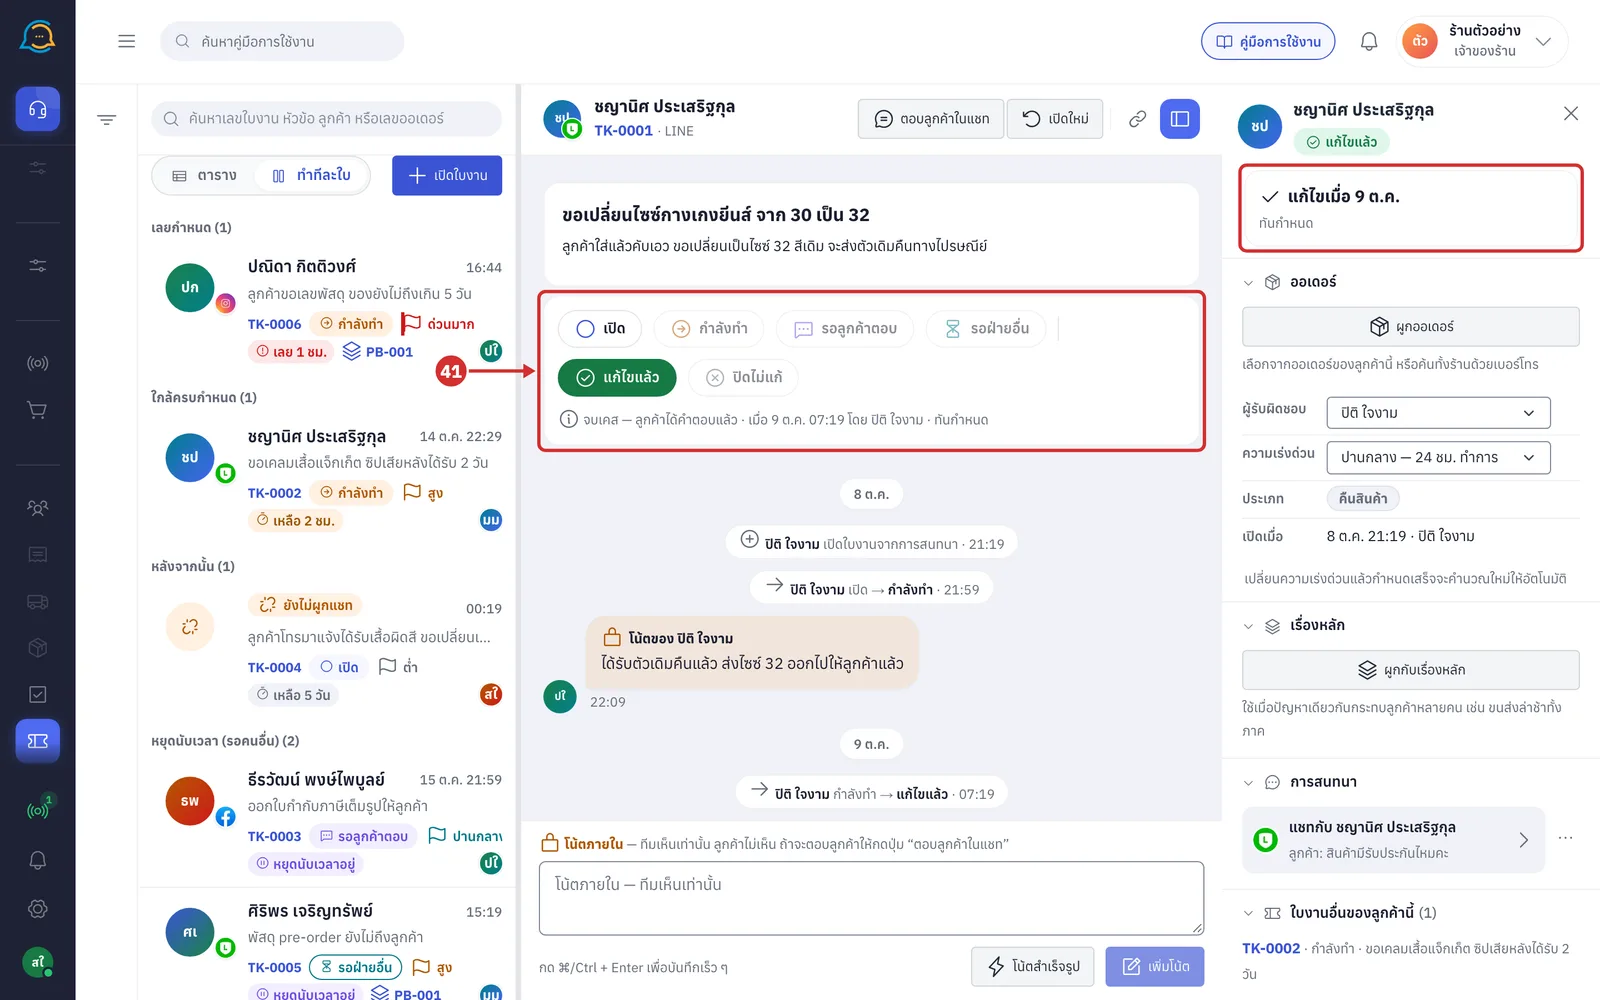
On a finished ticket, the line under the status bar says when it finished, who closed it and how it compared with the due time, such as · เมื่อ … โดย … · ทันกำหนด (· on … by … · On time), and the due card shows แก้ไขเมื่อ (Resolved on) with the date
On a ปิดไม่แก้ (Closed without fix) ticket, the card shows ปิดเมื่อ (Closed on) with the date
The other status buttons cannot be clicked until you click เปิดใหม่ (Reopen)
Click เปิดใหม่ (Reopen) in the header. The status goes back to เปิด (Open) straight away, and you can then change the status or due time as usual. The due time stays the same
Reading grey lines in the chat
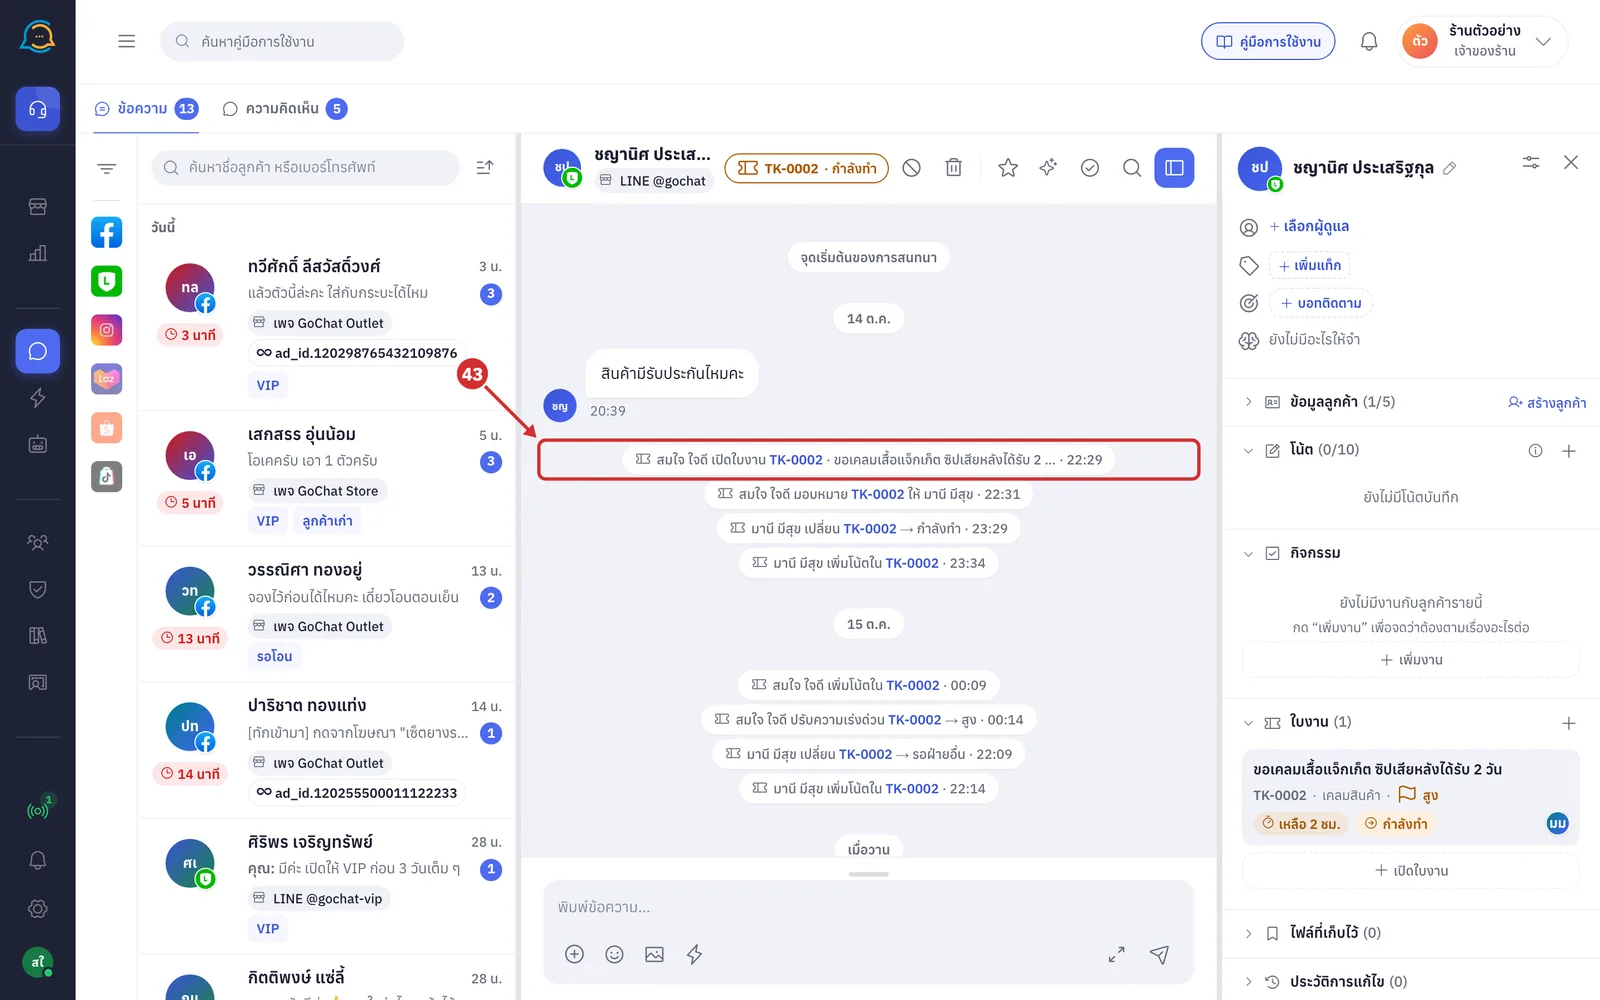
In the chat linked to a ticket, changes to the ticket appear as grey lines in time order among the messages, such as สมใจ ใจดี เปิดใบงาน TK-0002 (Somjai Jaidee opened TK-0002), มานี มีสุข เปลี่ยน TK-0002 → กำลังทำ (Manee Meesuk changed TK-0002 → In progress) and มานี มีสุข เพิ่มโน้ตใน TK-0002 (Manee Meesuk added a note to TK-0002)
Only your shop's team sees them; customers do not
Note lines only say there is a note, without its text
Click the ticket number in a line to open that ticket
For a ticket linked to a chat later, grey lines start from when it was linked. If the chat is changed or removed, the lines already in the old chat stay
Good to know: Replying to the customer, or the customer messaging again in the chat, does not change the ticket's status. When the issue is fixed, come back and click ปิดเคส (Close case) on the ticket.
About working on tickets
While offline you can still view the ticket, but a ออฟไลน์ — เปลี่ยนสถานะและเพิ่มโน้ตได้เมื่อกลับมาออนไลน์ (Offline — you can change the status and add notes when you are back online) bar appears and the editing buttons cannot be clicked
If saving fails, a บันทึกไม่สำเร็จ — ตรวจการเชื่อมต่อแล้วลองใหม่ (Not saved — check your connection and try again) bar appears at the top of the ticket, and the old values are kept
If the ticket cannot load, you see โหลดใบงานไม่สำเร็จ — ตรวจการเชื่อมต่อแล้วลองใหม่ (Could not load the ticket — check your connection and try again) with a ลองใหม่ (Try again) button
The ticket page does not update by itself when a teammate edits the same ticket. Reload the page to see the latest values
In shops that count ticket time in business hours only, the clock does not count while the shop is closed, and due-soon and overdue alerts are sent when the shop opens
Tickets cannot be deleted. Close tickets you no longer need with ปิดไม่แก้ (Closed without fix). If a ticket's chat is deleted, the ticket stays and becomes a ticket with no chat linked