

Conversions API settings
The วิธีจัดการข้อมูลกิจกรรม Facebook (How to manage Facebook activity data) page, under the Conversions API menu, lets you send key activity of customers who chat with your shop on Messenger directly to Facebook, for example when an order is created, a purchase succeeds or a tracking number is issued, so Facebook can measure the ads that brought customers into the chat.
Settings are per Page. A Page can send to up to 3 datasets, and you choose which events to send. Everyone in the shop can change the settings. Changes apply to events after you save; nothing is sent retroactively.
Before you start, get the Dataset ID and Access token from Facebook Events Manager (ตัวจัดการเหตุการณ์) from your shop's Page admin or business portfolio admin. The dataset must be a Messaging dataset linked to the same Page you set up in GoChat.
Note: The token sends data into your shop's dataset. Do not share it in chats, emails or screenshots.
Opening the Conversions API page
Under Ads Commerce, choose Conversions API in the left menu
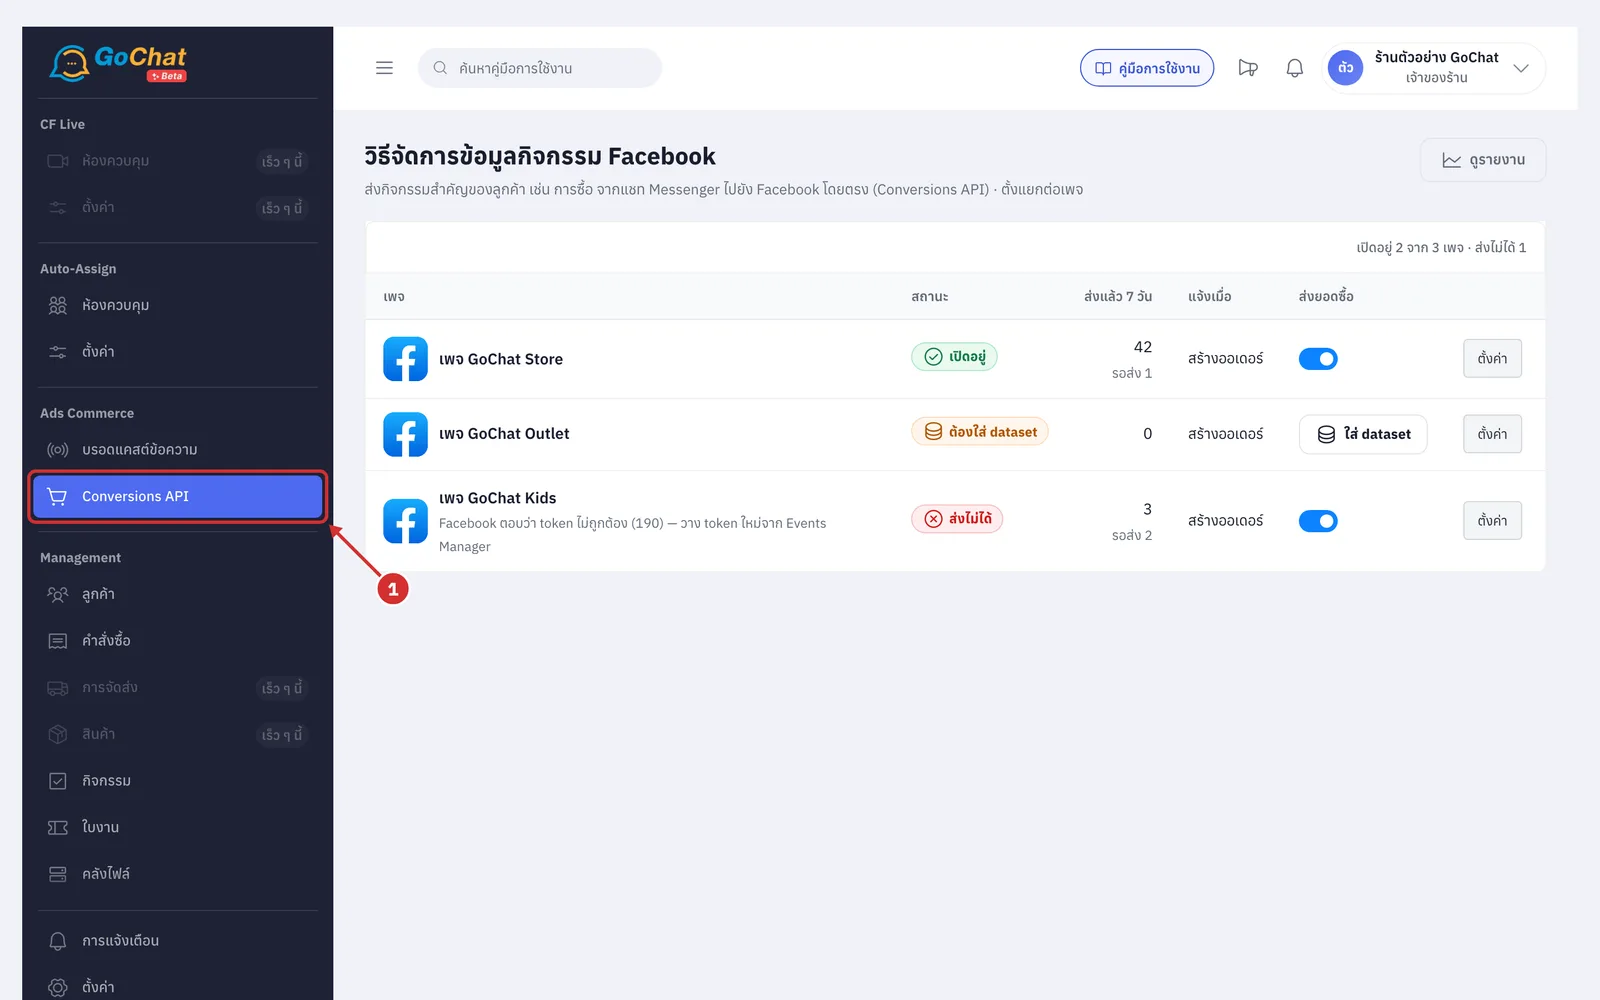
The table lists every Messenger Page of the shop with a status label
เปิดอยู่ (On): sending to Facebook normally
ปิดอยู่ (Off): not sending
ส่งไม่ได้ (Cannot send): Facebook rejects it; the reason shows under the Page name
ต้องใส่ dataset (Needs a dataset): no dataset to send to yet
The ส่งแล้ว 7 วัน (Sent in 7 days) column counts events delivered to Facebook, plus รอส่ง (Waiting) if any are queued
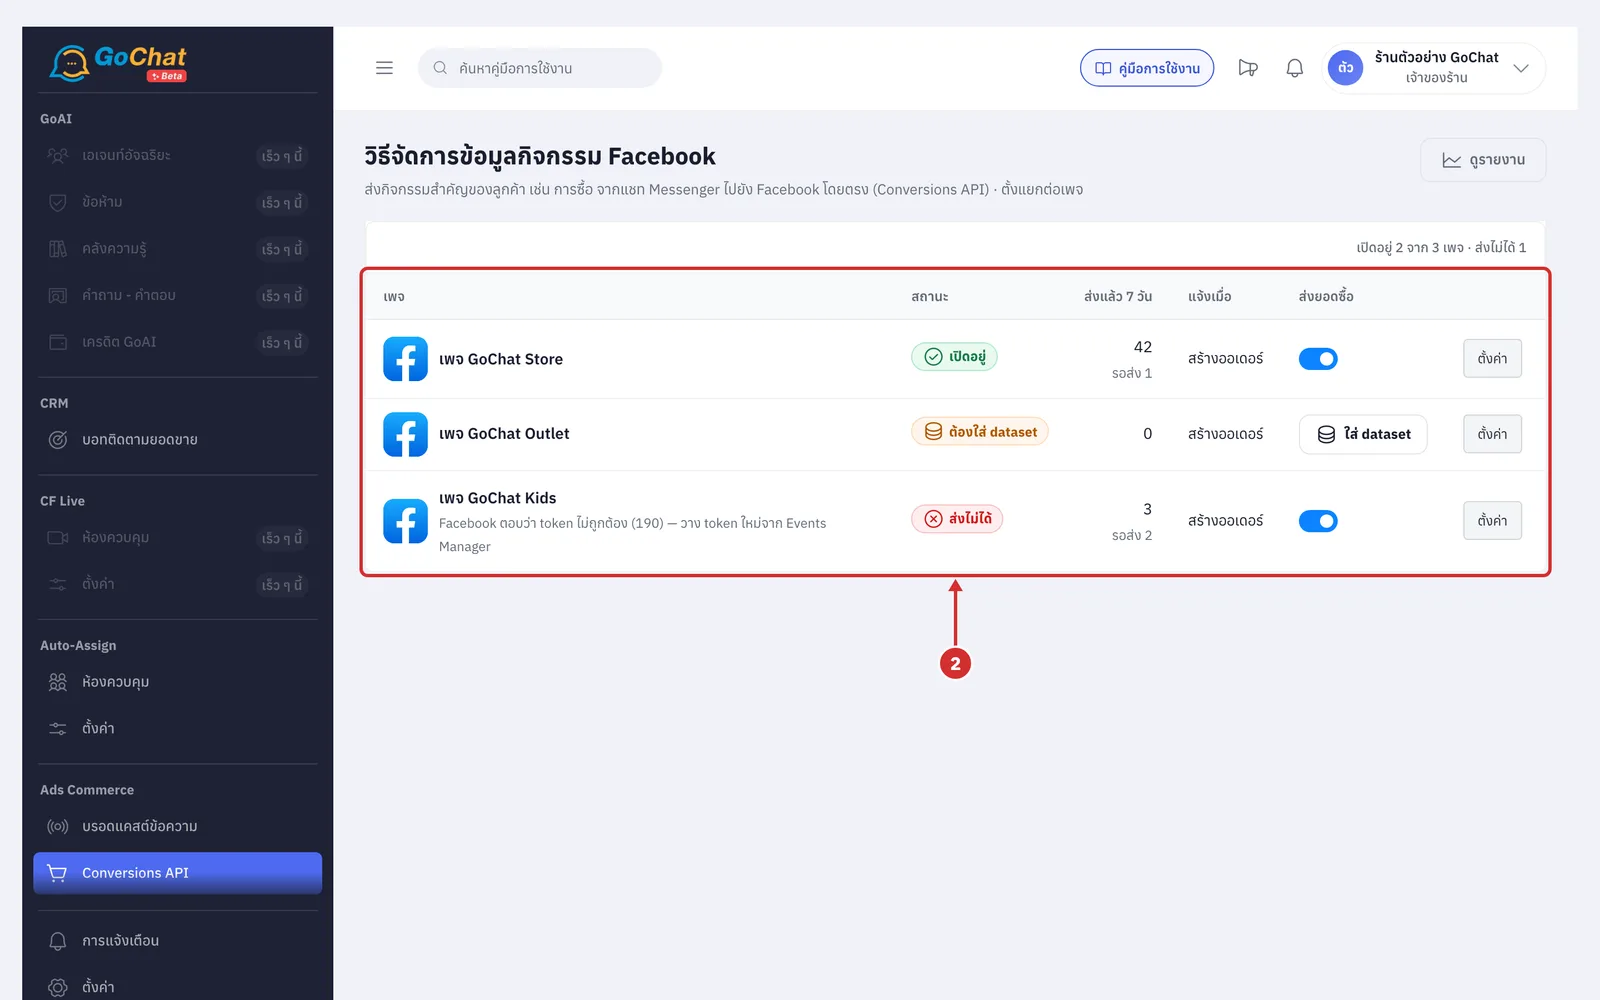
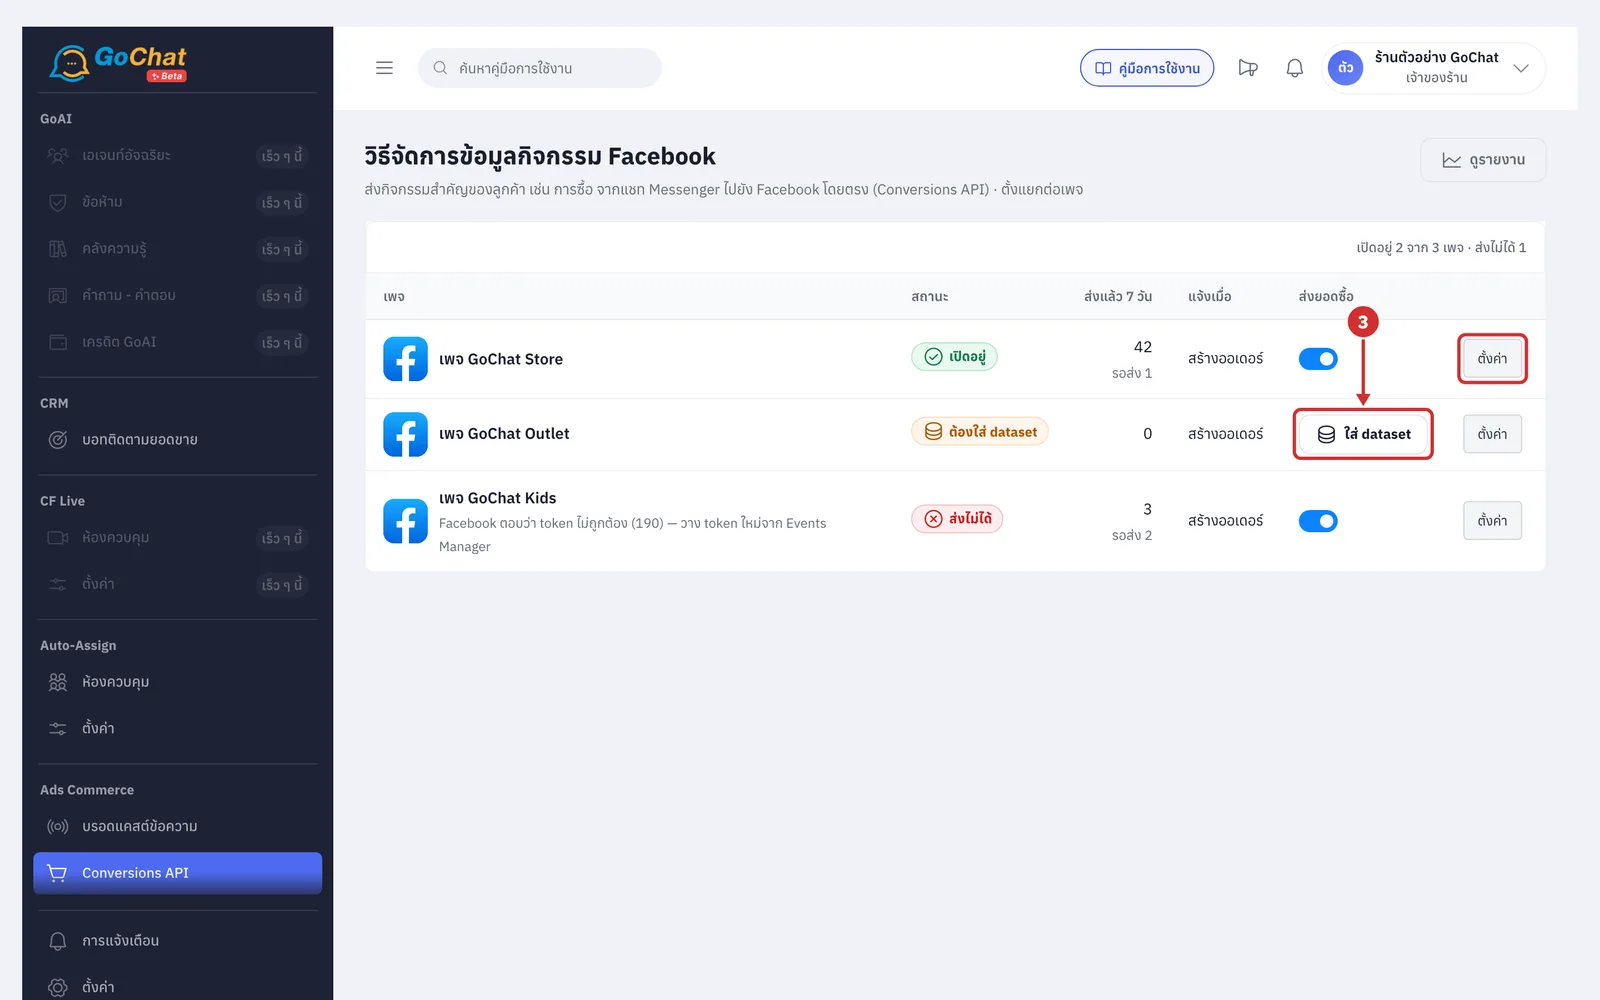
Click ใส่ dataset (Add dataset) on a Page that is not set up, or ตั้งค่า (Settings) on a Page that is; you go to that Page's settings
Adding a dataset
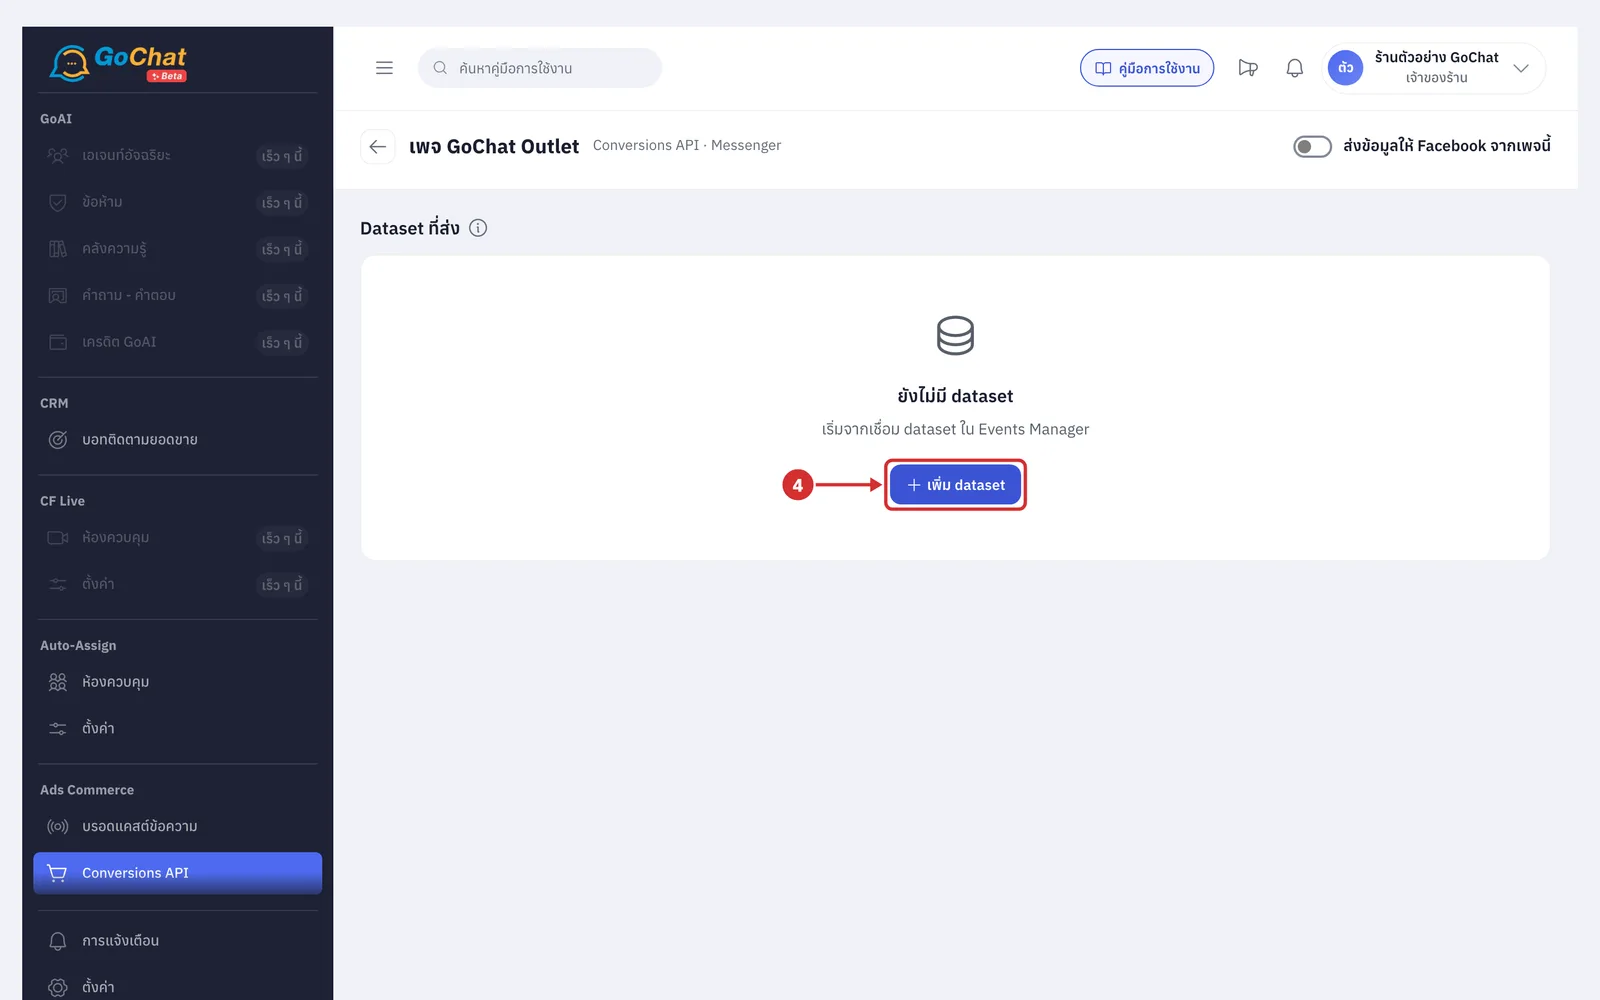
Under Dataset ที่ส่ง (Datasets sent to), click เพิ่ม dataset (Add dataset); a Page can have up to 3 datasets
In Dataset ID, paste the dataset ID from Events Manager (5 to 25 digits)
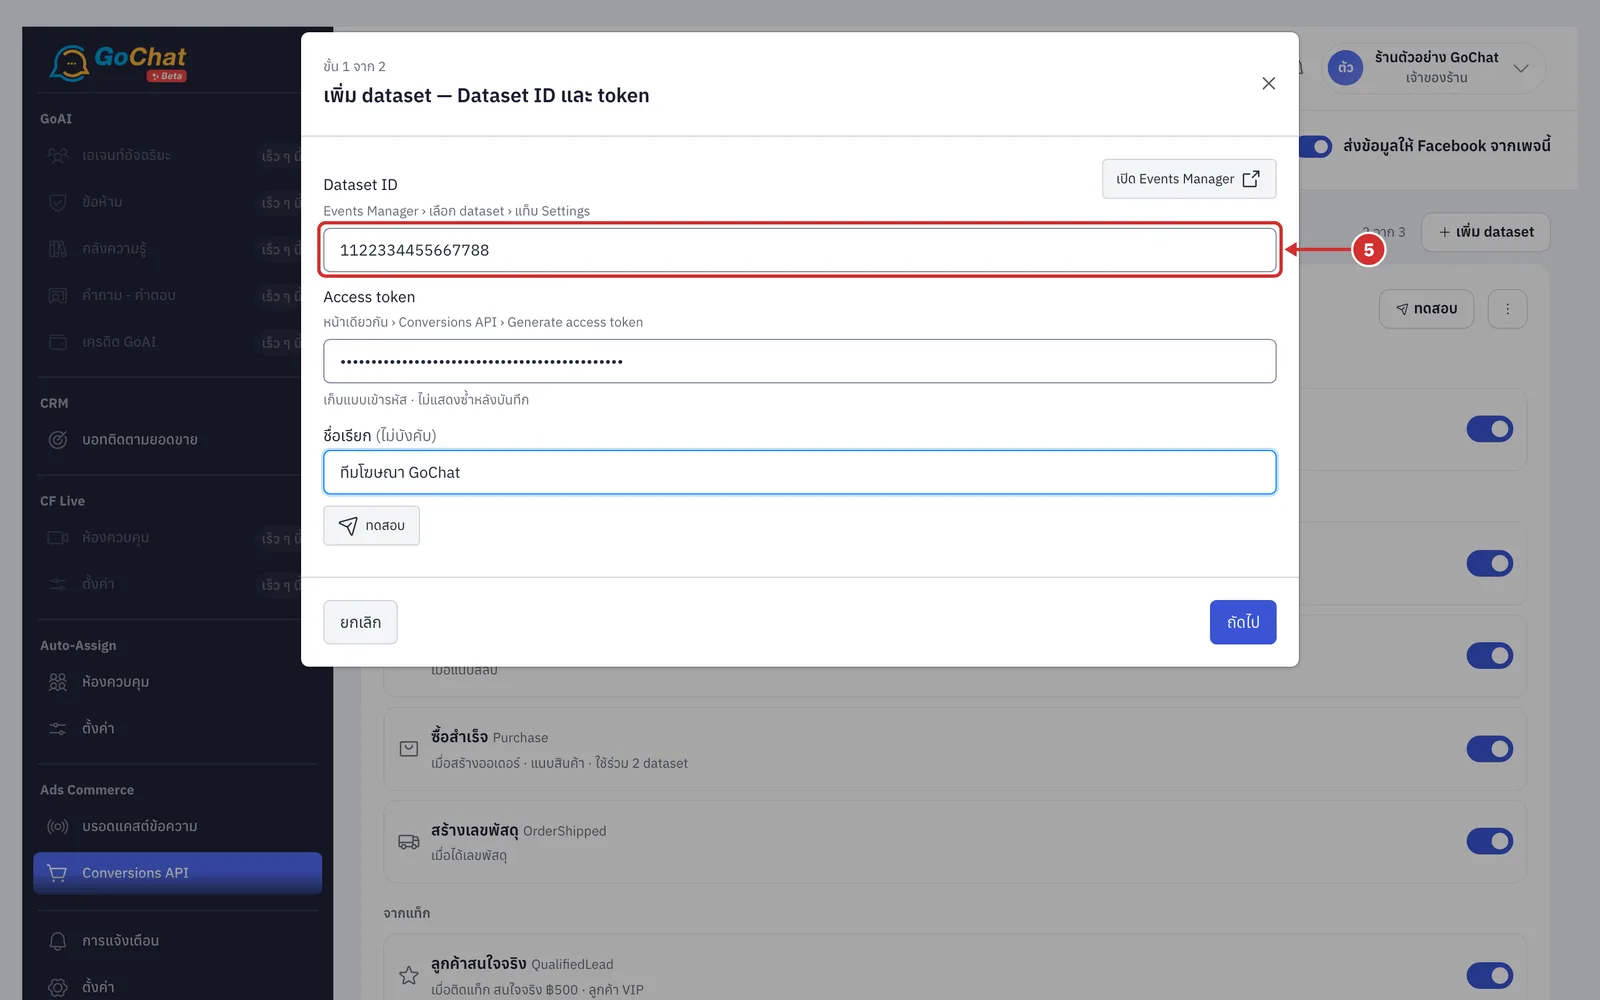
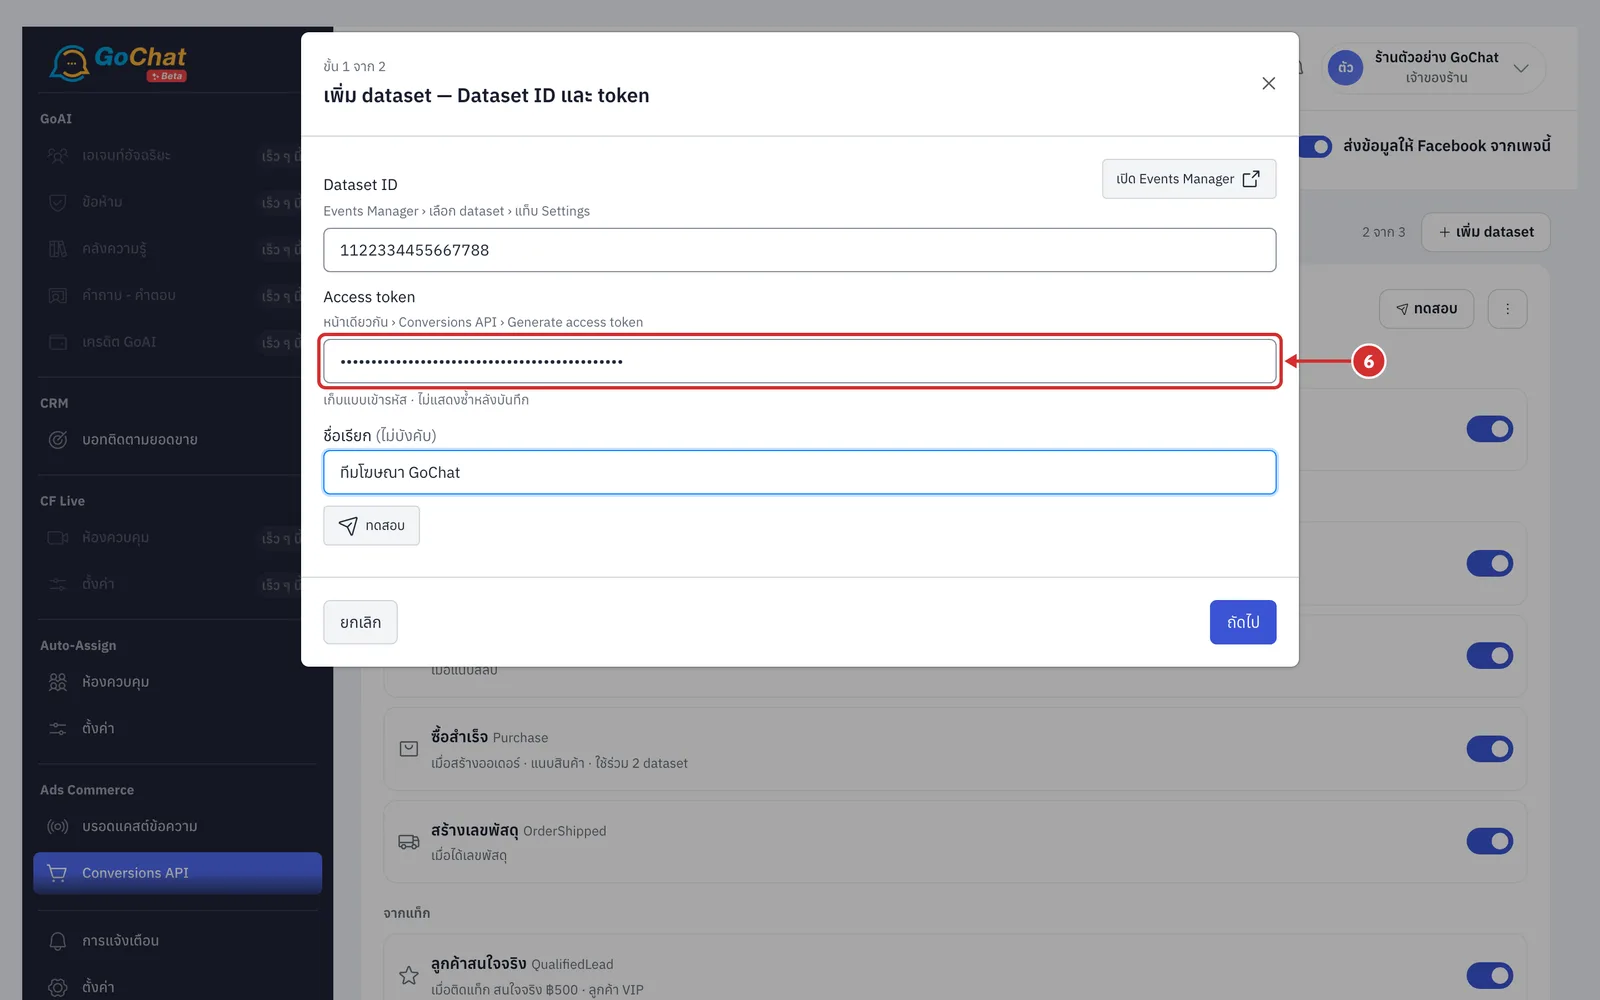
In Access token, paste the token from Events Manager
The token is stored encrypted and is not shown again after saving
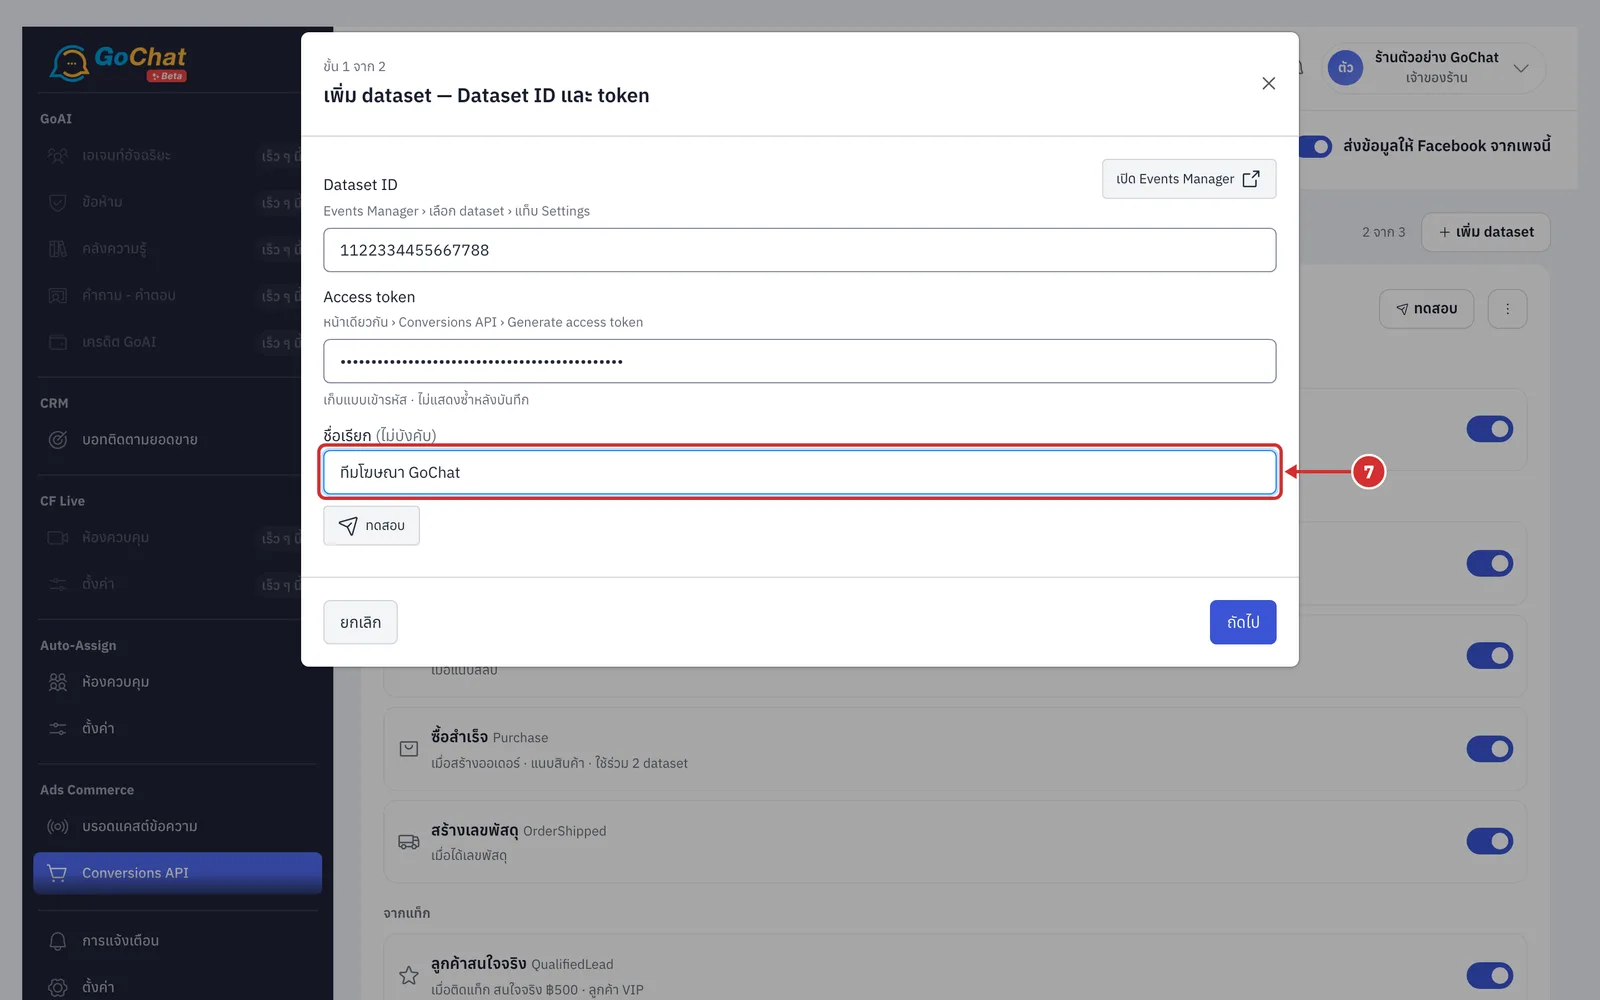
In ชื่อเรียก (Label), give it a name that is easy to recognise, such as the shop or agency name (optional)
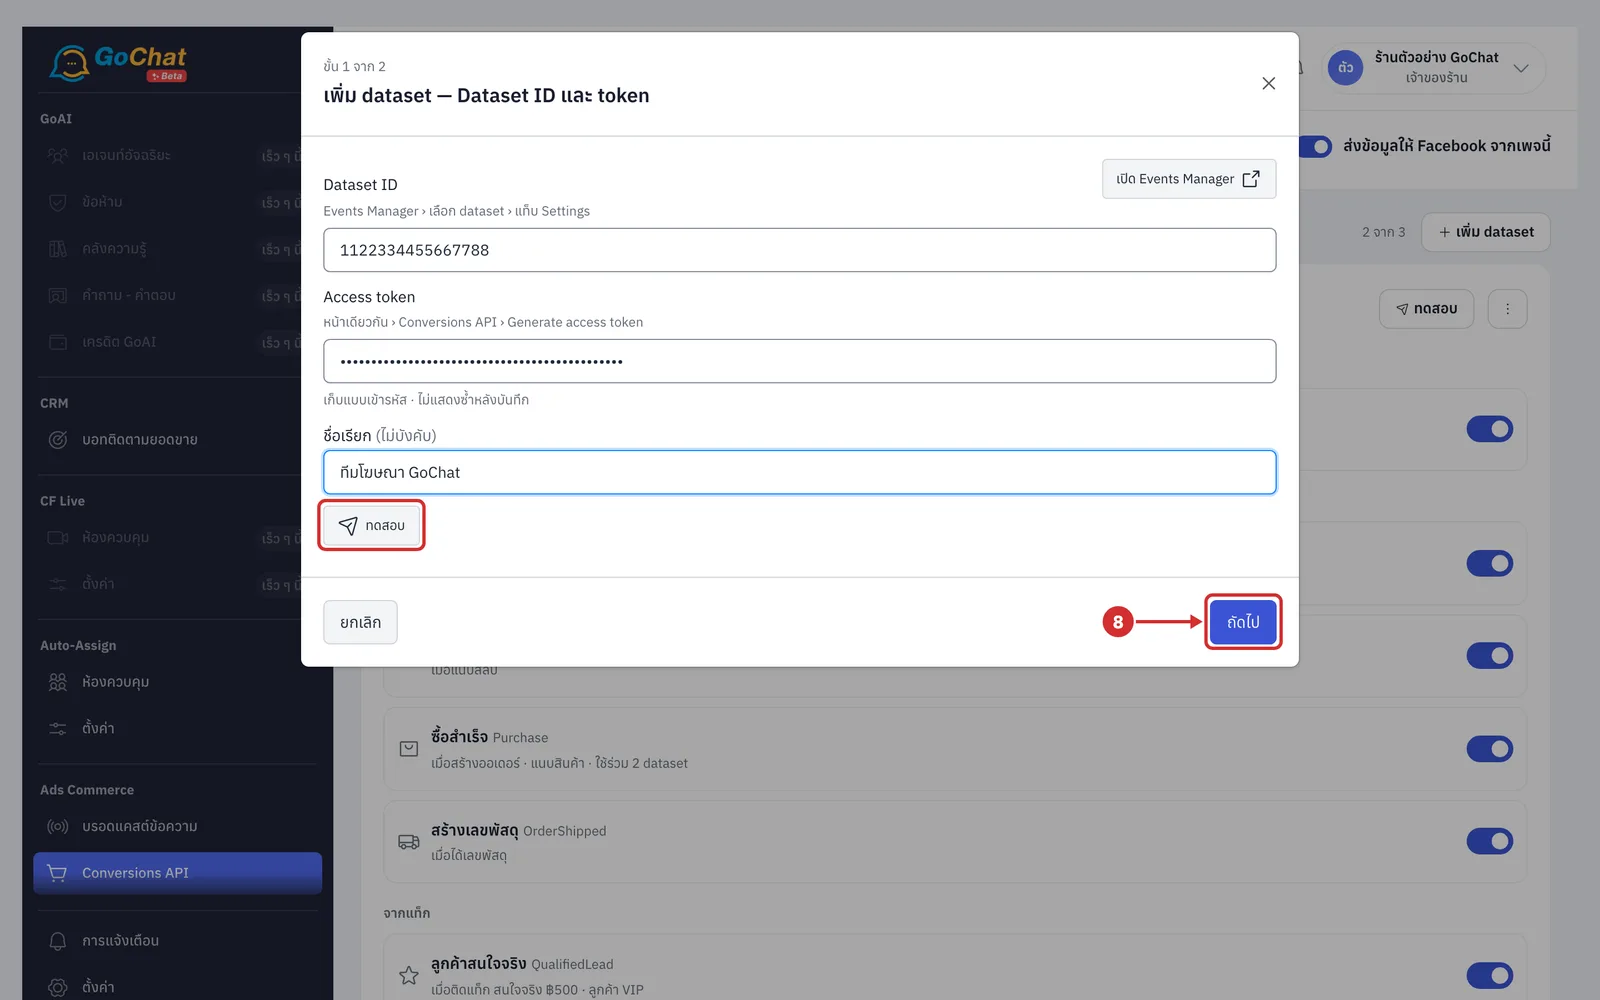
Click ถัดไป (Next)
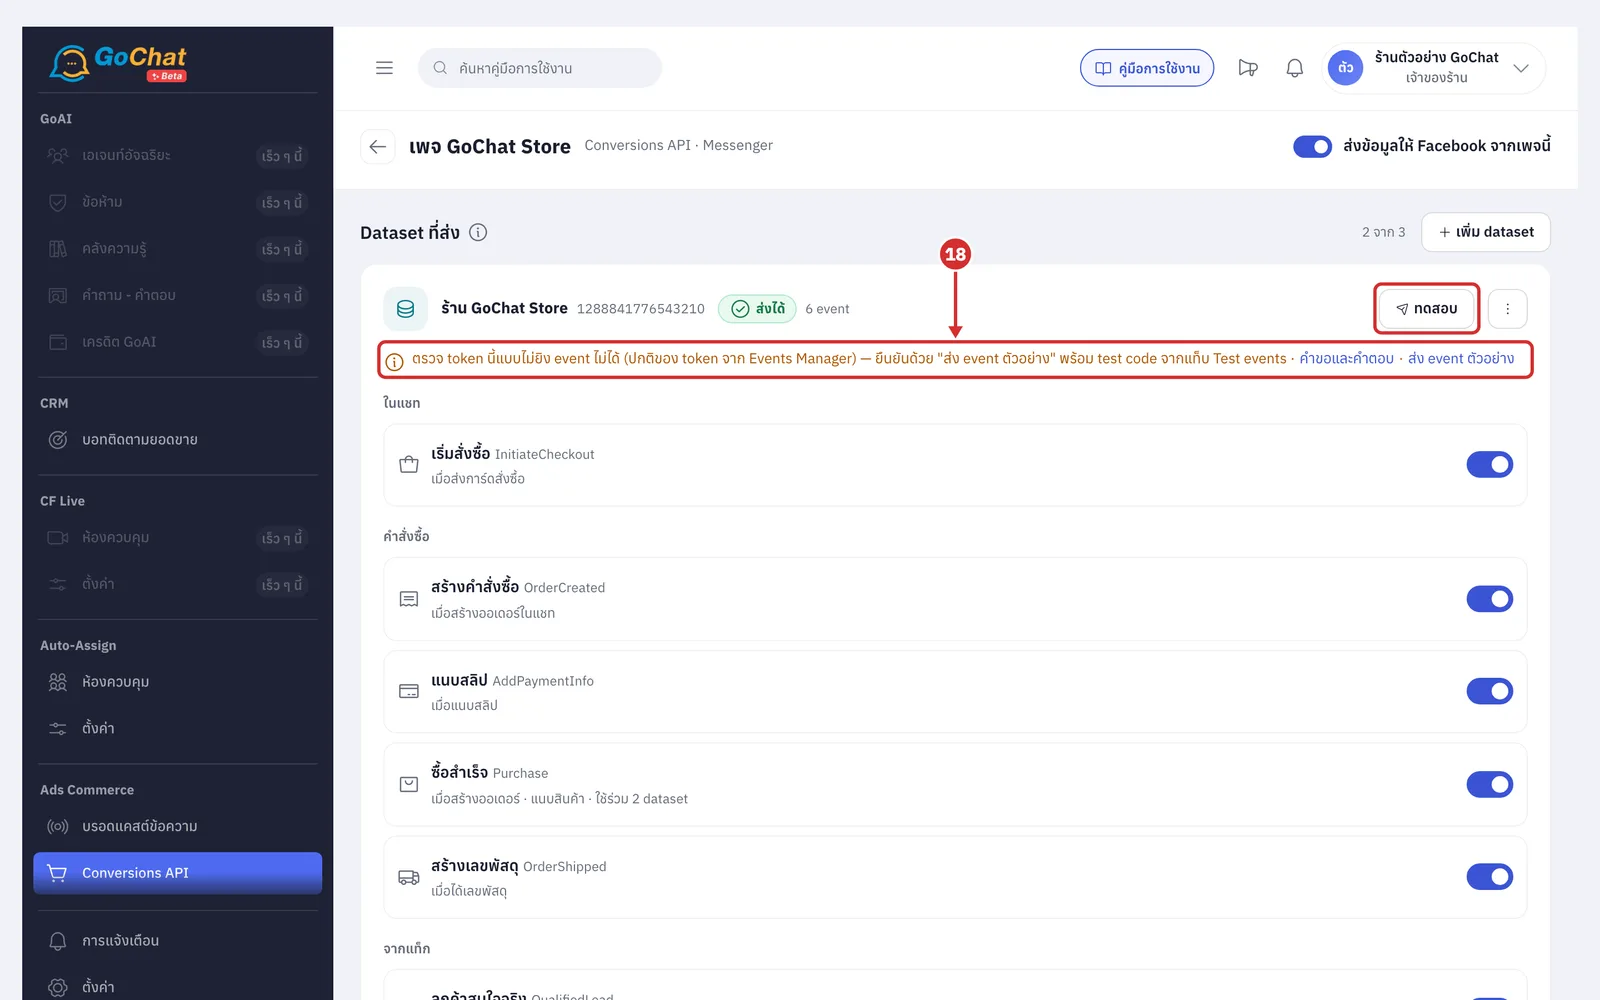
You can click ทดสอบ (Test) first; the results are explained in step 18
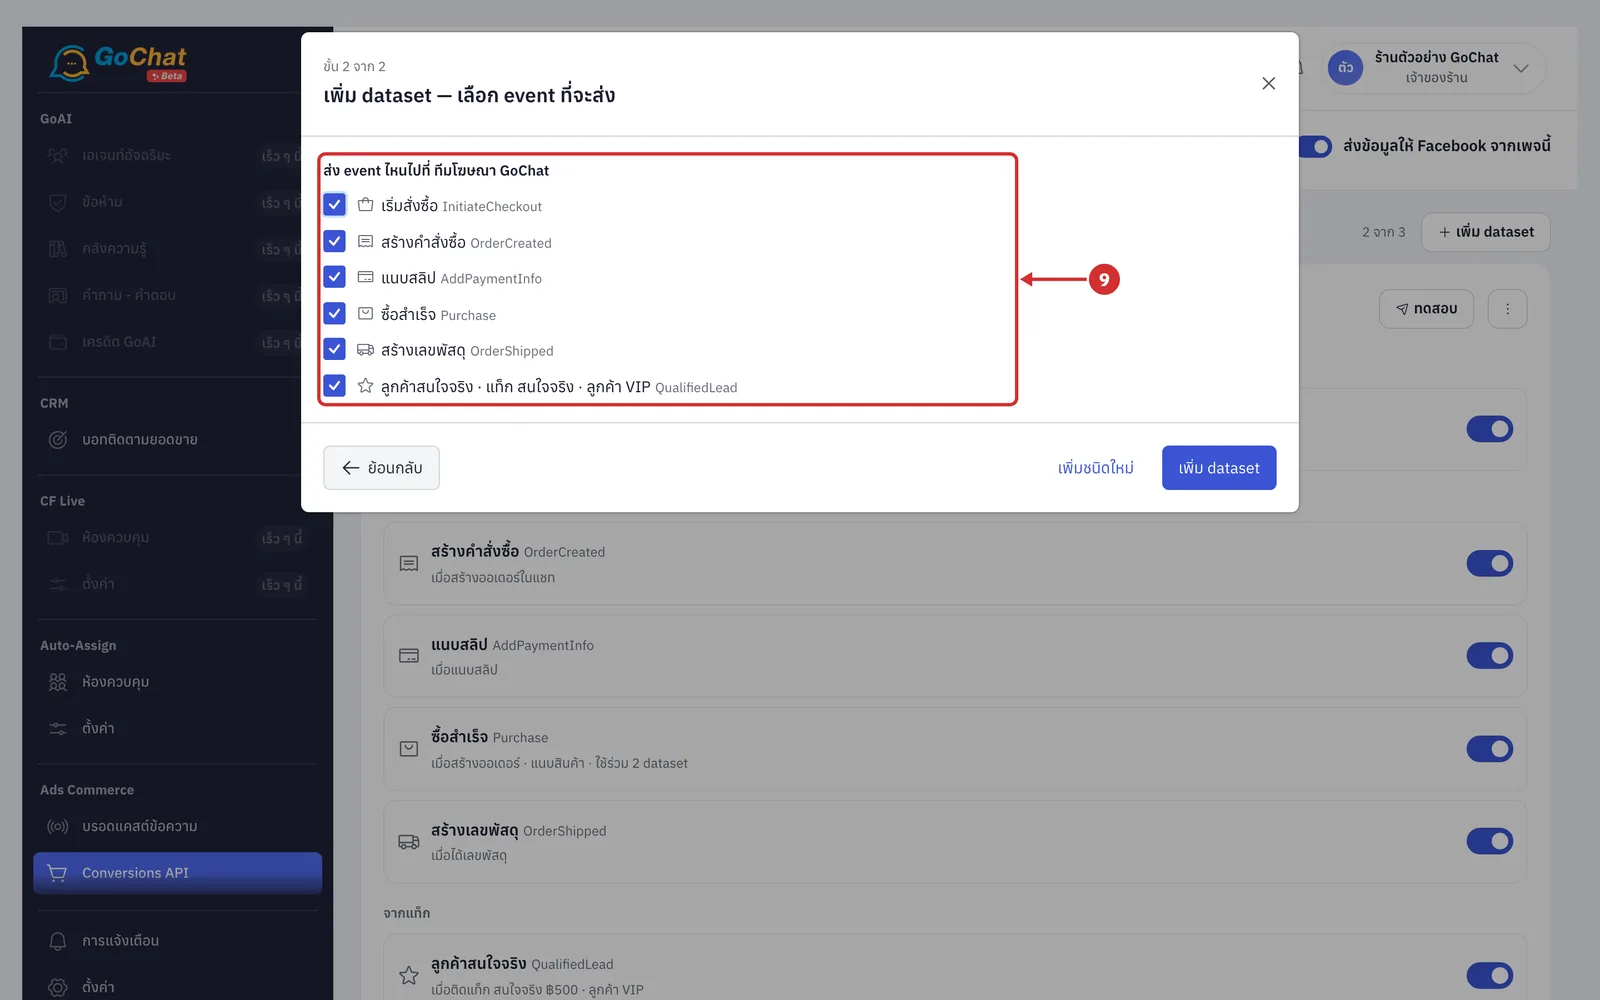
Tick the events to send to this dataset
The list shows events this Page already sends; for another type, click เพิ่มชนิดใหม่ (Add new type)
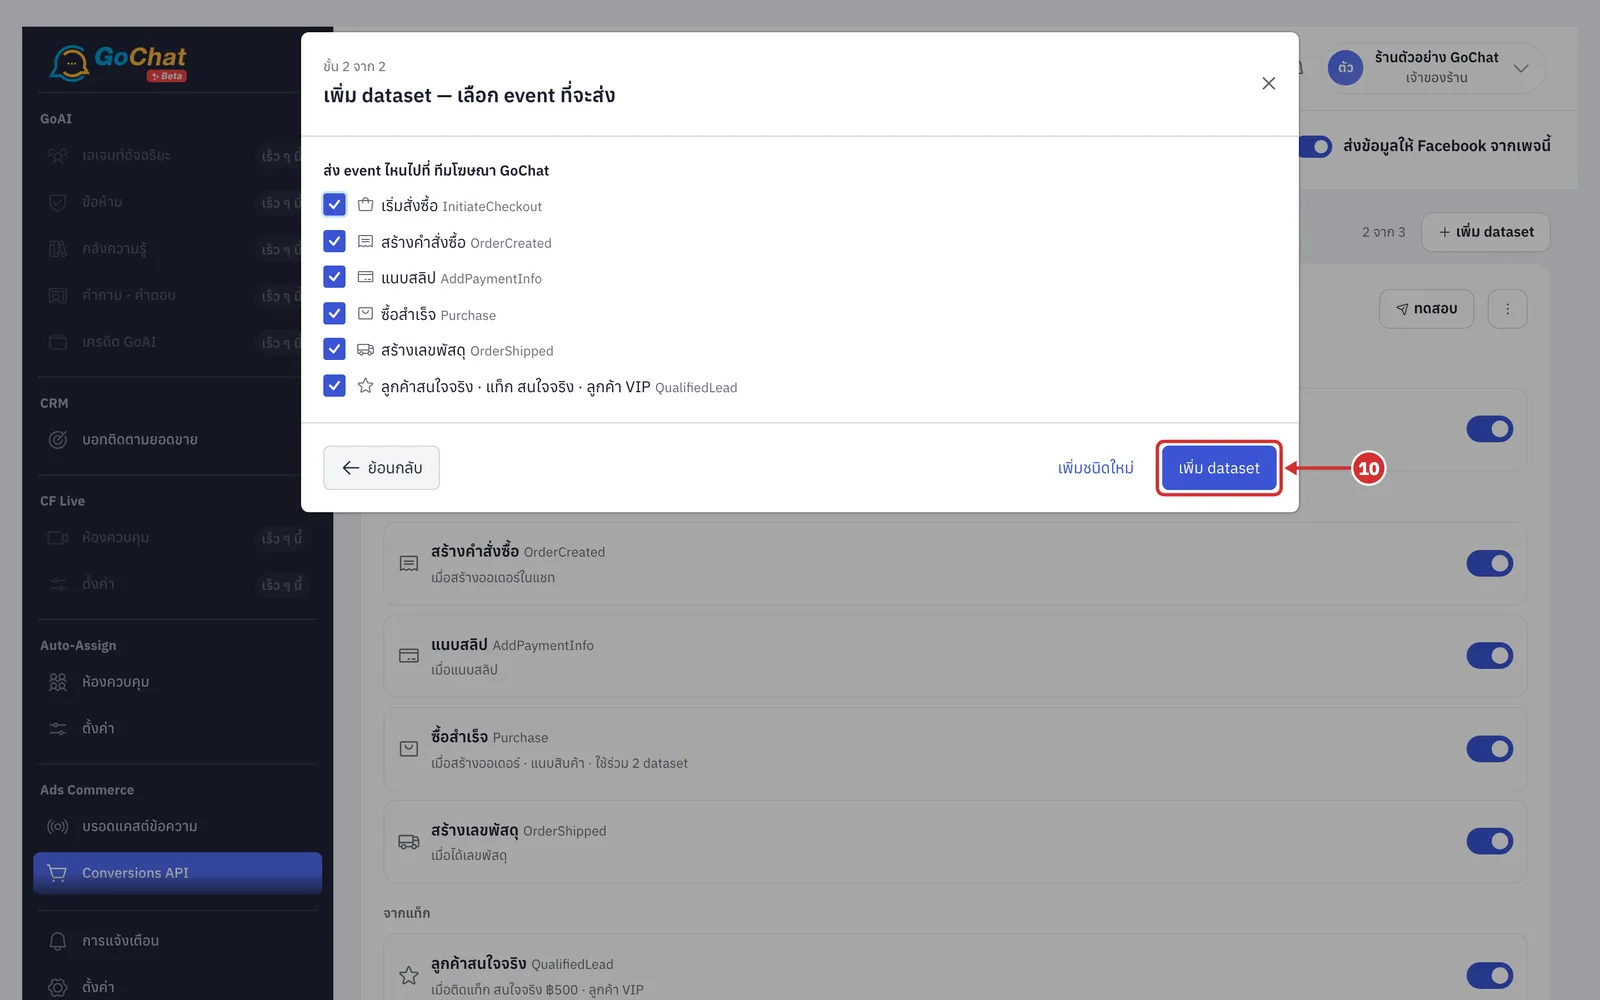
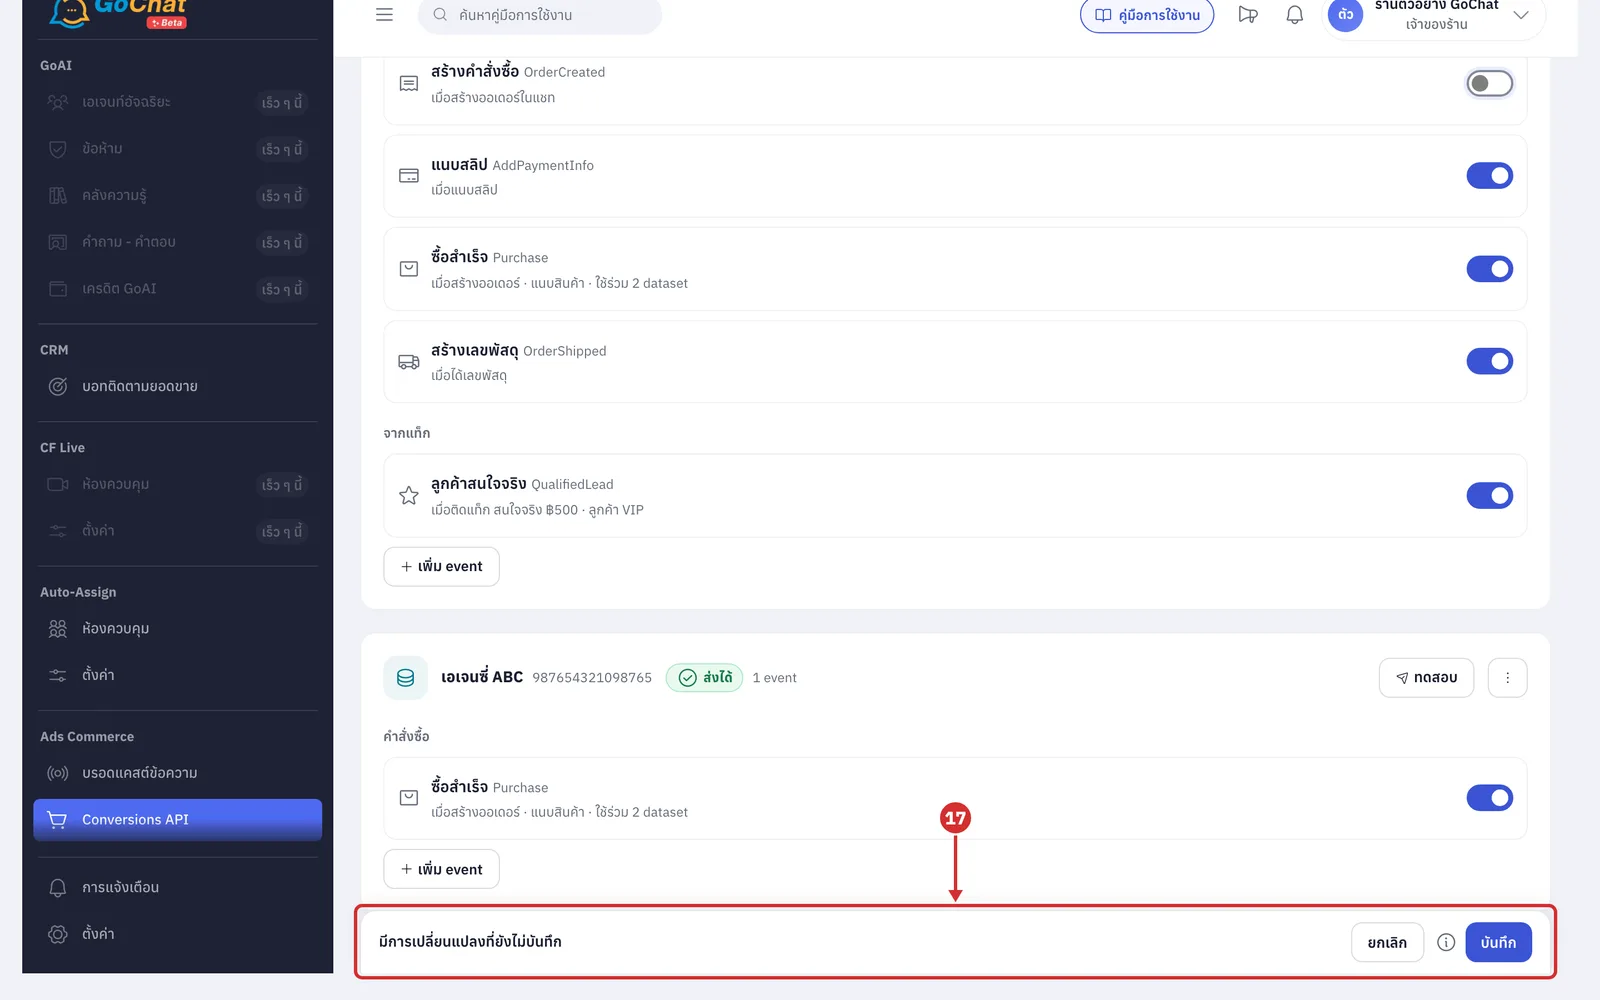
Click เพิ่ม dataset (Add dataset), then click บันทึก (Save) in the bar at the bottom (step 17)
Setting up events in a dataset
Changes in this section apply only after you click บันทึก (Save) in the bottom bar.
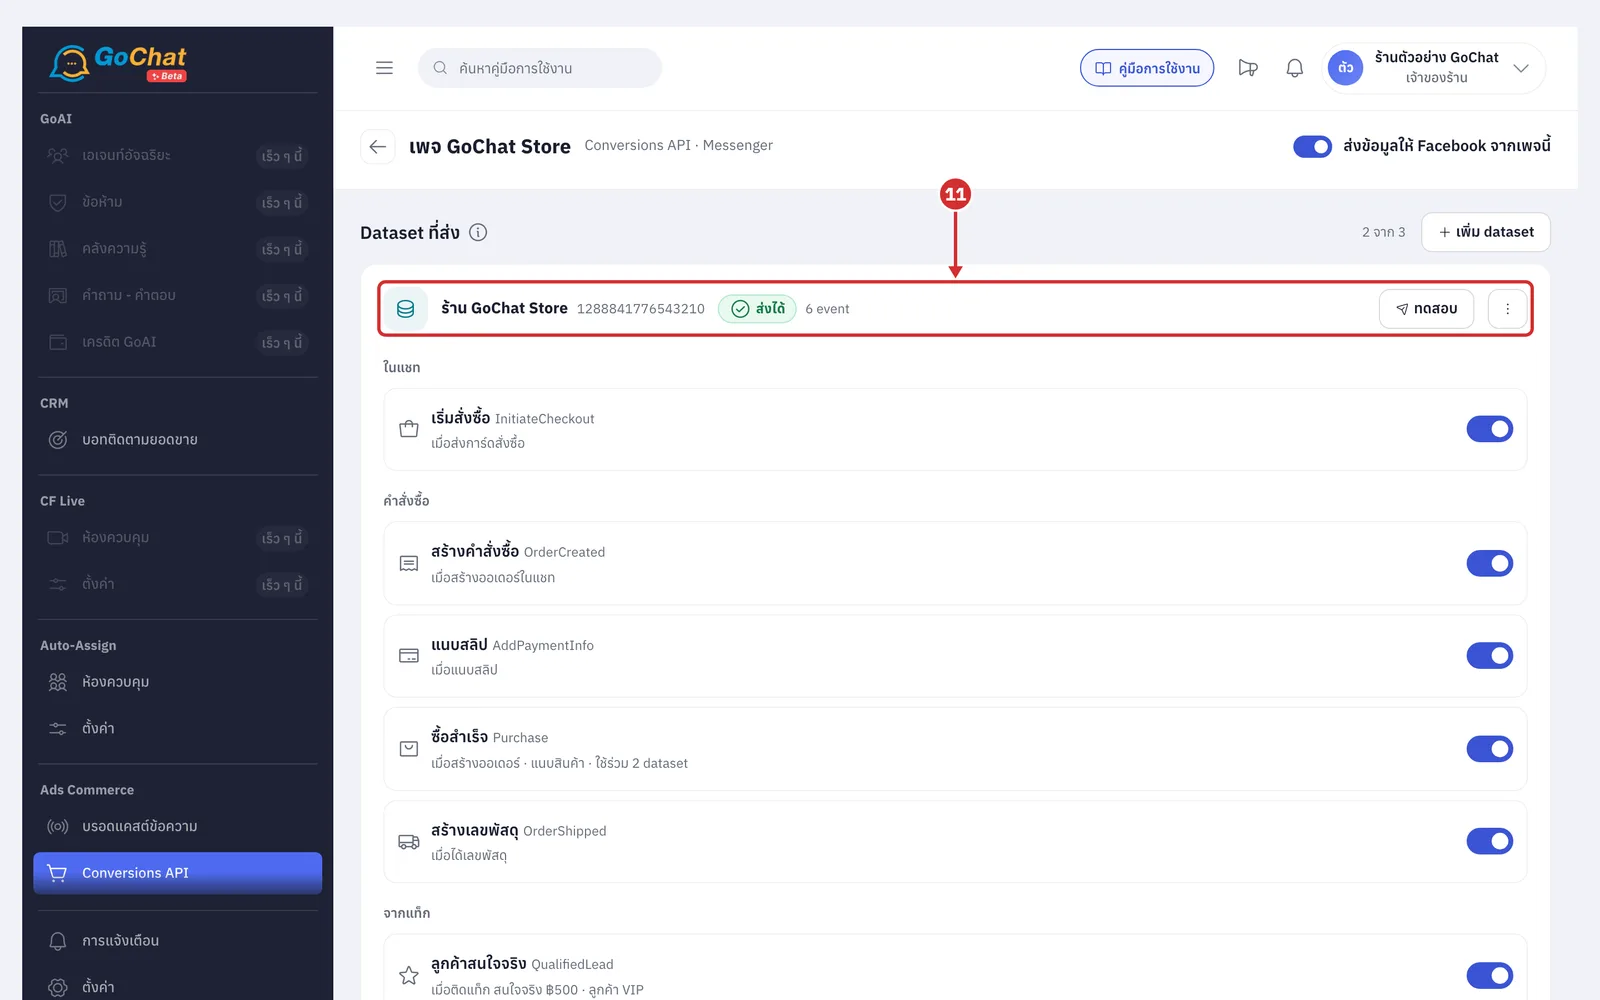
Each dataset box shows
The label and ID of the dataset
Its status: ส่งได้ (Can send) · ยังไม่ทดสอบ (Not tested) · ส่งไม่ได้ (Cannot send)
How many events are sent to this dataset
The ทดสอบ (Test) button (step 18) and the ⋮ button (step 21)
Events grouped as ในแชท (In chat) · คำสั่งซื้อ (Orders) · จากแท็ก (From tags)
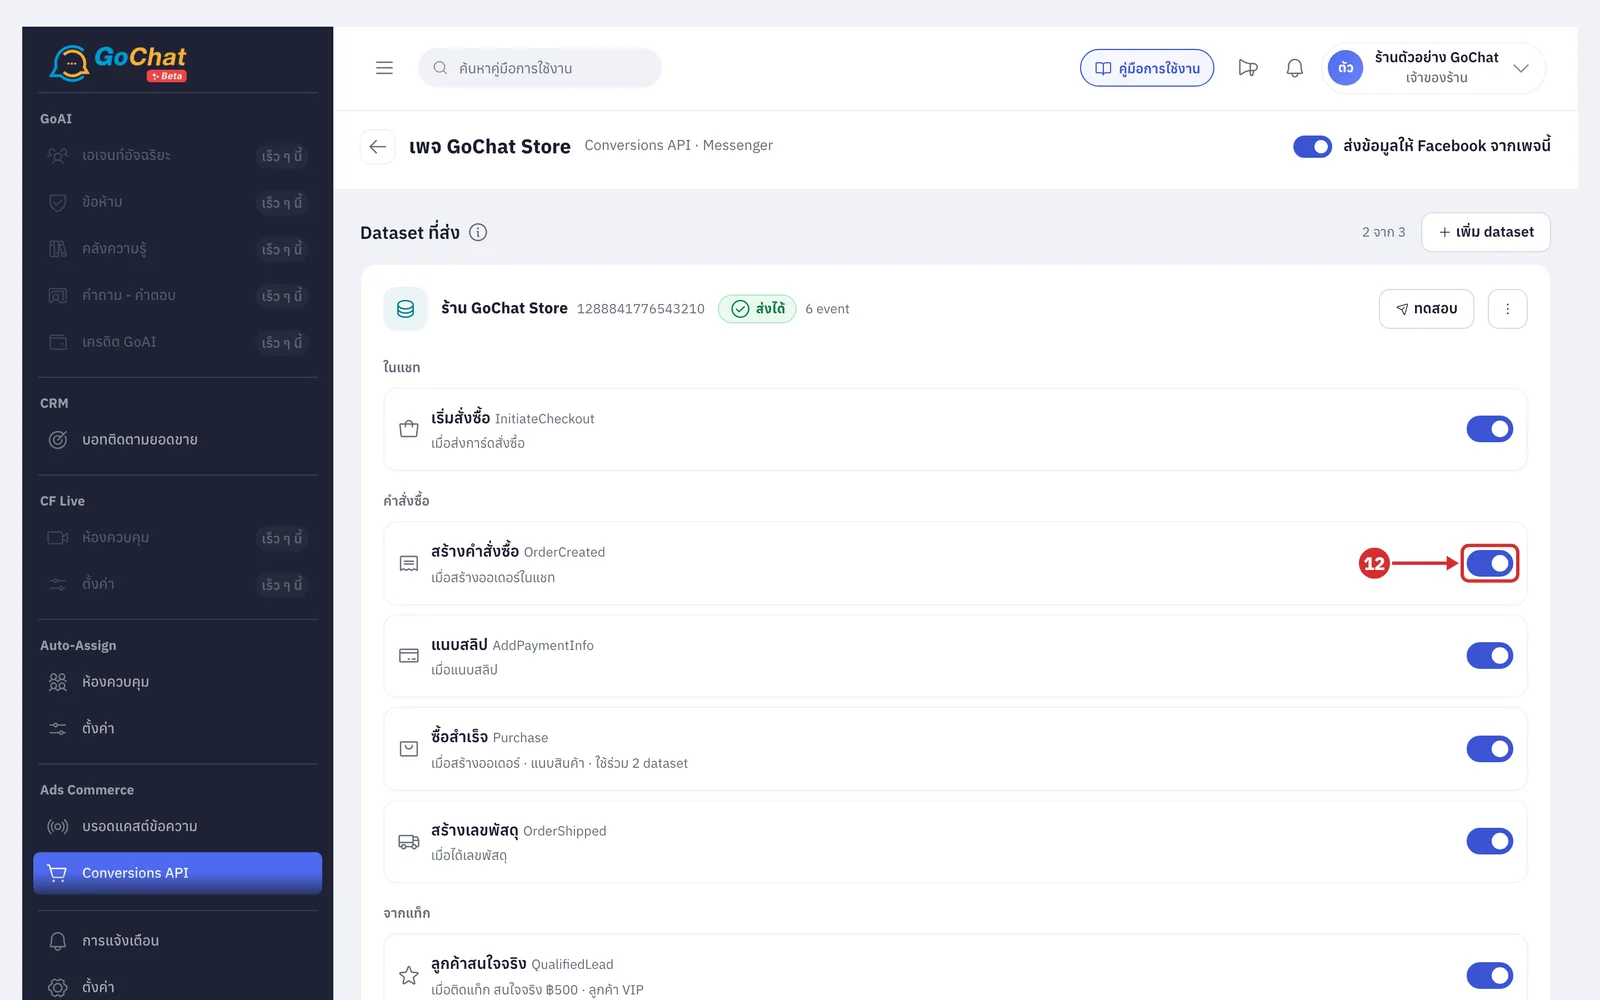
Turn the switch at the end of a row off to pause that event; its settings are kept
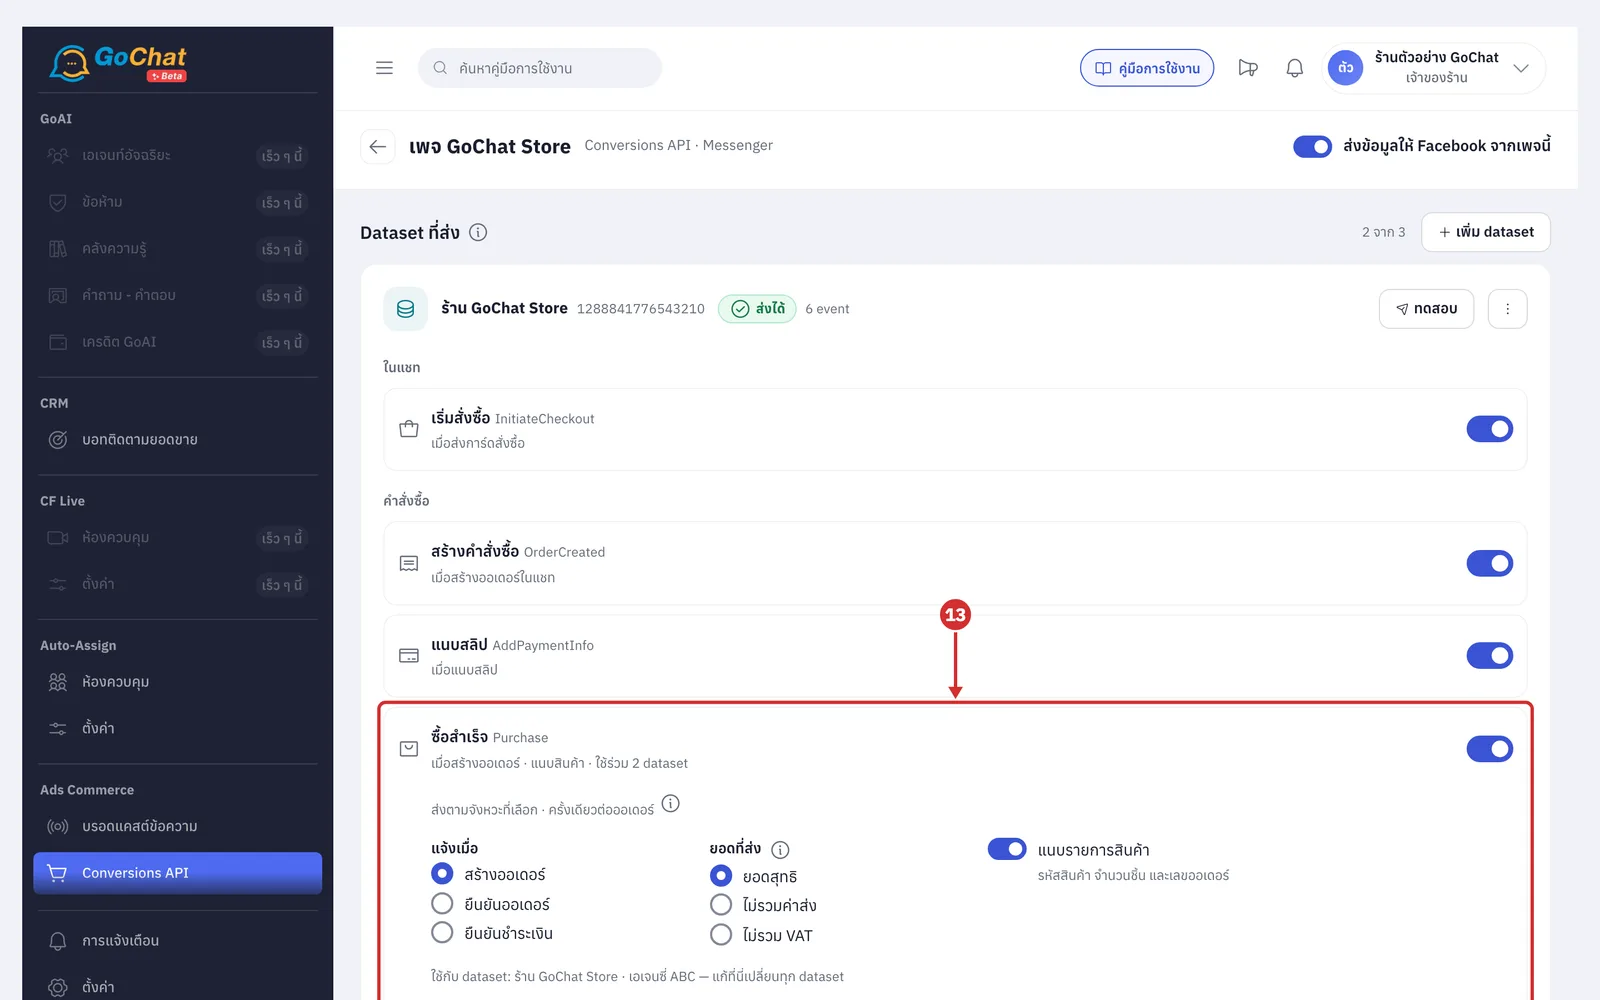
Click an event name to see its options, for example ซื้อสำเร็จ (Purchase)
แจ้งเมื่อ (Send when): สร้างออเดอร์ (Order created) · ยืนยันออเดอร์ (Order confirmed, or fully paid, whichever comes first) · ยืนยันชำระเงิน (Fully paid only; deposits do not count); sent once per order
ยอดที่ส่ง (Value sent): ยอดสุทธิ (Net) · ไม่รวมค่าส่ง (Excluding shipping) · ไม่รวม VAT (Excluding VAT)
แนบรายการสินค้า (Attach products): sends product IDs, quantities and the order number
Options are shared by every dataset that has this event; the screen says ใช้กับ dataset: … — แก้ที่นี่เปลี่ยนทุก dataset (Used by datasets… — editing here changes all)
Click ลบ event นี้ออกจาก dataset (Remove this event from the dataset) to stop sending it there
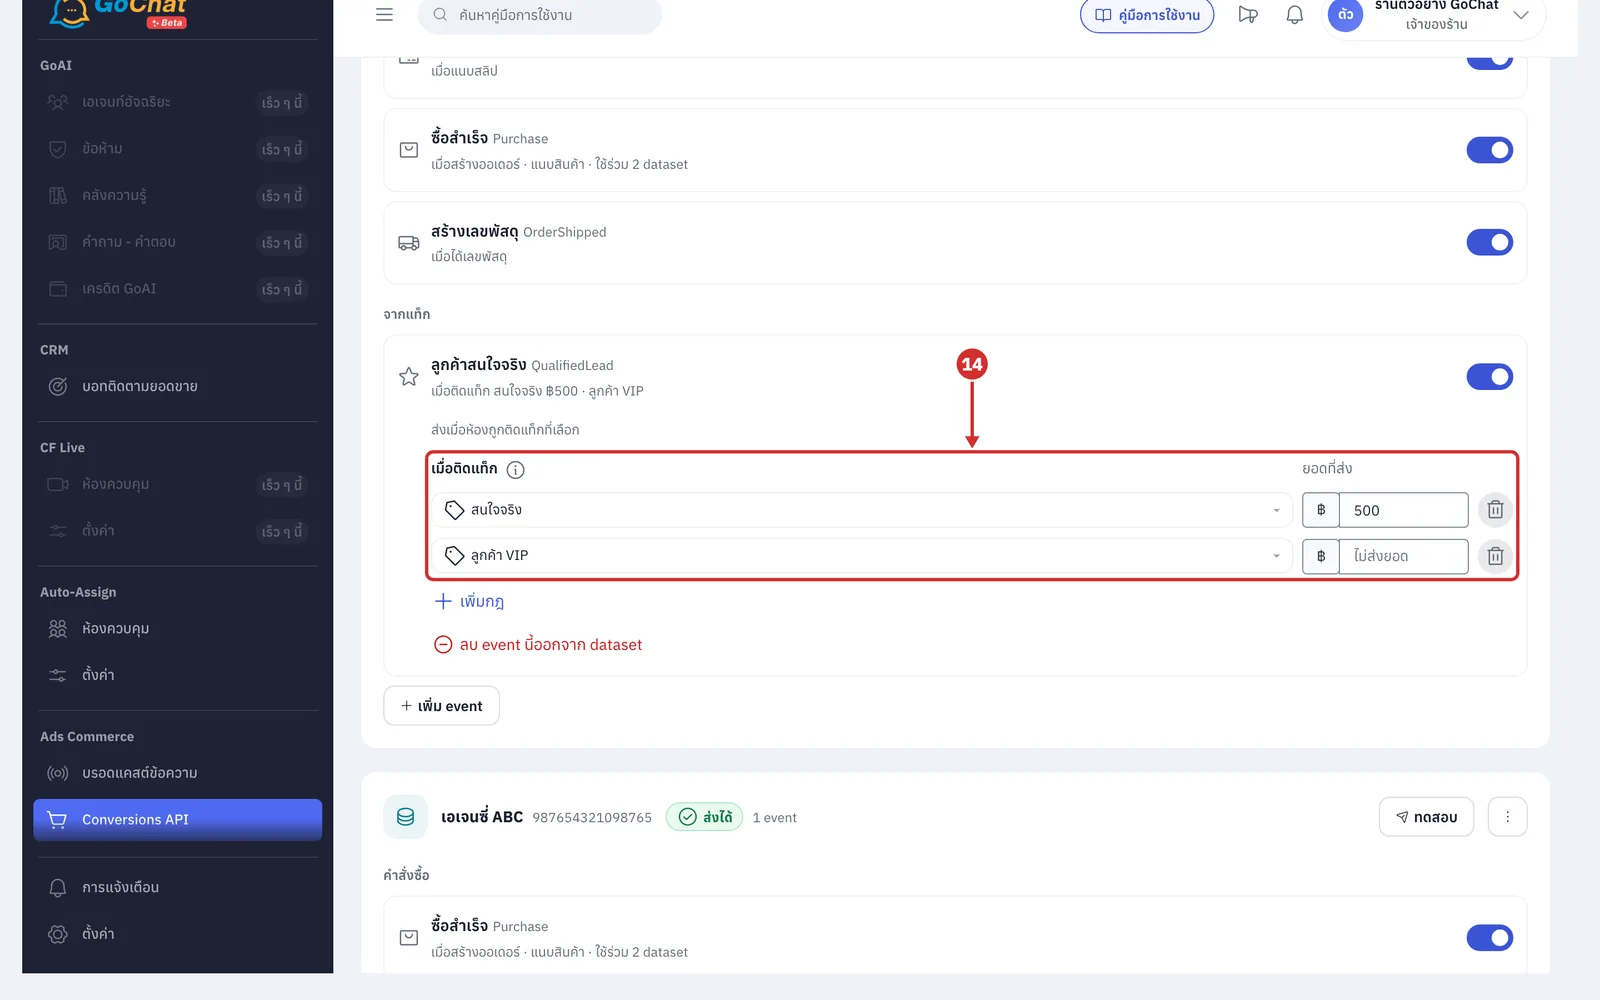
Events in จากแท็ก (From tags), such as ลูกค้าสนใจจริง (Qualified lead), are sent when a chat gets the chosen tag; set them up as rules, one per row
เมื่อติดแท็ก (When tagged): choose a tag, or create a new one from the list
ยอดที่ส่ง (Value sent): a fixed value for that rule; leave it empty to ไม่ส่งยอด (send no value)
Click เพิ่มกฎ (Add rule) for up to 20 rules per event; click the trash icon to remove one
Each chat is sent once per rule within 30 days; removing and re-adding the tag within 30 days does not resend; tags added by bots count too
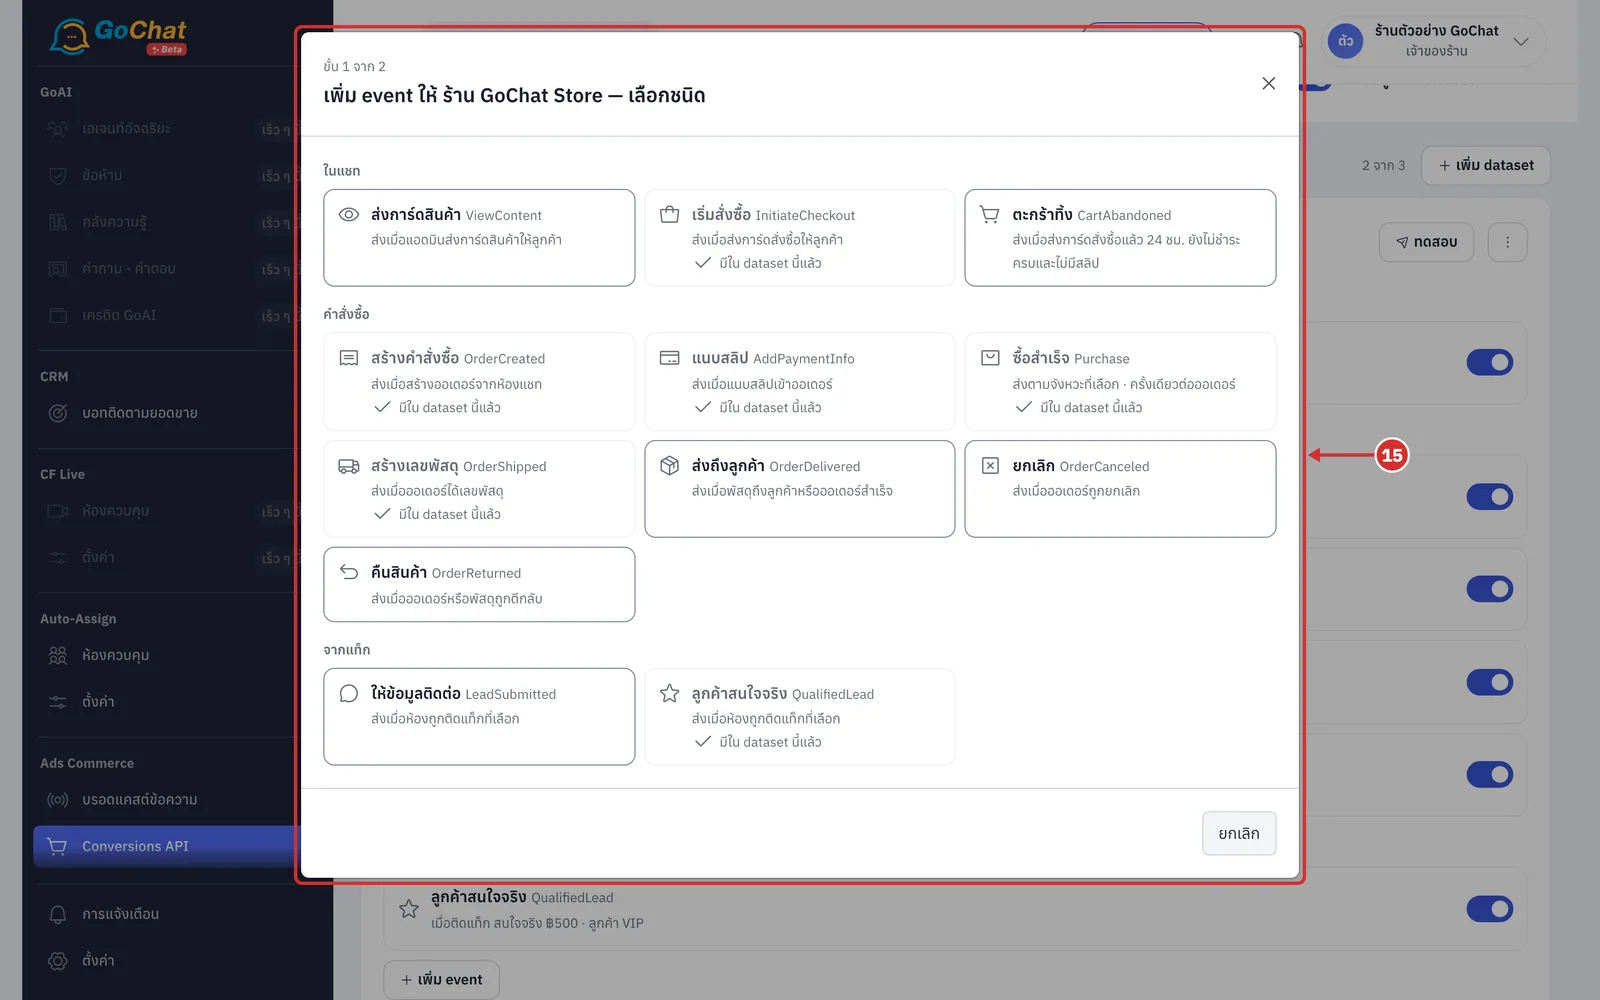
Click เพิ่ม event (Add event) in the dataset box to add a new event
Step 1: choose the event type (events already there show มีใน dataset นี้แล้ว (Already in this dataset))
Step 2: set the options and click เพิ่ม event (Add event)
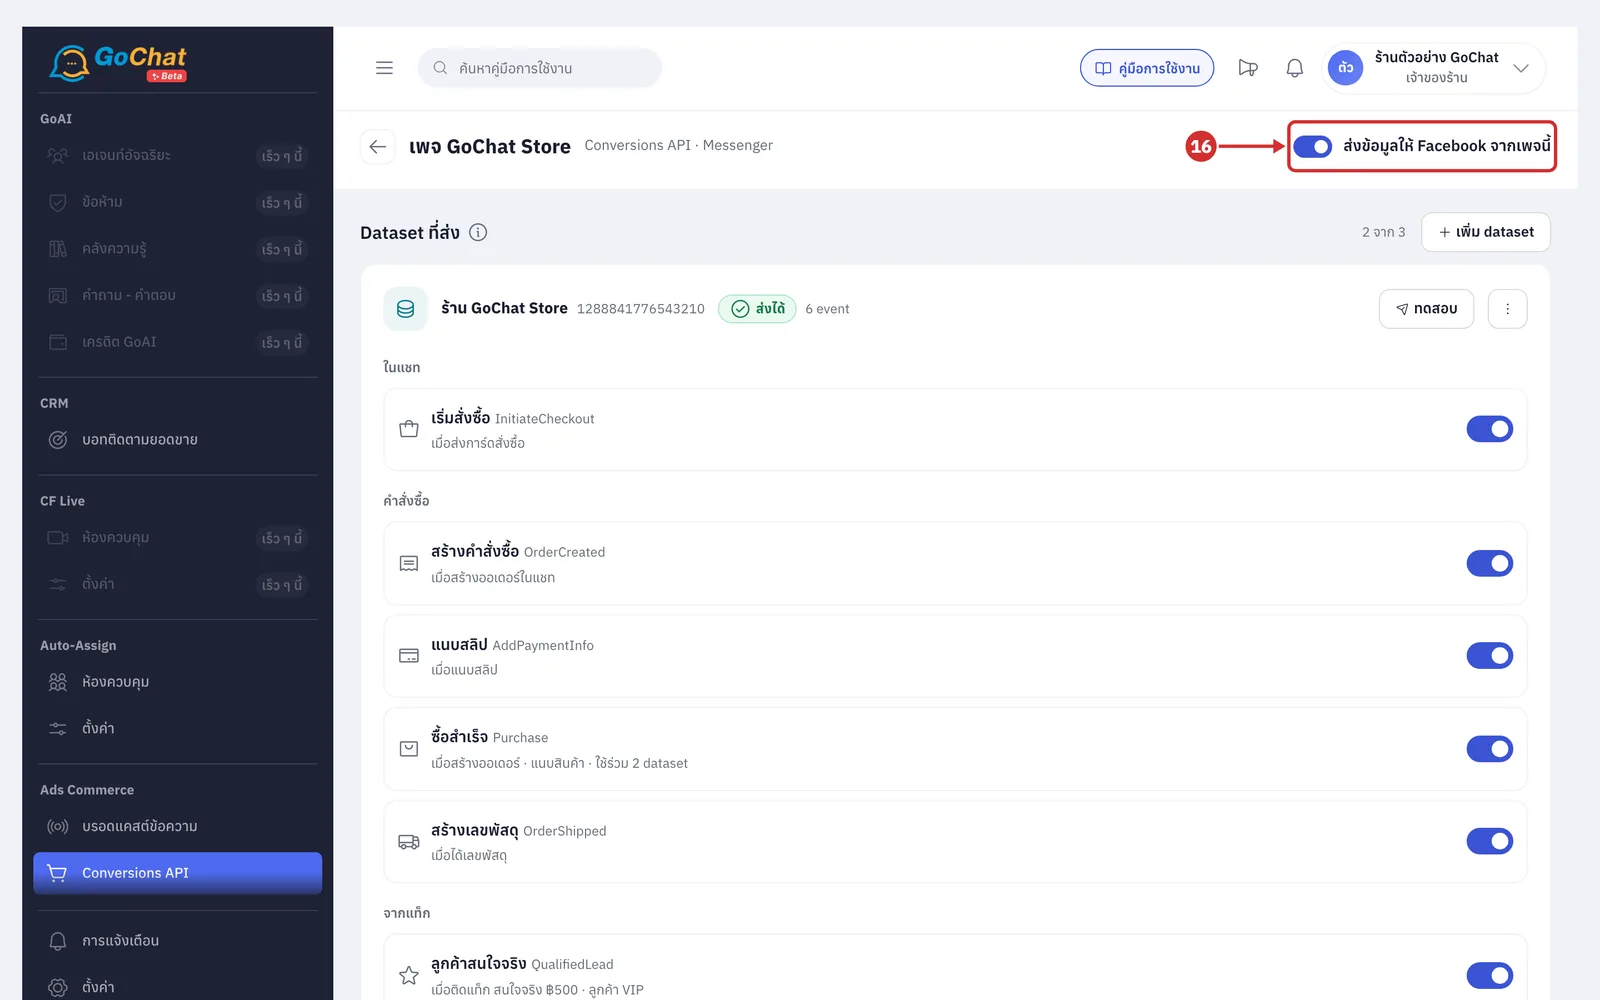
Turn on ส่งข้อมูลให้ Facebook จากเพจนี้ (Send data to Facebook from this Page) at the top right; off means no dataset of this Page receives anything
When something changes, the มีการเปลี่ยนแปลงที่ยังไม่บันทึก (Unsaved changes) bar appears at the bottom; click บันทึก (Save), or ยกเลิก (Cancel) to go back to the last saved values
Testing
Click ทดสอบ (Test) on the dataset box; the result shows under the header
Green: Facebook accepts this token for the dataset
Orange ตรวจ token นี้แบบไม่ยิง event ไม่ได้ (ปกติของ token จาก Events Manager) (This token cannot be checked without sending an event — normal for Events Manager tokens) is expected, not an error; confirm with step 19
Red: Facebook rejects it, with the reason, such as an invalid token
Click คำขอและคำตอบ (Request and response) to see what was sent and what Facebook replied
Click ส่ง event ตัวอย่าง (Send sample event), paste a code into Test event code and click ส่ง (Send)
Find the code in Events Manager › your dataset › the เหตุการณ์ทดสอบ (Test events) tab
Sample events appear in Facebook's Test events page and do not count as real results
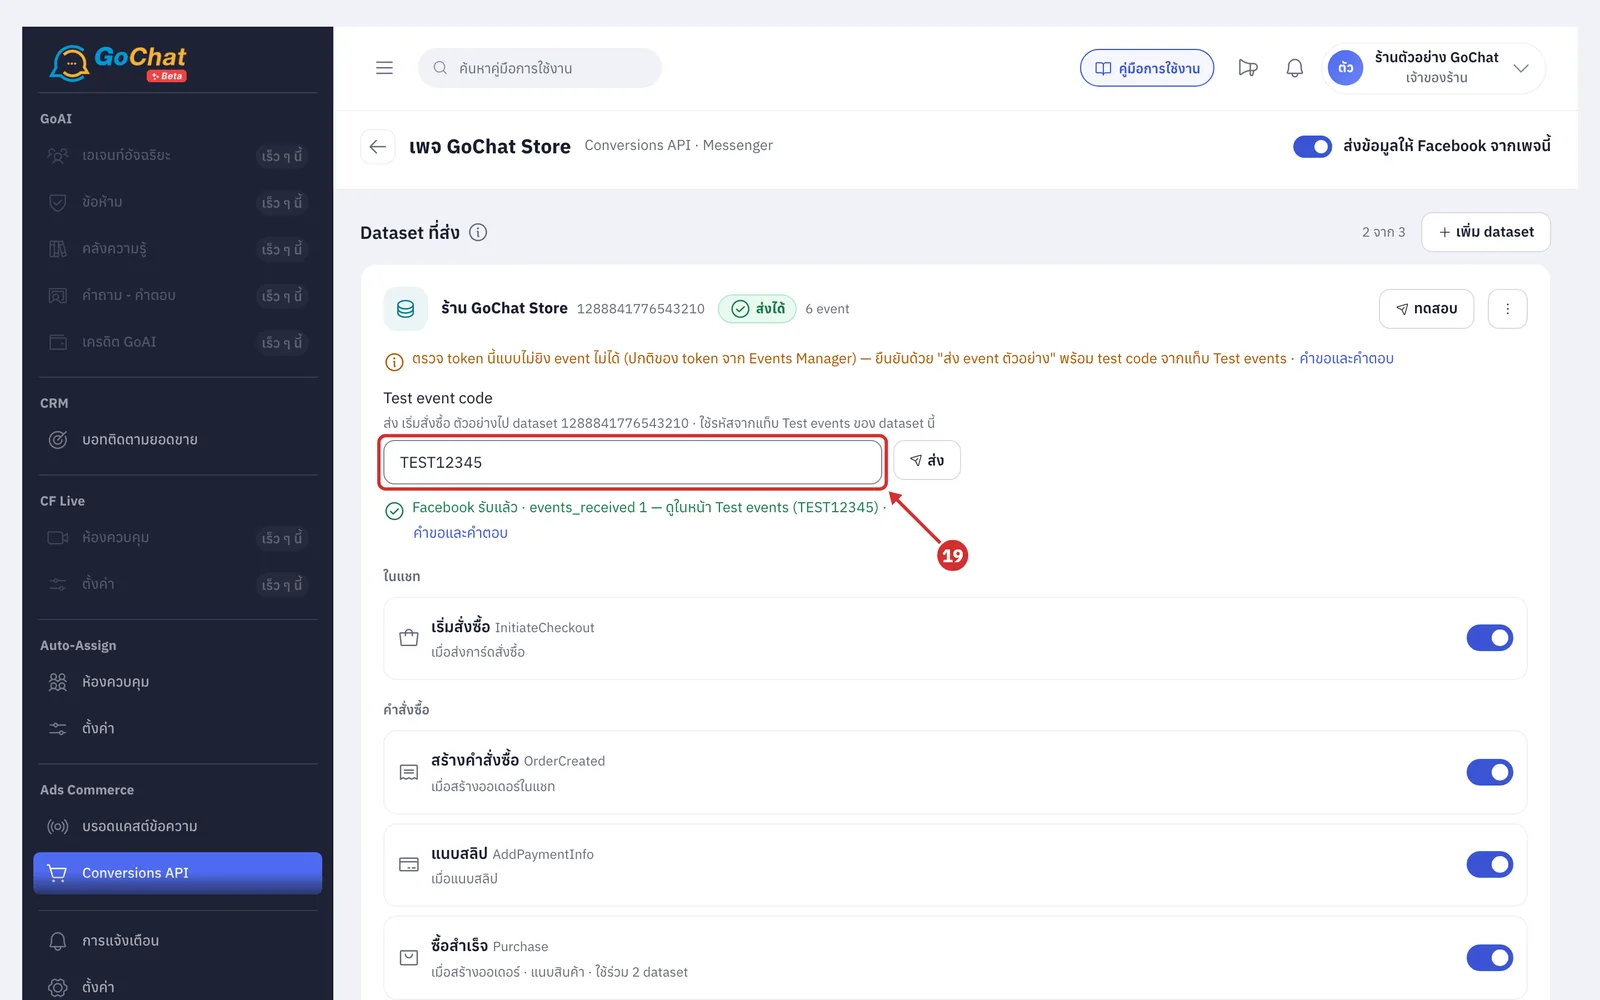
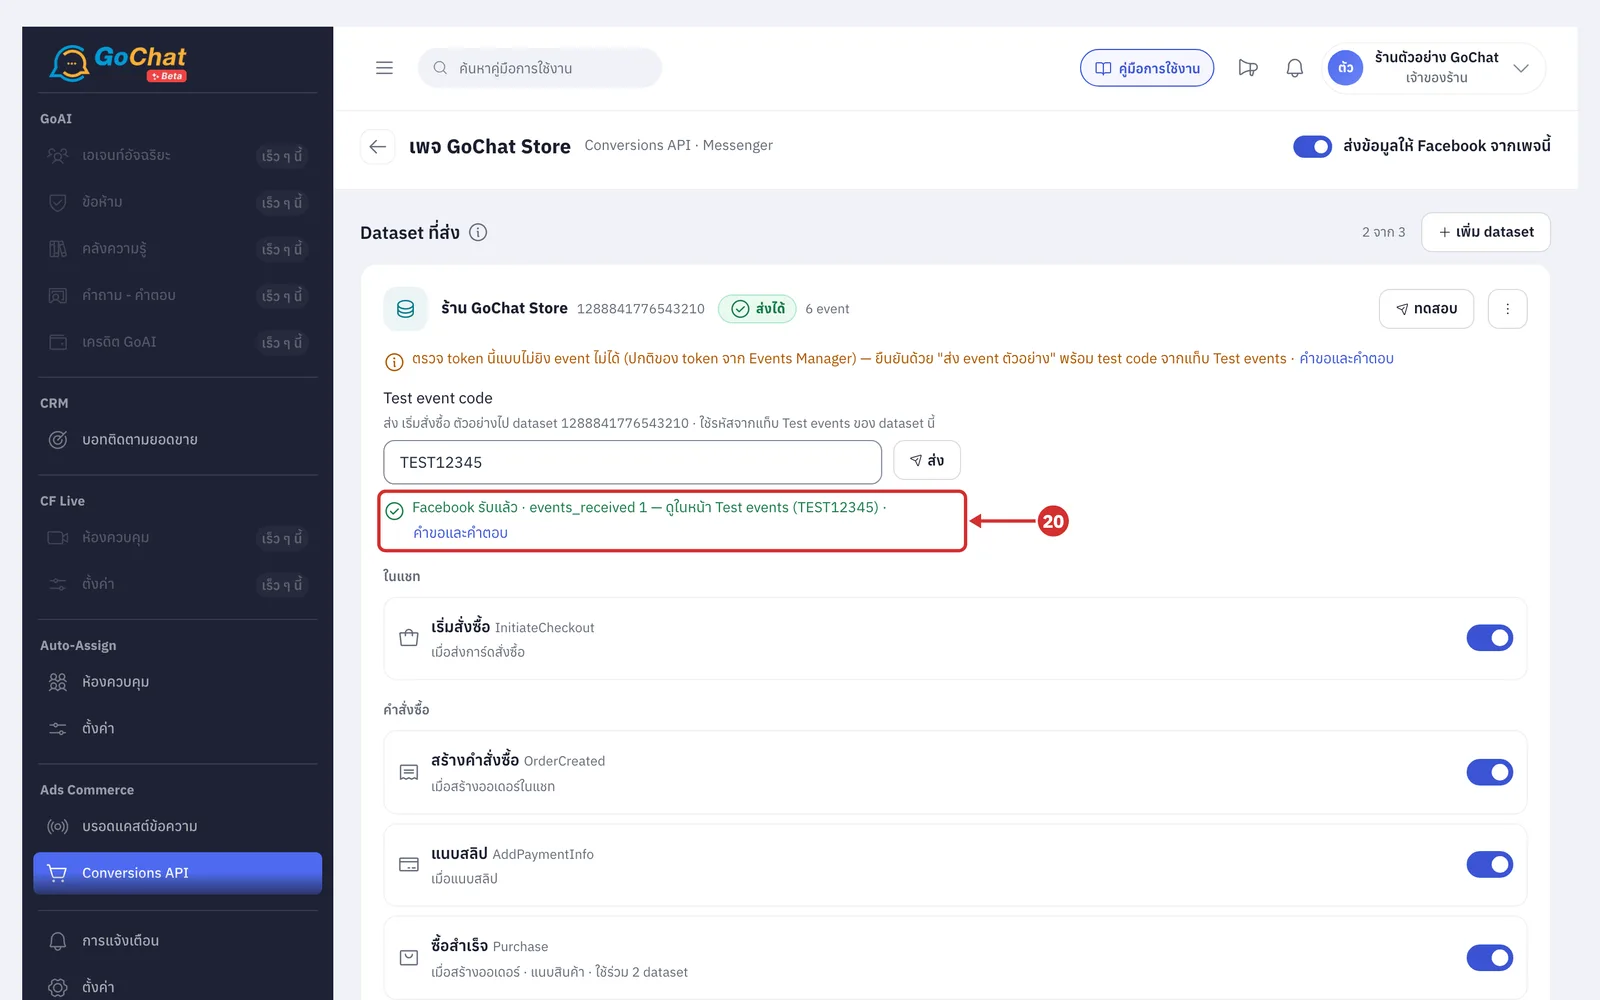
The screen shows Facebook รับแล้ว · events_received 1 (Facebook received it), which means the setup works
Changing the token or label, or removing a dataset
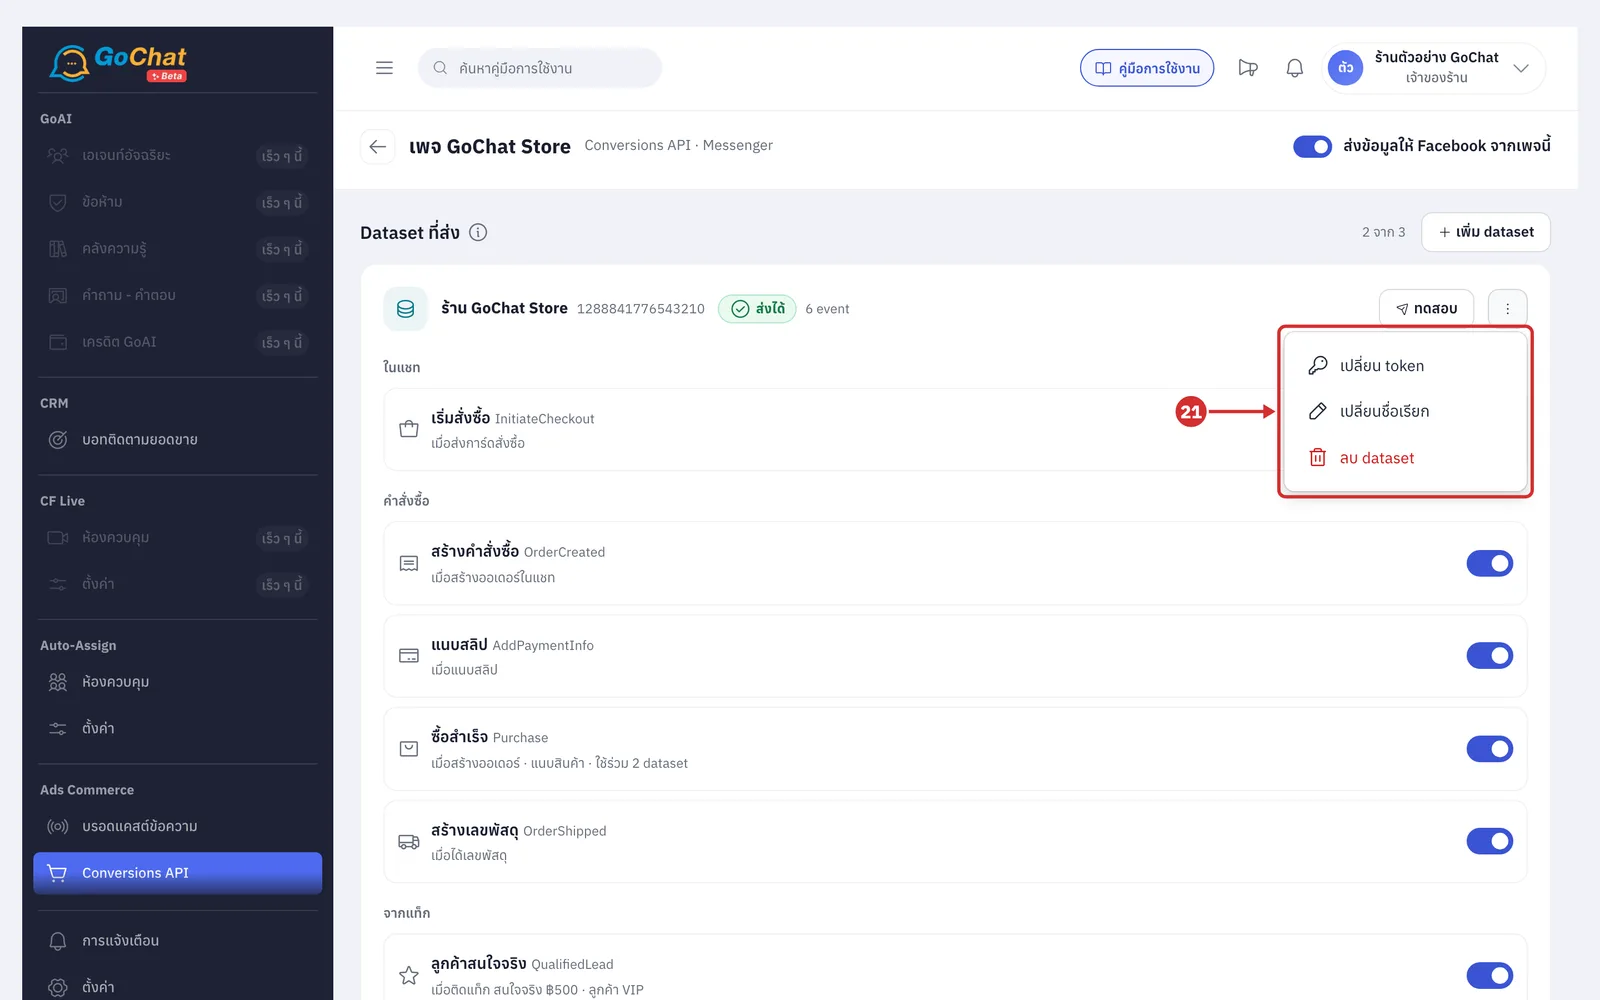
Click ⋮ on the dataset box and choose
เปลี่ยน token (Change token): paste a new token, for example when the status is ส่งไม่ได้ (Cannot send) because the token expired
เปลี่ยนชื่อเรียก (Rename): change the label shown on the box
ลบ dataset (Remove dataset): stop sending to this dataset after saving; its queued items are canceled
Reading the report
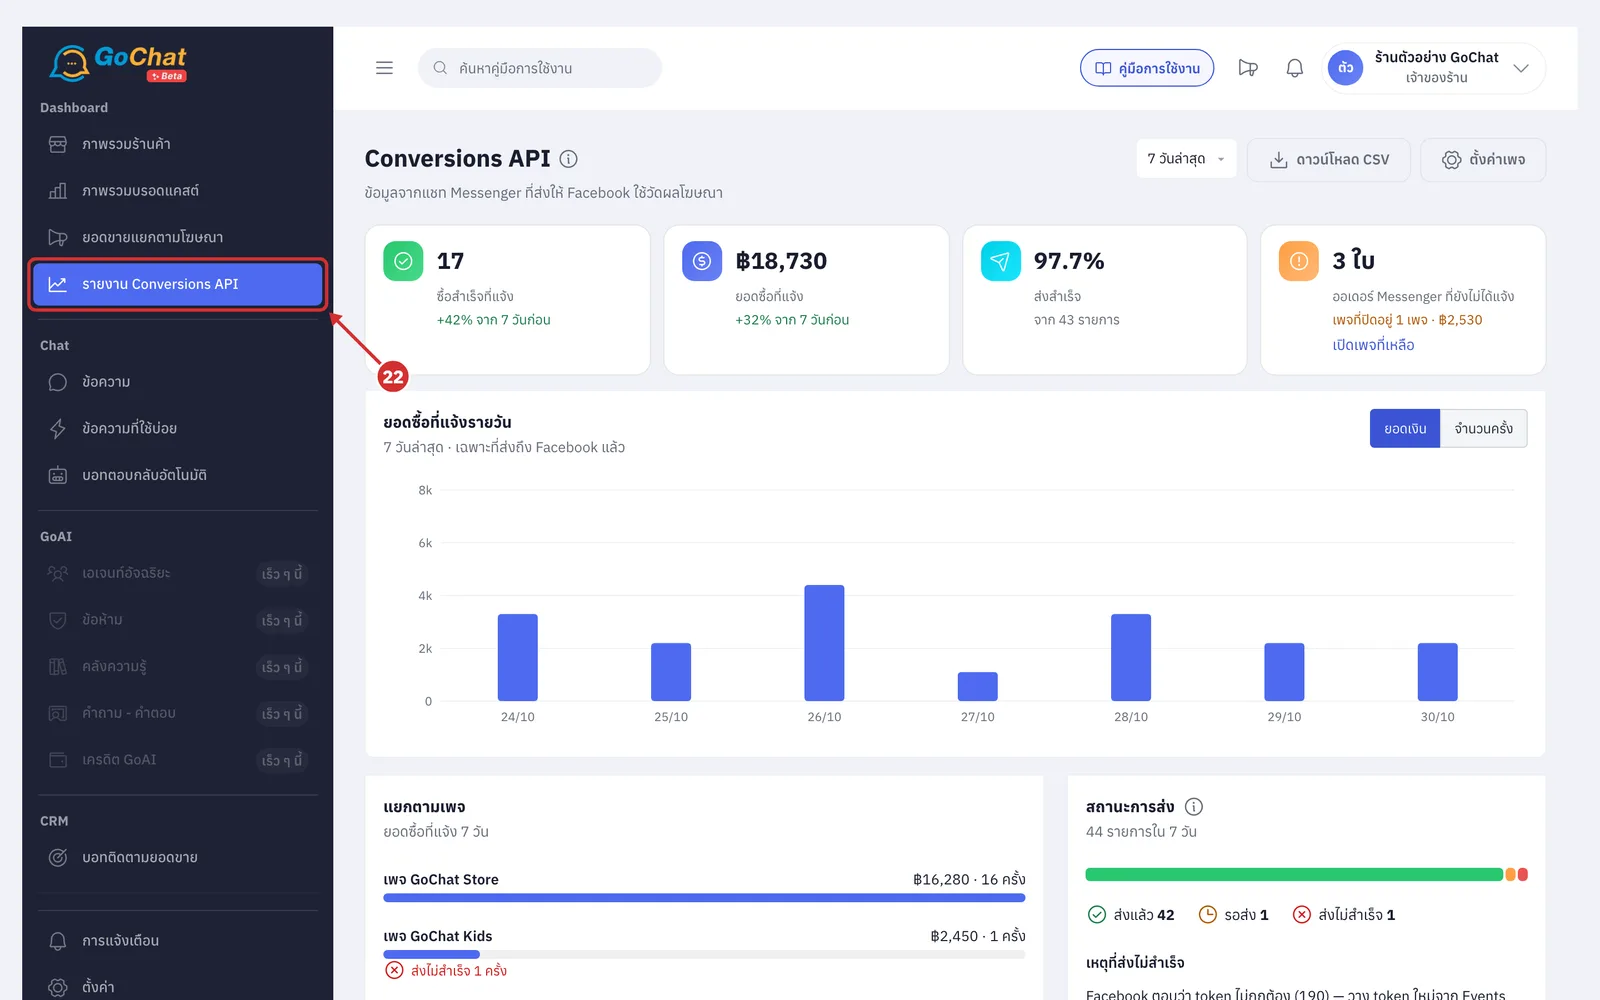
Under Dashboard, choose รายงาน Conversions API (Conversions API report), or click ดูรายงาน (View report) on the Conversions API page
The summary cards follow the chosen period
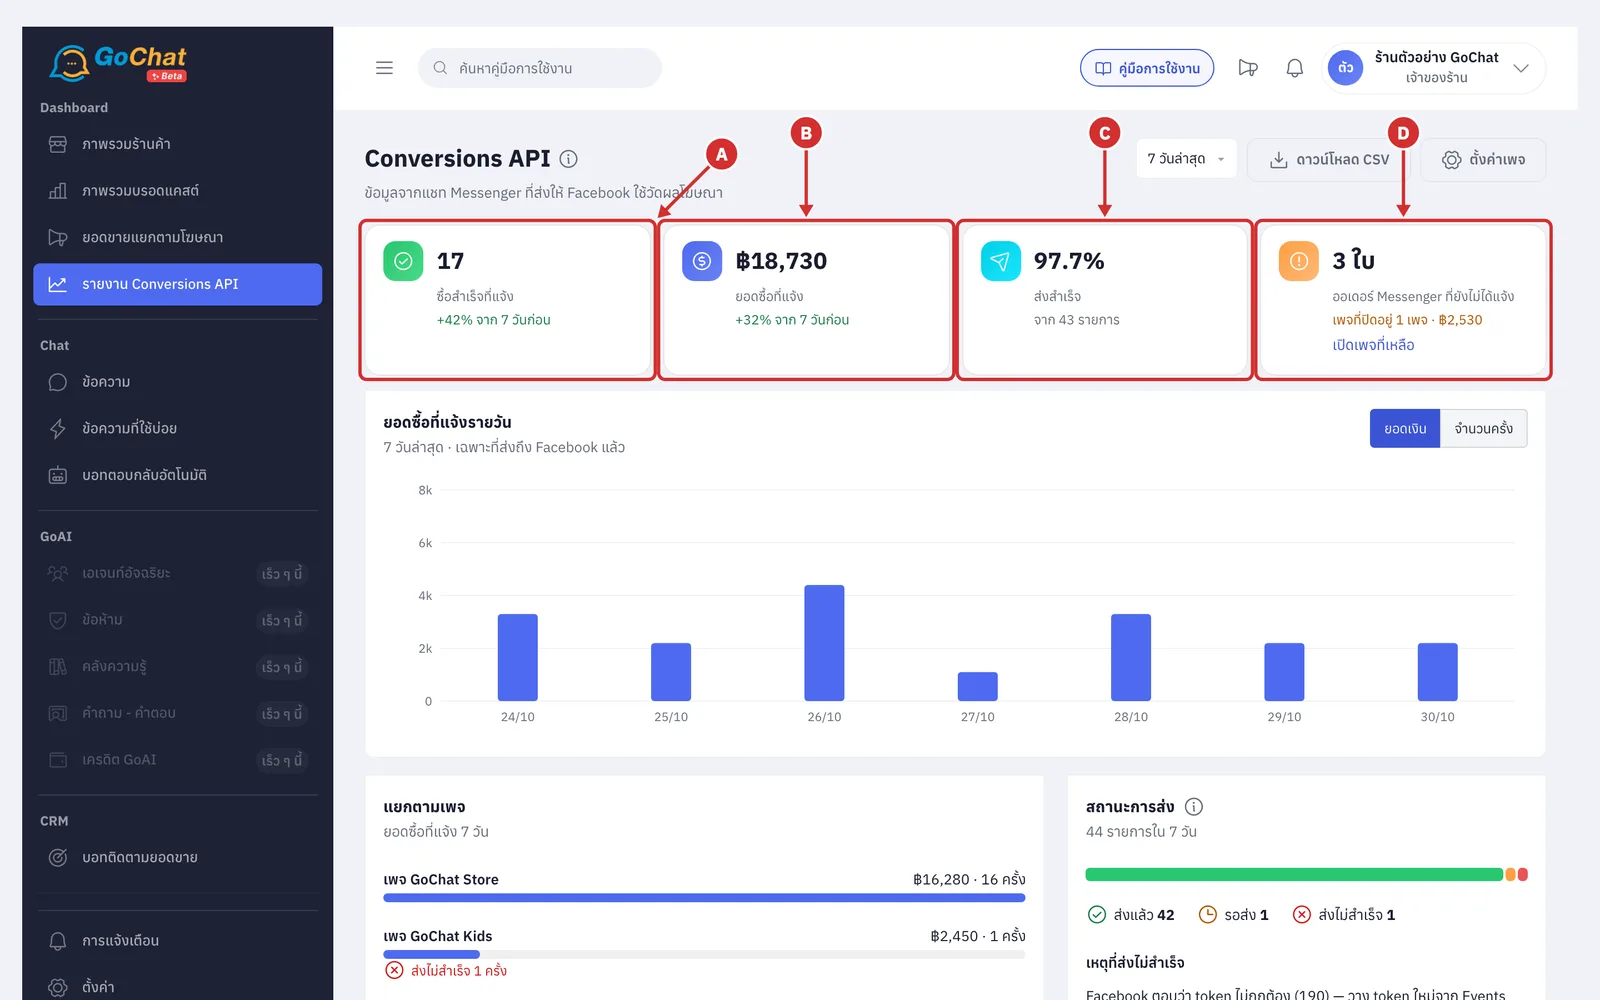
A ซื้อสำเร็จที่แจ้ง (Purchases reported), compared with the previous period of the same length
B ยอดซื้อที่แจ้ง (Purchase value reported), compared with the previous period
C ส่งสำเร็จ (Delivered) as a percentage of all items
D ออเดอร์ Messenger ที่ยังไม่ได้แจ้ง (Messenger orders not reported) from Pages that are not sending
Choose the period at the top right, and click ดาวน์โหลด CSV (Download CSV) to export
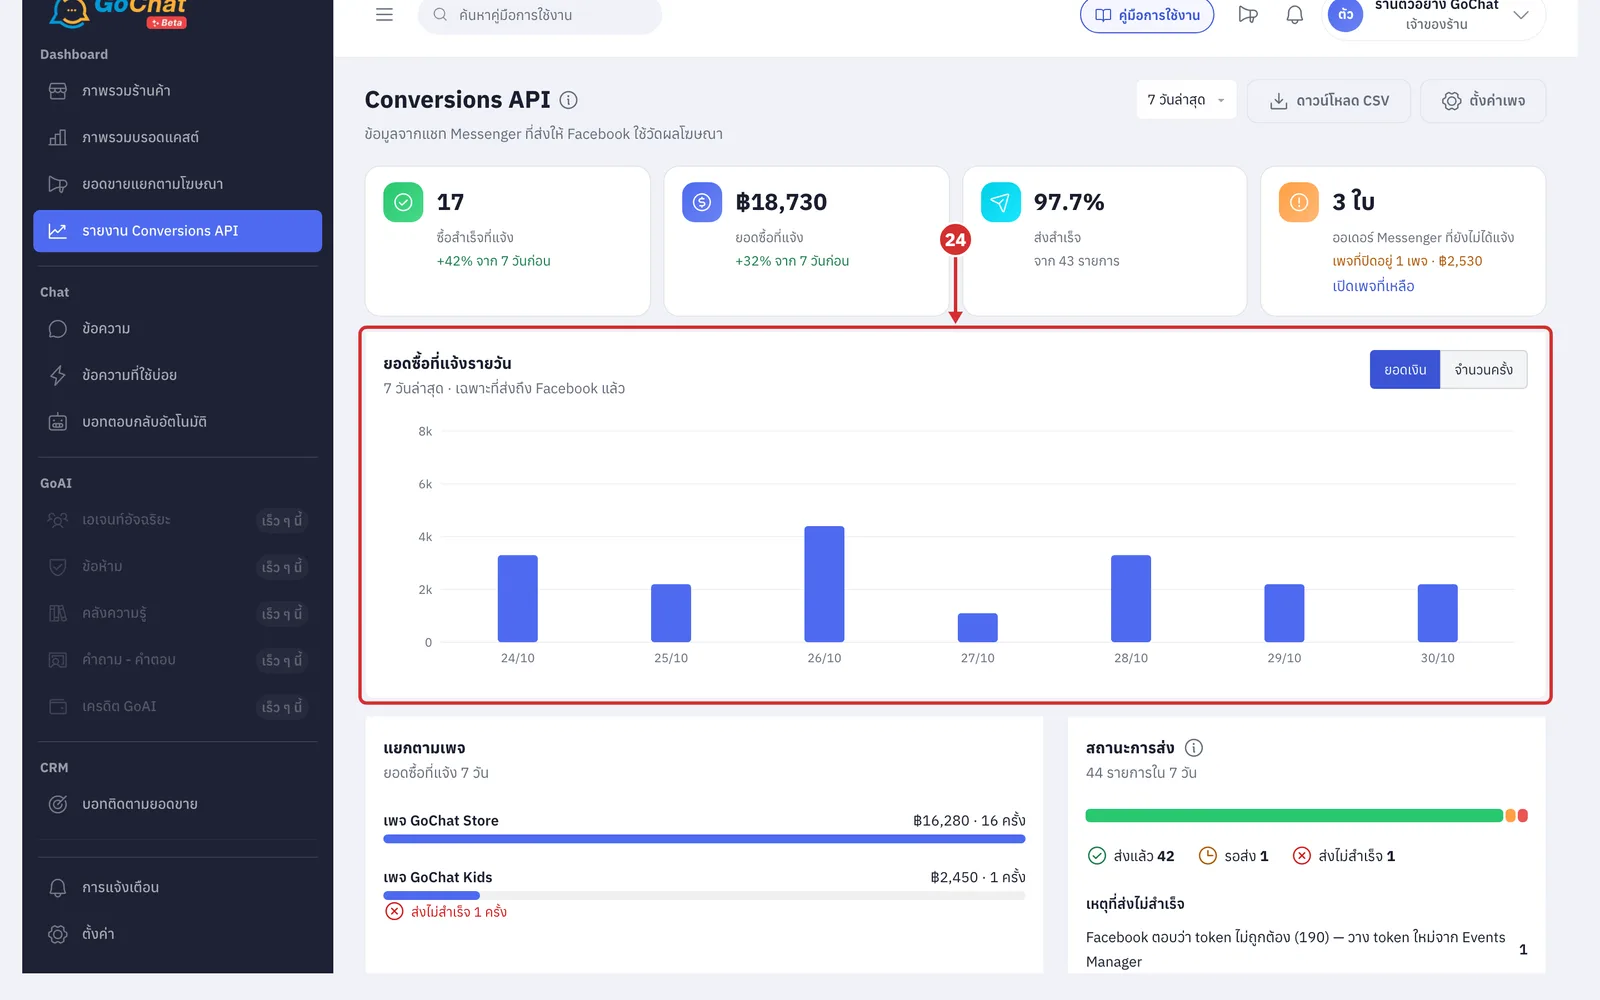
The ยอดซื้อที่แจ้งรายวัน (Daily purchases reported) chart switches between ยอดเงิน (Value) and จำนวนครั้ง (Count)
แยกตามเพจ (By Page) shows the value reported per Page, and สถานะการส่ง (Delivery status) counts ส่งแล้ว (Sent) · รอส่ง (Waiting) · ส่งไม่สำเร็จ (Failed)
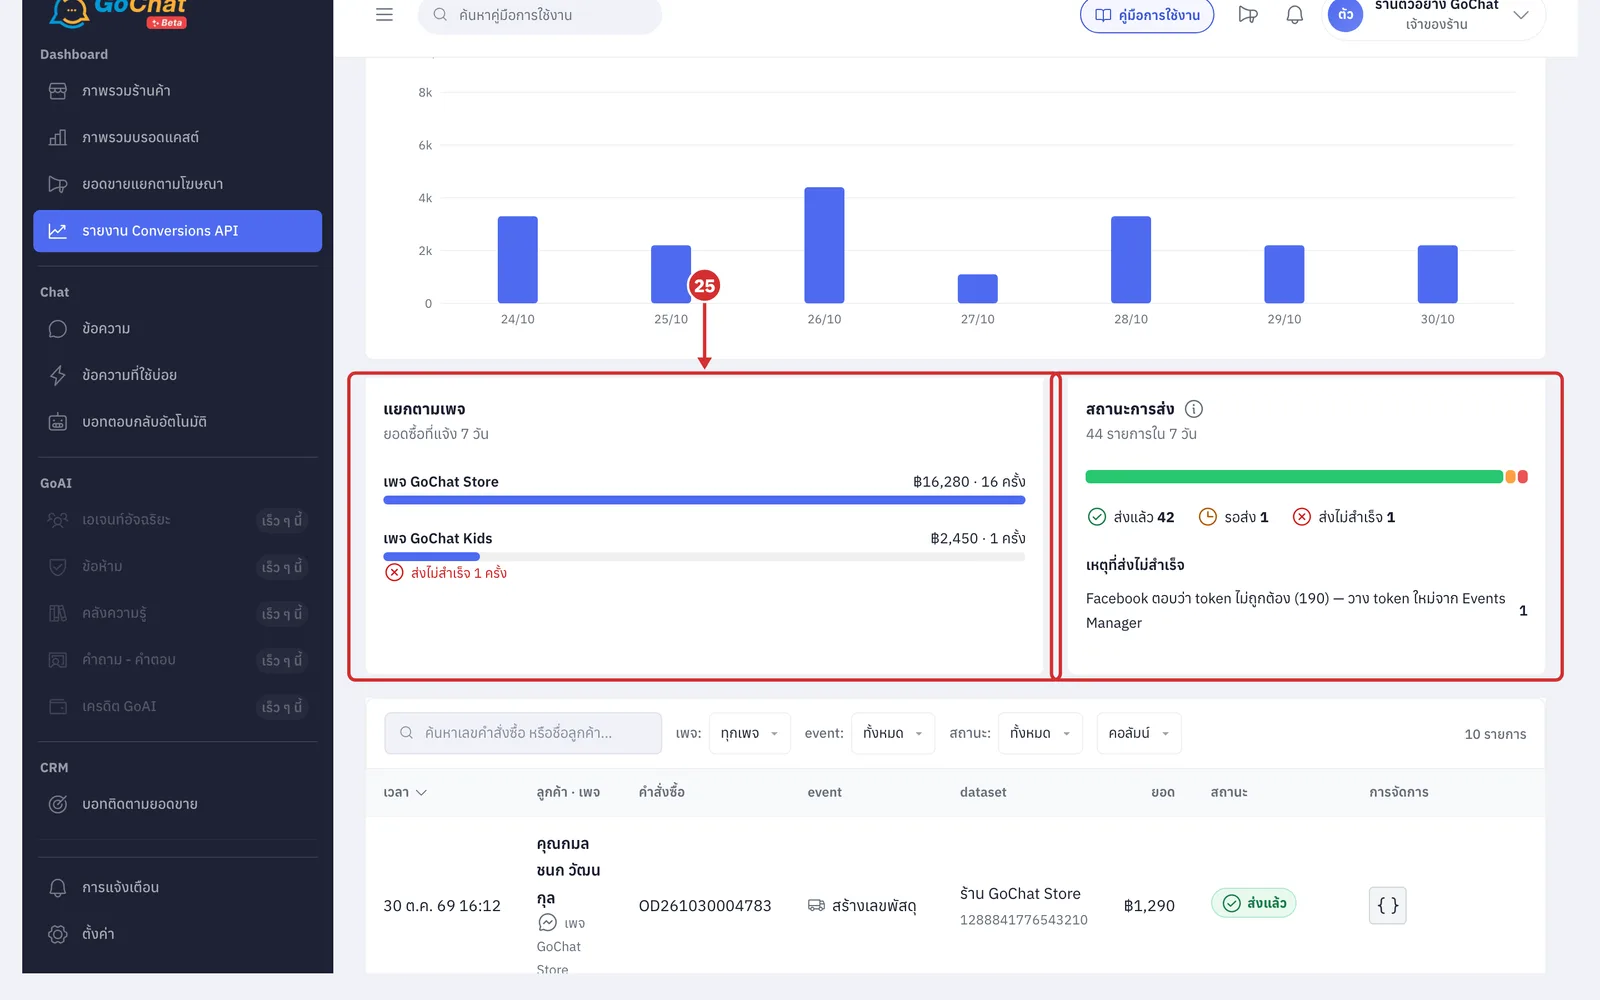
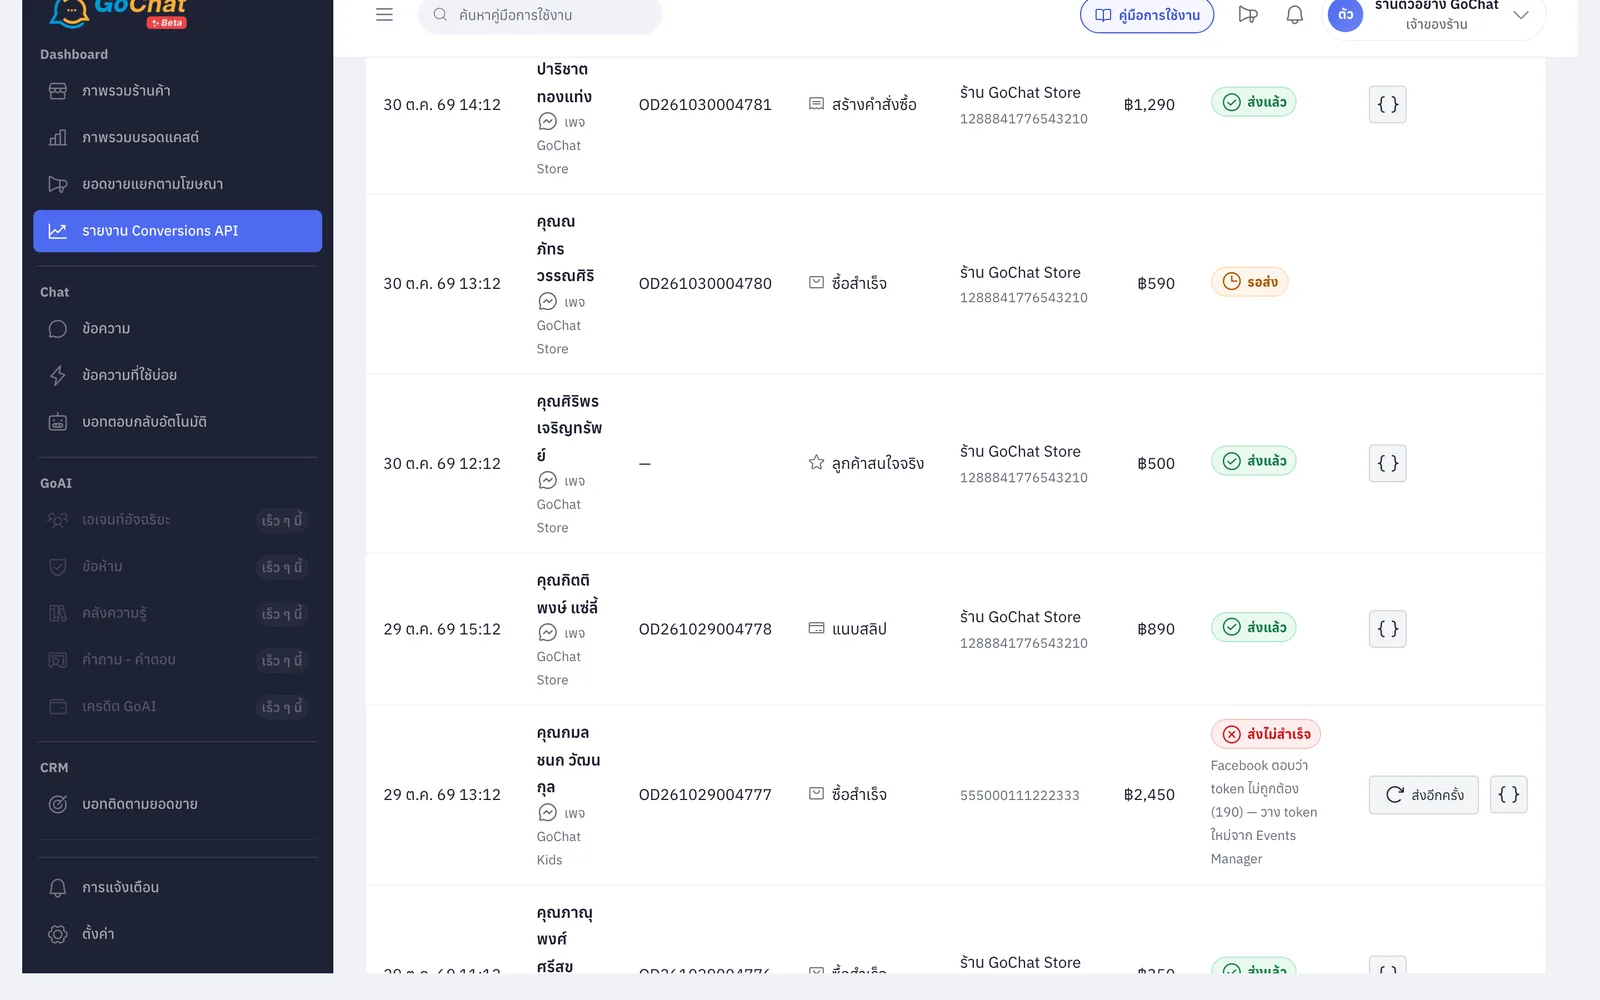
The table lists every event sent; search an order number or customer name and filter by เพจ (Page) · event · สถานะ (Status)
Failed rows have ส่งอีกครั้ง (Send again)
Click เปิดห้องแชท (Open chat) to go to the customer's chat
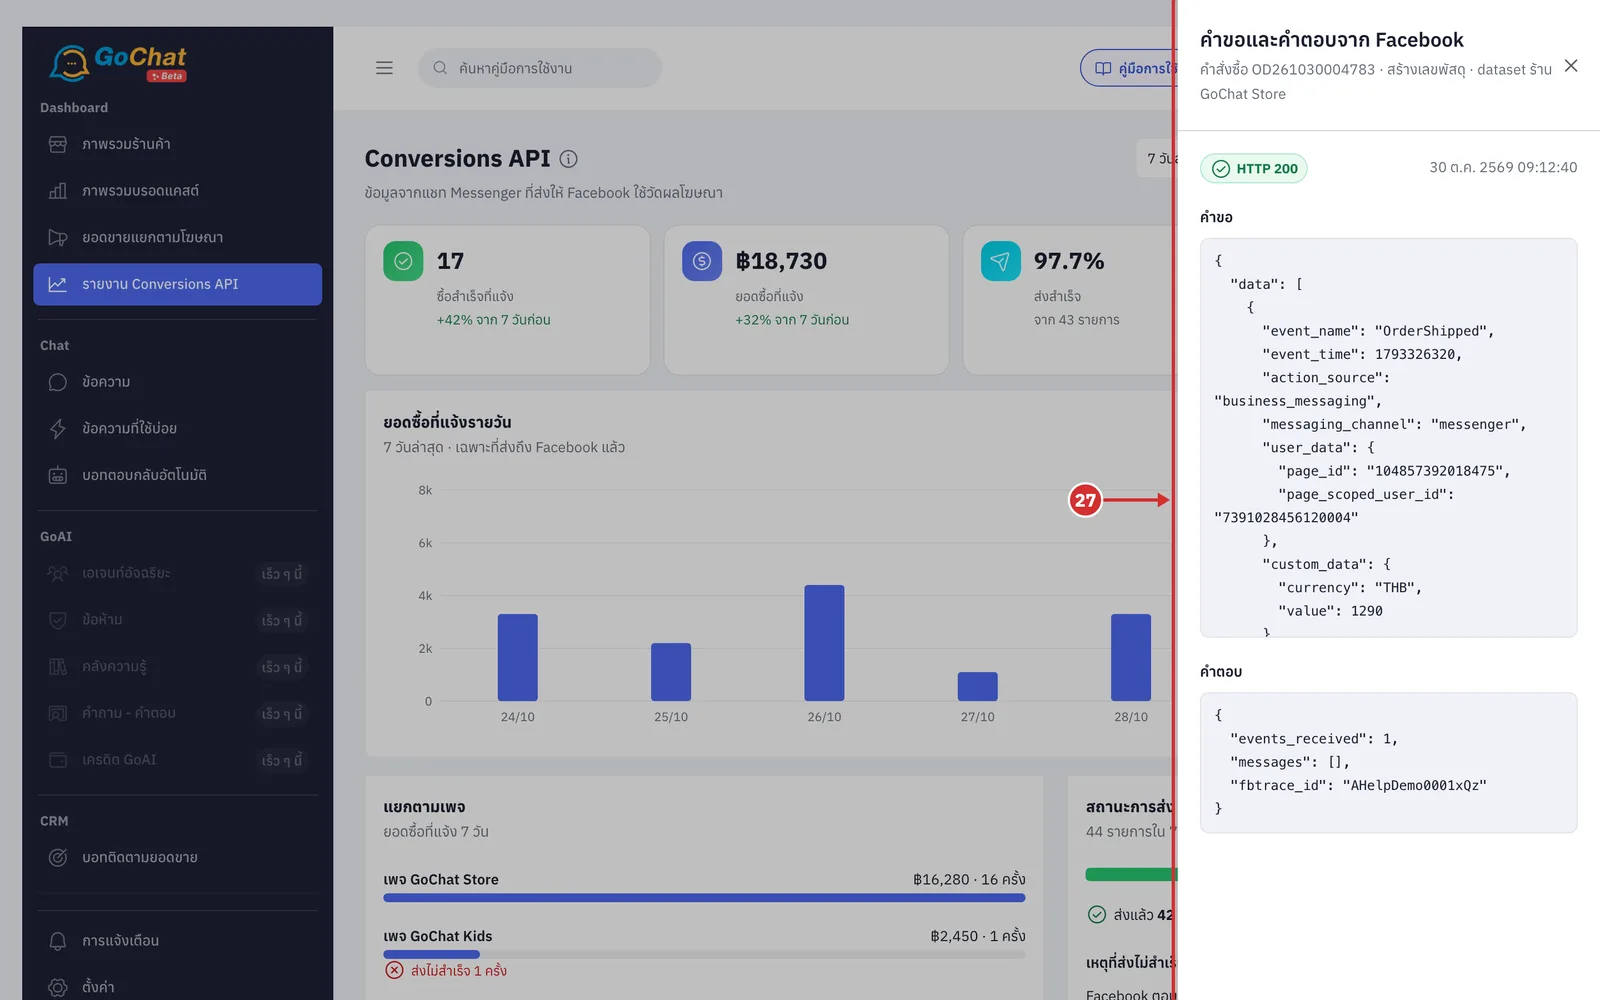
Click { } at the end of a row to see คำขอและคำตอบจาก Facebook (Request and response from Facebook); HTTP 200 with events_received 1 means Facebook received it, and fbtrace_id is the reference to give Meta
Good to know about Conversions API
The dataset must be linked to the same Page you set up in GoChat. Otherwise Facebook replies Invalid parameter and the request and response show Page ID doesn't match this dataset; use the dataset linked to this Page (see the dataset Settings tab › Linked assets)
The Dataset ID is not the Page ID. Both are long numbers; if you paste the Page ID, the test says the token has no permission for this dataset
An orange test result with an Events Manager token is normal; confirm with ส่ง event ตัวอย่าง (Send sample event)
On orders (order list and order cards), the Facebook icon shows the icon of the latest event sent, such as tracking number created; click it to see the status of each event
Only Messenger chats of that Page are sent, and the report keeps 180 days of history