

Using saved replies in a chat
In a chat there are 3 ways to use saved replies: the lightning button, typing /, and typing the start of a reply and picking it from the suggestions. Adding and editing replies is covered in Adding and editing saved replies.
How saved replies work in a chat
The reply you pick goes into the message box so you can edit it first; nothing is sent until you press send
A reply with several messages asks before sending the whole set
Each chat can only use replies that are switched on and set for that chat's page or account
Replies that are off still show faded in the lightning button window, but not when typing
A use is counted when it reaches the customer
Picking a reply from the lightning button
In a chat, click the lightning icon ข้อความที่ใช้บ่อย (Saved replies) in the message box toolbar
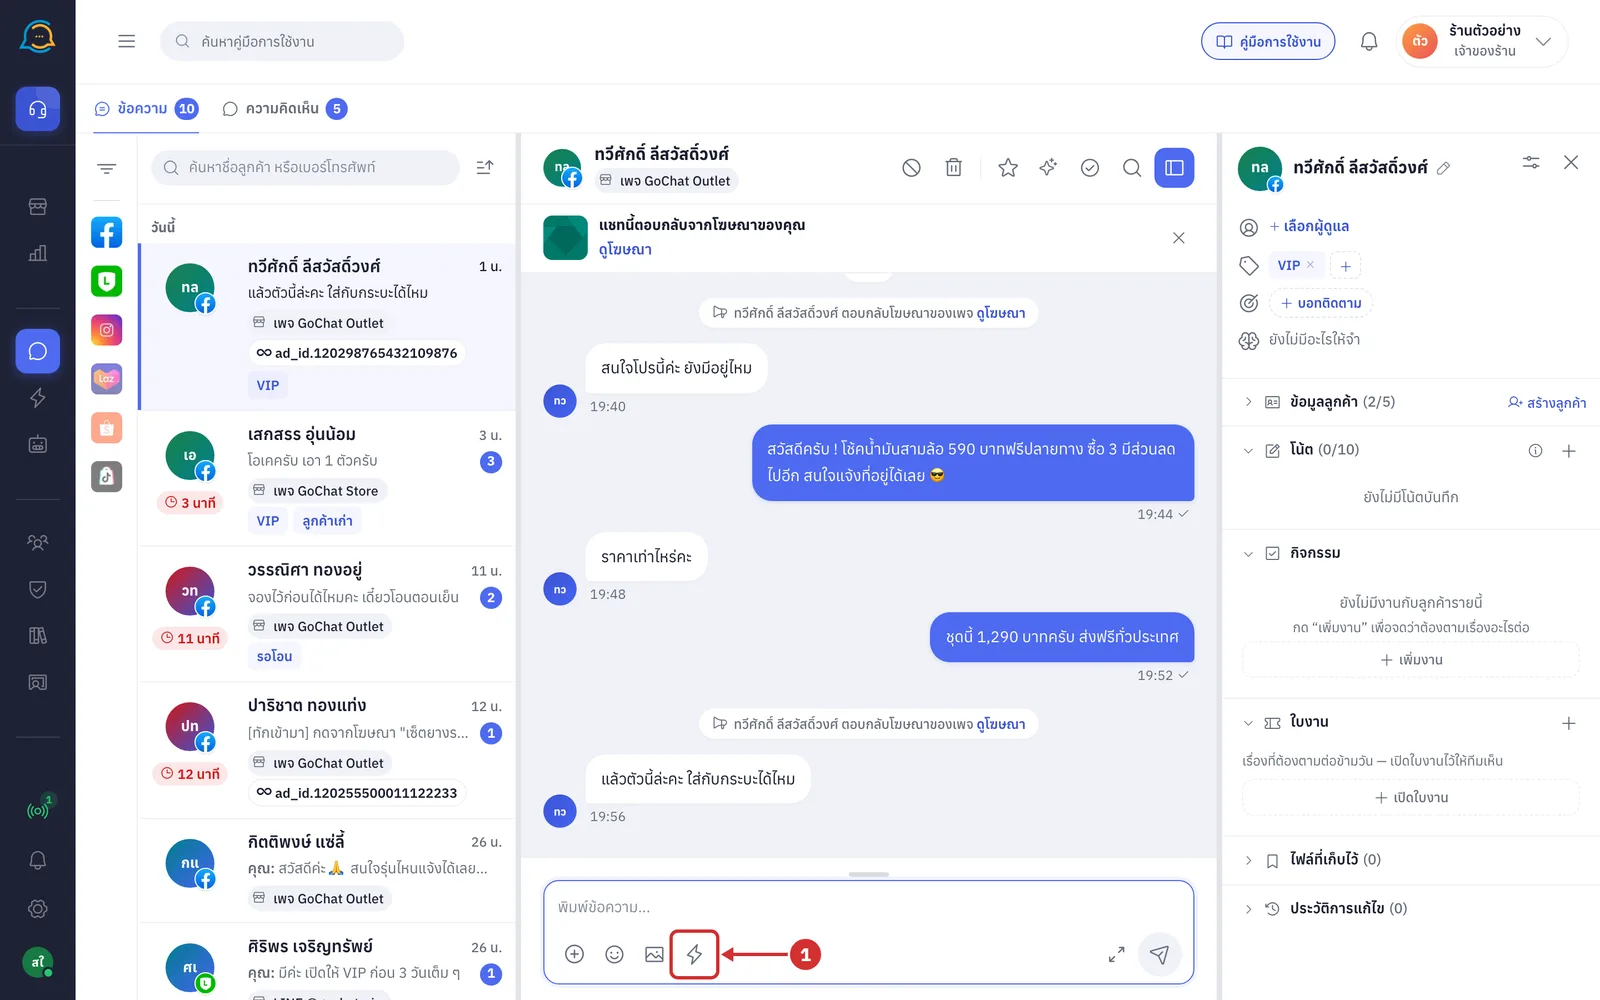
The ข้อความที่ใช้บ่อย (Saved replies) window opens. Its parts mean:
A Title and number the number is how many replies show in this chat, including ones that are off
B Toolbar the ค้นหาหัวข้อหรือเนื้อหา (Search title or content) box and the หมวด (Category) button
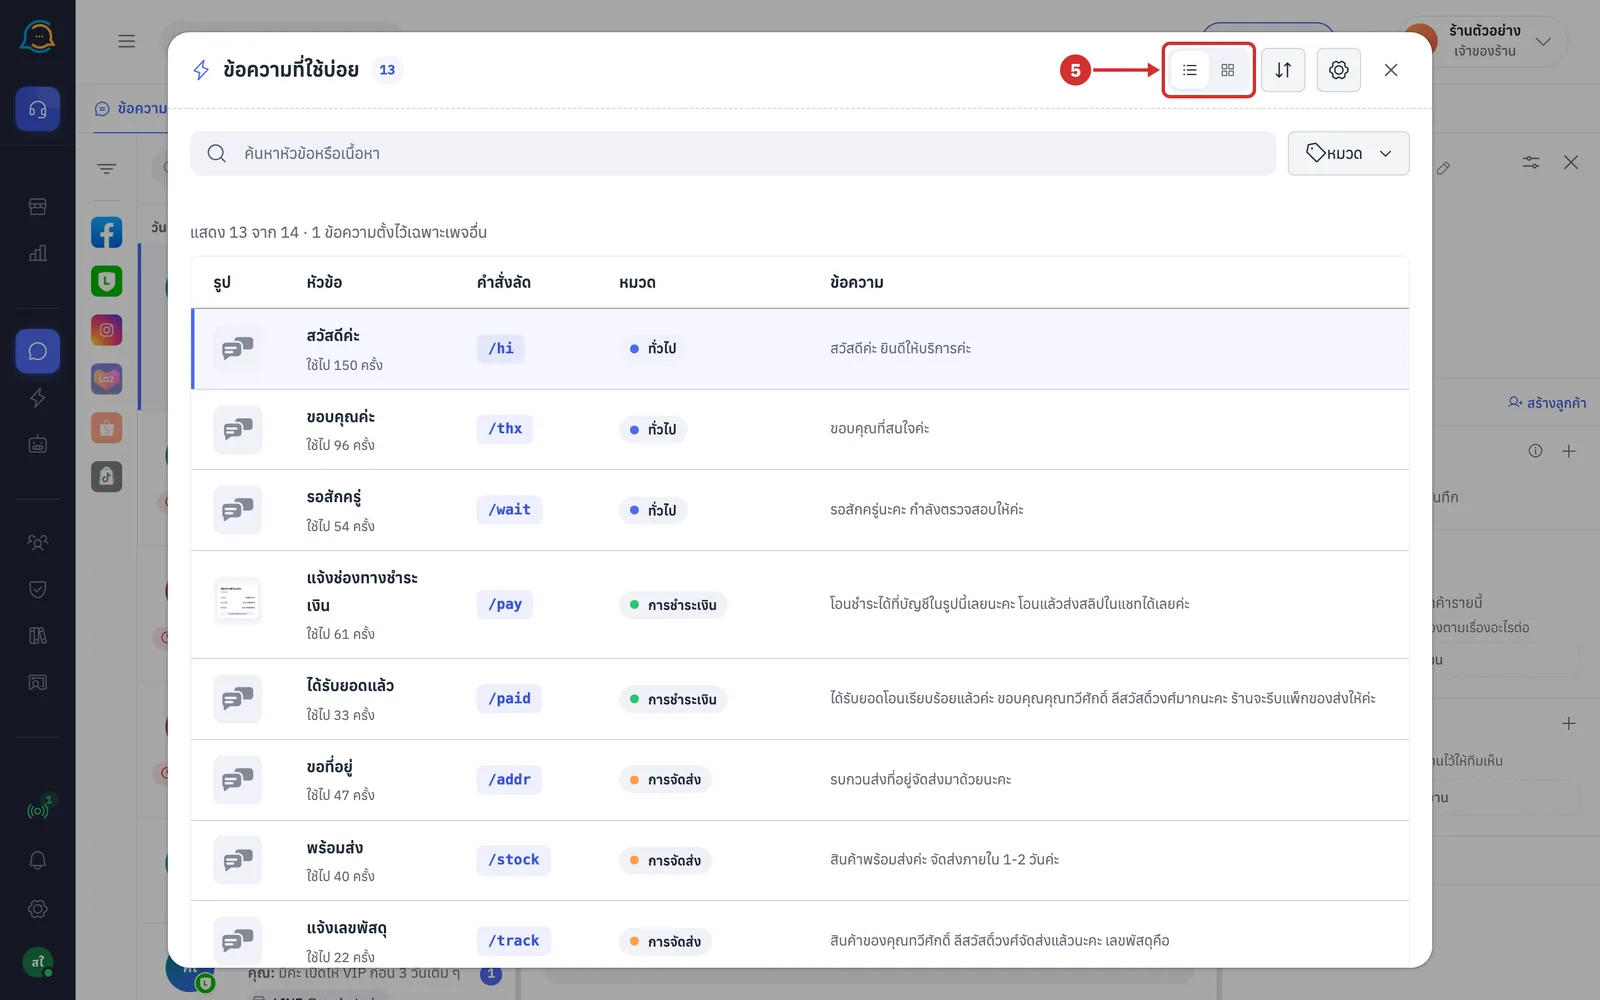
The buttons at the top right of the window are list view, card view, reorder replies, manage replies and close
C Scope line such as แสดง 13 จาก 14 · 1 ข้อความตั้งไว้เฉพาะเพจอื่น (Showing 13 of 14 · 1 reply is set for other pages only); it appears when the shop has replies limited to other pages or accounts, so they do not show in this chat
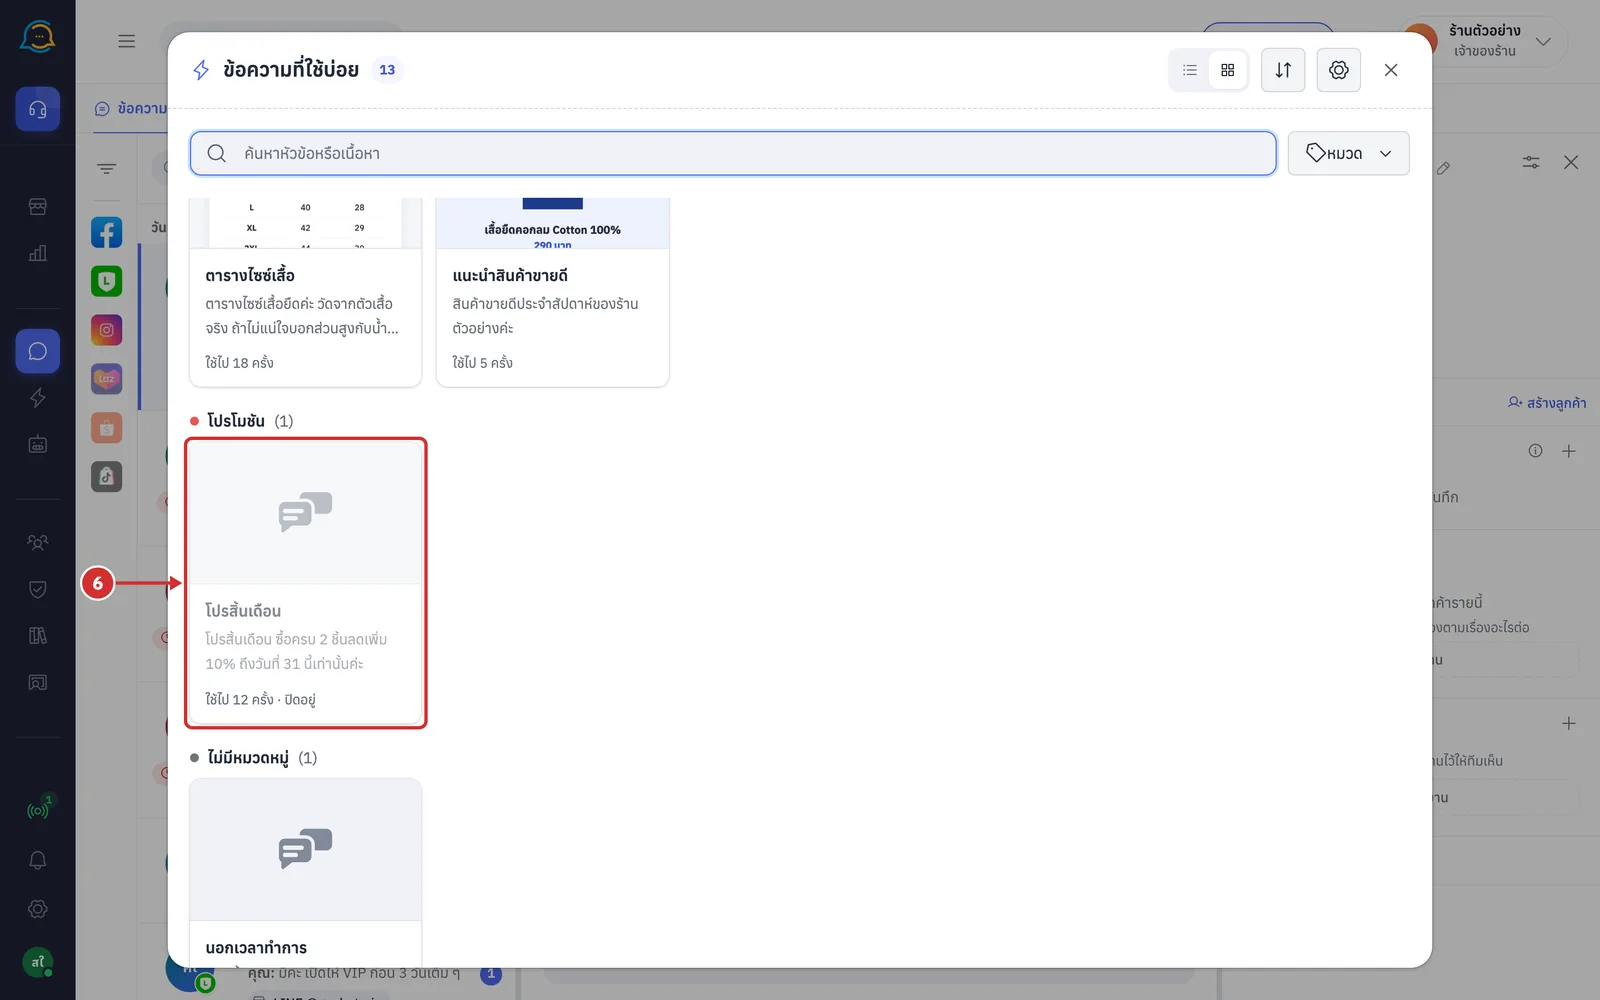
D Reply cards grouped by category; each card shows
The first image, with the number of images on the corner; no image shows a message icon
The title and the text with the customer and shop names filled in
ใช้ไป … ครั้ง (Used … times) or ยังไม่เคยใช้ (Never used)
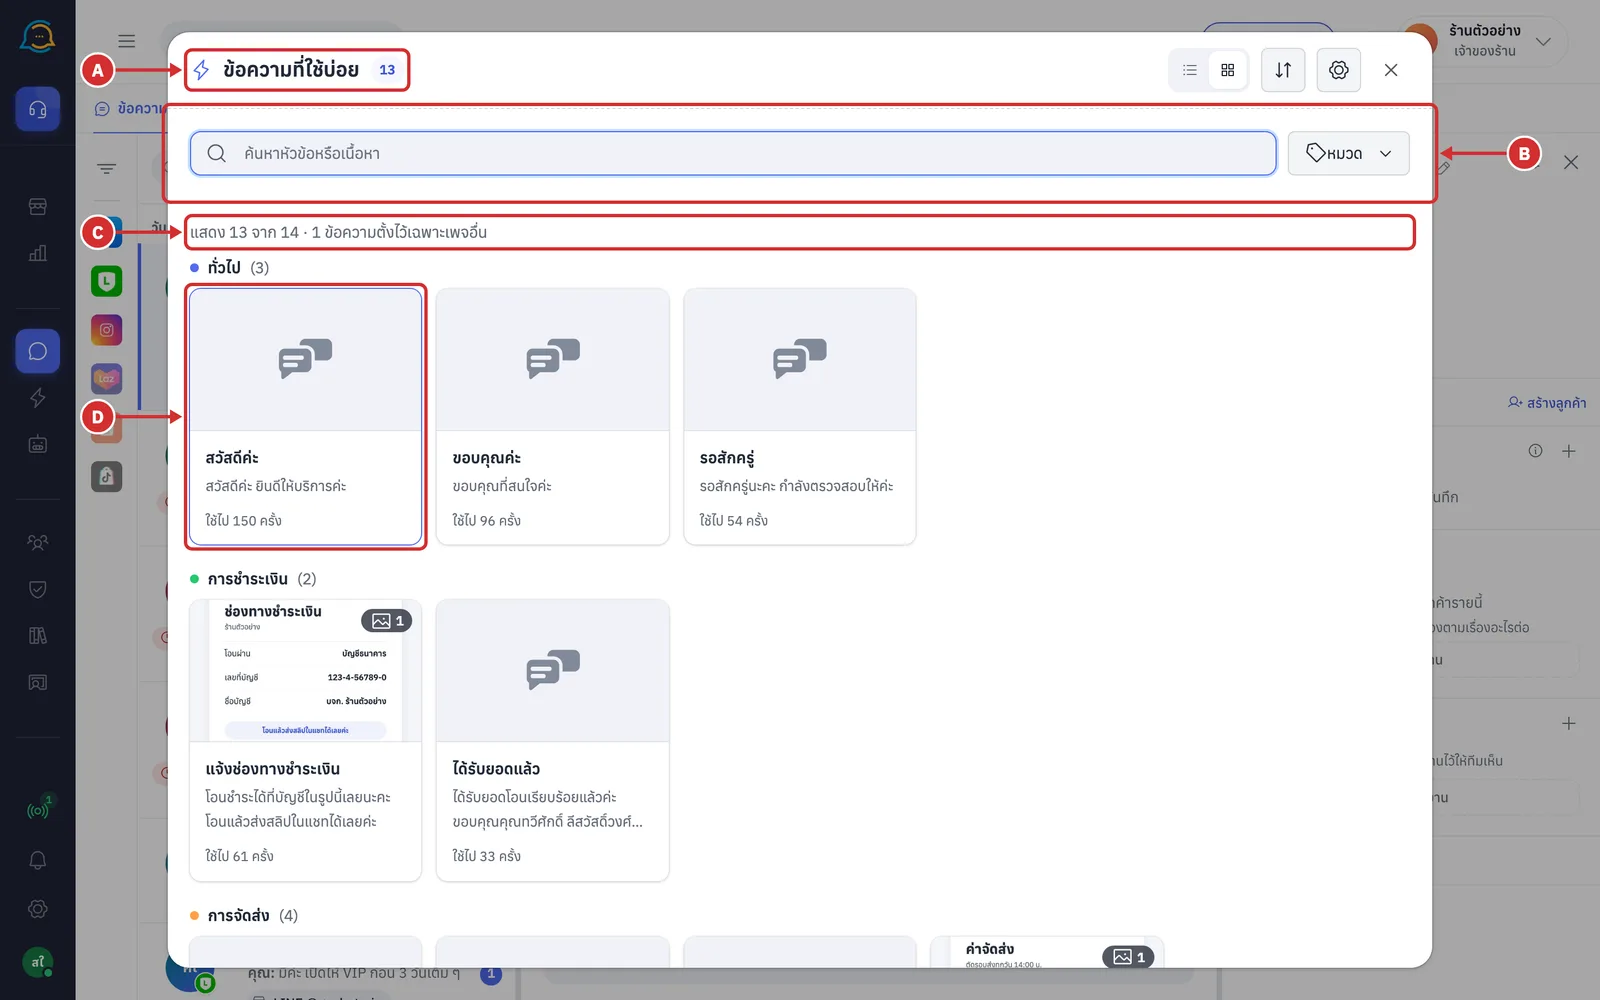
Type a word from the title or text in ค้นหาหัวข้อหรือเนื้อหา (Search title or content). Only matching cards stay
The matching words are highlighted, and it shows พบ … ข้อความ (… found)
If nothing matches it shows ไม่พบข้อความที่มีคำว่า “…” (No replies contain “…”) with ล้างคำค้น (Clear search) and เพิ่มข้อความใหม่ (Add a new reply)
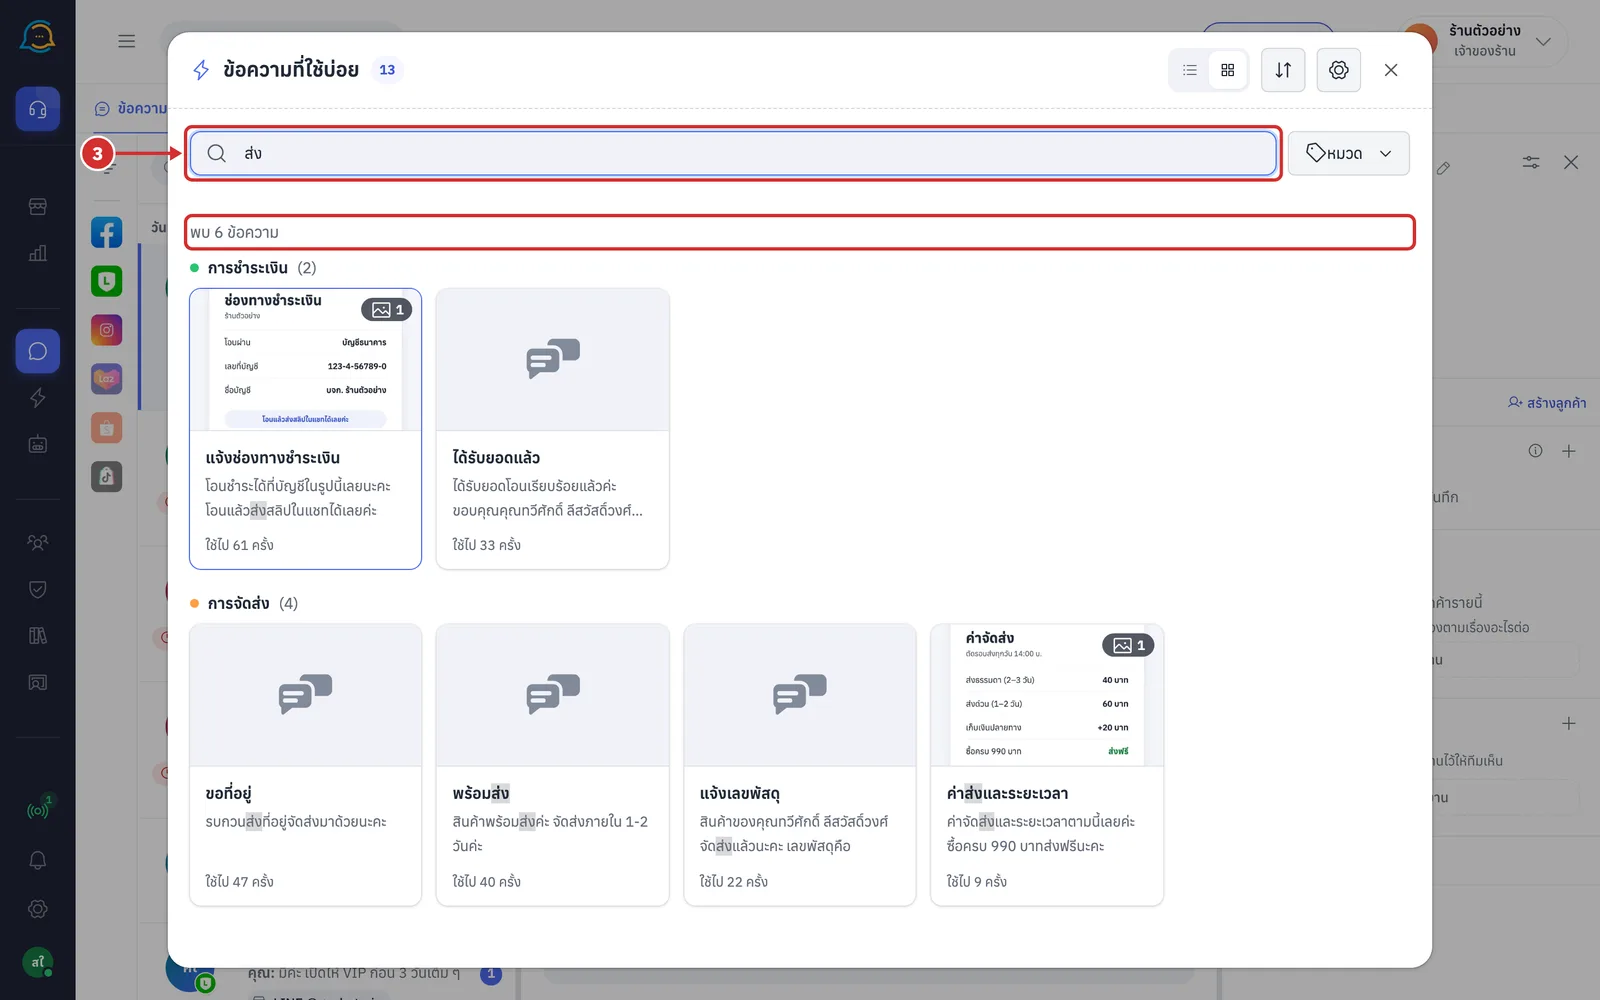
Click หมวด (Category) to see one category; the number on the right is how many replies in it show in this chat (choose ทุกหมวด (All categories) to see everything)
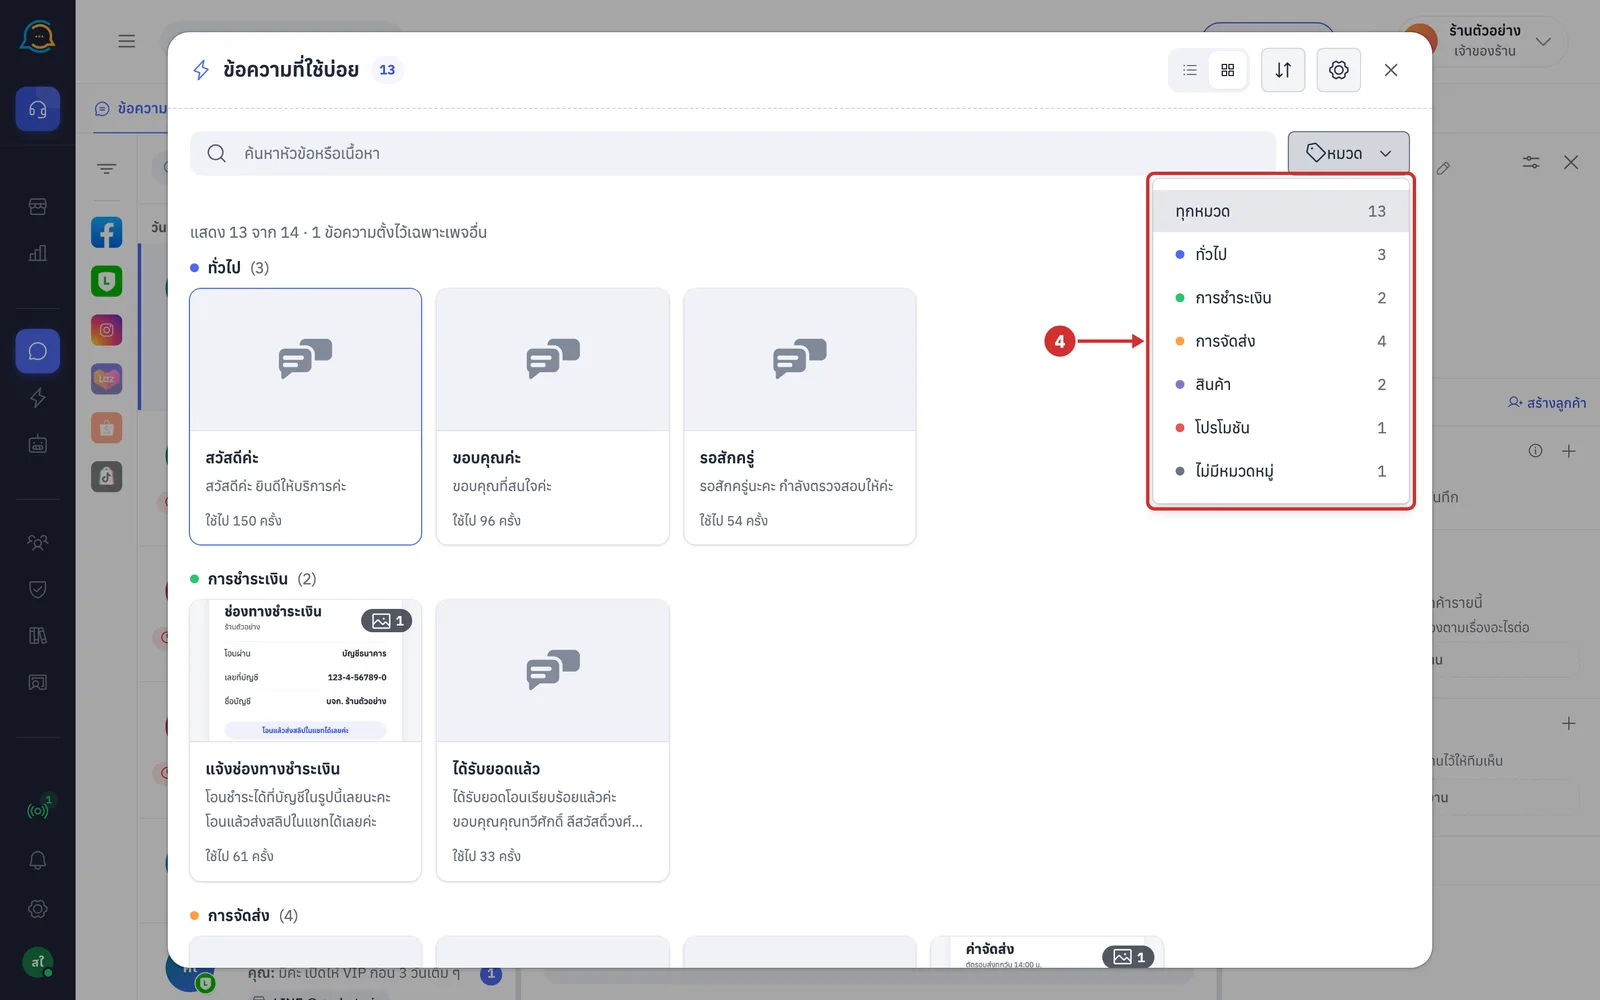
Click the มุมมองรายการ (List view) icon to see replies as a table, or มุมมองการ์ด (Card view) to go back to cards
The table has the columns รูป (Image) · หัวข้อ (Title, with its use count) · คำสั่งลัด (Shortcut) · หมวด (Category) · ข้อความ (Text)
The view is remembered on this device
Cards of replies that are switched off are faded, say ปิดอยู่ (Off) and cannot be inserted (switch them on from the edit page)
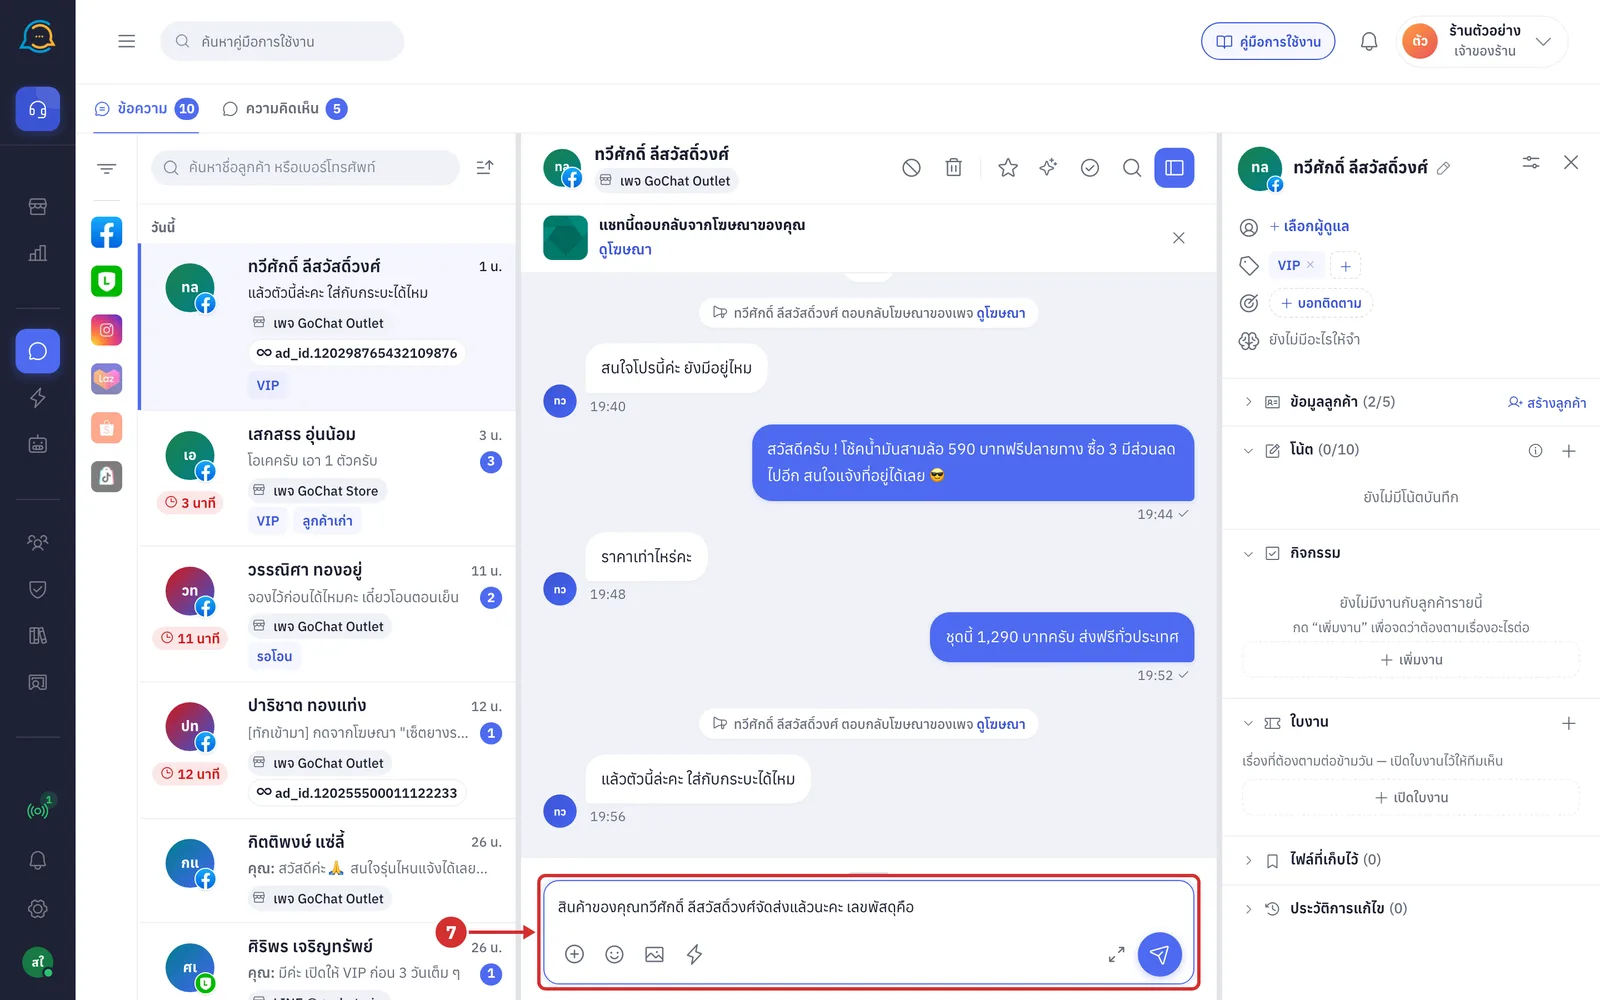
Click the card you want (or use the arrow keys and Enter). The window closes and the reply goes into the message box. Then click ส่ง (Send) or press Enter
{{ชื่อลูกค้า}} (customer name) is replaced by this chat's customer and {{ชื่อร้าน}} (shop name) by your shop
You can edit or add to it before sending, such as typing the tracking number
The use is counted once it reaches the customer
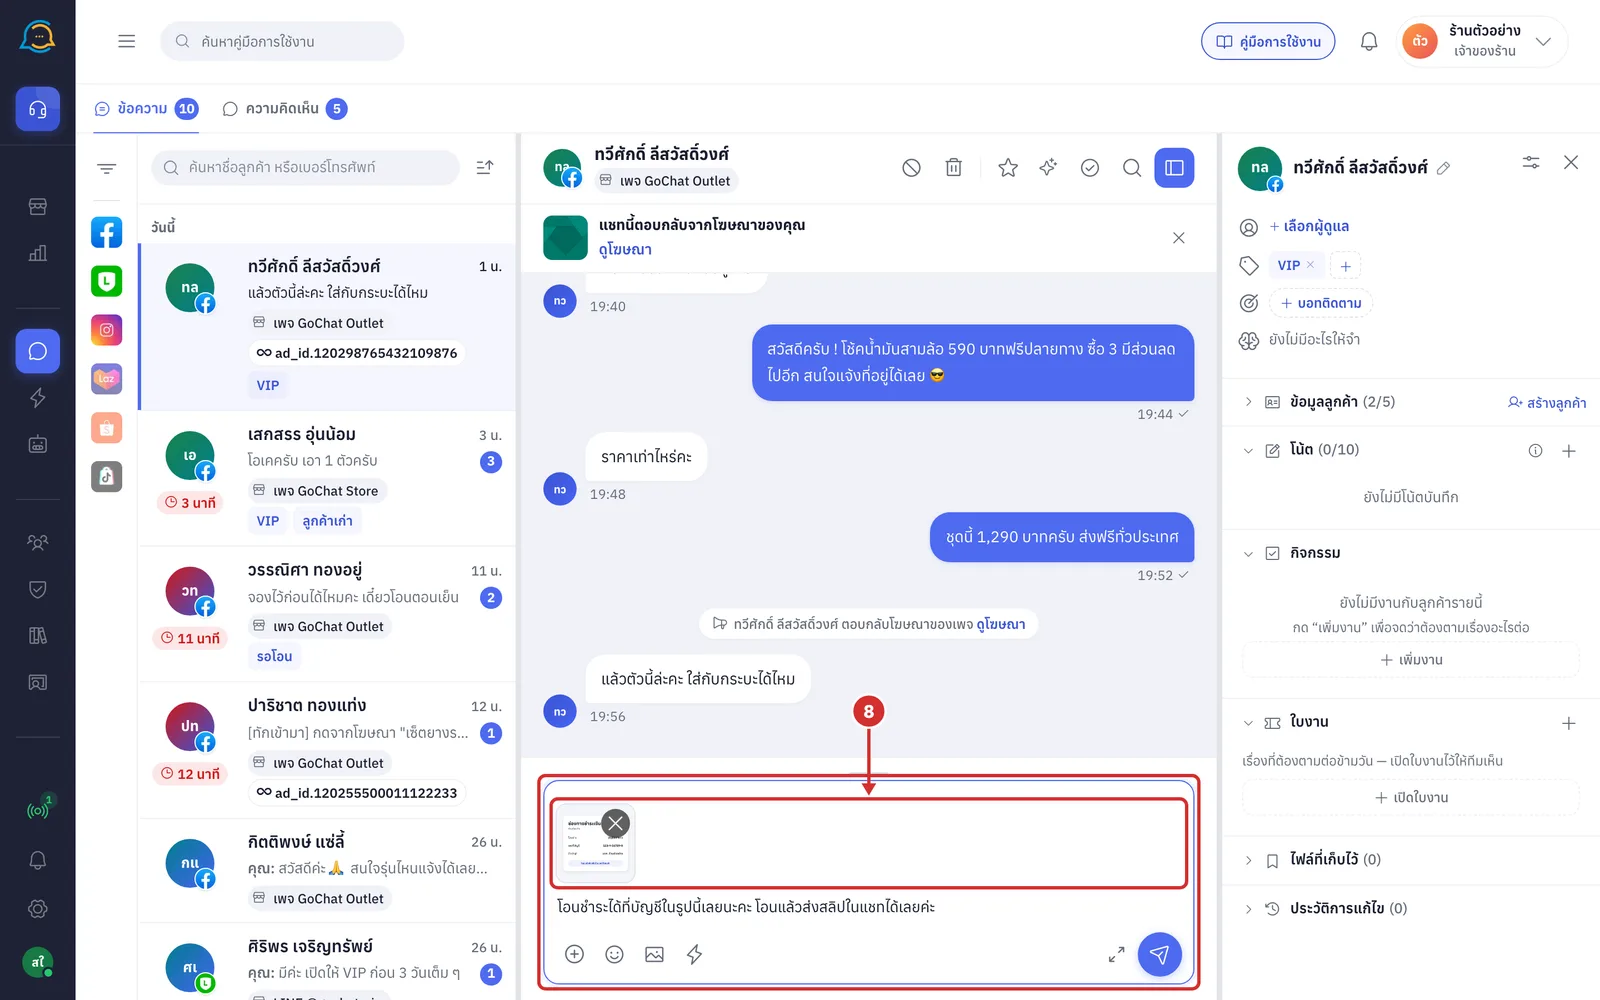
For a reply with images, the images appear in the tray above the text in the message box. Click ✕ on an image to leave it out
When you send, the text goes first and the images follow
You can delete all the text and still send just the images
Chats on a channel that cannot send images yet show ช่องทางของห้องนี้ยังส่งรูปไม่ได้ — การ์ดที่มีรูปจะใส่ได้เฉพาะตัวข้อความ (This chat's channel cannot send images yet — cards with images insert the text only)
For a reply with several messages, clicking the card opens ส่งชุดข้อความ (Send message set), which says มี … ข้อความกับรูป … รูป จะส่งให้ (customer name) ตามลำดับ (… messages and … images will be sent to … in order)
LINE chats with more than 5 bubbles show ส่งเป็น … รอบ (Sent in … rounds); click (i) for why
Click ตกลง (OK) or press Enter to send the whole set straight away
Click ยกเลิก (Cancel), ✕ or press Esc to not send it
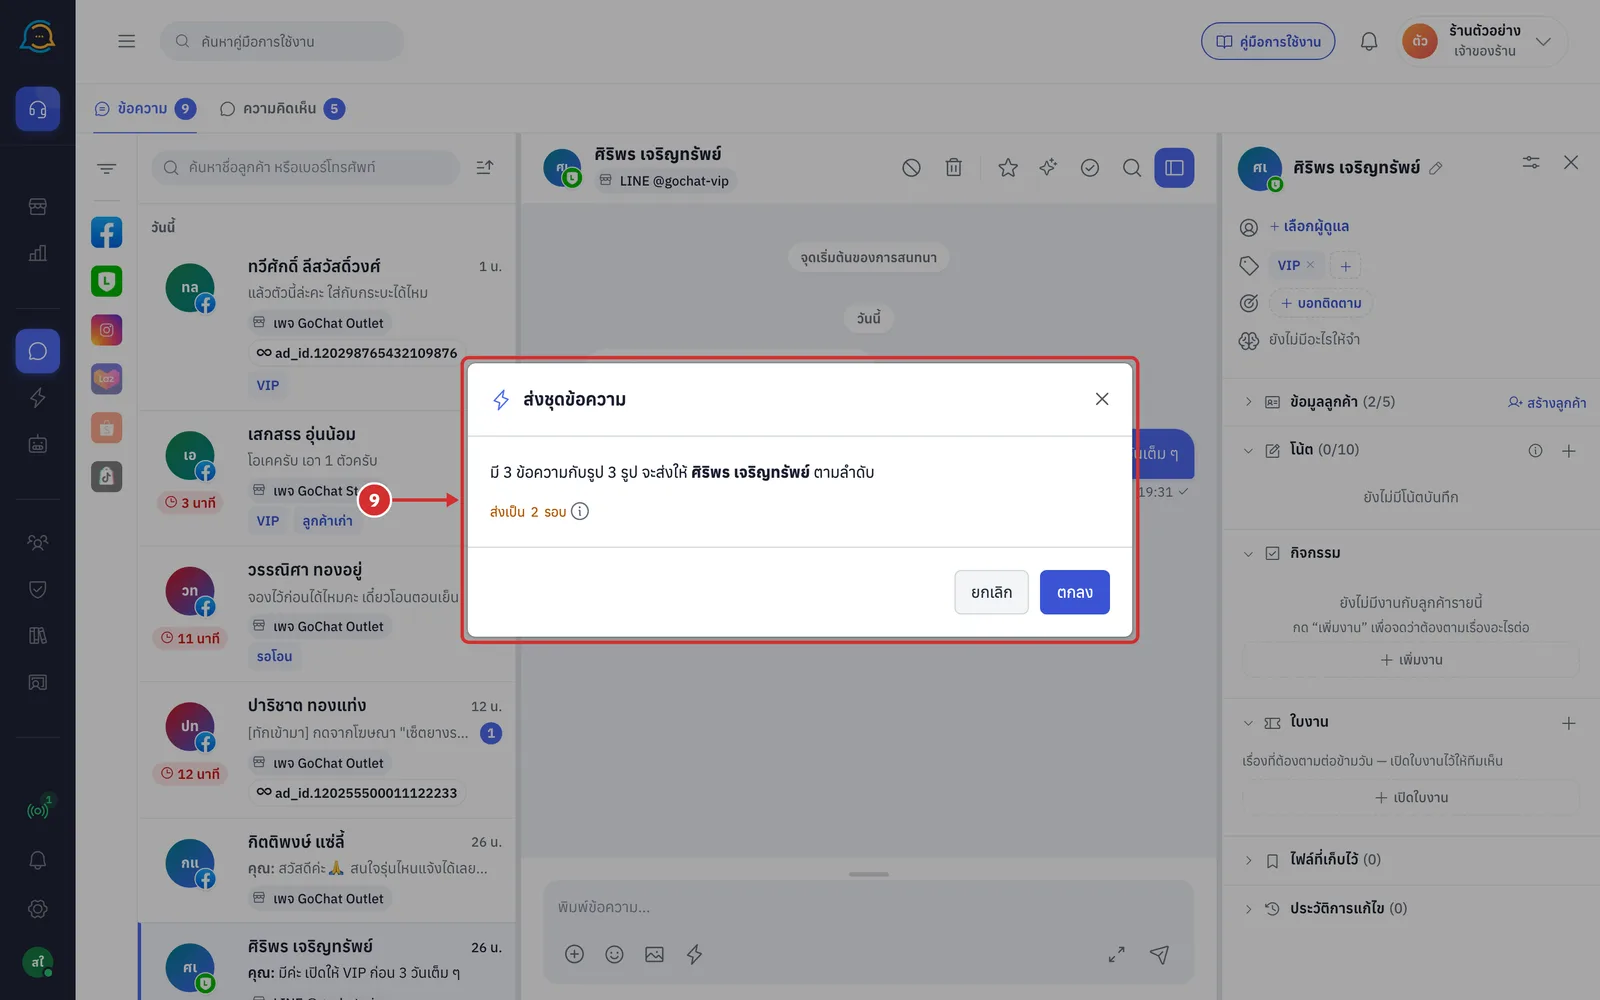
Good to know: After ตกลง (OK), the set is sent like this:
Every message and image of the set appears in the chat as กำลังส่ง (Sending) in order and goes out one at a time; each piece starts once the previous one has arrived
The send button is locked meanwhile so nothing lands in the middle of the set
Text you had typed in the message box is not sent with the set
If a piece does not arrive, it shows ส่งไม่สำเร็จ (Failed) with ลองใหม่ (Try again) to send that piece and then the rest, and a bin to drop the rest of the set
Pieces not sent yet show as dashed bubbles รอส่ง … ชิ้น (… waiting)
Editing, adding and reordering in the window
Click the gear จัดการข้อความ (Manage replies) to enter manage mode
Every card gets a pencil (edit) and a bin (delete)
The toolbar gets เพิ่มข้อความ (Add reply)
Deleting here asks with the same ลบข้อความนี้? (Delete this reply?) window as the list page
Click the gear again to leave manage mode
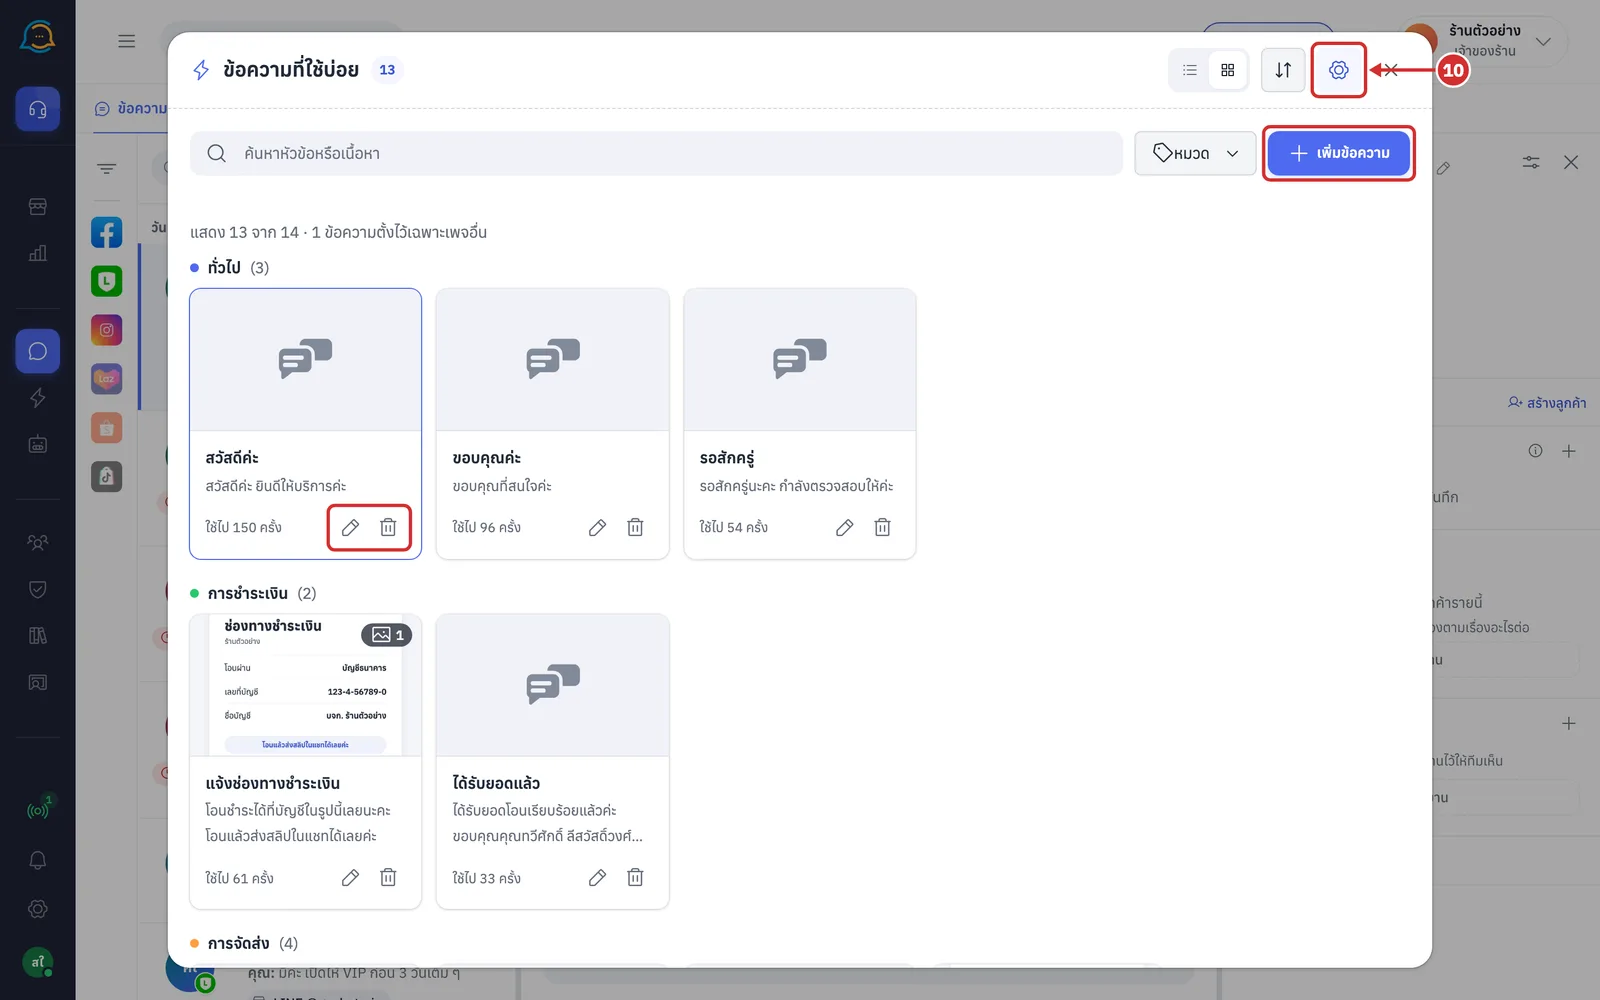
Click the pencil on a card, or เพิ่มข้อความ (Add reply). The form opens right in this window without leaving the chat
So text you typed in the message box is kept
The fields are the same as the edit page
Click บันทึก (Save) to go back to the picker with the latest reply, or the back arrow/ยกเลิก (Cancel); if not saved it asks ปิดฟอร์มทั้งที่ยังไม่บันทึก? (Close the form without saving?)
Chats on a page with no replies yet offer เพิ่มข้อความสำหรับเพจนี้ (Add a reply for this page) with the chat's page already selected
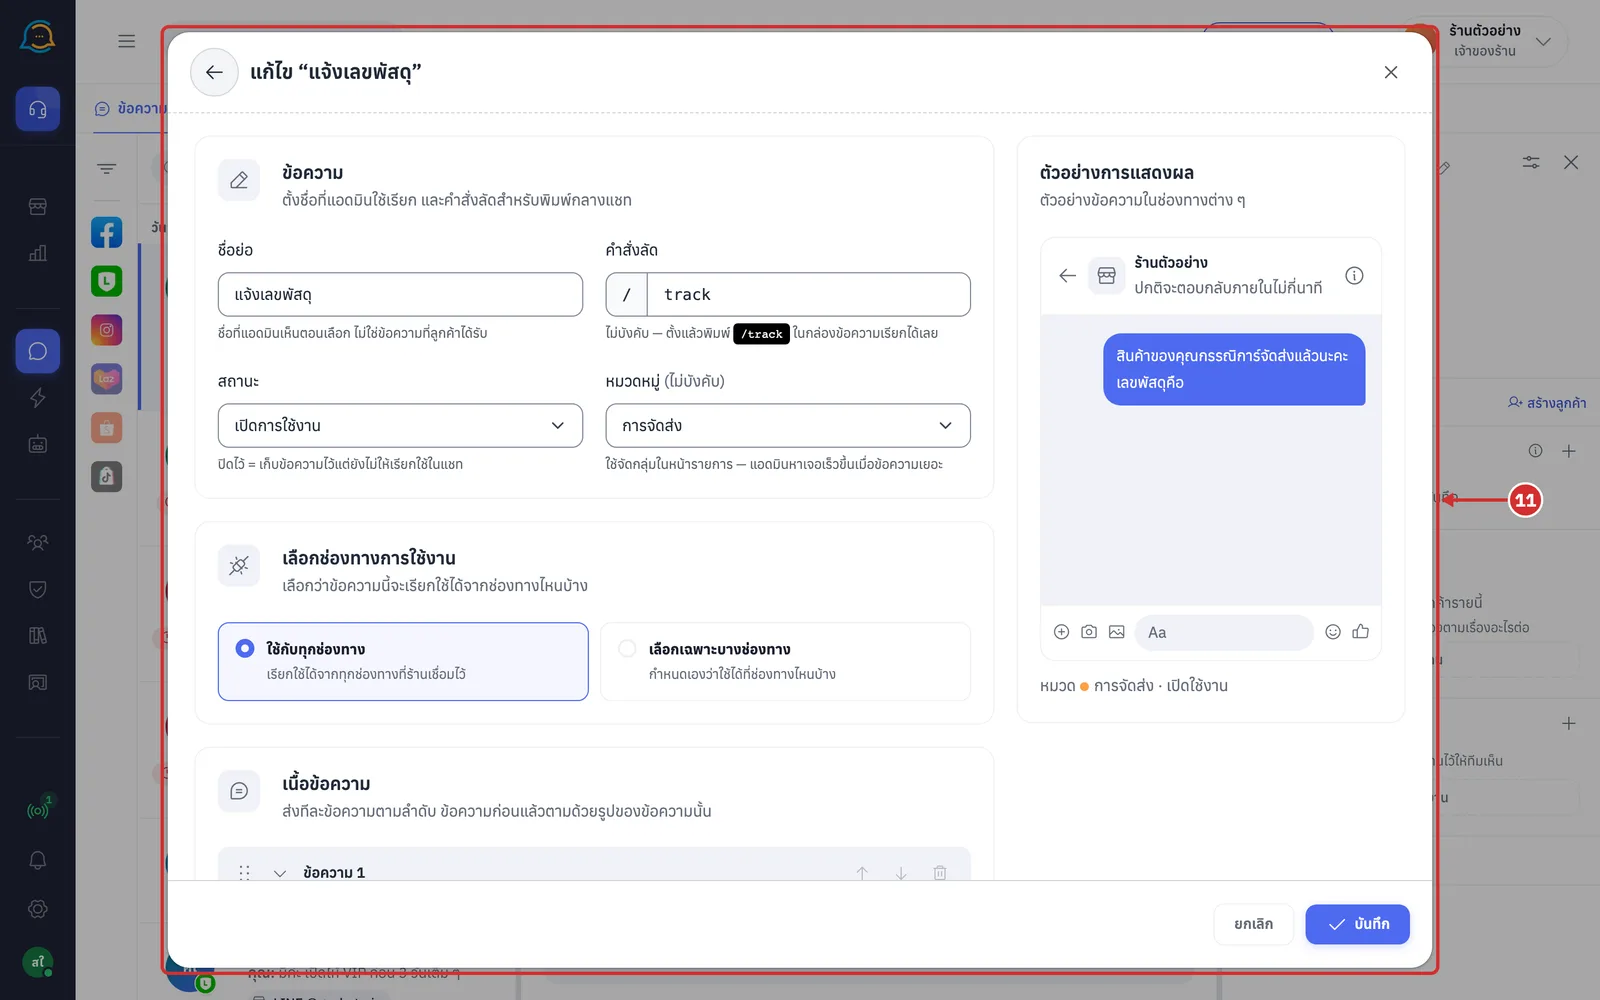
Click the up-down arrows จัดลำดับข้อความ (Reorder replies), then drag the handle on the left of a row (across categories too) or use the up and down arrows on the right. It saves straight away and shows บันทึกลำดับแล้ว (Order saved)
The order applies to the saved replies window for everyone in the shop
The ข้อความที่ใช้บ่อย (Saved replies) list page still sorts by how often each reply is used and does not follow this order
Search and category filter are off while reordering
Replies this chat cannot see do not move
Click the button again to leave reorder mode
Bringing up replies by typing
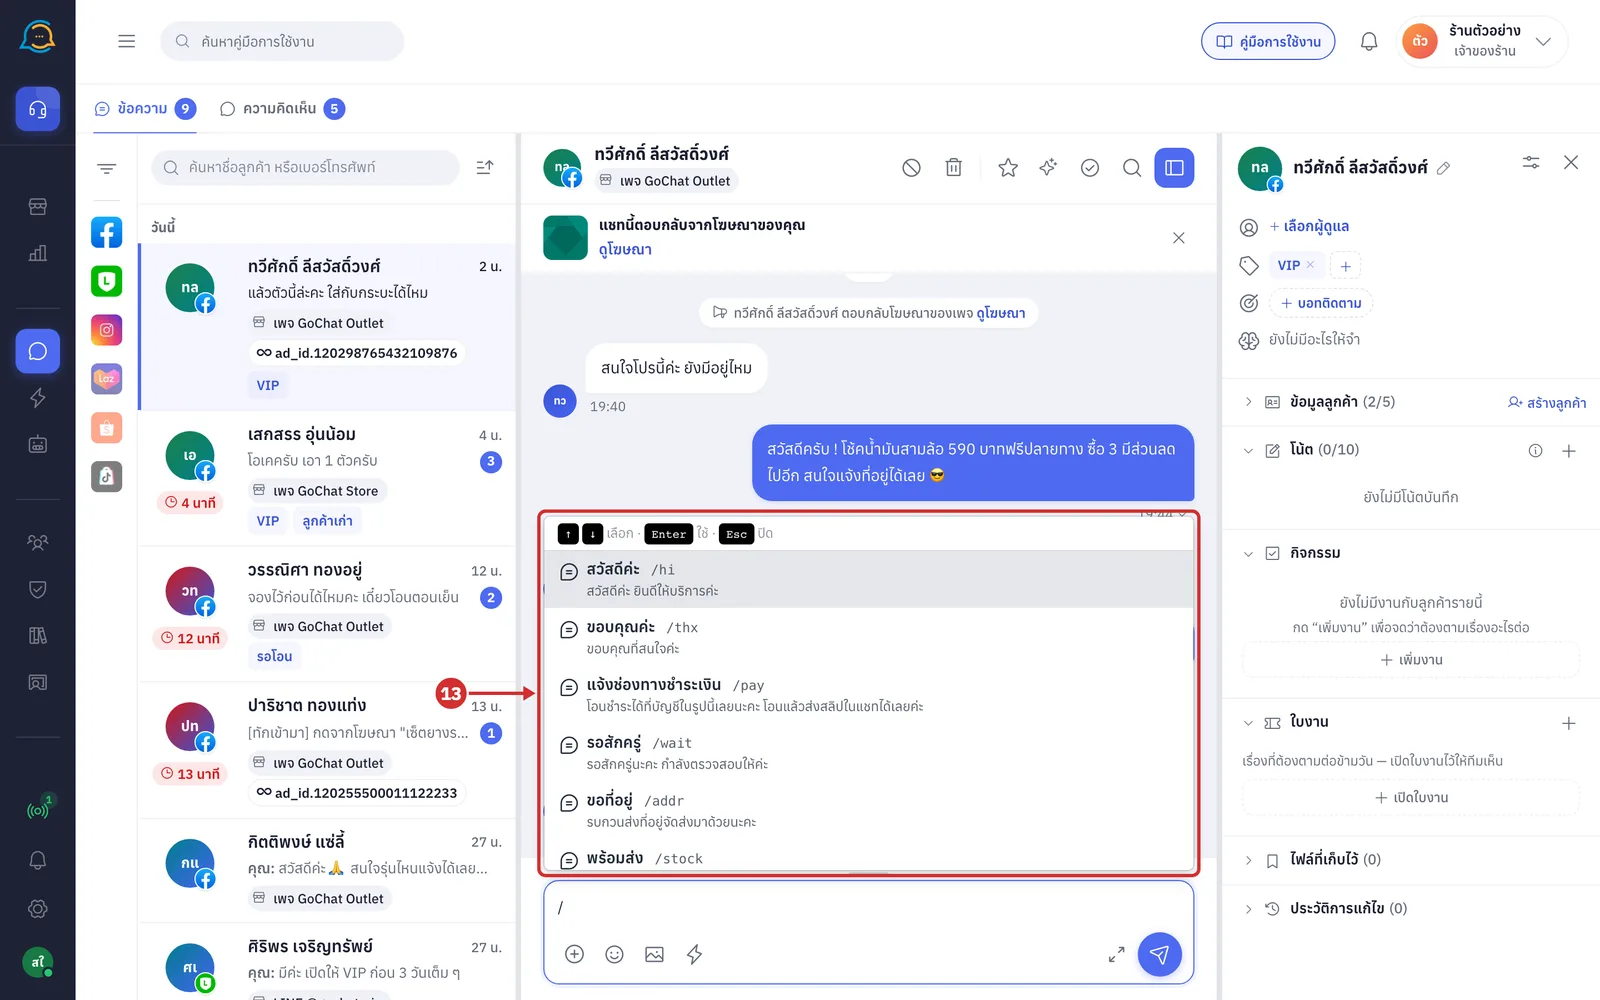
Type / in the message box to see this chat's saved replies with their shortcuts and a preview of the text. Use the arrow keys to choose, press Enter to insert, or Esc to close
The last item, จัดการข้อความที่ใช้บ่อย (Manage saved replies), opens the list page
Replies without a shortcut can be called by their title
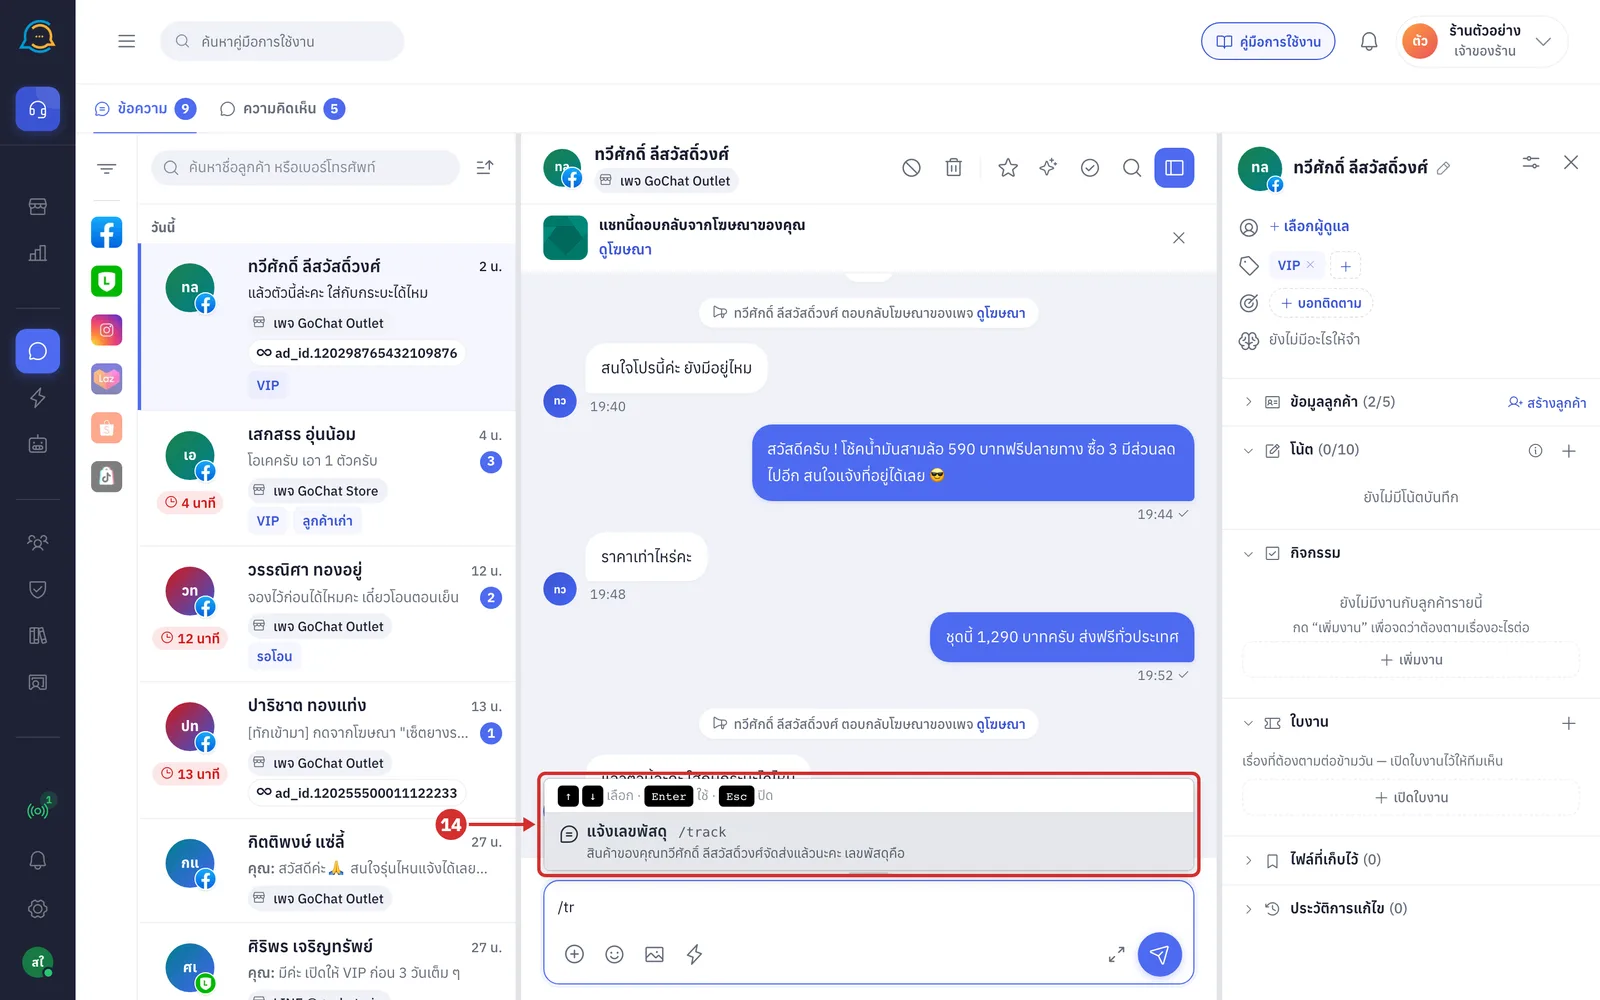
Keep typing after the /, such as /tr, and the list narrows to matching replies
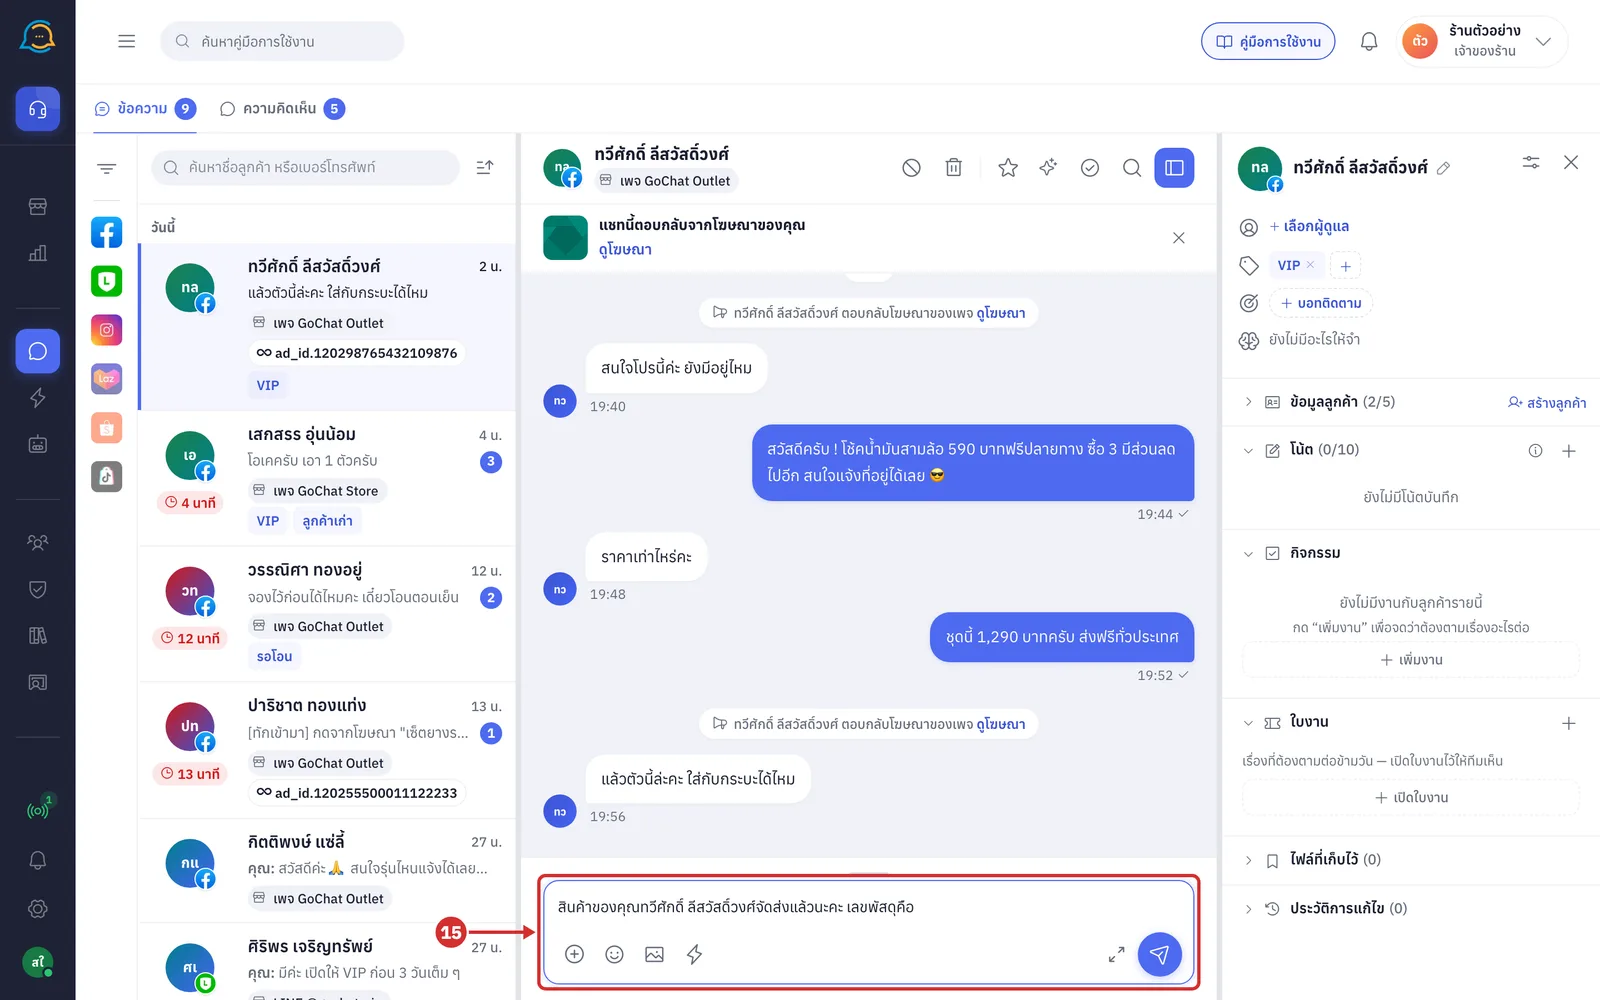
Type a whole shortcut, such as /track, then press space; the shortcut is replaced by the reply straight away (replies with images or several messages work the same as picking them from the lightning button)
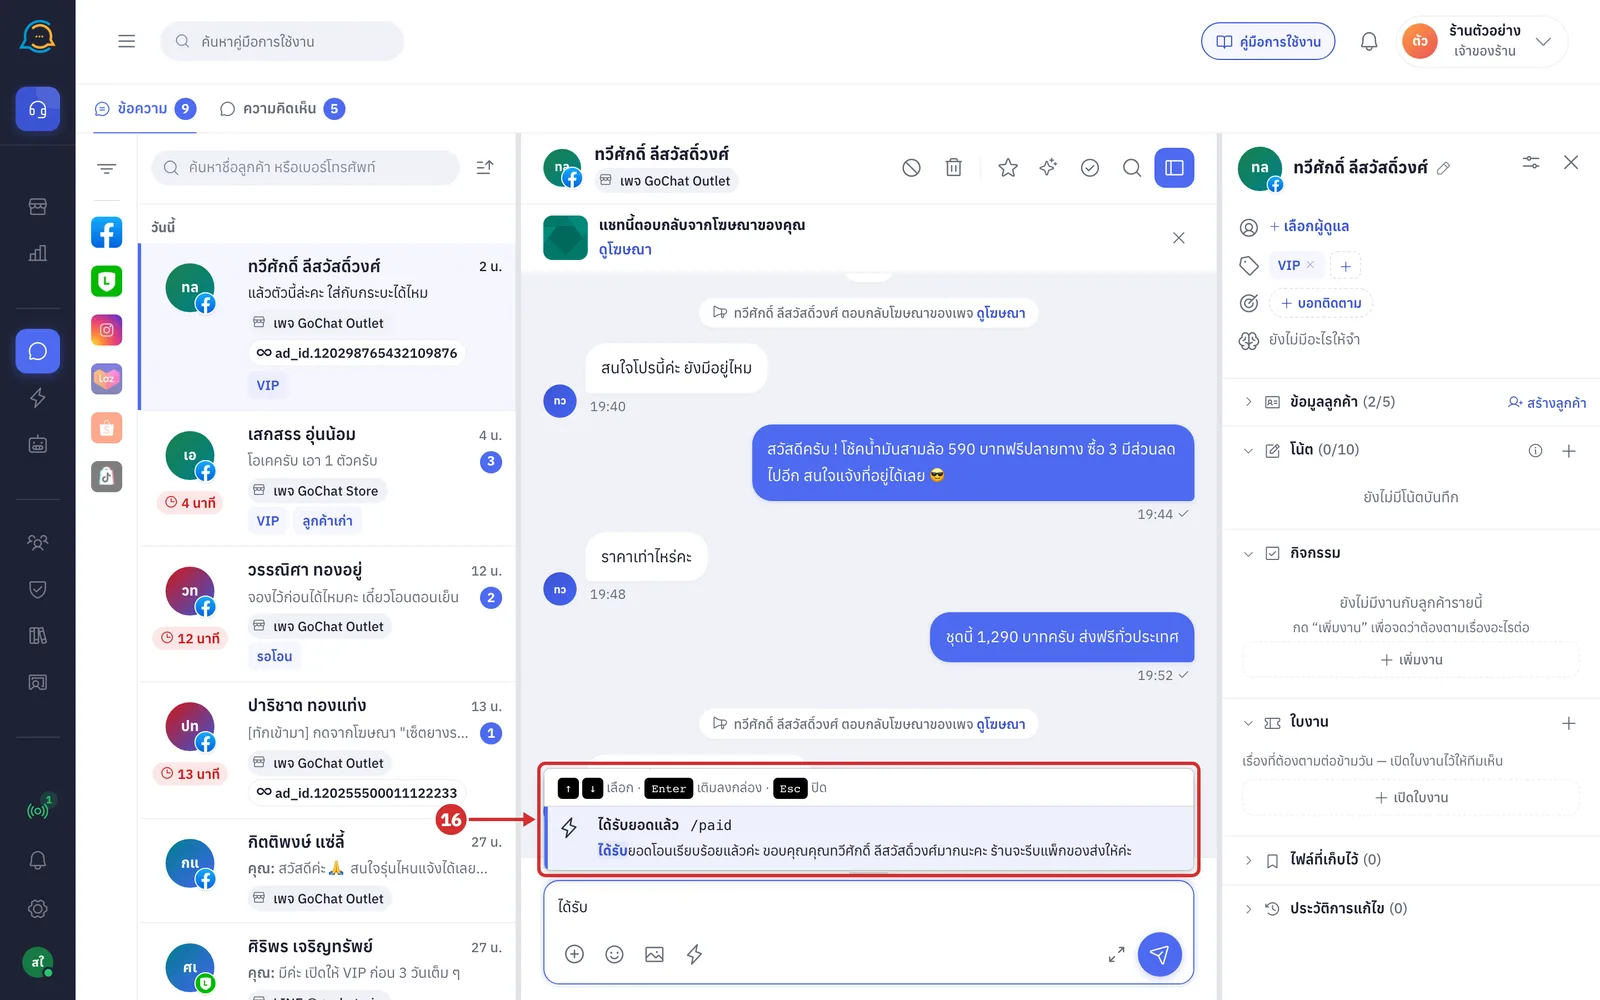
When what you type matches the start of a saved reply's shortcut, text or title for 3 characters or more, such as ได้รับ, suggestions pop up above the message box with the matching part highlighted. Press Enter to fill in that reply or Esc to close
After closing, suggestions stay away until you start a new word
When several replies start the same way it says และอีก … ข้อความที่ขึ้นต้นเหมือนกัน — กดปุ่ม ⚡ เพื่อดูทั้งหมด (and … more start the same way — click ⚡ to see them all)
About the customer name in replies
In a chat where the customer's name is not known yet, {{ชื่อลูกค้า}} (customer name) stays in the message box for you to type the name before sending
For a message set, the ส่งชุดข้อความ (Send message set) window asks for the name in ยังไม่มีชื่อลูกค้า — กรุณาใส่ชื่อที่จะแสดงแทน {{ชื่อลูกค้า}} (No customer name yet — enter the name to use for {{ชื่อลูกค้า}}) before you click ตกลง (OK)
In LINE group chats you pick the member to tag in place of {{ชื่อลูกค้า}}