

Chat header tools
The chat header is the bar at the top of the open chat on the ข้อความ (Messages) page. It shows who you are talking to and which channel they came from, and holds the buttons for managing this chat. Everyone in the shop can use the header buttons, and what you change belongs to the chat, so others in the shop see the same result.
Reading the chat header
On the ข้อความ (Messages) page, click the chat you want in the list on the left. The header appears at the top of the chat (see how to open a chat in Replying to customer chats)
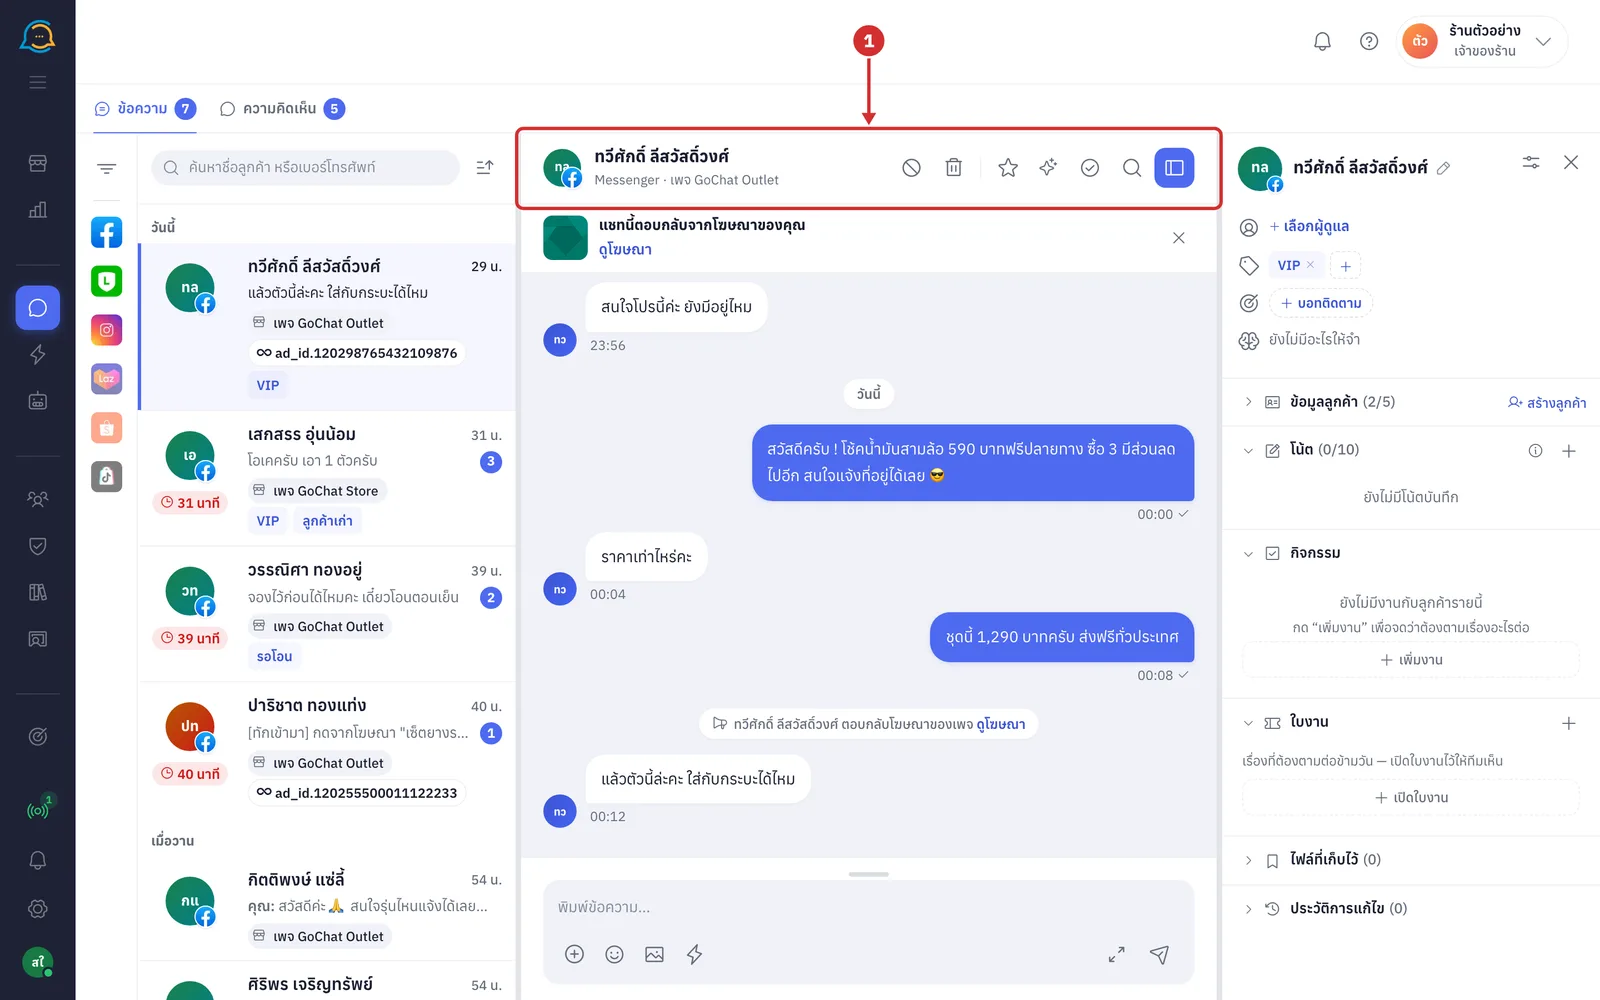
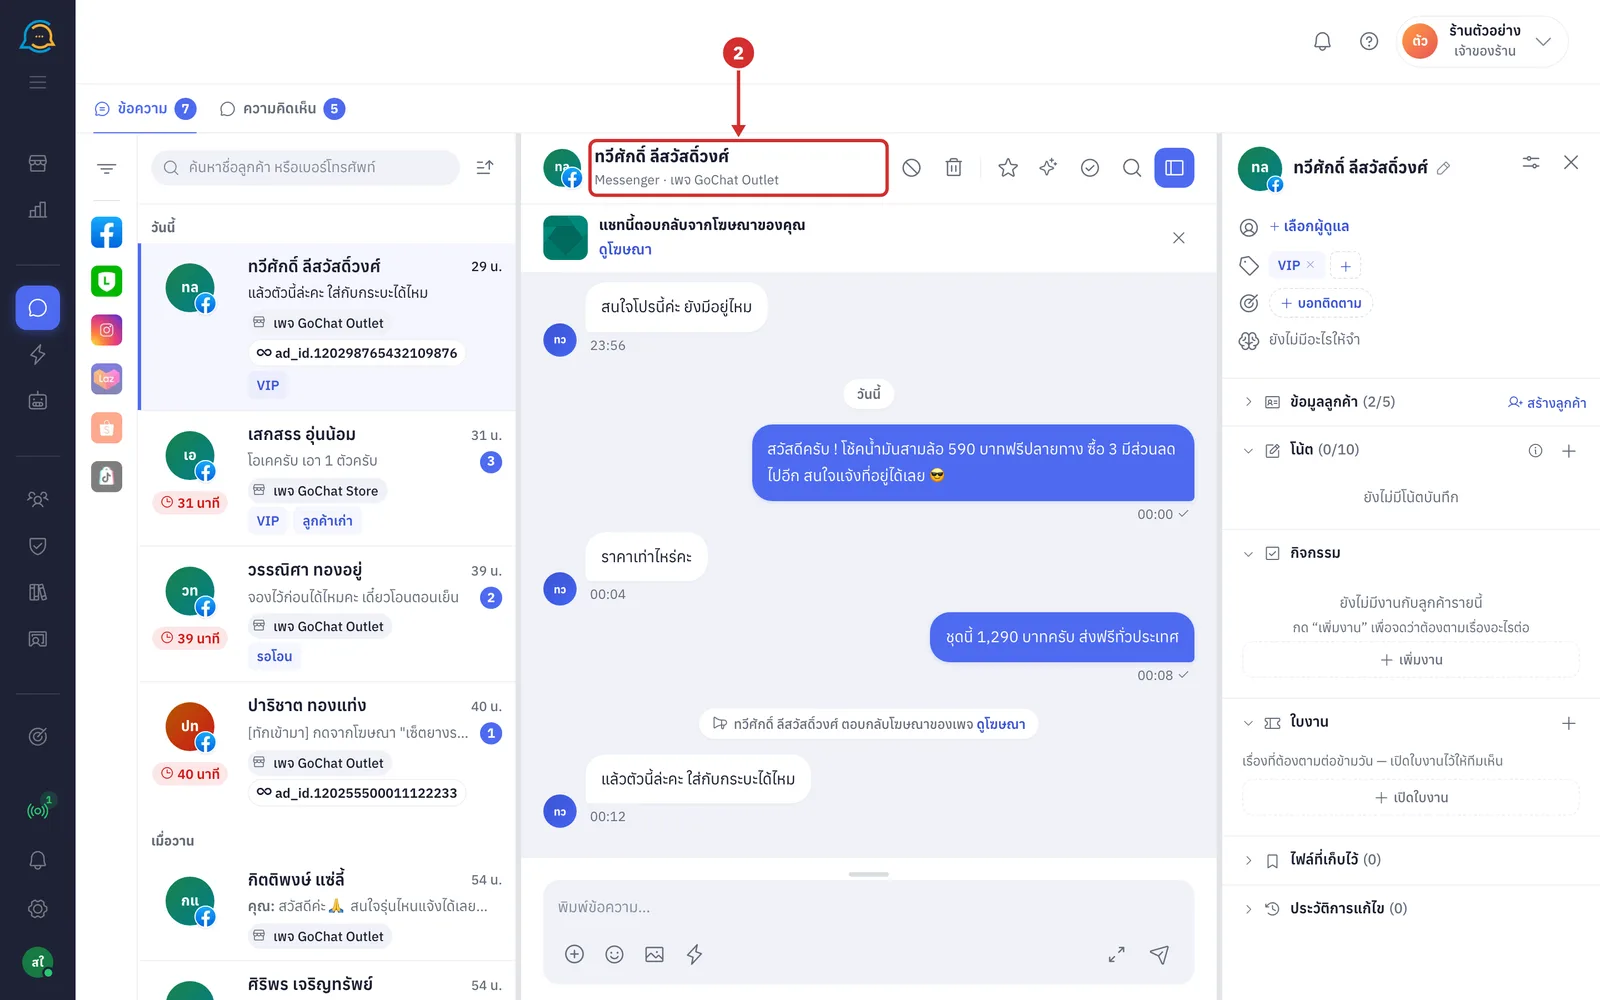
Check the customer name and the line under it, which shows the channel and the page or account the customer messaged, such as Messenger · เพจ GoChat Outlet (the logo on the picture also shows the channel)
A blue name with a card icon means this person is already one of your shop's customers (you can create a customer from the customer panel)
LINE group chats show กลุ่ม N คน (Group of N people) at the end of the line under the name
To give the chat your own name, click the pencil next to the name in the customer panel; see Using the customer panel
If a teammate has this chat open, their picture appears before the buttons (hover over it to see … กำลังดูห้องนี้ (… is viewing this chat)). If the chat has an unfinished ticket, a ticket number label (such as TK-0001) appears; click it to open the ticket
Marking as spam and deleting a conversation
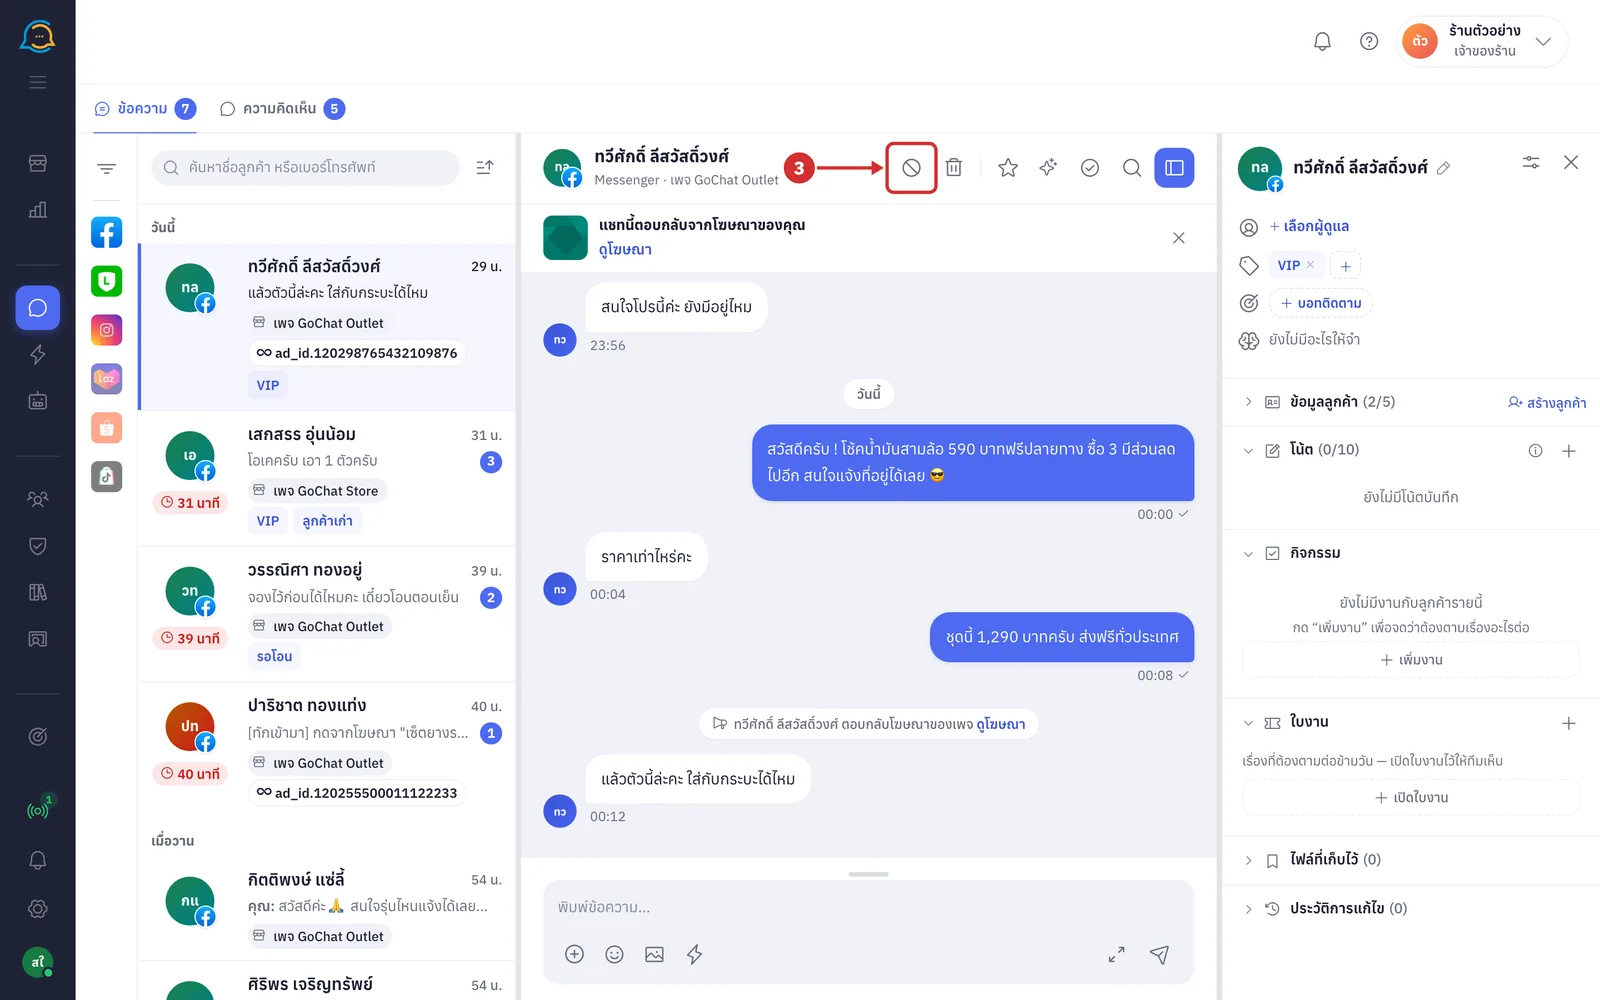
These two buttons are at the far left of the button row, separated from the others by a divider. They take effect as soon as you click them.
Click ทำเครื่องหมายว่าสแปม (Mark as spam — the circle with a line) when the chat is junk. The chat disappears from the main list for everyone in the shop and can be found under the สแปม (Spam) status filter (if you marked the wrong chat, click the same button again, now เอาออกจากสแปม (Remove from spam), to bring it back)
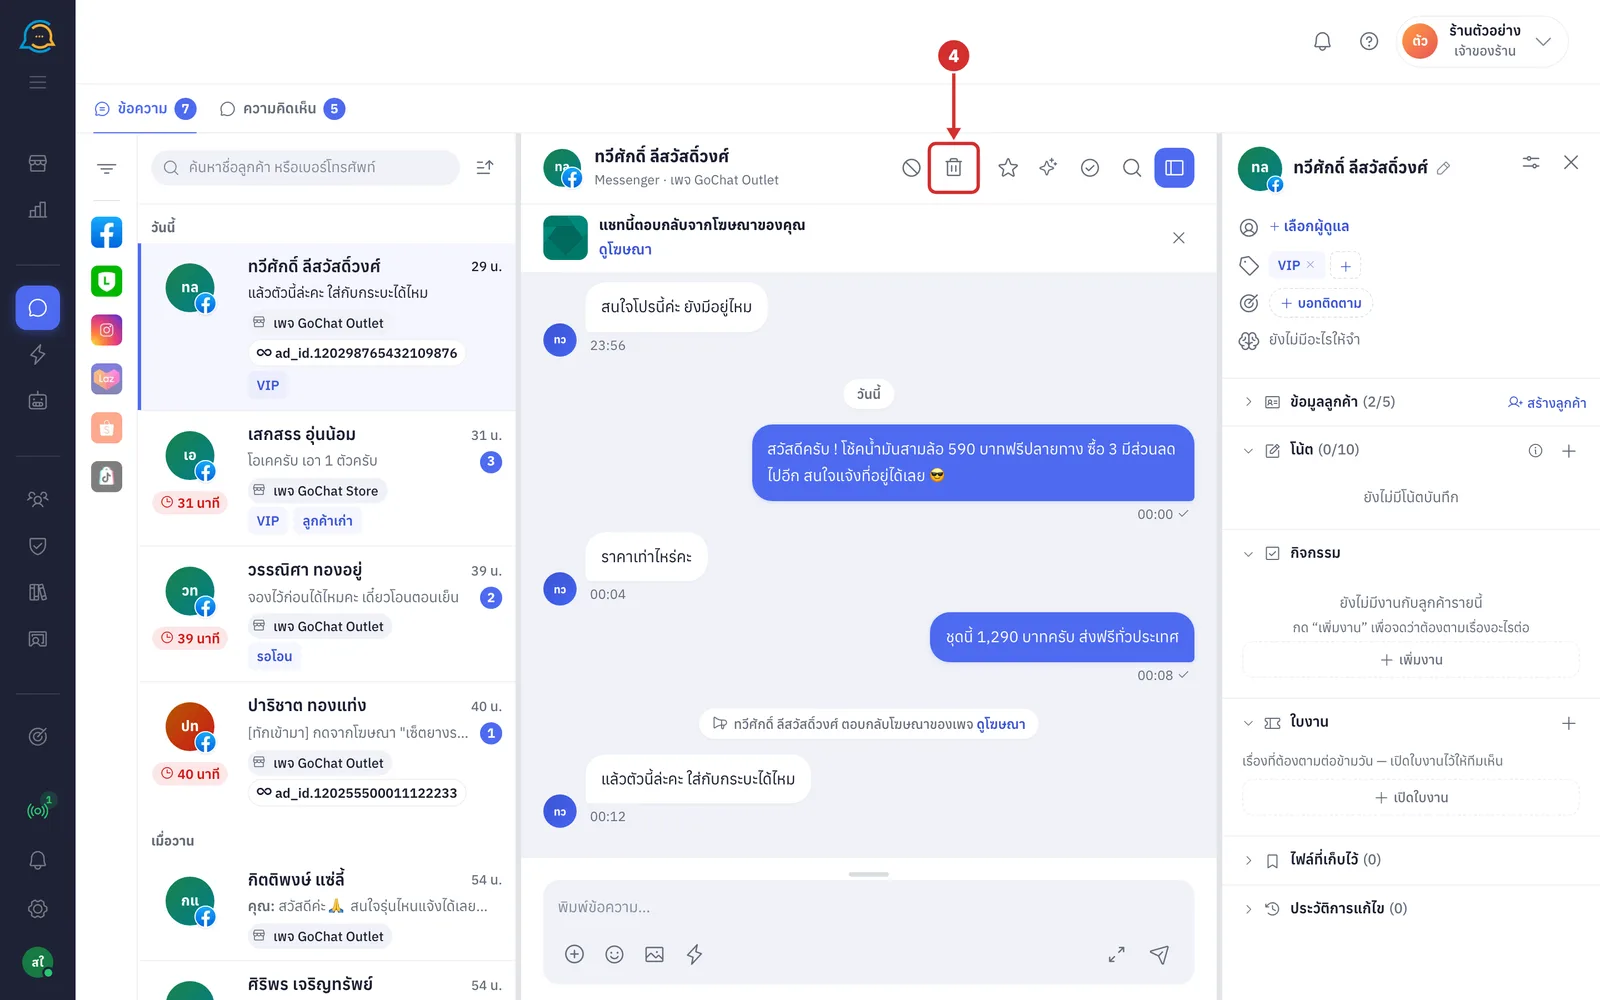
Click ลบการสนทนา (Delete conversation — the trash can) to remove the chat from the list. The system asks ลบการสนทนากับ <ชื่อลูกค้า> ออกจากรายการ? (Remove the conversation with <customer name> from the list?). Confirm in that window to delete
The chat disappears from everyone's list in the shop, but the messages are not deleted on the other side (the customer still sees the chat in their app)
If the customer messages again, the chat comes back with its full history
Deleted chats are under the ลบแล้ว (Deleted) status filter. When you open one, the trash button becomes กู้คืนการสนทนา (Restore conversation); click it and confirm, and the chat returns to everyone's list as usual
Following a chat
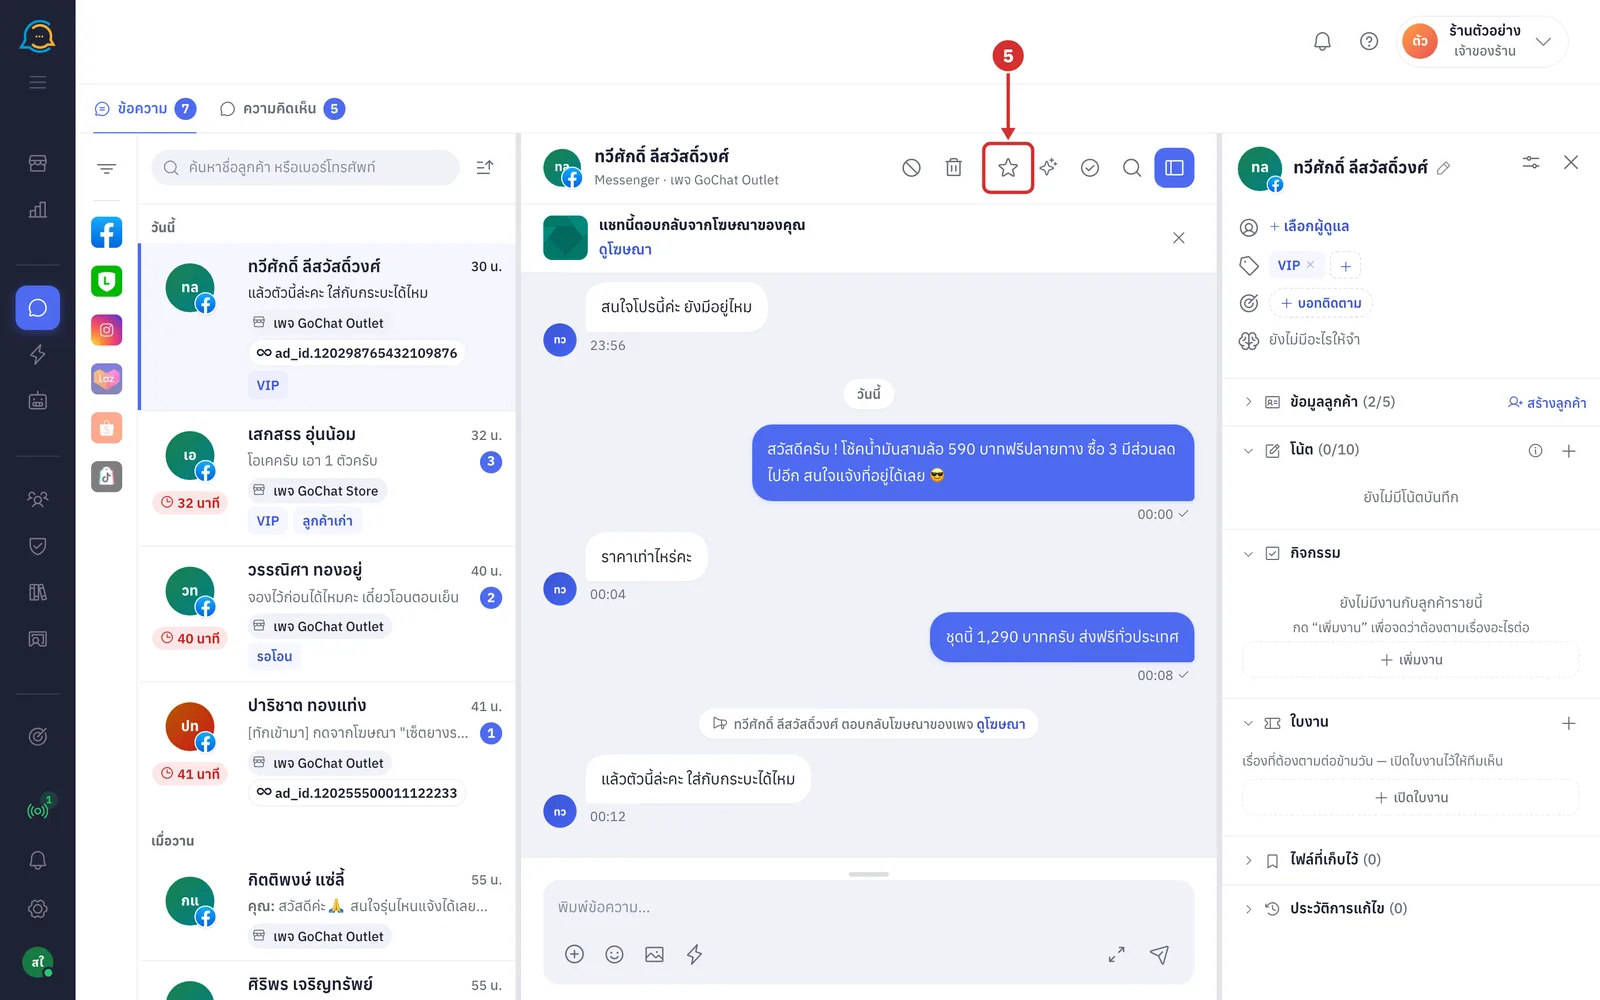
Click ติดตามห้องนี้ (Follow this chat — the star) to add a ติดตาม (Following) label to the chat in the left list. The chat stays where it is rather than moving to the top like a pinned chat, and everyone in the shop sees the same label. Show only followed chats with the ติดตาม (Following) status filter (click again = เลิกติดตาม (Unfollow))
Checking the AI assistant for this chat
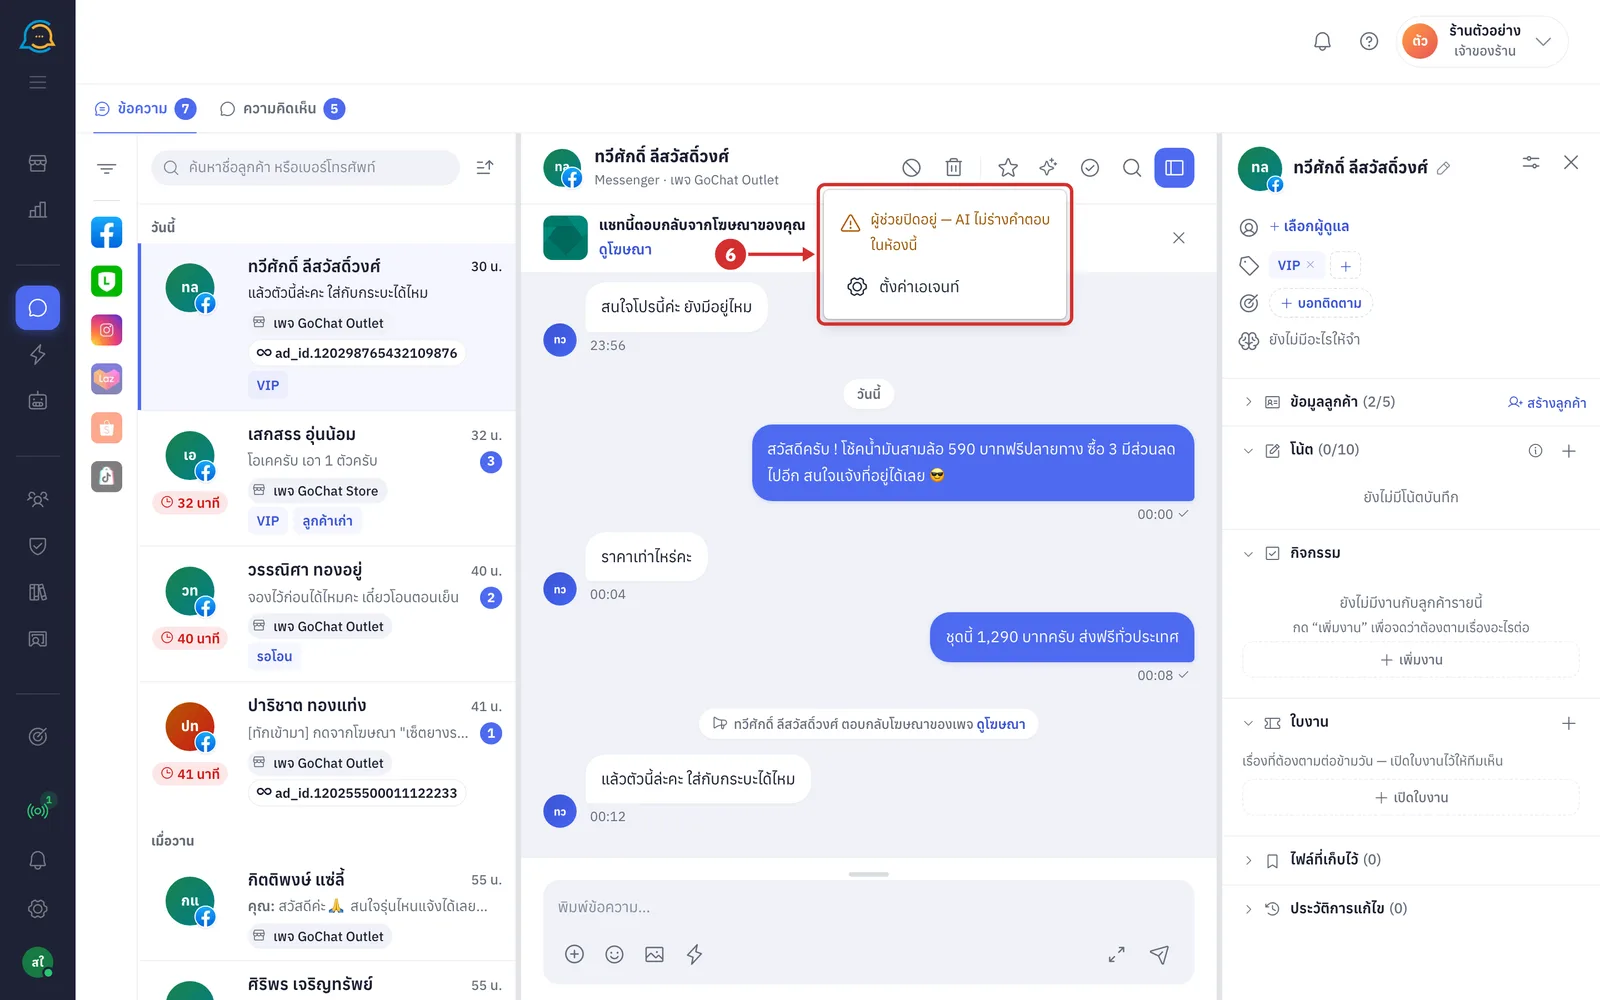
Click the ผู้ช่วย AI (AI assistant — sparkle) icon to see whether AI drafts replies for this chat
If AI is not working in this chat, the icon is grey and the menu gives the reason, such as ผู้ช่วยปิดอยู่ — AI ไม่ร่างคำตอบในห้องนี้ (The assistant is off — AI does not draft replies in this chat), with a ตั้งค่าเอเจนท์ (Agent settings) link to set up the AI assistant (if this channel has no agent yet, the link is ผูกเอเจนท์กับช่องทาง (Link an agent to the channel))
If AI is ready, the icon shows the agents looking after the chat, and the menu lists them under AI ที่ดูแลห้องนี้ (AI looking after this chat); the one that replied last has a ตอบล่าสุด (Replied last) label
LINE group chats have no AI assistant or auto reply, so this button cannot be clicked
Closing a chat
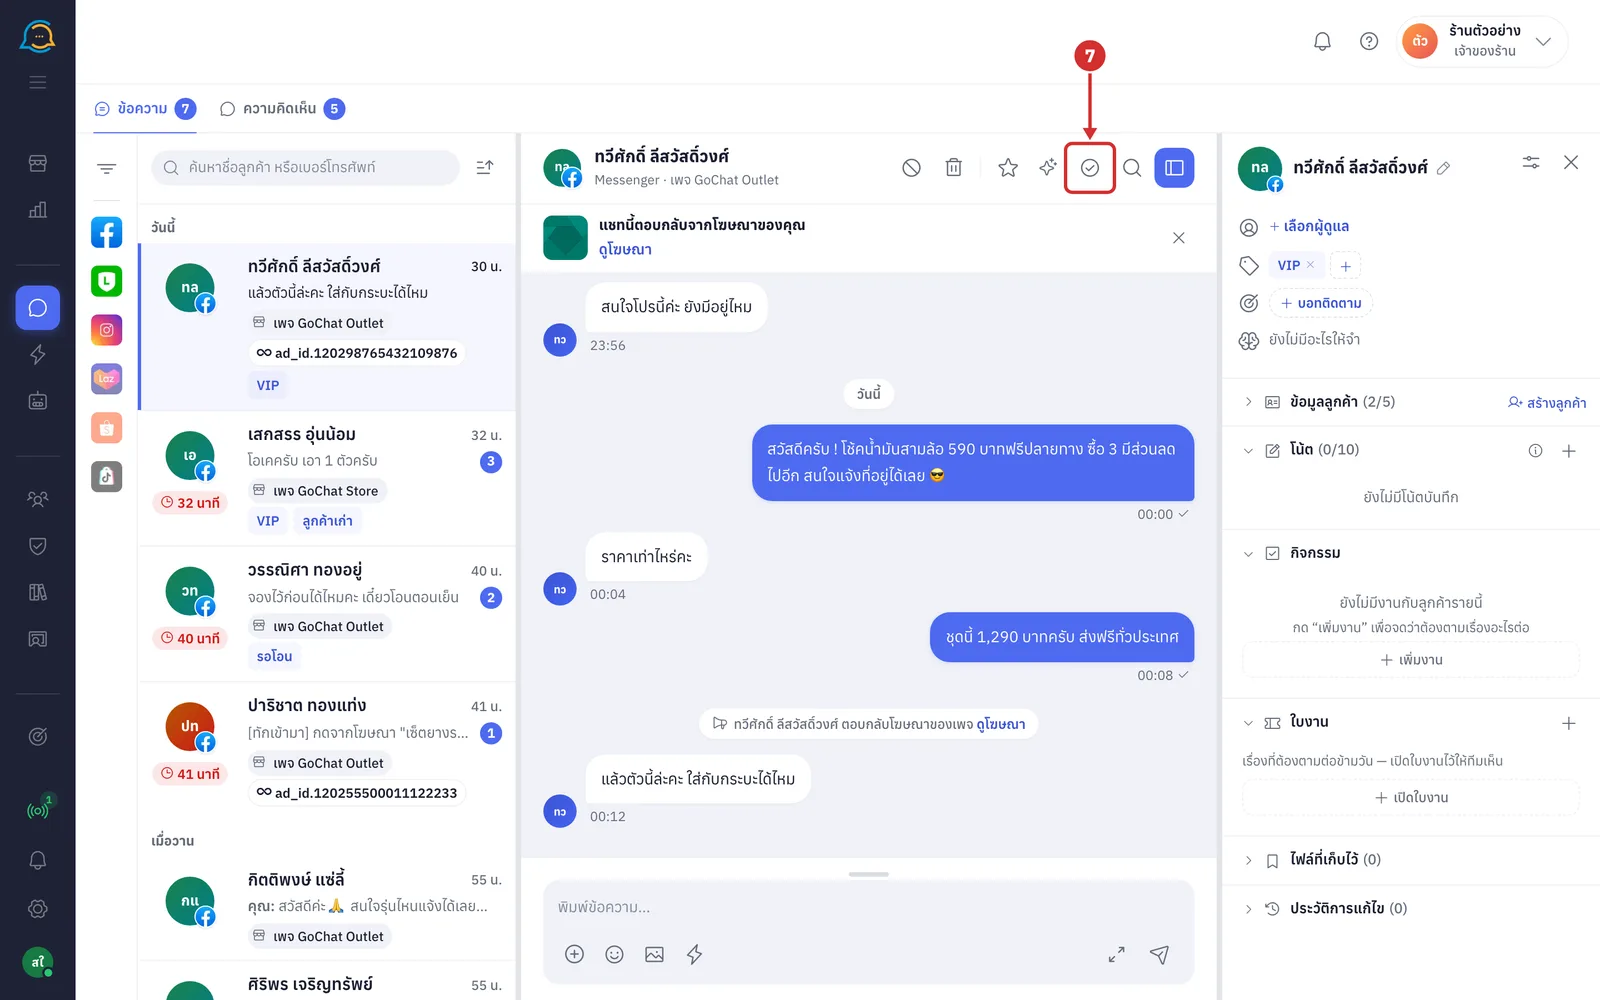
When the conversation is finished, click ปิดงาน (Close — the circle with a check mark). The button turns blue. The open chat stays on screen until you switch chats; after that it disappears from the main list and can be found under the ปิดงาน (Closed) status filter or by searching its name (if the customer messages again, it returns to the list by itself · click the same button again = เปิดงานอีกครั้ง (Reopen))
Searching messages in a chat
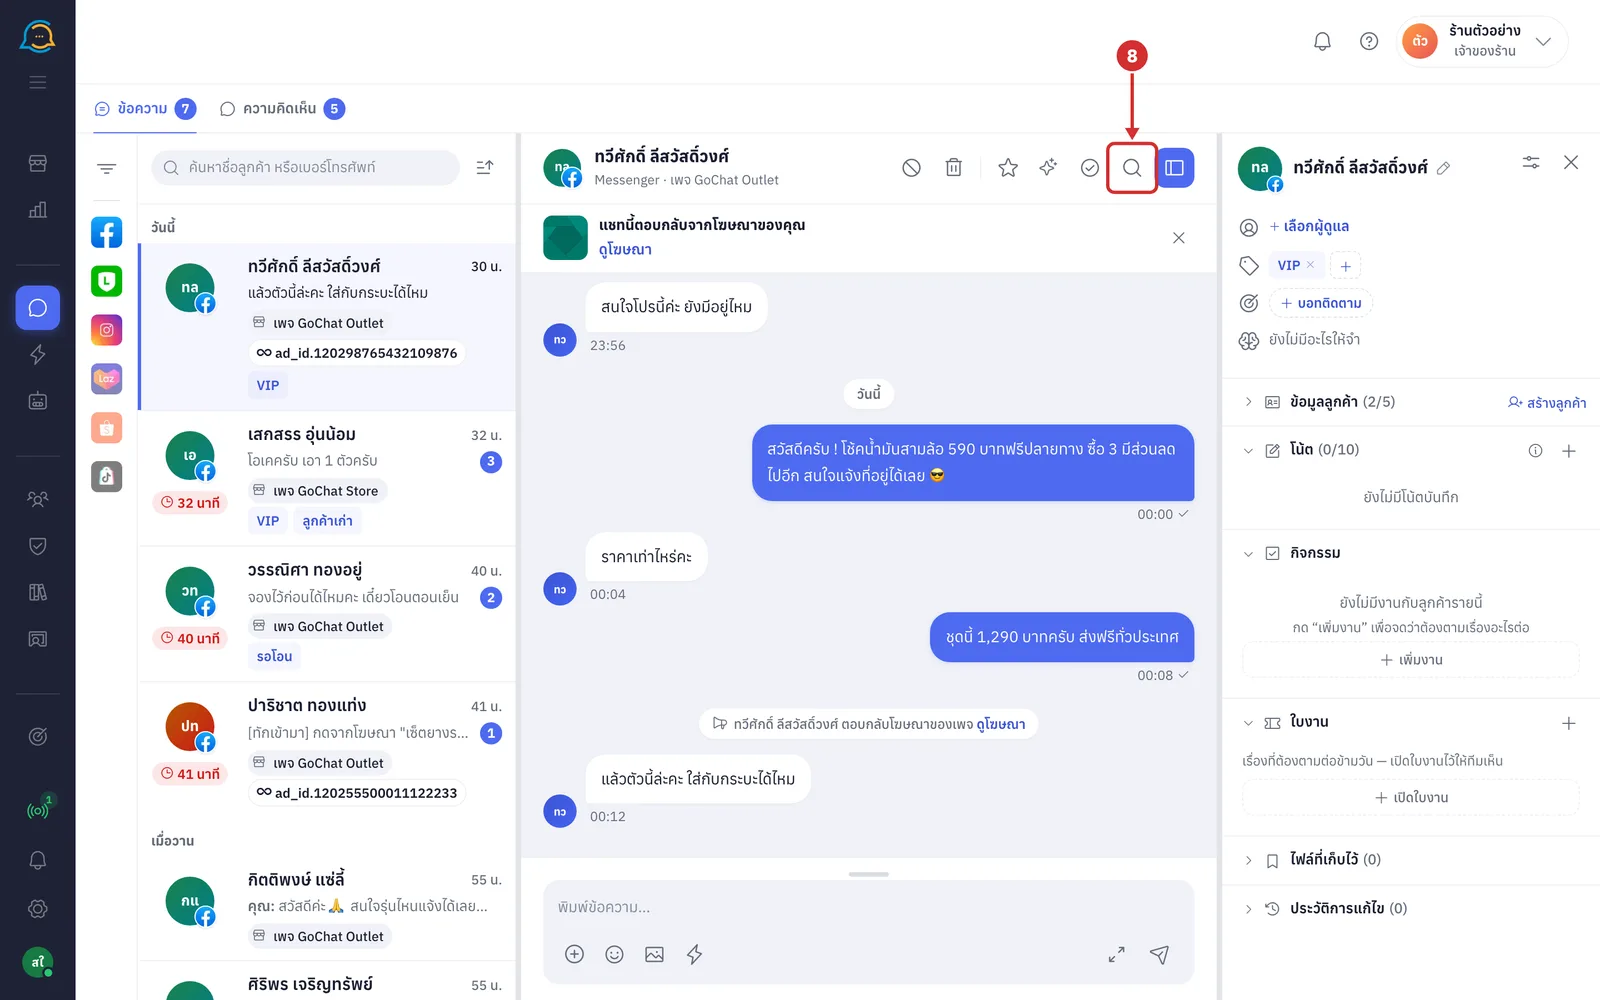
Click ค้นหาในแชท (Search in chat — the magnifying glass). A search box replaces the header (while searching, the bars under the header, the pinned bar and the message box are hidden for now)
Type what you want in ค้นหาข้อความในห้องนี้ (Search messages in this chat). The search runs when you stop typing and shows how many were found (such as ข้อความ 2 (2 messages)) with a list of messages containing the word; matches are in bold blue (with more than 50 results, the 50 most recent are shown, so type something more specific · with no results it shows ไม่พบข้อความที่มี “…” (No messages contain “…”))
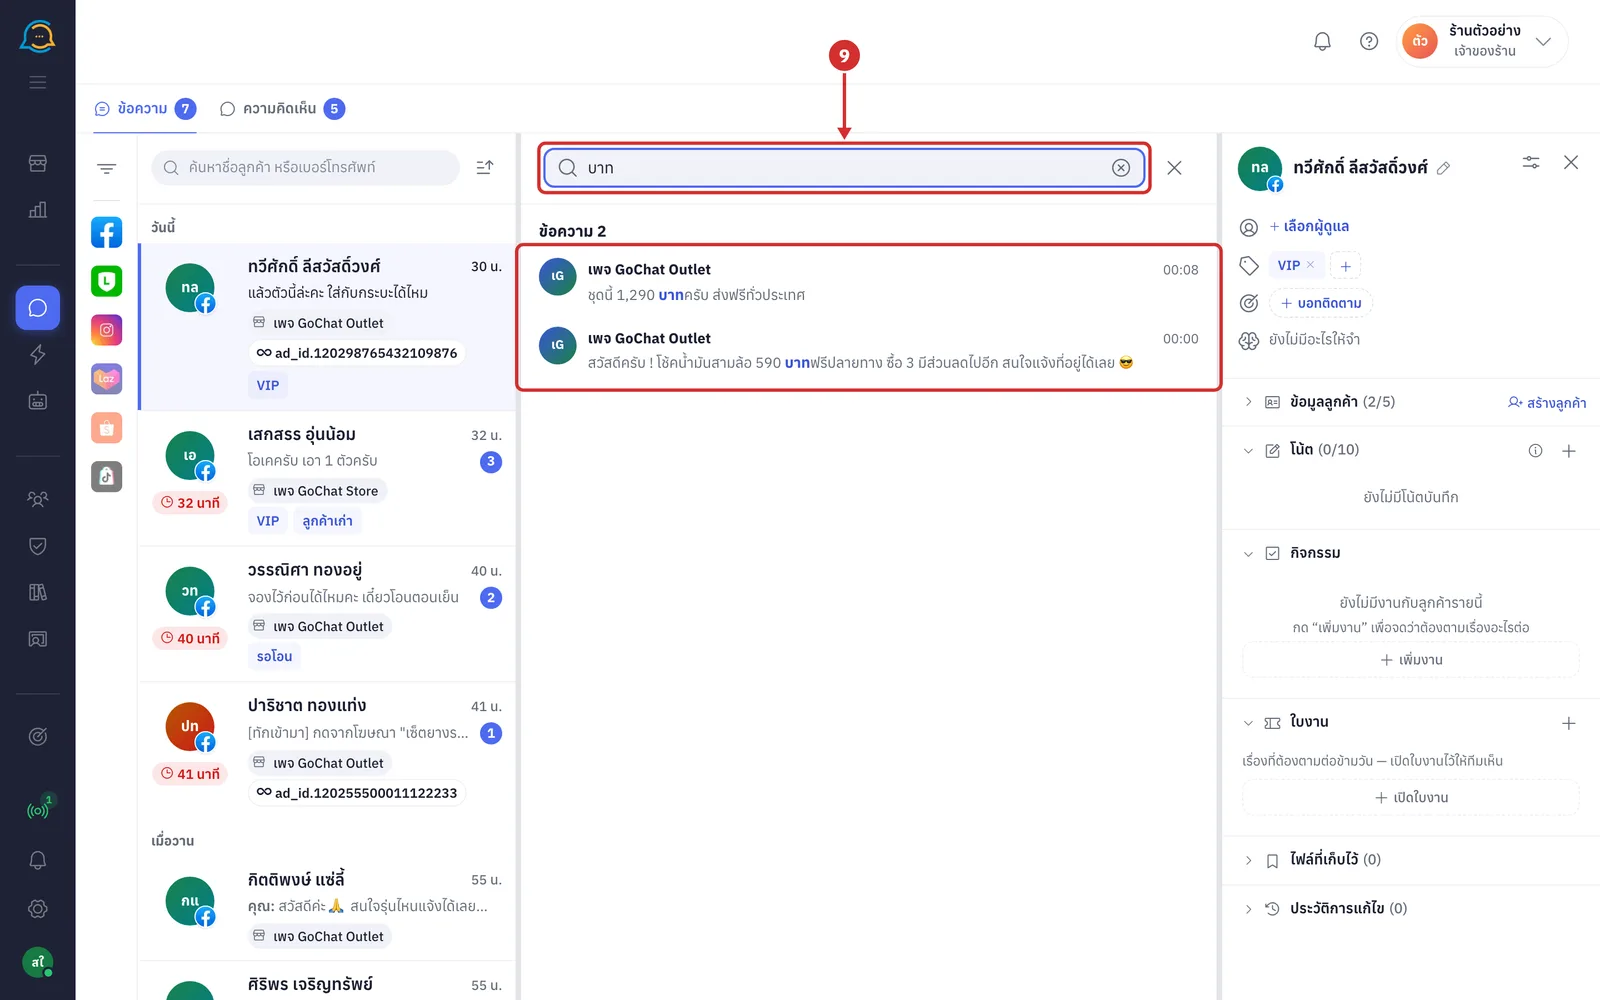
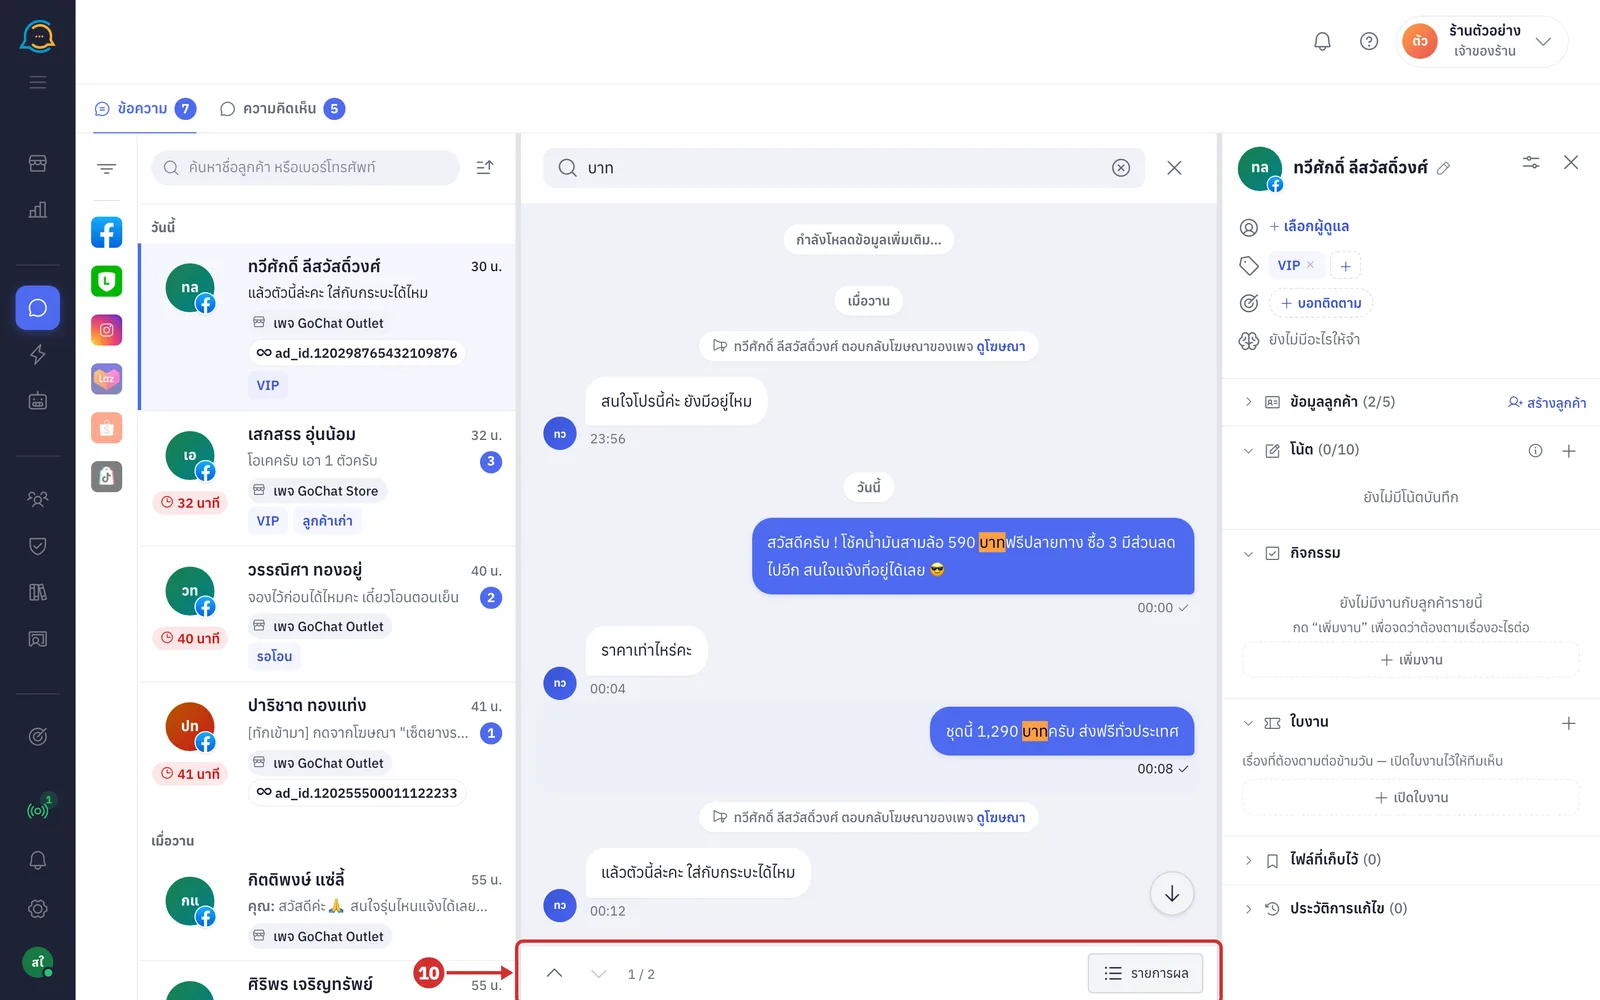
Click a message in the results to jump to it in the chat (the word you searched is highlighted in orange in the message bubbles). A bar at the bottom lets you step through results: the up arrow (ผลที่เก่ากว่า (Older result) or Enter), the down arrow (ผลที่ใหม่กว่า (Newer result) or Shift + Enter), and a number showing which result you are on. Click รายการผล (Result list) to go back to the list, and click × at the top right (or Esc) to close the search
Opening or closing the customer panel
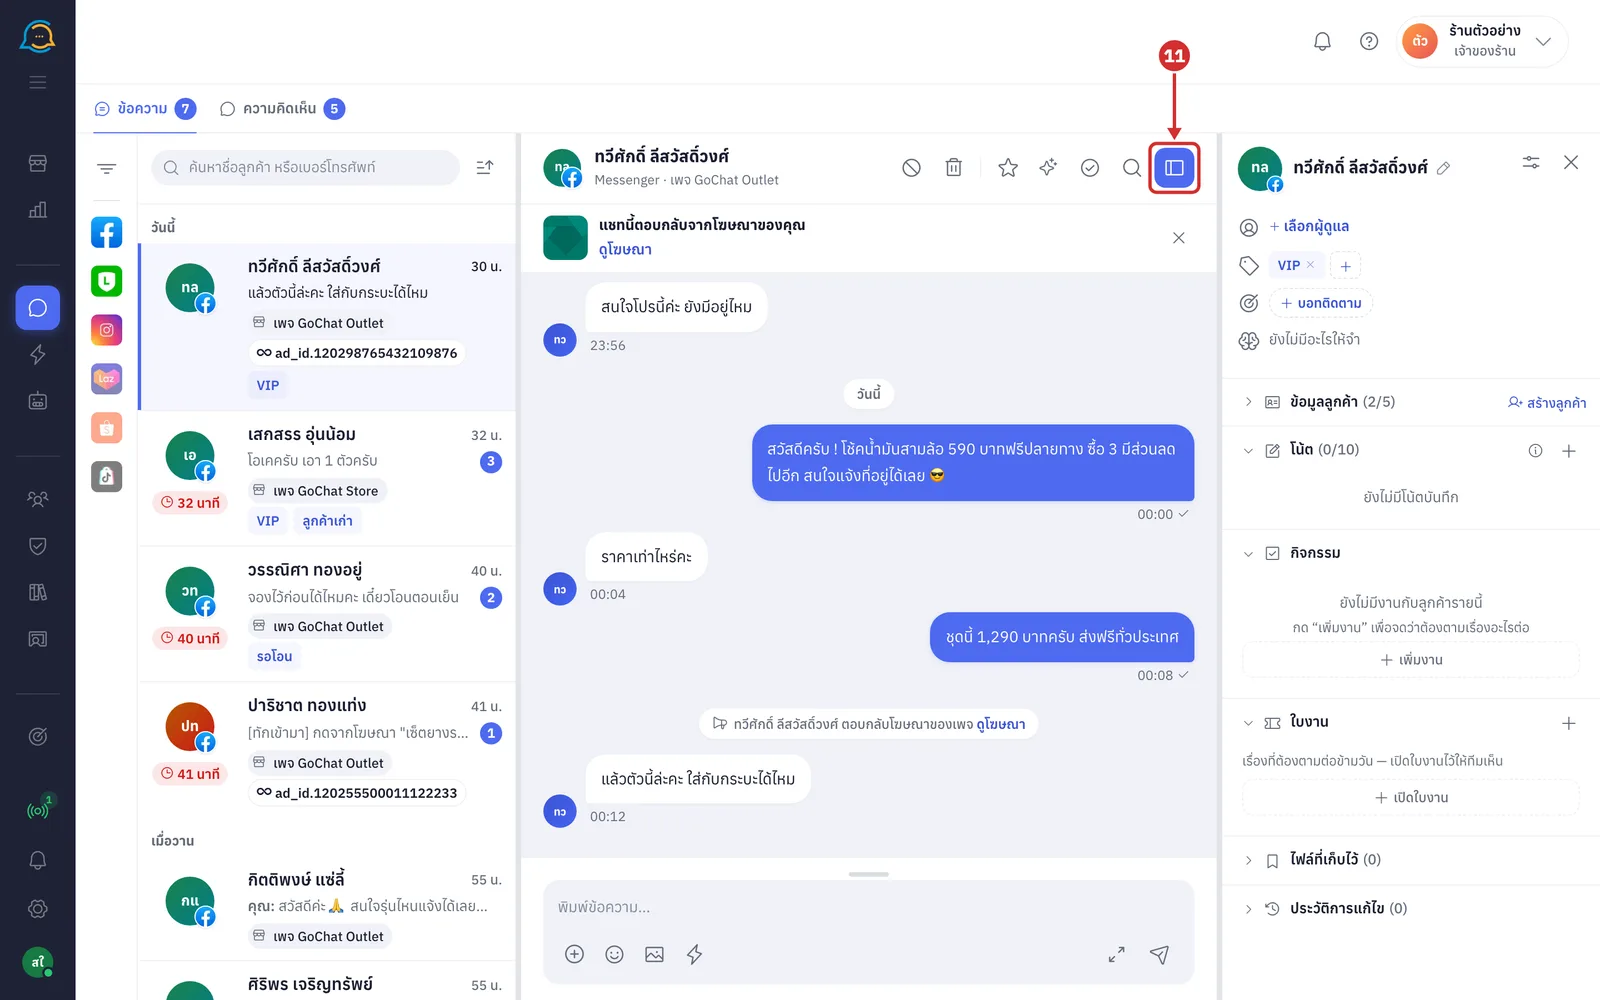
Click the ข้อมูลลูกค้า (Customer info — side panel icon, far right of the button row) button to open or close the customer panel on the right. The button is blue while the panel is open (drag the divider between the chat and the panel to change its width · see Using the customer panel)
Reading the ad bar under the header
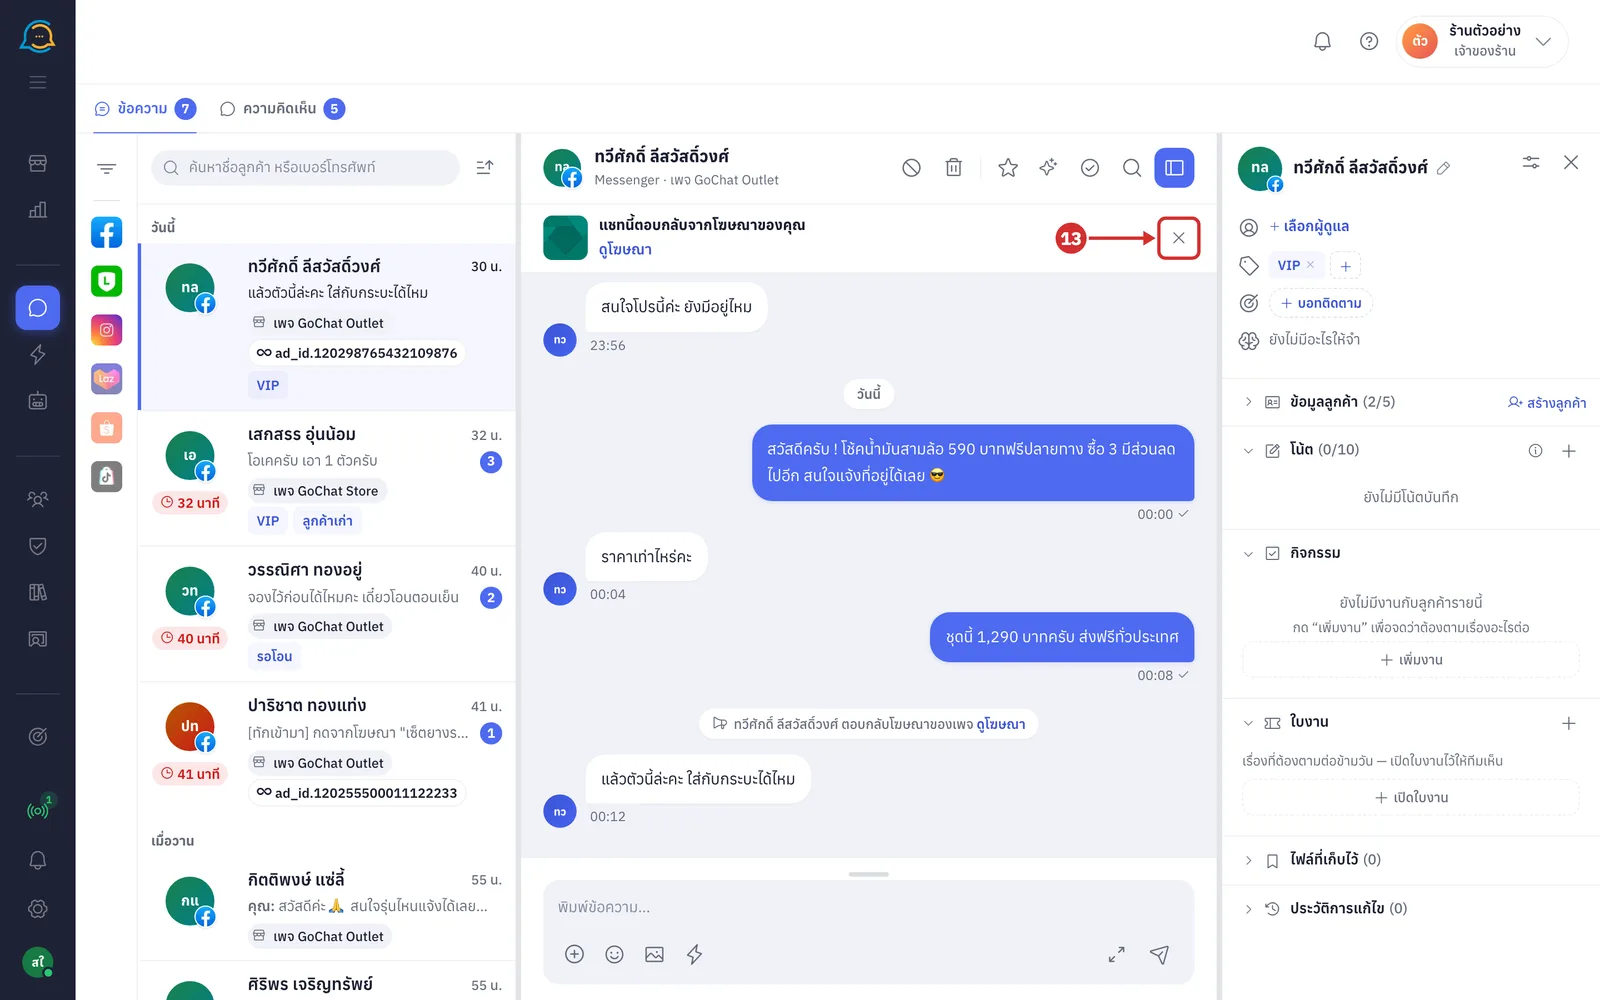
Chats from customers who clicked a Facebook ad and messaged you have a แชทนี้ตอบกลับจากโฆษณาของคุณ (This chat came from your ad) bar under the header. If the customer came from several ads, the bar shows the latest one
The picture on the left is the ad image; for a video ad, click the picture to play the video
Under the title is the text of the ad post (while loading it shows กำลังดึงเนื้อหาโฆษณา… (Loading ad content…) · if it cannot be loaded it shows ดึงเนื้อหาไม่ได้ (Could not load content))
Click ดูโฆษณา (View ad) to open the ad's post on Facebook, or the ad in Ads Manager, in a new tab (ads with nothing to open have no such button)
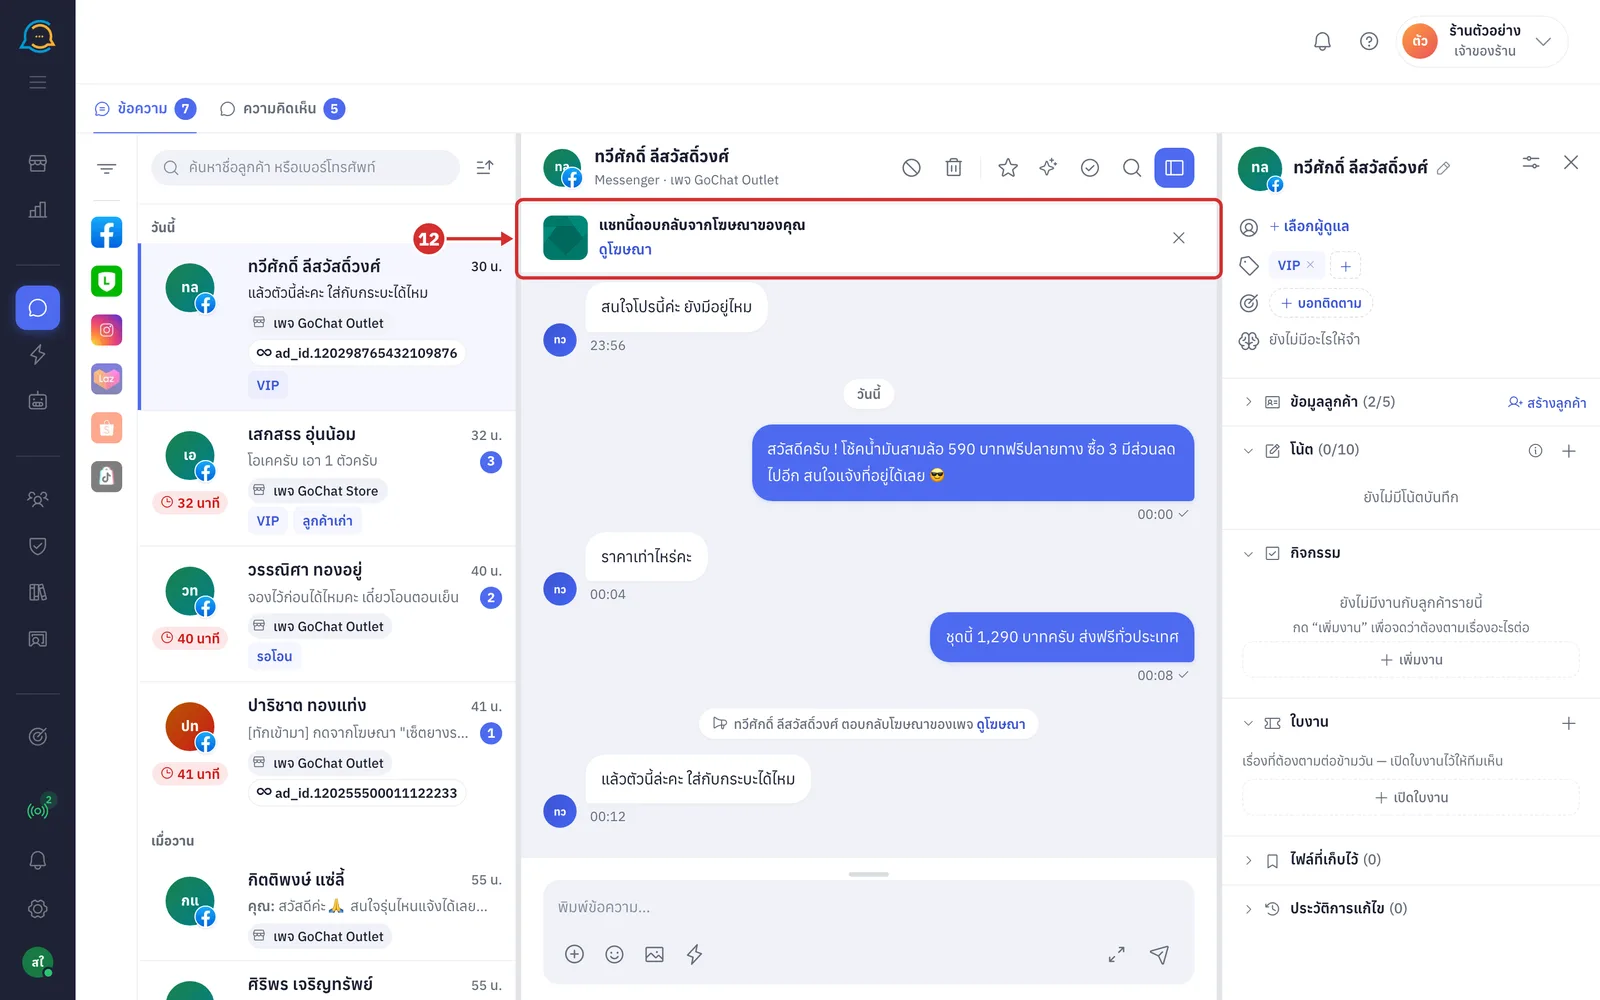
Click × at the end of the bar to close the ad bar for this chat. It comes back when you refresh the page
Reading the Facebook and Instagram reply-time bar
Messenger and Instagram chats can be answered within the time Facebook allows, counted from the customer's latest message. A bar appears under the header when time is running out. LINE chats do not have this bar.
Read the reply-time bar under the header, which changes with the time since the customer last typed
Within the first 24 hours, the bar appears when 12 hours or less are left: เหลือเวลาตอบอีก … (… left to reply) (after that you cannot send stickers or reactions, but you can still type replies for up to 7 days); it turns orange when less than 2 hours are left
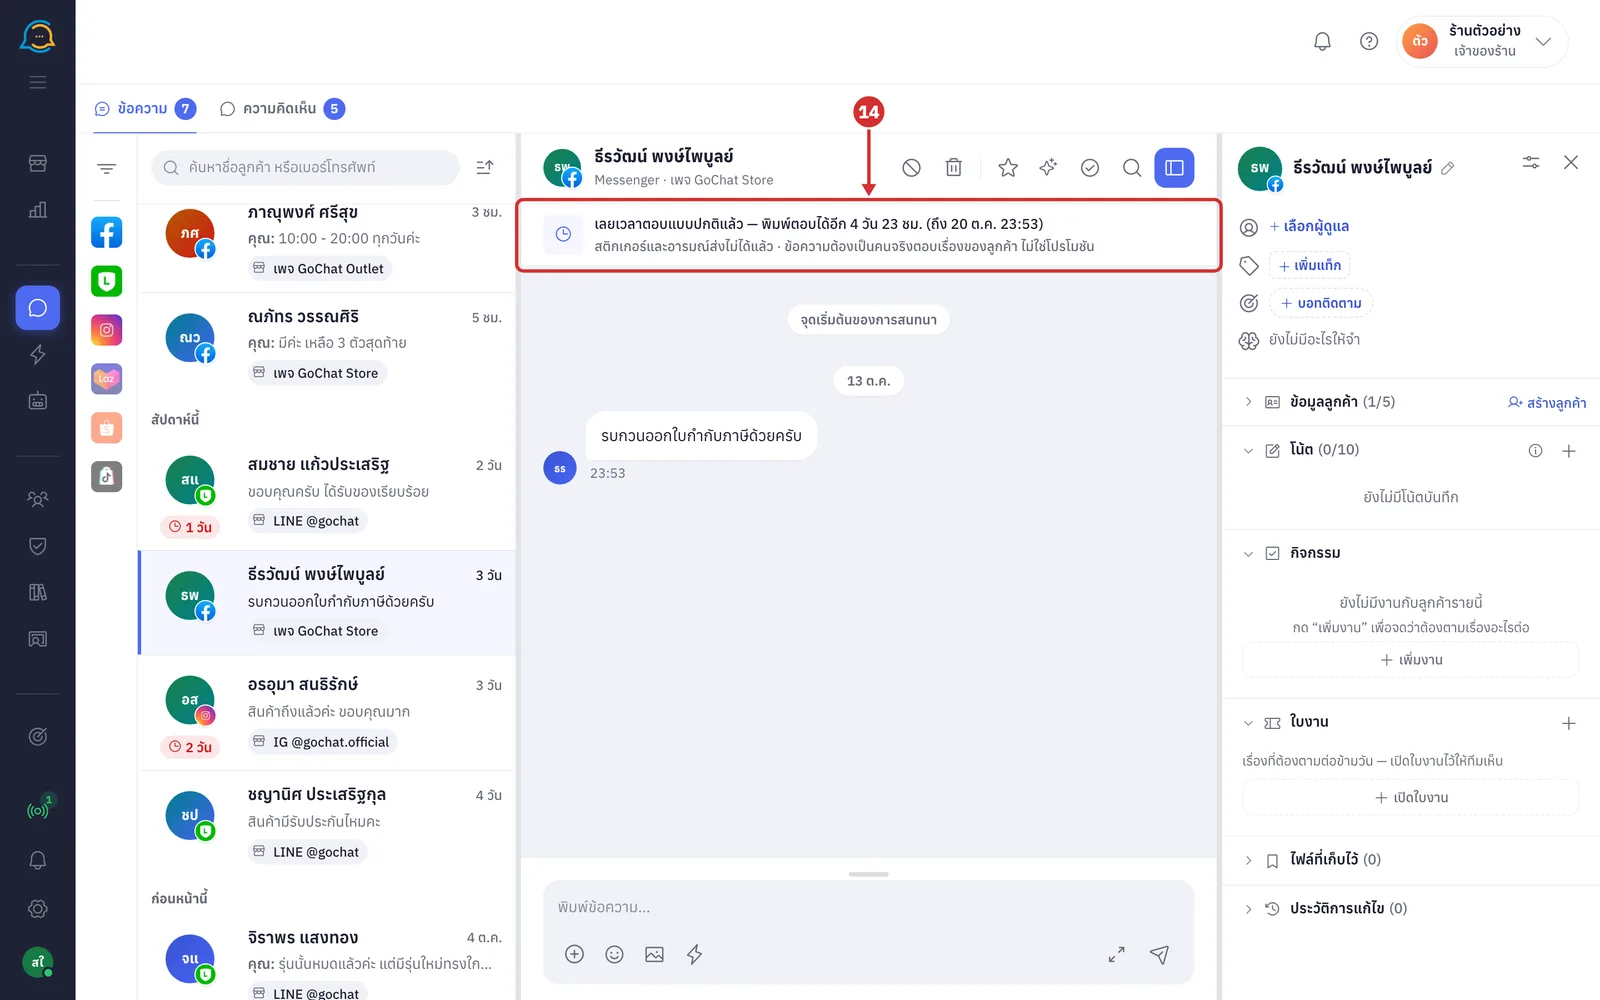
After 24 hours, it shows เลยเวลาตอบแบบปกติแล้ว — พิมพ์ตอบได้อีก … (Past the standard reply time — you can still type replies for …) with the date and time it ends (stickers and reactions can no longer be sent, and replies must come from a real person about the customer's matter, not promotions)
With less than 6 hours before 7 days, it changes to เหลือเวลาพิมพ์ตอบอีก … (… left to type replies) (after that nothing can be sent until the customer messages again)
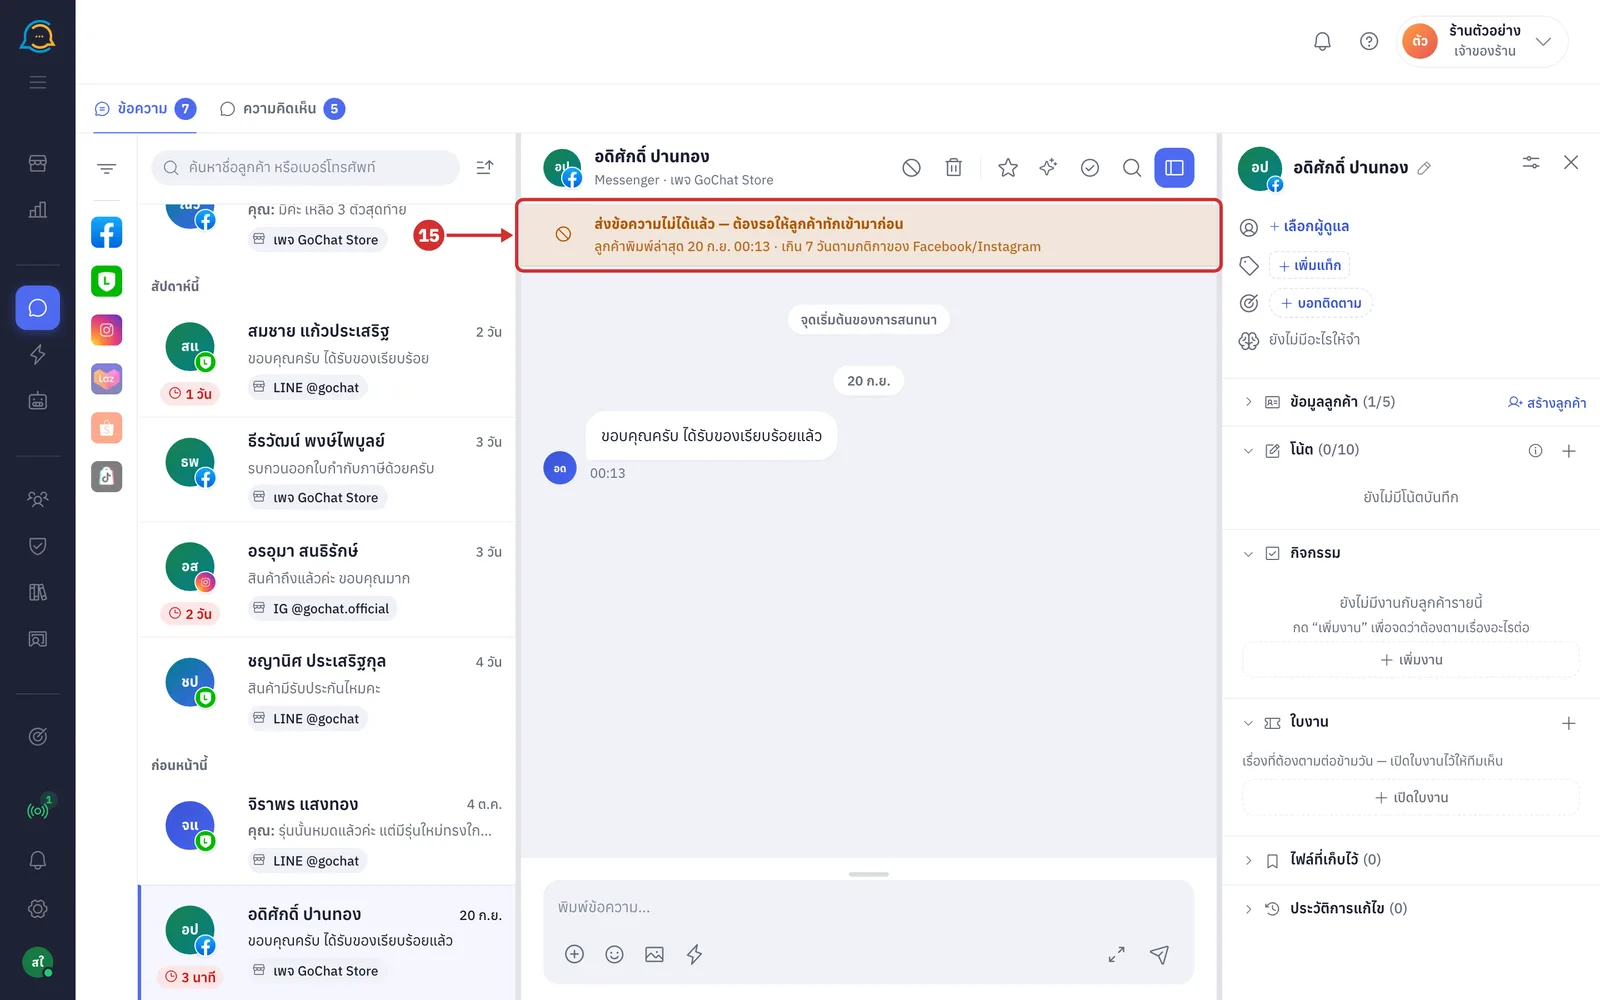
When the customer last typed more than 7 days ago, the bar shows ส่งข้อความไม่ได้แล้ว — ต้องรอให้ลูกค้าทักเข้ามาก่อน (Messages can no longer be sent — wait for the customer to message first) with when the customer last typed. Once the customer messages again, you can reply again
Note: Shops connected to the GoSaaS sales system have a แท็กสถานะ (Status tag) label next to the customer name in the header (such as ยังไม่ซื้อ (Not bought yet) · เปิดบิล (Billed) · ยืนยันแล้ว (Confirmed) · ส่งแล้ว (Shipped) · สำเร็จ (Completed)). The system moves it according to the order in GoSaaS, and you can click the label to change it yourself · Pinned messages appear as a bar under the header; see how to pin in Managing messages in a chat