

Managing shop users
The สมาชิกทีม (Team members) page — the ผู้ใช้งาน (Users) menu — shows who can enter this shop, their role, and who added or removed whom and when. A shop has 2 roles: เจ้าของร้าน (Shop owner — connect channels · manage the team · edit shop info · reply to chats) and แอดมิน (Admin — reply to chats). Only the เจ้าของร้าน (Shop owner) can add people, change roles, suspend access and view the history; other users only see the list. Shops connected to GoSaaS sign in with GoSaaS accounts, so anyone joining the shop needs an account in that shop on GoSaaS first.
Opening the Team members page
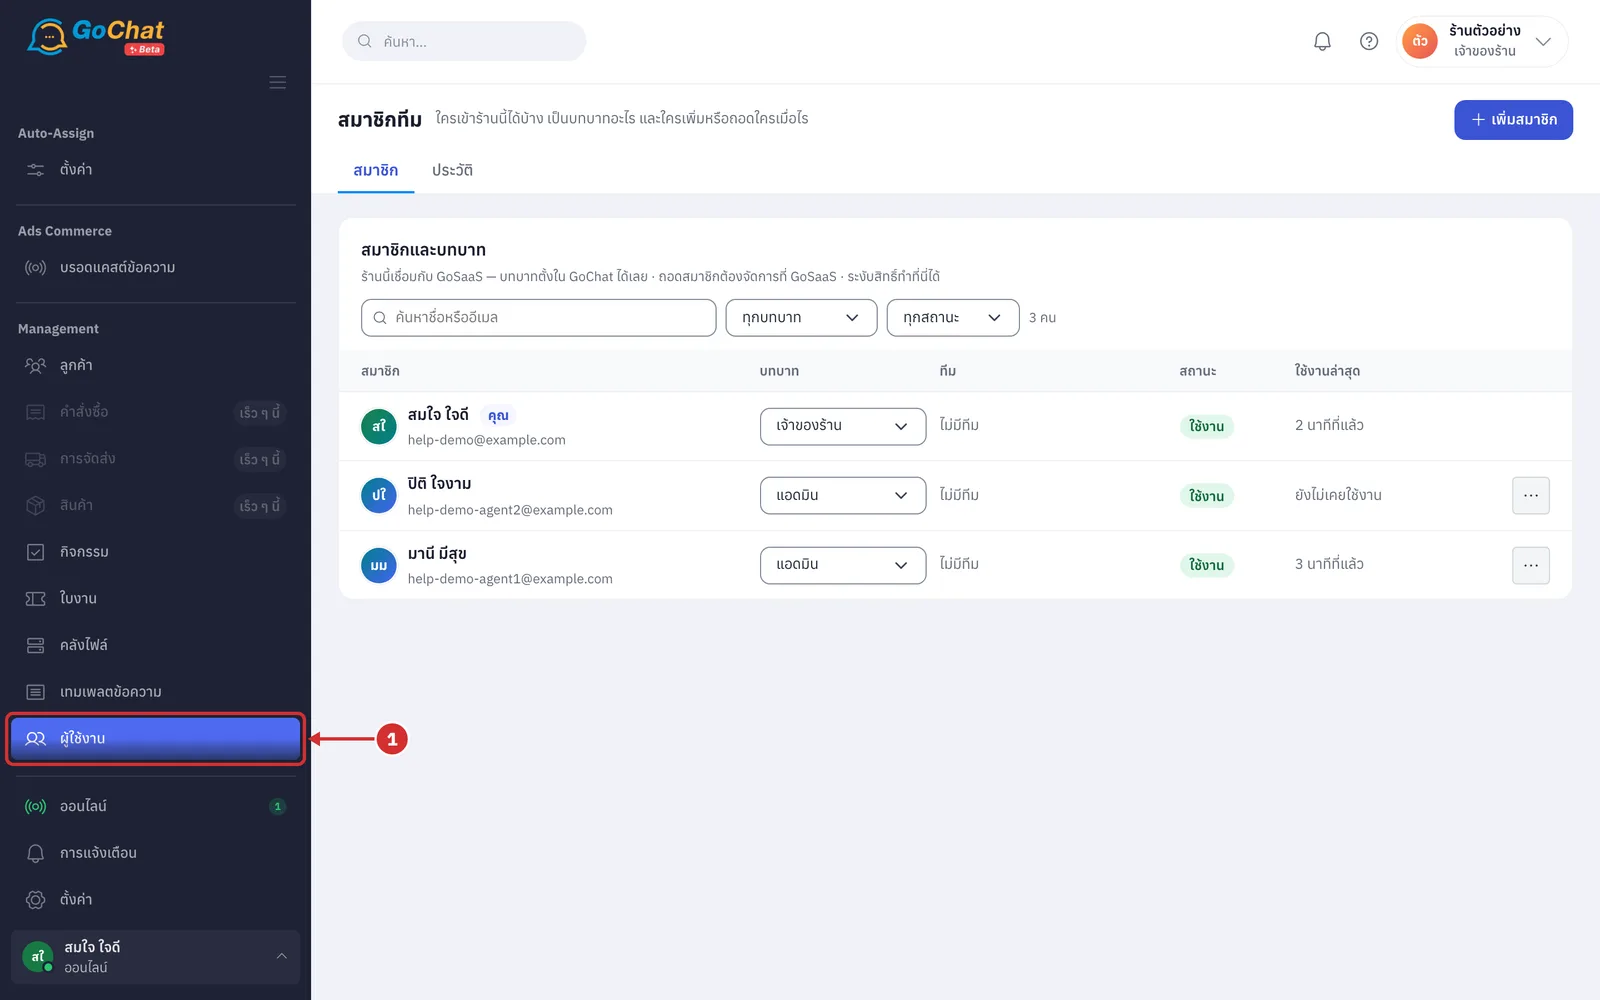
Go to the ผู้ใช้งาน (Users) menu under Management in the left menu bar. The system opens the สมาชิกทีม (Team members) page on the สมาชิก (Members) tab
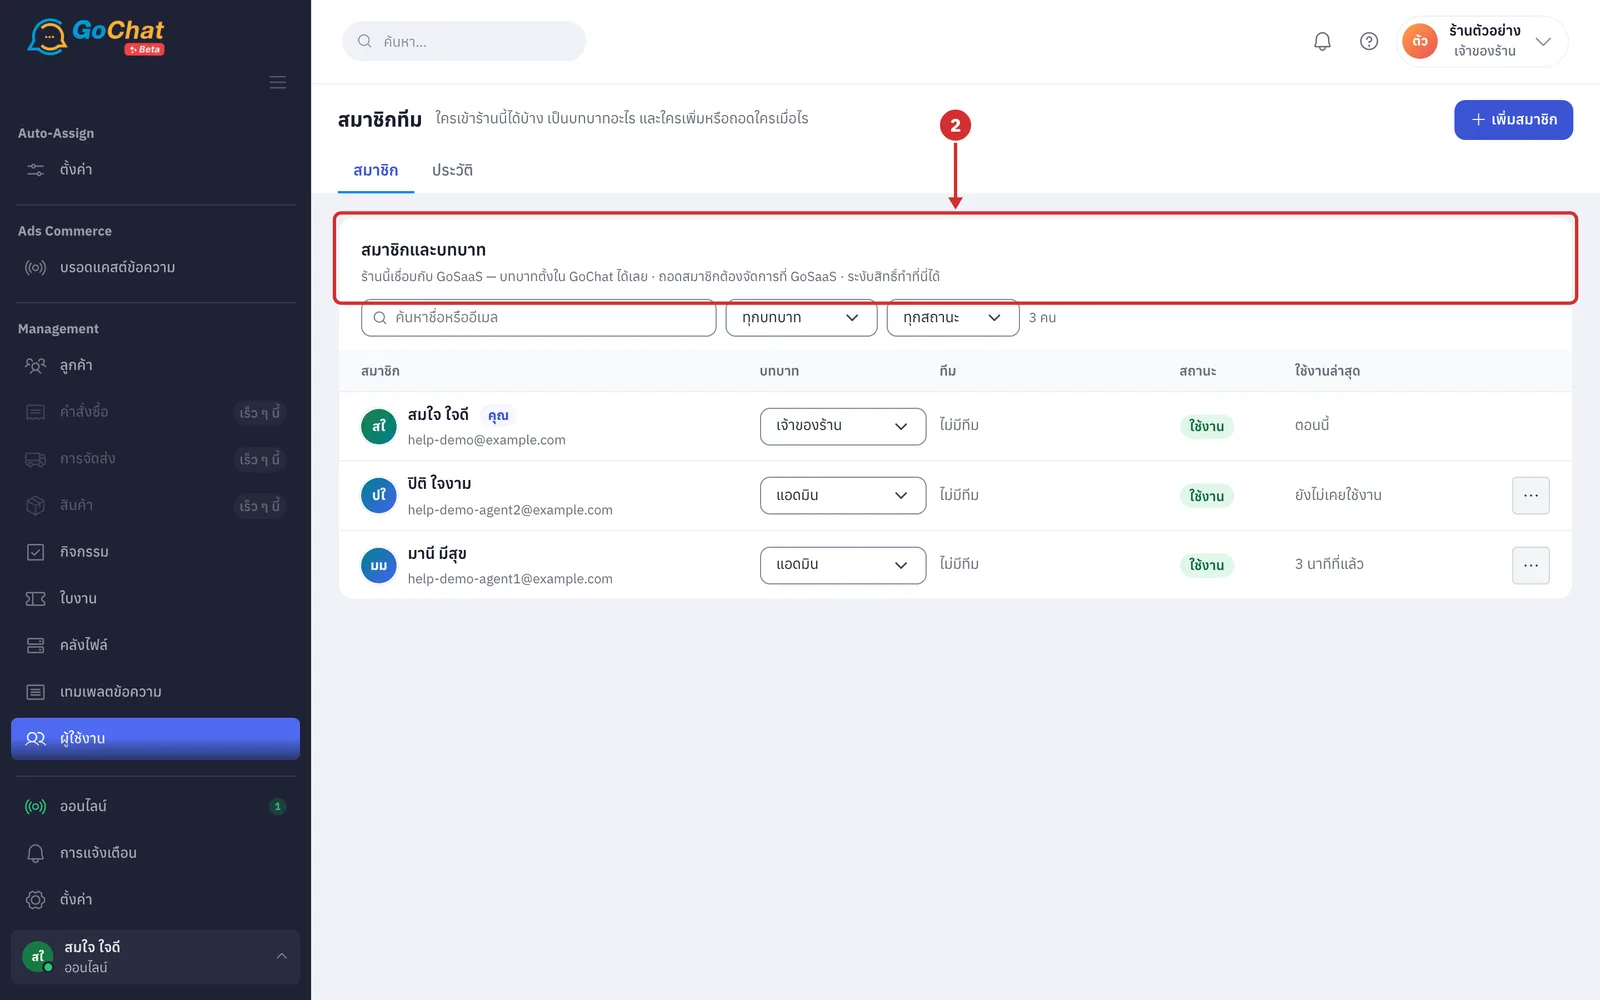
The สมาชิกและบทบาท (Members and roles) card lists everyone in the shop. Below its title it says what you can do in a shop connected to GoSaaS: บทบาทตั้งใน GoChat ได้เลย · ถอดสมาชิกต้องจัดการที่ GoSaaS · ระงับสิทธิ์ทำที่นี่ได้ (Set roles right here in GoChat · removing members is managed on GoSaaS · suspending is done here)
Reading the member list
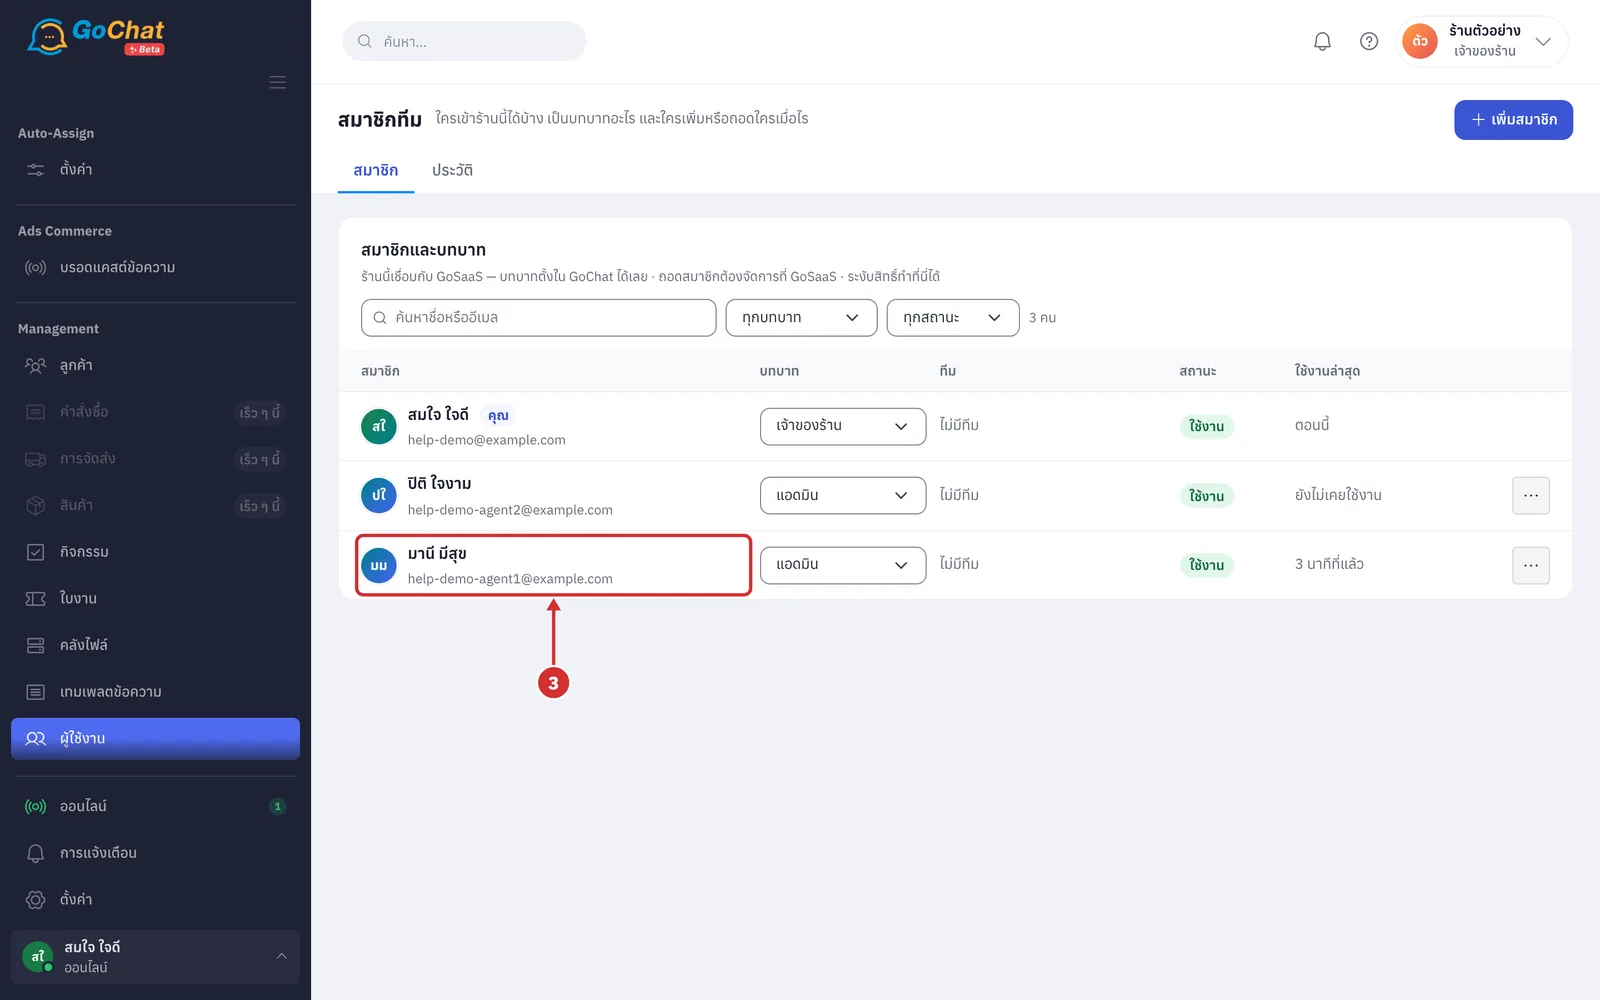
In the สมาชิก (Member) column, see each person's picture, name and email (your own row has a คุณ (You) tag · accounts that sign in with LINE have no email)
In the หมายเลขผู้ใช้ (User number) column, see each person's GoSaaS user number (such as USR12345). Click it to copy; the system shows คัดลอก … แล้ว (Copied …). Use it in the order-taking command (people not linked to a GoSaaS account have an empty cell · while loading you see a grey bar; if loading fails it shows — and the line ดึงหมายเลขผู้ใช้จาก GoSaaS ไม่สำเร็จ · ลองใหม่ (Could not get user numbers from GoSaaS · Try again) below the card title)
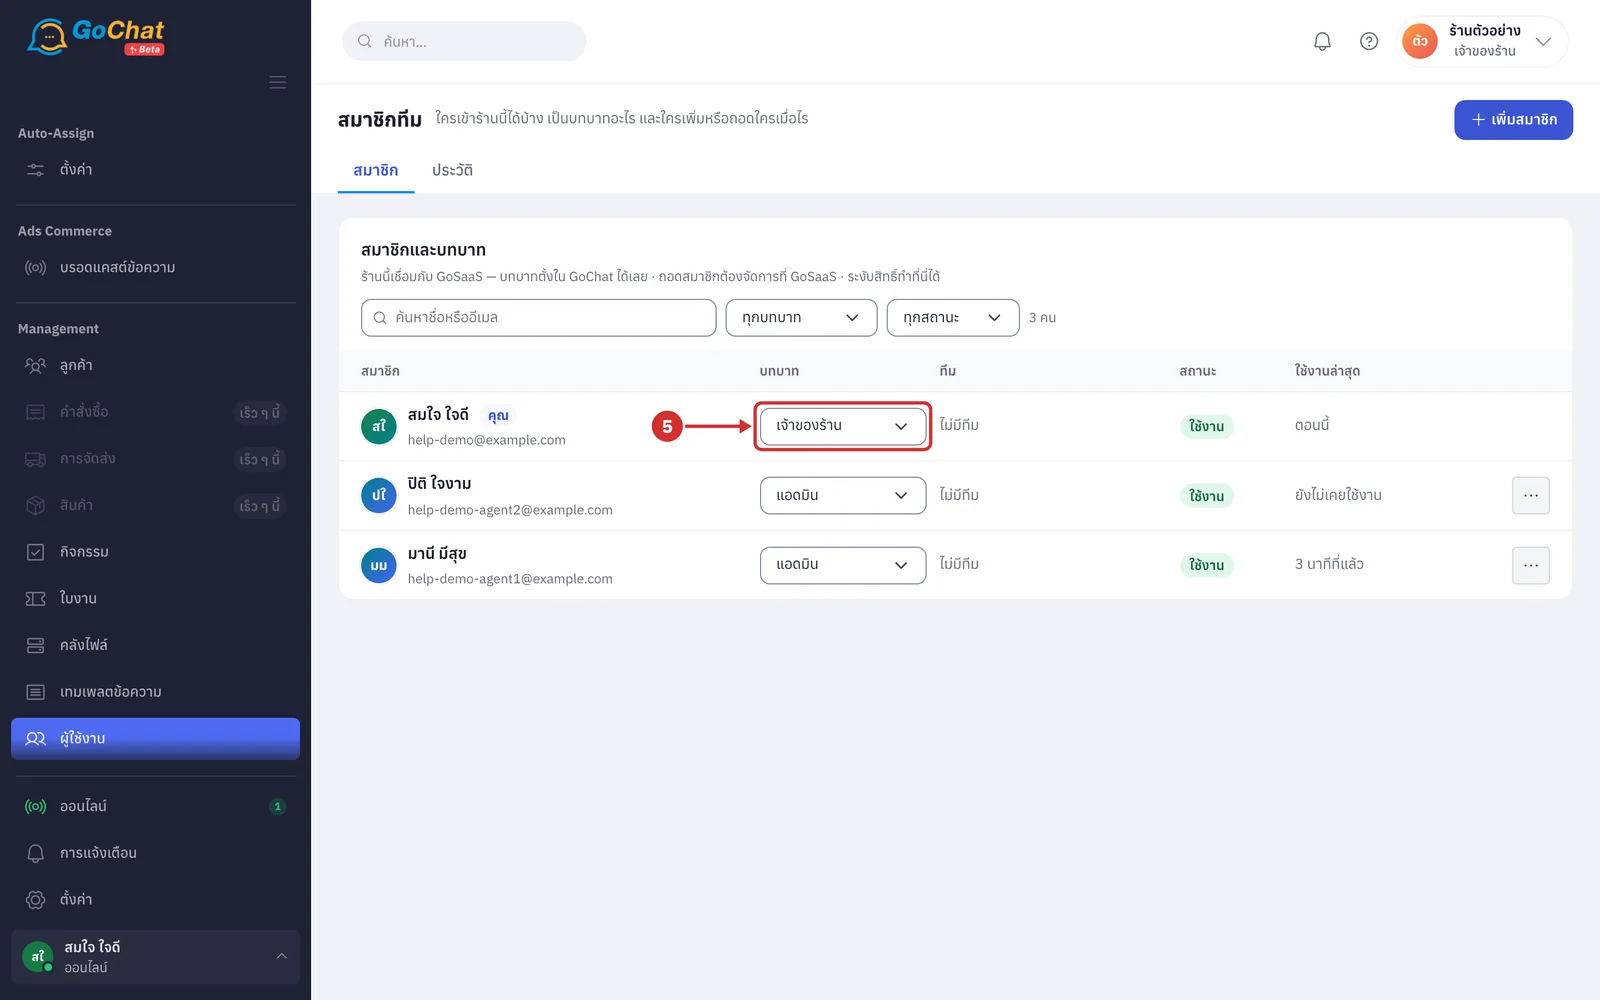
In the บทบาท (Role) column, see whether each person is a เจ้าของร้าน (Shop owner) or แอดมิน (Admin) (the shop owner sees a dropdown and can change it as in Changing a role · a person who is the Owner of the shop on GoSaaS has a lock icon; point at it to see เป็นเจ้าของร้านใน GoSaaS — เป็นเจ้าของร้านใน GoChat เสมอ เปลี่ยนบทบาทไม่ได้ (Shop owner on GoSaaS — always shop owner in GoChat; the role cannot be changed))
In the ทีม (Team) column, see each person's team (people not in a team show ไม่มีทีม (No team) · the crown icon means หัวหน้าทีม (Team lead) · teams and team leads are set on the จัดสรรแชท (Chat assignment) page; the shop owner can click a team name to go there — see การเปิดระบบจัดสรรแชท)
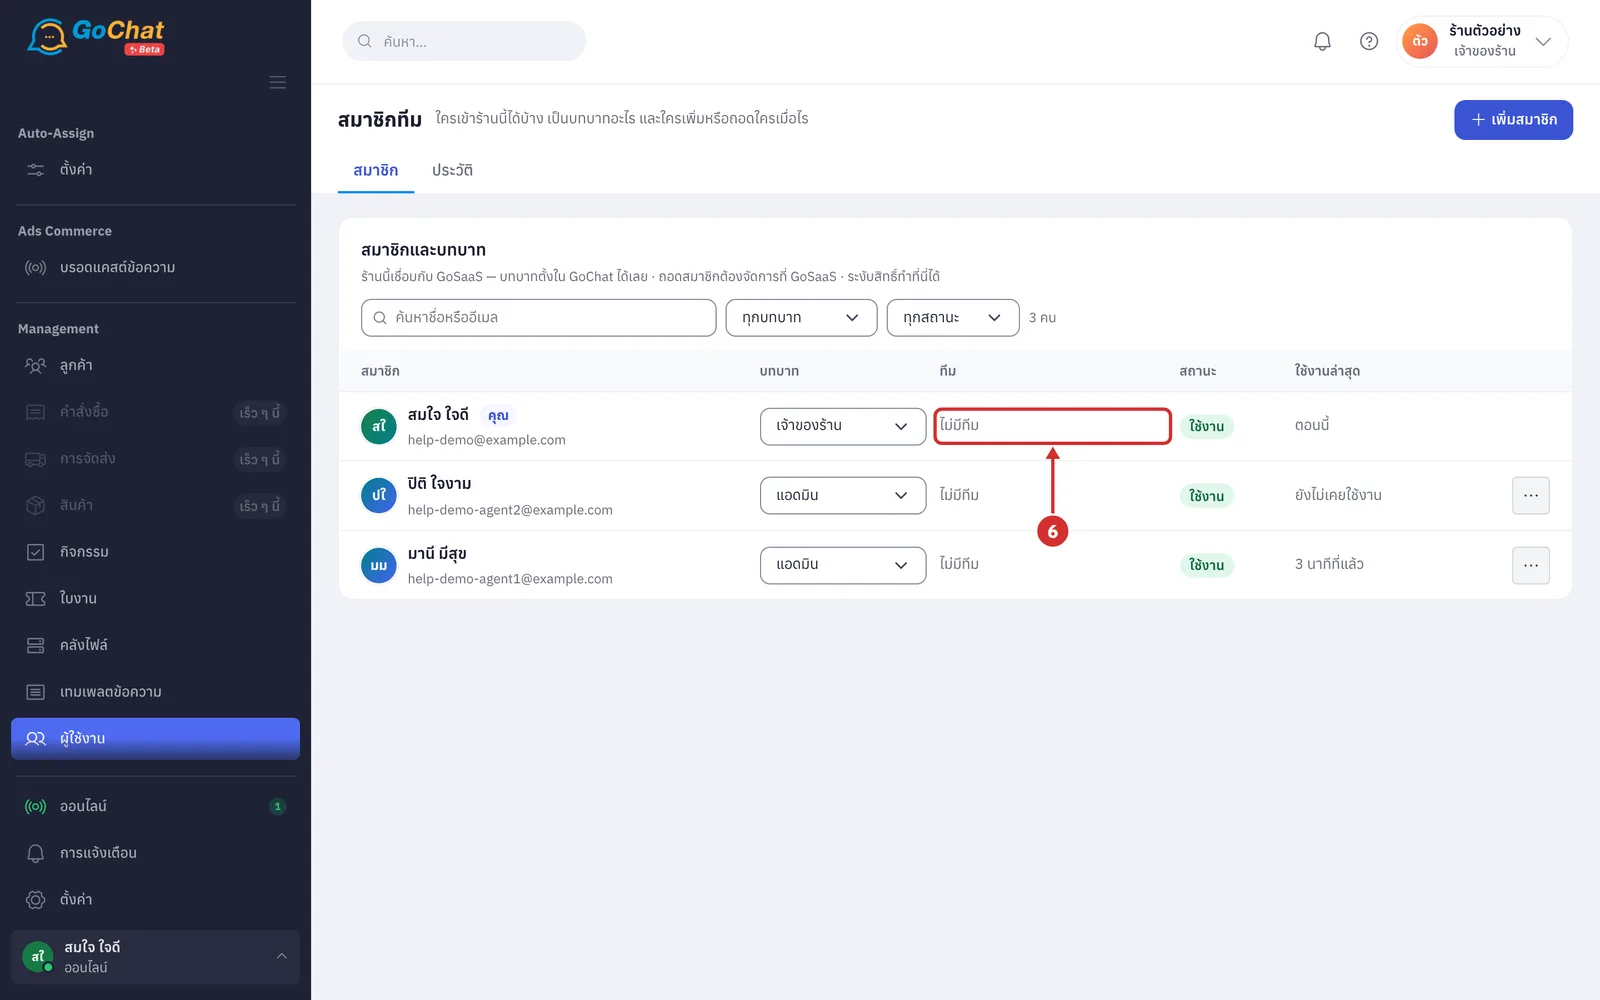
In the สถานะ (Status) column, see each person's status. There are 3 kinds:
ใช้งาน (Active) — can enter the shop as usual
ยังไม่เข้าใช้ (Not signed in yet) — has an account in the shop on GoSaaS but has never entered GoChat (not counted in your package's users until their first sign-in; you can set their role or suspend them in advance)
ถูกระงับ (Suspended) — cannot enter this shop until the shop owner restores access
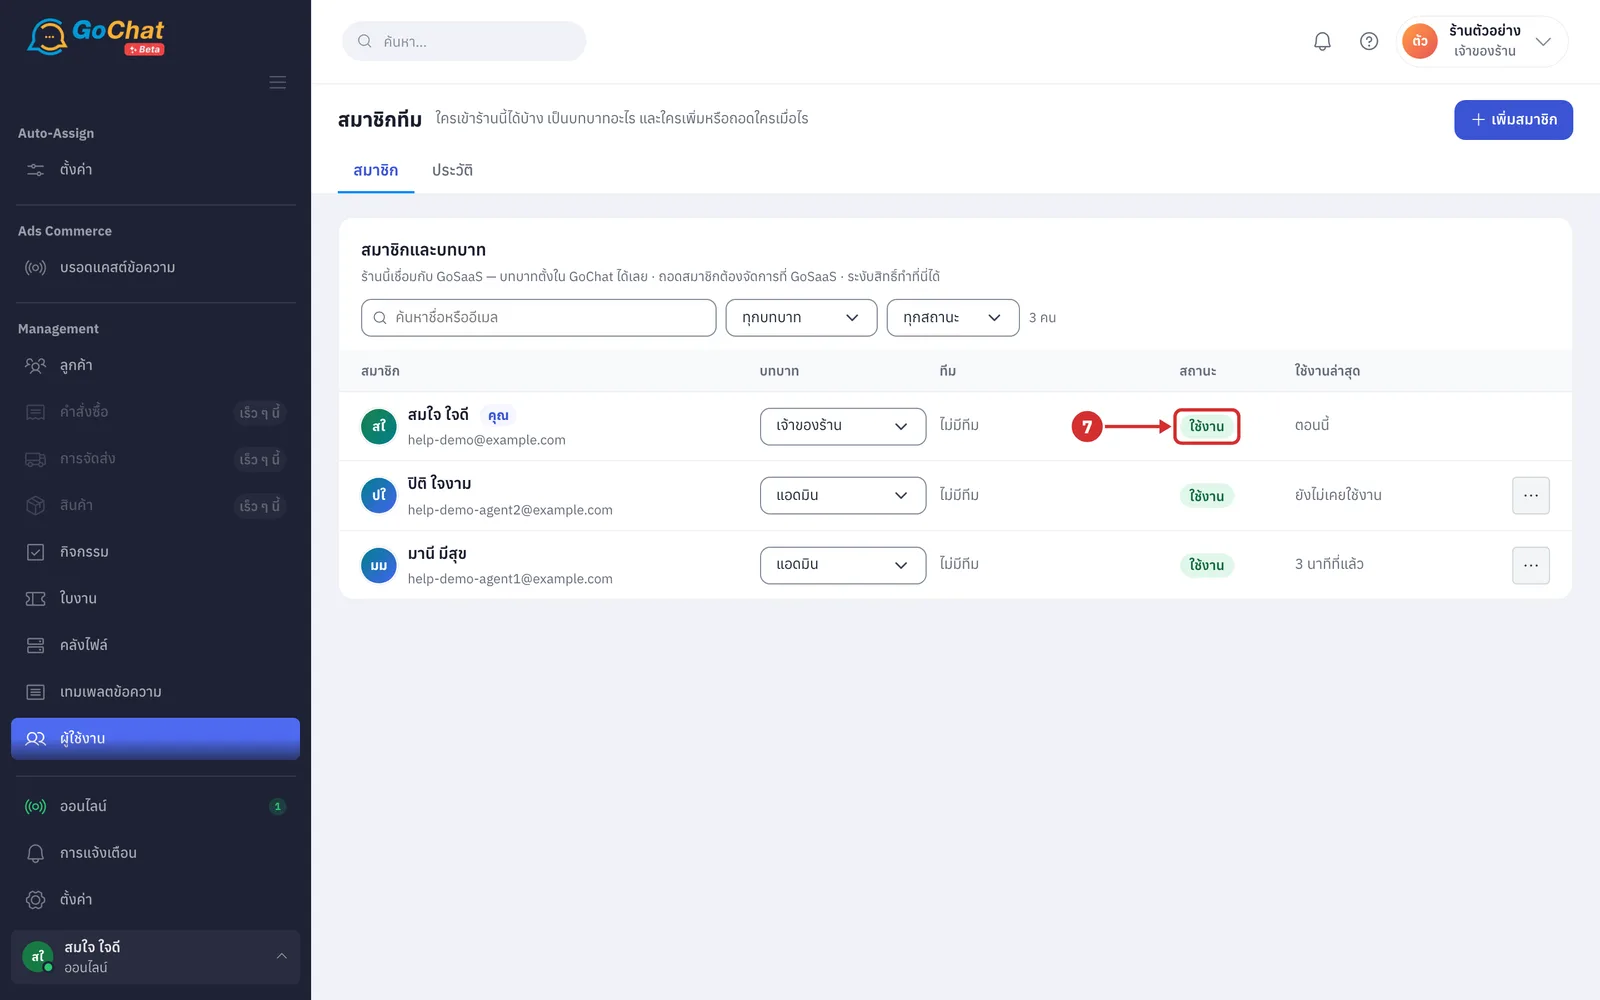
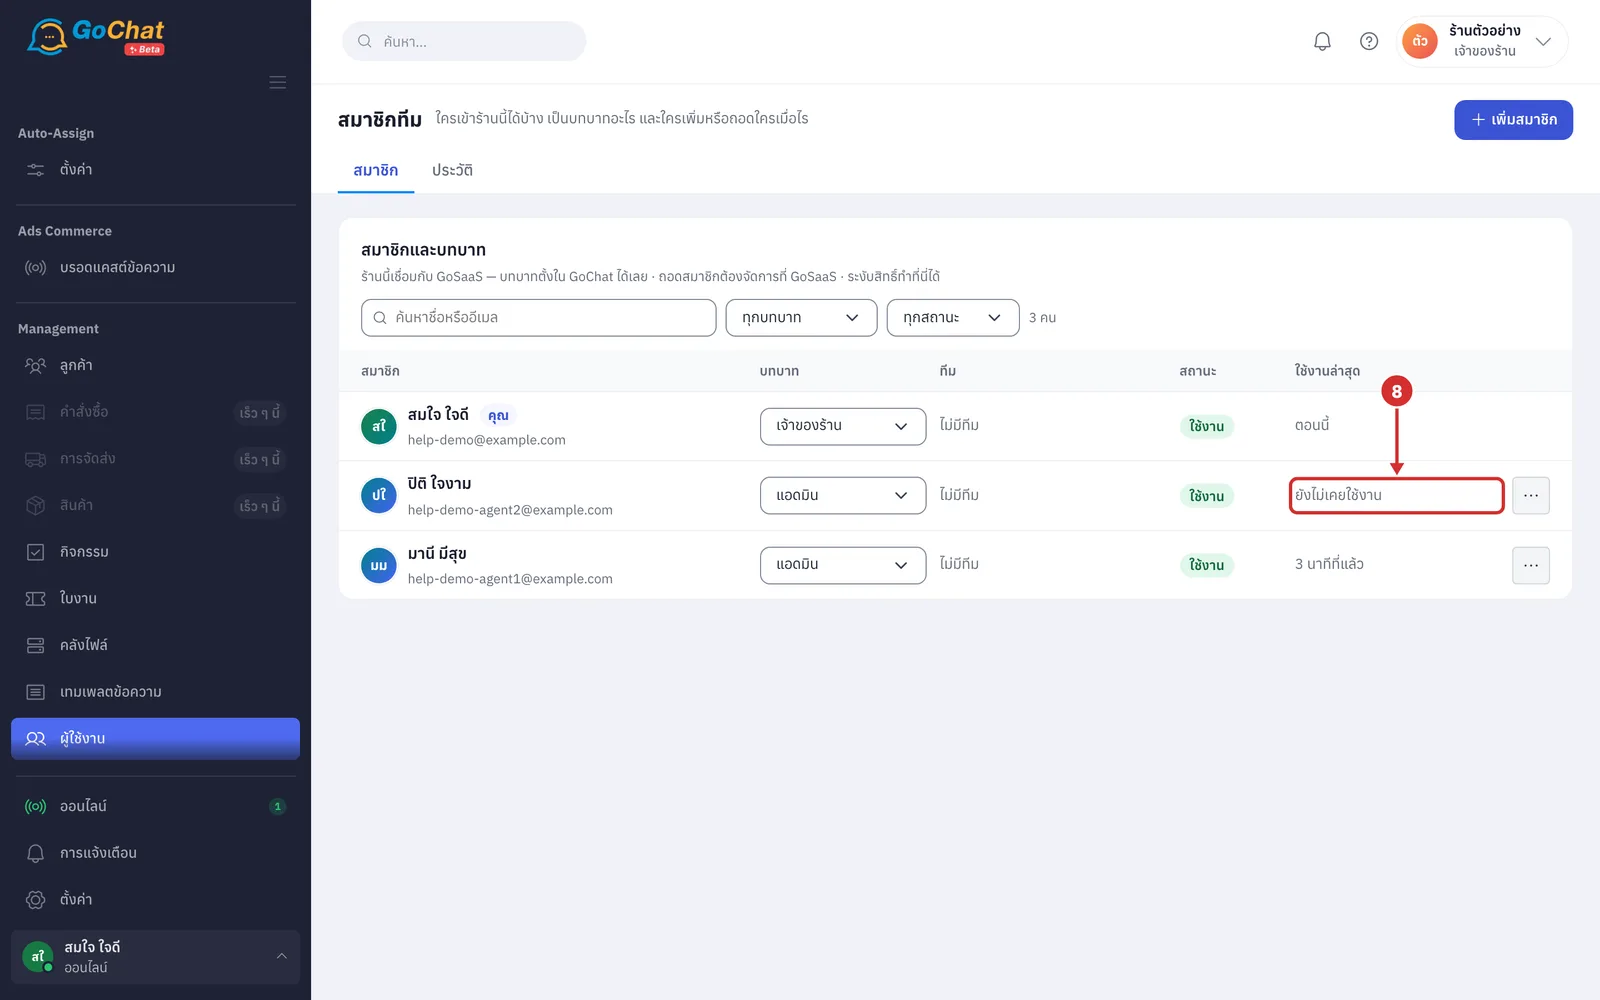
In the ใช้งานล่าสุด (Last active) column, see when each person was last active, such as ตอนนี้ (Now) · 5 นาทีที่แล้ว (5 minutes ago) · 2 ชั่วโมงที่แล้ว (2 hours ago) · เมื่อวาน (Yesterday) with the time · 3 วันที่แล้ว (3 days ago) or a date (people who never signed in show ยังไม่เคยใช้งาน (Never active) · times are in your shop's time zone)
Searching and filtering members
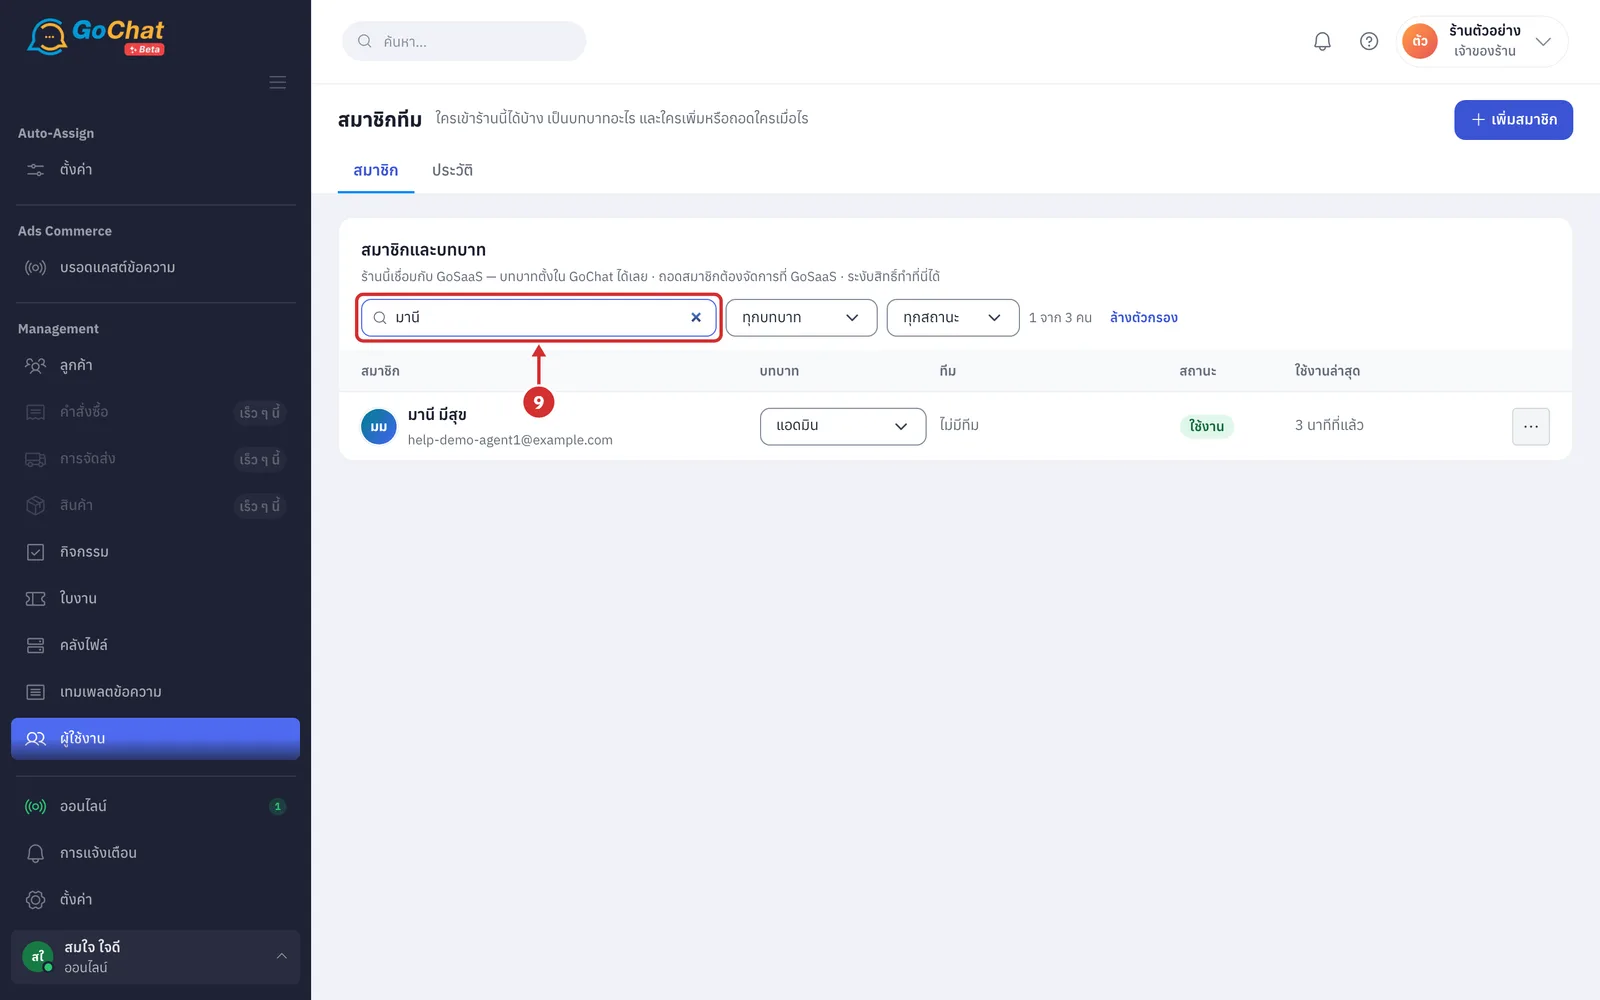
In the search box, type a name, email or user number (USR). The list filters as you type (if nothing matches, it shows ไม่พบสมาชิกที่ตรงกับ “…” (No member matches “…”))
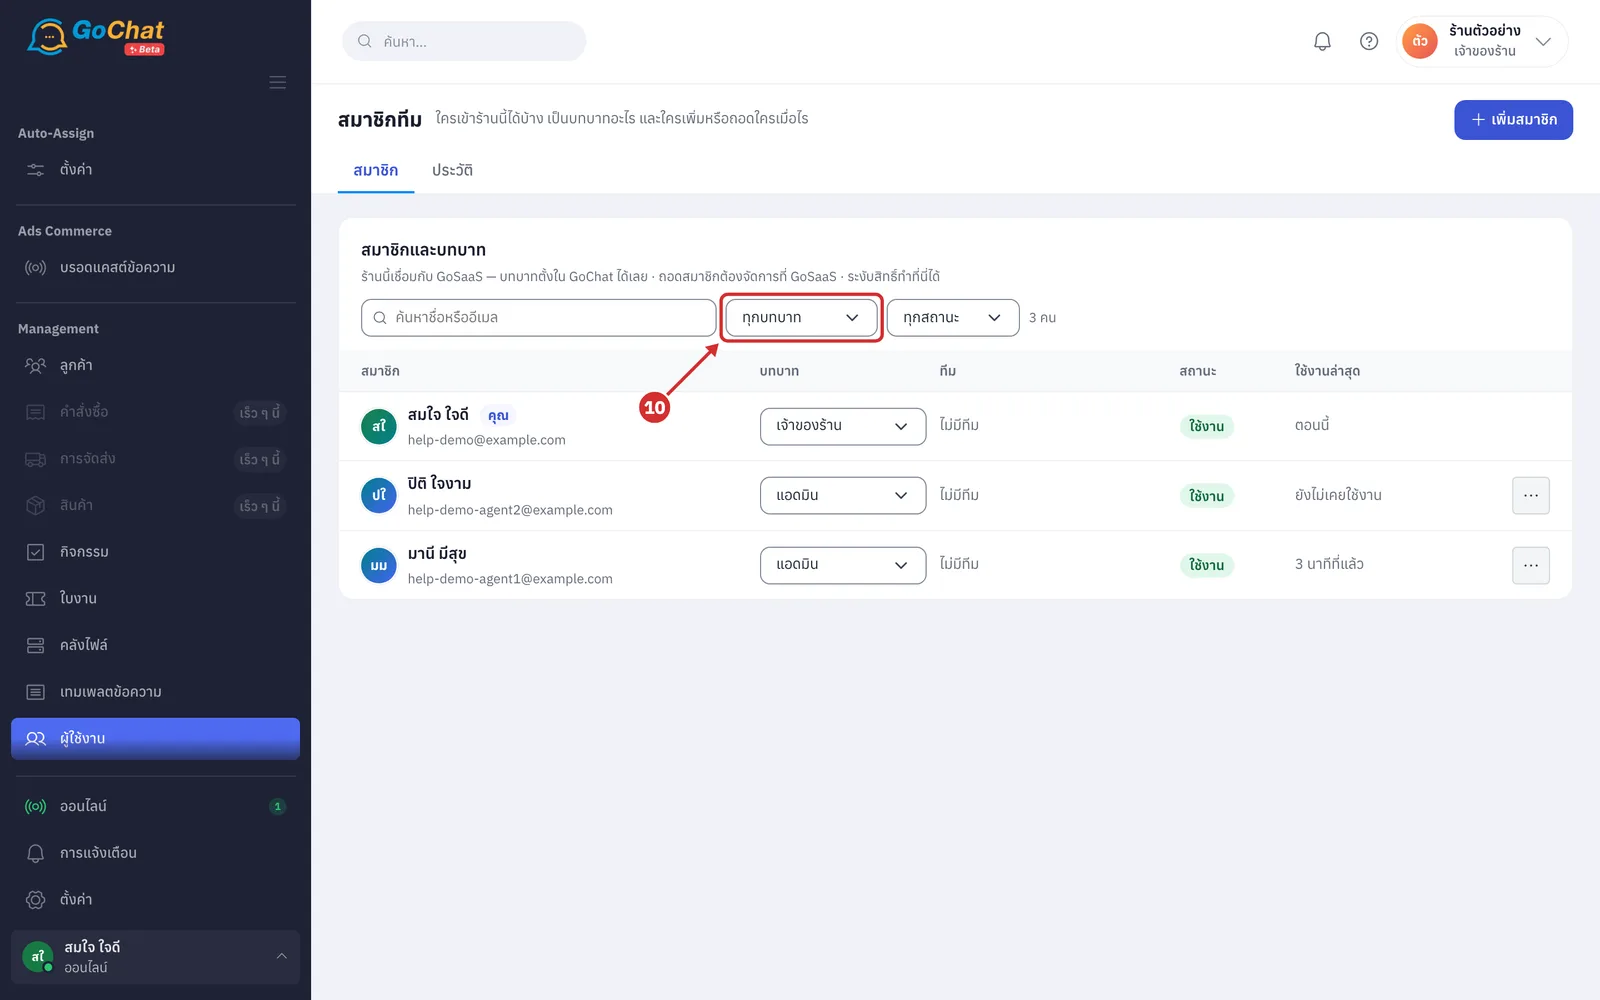
In ทุกบทบาท (All roles), choose เจ้าของร้าน (Shop owner) or แอดมิน (Admin) to show only that role (the number in brackets is how many people have that role)
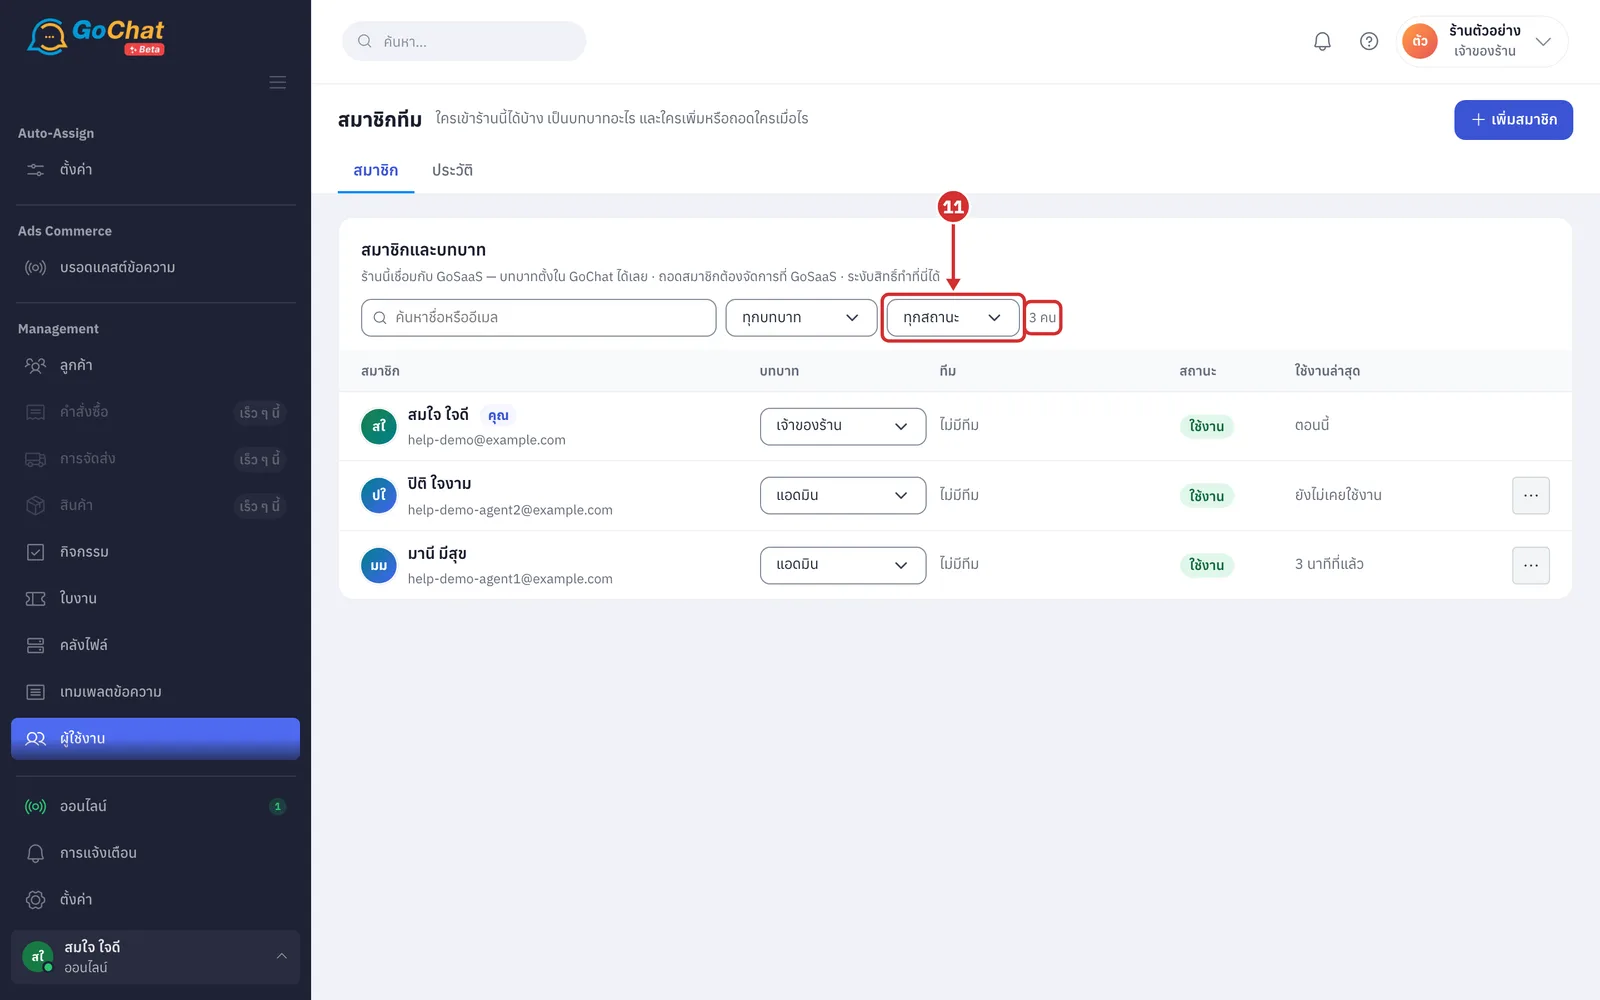
In ทุกสถานะ (All statuses), choose ใช้งาน (Active) · ยังไม่เข้าใช้ (Not signed in yet — shown when the shop has such people) or ถูกระงับ (Suspended) (the right of the filters shows the count, such as 3 คน (3 people) or 1 จาก 3 คน (1 of 3 people) while filtering; click ล้างตัวกรอง (Clear filters) to see everyone · 50 people are shown per page; with more, use ก่อนหน้า (Previous) / ถัดไป (Next) at the bottom of the card)
Adding people to the shop
A shop connected to GoSaaS adds people by adding the user to that shop on GoSaaS first. People who already have a GoChat account can also be added by email on this page.
Add the user to the shop on GoSaaS. When the shop owner opens this page, the system pulls the shop's users from GoSaaS into the list with the status ยังไม่เข้าใช้ (Not signed in yet) (the shop's Owner on GoSaaS becomes เจ้าของร้าน (Shop owner) and everyone else แอดมิน (Admin) · you can set their role or suspend them before they sign in · the system refreshes the list from GoSaaS at most once every 10 minutes, so someone just added may not appear right away)
Have that person sign in to GoChat with their GoSaaS account. The system takes them into the shop and their status changes to ใช้งาน (Active) (see การเข้าสู่ระบบครั้งแรกและเชื่อมร้านจาก GoSaaS)
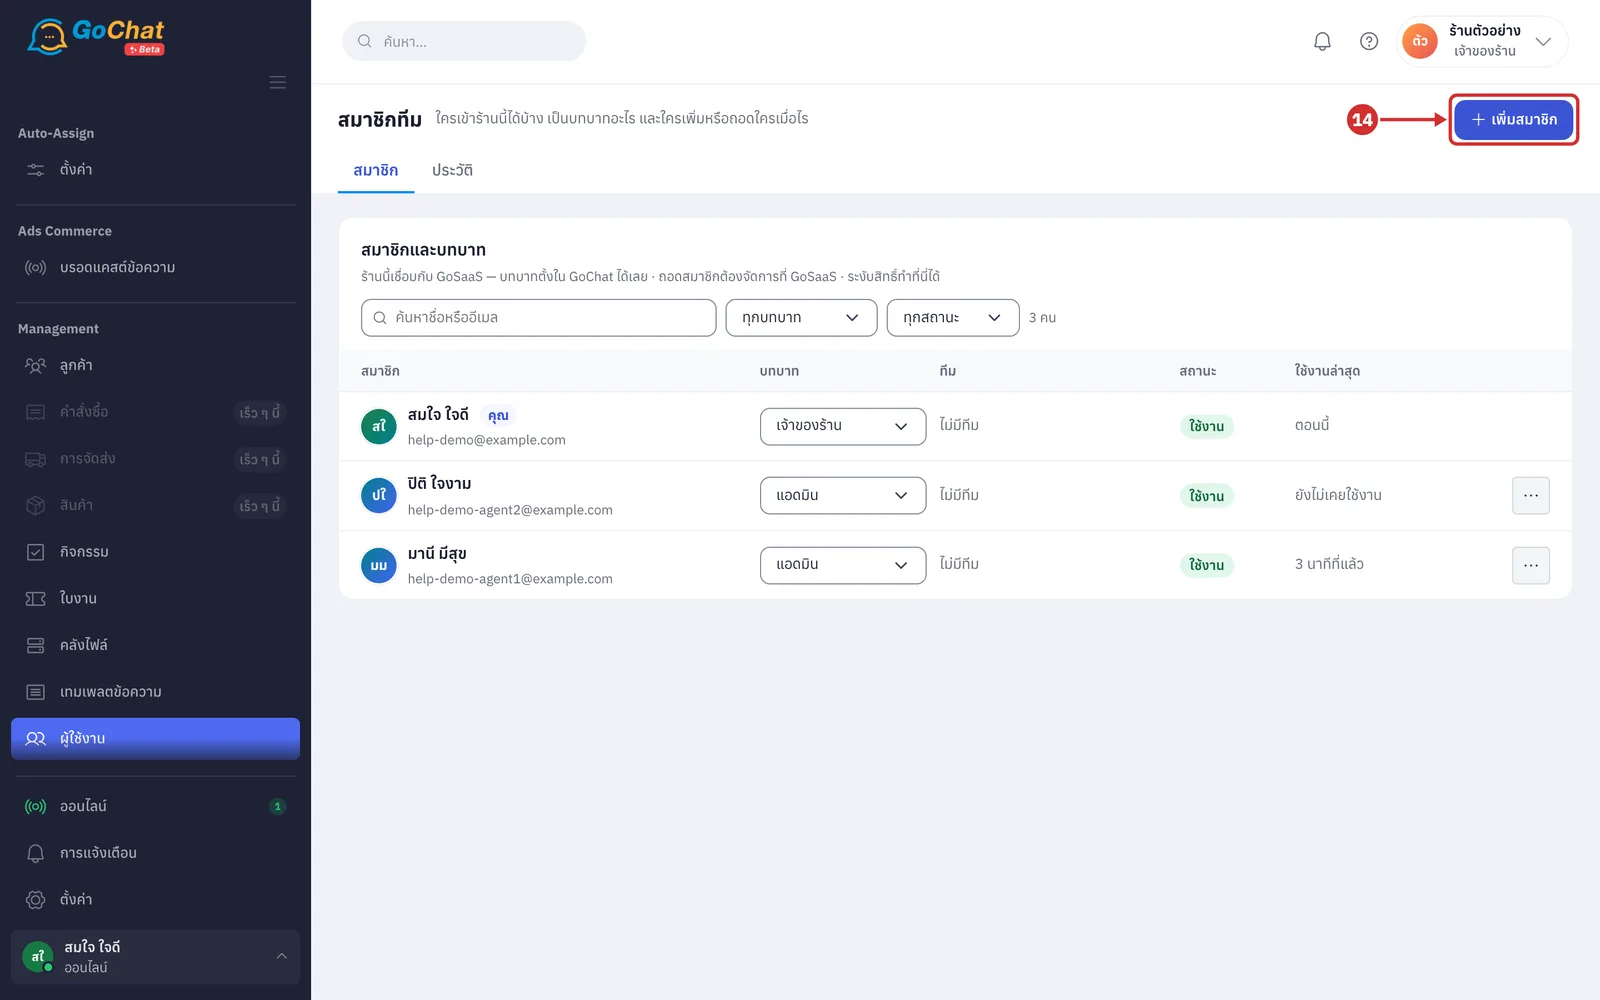
If the person already has a GoChat account, click เพิ่มสมาชิก (Add member) at the top right to add them by email (when users reach your package's limit, this button cannot be clicked; point at it to see ผู้ใช้งานครบแพ็กเกจแล้ว (… / …) (Users at the package limit))
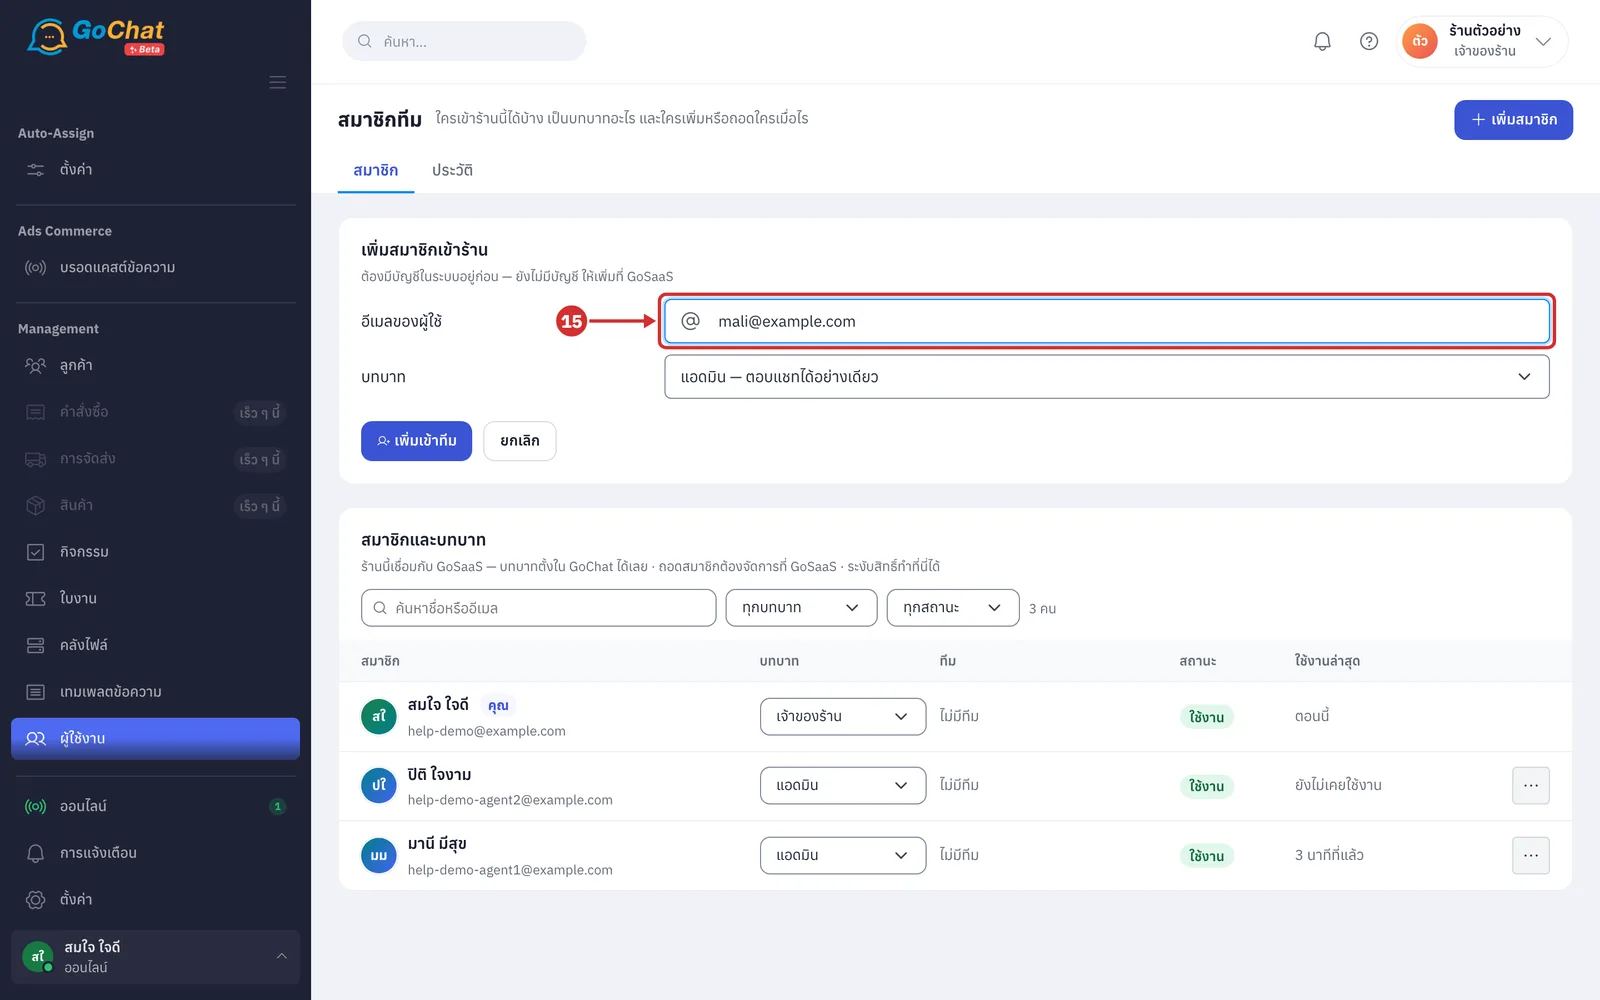
In the เพิ่มสมาชิกเข้าร้าน (Add a member to the shop) card, enter the person's account email in อีเมลของผู้ใช้ (User email) (the account must already exist; if it does not, add it on GoSaaS)
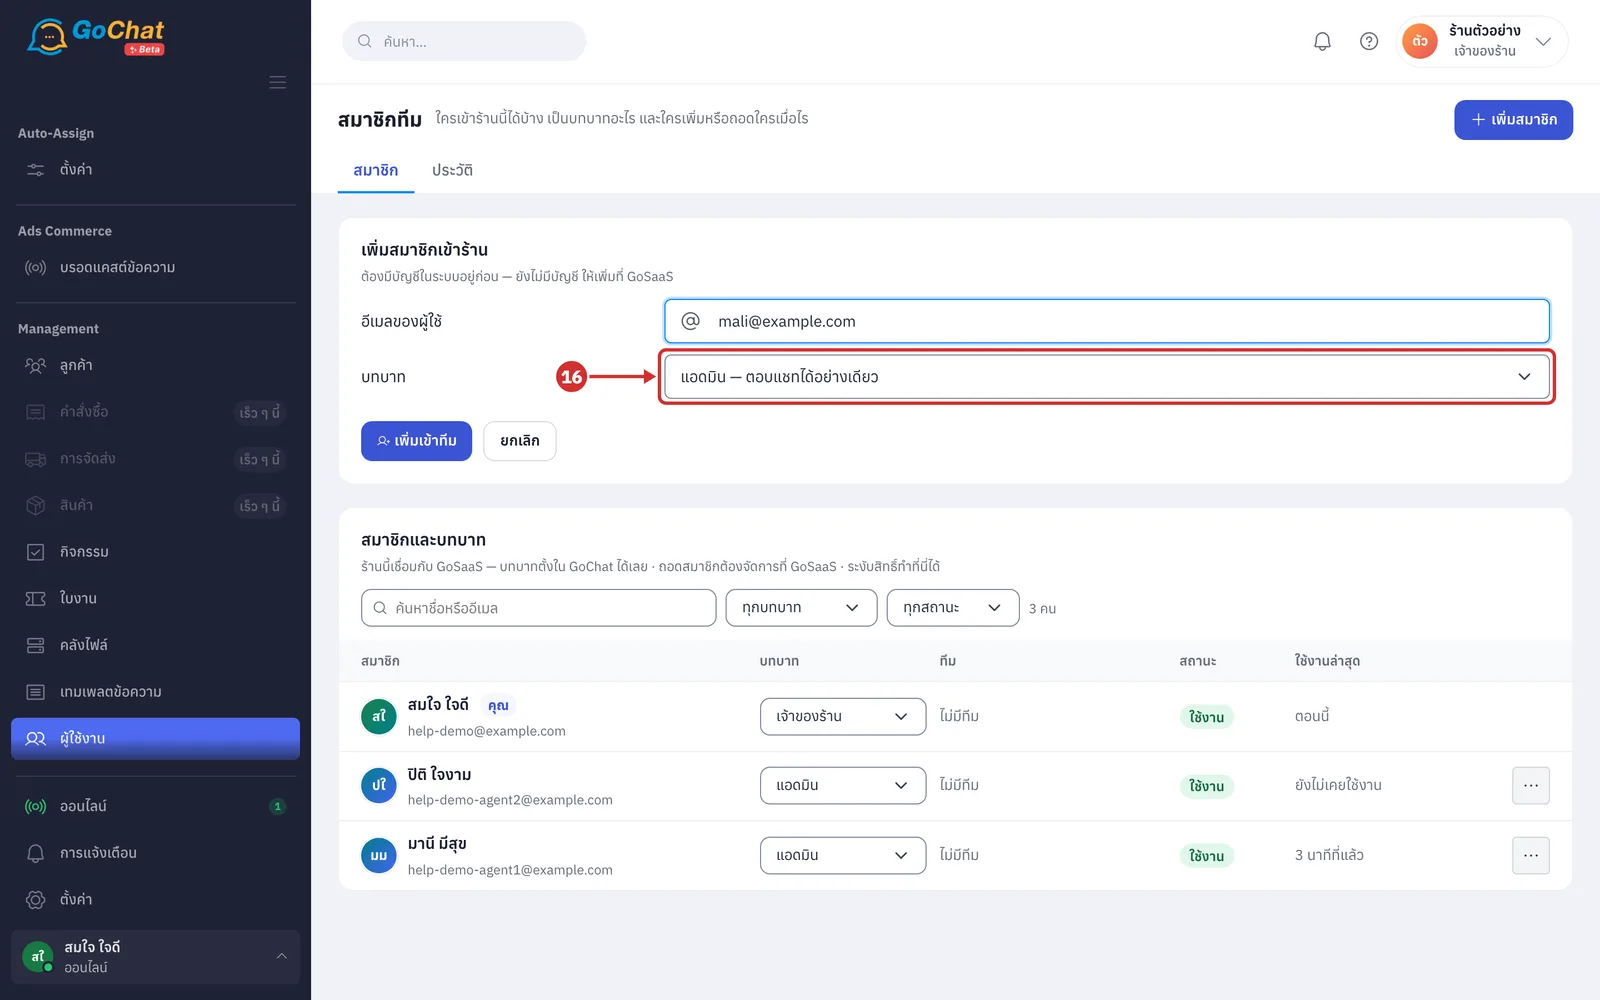
In บทบาท (Role), choose the person's role. There are 2 options:
แอดมิน — ตอบแชทได้อย่างเดียว (Admin — can only reply to chats) (the default)
เจ้าของร้าน — เชื่อมช่องทาง · จัดการทีม · แก้ข้อมูลร้าน · ตอบแชท (Shop owner — connect channels · manage the team · edit shop info · reply to chats)
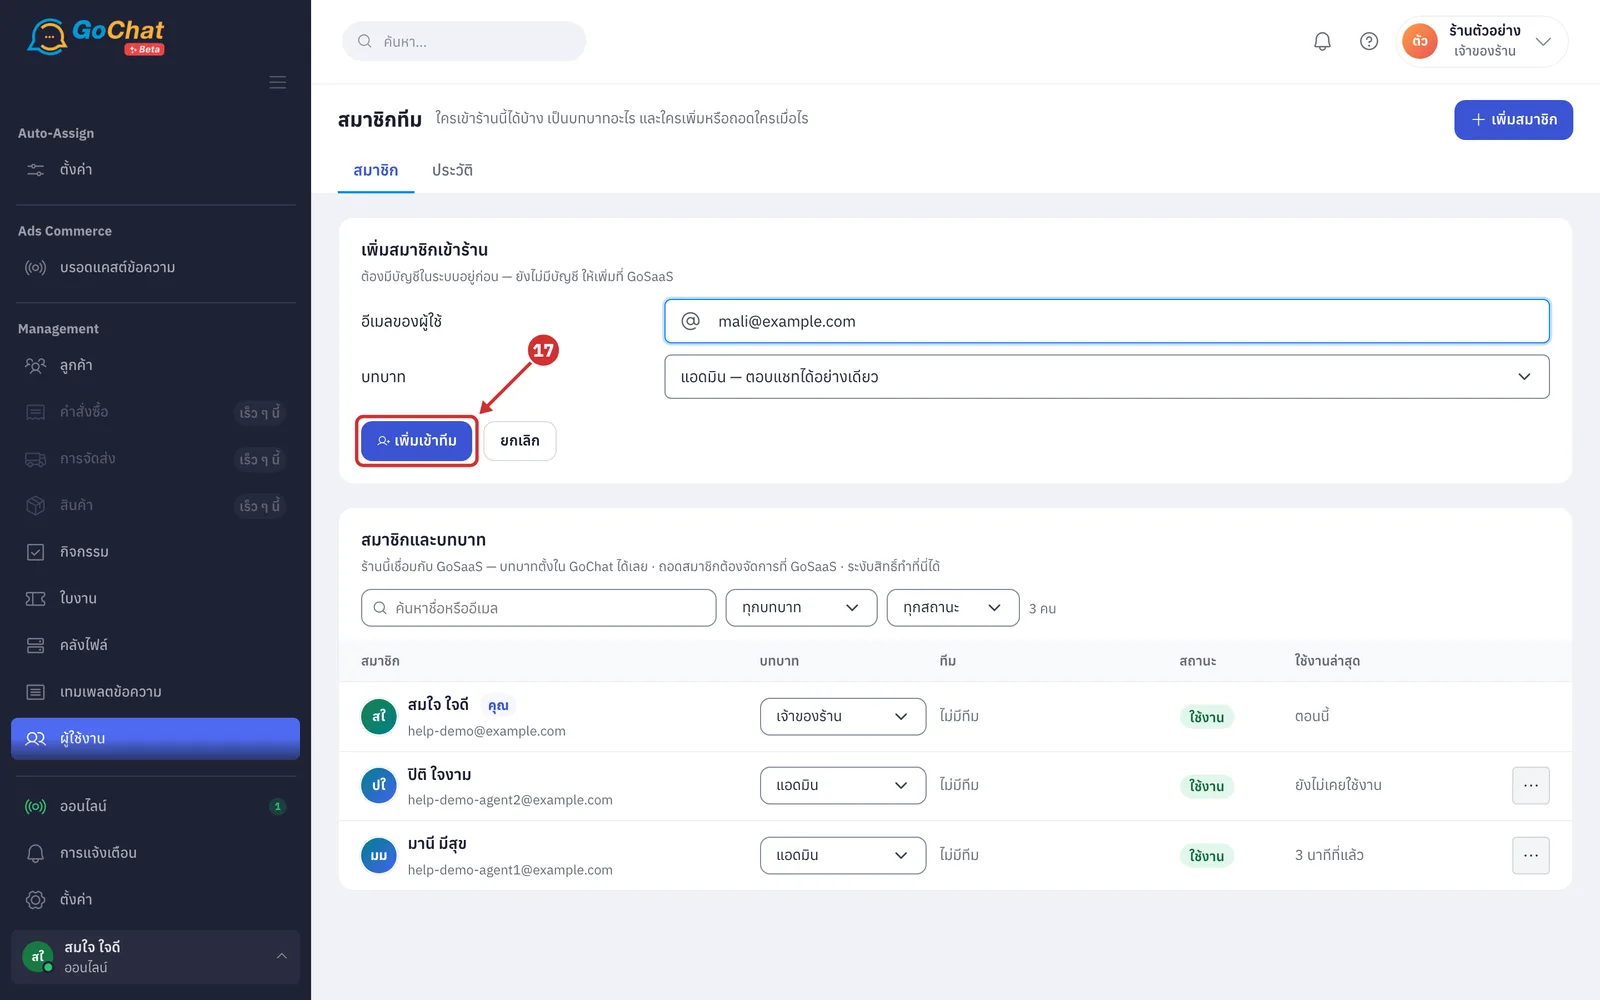
Click เพิ่มเข้าทีม (Add to team). The system shows เพิ่ม … เข้าทีมแล้ว (Added … to the team) and the person appears in the list (click ยกเลิก (Cancel) to close the form · if they cannot be added, the reason appears in a red bar above the form and the email you typed stays for you to fix, such as ไม่พบบัญชีของ … — ให้เพิ่มที่ GoSaaS (No account found for … — add it on GoSaaS) · … เป็นสมาชิกร้านนี้อยู่แล้ว (… is already a member of this shop) · … ถูกระงับสิทธิ์อยู่ — กดคืนสิทธิ์ในรายชื่อแทนการเพิ่มใหม่ (… is suspended — restore access in the list instead of adding again) or a message that the package's team members are used up)
Changing a role
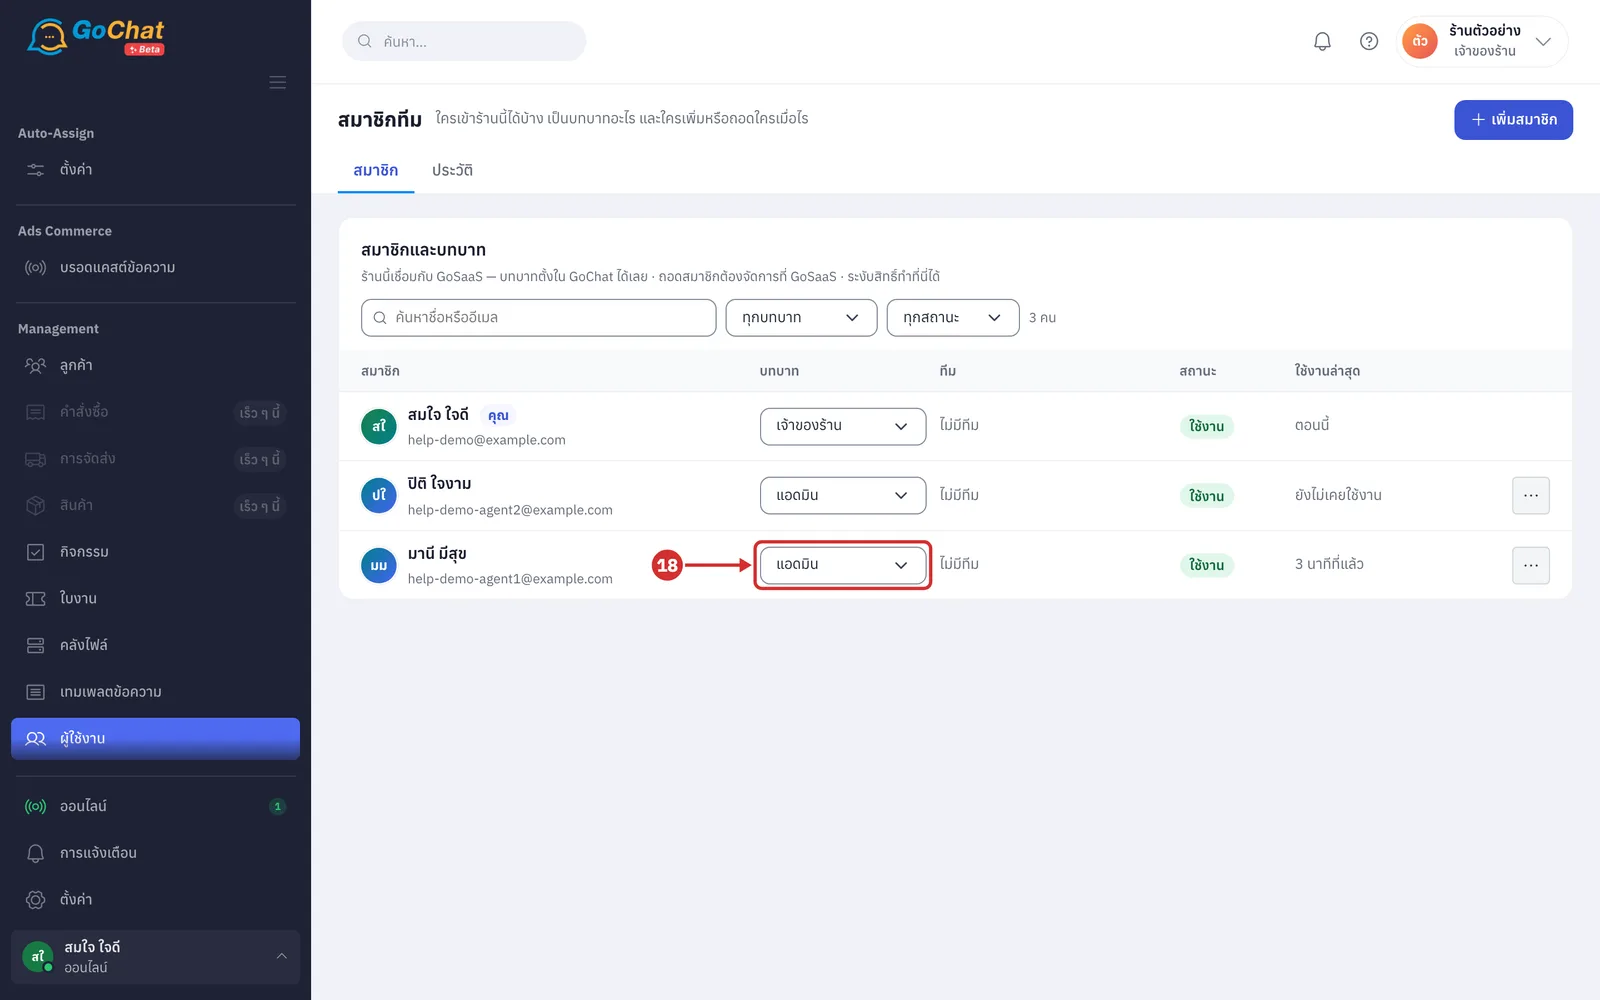
In the role field on the person's row, choose เจ้าของร้าน (Shop owner) or แอดมิน (Admin). It saves right away and shows เปลี่ยนบทบาทแล้ว (Role changed) (the shop needs at least 1 shop owner; demoting the last one shows ร้านต้องมีเจ้าของอย่างน้อยหนึ่งคน — ตั้งคนอื่นเป็นเจ้าของก่อน (The shop needs at least one owner — make someone else owner first) · a suspended person's role cannot be changed until access is restored · if you demote yourself to admin, the page reloads in the admin view · a role set in GoChat is not changed back when the person signs in through GoSaaS again)
Suspending and restoring access
Suspend someone when they should no longer enter this shop. A suspended person cannot enter the shop, is not assigned chats, and sees สิทธิ์ของคุณในร้าน … ถูกระงับ — กรุณาติดต่อเจ้าของร้าน (Your access to shop … is suspended — please contact the shop owner). They stay suspended even if they sign in through GoSaaS again, and their role and team are kept.
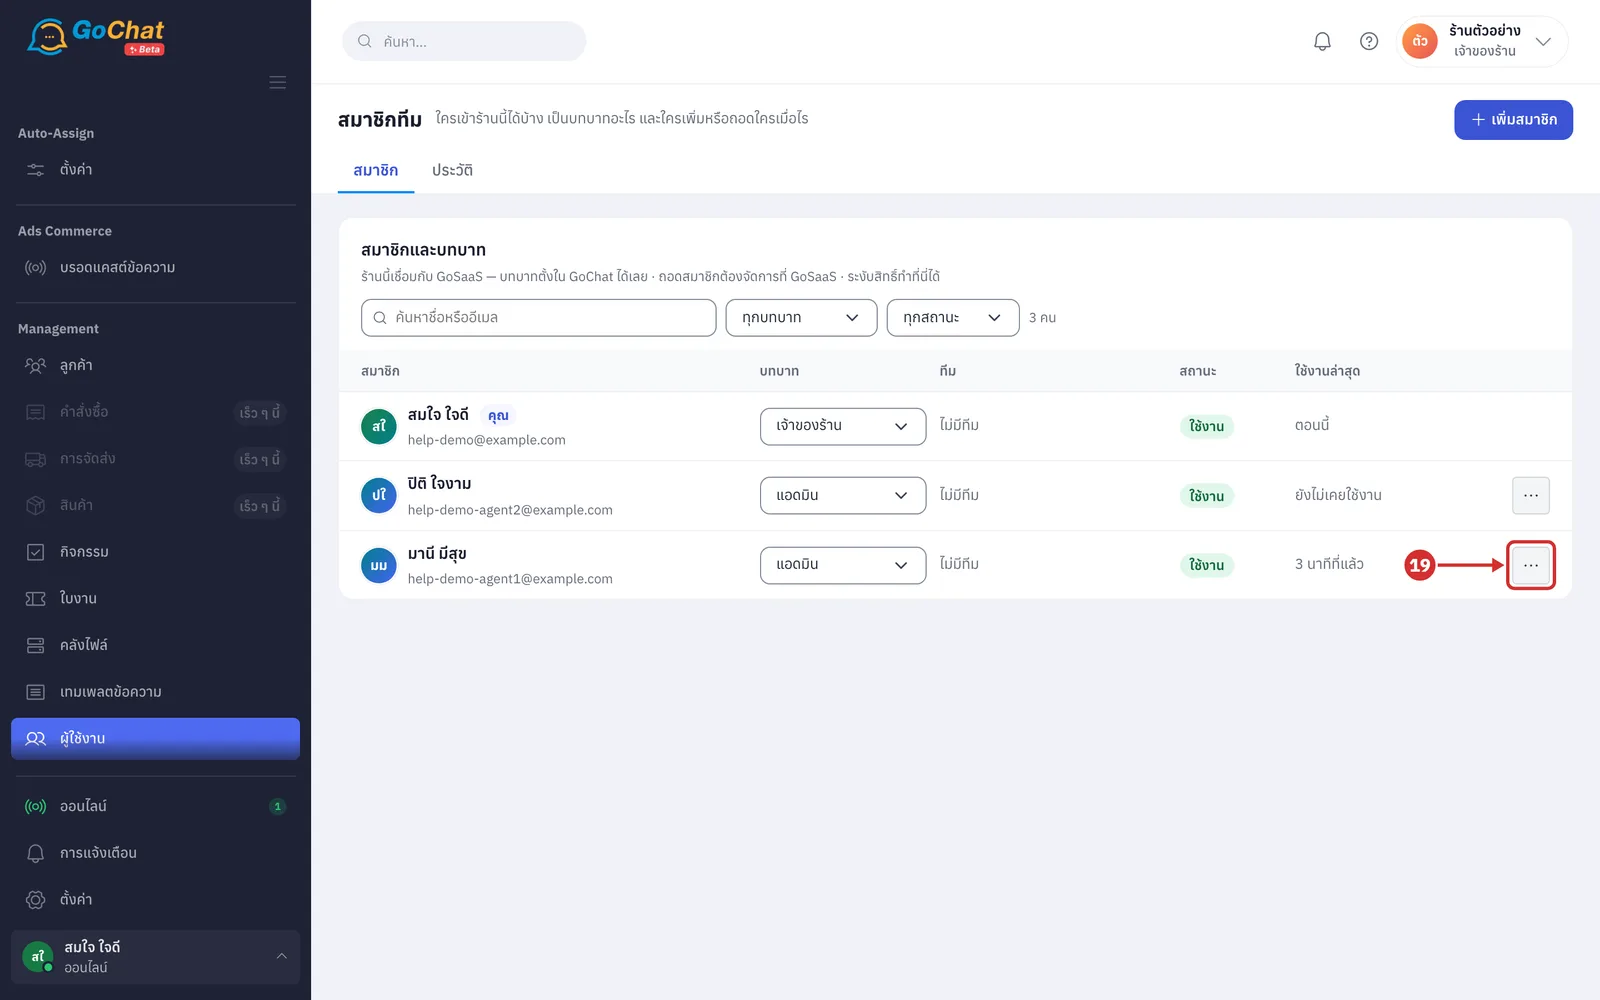
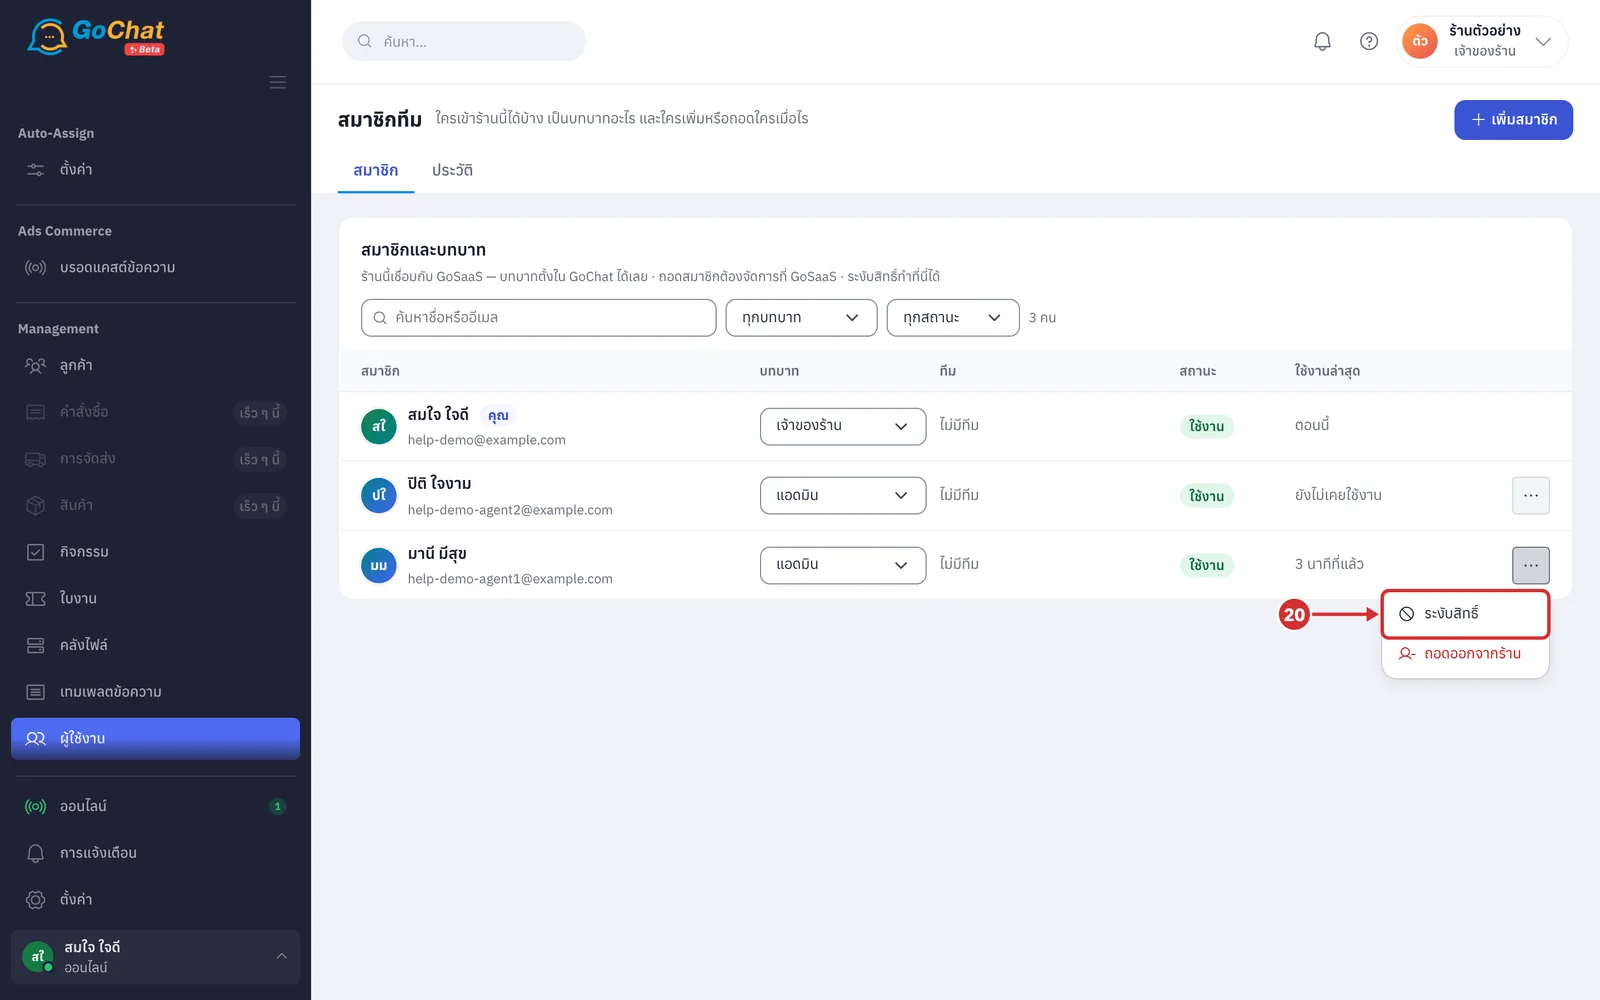
Click the ⋯ button at the end of the person's row (your own row has no such button; you cannot suspend or remove yourself)
Choose ระงับสิทธิ์ (Suspend access) (the menu also has ถอดออกจากร้าน (Remove from shop), but in shops connected to GoSaaS it is greyed out and cannot be clicked — see the note at the end)
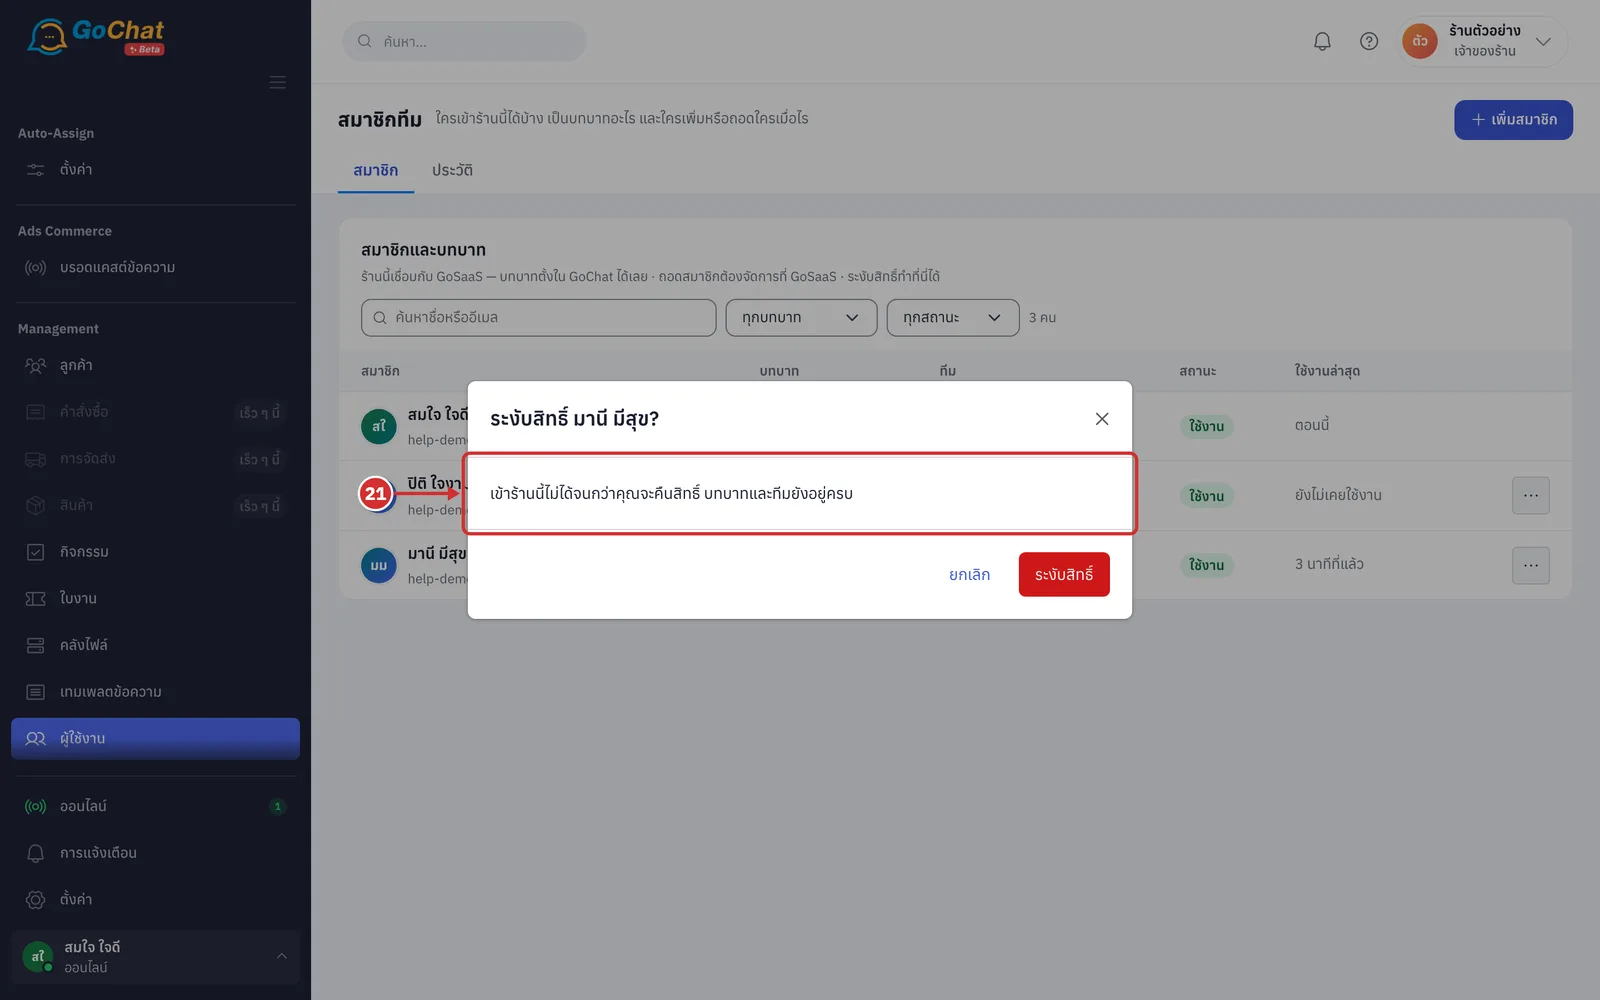
In the ระงับสิทธิ์ …? (Suspend …?) window, read what will happen: เข้าร้านนี้ไม่ได้จนกว่าคุณจะคืนสิทธิ์ บทบาทและทีมยังอยู่ครบ (They cannot enter this shop until you restore access; role and team are kept) (while the system counts their work it shows กำลังนับงานที่ถืออยู่… (Counting work in hand…)). If the person holds open chats or unclosed tickets, the window shows ถืออยู่ … แชท · … ใบงาน (Holding … chats · … tickets) and offers 2 options:
A คืนเข้าคิว (Return to queue — the default): chats and tickets go back to wait for someone, following your shop's chat assignment
B โอนให้ (Transfer to): move them all to one member, then choose that person
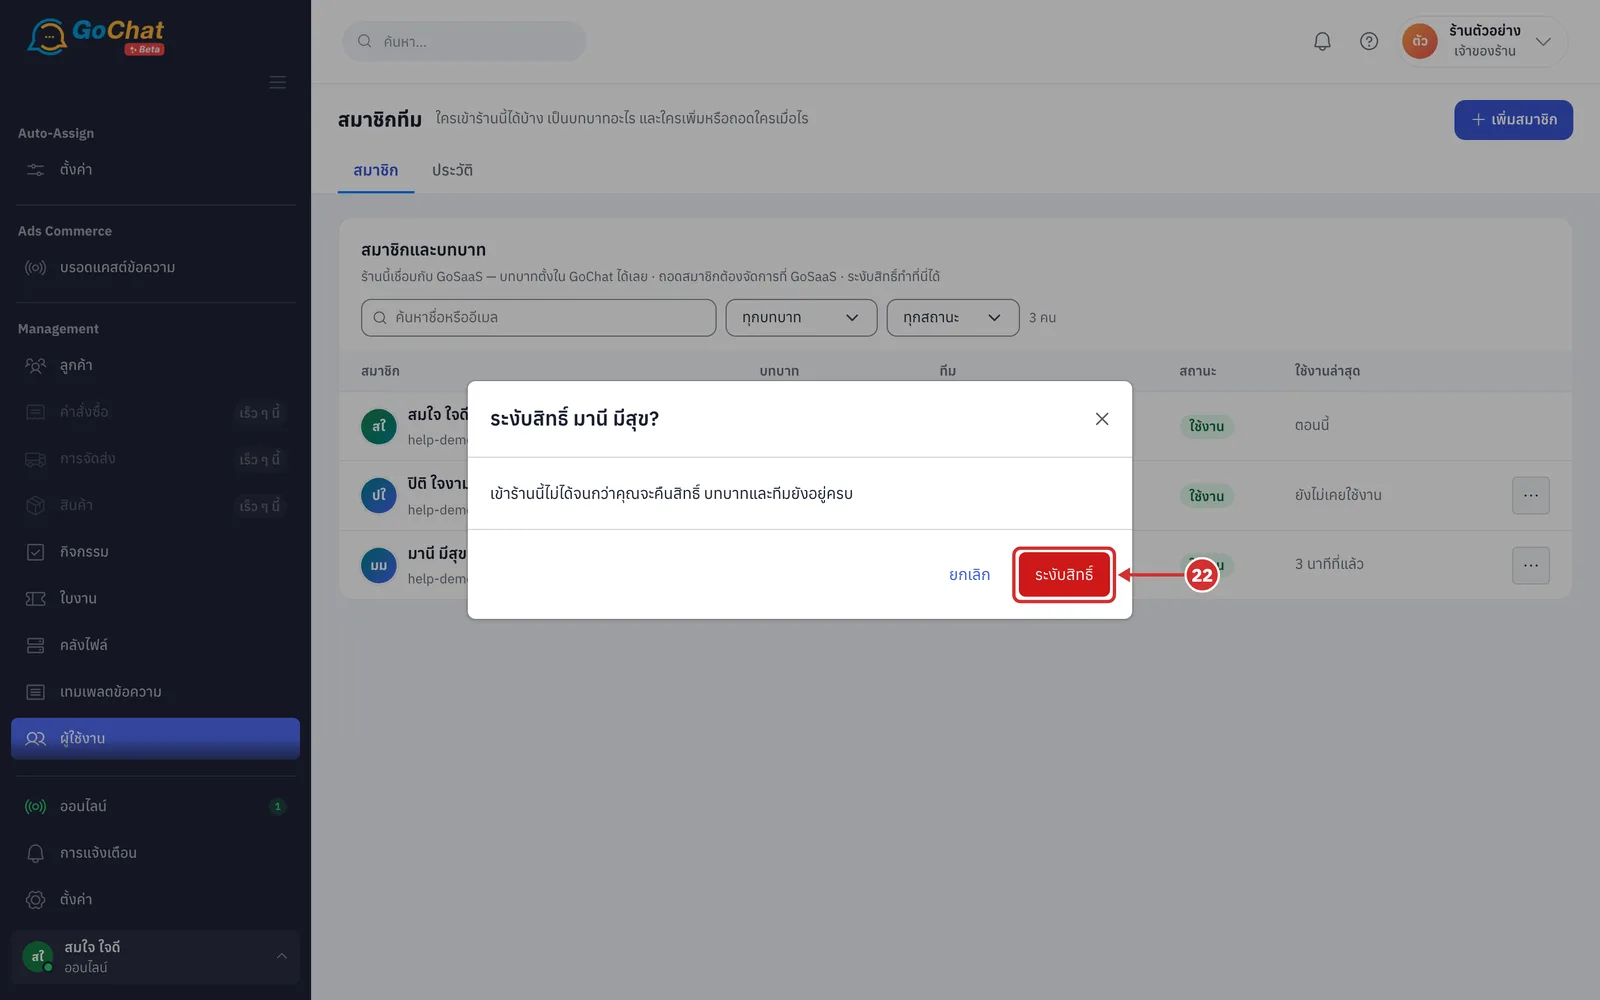
Click ระงับสิทธิ์ (Suspend access). The system shows ระงับสิทธิ์ … แล้ว (Suspended …) and the row's status changes to ถูกระงับ (Suspended) (click ยกเลิก (Cancel) to close the window without suspending)
To let the person back in, click the ⋯ button at the end of their row and choose คืนสิทธิ์ (Restore access). The system shows คืนสิทธิ์ให้ … แล้ว (Restored access for …); their role, team and assigned pages come back as before, but chats and tickets that were moved do not move back (you can restore access only while users are below your package's limit)
Viewing the member history
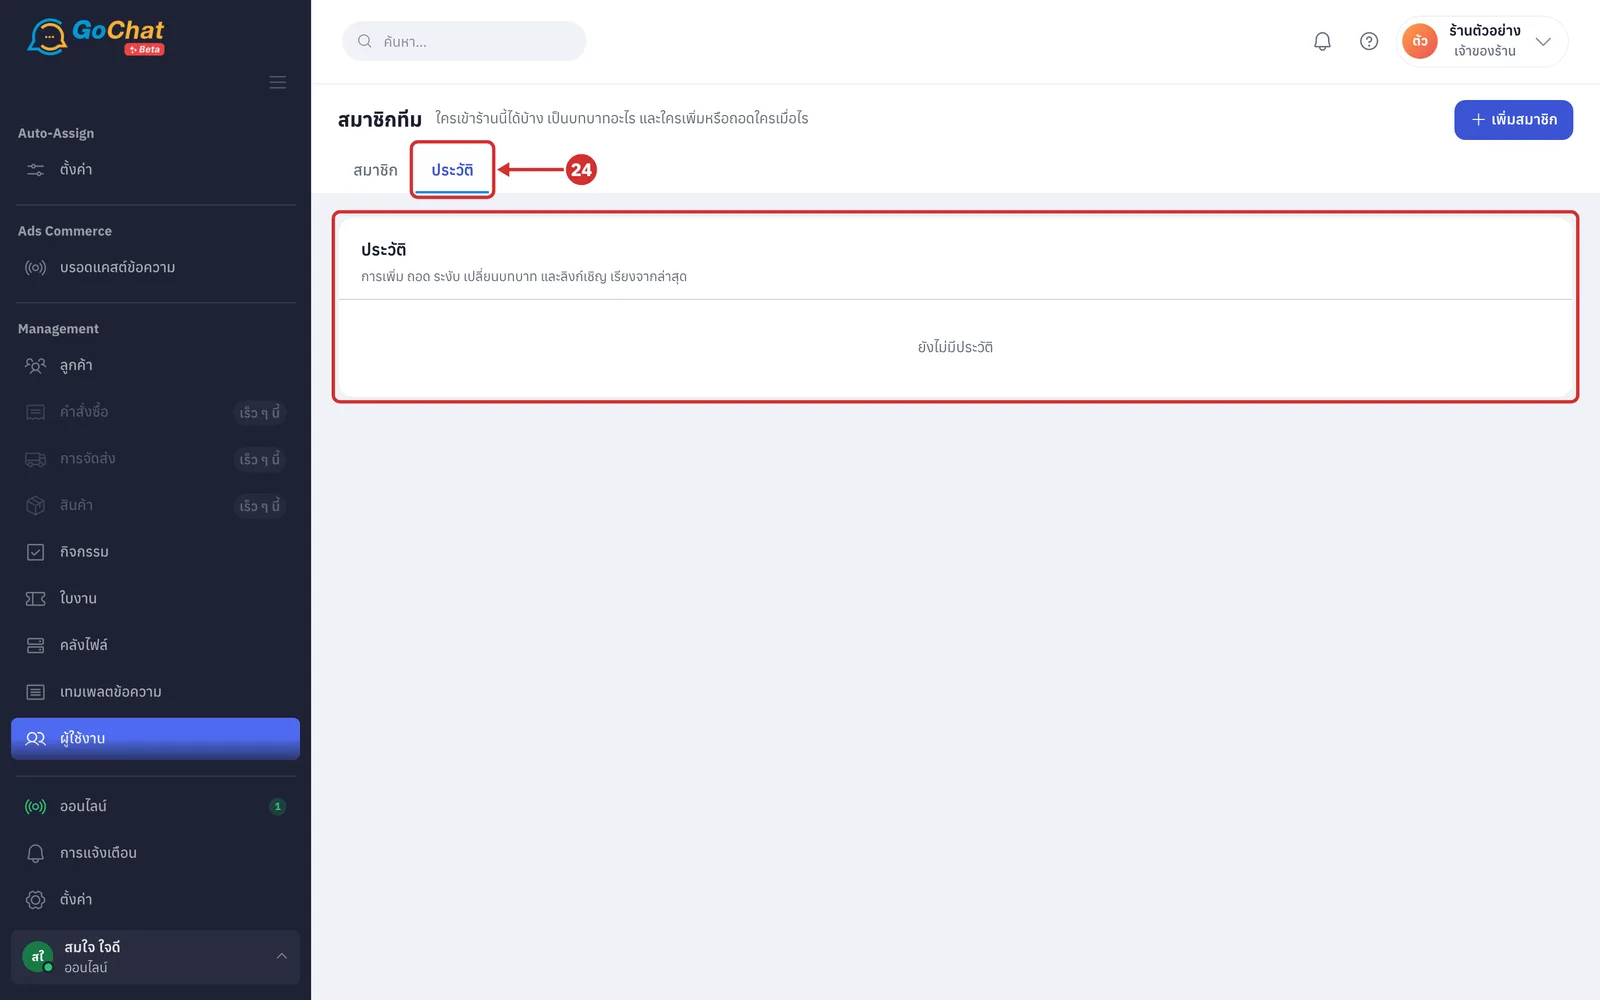
Click the ประวัติ (History) tab to see who did what to members and when, newest first, such as … เพิ่ม (added) … เข้าร้านเป็น (to the shop as) admin · … เปลี่ยนบทบาท (changed the role of) … · … ระงับสิทธิ์ (suspended) … (with how much work was returned to the queue or transferred to whom) · … คืนสิทธิ์ (restored) … · … ถอด (removed) … ออกจากร้าน (from the shop) (click โหลดเพิ่ม (Load more) at the end to see older entries · a shop with no member changes yet shows ยังไม่มีประวัติ (No history yet) · only shop owners see this tab)
What admins see on this page
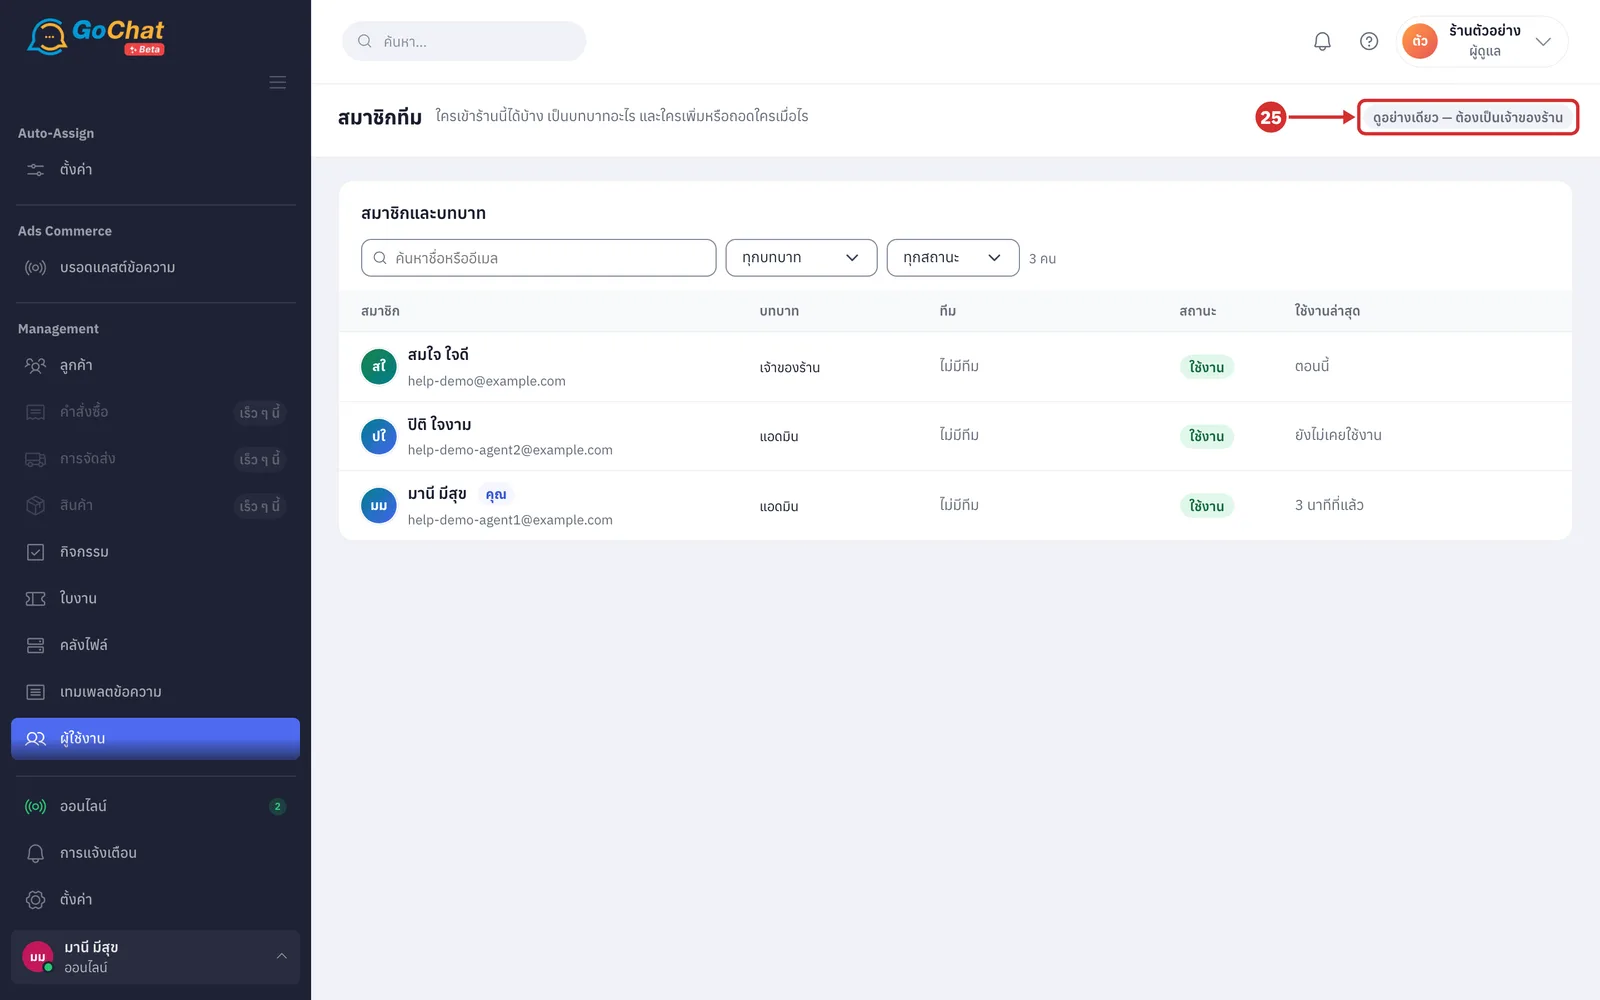
Users with the admin role can open this page, but they see the ดูอย่างเดียว — ต้องเป็นเจ้าของร้าน (View only — shop owner required) tag instead of the Add member button, no History tab, roles as plain text, and no ⋯ button at the end of rows
When users exceed the package
If the number of ใช้งาน (Active) people exceeds your package's users (for example after an add-on expires), this page shows a red bar สมาชิกที่ใช้งานอยู่ … / … — ระงับสิทธิ์อีก … คน ร้านจะกลับมาใช้งานได้ (Active members … / … — suspend … more people and the shop will work again). Suspend people who no longer need access as in steps 19–22, or click ซื้อผู้ใช้งานเพิ่ม (Buy more users) to go to the แพ็กเกจ (Package) page (see การเลือกและสั่งซื้อแพ็กเกจ). When the number fits, a green bar … — ครบตามแพ็กเกจแล้ว (… — within the package) appears with a ไปกล่องข้อความ (Go to inbox) button (suspended people and people not signed in yet are not counted)
Note: Shops connected to GoSaaS cannot remove members from the shop in GoChat (GoSaaS would bring the person back into the shop when they sign in). Manage users on GoSaaS, and to stop someone from entering the shop right away, use ระงับสิทธิ์ (Suspend access).