

Using the customer panel
The customer panel is on the right of the chat on the ข้อความ (Messages) page. Use it to see who looks after this customer, tag customers into groups, keep their phone number and address, note what the team needs to know, and follow up. Everyone in the shop can edit the panel, and every change is kept in the edit history. Customers do not see anything in this panel.
Opening the panel and naming the chat
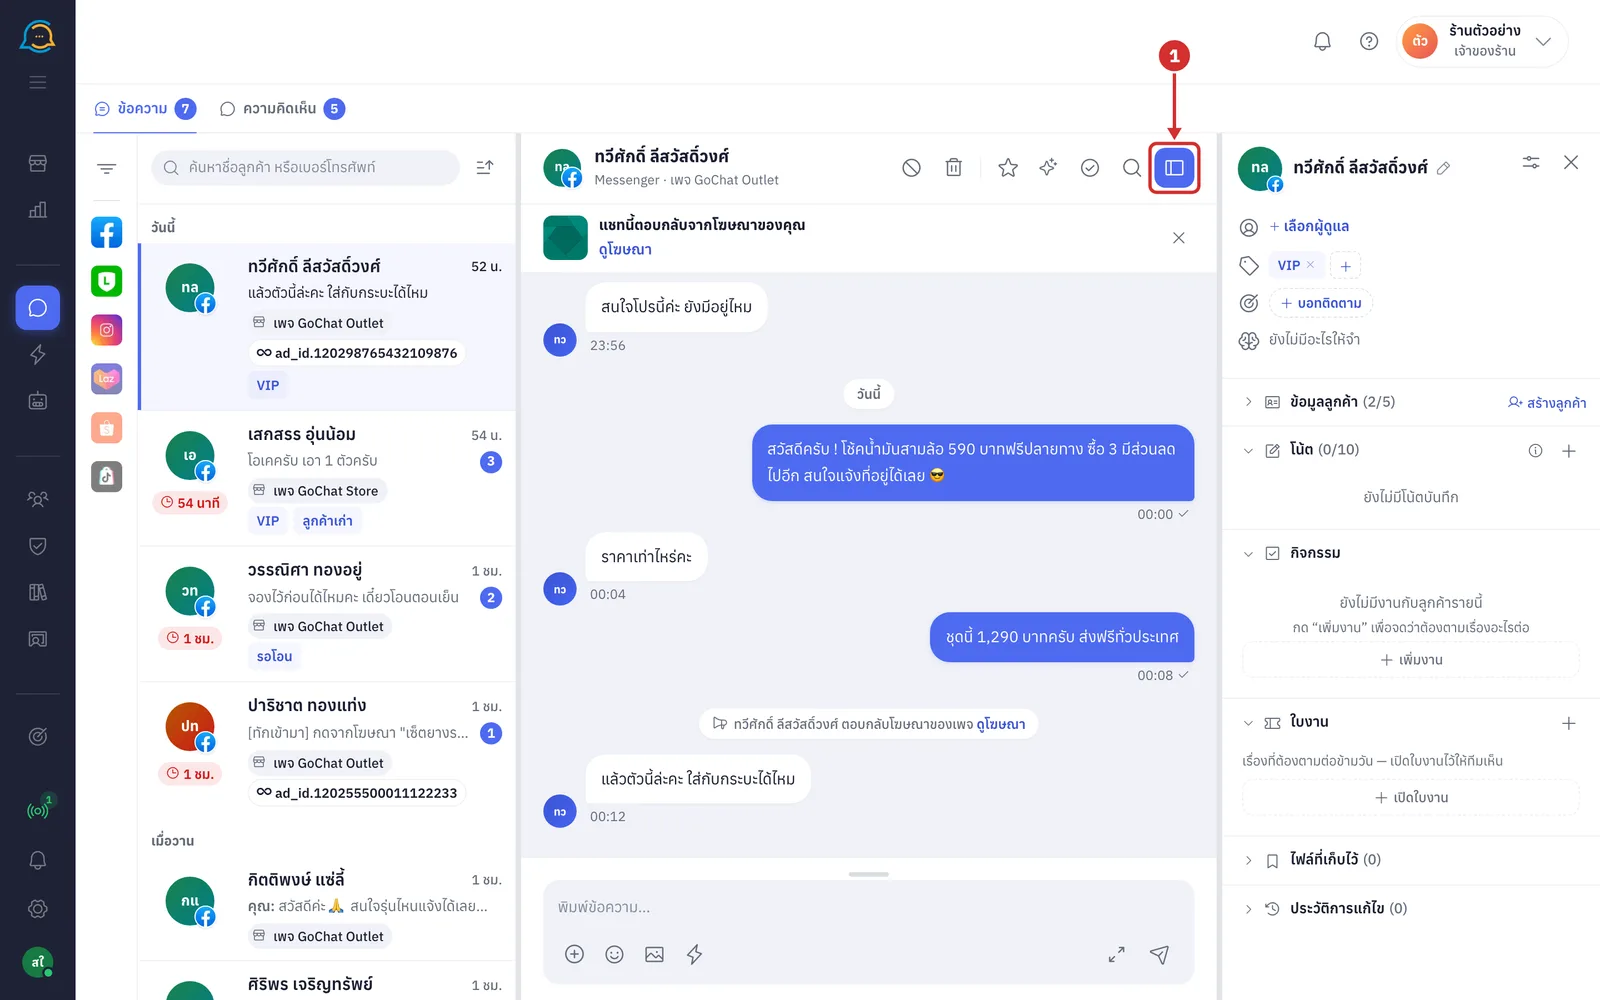
In a chat, click the ข้อมูลลูกค้า (Customer info) button at the far right of the chat header to open the panel on the right (click again to close it · see the other header buttons in Chat header tools)
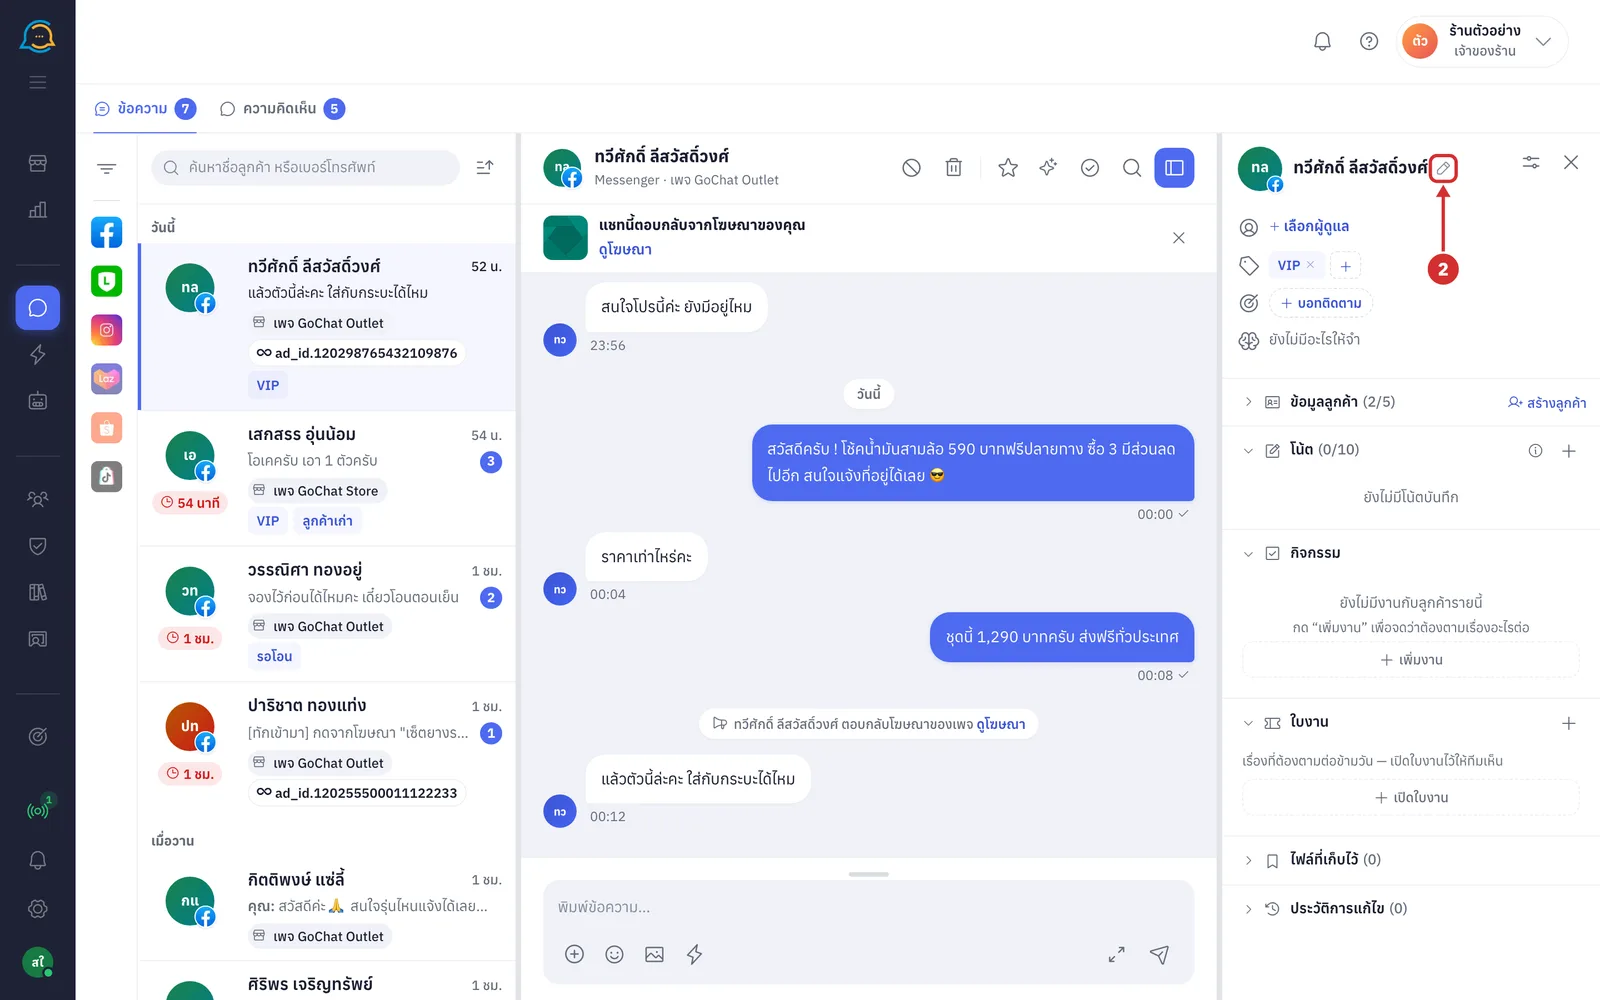
Click the pencil (ตั้งชื่อห้องนี้ (Name this chat)) next to the customer name on the panel to give the chat your own name, such as the product the customer asked about, so it is easier to find
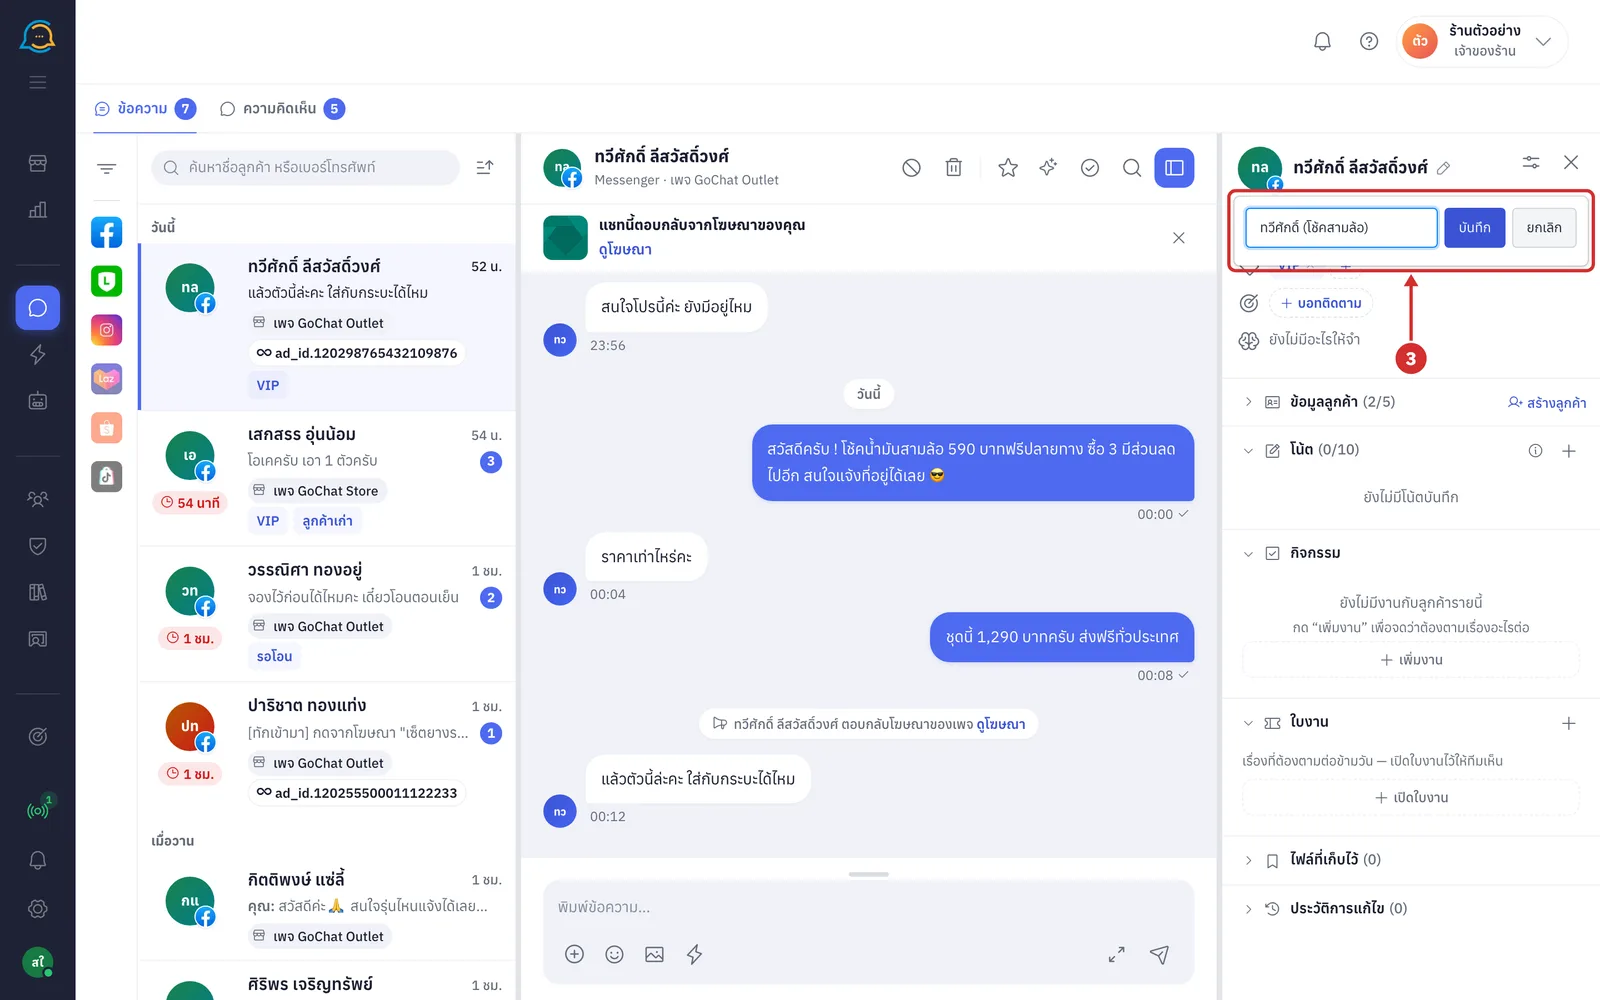
Type the name you want, up to 120 characters, then click บันทึก (Save). The name replaces the customer name on the chat header, the chat list and the panel (only people in your shop see it; it is not sent to the customer · for a named chat, hover over the name to see the original name · clear the name and click บันทึก (Save) to go back to the original name · click ยกเลิก (Cancel) or outside the box to leave without changing)
Choosing an owner
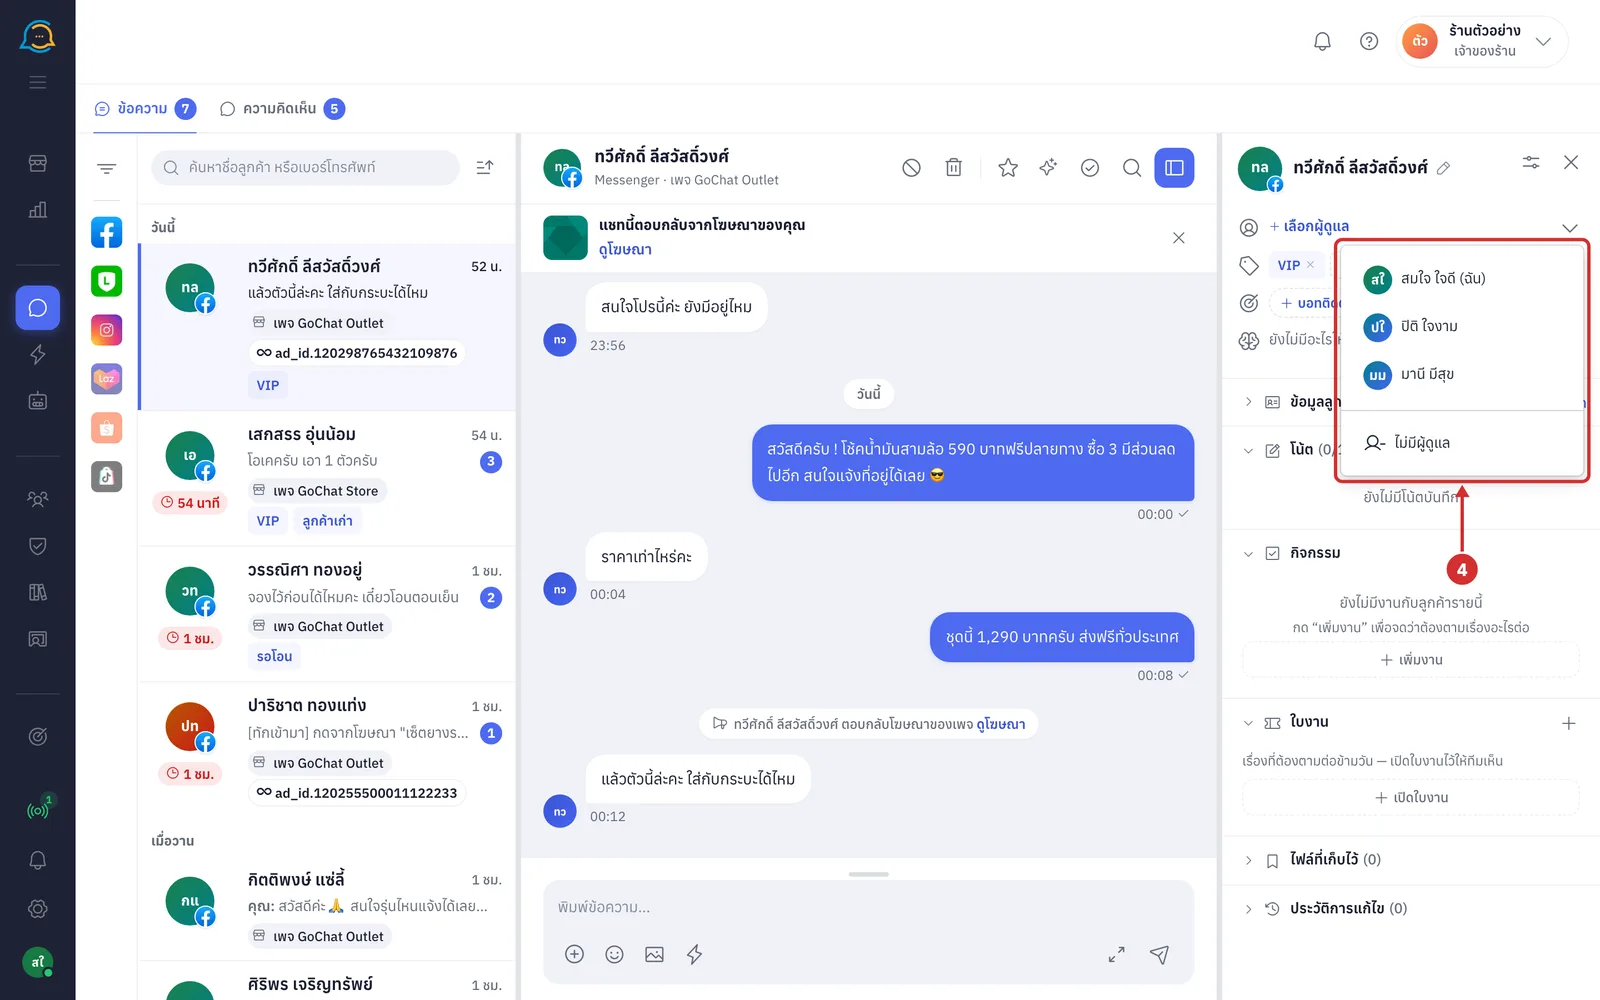
In the owner row, click เลือกผู้ดูแล (Choose owner) and pick the person in your shop who will look after this chat. It saves as soon as you pick
Your own name has (ฉัน) (me) after it; you can only pick people on this shop's team
Pick ไม่มีผู้ดูแล (No owner) to remove the owner
Once there is an owner, the row shows their picture and name; click the arrow at the end of the row (เปลี่ยนผู้ดูแล (Change owner)) to change the person
In shops with chat assignment turned on, if the system needs confirmation first, it shows the reason with a ยืนยันเกินเพดาน (Confirm over limit) button in the same row
Adding tags
Tags belong to the chat and are used to filter the chat list later. Adding or removing a tag saves immediately.
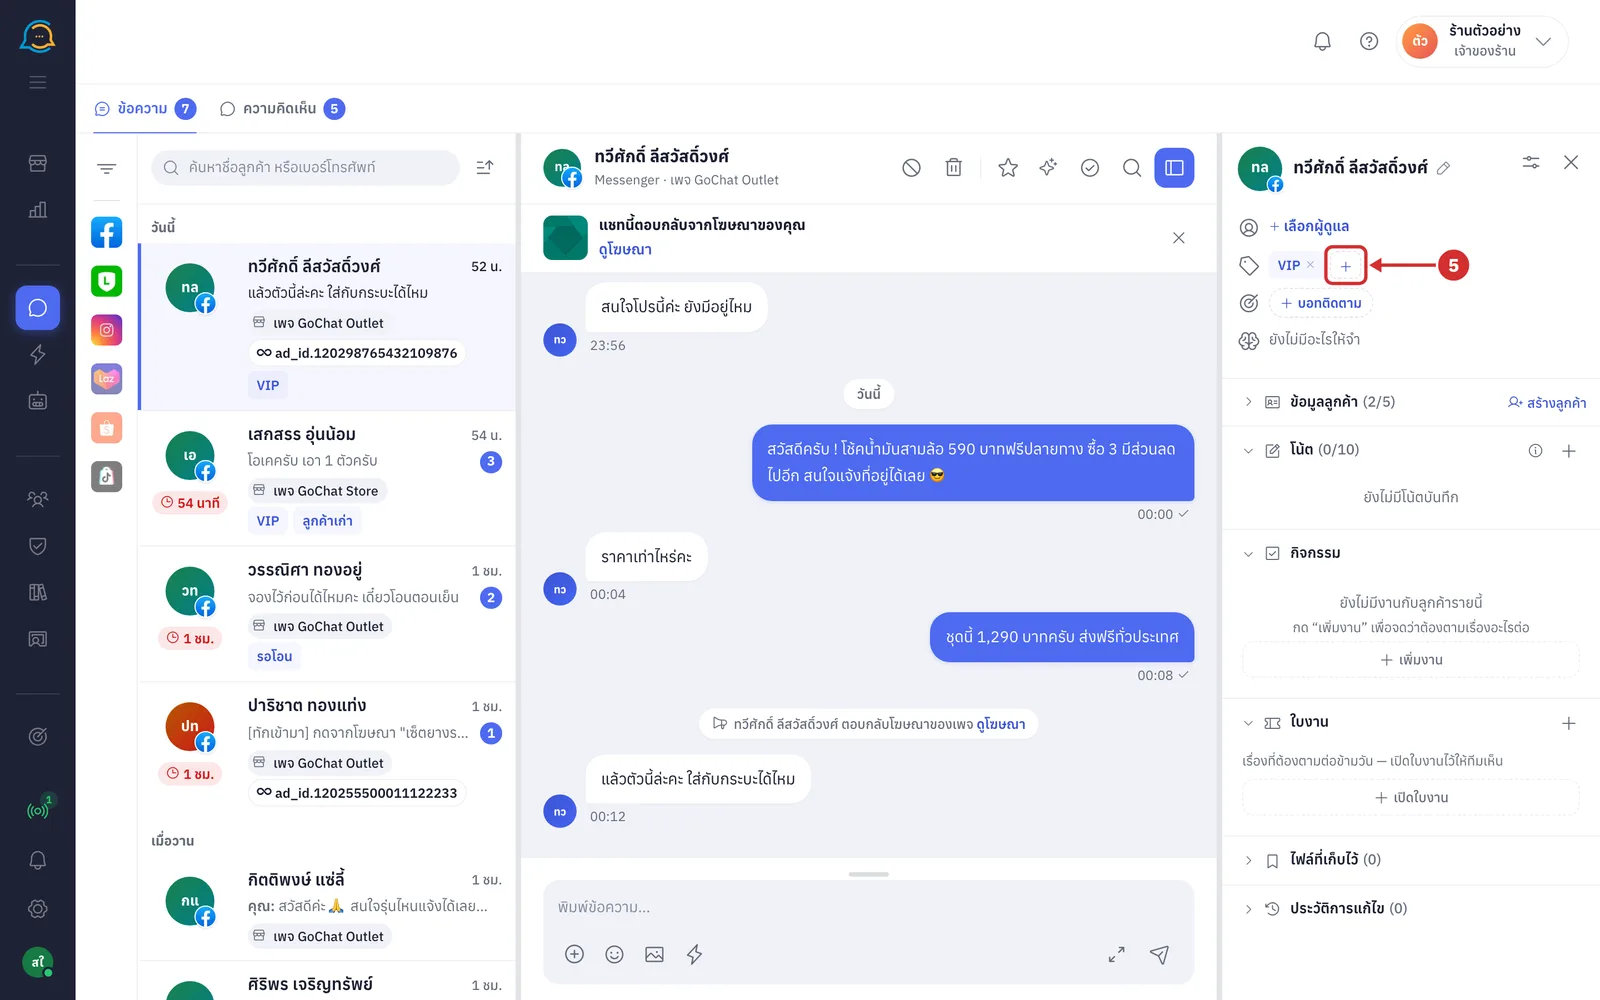
In the tag row, click + (เพิ่มแท็ก (Add tag)) after the existing tags (chats with no tags show the words เพิ่มแท็ก (Add tag) instead)
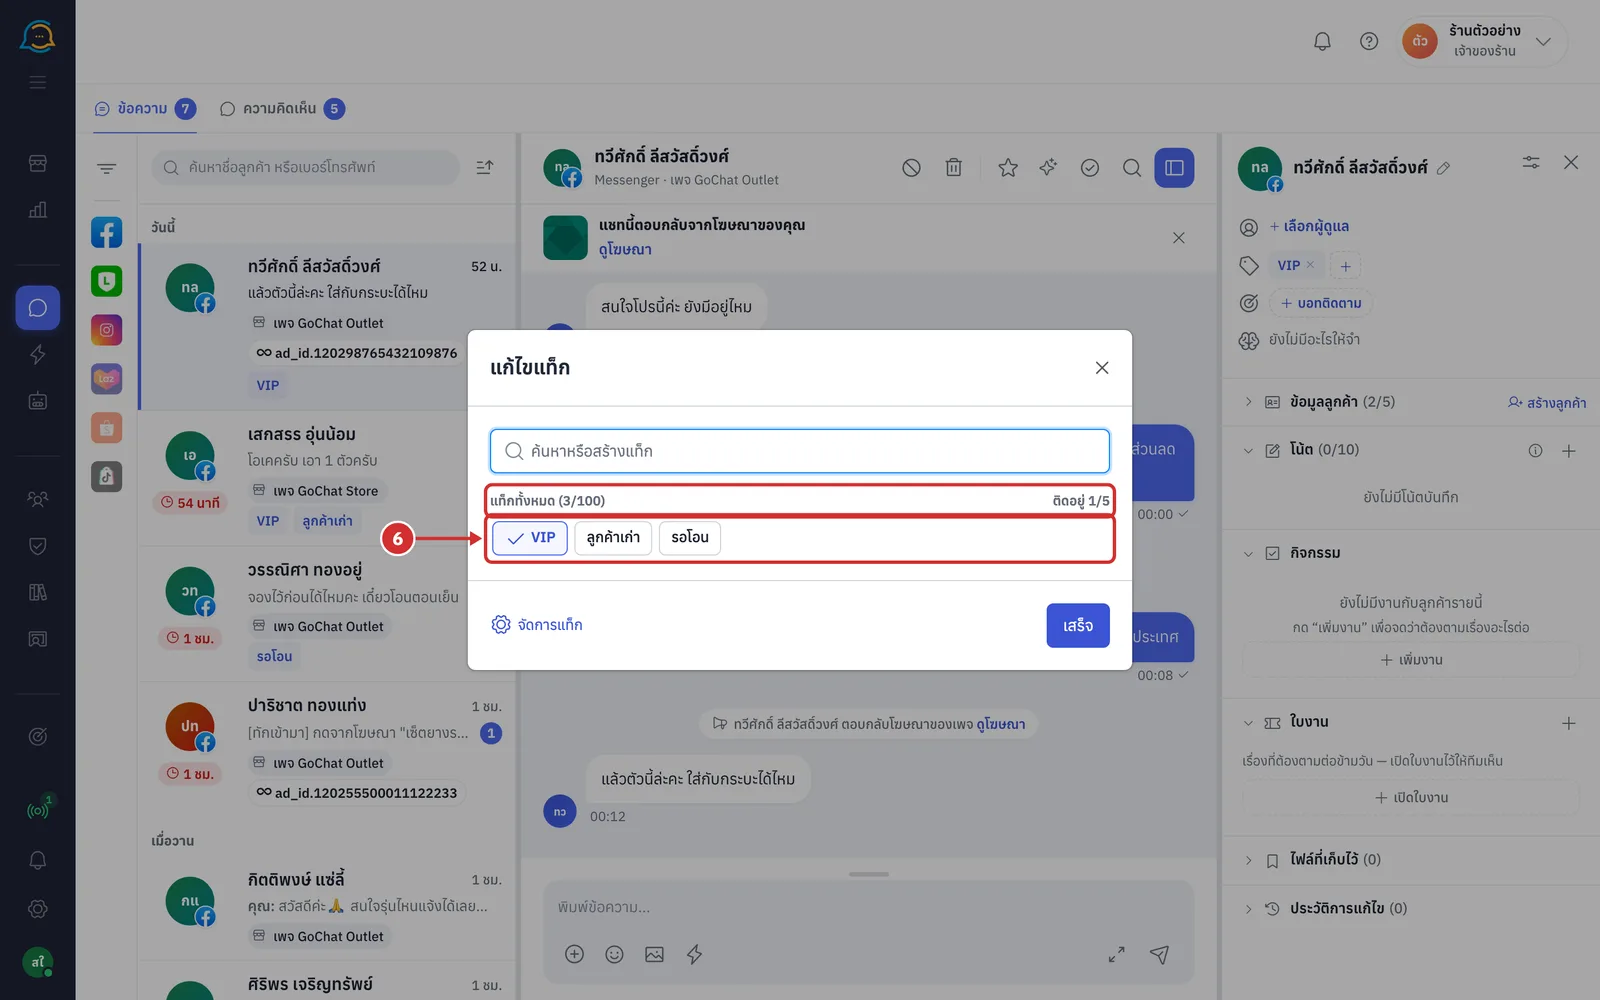
In the แก้ไขแท็ก (Edit tags) window, click a shop tag to add it to this chat. Tags already on the chat have a check mark; click again to remove. The top shows แท็กทั้งหมด (All tags) of the shop and how many are ติดอยู่ (Attached) to this chat (the number after / is the limit for your package; when it is full, remove one first). Click จัดการแท็ก (Manage tags) to rename or delete shop tags, and click เสร็จ (Done) to close the window
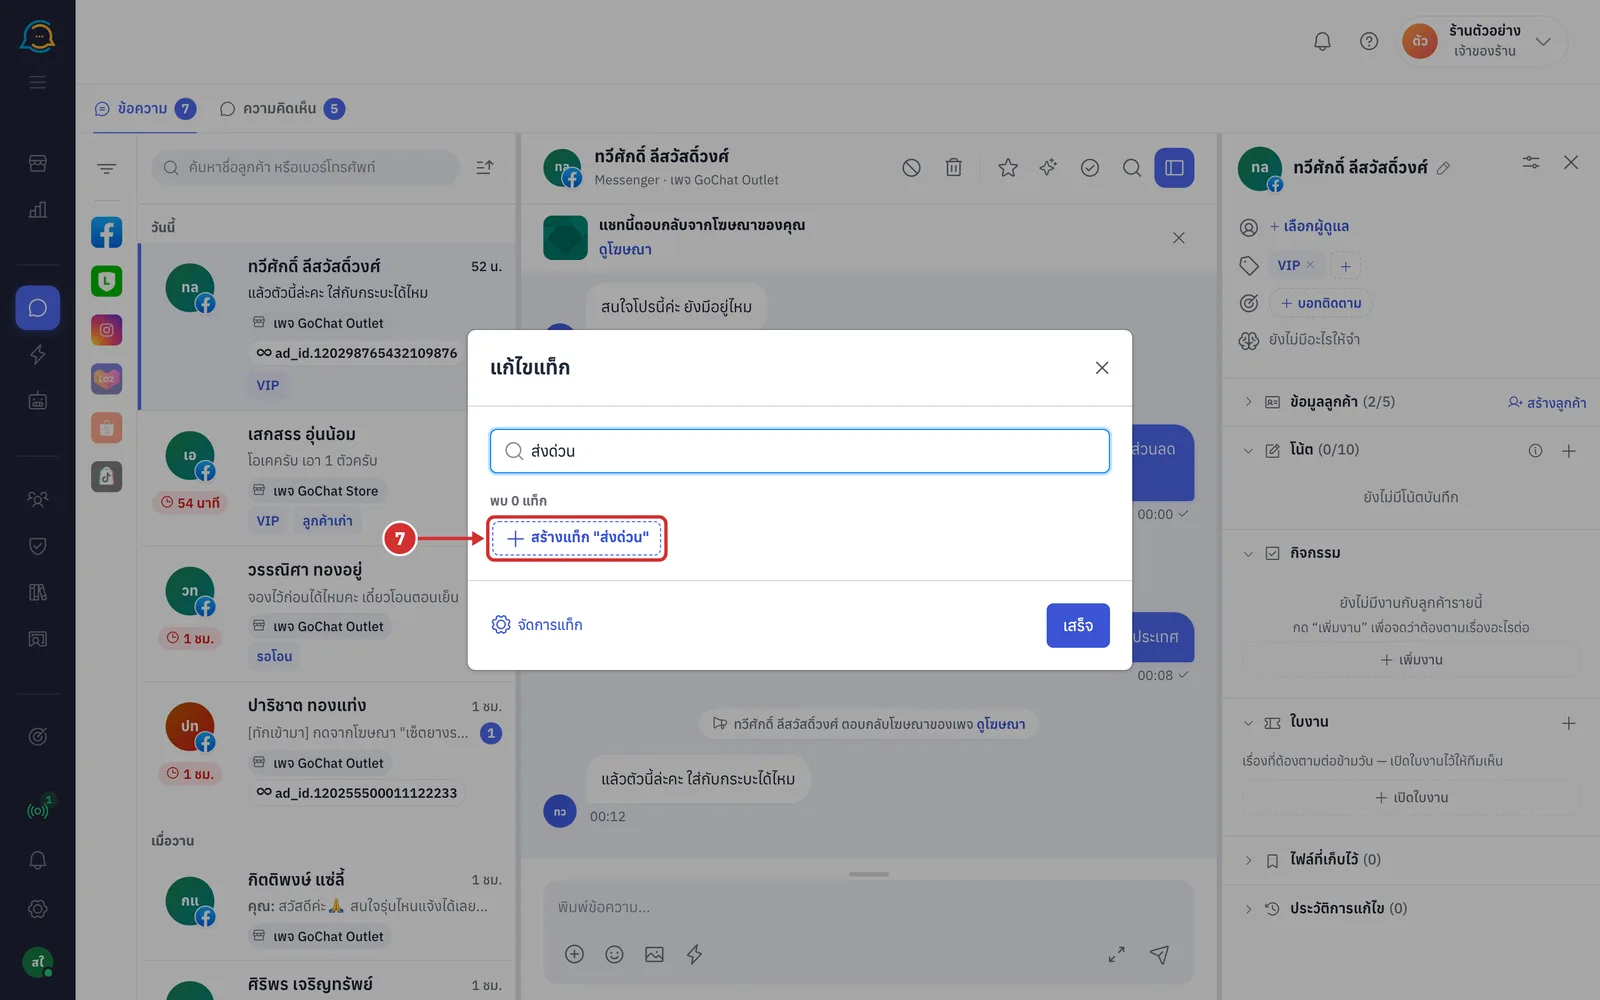
If the tag you want does not exist, type its name in ค้นหาหรือสร้างแท็ก (Search or create a tag), up to 40 characters, then click สร้างแท็ก "…" (Create tag "…"). The system creates the tag for your shop and adds it to this chat (typing an existing name finds that tag for you to click instead)
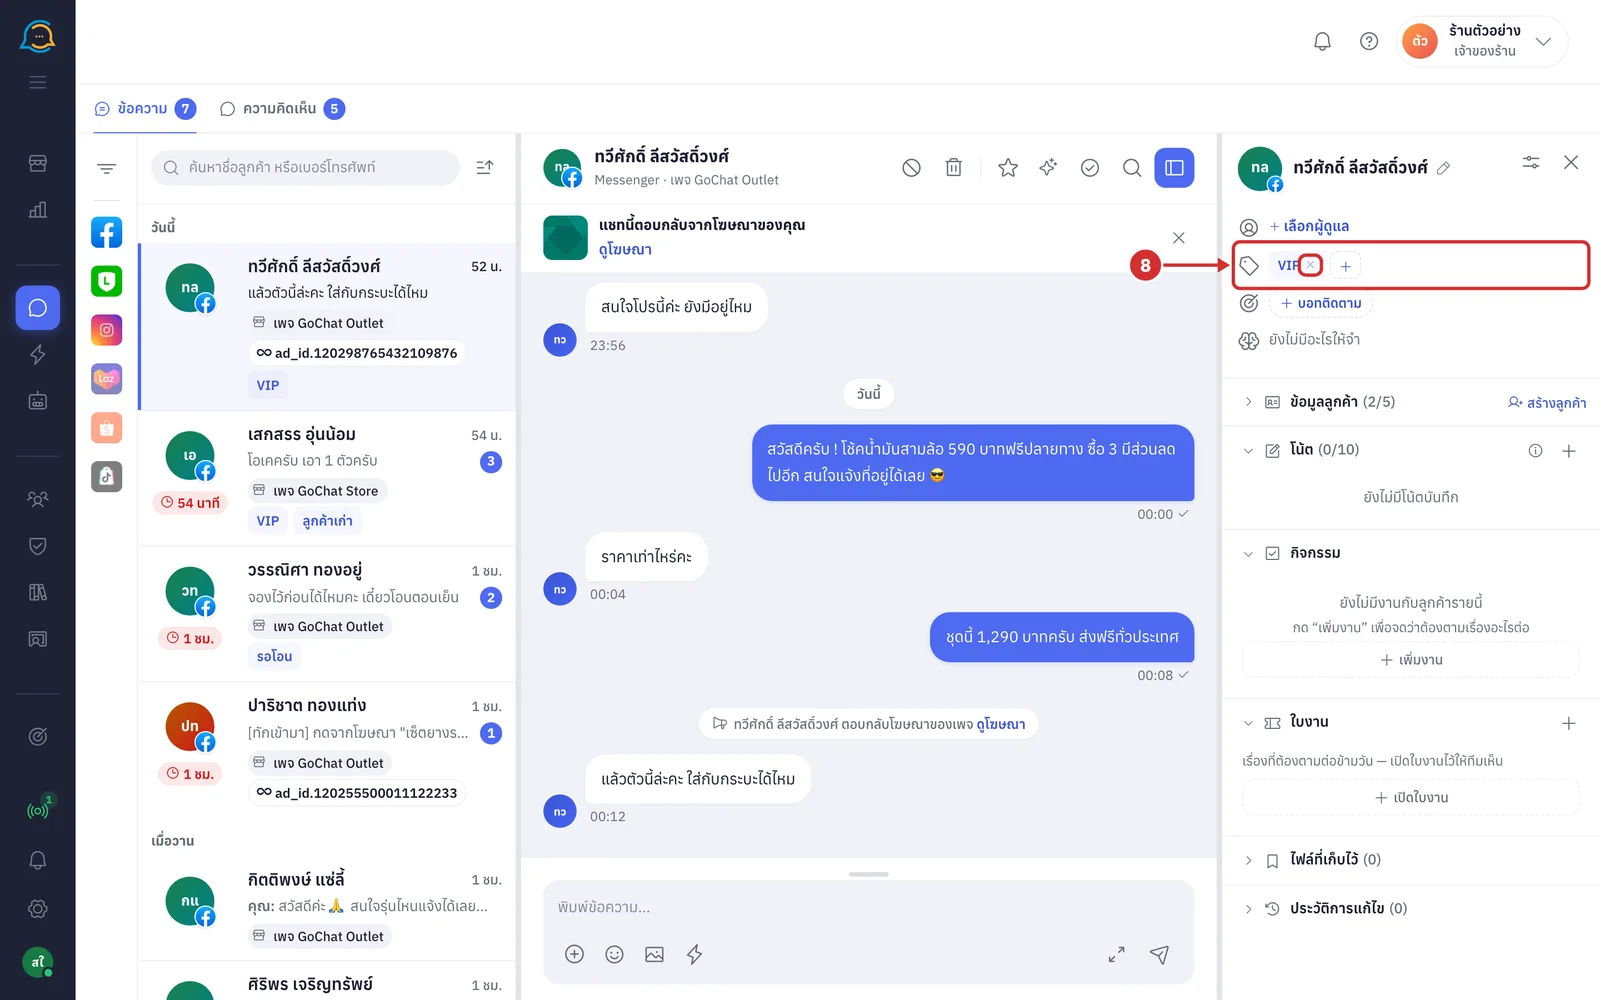
Click × on a tag in the panel to remove it from this chat (the tag stays in your shop and can be added again)
Follow-up bots and chat memory
Click + บอทติดตาม (+ Follow-up bot) to attach a bot that messages the customer again when they go quiet. In the แนบบอทติดตาม (Attach follow-up bot) window, choose a บอท (Bot) and a สินค้า (Product); the system previews the first step's message and when it will be sent. Then click แนบบอท (Attach bot) (create bots in Creating a sales follow-up bot)
Once attached, this row shows the bot's name and its steps, such as ขั้น 1 · ข้อความ (Step 1 · Message), with when each step was or will be sent
Click หยุด (Stop) to stop the bot in this chat, and click (i) next to the bot's name to see when the bot stops by itself
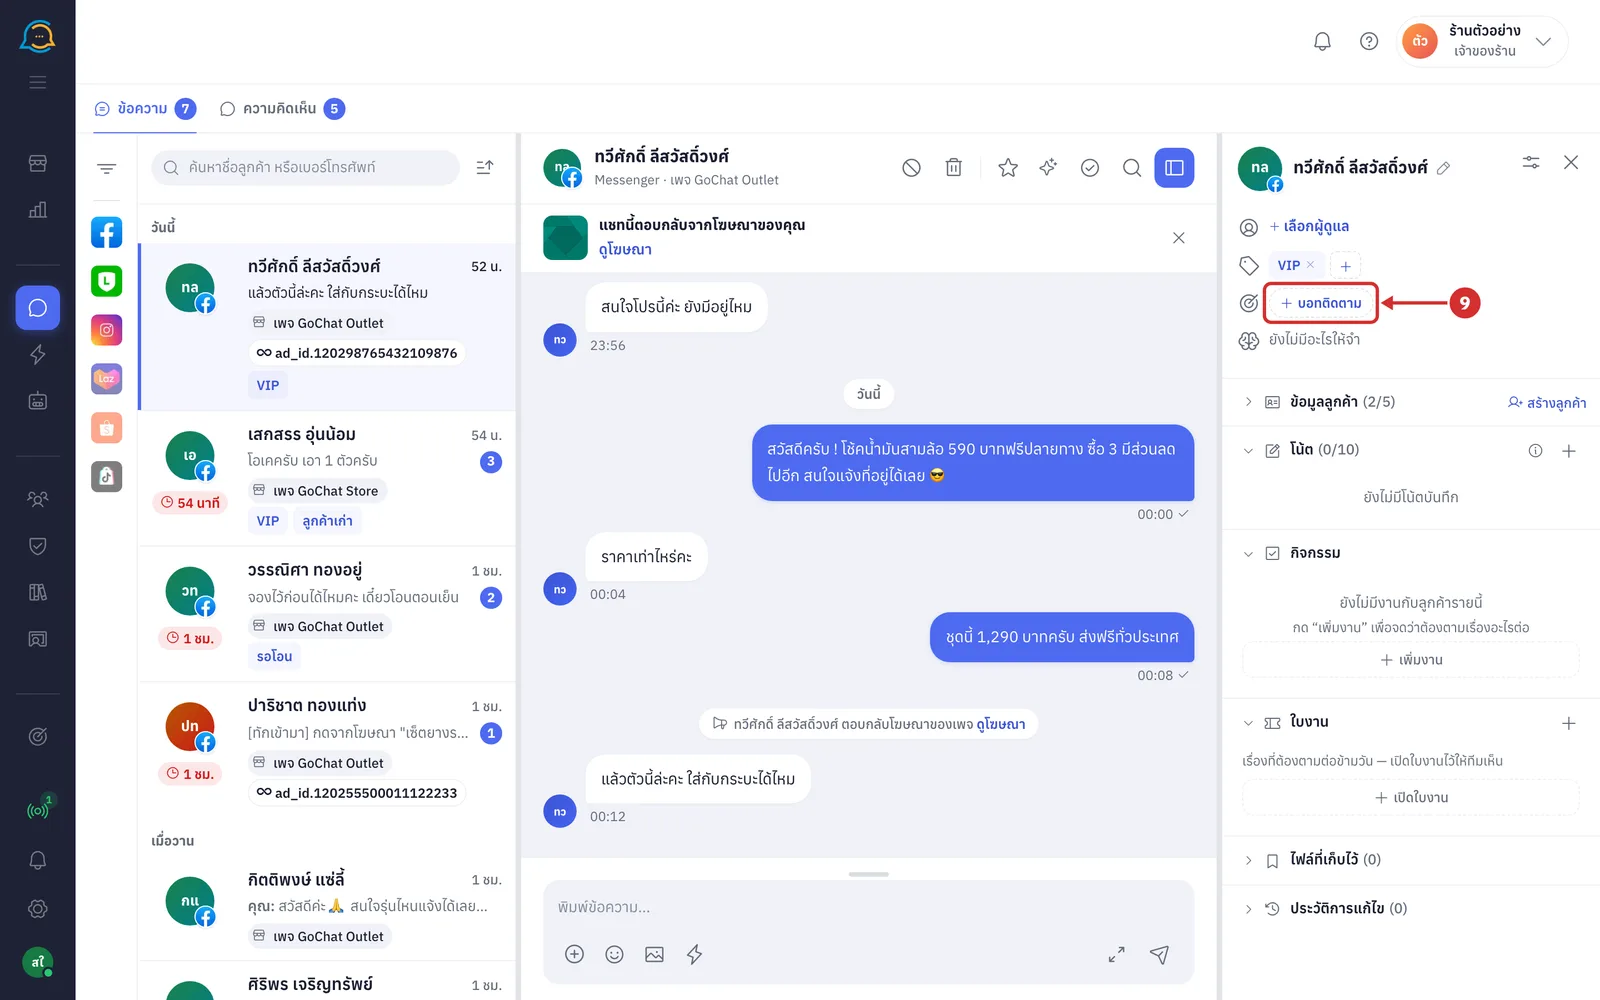
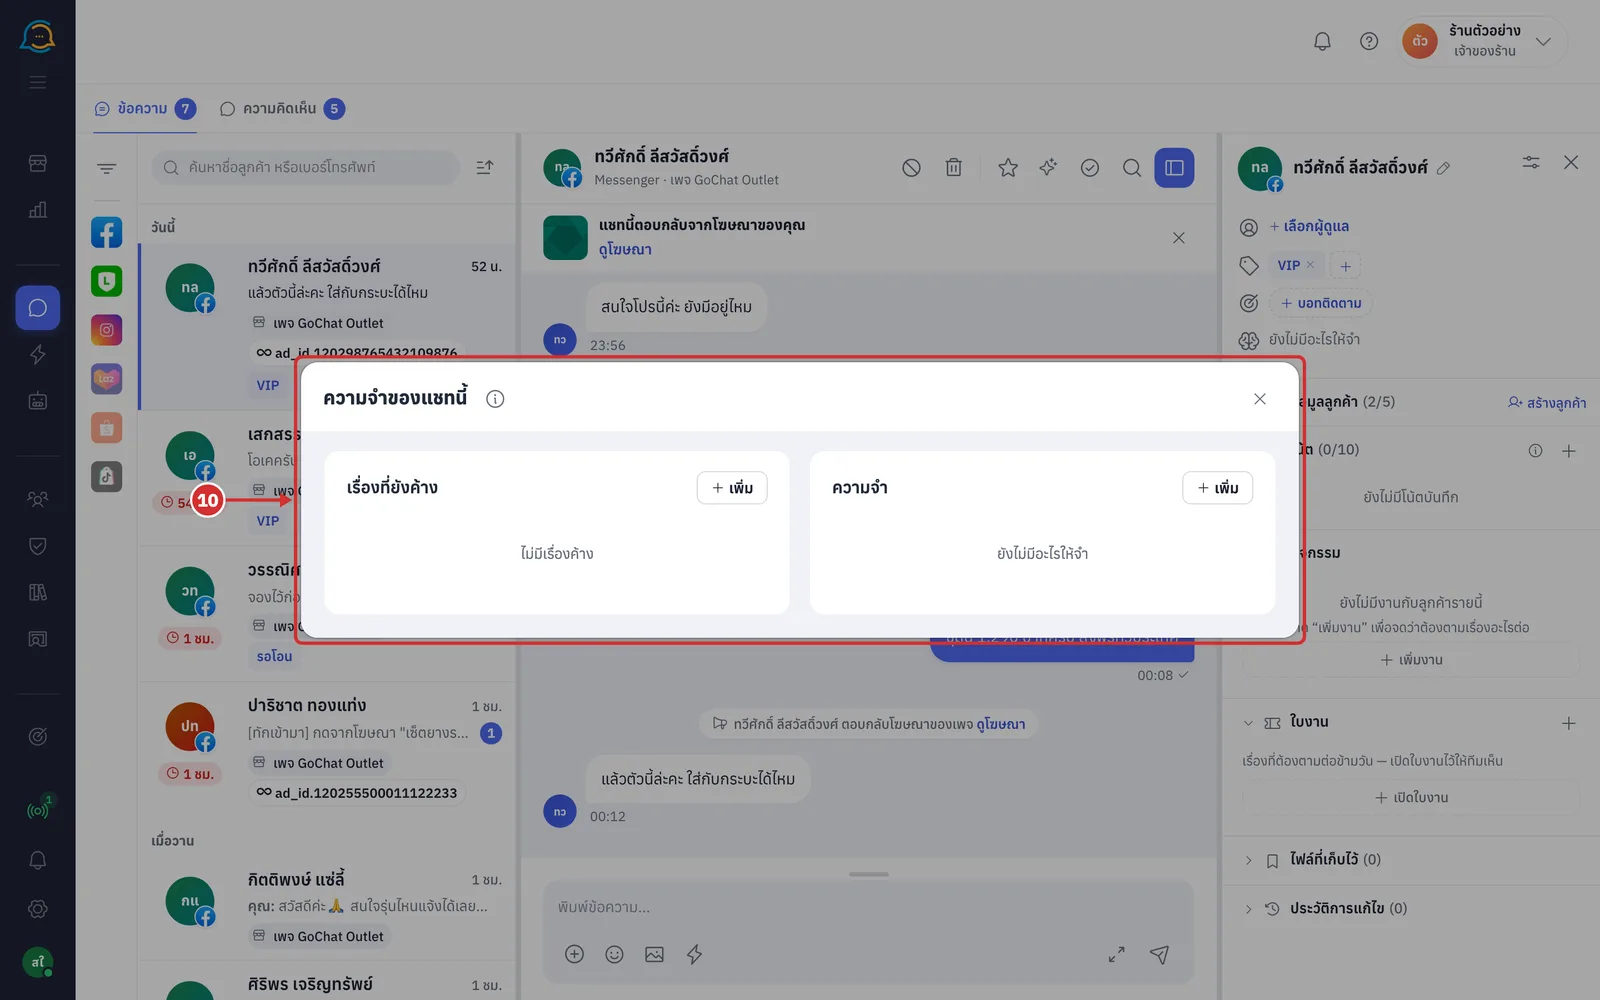
Click the ความจำของแชทนี้ (This chat's memory) row (under the follow-up bot) to open what AI has noted from the chat for drafting replies; customers do not see it. The window has two parts
เรื่องที่ยังค้าง (Open items) are things still to do for the customer. For each one, click เสร็จแล้ว (Done) when finished, or เปิดใบงาน (Open ticket) to hand it to the team as a ticket
ความจำ (Memory) holds facts about the customer. AI คาด (AI guess) means AI inferred it; แอดมินเขียน (Written by admin) means someone in your shop wrote it (AI does not change items written by admins)
Click เพิ่ม (Add) to write your own in either part, click the pencil to edit, or ลบ (Delete) (after deleting, AI will not note it again until the customer mentions it again)
Saving customer details
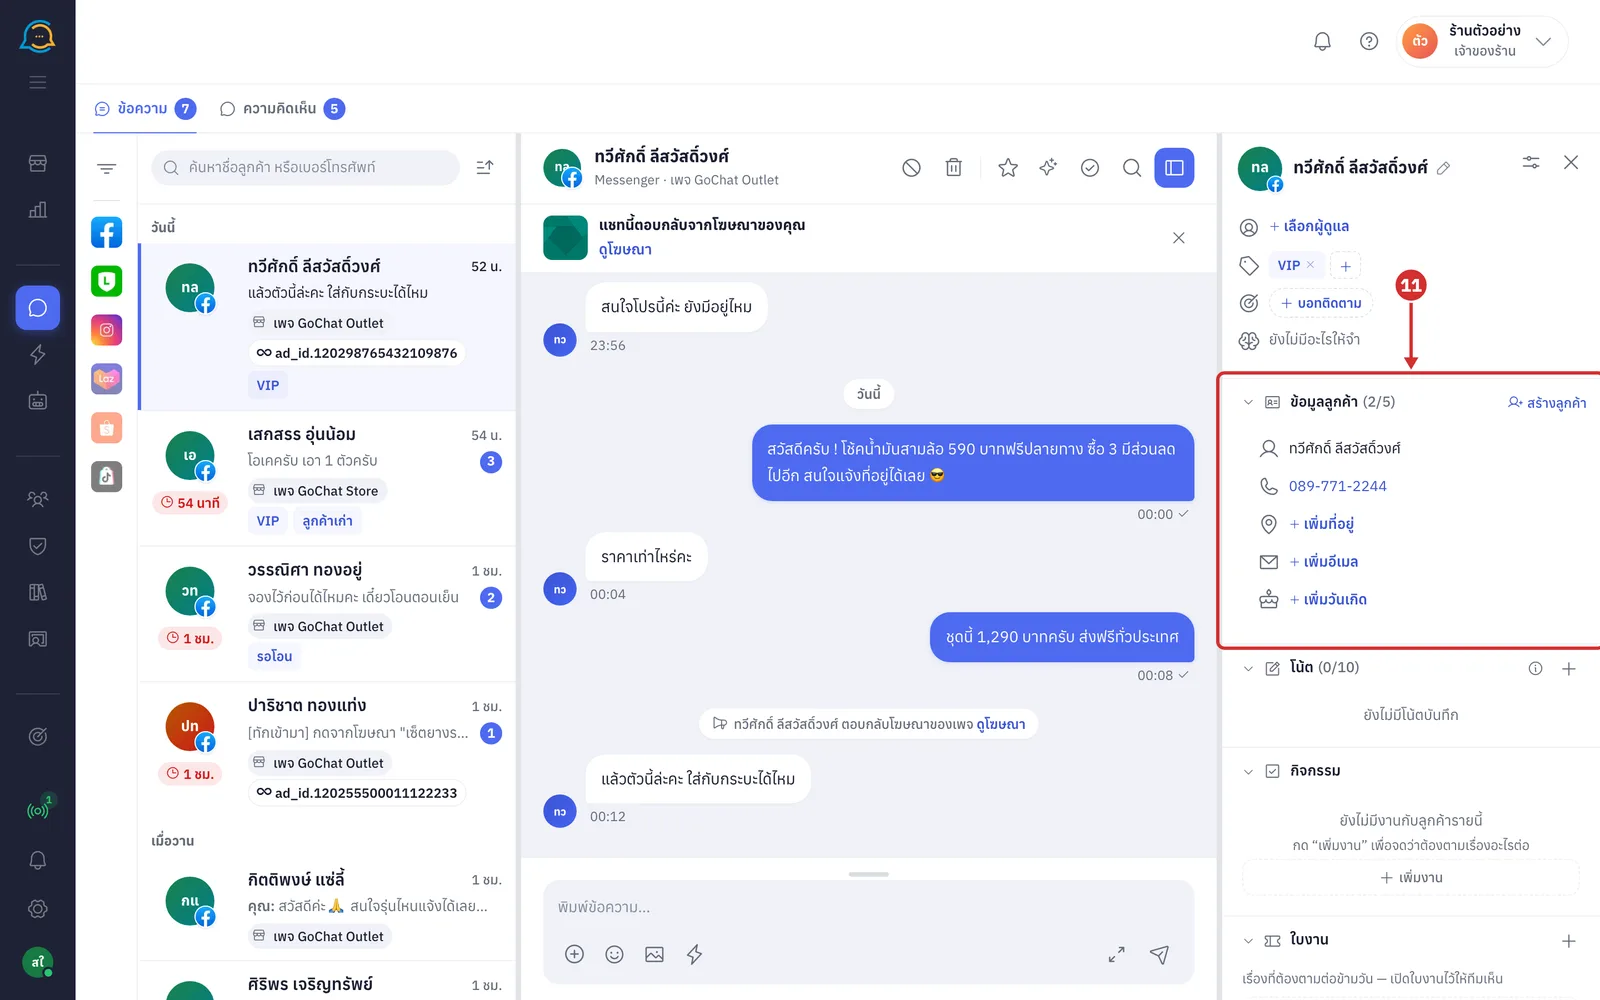
Customer details are saved one field at a time. Click the pencil or the เพิ่ม… (Add…) button of a field, type, then click บันทึก (Save) (or Enter). Click ยกเลิก (Cancel) or Esc to leave without saving.
Click the ข้อมูลลูกค้า (Customer info) heading to expand the details. The numbers in brackets, such as (2/5), are how many of the 5 fields are filled in (name · phone · address · email · birthday)
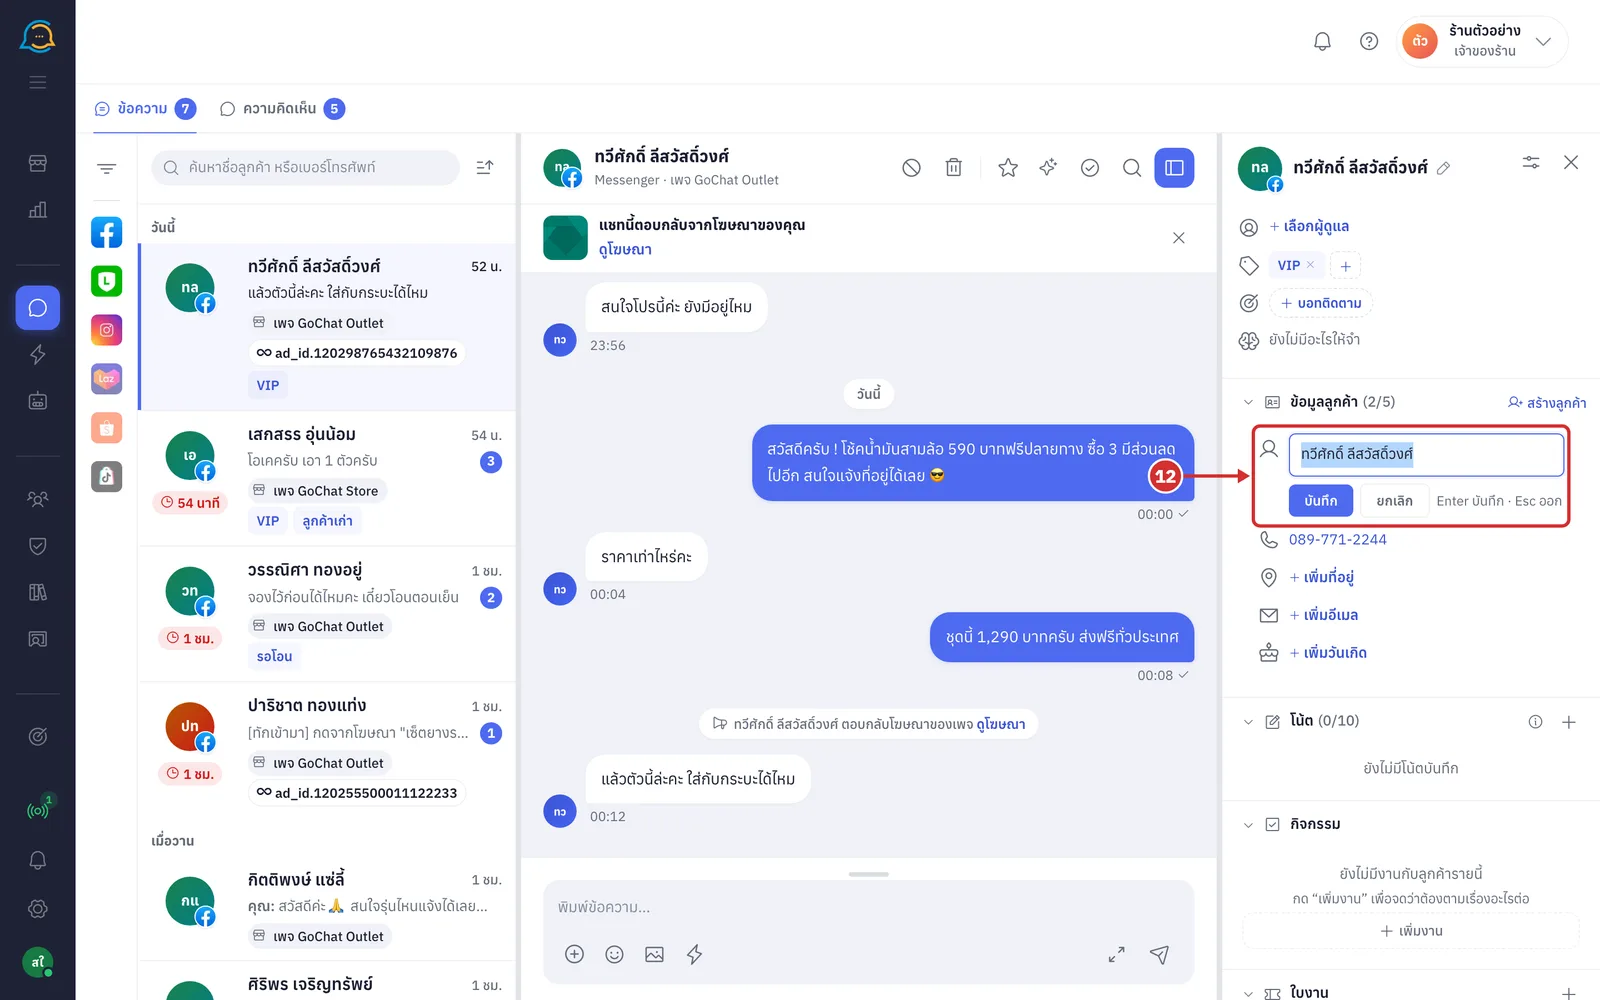
In ชื่อ (Name), click the pencil (แก้ชื่อ (Edit name)) and type the customer's real name (if empty, the name from the channel shows in light text · when you save a name in a chat that is not a customer yet, the system asks สร้างข้อมูลลูกค้า “…” ด้วยเลยไหม? (Create customer “…” as well?); click สร้างลูกค้า (Create customer) or ไม่ต้อง (No thanks))
In โทรศัพท์ (Phone), click เพิ่มเบอร์ (Add number) or the pencil to enter the customer's phone number (a saved number can be clicked to call)
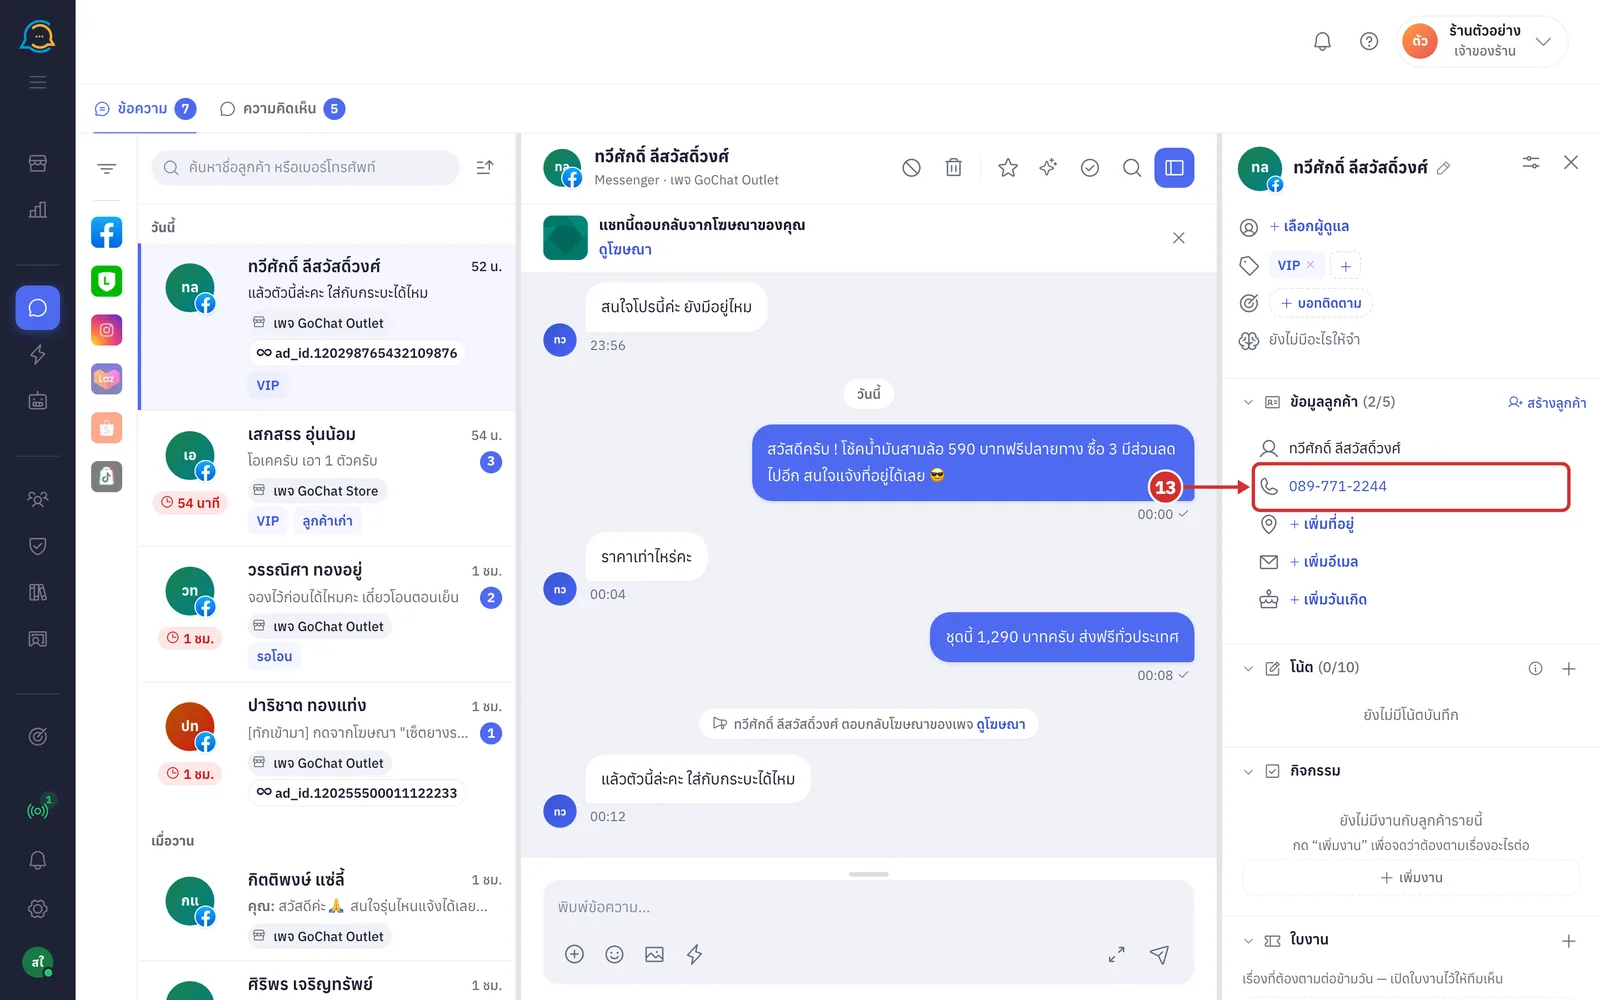
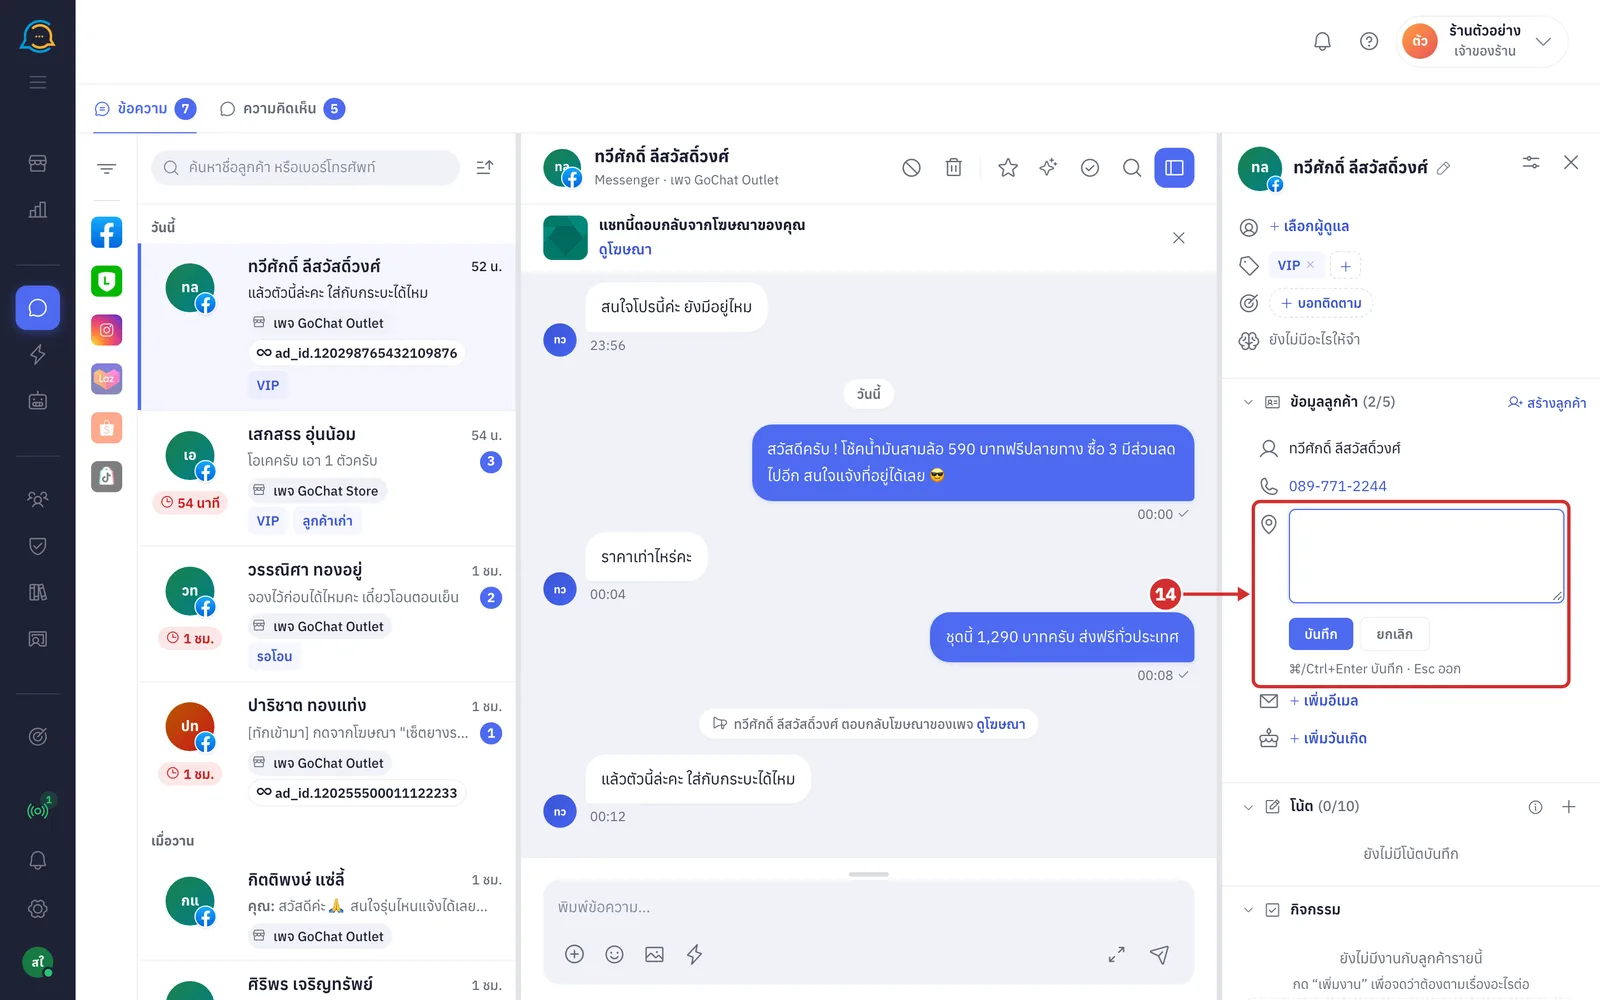
In ที่อยู่ (Address), click เพิ่มที่อยู่ (Add address) to enter the customer's address. This field takes several lines; press ⌘/Ctrl + Enter to save (if the customer sent their address themselves and you overwrite it, a คืนค่าที่ลูกค้าส่ง (Restore what the customer sent) button appears under the address to bring it back)
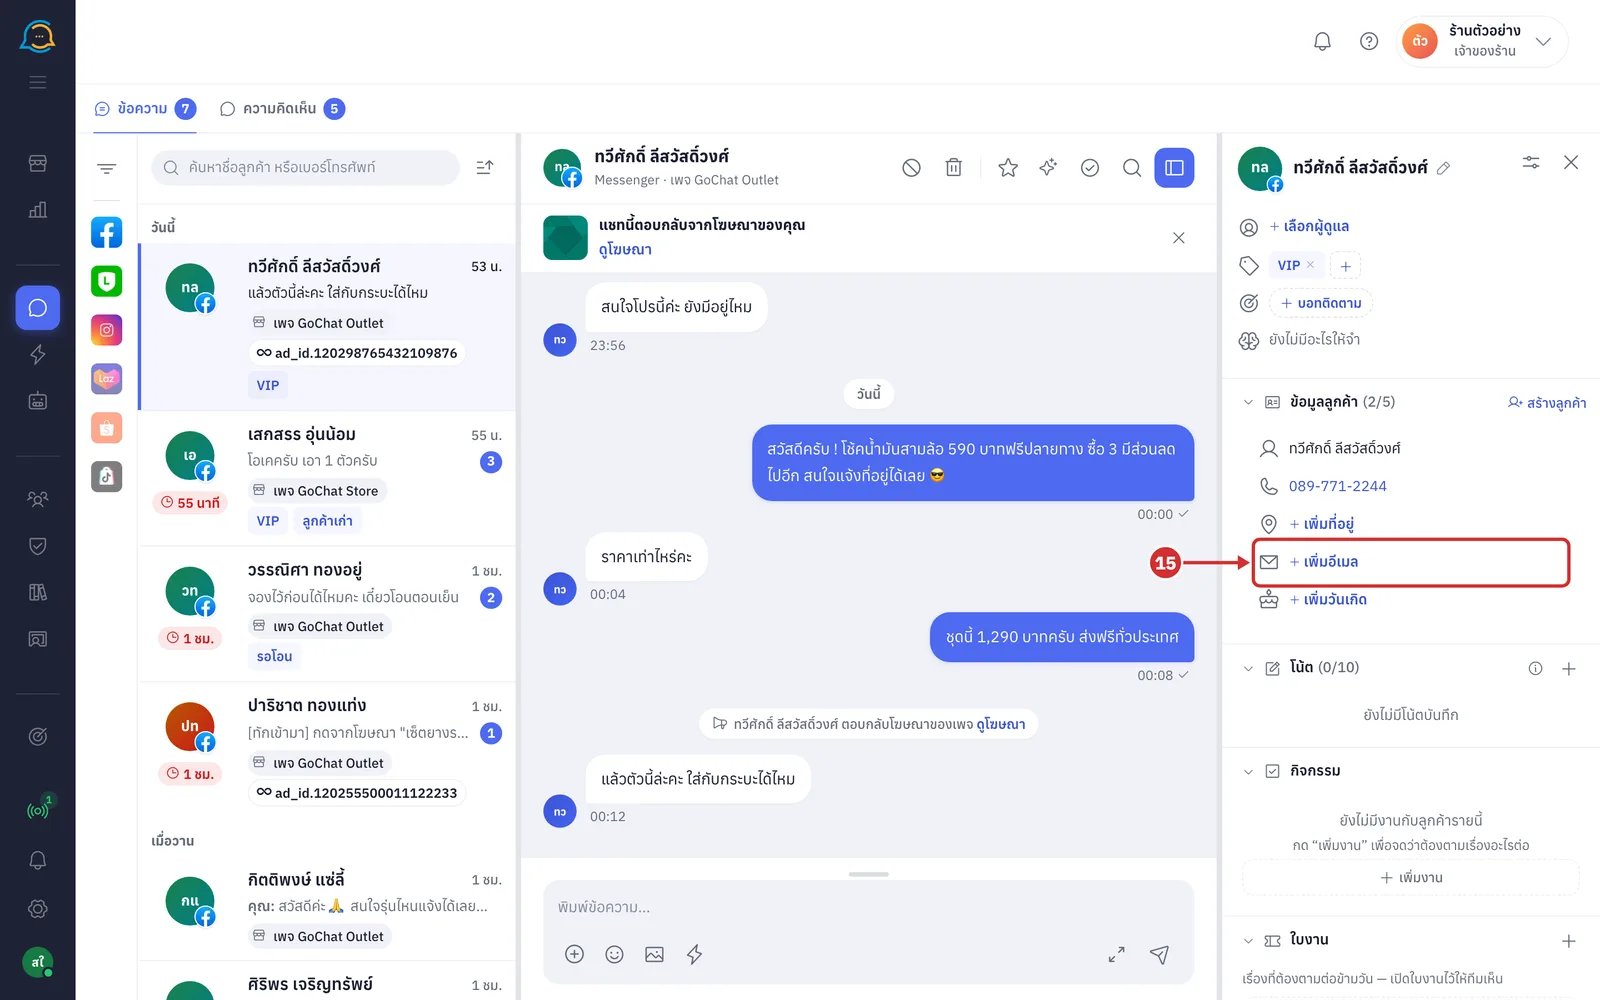
In อีเมล (Email), click เพิ่มอีเมล (Add email) to enter the customer's email
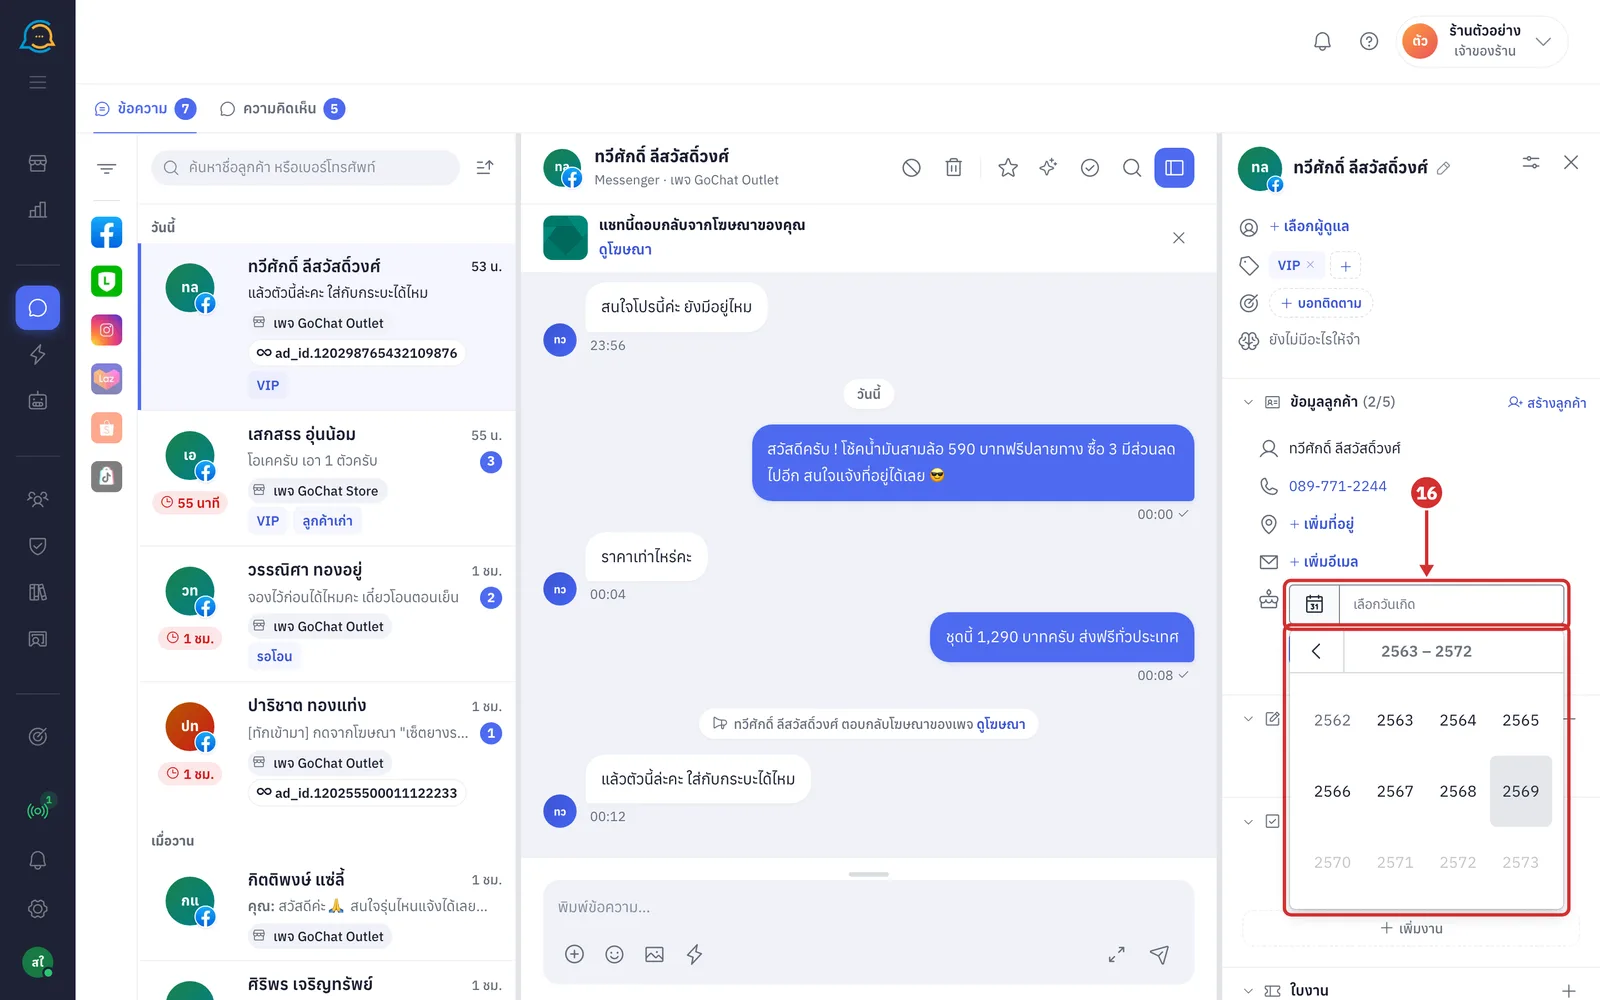
In วันเกิด (Birthday), click เพิ่มวันเกิด (Add birthday), pick the year, month and day from the calendar (years are in the Buddhist era), then click บันทึก (Save). The panel shows the birthday with the age, such as · อายุ 30 ปี (· age 30)
Creating a customer
Click สร้างลูกค้า (Create customer) at the end of the Customer info heading to save this person as one of your shop's customers (once they are a customer, the button becomes ดูโปรไฟล์ › (View profile ›) to the customer profile page, and the name on the chat header turns blue)
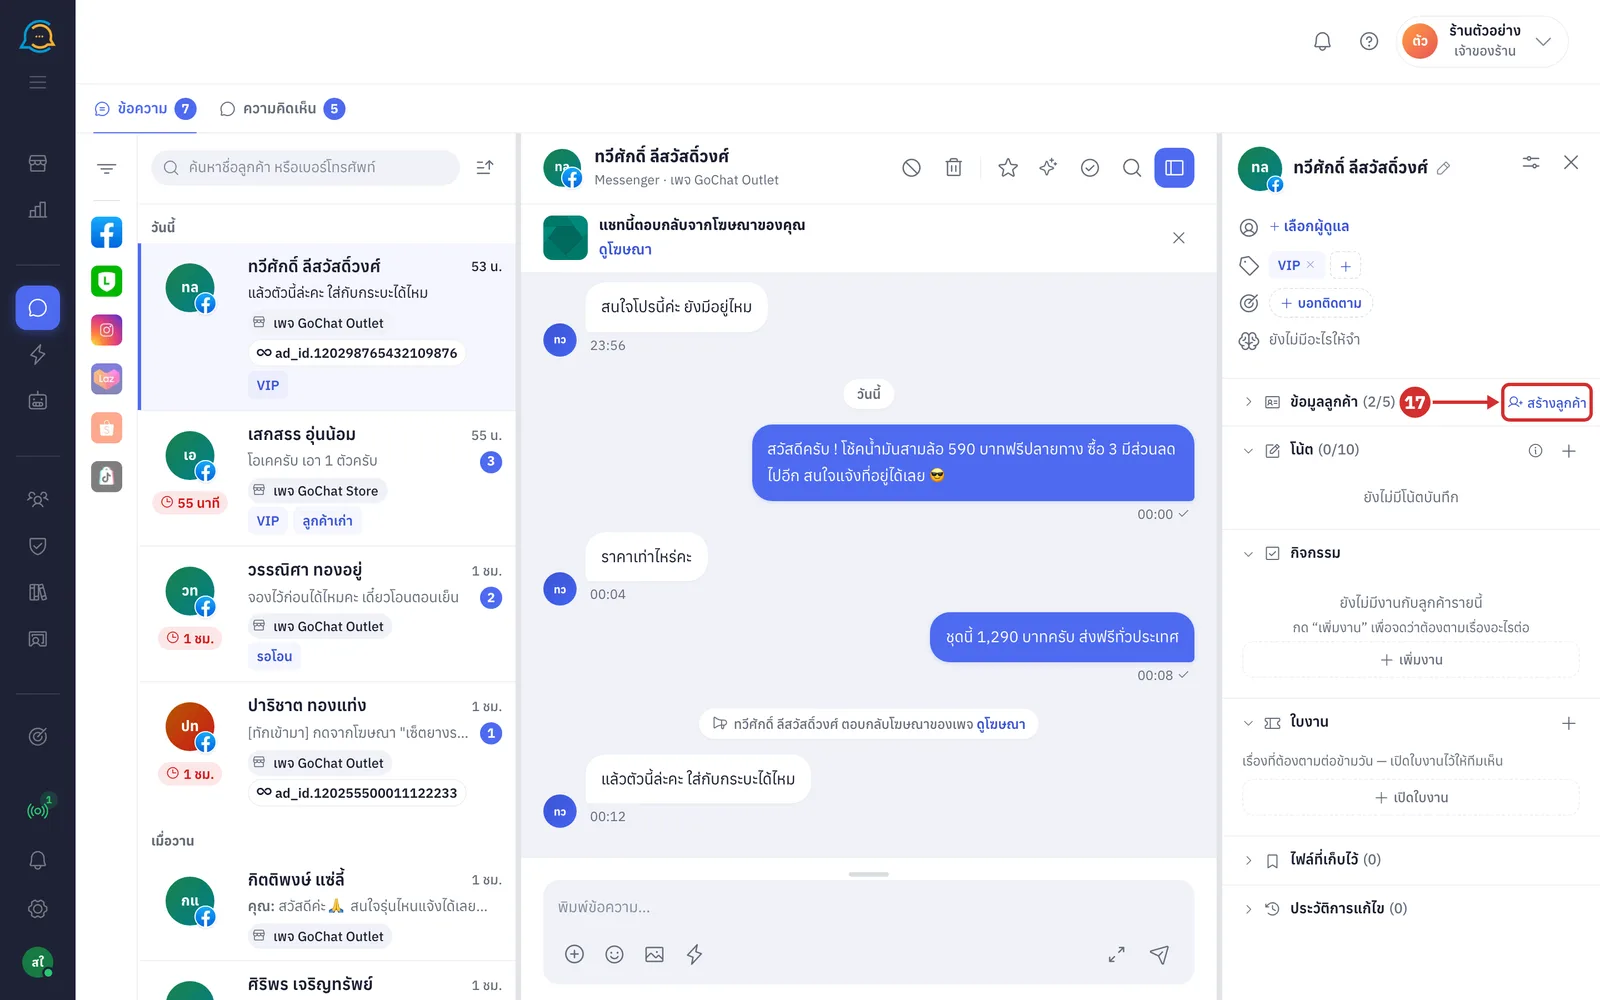
In the สร้างใหม่ (New) tab, check and edit ชื่อ (Name), โทรศัพท์ (Phone) and อีเมล (Email) (filled in from the panel for you · a name is required). ที่อยู่ (Address) is the address the customer sent through the form in the chat and cannot be edited here. Then click บันทึก (Save) to add this person to your shop's customers
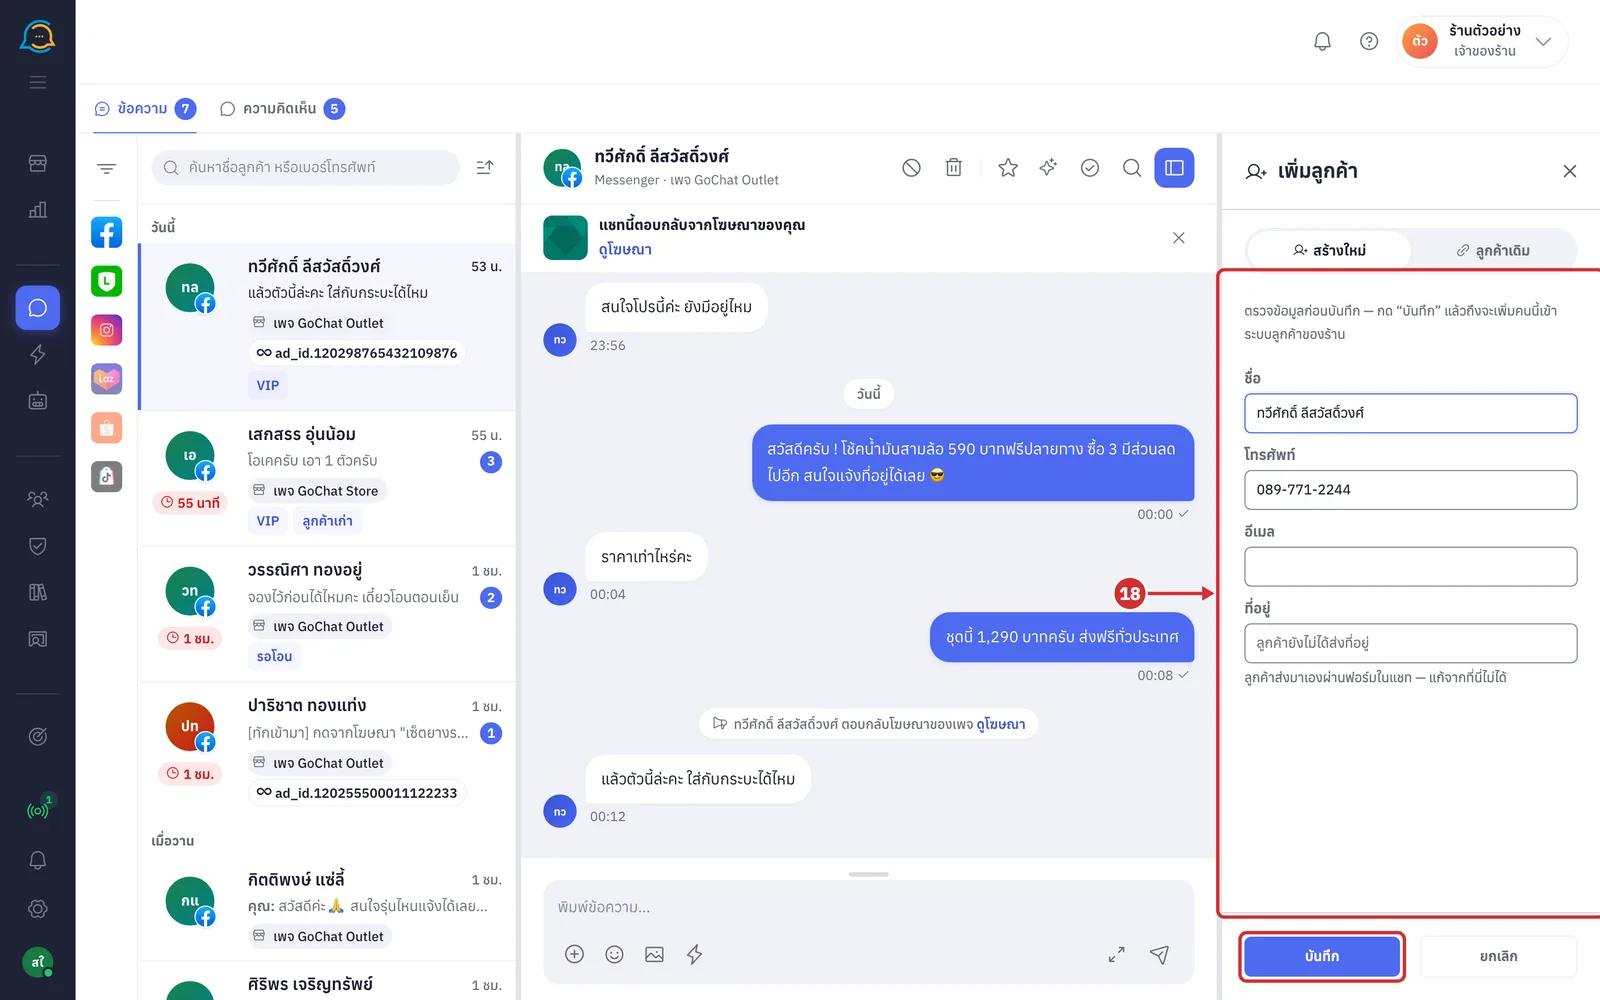
If this person is already a customer in the system (for example, they messaged before on another channel), click the ลูกค้าเดิม (Existing customer) tab, search by name, phone or email, and pick them to merge this chat into the same person (the system does not guess who is a duplicate; you choose)
The รวมเป็นลูกค้าคนเดียวกัน (Merge into one customer) confirmation lists what will happen: the chat with its full history moves to the existing customer, new messages from this person go to that customer, notes and tags move along, and the existing customer's phone and email are not overwritten
If the two names differ, you can choose the ชื่อหลักหลังรวม (Main name after merging), then click ใช่ คนเดียวกัน (Yes, same person) (click ย้อนกลับ (Back) to choose again)
Merged customers can still be separated, but only from the customer list page
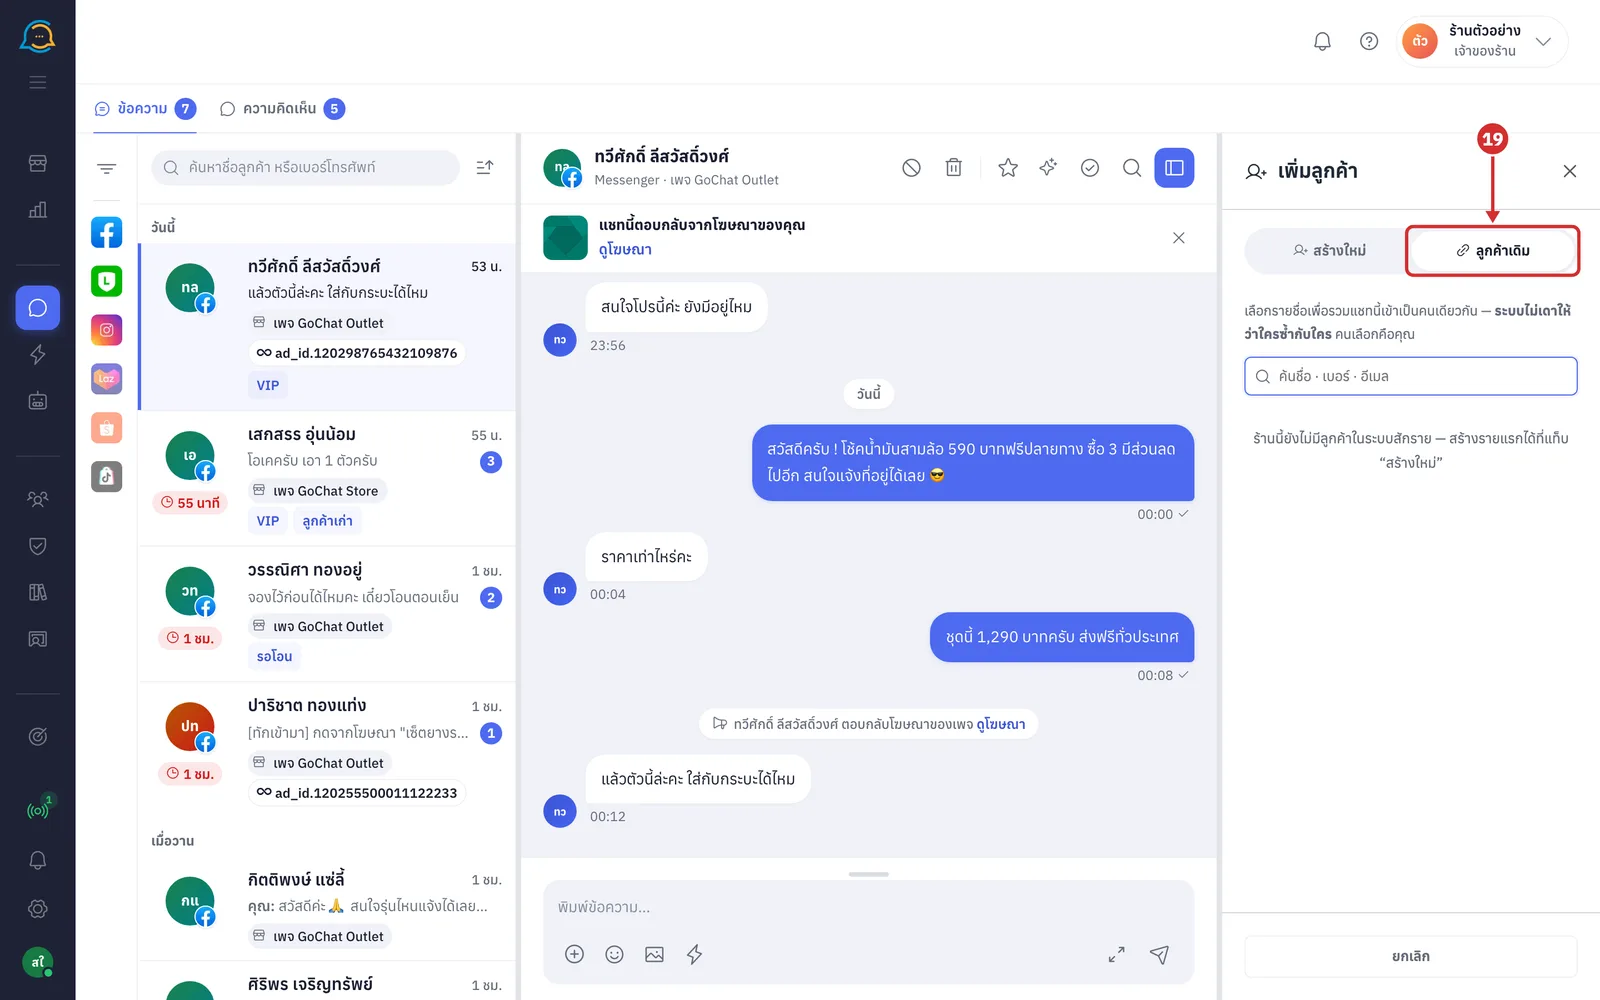
Writing notes, adding tasks and opening tickets
Under โน้ต (Notes), click + (เพิ่มโน้ต (Add note)), choose a ประเภท (Type), write the note and click บันทึกโน้ต (Save note). The system shows บันทึกโน้ตแล้ว (Note saved) (notes are visible only to your team, not to the customer · the numbers in brackets, such as (0/10), are the number of notes and the limit for your package)
ทั่วไป (General) — for the team to know, nothing to do · ติดตาม (Follow up) — something pending that someone must do · ข้อมูลลูกค้า (Customer info) — facts worth remembering, such as address, size, preferences · สำคัญ (Important) — be careful, don't miss it, such as a past complaint
The toolbar above the box makes text bold, italic or struck through, adds bullet or numbered lists, and inserts links
Saved notes appear under this heading with the writer's name and time. Each note has แก้ไขโน้ต (Edit note) and ลบโน้ต (Delete note) buttons (deleted notes cannot be restored), change the order to newest, oldest or by type, and click ดูทั้งหมด (See all) when there are many
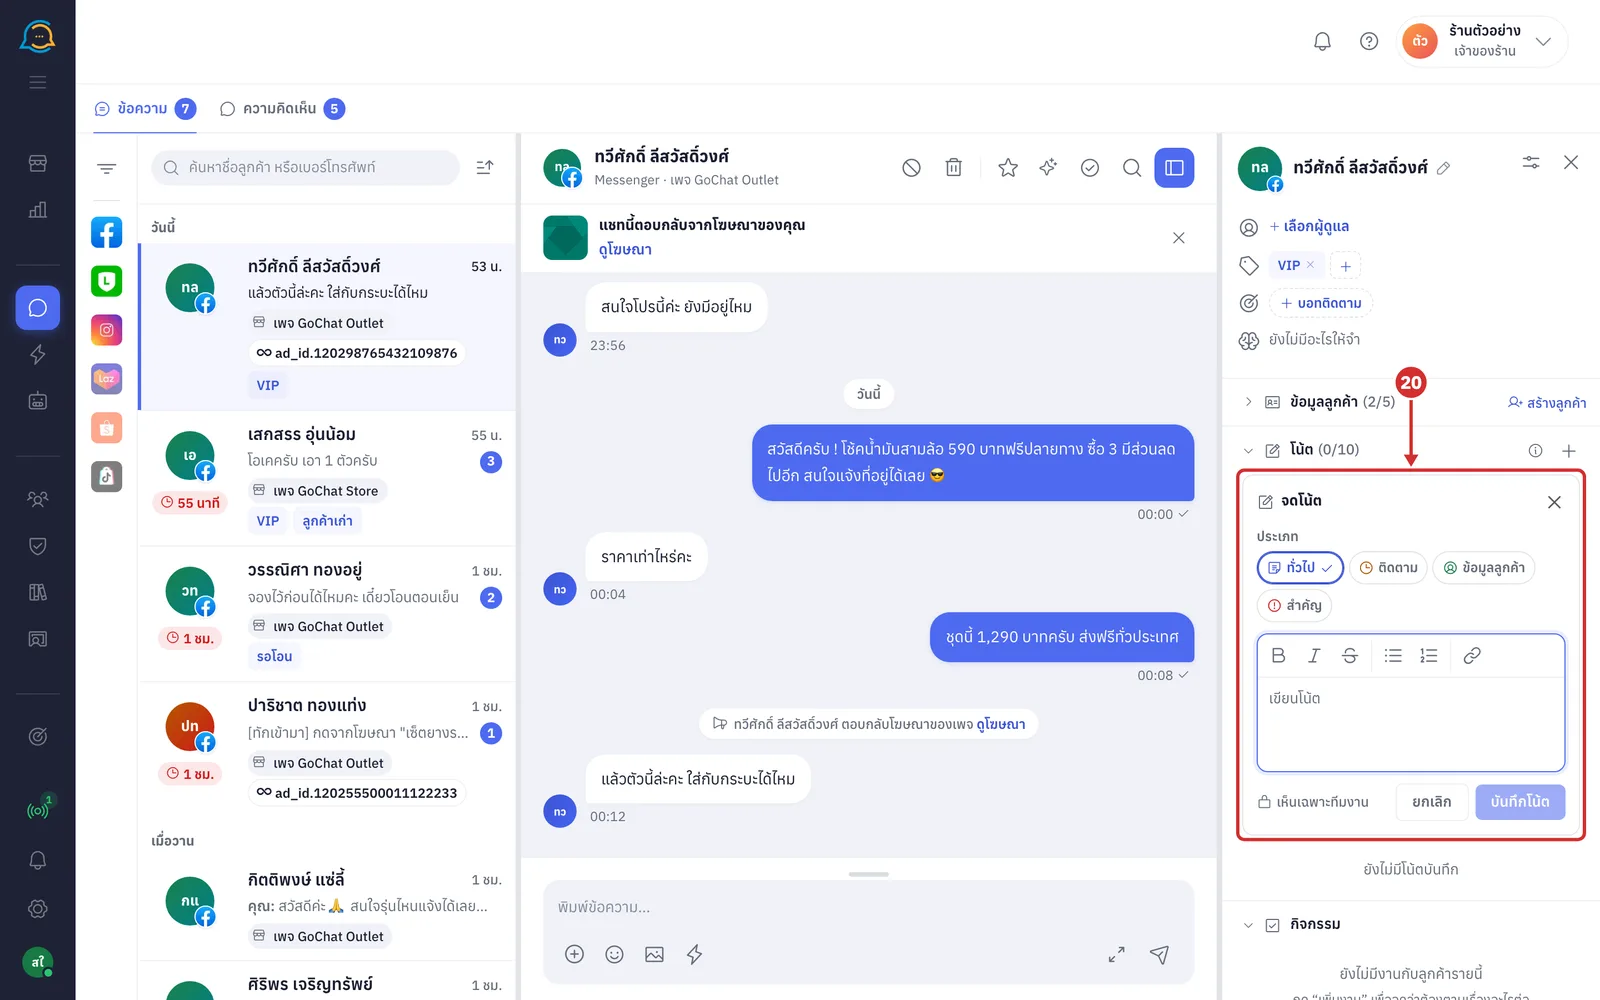
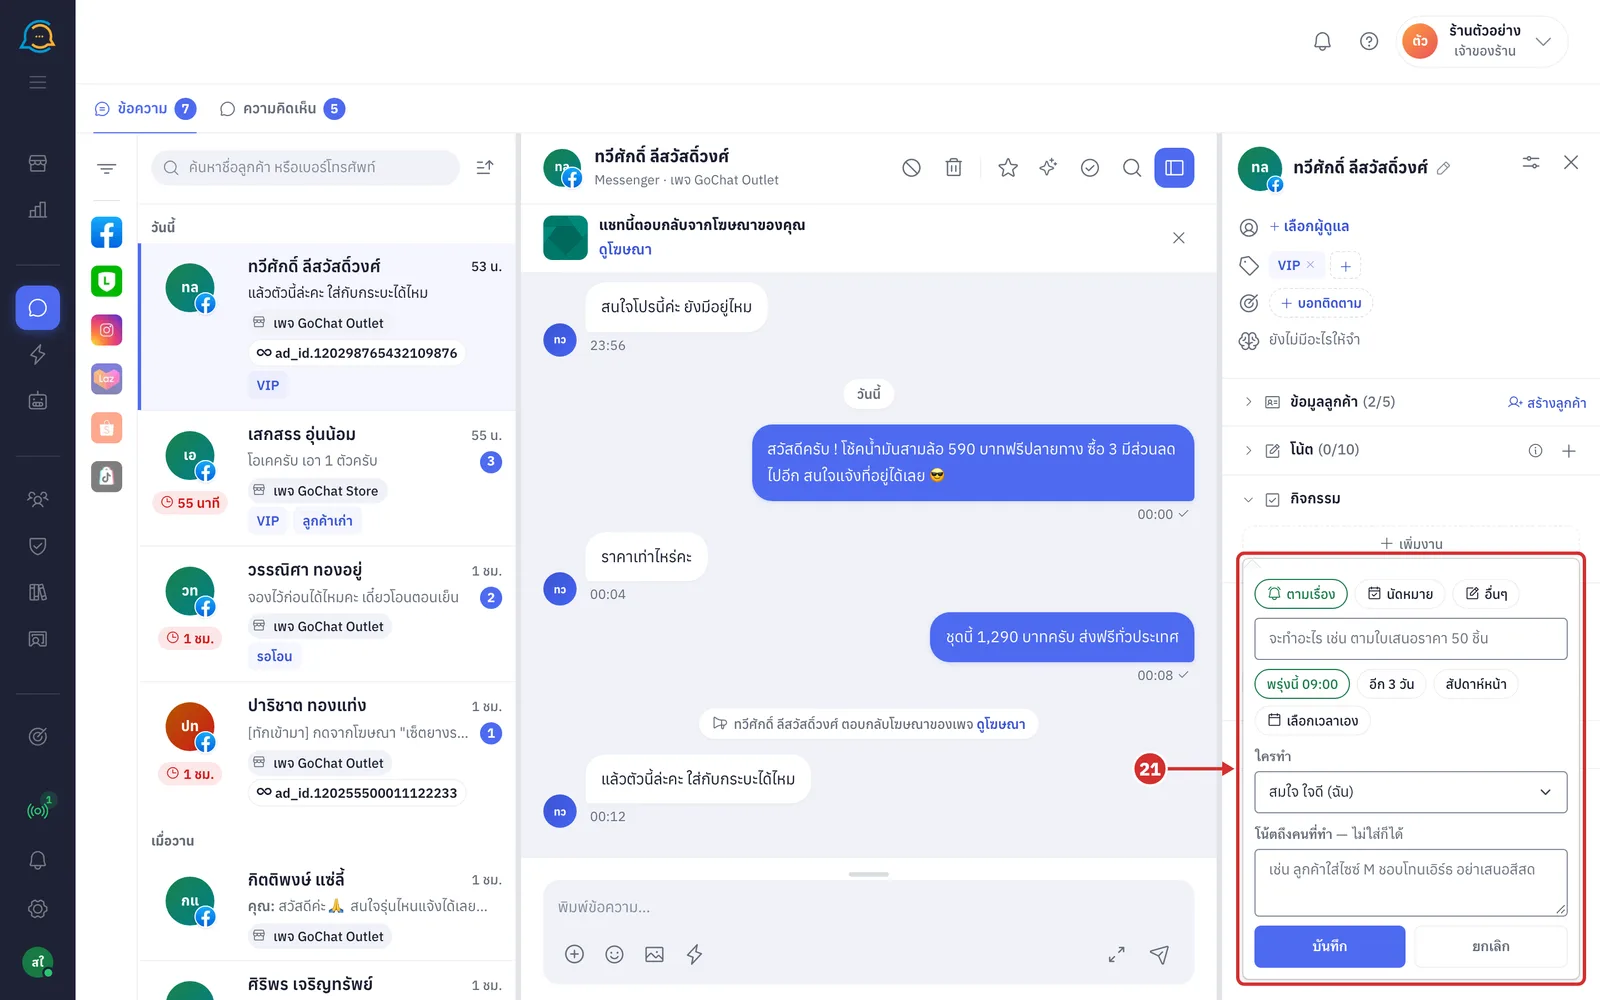
Under กิจกรรม (Activities), click เพิ่มงาน (Add task) to note a follow-up with the customer. Choose a kind (ตามเรื่อง (Follow up) · นัดหมาย (Appointment) · อื่นๆ (Other)), type what to do, choose a time (พรุ่งนี้ 09:00 (Tomorrow 09:00) · อีก 3 วัน (In 3 days) · สัปดาห์หน้า (Next week) or เลือกเวลาเอง (Pick a time)), choose ใครทำ (Who does it) (you by default), add a โน้ตถึงคนที่ทำ (Note for the person doing it) if you like, then click บันทึก (Save)
Saved tasks appear under this heading with their due time, such as tomorrow or overdue, and the heading opens by itself when a task is overdue
When done, click ทำแล้ว (Done) and choose the outcome (ติดต่อได้ · สนใจต่อ (Reached · still interested) · ไม่รับสาย (No answer) · ขอให้ติดต่อใหม่ (Asked to be contacted later) · ไม่สนใจแล้ว (No longer interested) or ข้าม (Skip)) · click เลื่อน (Snooze) to move the time · click แก้ (Edit) to change the task · if you marked the wrong task done, click เปิดใหม่ (Reopen)
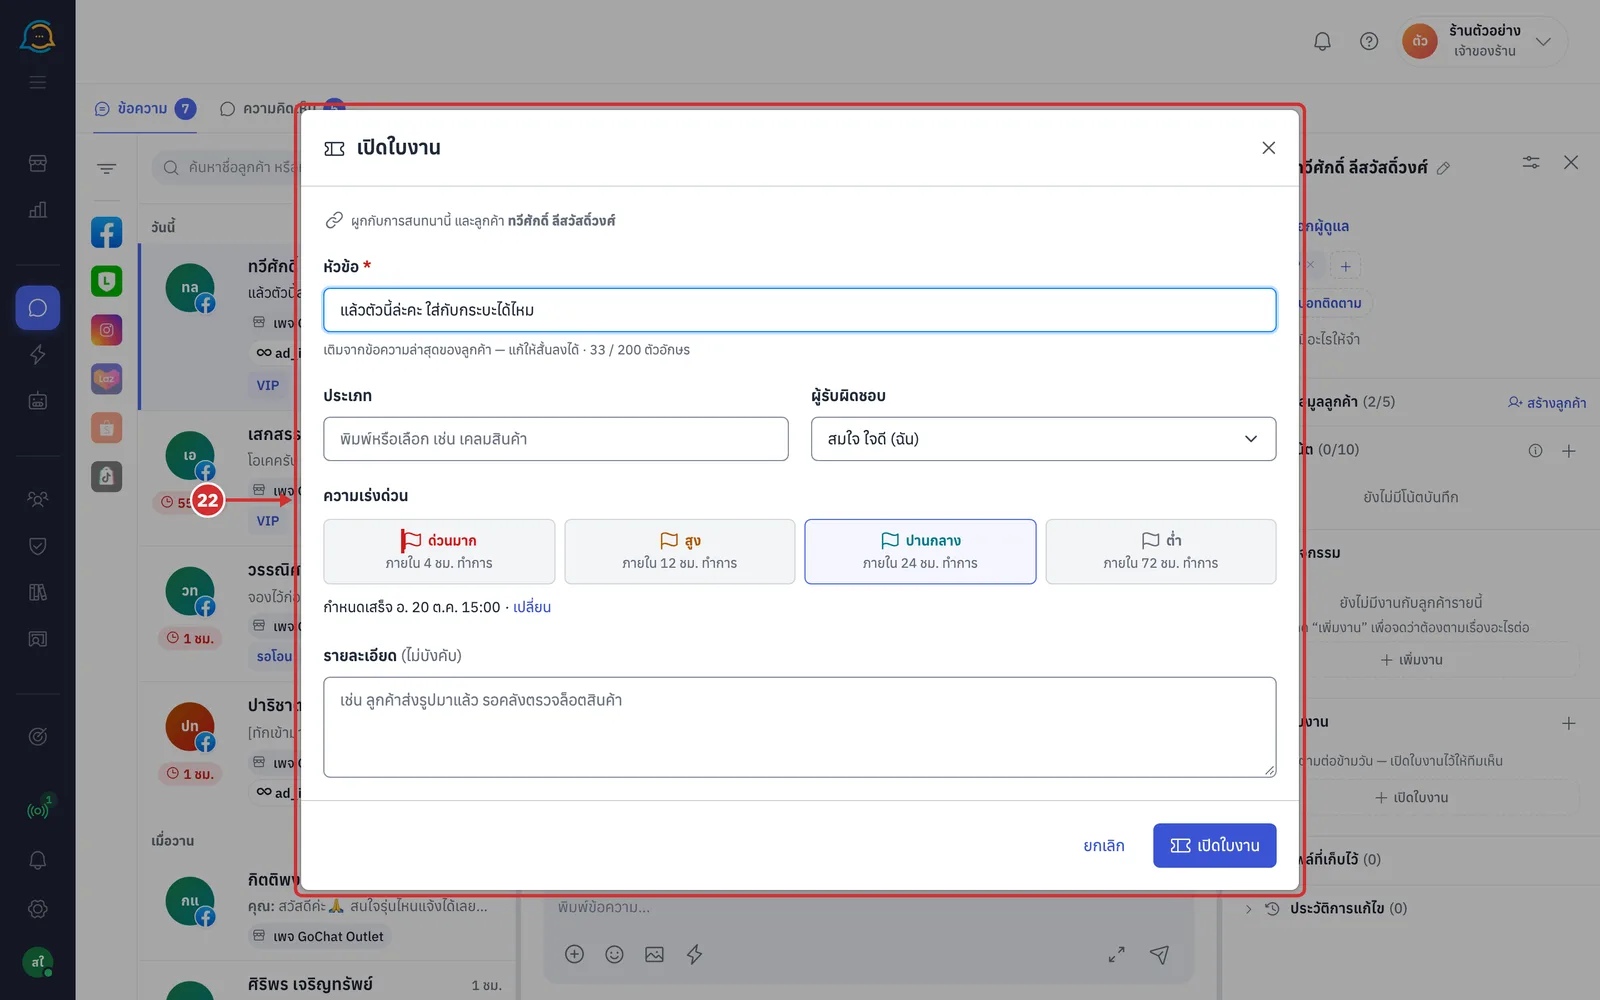
Under ใบงาน (Tickets — matters to follow up over several days), click เปิดใบงาน (Open ticket). The window fills the หัวข้อ (Subject) from the customer's latest message; shorten it to 200 characters or fewer. Choose the ประเภท (Type), ผู้รับผิดชอบ (Assignee) and ความเร่งด่วน (Urgency) (ด่วนมาก (Very urgent) within 4 hours · สูง (High) 12 hours · ปานกลาง (Medium) 24 hours · ต่ำ (Low) 72 hours; the system works out the due time), add รายละเอียด (Details) if you like, then click เปิดใบงาน (Open ticket). The ticket is linked to this conversation and this customer and shows as a label on the chat header
Saved files and edit history
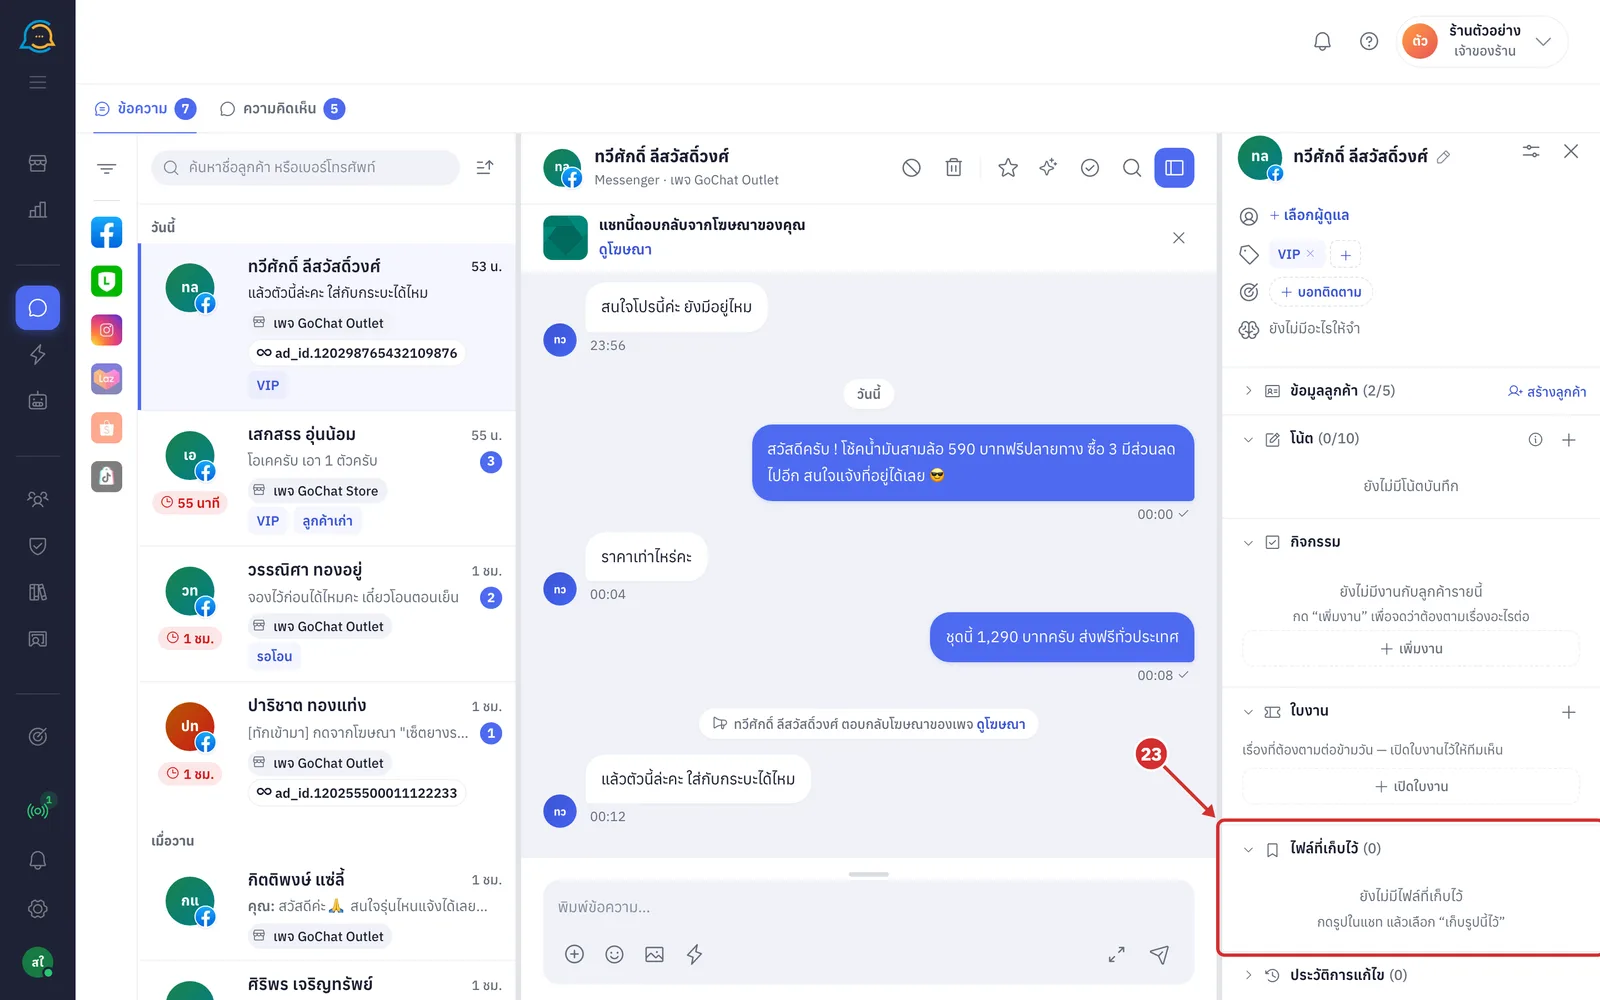
Click the ไฟล์ที่เก็บไว้ (Saved files) heading to see images people in your shop saved from this chat. Saved images do not expire with the chat's files; click one to view it full screen (when there are none it shows ยังไม่มีไฟล์ที่เก็บไว้ (No saved files yet) · see how to save images in Managing messages in a chat)
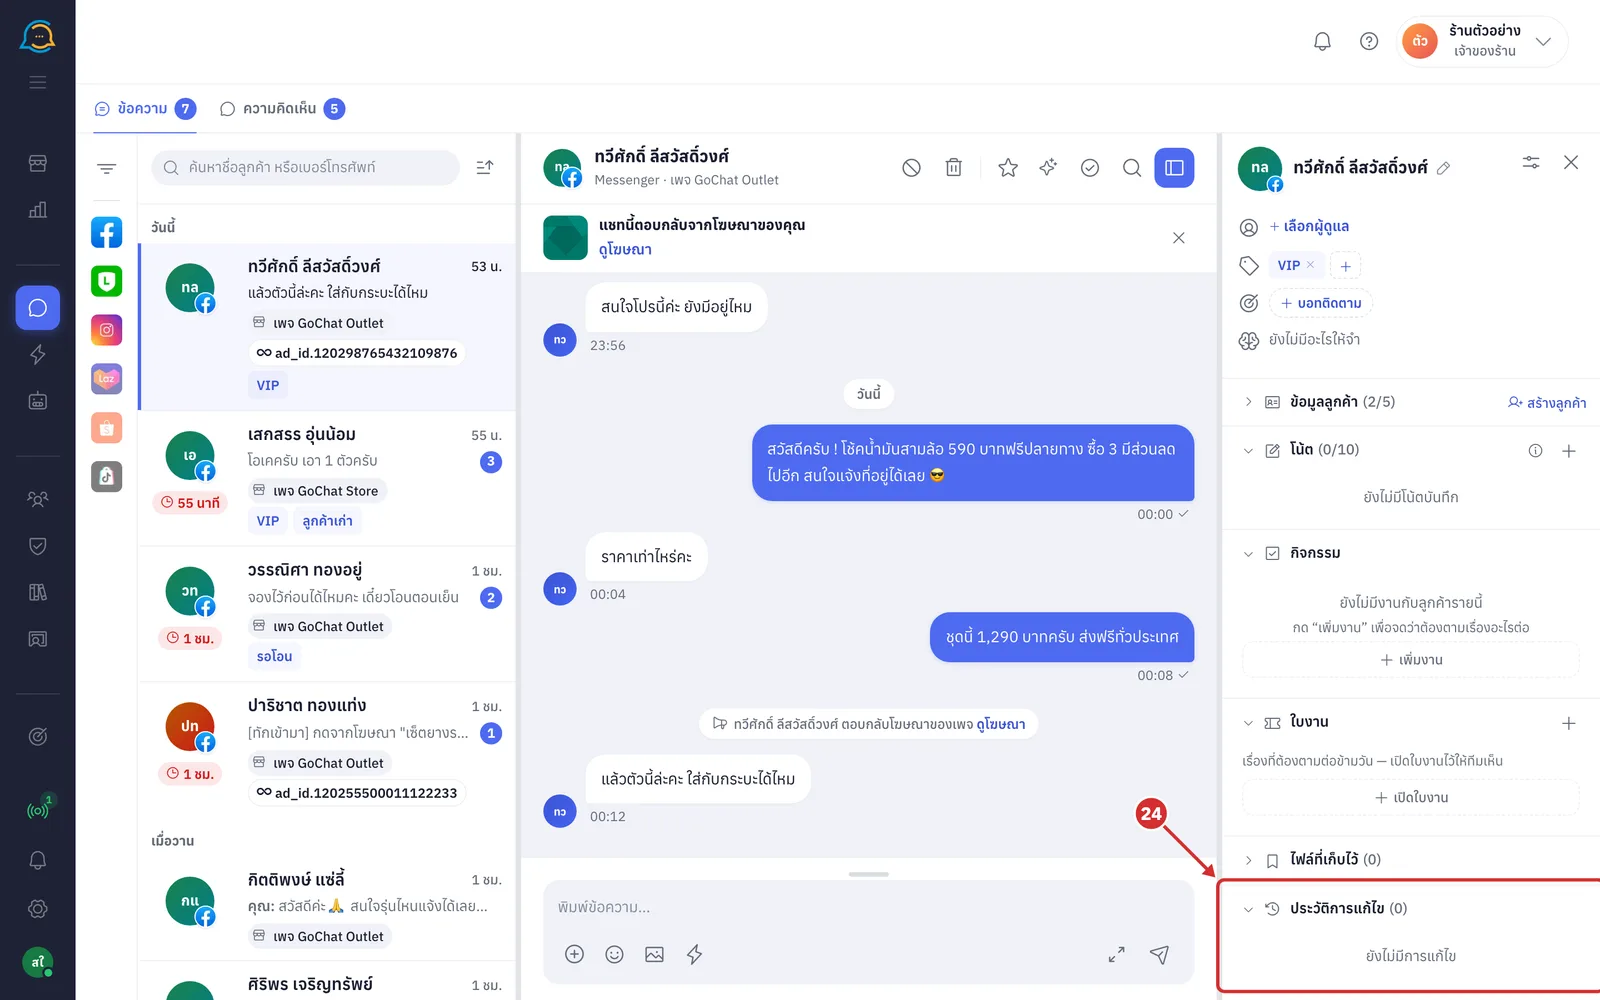
Click the ประวัติการแก้ไข (Edit history) heading to see who changed what in this chat and when, such as the owner, tags, notes, the chat name and each customer field, with the values changed (up to the latest 50 entries · when there are none it shows ยังไม่มีการแก้ไข (No edits yet))
Customising your panel
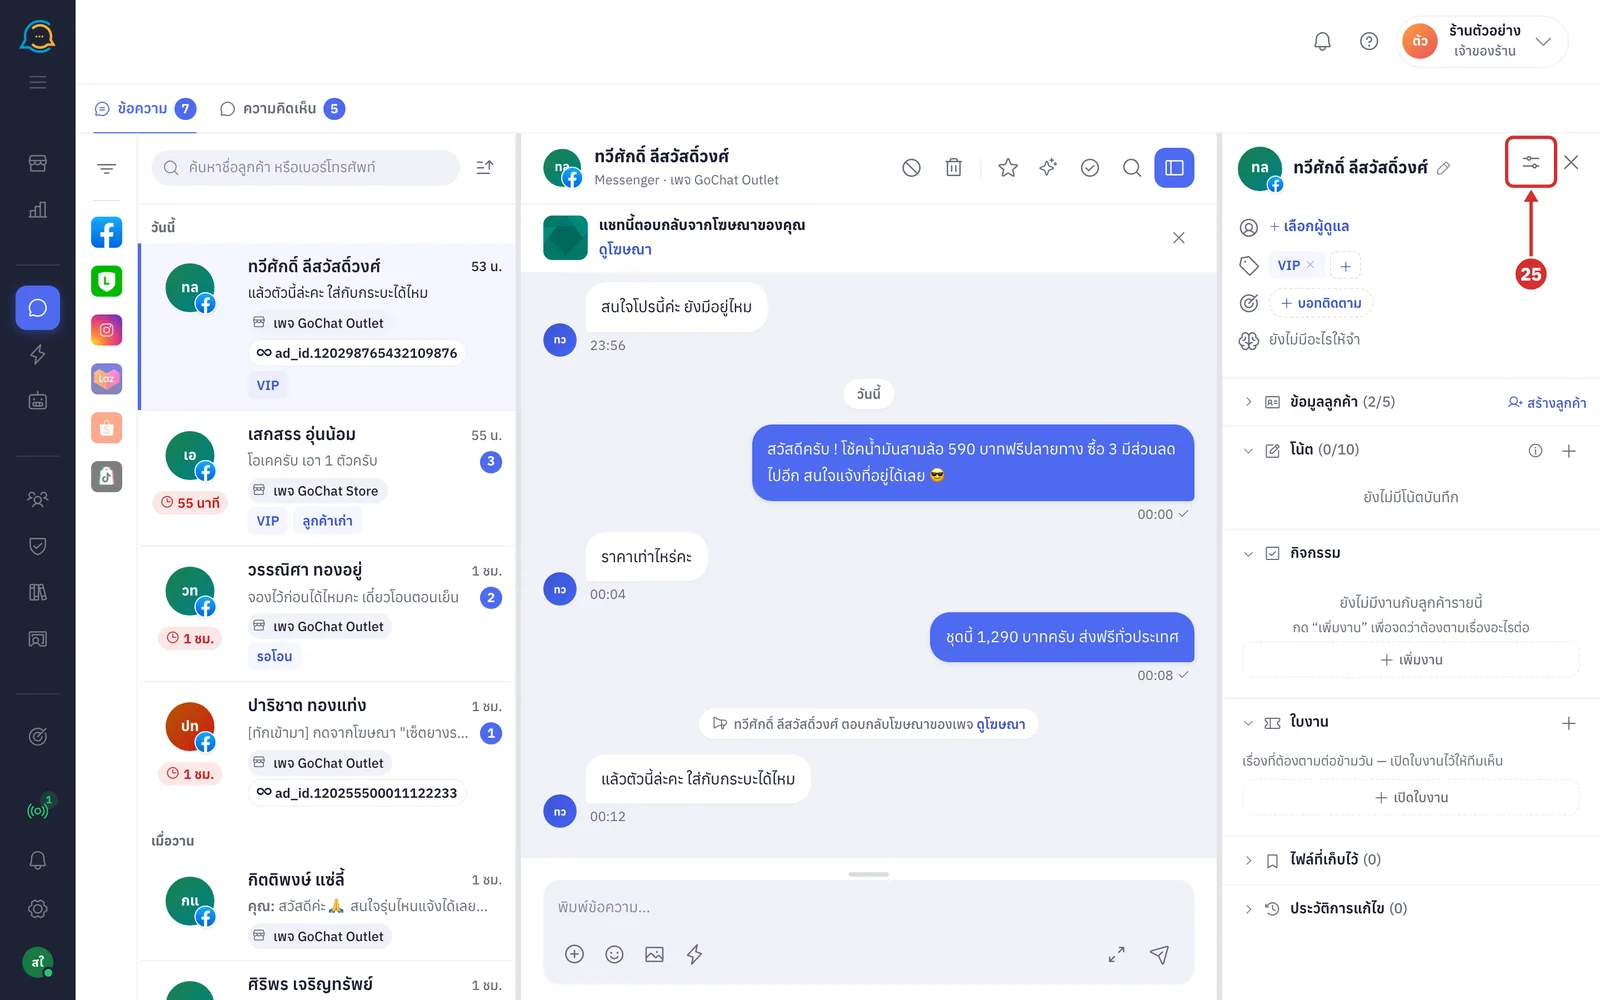
Click the ปรับแต่งแผง (Customise panel — slider icon at the top right of the panel) button
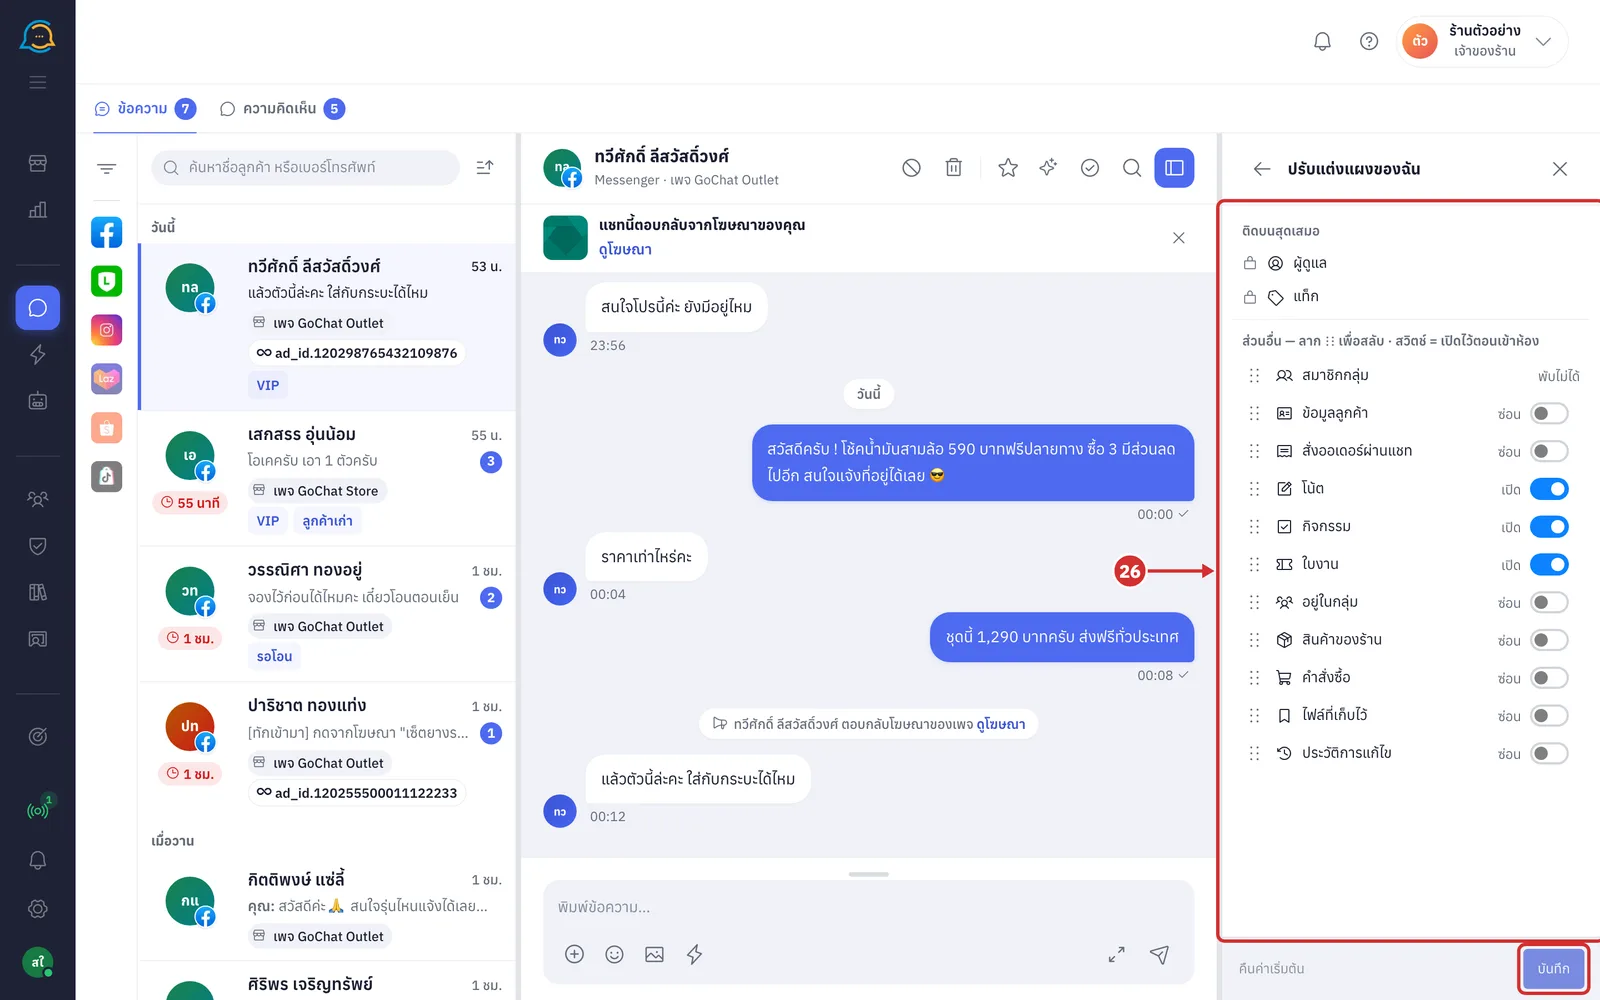
On the ปรับแต่งแผงของฉัน (Customise my panel) page, set the order and whether each section is open, then click บันทึก (Save). The system shows บันทึกการปรับแต่งแผงแล้ว (Panel settings saved) (these settings are yours only, apply to every chat, and do not affect others in your shop)
ผู้ดูแล (Owner) and แท็ก (Tags) always stay at the top and cannot be moved
Drag ⋮⋮ in front of a section to reorder (or click ⋮⋮ and use the up and down arrows)
Switch เปิด (Open) = the section is expanded when you open a chat · ซ่อน (Hidden) = collapsed, but the heading stays and you can open it yourself · พับไม่ได้ (Cannot collapse) = a section that cannot be collapsed
The list has every section the panel can have; sections a chat does not have (such as group members for group chats) are skipped
Click คืนค่าเริ่มต้น (Reset to default) to go back to the original order and open/closed settings · click the arrow at the top left to go back to the panel
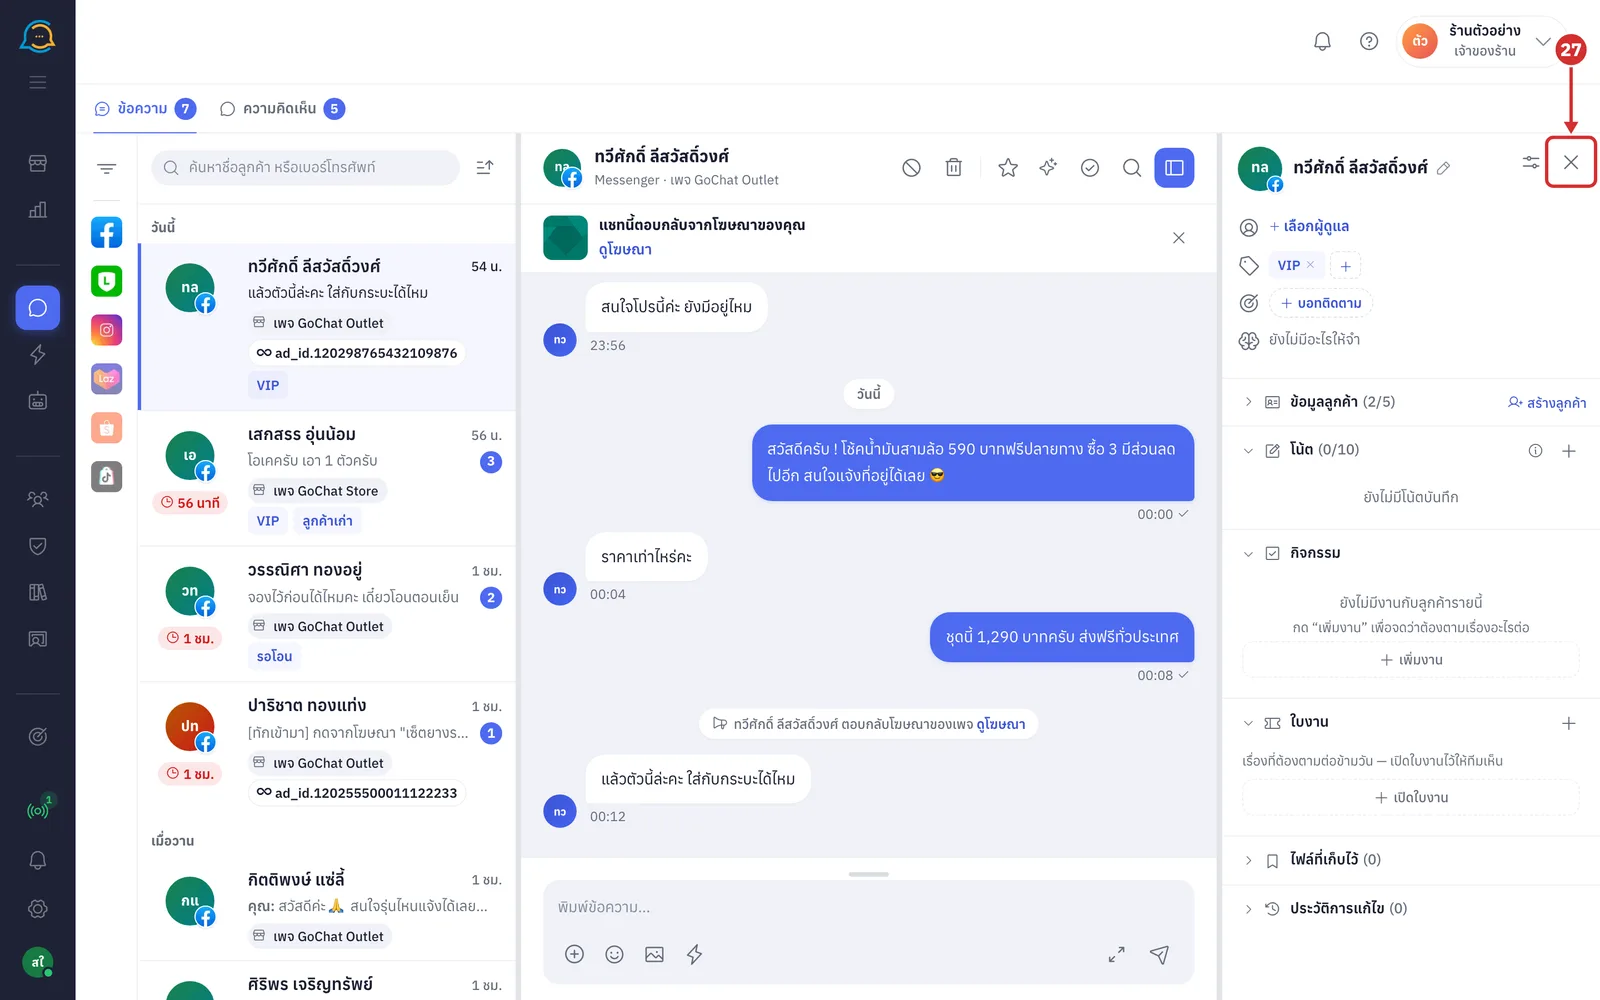
Click × (ปิดแผงข้อมูลลูกค้า (Close customer panel)) at the top right of the panel to close it. Open it again from the ข้อมูลลูกค้า (Customer info) button on the chat header
Note: While your internet is disconnected, the panel shows a ดูอย่างเดียว (View only) label and has no pencils to click until you are back online · Chats not yet linked to a customer cannot save customer details, but you can still change the owner and tags · In shops with chat assignment turned on, chats looked after by someone else are view only