

Sending products and orders to customers
The ส่งให้ลูกค้า (Send to customer) tray in a chat lets you send products and orders from your GoSaaS order management system without typing the details yourself. For example, when a customer asks about a T-shirt, you can search for it and send a card with its name, price and stock left; when a customer asks about an order they placed, you can send an order card with a button to open the order.
This tray works only in LINE, Facebook and Instagram chats of shops connected to GoSaaS (Shopee, Lazada and TikTok chats use a different tray that is not covered here). Anyone who can reply in the chat can send. What you send reaches the customer straight away, and the card you sent appears in the chat for everyone in the shop.
Opening the Send to customer tray
On the ข้อความ (Messages) page, click the customer's LINE, Facebook or Instagram chat in the list on the left, such as กมลชนก วัฒนกุล
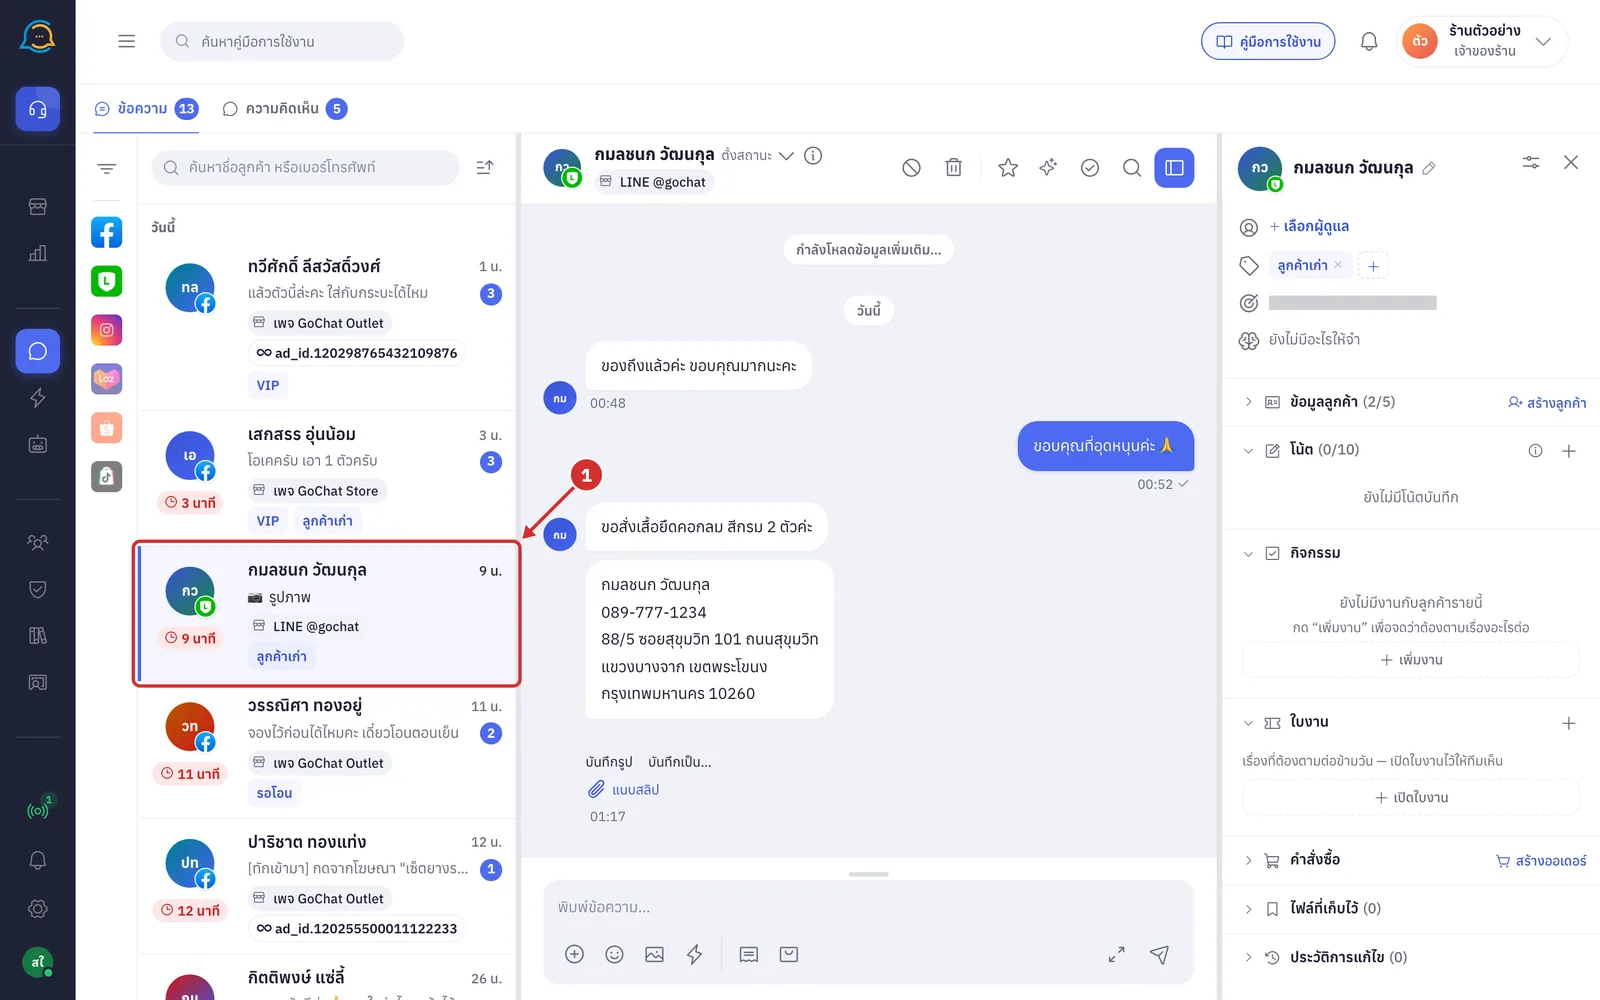
Click the bag icon การ์ดสินค้า (Product card) in the message box toolbar to open the ส่งให้ลูกค้า (Send to customer) tray on the สินค้า (Products) tab
The receipt icon คำสั่งซื้อ (Orders) next to it opens the same tray on the คำสั่งซื้อ (Orders) tab (step 11)
Shops not connected to GoSaaS do not have these two icons
LINE group chats only have the การ์ดสินค้า (Product card) icon, because an order card is one customer's information
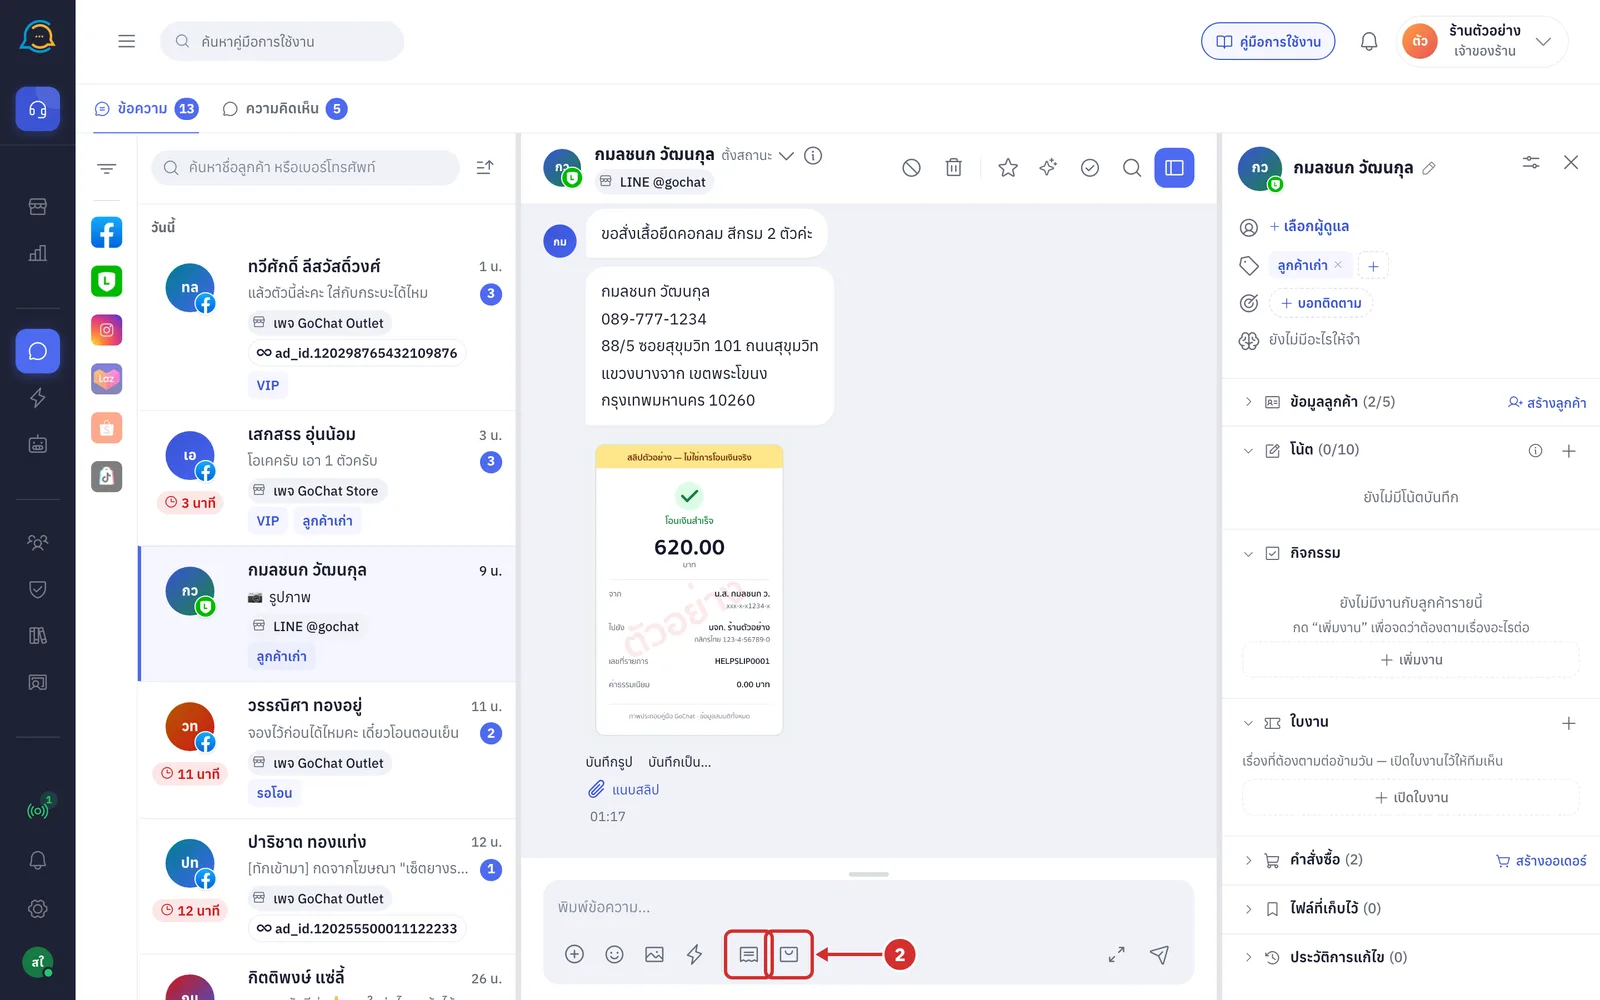
The ส่งให้ลูกค้า (Send to customer) tray opens above the message box. It has these parts
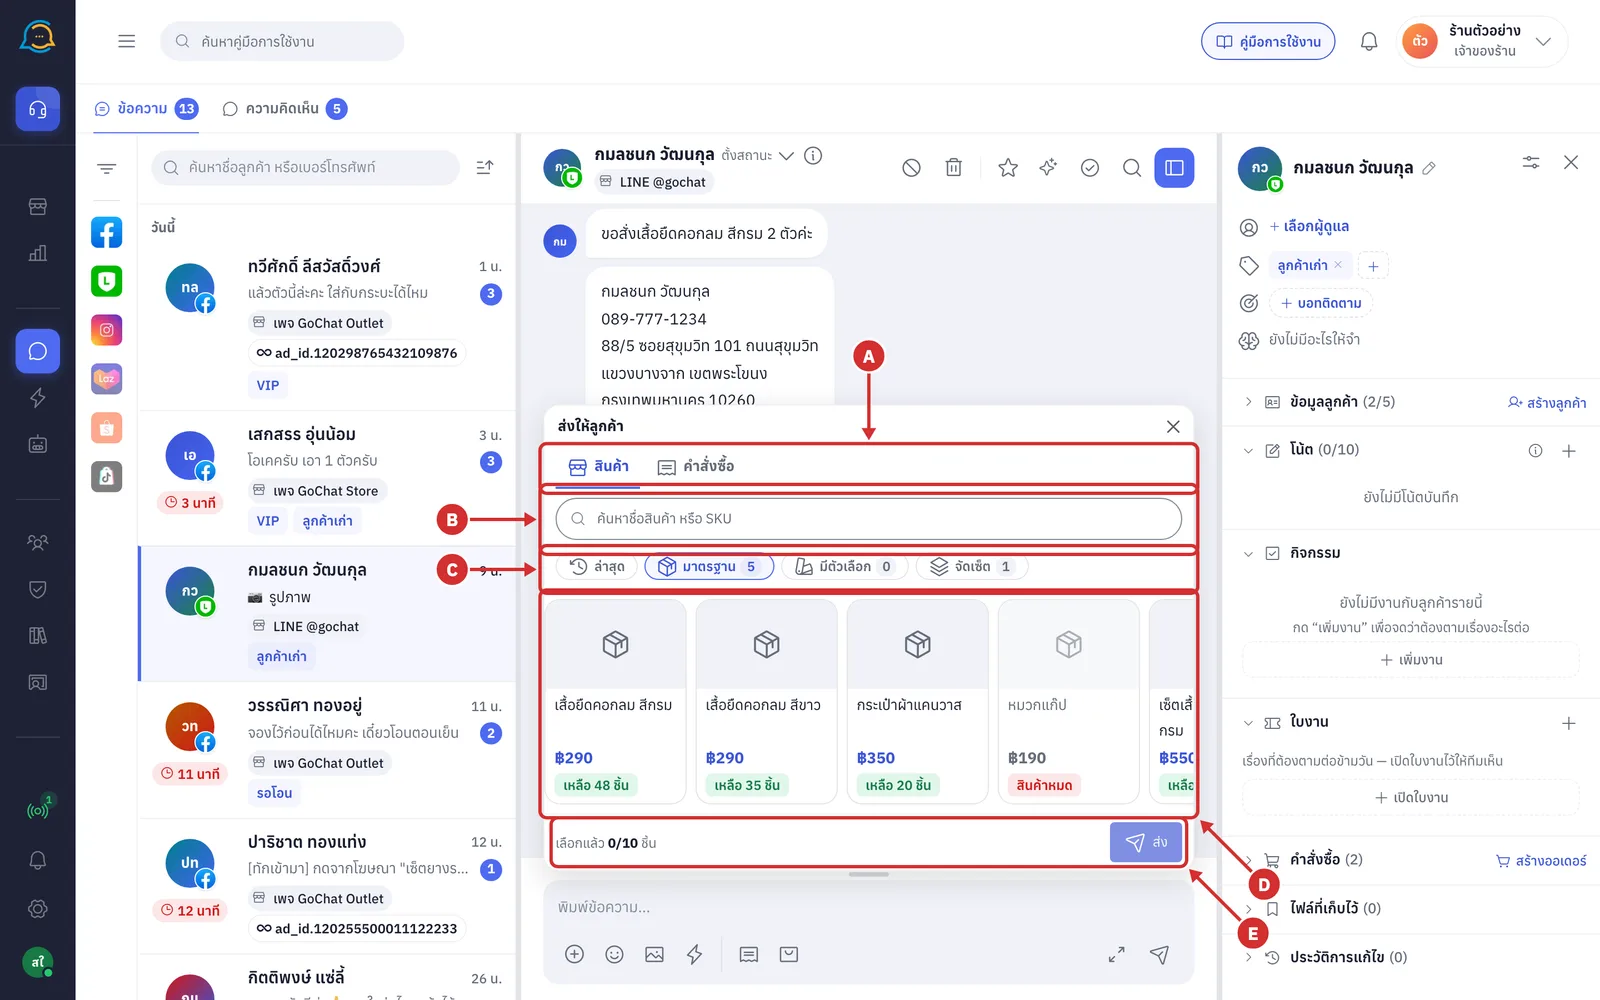
A Products and orders tabs switch between sending products and sending orders. Once you have opened the คำสั่งซื้อ (Orders) tab, the number on it is how many of the customer's orders were found
B Search box searches products by name or SKU (step 4)
C Type chips filter products by type (step 5)
D Product card strip shows your shop's products as cards in a row. Scroll left and right, or turn the mouse wheel over the strip, to see more; more products load by themselves as you near the end
E Bottom bar shows how many products you picked and the ส่ง (Send) button (steps 7 and 8)
More details
Click ✕ at the top right of the tray, click the same icon in the message box again, or press Esc to close the tray
Products you picked are cleared when you close the tray or switch chats
While loading, the tray shows grey card outlines first
How the Send to customer tray works
Products, prices, stock left and orders in the tray are fetched from GoSaaS every time you open the tray
When you send, the tray closes straight away and shows a sending message; the card you sent then appears in the chat
If sending fails, the reason is shown as an alert or on the card in the chat
Facebook and Instagram chats can send within 7 days of the customer's last message. After that you see ลูกค้าทักมาเกิน 7 วันแล้ว — Meta ไม่ให้ทักไปก่อน ต้องรอให้ลูกค้าทักเข้ามาใหม่ (The customer last messaged more than 7 days ago — Meta does not allow you to message first; wait for the customer to message again)
Sending from the tray does not create a new order. To key an order for the customer, see Keying an order in a chat room
Searching for products
Type a product name or SKU in ค้นหาชื่อสินค้า หรือ SKU (Search product name or SKU), such as เสื้อยืด (T-shirt). Only products matching the search in the selected type are shown
The search starts by itself when you pause typing; you do not need to press Enter
If nothing matches in the selected type but something does in another type, you see ไม่พบ “…” ในแท็บ “…” — เจอใน (“…” not found in the “…” tab — found in) followed by the type name and count. Click that type name to jump to it
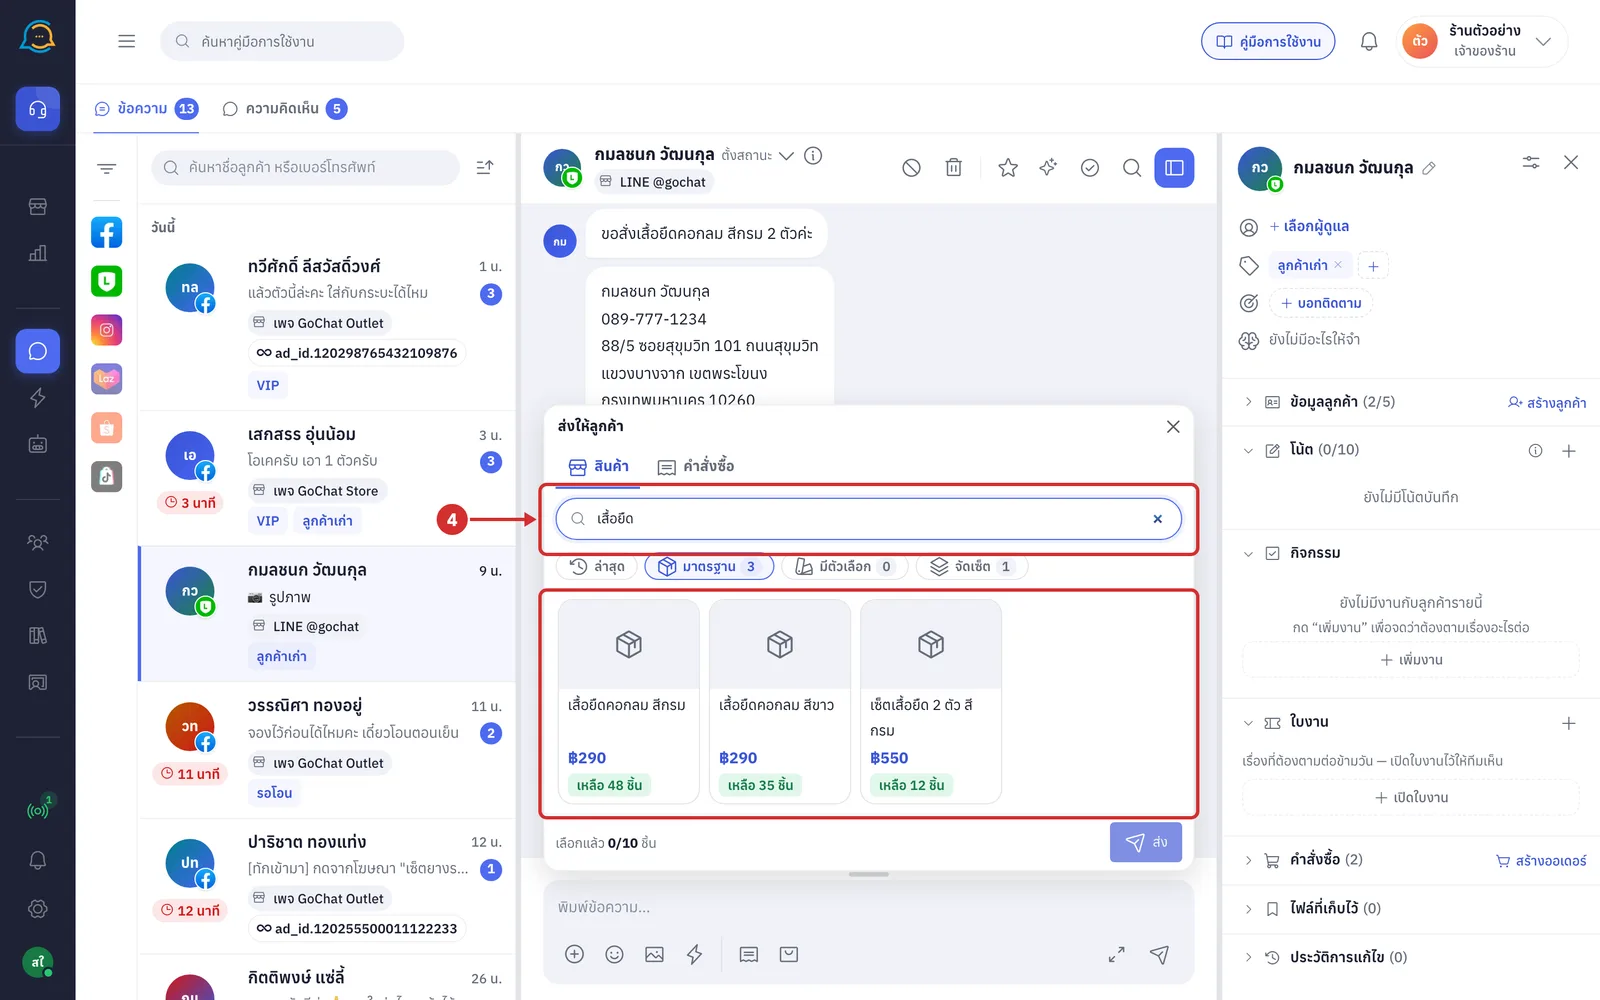
4.1 If no product matches at all, you see ไม่พบ “…” ในสินค้าทั้งร้าน (“…” not found in the whole shop). Try another word, or clear the search to see all products again
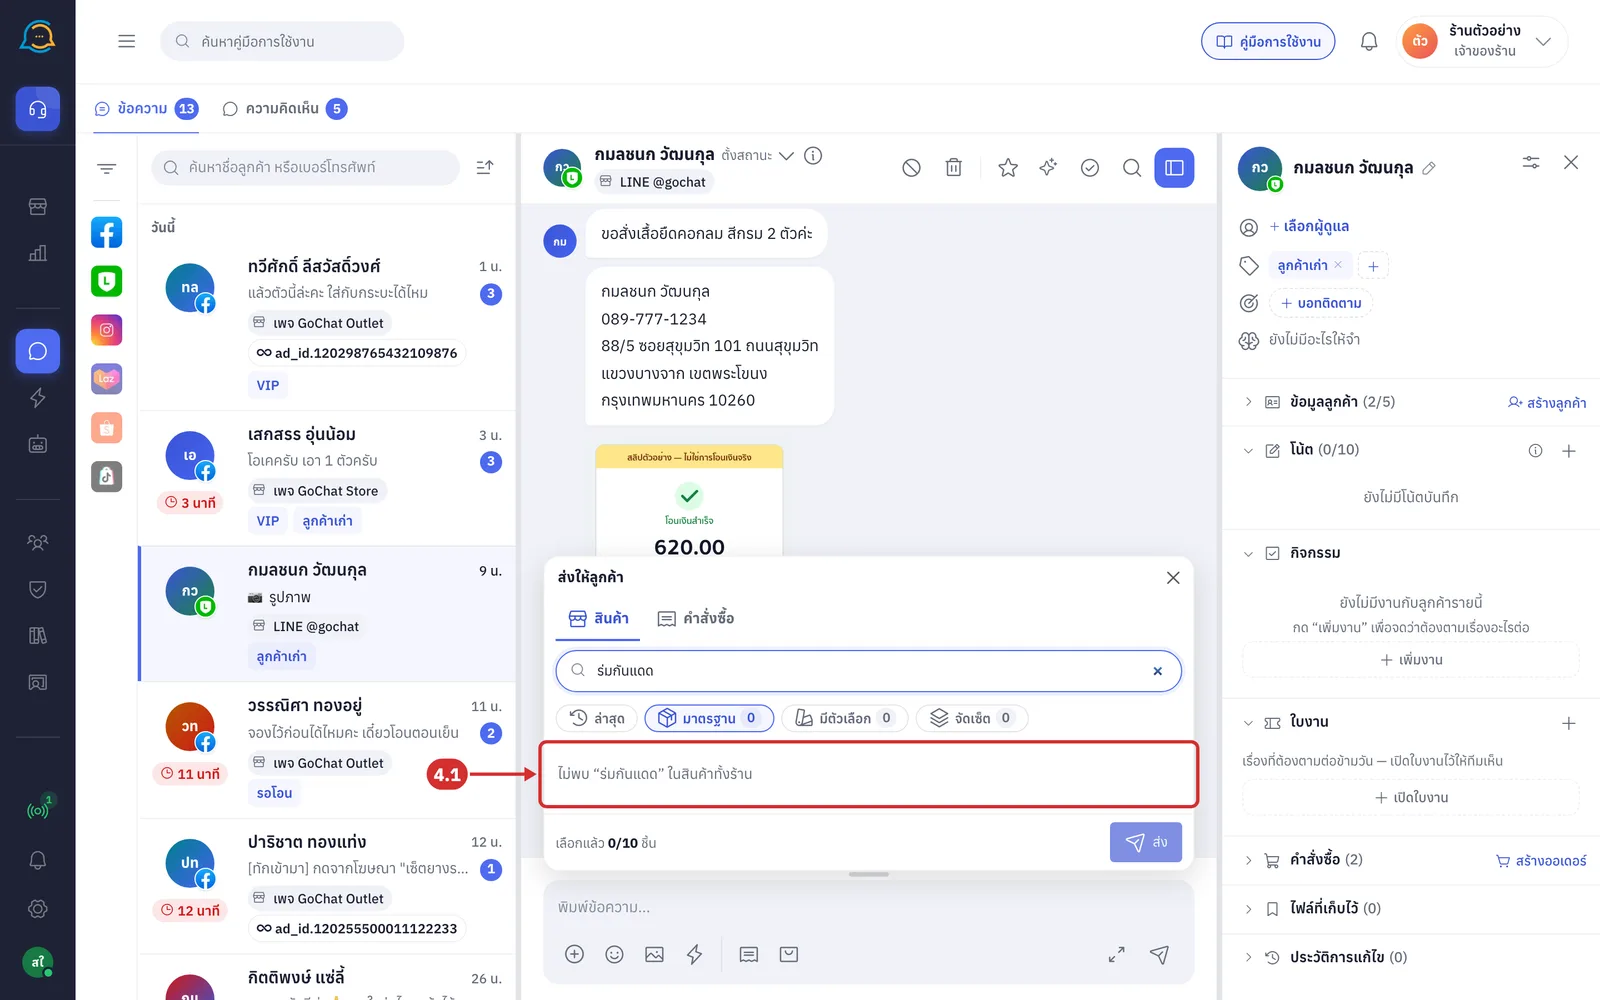
Click a type chip to see only products of that type. The chips are
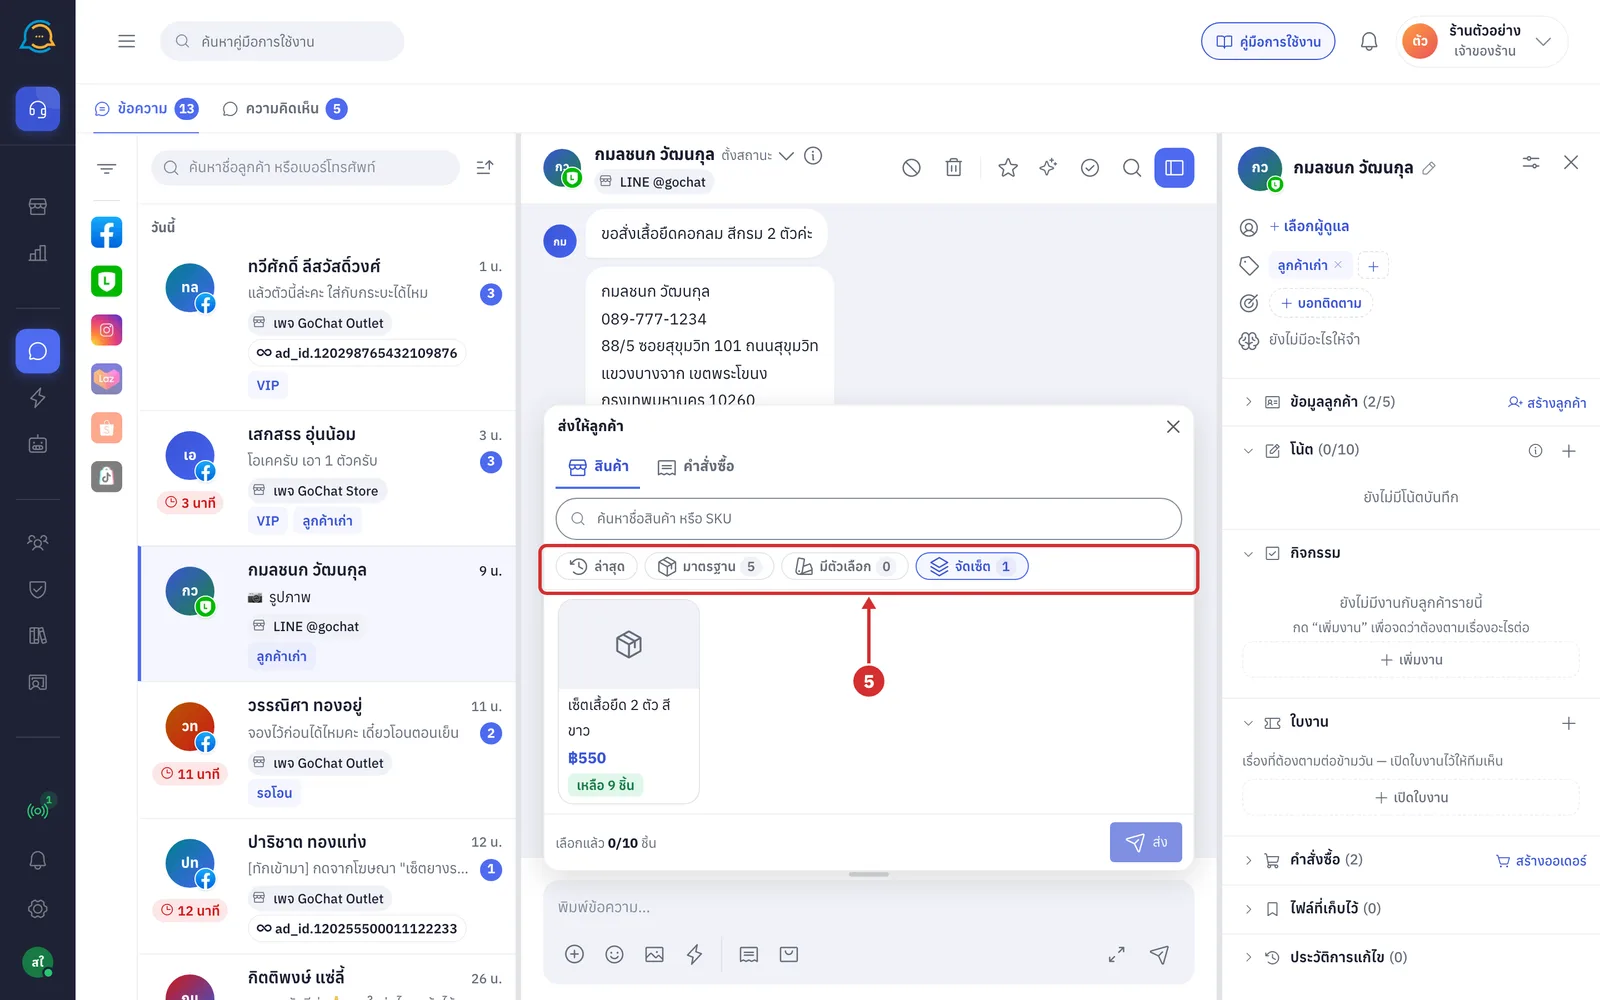
ล่าสุด (Recent): products recently added to the order form on this device. With none, you see ยังไม่มีสินค้าที่เพิ่งใช้บนเครื่องนี้ — ดูแท็บ “มาตรฐาน” (No recently used products on this device — see the “Standard” tab)
มาตรฐาน (Standard): your shop's standard products in GoSaaS
มีตัวเลือก (With options): products with options such as colour or size; you must choose an option before sending (step 6)
จัดเซ็ต (Sets): your shop's set products in GoSaaS
More details
The tray opens on ล่าสุด (Recent) if this device has added products in the order form before; otherwise it opens on มาตรฐาน (Standard)
The number after a chip is how many products that type has. While searching, it only counts products matching the search
A type with no products shows ร้านนี้ยังไม่มีสินค้าในประเภทนี้ (This shop has no products of this type yet)
Choosing and sending products
Click the card of the product you want to send, such as เสื้อยืดคอกลม สีกรม. The chosen card gets a tick at its top right
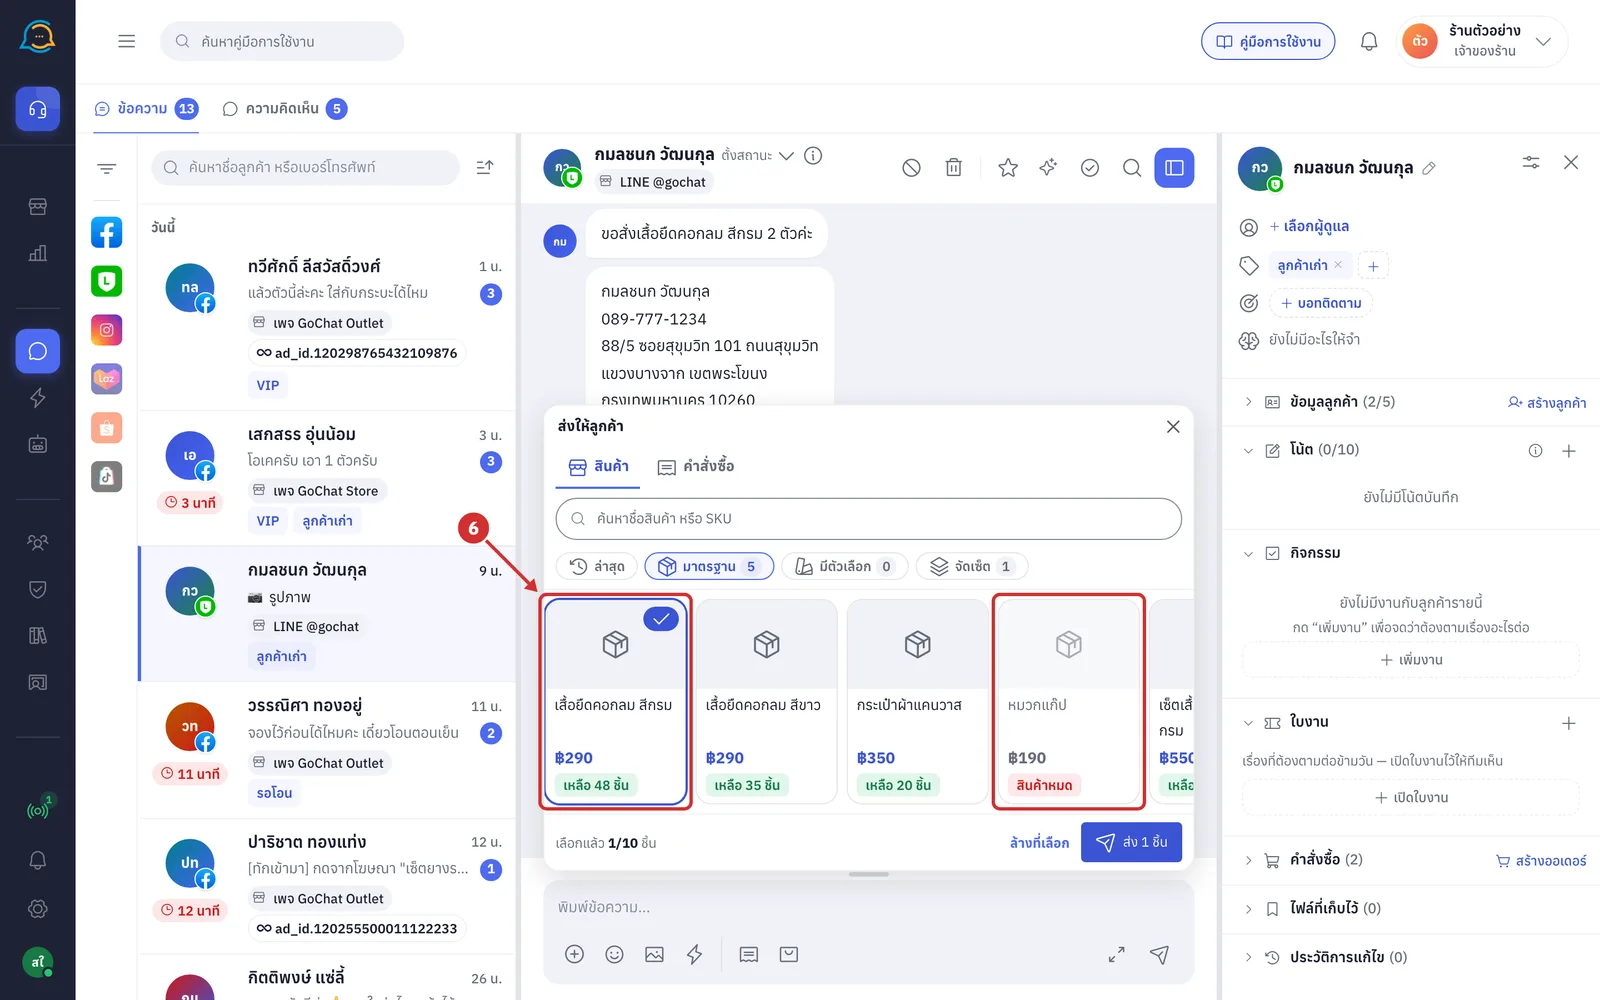
Each card shows the product name, price and a stock tag, such as เหลือ 48 ชิ้น (48 left)
Cards tagged สินค้าหมด (Out of stock) or ไม่มีในคลังนี้ (Not in this warehouse), such as หมวกแก๊ป, are faded and cannot be chosen
Cards tagged เช็คสต๊อกไม่ได้ตอนนี้ (Stock cannot be checked right now) can still be sent
Click a chosen card again to remove it
Products with options
Cards of products with options have a เลือกตัวเลือก (Choose option) tag. Clicking the card slides an options sheet up from the bottom of the tray
The sheet groups options, such as colour and size; values with no stock cannot be clicked. Once every group is chosen, the price and stock left of that option are shown, then click เพิ่ม (Add)
If the product has only one option group, click the value you want to choose it straight away
Added options appear under เลือกไว้ (Chosen); click a chip there to remove it
Click เสร็จ (Done) to go back to the tray. The number at the corner of the card is how many options you chose
Click more product cards, such as กระเป๋าผ้าแคนวาส, to send several at once. The bottom bar shows how many you picked, such as เลือกแล้ว 2/10 ชิ้น (2/10 picked)
You can pick up to 10 products per send
The customer gets the products in the order you picked them
Click ล้างที่เลือก (Clear selection) to remove all picked products
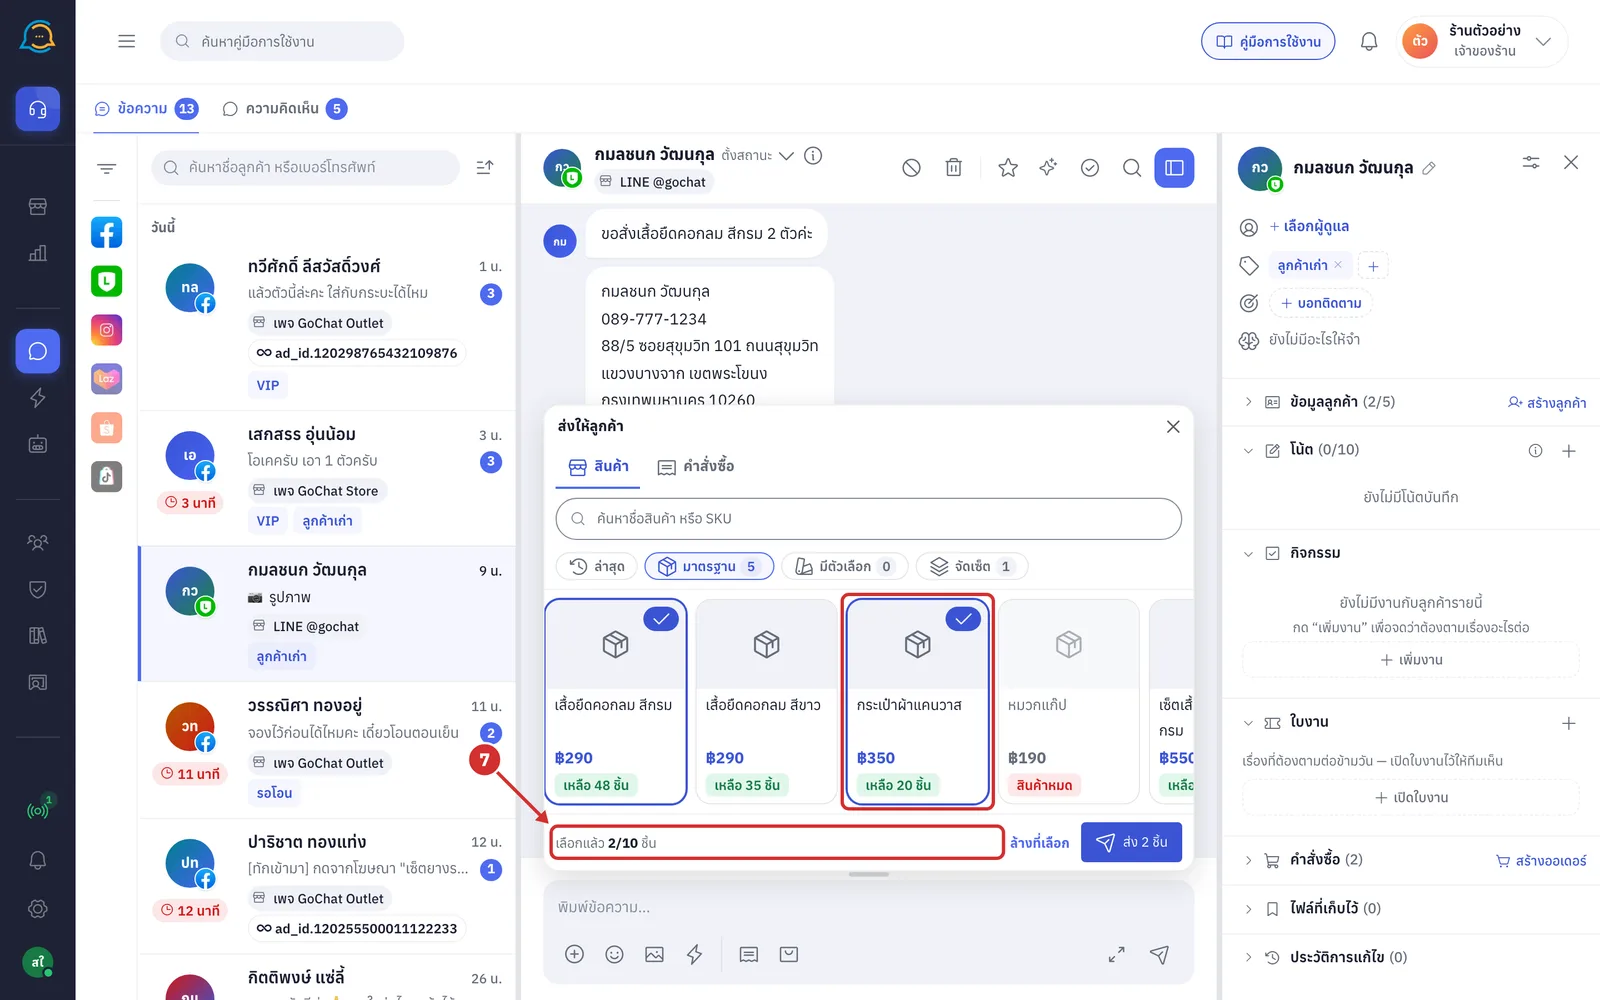
Click ส่ง 2 ชิ้น (Send 2 items) — the button shows how many you picked — to choose how to send
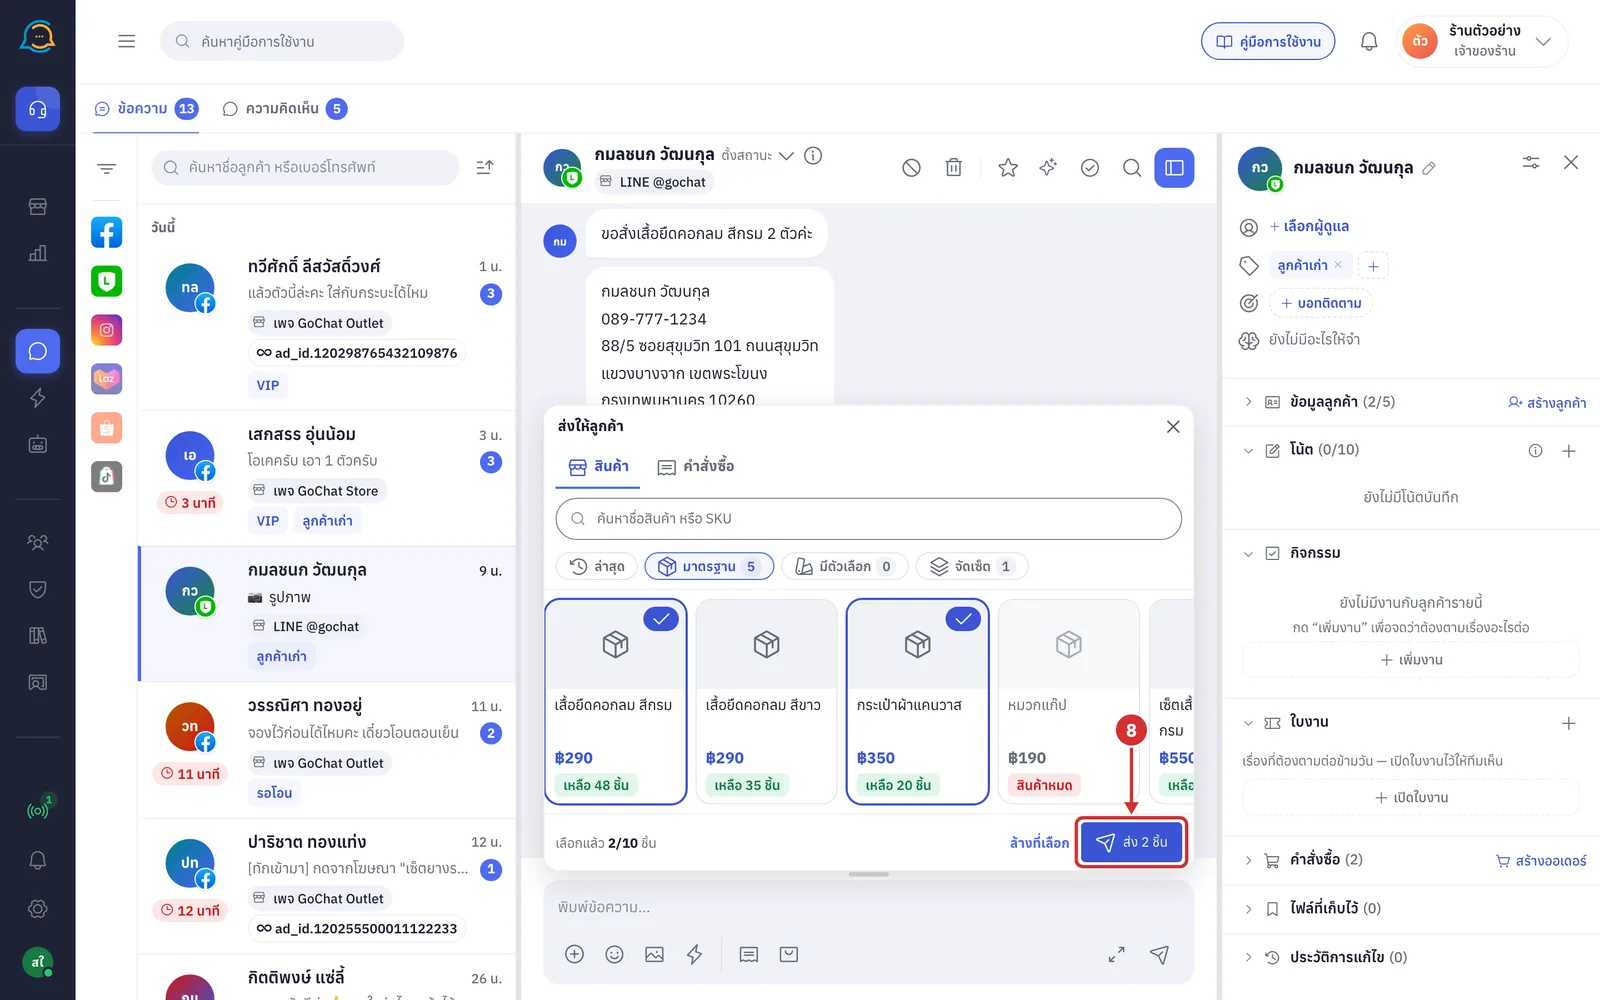
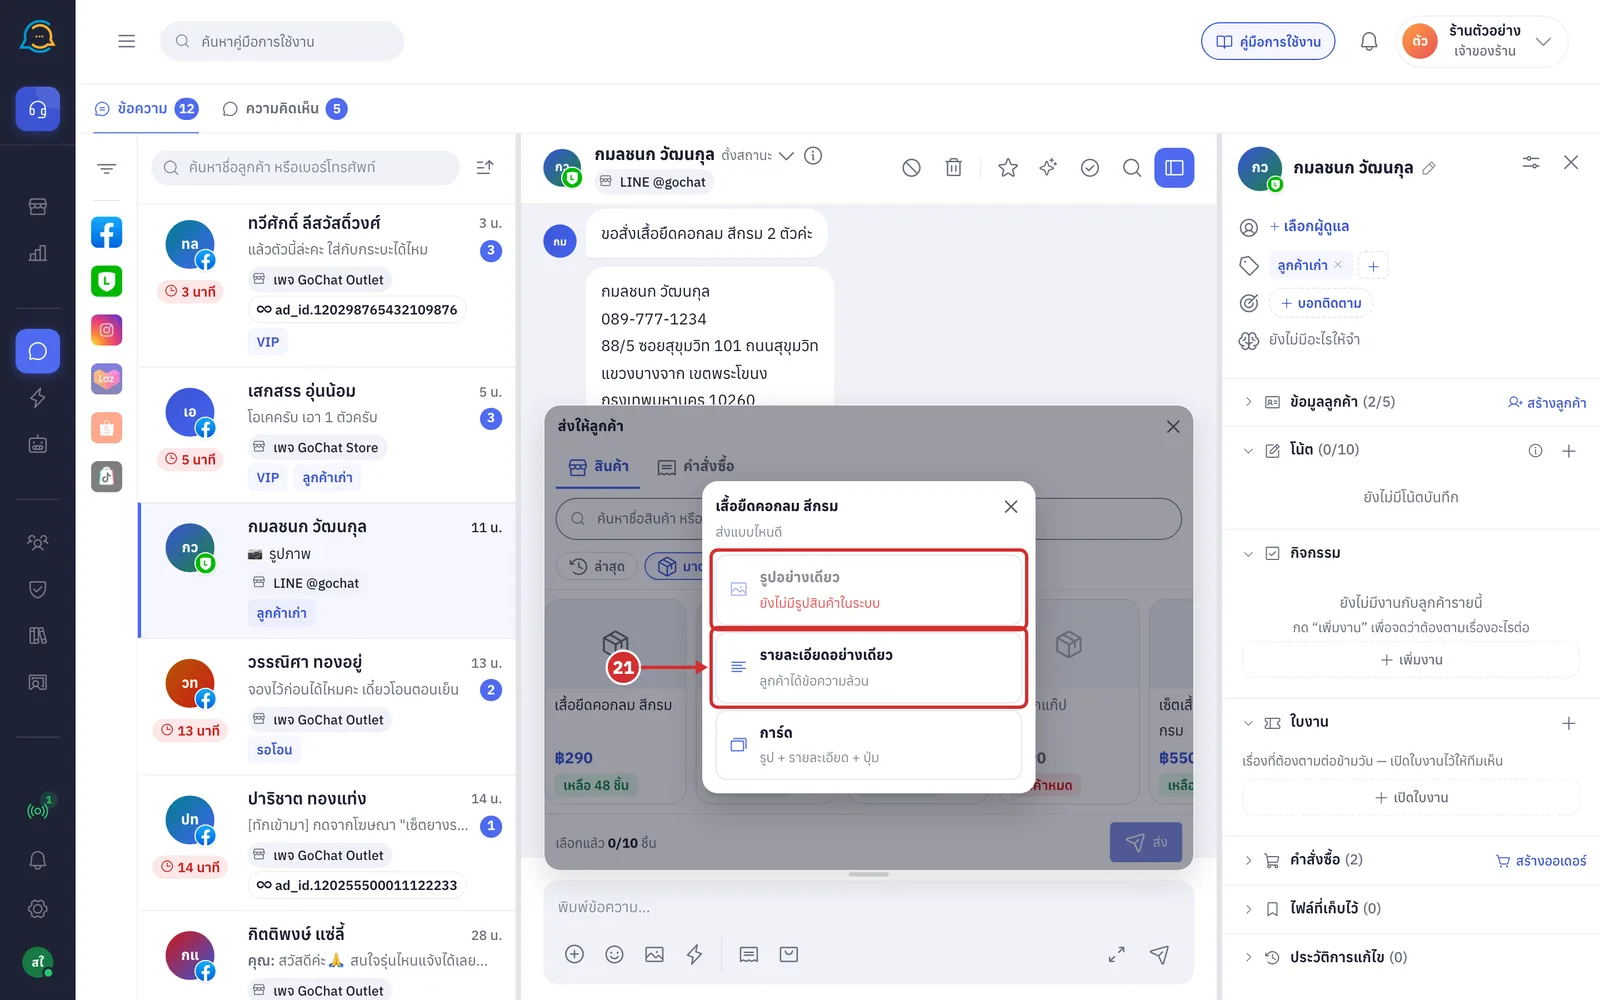
The ส่งแบบไหนดี (How to send) sheet opens. Its heading shows the product name when you picked one, or ส่งสินค้า 2 ชิ้น (Send 2 products) when you picked several. You can send in 3 ways
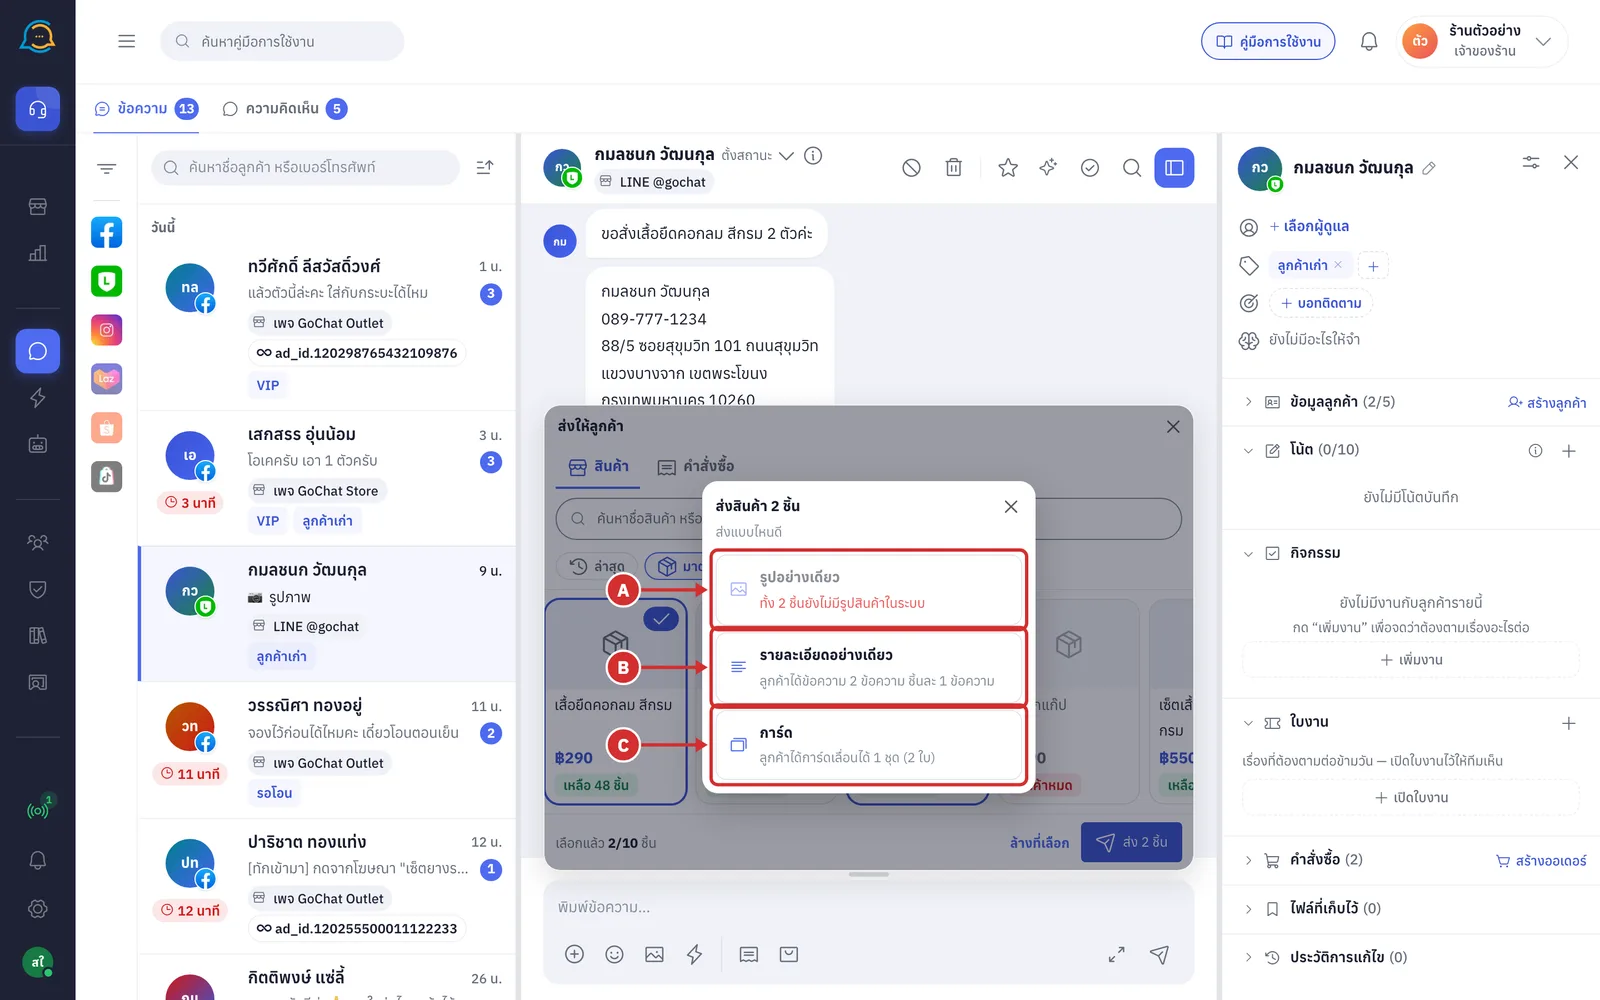
A รูปอย่างเดียว (Image only) to send the product image without text
It cannot be clicked when the product has no image yet, and the sheet shows the reason, such as ยังไม่มีรูปสินค้าในระบบ (No product image in the system yet)
With several products where some have no image, it can still be clicked: only products with images are sent, and the sheet says how many will be skipped
B รายละเอียดอย่างเดียว (Details only) to send plain text
Several products are sent as one message per product
C การ์ด (Card) to send a card with an image, details and a button
Several products are sent as one set of swipeable cards
The sheet does not remember your last choice. If you do not want to send yet, click ✕ or click outside the sheet to close it
Click การ์ด (Card). The tray closes and shows กำลังส่งสินค้า 2 ชิ้น… (Sending 2 products…), then a สินค้า 2 ชิ้น (2 products) card appears in the chat
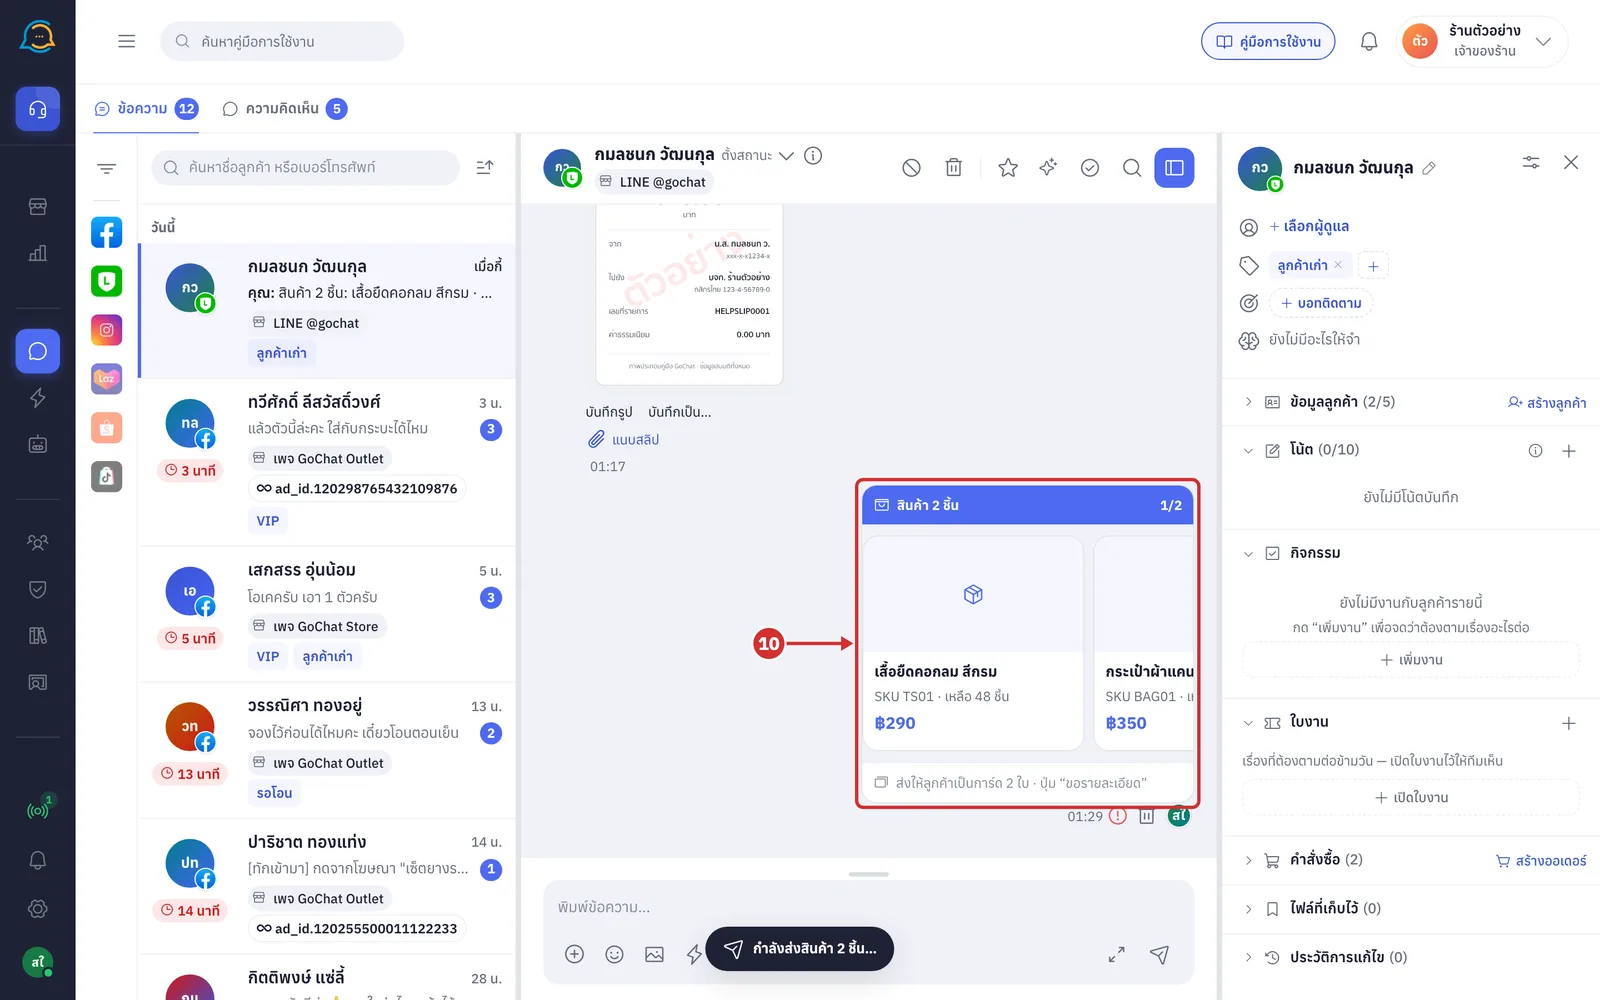
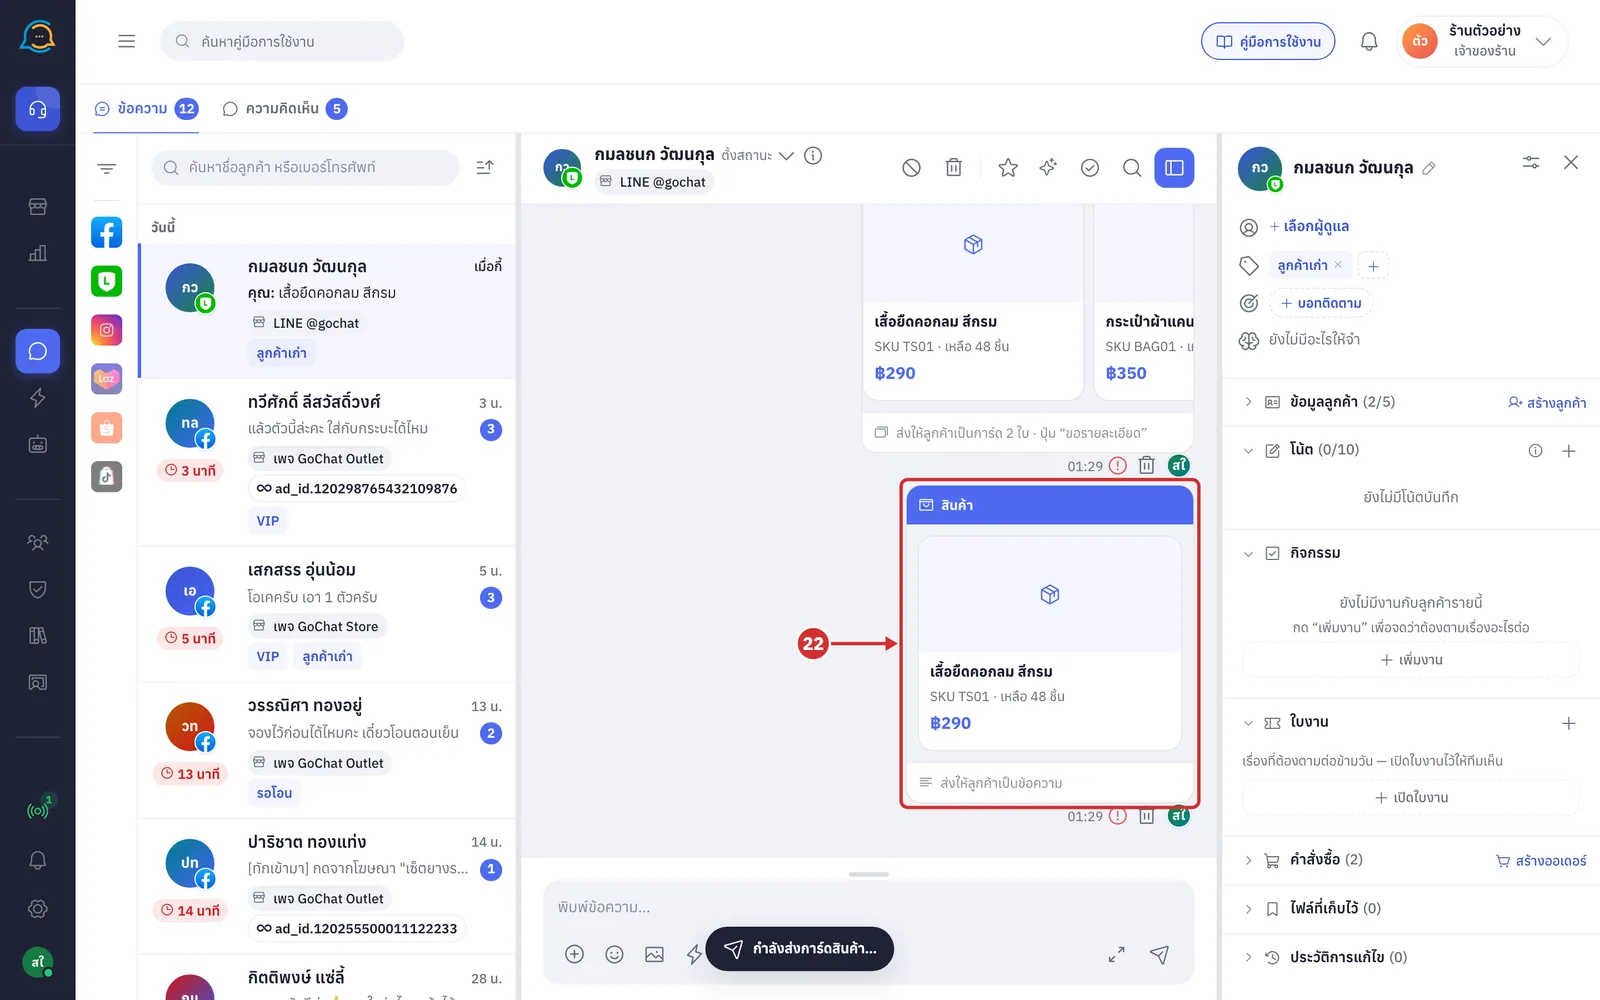
For one product, the message is กำลังส่งการ์ดสินค้า… (Sending product card…) and the card is headed สินค้า (Product)
Cards with several products have a counter, such as 1/2; scroll left and right to see the others
The line at the bottom of the card says what the customer actually got, such as ส่งให้ลูกค้าเป็นการ์ด 2 ใบ · ปุ่ม “ขอรายละเอียด” (Sent to customer as 2 cards · “Ask for details” button), ส่งให้ลูกค้าเป็นข้อความ (Sent to customer as text) or ส่งให้ลูกค้าเป็นรูป (Sent to customer as an image)
The card in the chat has no button; the ขอรายละเอียด (Ask for details) button is only on the customer's side
Products skipped when sending as image only are listed under the card as ไม่ได้ส่ง … ชิ้น — ไม่มีรูปในระบบ (… not sent — no image in the system)
What the customer gets when you send products
What the customer sees in LINE, Messenger or Instagram depends on how you sent it
การ์ด (Card)
LINE: a card with an image, the product name, a line with the SKU and stock left, the price, and an ขอรายละเอียด (Ask for details) button
Facebook and Instagram: a card with an image, the product name, one line combining the SKU, stock left and price, and an ขอรายละเอียด (Ask for details) button
For several products, the customer gets one set of cards they can swipe through
For products with no image yet, the card uses an image the system makes from your shop name and an icon
รายละเอียดอย่างเดียว (Details only)
A 3-line text message: the product name, the SKU with stock left, and the price, with no link
รูปอย่างเดียว (Image only)
The product image without text
When the customer taps ขอรายละเอียด (Ask for details), the chat receives a message from the customer naming the product and SKU, such as ขอรายละเอียด เสื้อยืดคอกลม สีกรม (TS01) หน่อยค่ะ (Could I have details of เสื้อยืดคอกลม สีกรม (TS01), please), so you know right away which product they mean
The price and stock left the customer sees are the values at the time you sent
Sending an order
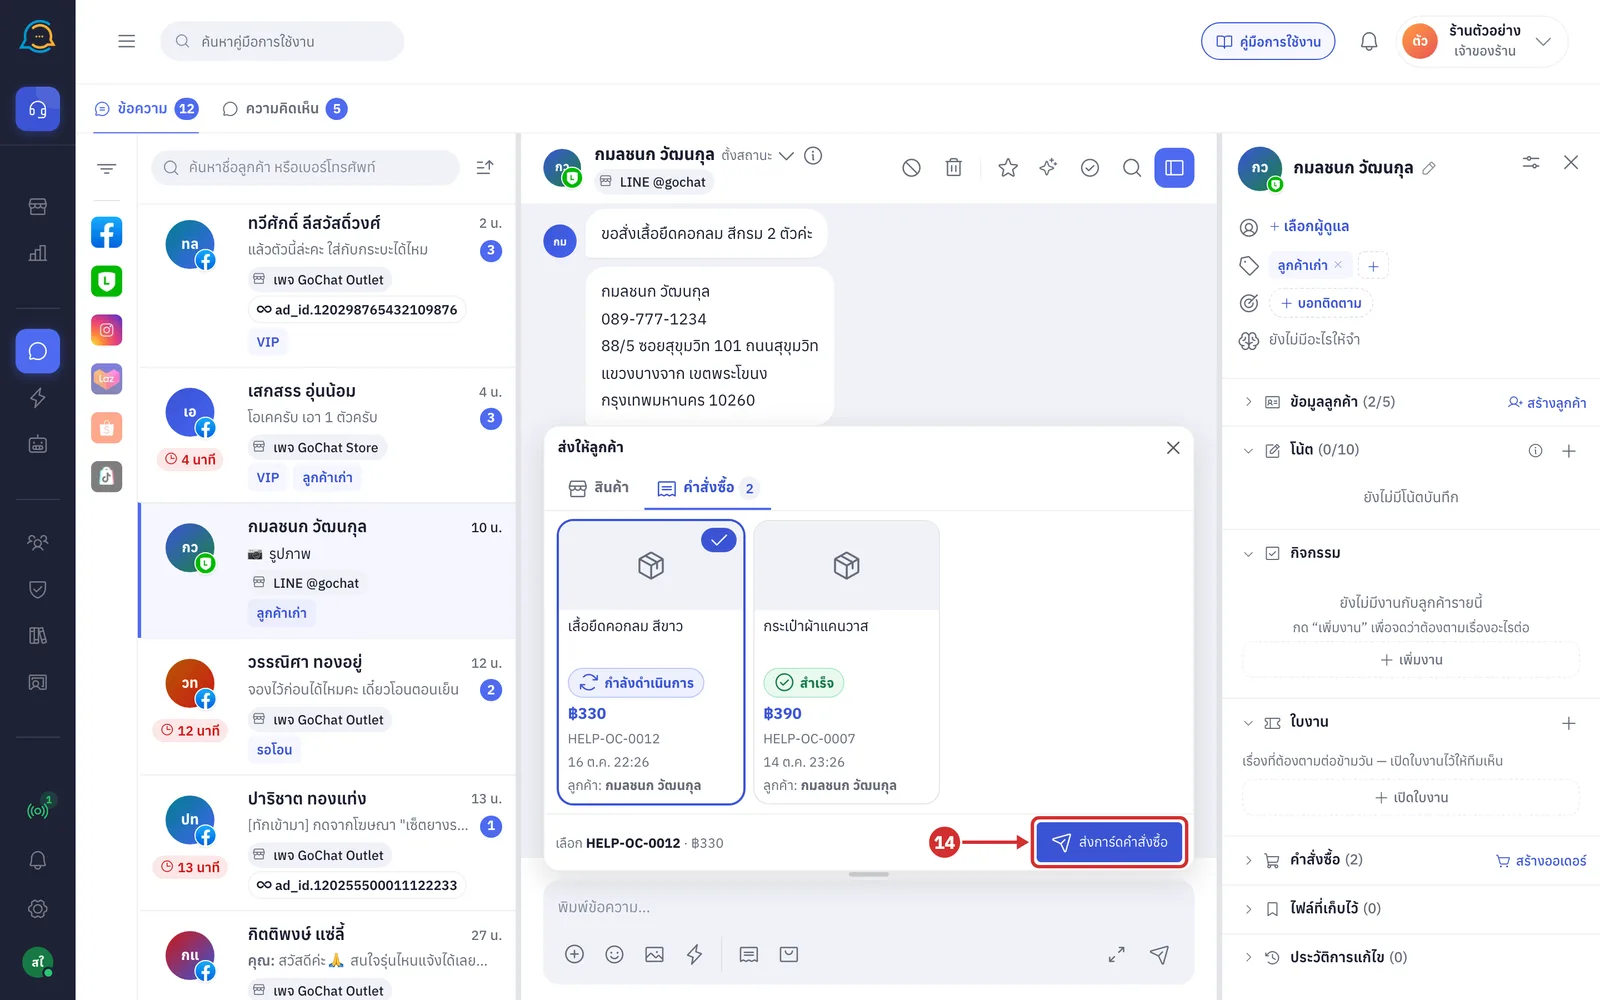
In the ส่งให้ลูกค้า (Send to customer) tray, click the คำสั่งซื้อ (Orders) tab (or click the receipt icon คำสั่งซื้อ (Orders) in the message box) to see this customer's orders
Orders are looked up by the GoSaaS customer linked to this chat. If none is linked yet, they are looked up by the phone number in the chat's customer info
The list is not limited to orders created from this chat; it also includes the customer's other orders in GoSaaS
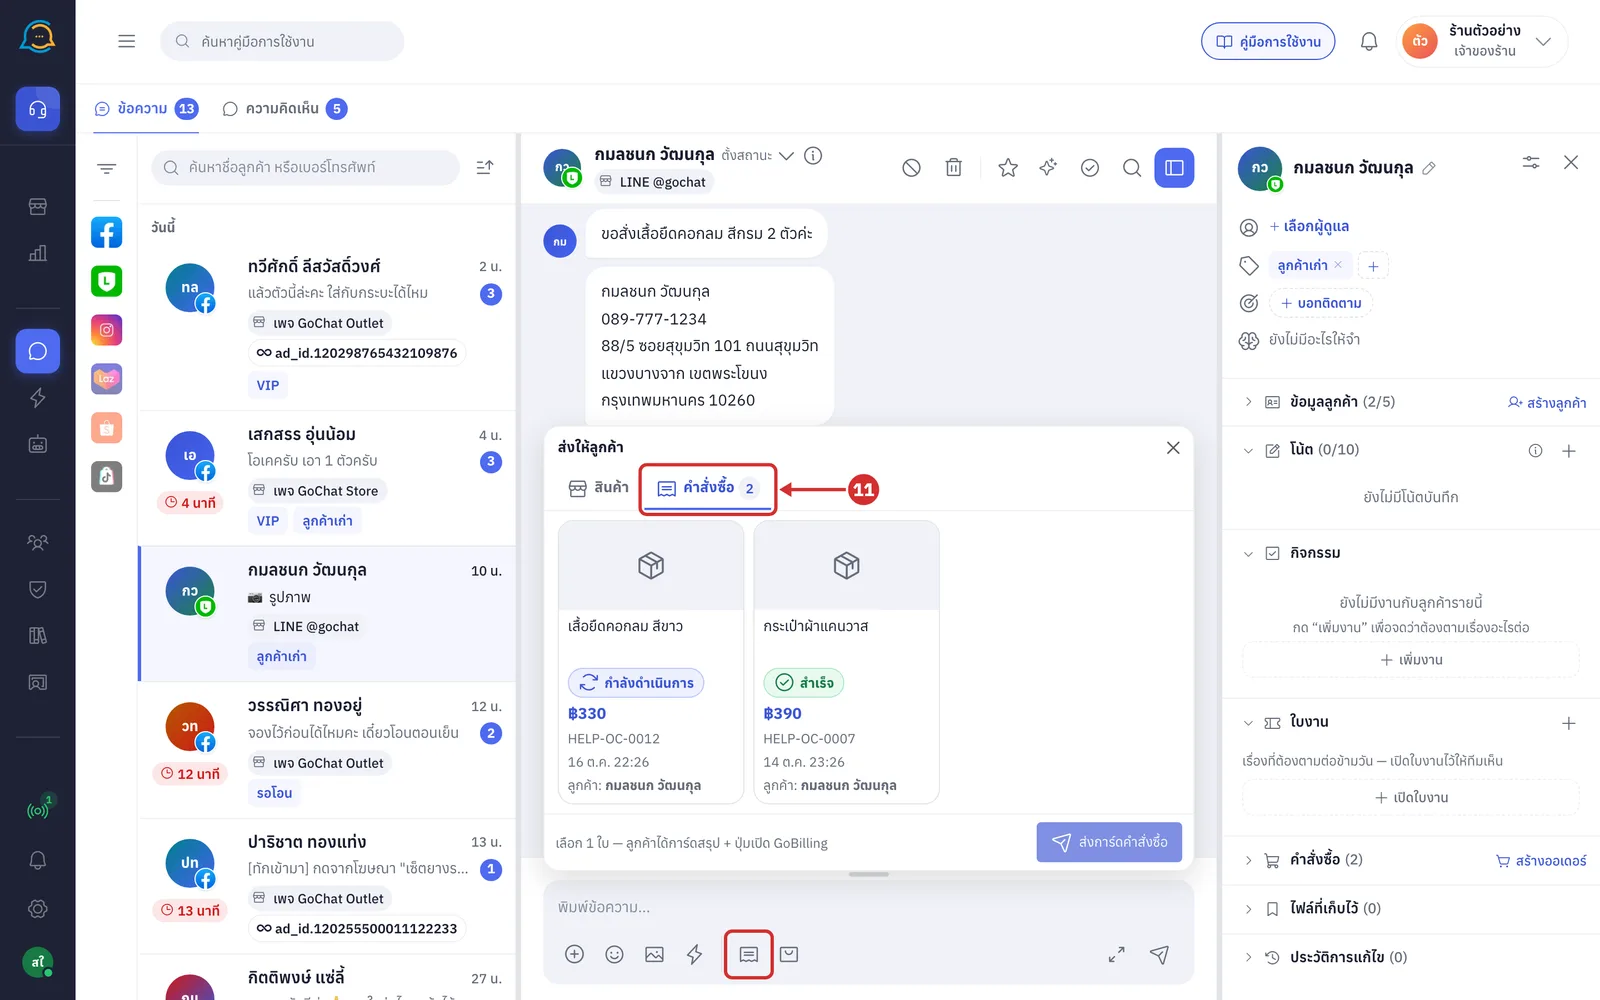
Orders are shown as cards in a row. Each card shows
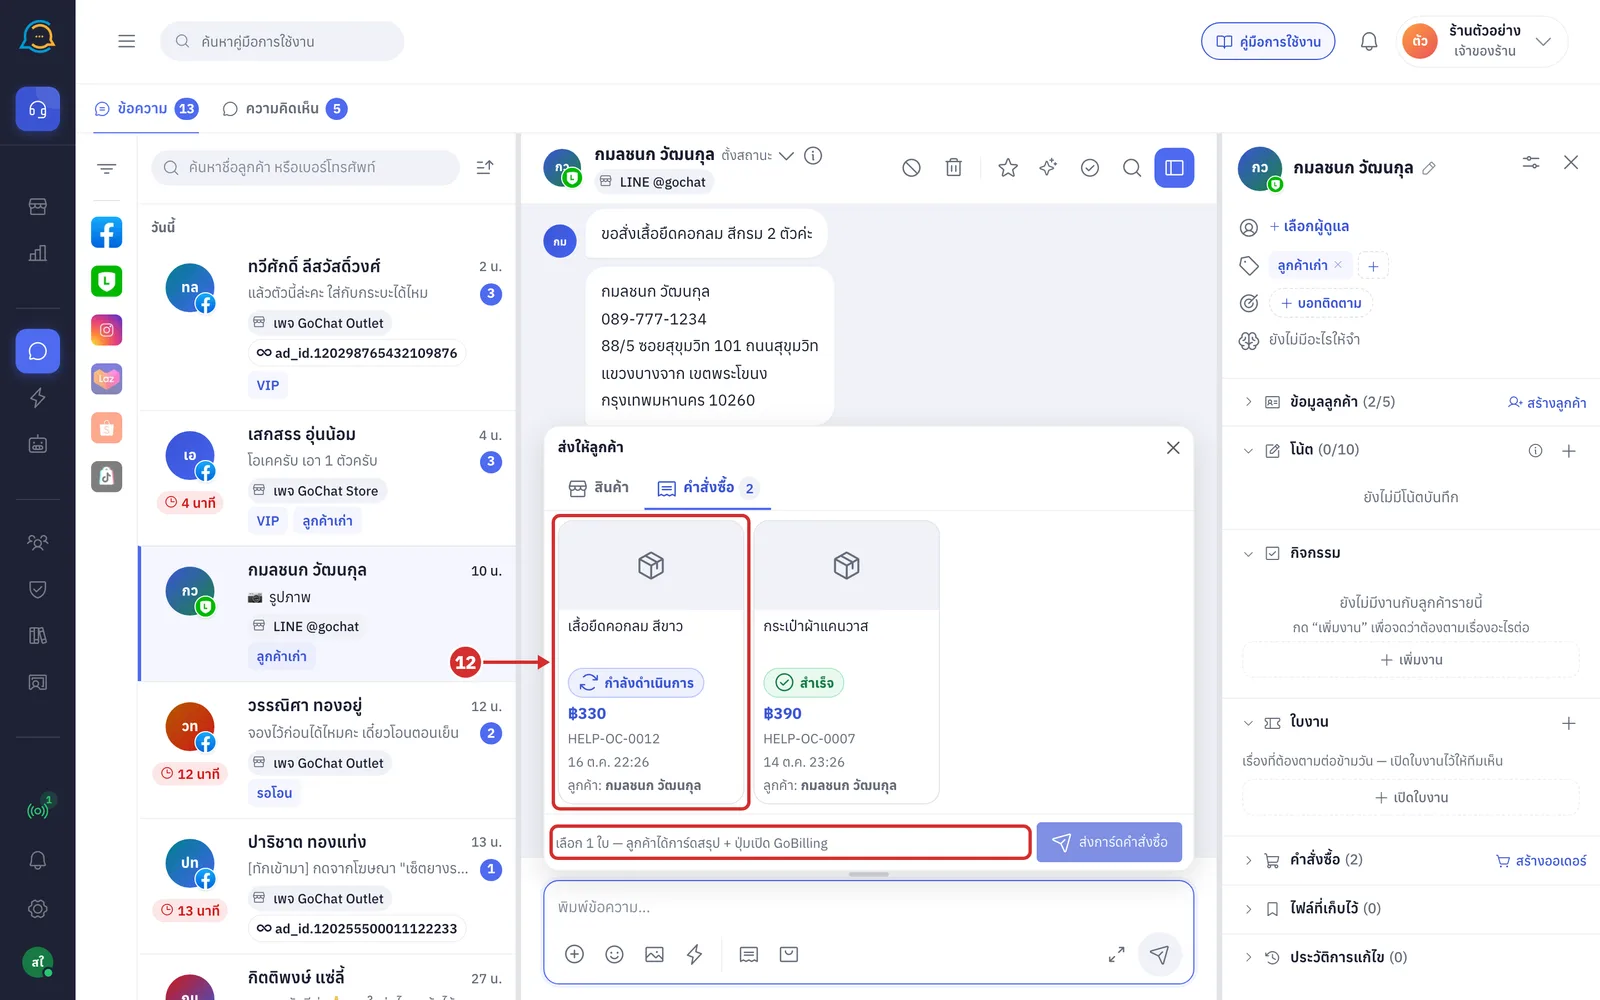
The first product's name; with several items, the image has a count tag such as 2 รายการ (2 items)
The order status, such as กำลังดำเนินการ (In progress) or สำเร็จ (Completed)
The net total, order number and when it was ordered
The order owner's name, such as ลูกค้า: กมลชนก วัฒนกุล (Customer: กมลชนก วัฒนกุล), shown when orders were looked up by phone number, because one number can belong to several customers
Before you choose one, the bottom bar shows เลือก 1 ใบ — ลูกค้าได้การ์ดสรุป + ปุ่มเปิด GoBilling (Choose 1 order — the customer gets a summary card + a button to open GoBilling)
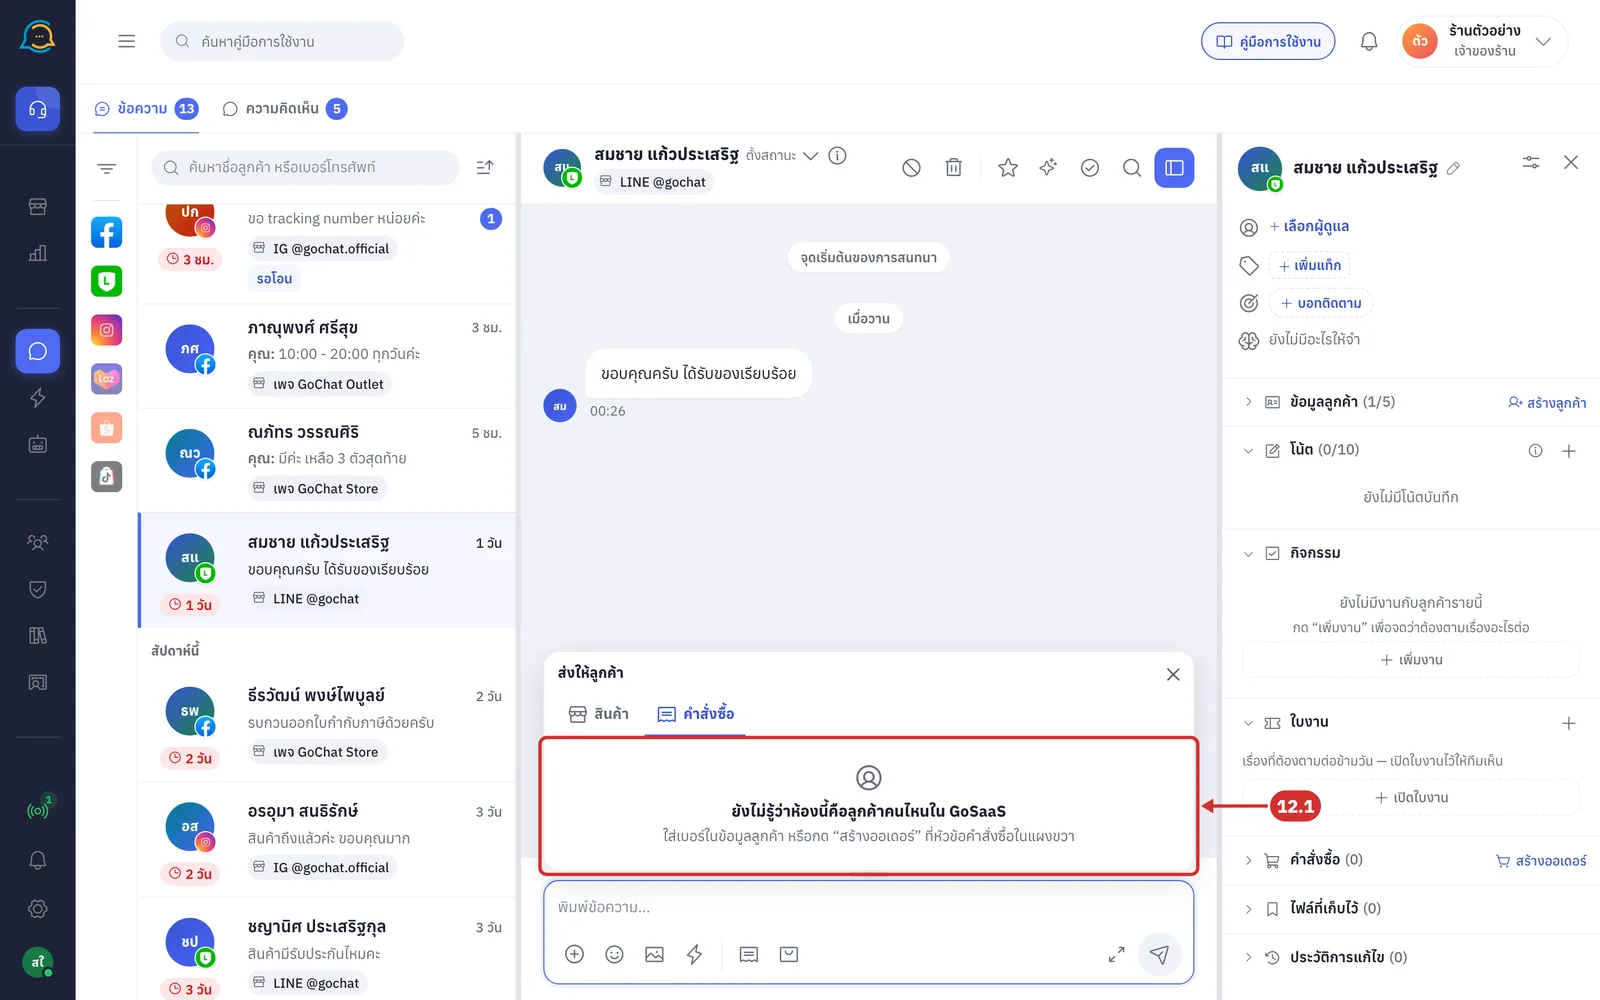
12.1 If this chat is not linked to a GoSaaS customer and the customer info has no phone number, the tray shows ยังไม่รู้ว่าห้องนี้คือลูกค้าคนไหนใน GoSaaS (We do not know which GoSaaS customer this chat is yet) with the hint ใส่เบอร์ในข้อมูลลูกค้า หรือกด “สร้างออเดอร์” ที่หัวข้อคำสั่งซื้อในแผงขวา (Add a phone number to the customer info, or click “Create order” in the Orders section of the right panel). See how to add a number in Using the customer panel and how to create an order in Keying an order in a chat room
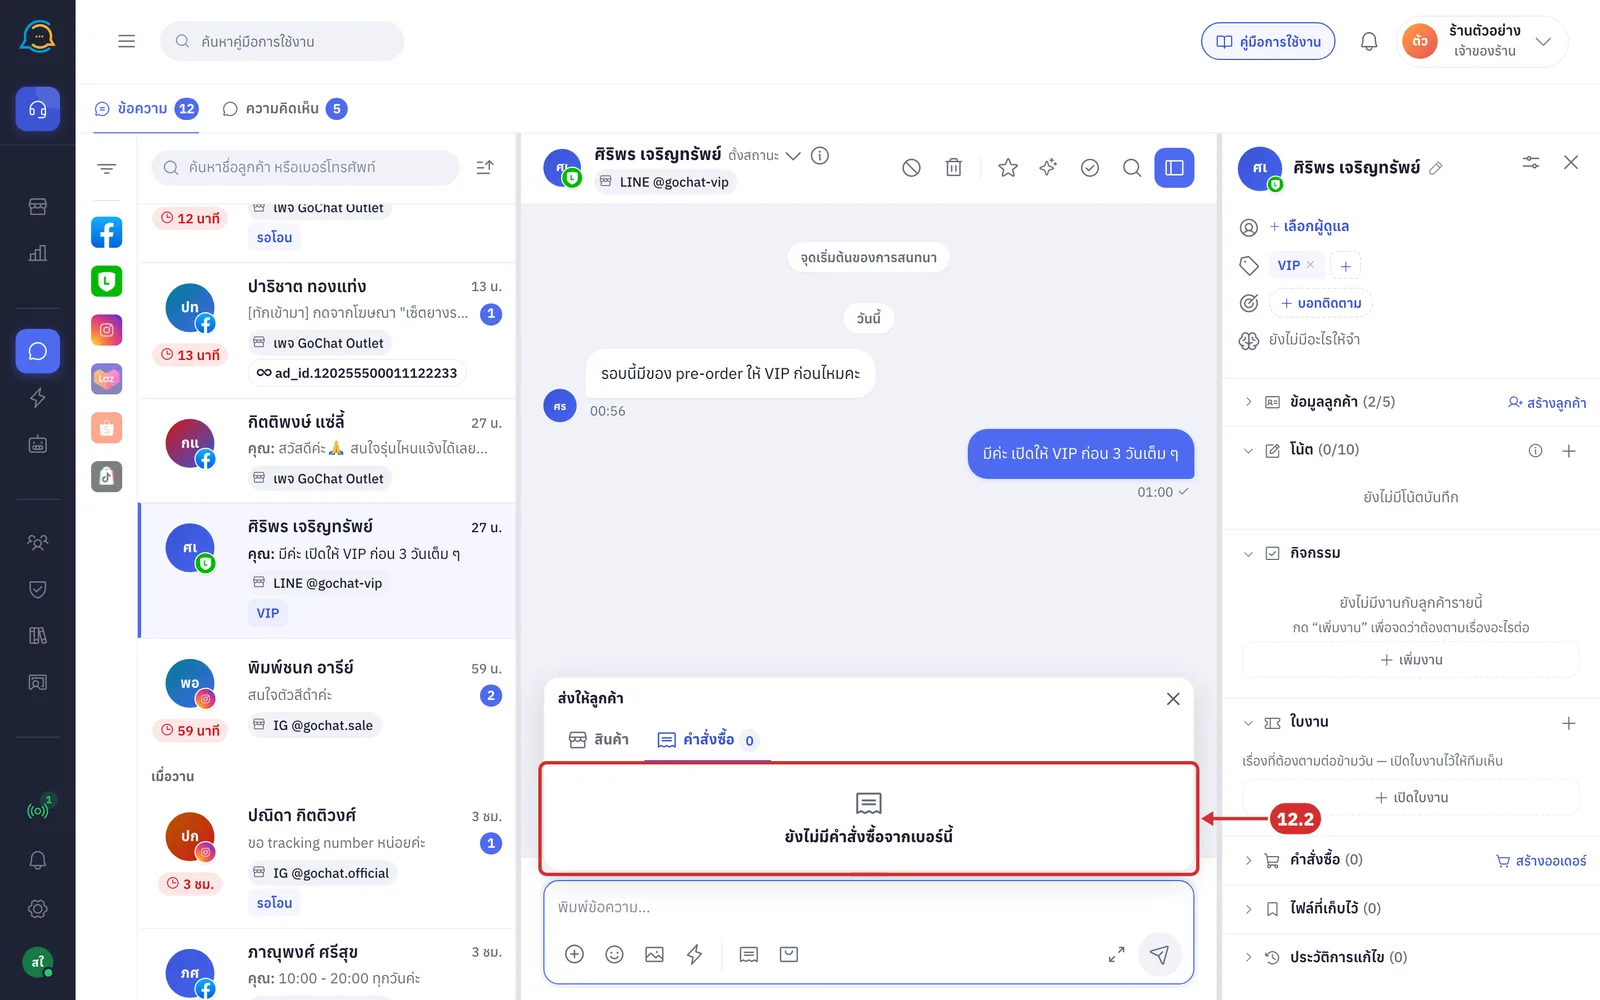
12.2 If no orders are found, the tray shows ยังไม่มีคำสั่งซื้อจากเบอร์นี้ (No orders from this number yet) when looked up by phone number, or ลูกค้าคนนี้ยังไม่มีคำสั่งซื้อ (This customer has no orders yet) when the chat is linked to a customer
Click the card of the order you want to send, such as HELP-OC-0012. The chosen card gets a tick at its top right, and the bottom bar shows the order number and net total
You can send 1 order at a time
Click the same card again to unselect it
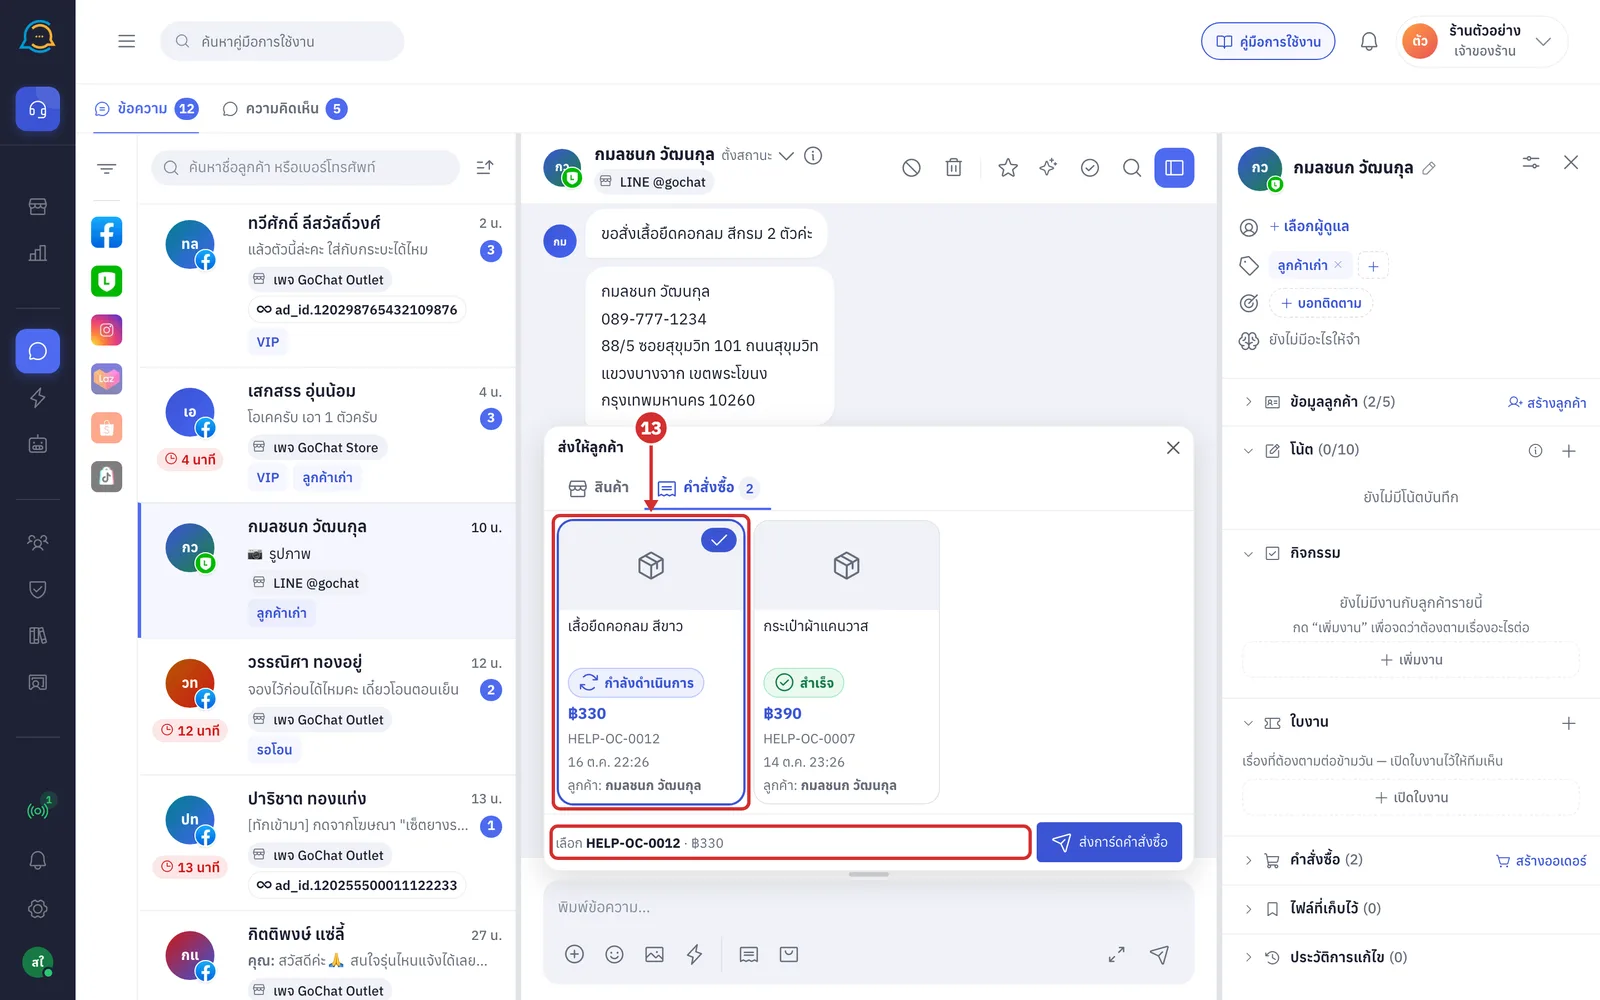
Click ส่งการ์ดคำสั่งซื้อ (Send order card) to send the chosen order's card to the customer
If the chat's phone number belongs to several GoSaaS customers, the bottom bar shows เบอร์นี้เป็นของลูกค้าหลายคน — ต้องยืนยันก่อนส่ง (This number belongs to several customers — confirm before sending)
When you send in that case, the system asks ใบนี้เป็นของลูกค้าห้องนี้ใช่ไหม (Is this order this chat's customer's?) with the owner's name. Click ใช่ ส่งใบนี้ (Yes, send this order) to confirm, or ยกเลิก (Cancel)
Once sent, a chat that was looked up by phone number is linked to that order's customer
The tray closes and shows กำลังส่งการ์ดคำสั่งซื้อ… (Sending order card…), then an คำสั่งซื้อ (Order) card appears in the chat with
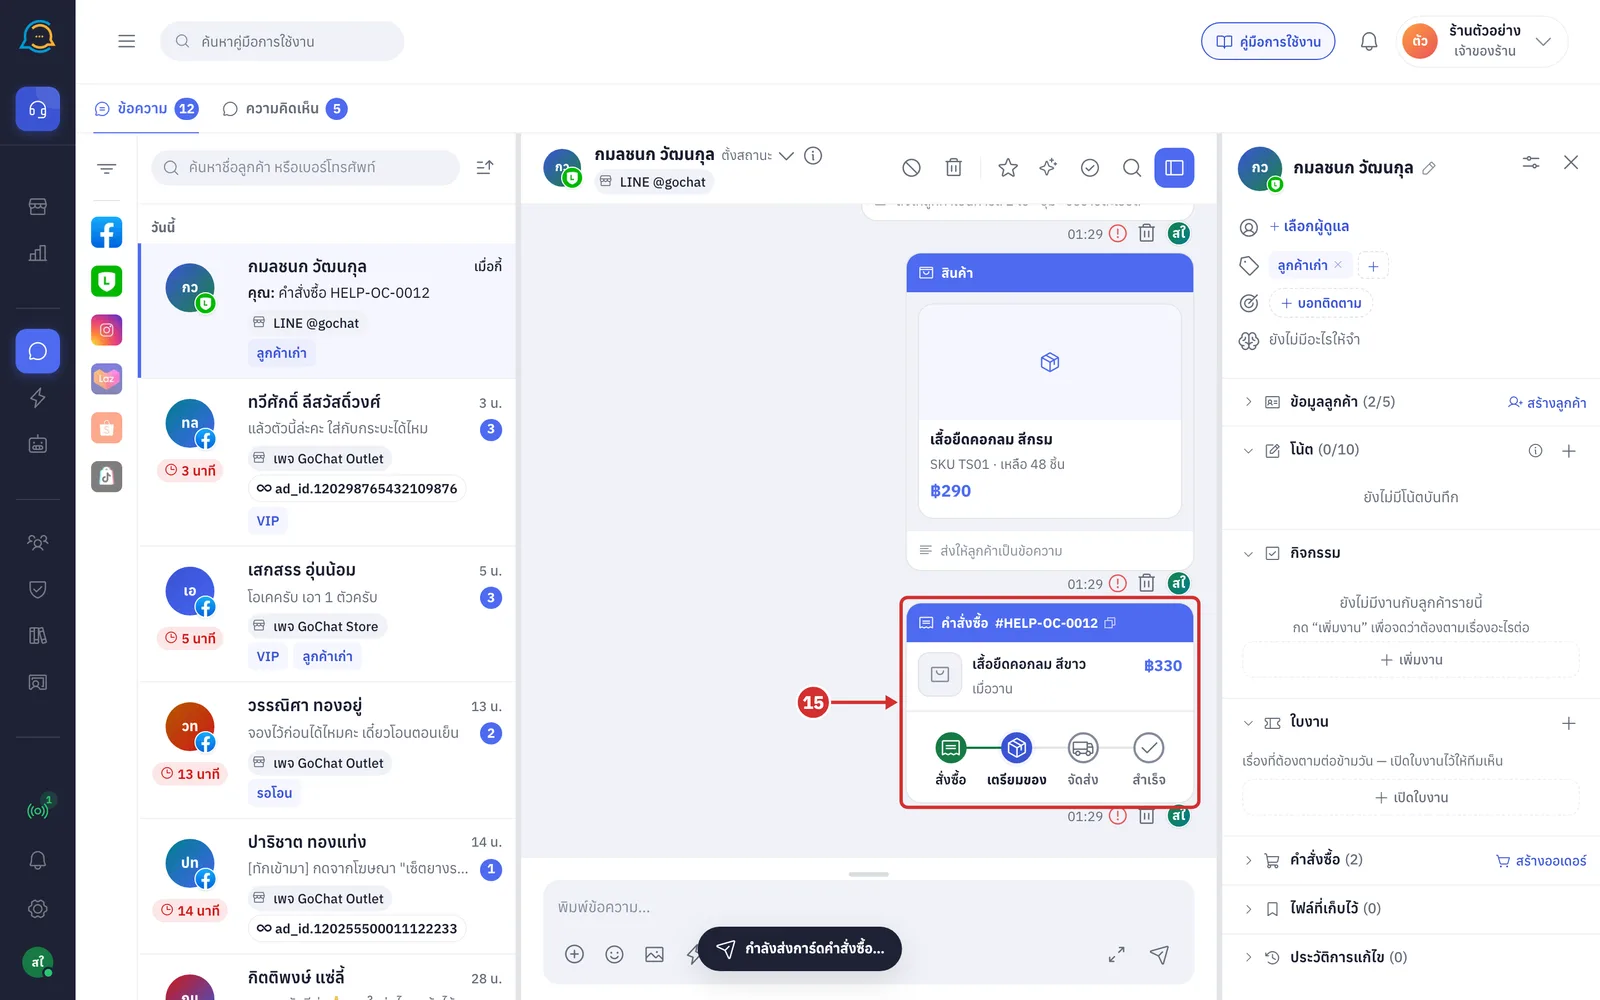
The order number at the top of the card; click it to copy the number
The first product's name, order date and net total
The step bar สั่งซื้อ (Ordered), เตรียมของ (Preparing), จัดส่ง (Shipping) and สำเร็จ (Completed) shows which step the order is at
Orders with a tracking number show the carrier and tracking number above the step bar, with a button to copy the tracking number
Cancelled or returned orders show a สถานะ (Status) row instead of the step bar
What the customer gets when you send an order
LINE: a card with the order number and status, the first product's name, and สั่งเมื่อ (Ordered on) and ยอดสุทธิ (Net total) rows
Facebook and Instagram: a card headed คำสั่งซื้อ (Order) followed by the order number, a line with the status and net total, and the product name
For orders with several items, the product name is followed by และอีก … รายการ (and … more items)
For orders with a tracking number, the card shows the carrier, tracking number and the parcel's latest step
The ดูคำสั่งซื้อ (View order) button opens that order's GoBilling page. If the order has no link yet, the system creates one when sending; if it cannot, the card is sent without this button
Orders with a parcel tracking link also get a ติดตามพัสดุ (Track parcel) button
Sending products of interest
สินค้าที่สนใจ (Products of interest) is a list of products you pin as ones this customer is interested in. It is in the ความจำของแชทนี้ (This chat's memory) window of the right panel. Use it as a shortcut to send that product to the customer; it also lets AI know which products the customer is interested in when drafting replies.
Only shops with AI turned on and connected to GoSaaS have it; group chats do not
Only the pinned products are kept, not their prices or stock
Chats with the same customer share this list
In the right panel of the chat, click the ความจำของแชทนี้ (This chat's memory) row
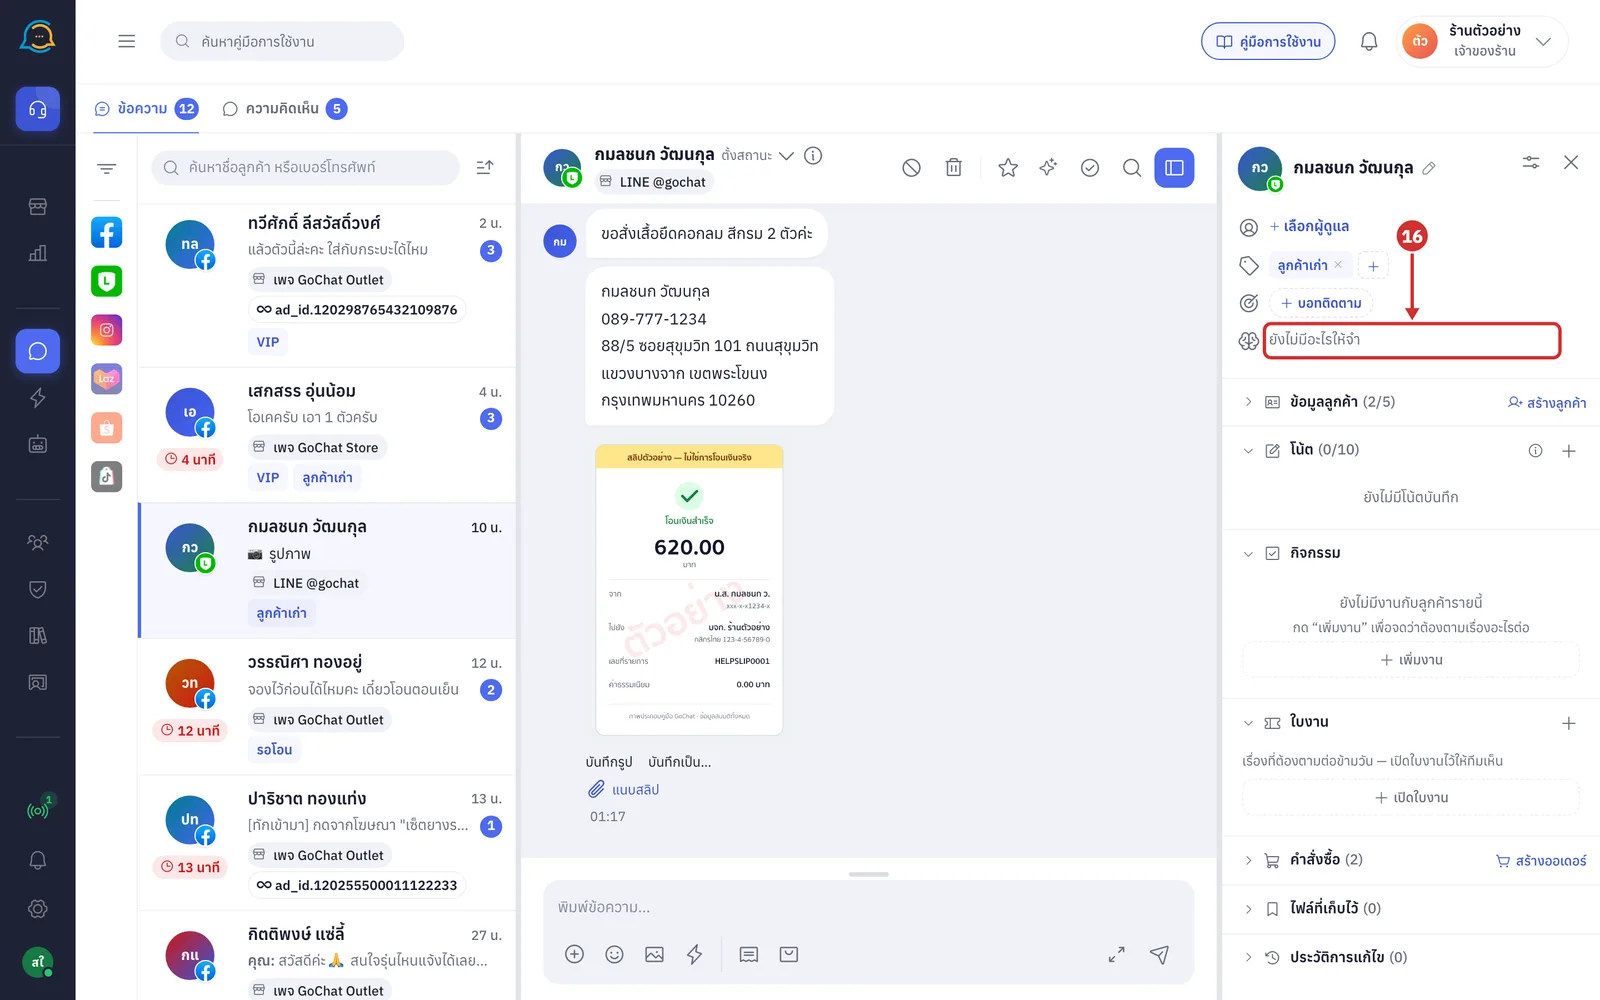
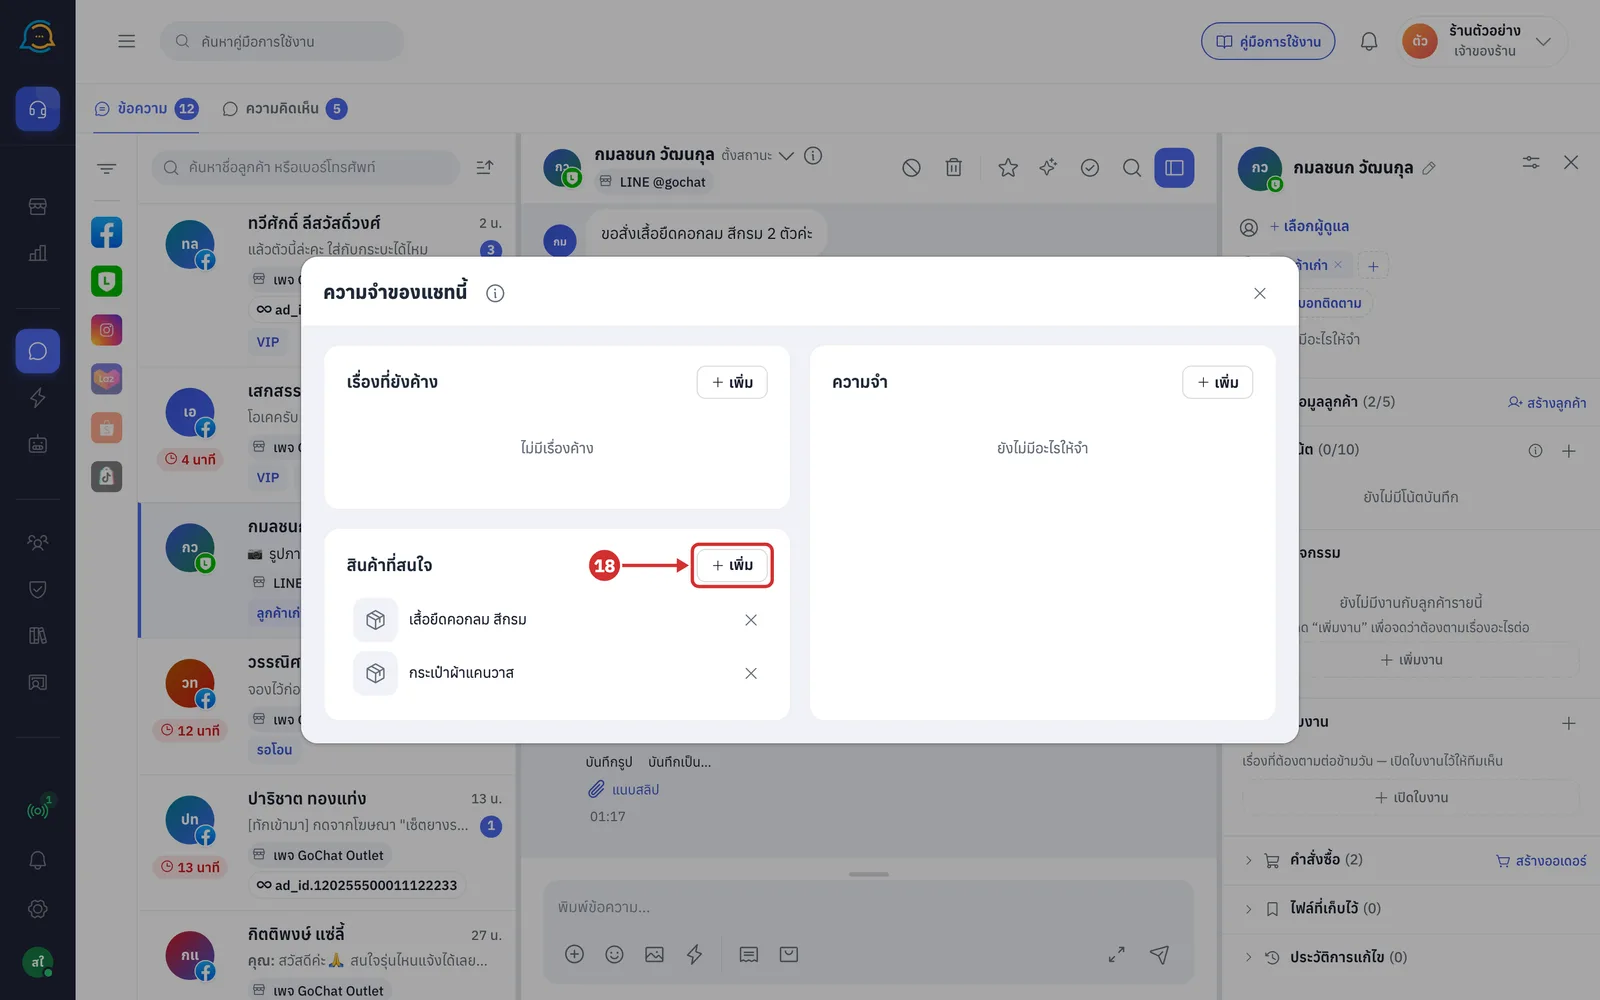
The ความจำของแชทนี้ (This chat's memory) window opens. The สินค้าที่สนใจ (Products of interest) card is under the เรื่องที่ยังค้าง (Open matters) card, and each row shows the product image and name
Products without an image show a box icon
If you pinned an option, its name appears under the product name
With nothing pinned yet, the card shows ยังไม่ได้แปะสินค้า (No products pinned yet)
The other parts of this window are explained in Using the customer panel
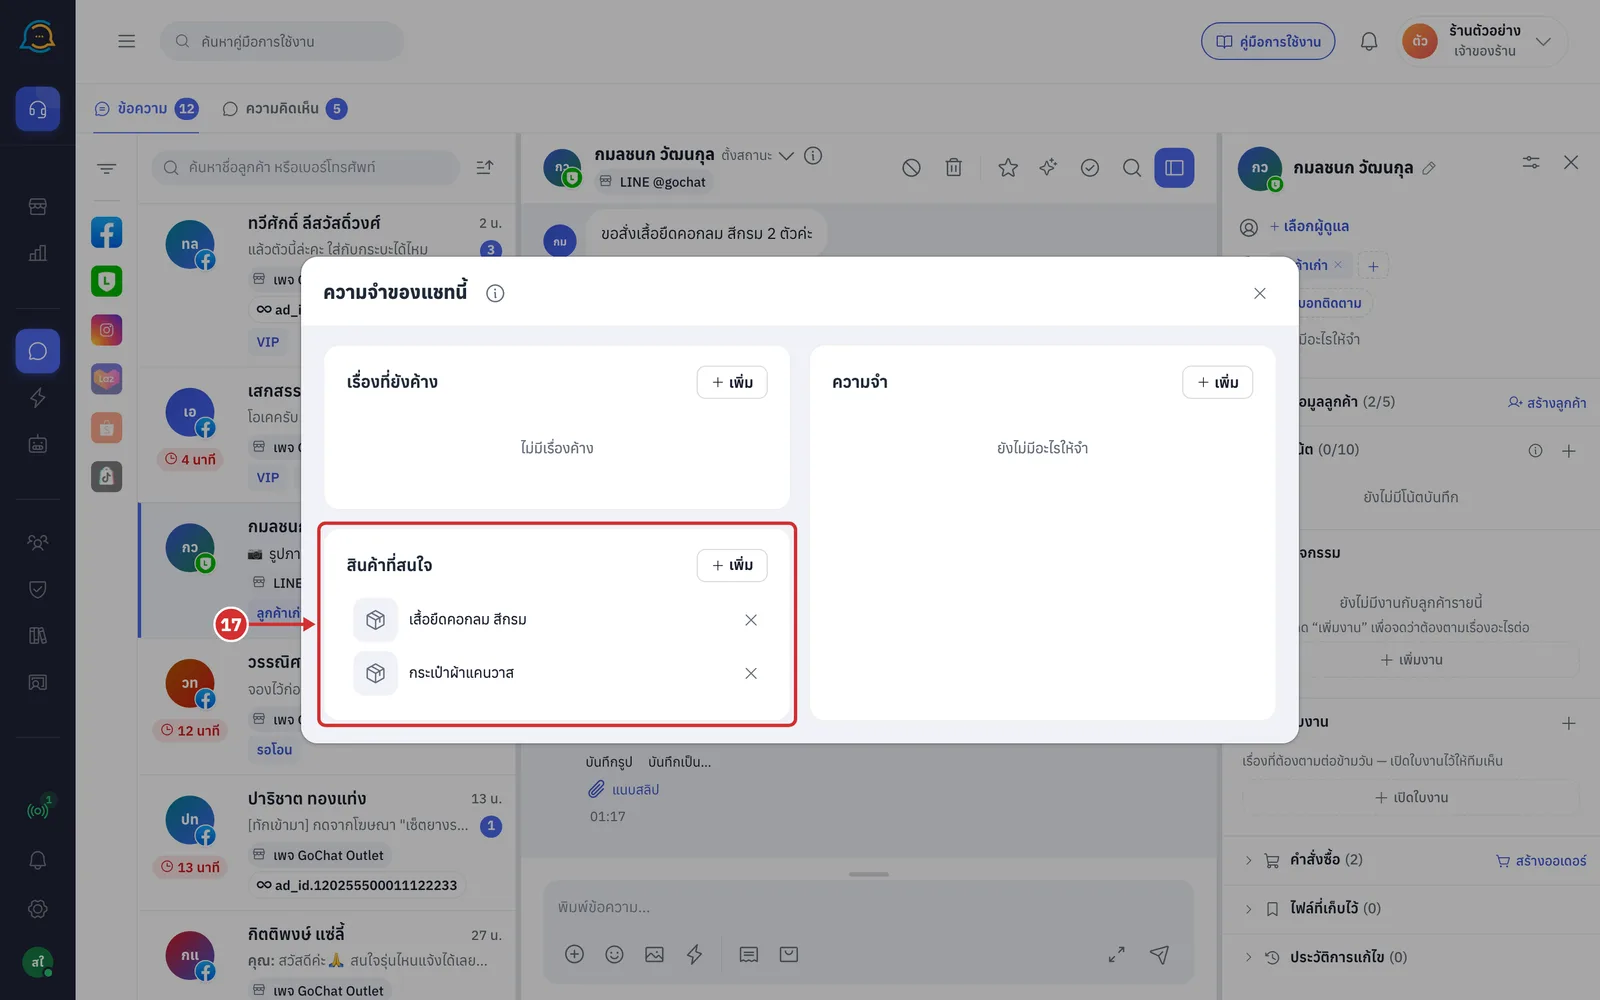
Click เพิ่ม (Add) on the สินค้าที่สนใจ (Products of interest) card to pin a product the customer is interested in
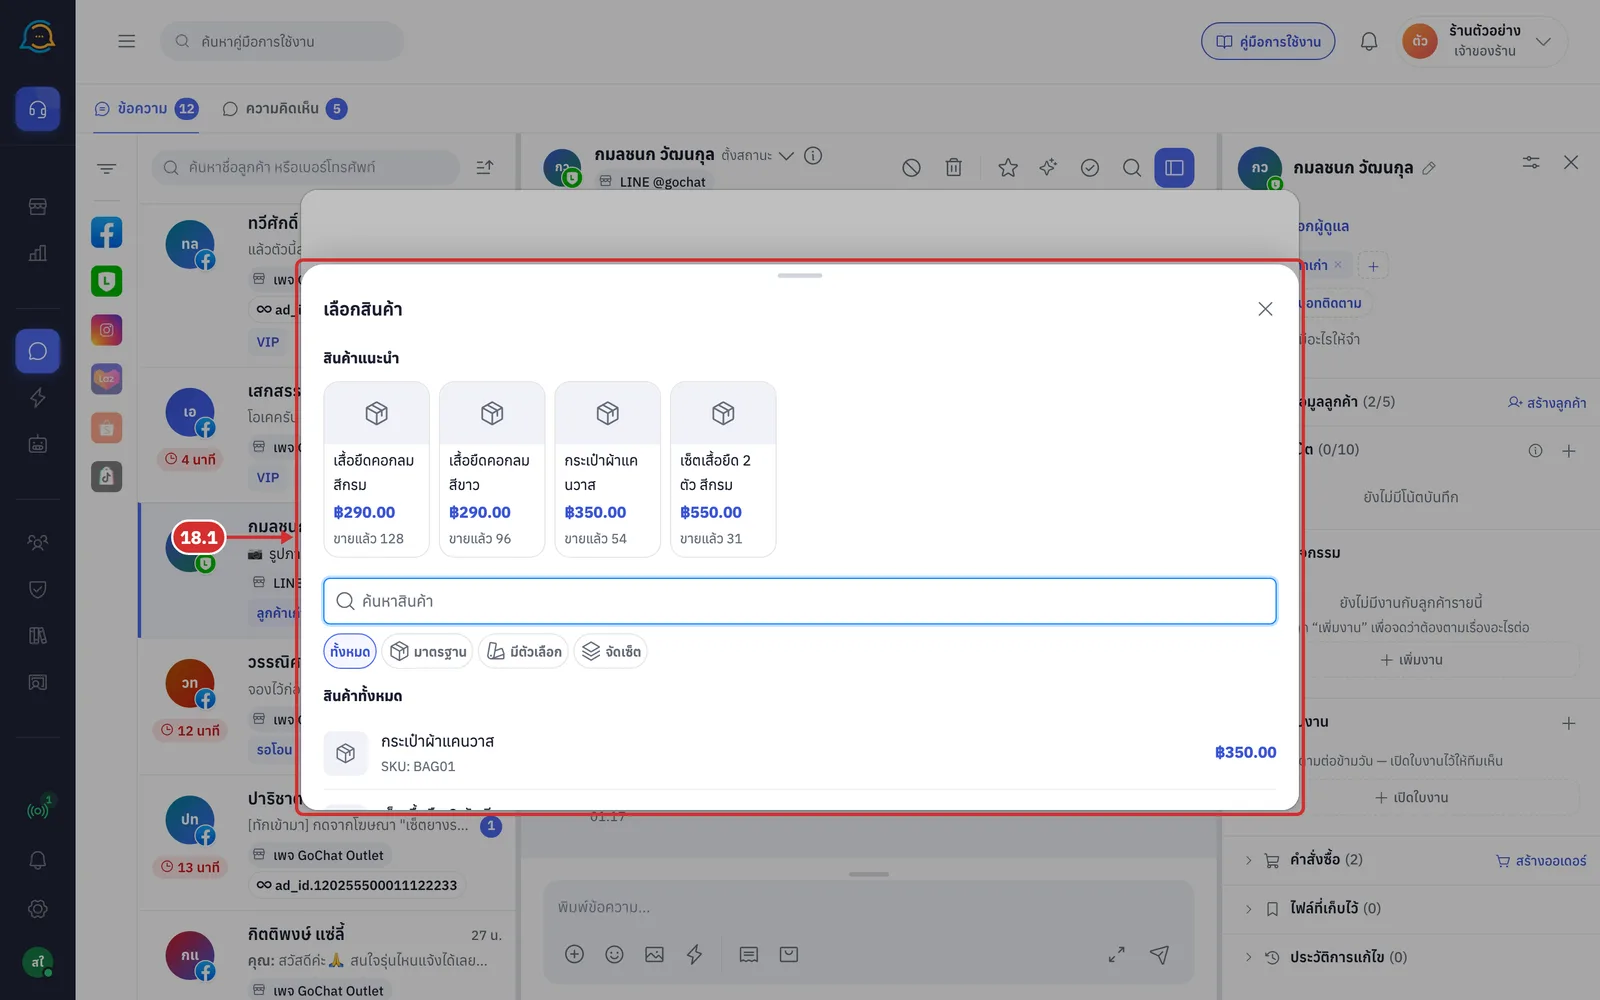
18.1 The เลือกสินค้า (Choose products) sheet opens. Click the product you want; it is added to the list straight away
This is the same sheet used to choose products in the order form. See its parts in Keying an order in a chat room
For products with options, you can choose down to a specific option
Out-of-stock products can be pinned too, because only the customer's interest is kept
A product that is already pinned is not added twice
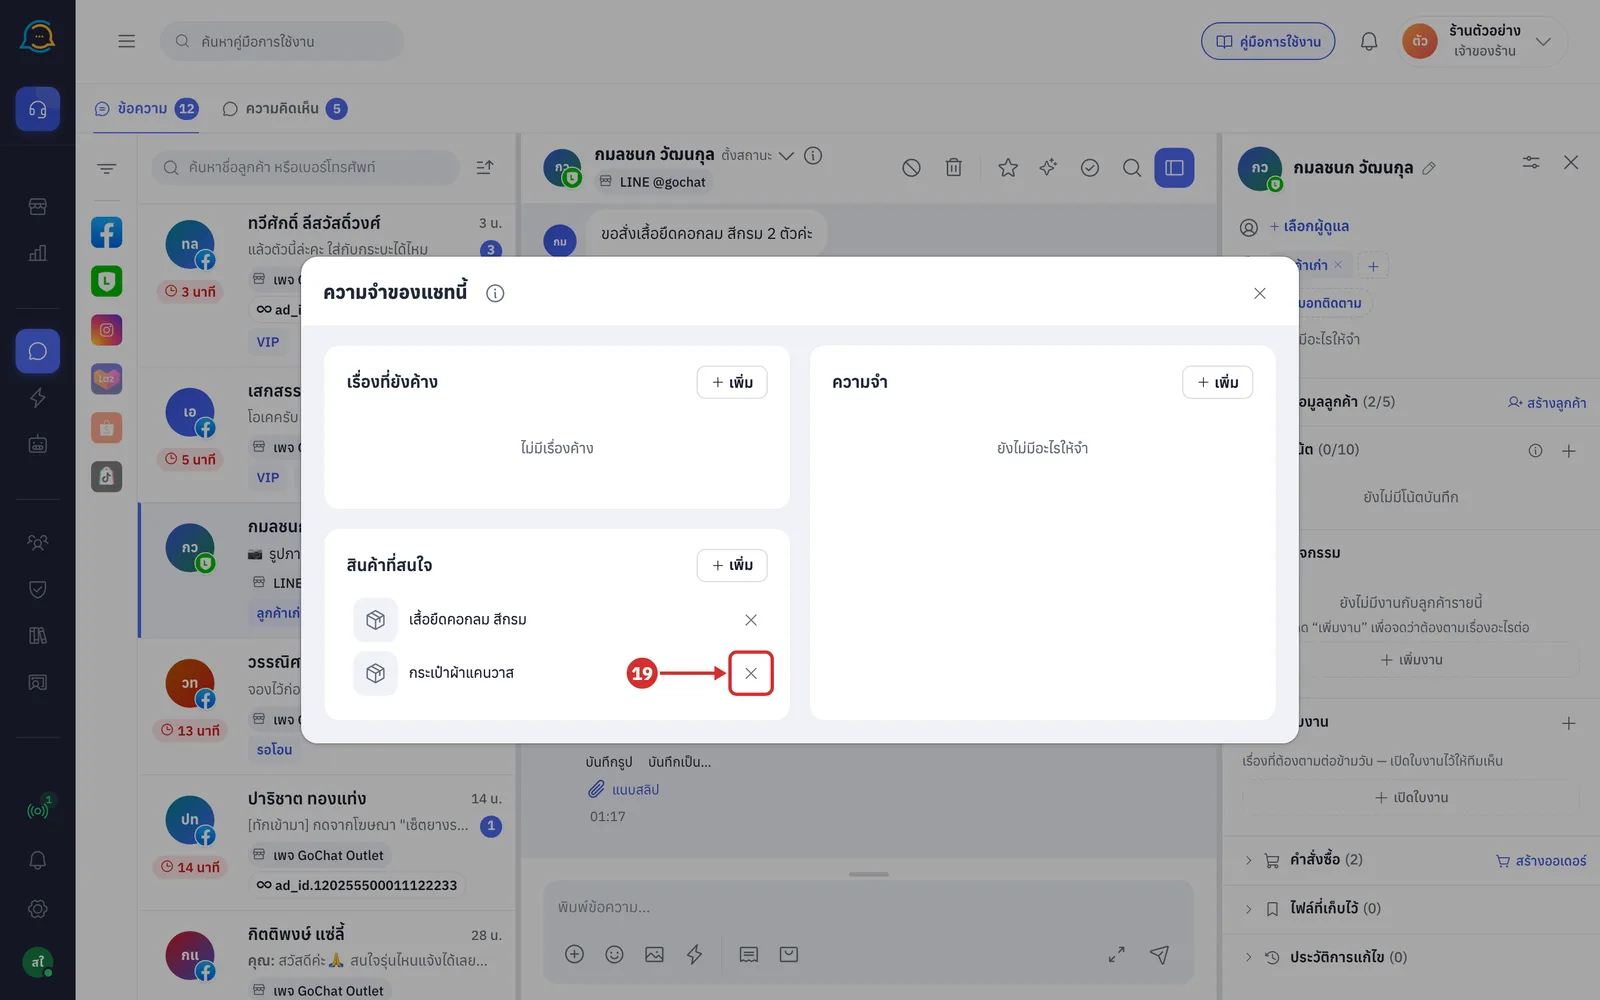
Click ✕ (เอาออก (Remove)) at the end of a row to take that product off the list. It is removed straight away; if that fails, the product comes back with the message เอา “…” ออกไม่สำเร็จ — ลองอีกครั้ง (Could not remove “…” — try again)
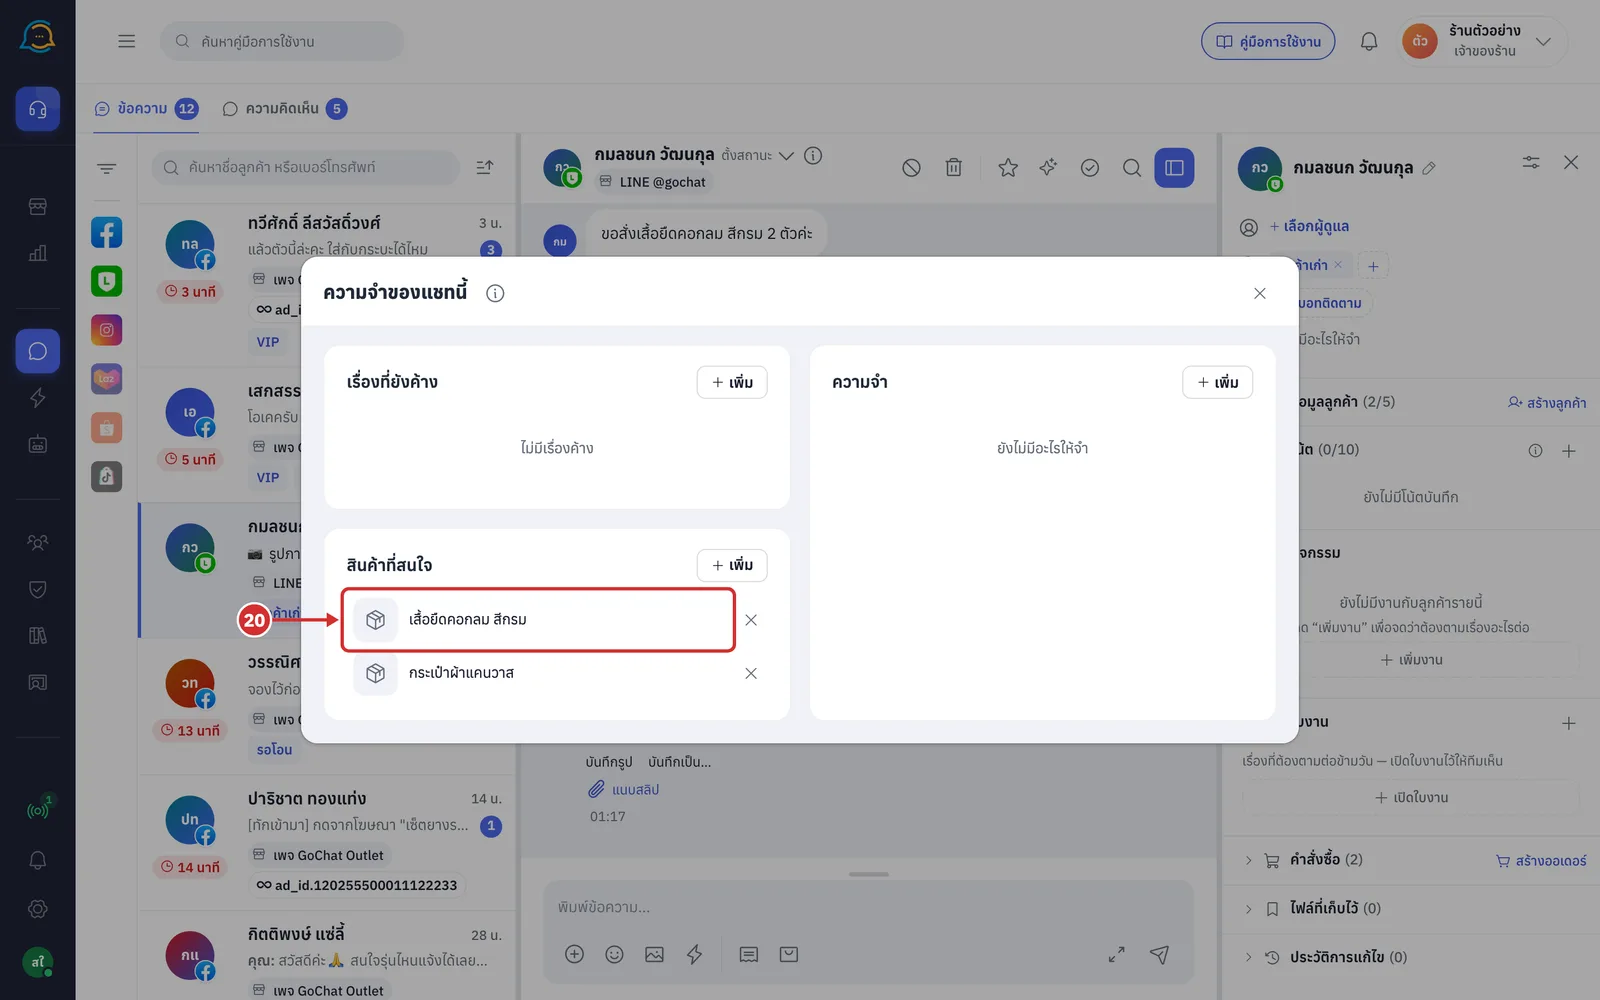
Click the row of the product you want to send, such as เสื้อยืดคอกลม สีกรม. The window closes and the ส่งให้ลูกค้า (Send to customer) tray opens with the ส่งแบบไหนดี (How to send) sheet for that product straight away
If the chat cannot send product cards at that moment, for example the message box is locked, you see ส่งการ์ดสินค้าในห้องนี้ตอนนี้ไม่ได้ (Product cards cannot be sent in this chat right now)
Choose how to send as in step 9. In this example, click รายละเอียดอย่างเดียว (Details only)
For products with no image yet, รูปอย่างเดียว (Image only) cannot be clicked and shows ยังไม่มีรูปสินค้าในระบบ (No product image in the system yet)
The tray closes and shows กำลังส่งการ์ดสินค้า… (Sending product card…), then a สินค้า (Product) card appears in the chat with the line ส่งให้ลูกค้าเป็นข้อความ (Sent to customer as text)
The customer gets a text message with the product name, SKU, stock left and price
About sending to customers
The คำสั่งซื้อ (Orders) tab in the tray shows the customer's orders in GoSaaS, including ones not created from this chat, while the คำสั่งซื้อ (Orders) section in the right panel only shows orders created from this chat
In Messenger chats of pages with Conversions API turned on, a successfully sent order card sends a เริ่มสั่งซื้อ (Initiate checkout) event to Facebook, once per order. See Setting up Conversions API
To put an order summary in the message box, use the ส่งสรุป (Send summary) button on the order card in the right panel, not this tray. See Keying an order in a chat room
If loading fails, the tray shows ดึงข้อมูลจาก GoSaaS ไม่สำเร็จ (Could not fetch data from GoSaaS) with the reason; click ลองใหม่ (Try again) to load again
If your GoSaaS shop access has expired, the tray shows สิทธิ์เข้าร้าน GoSaaS หมดอายุ (GoSaaS shop access expired). Click เข้าสู่ระบบ GoSaaS ใหม่ (Sign in to GoSaaS again) and you are brought back to this chat
If the shop is disconnected from GoSaaS while the tray is open, the tray shows ร้านนี้ยังไม่ได้เชื่อมกับ GoSaaS (This shop is not connected to GoSaaS)
Prepared messages, such as account numbers or how to order, can be sent with the ข้อความที่ใช้บ่อย (Saved replies) button in the message box. See Using saved replies in a chat