

Setting up order summaries
The สรุปคำสั่งซื้อ (Order summary) topic lets the bot answer customers who ask about their order straight away. For example, when a customer types “สั่งอะไรไปคะ” (What did I order?) or “ของถึงไหนแล้ว” (Where is my parcel?), the bot looks up that customer's latest order in GoSaaS and sends the order number, items, amounts, shipping status and tracking number, with separate messages for bank-transfer orders and cash-on-delivery orders.
The shop owner and every admin can set up order summary sets. These sets only work with LINE accounts, Facebook pages and Instagram, and one account can be in one set. This topic only appears for shops connected to the GoSaaS order system. Parts every topic shares, such as status, testing and history, are explained in Using the auto-reply bot.
Opening order summaries
Go to the บอทตอบกลับอัตโนมัติ (Auto-reply bot) menu under Chat in the left menu bar
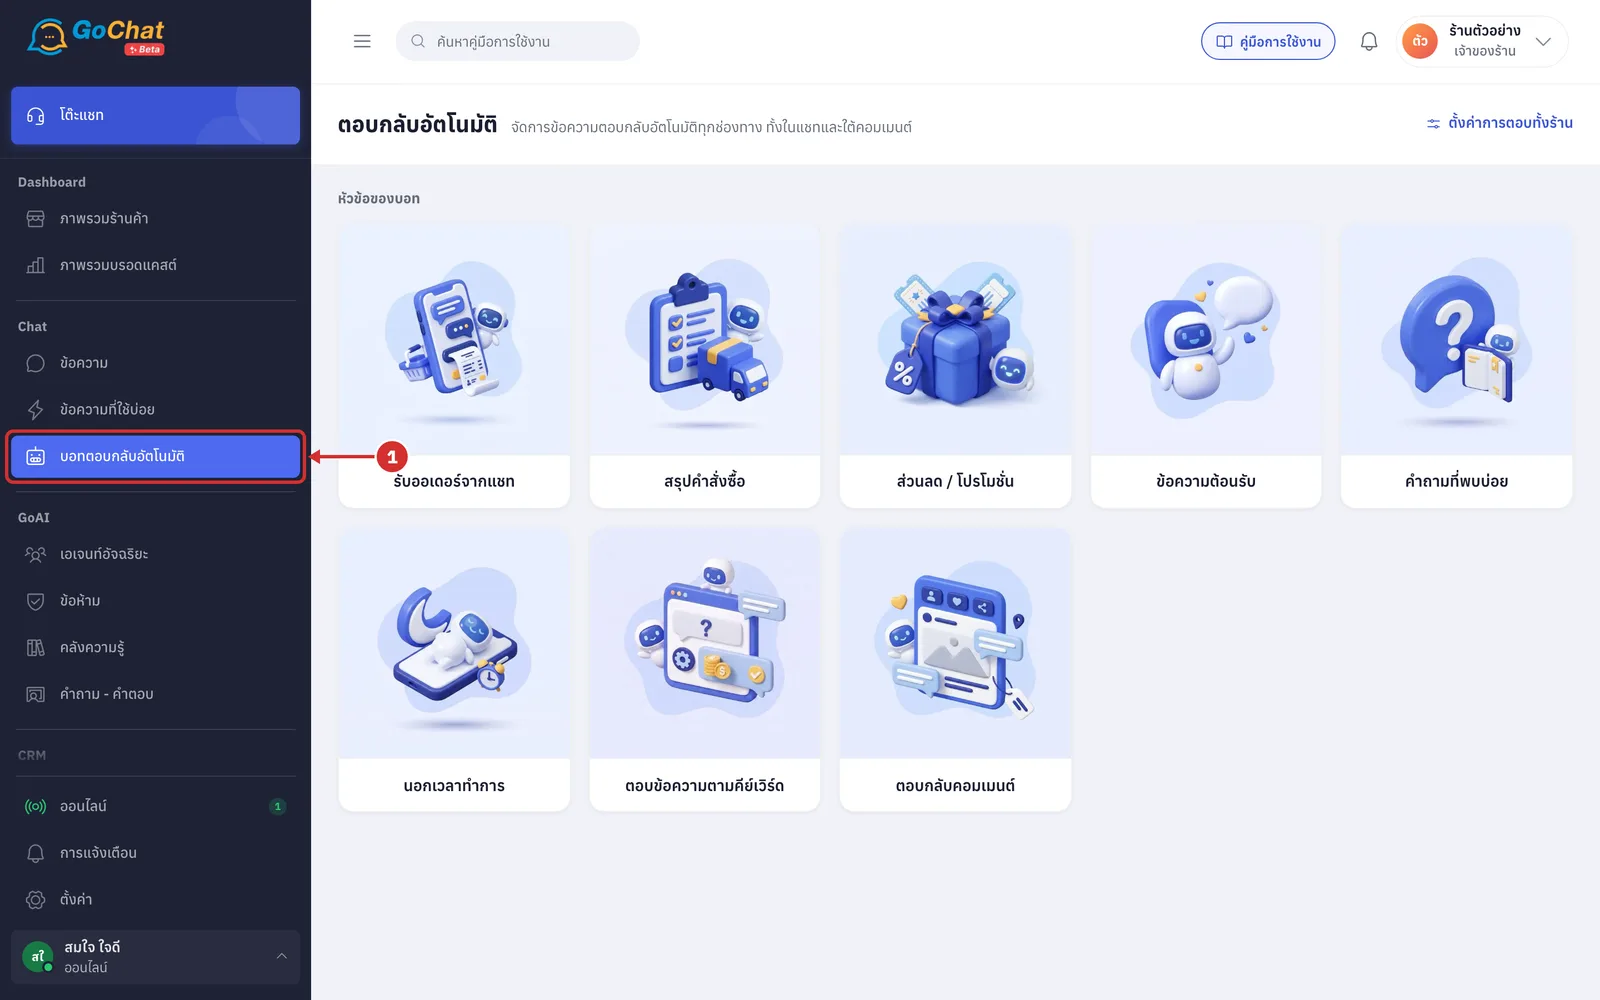
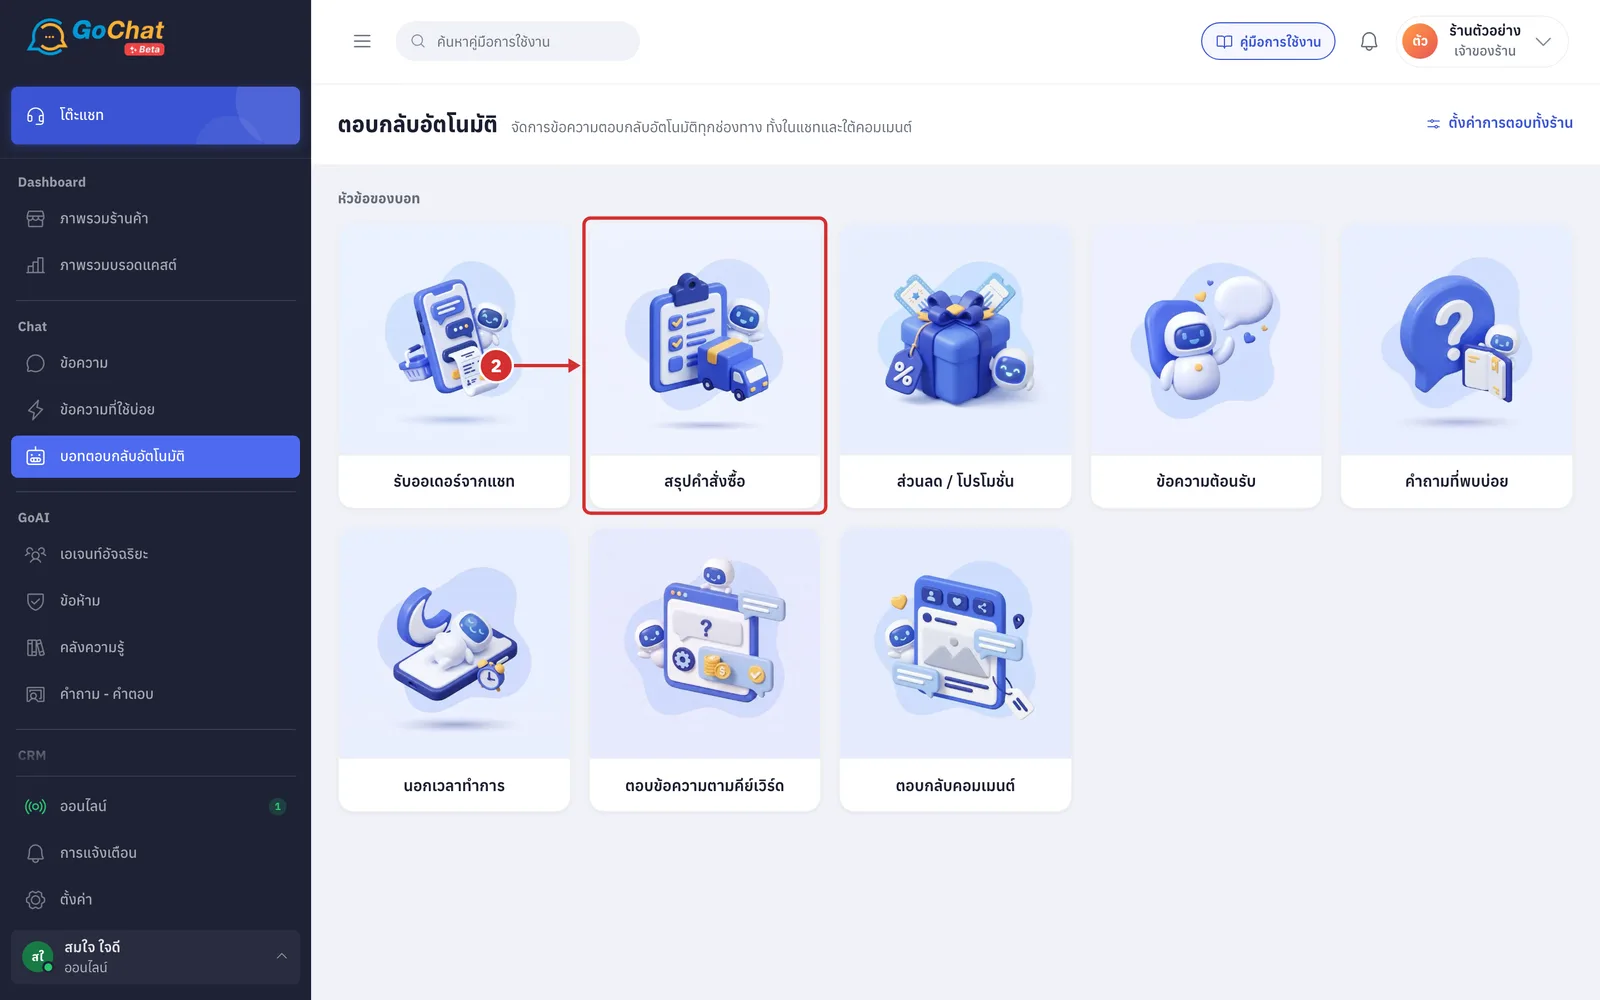
Click the สรุปคำสั่งซื้อ (Order summary) card
This card only appears for shops connected to GoSaaS
If your shop has no order summary set yet, the page to create a new set opens straight away
Reading the list of order summary sets
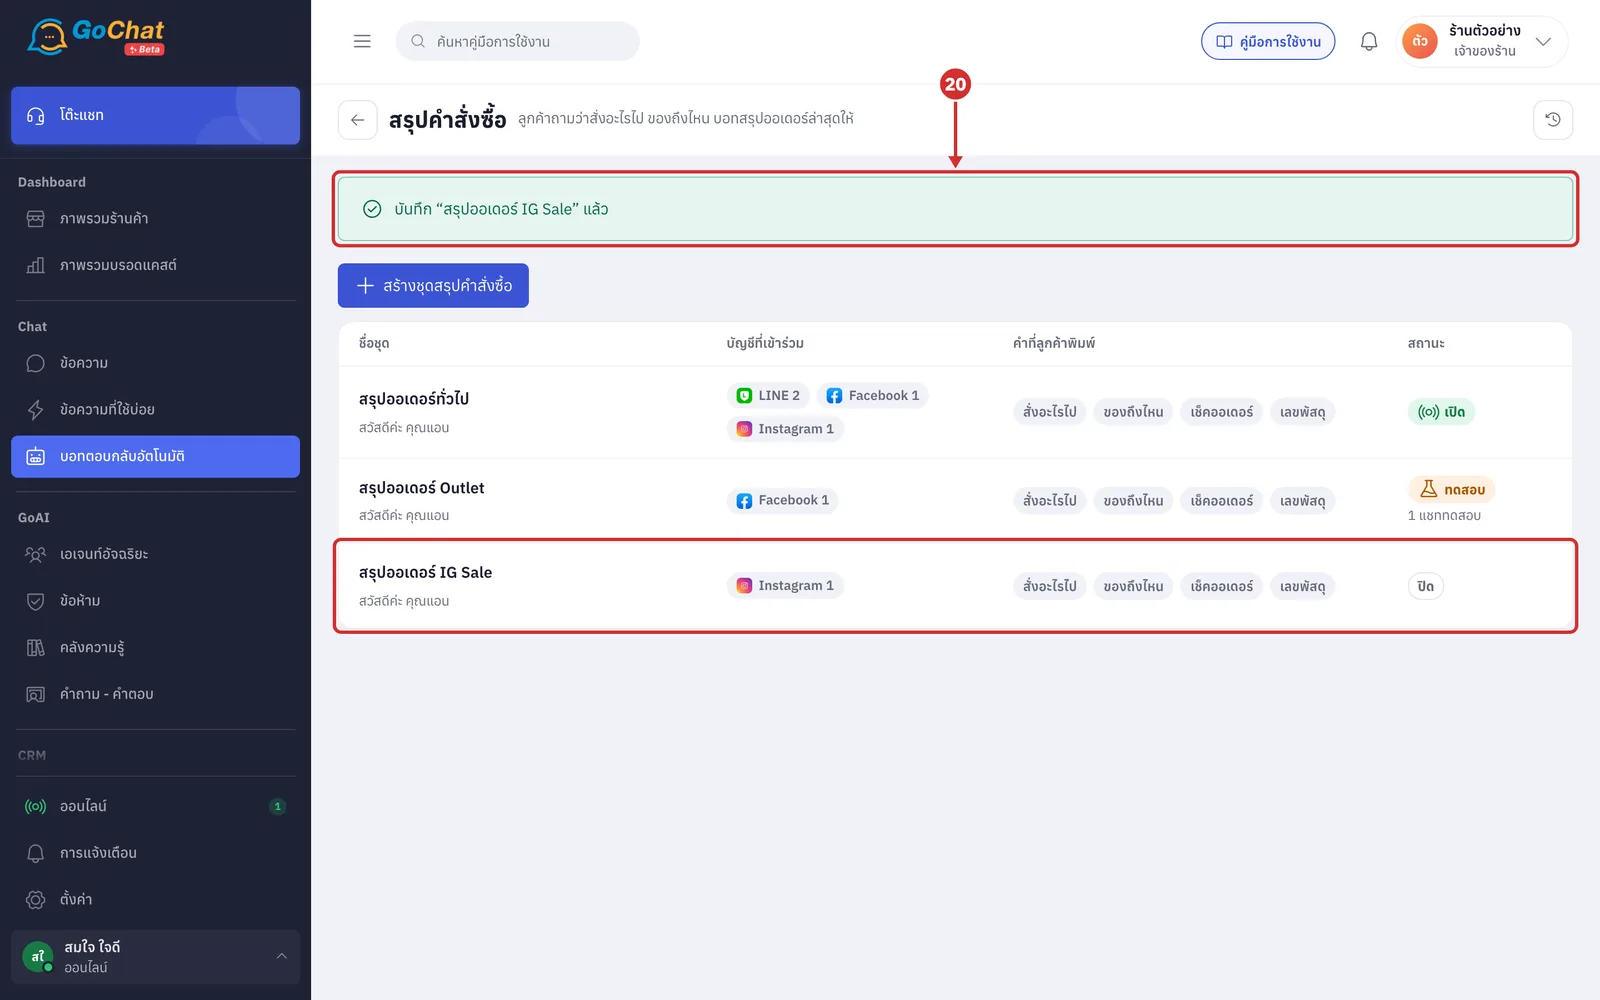
The สรุปคำสั่งซื้อ (Order summary) list page has these parts
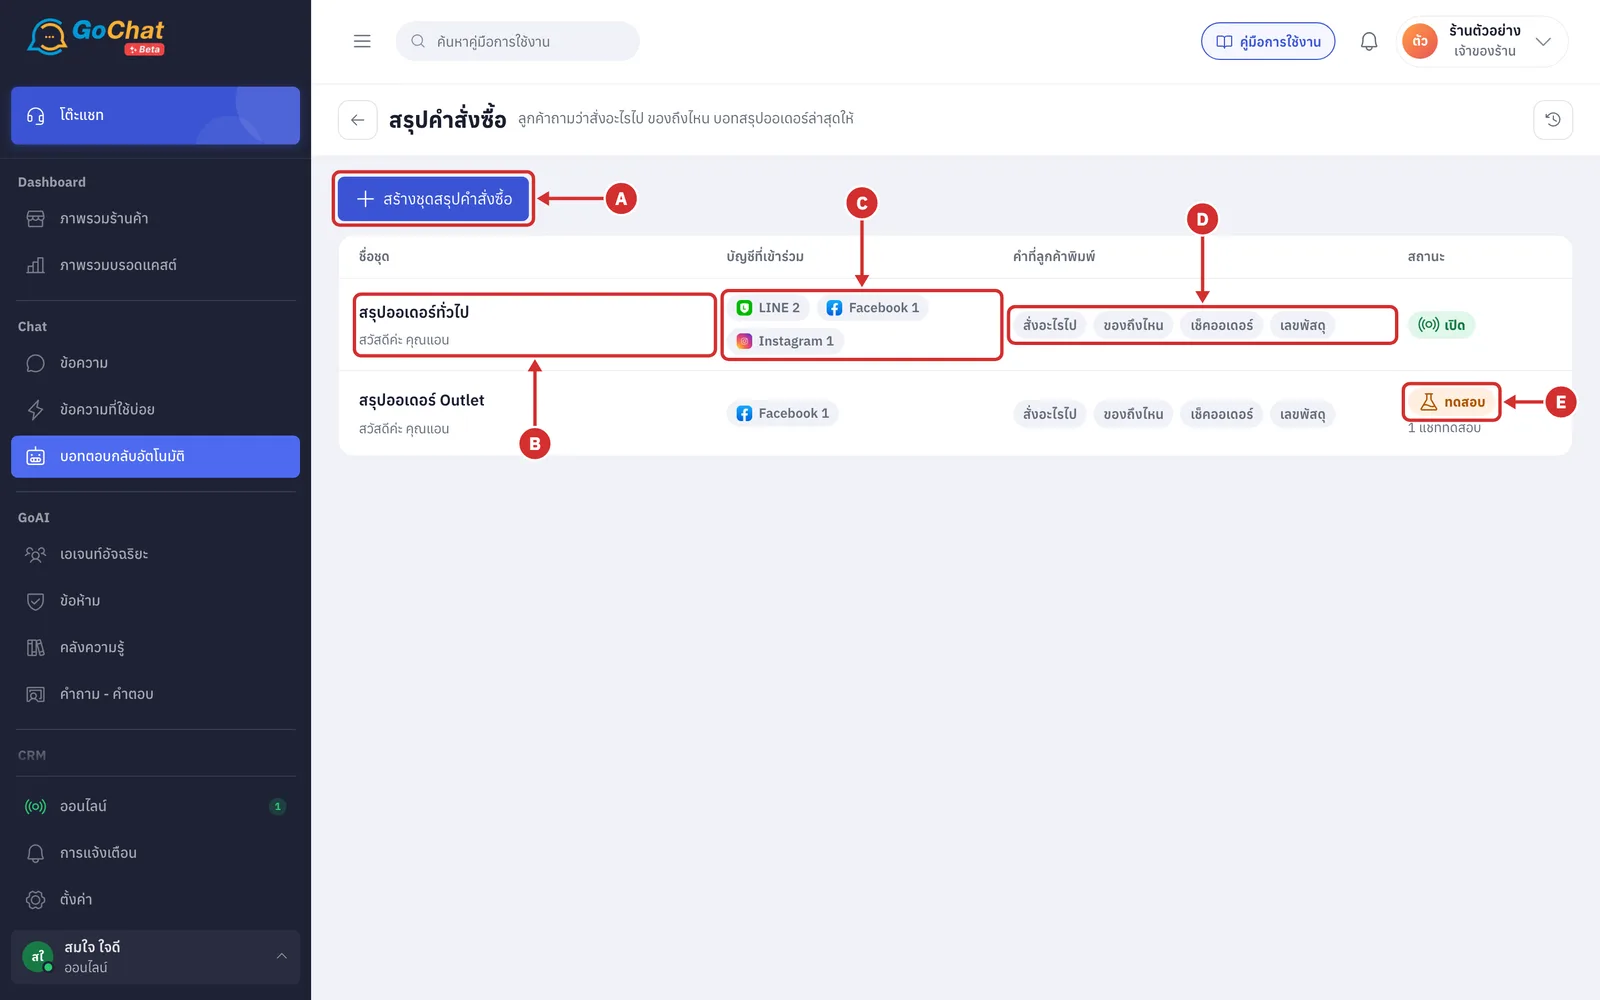
A สร้างชุดสรุปคำสั่งซื้อ (Create order summary set) — creates a new set
B ชื่อชุด (Set name) — with a grey line under it, which is the first line of the cash-on-delivery message with variables replaced by sample values, such as สวัสดีค่ะ คุณแอน (Hello Ann)
C บัญชีที่เข้าร่วม (Accounts) — the number of accounts per channel; point at or click it to see the account names
D คำที่ลูกค้าพิมพ์ (Words customers type) — the words that make the bot send an order summary
Up to 4 words are shown; the rest are grouped into an อีก … คำ (… more words) badge you can point at or click
A set with no words shows ยังไม่มีคำ (No words yet)
E สถานะ (Status) — เปิด (On), ทดสอบ (Test) or ปิด (Off); sets in test show the number of test chats under the badge
Creating an order summary set
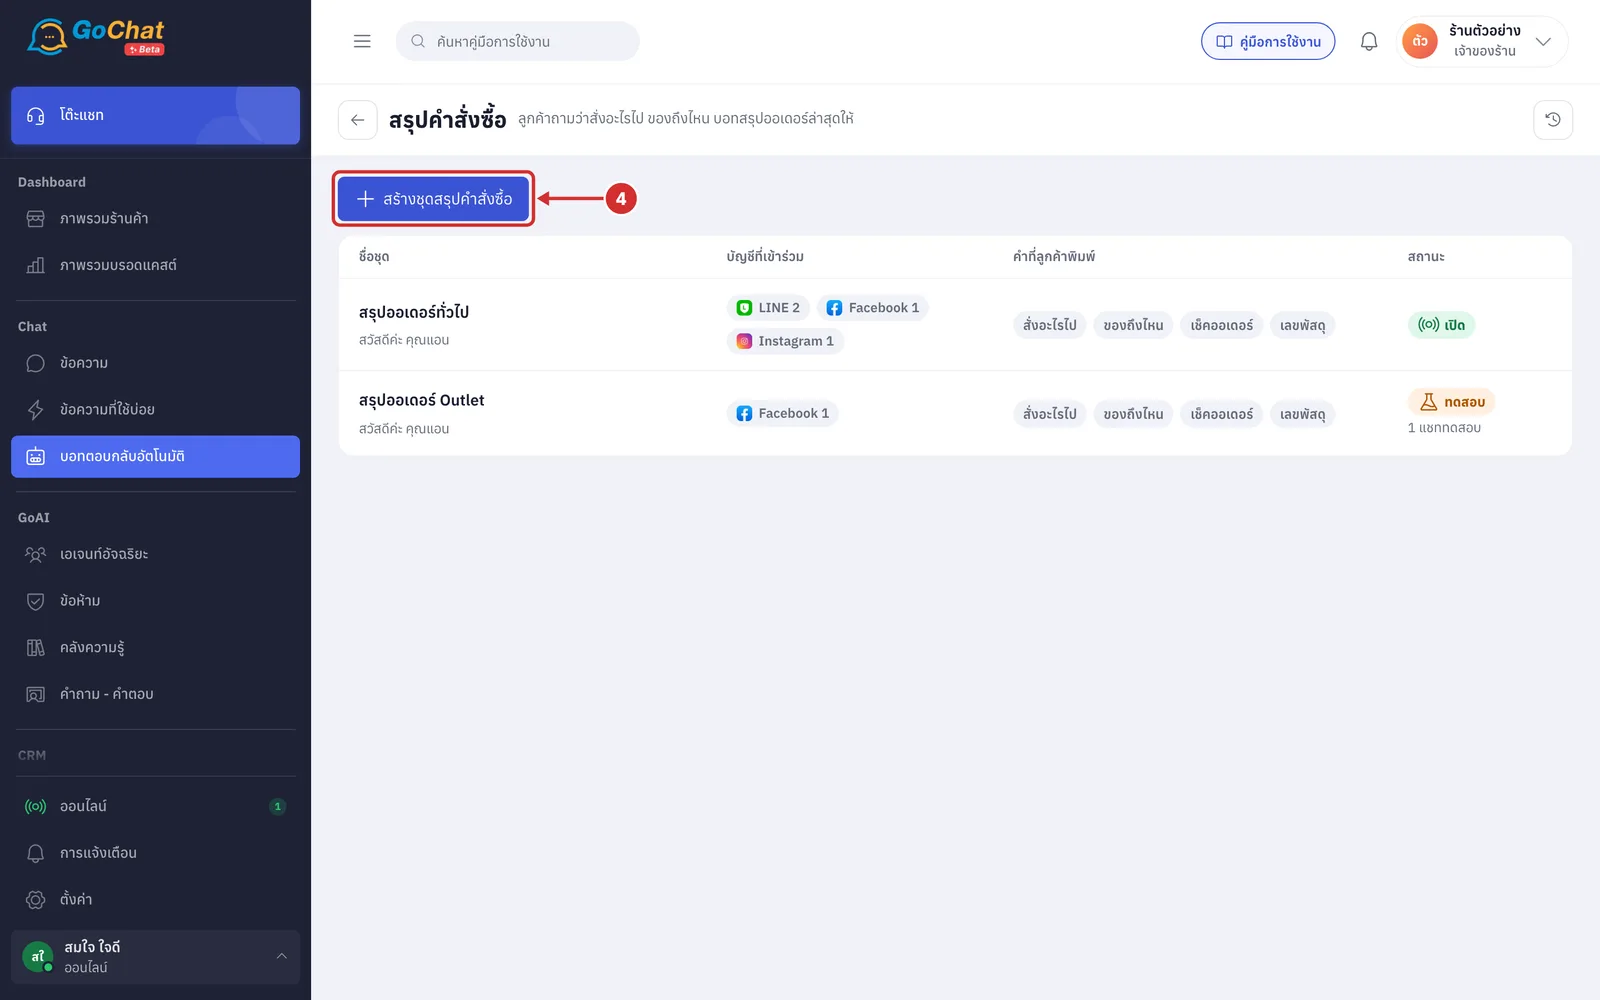
Click สร้างชุดสรุปคำสั่งซื้อ (Create order summary set) (to edit an existing set, click its name in the list instead)
In ชื่อชุด (Set name), enter a name for the set, such as สรุปออเดอร์ IG Sale
This field is required, up to 60 characters
Your team sees the set name in the list; customers do not
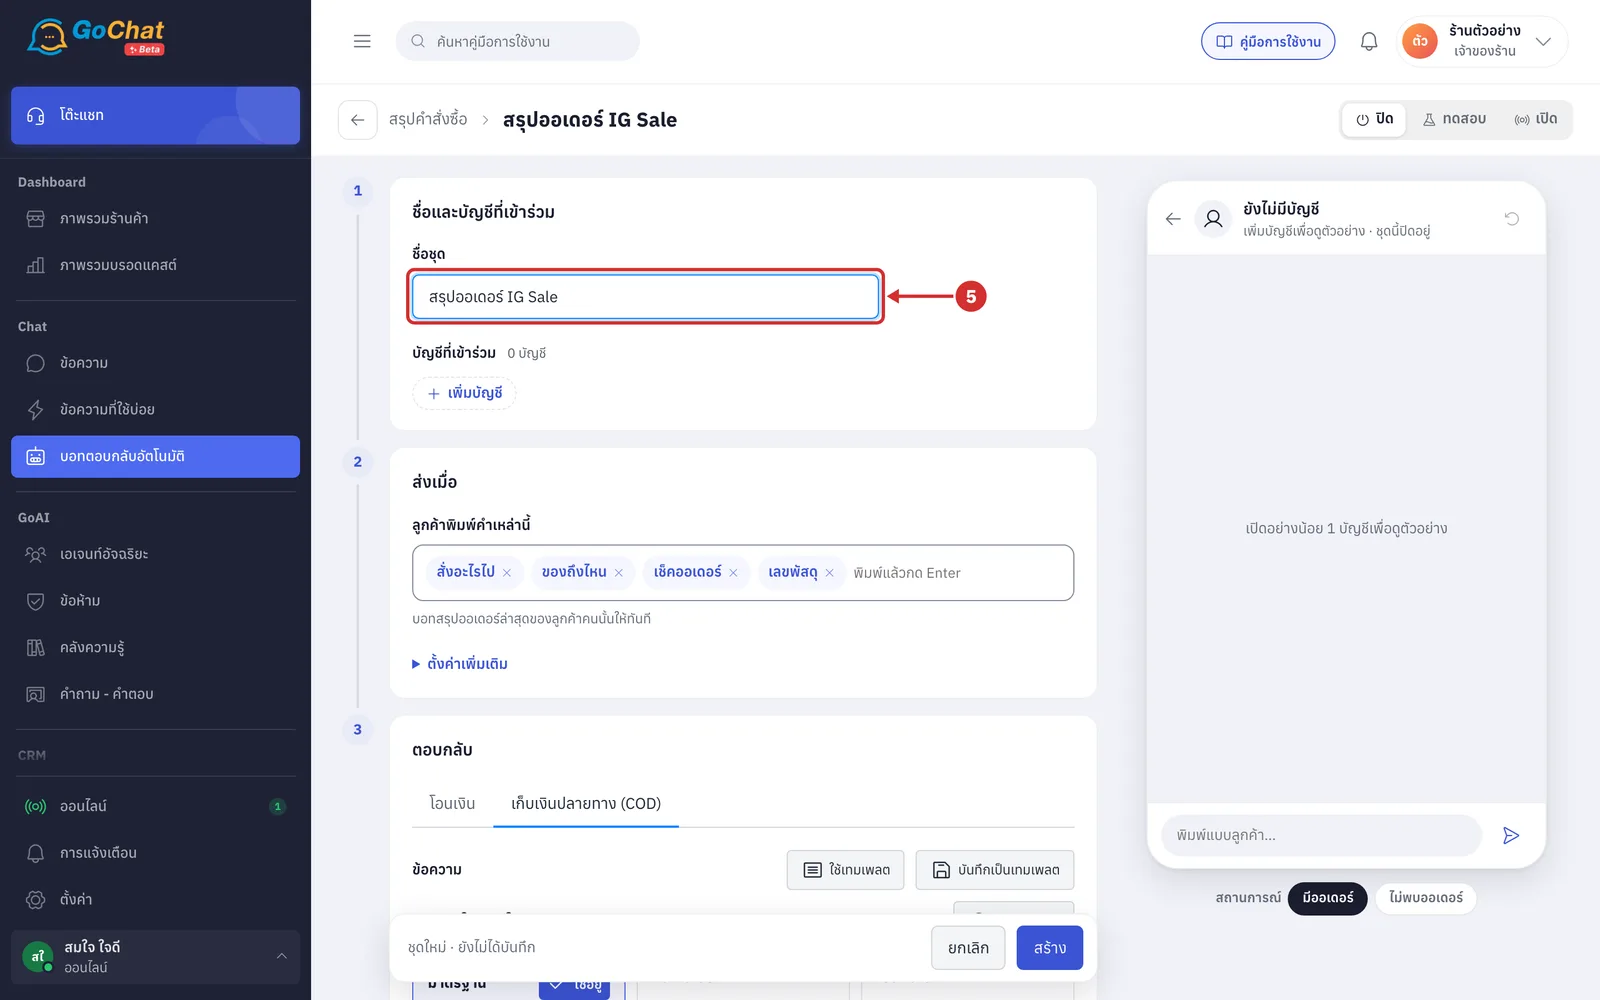
Click เพิ่มบัญชี (Add account) and tick the accounts that will use this set
The window only lists LINE accounts, Facebook pages and Instagram, because this topic does not work with other channels
Accounts already in another order summary set show a lock and อยู่ใน (In) the set's name
Those accounts cannot be chosen; remove them from that set first
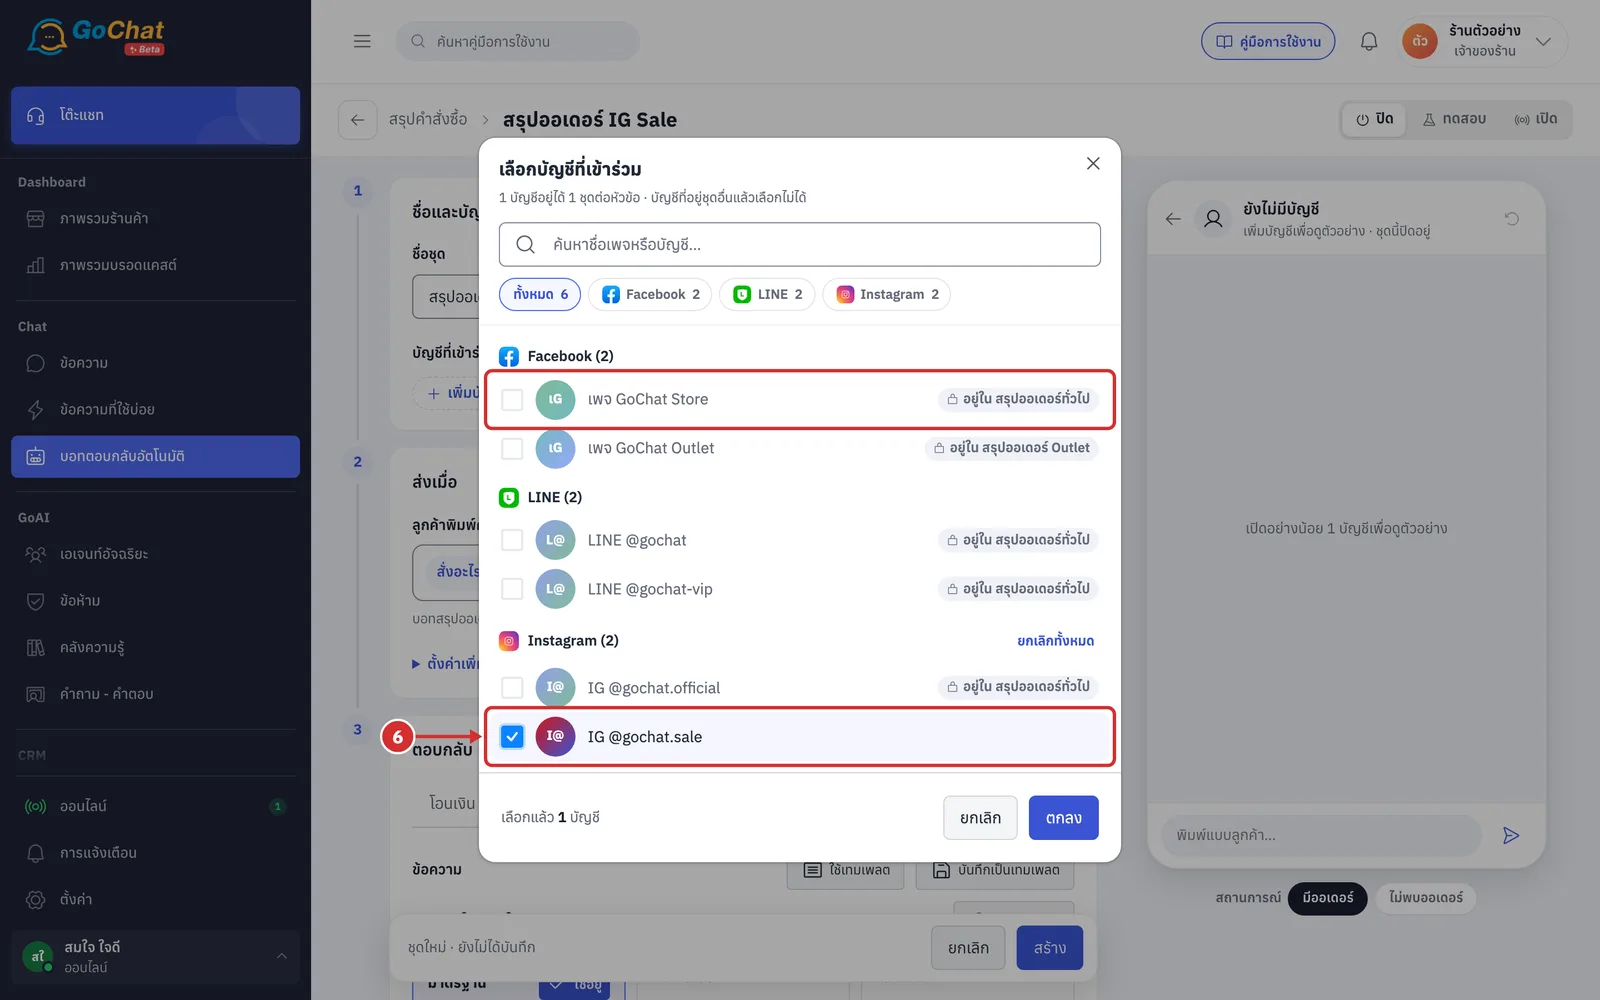
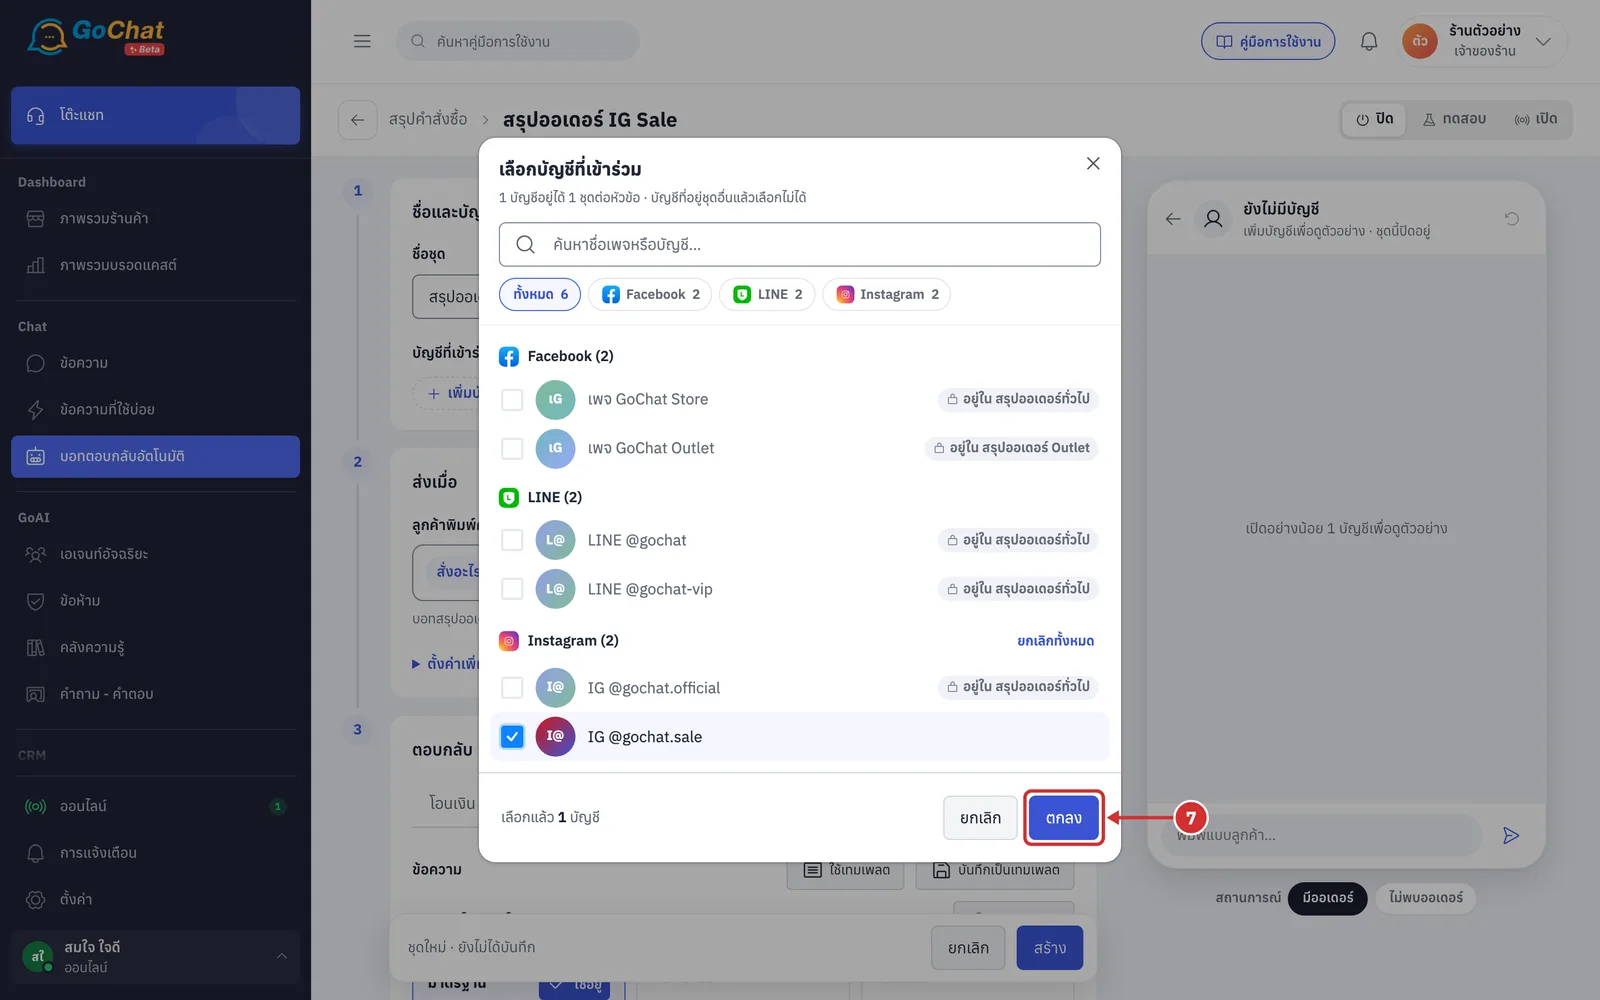
Click ตกลง (OK). The chosen accounts appear under บัญชีที่เข้าร่วม (Accounts)
Setting the words customers type
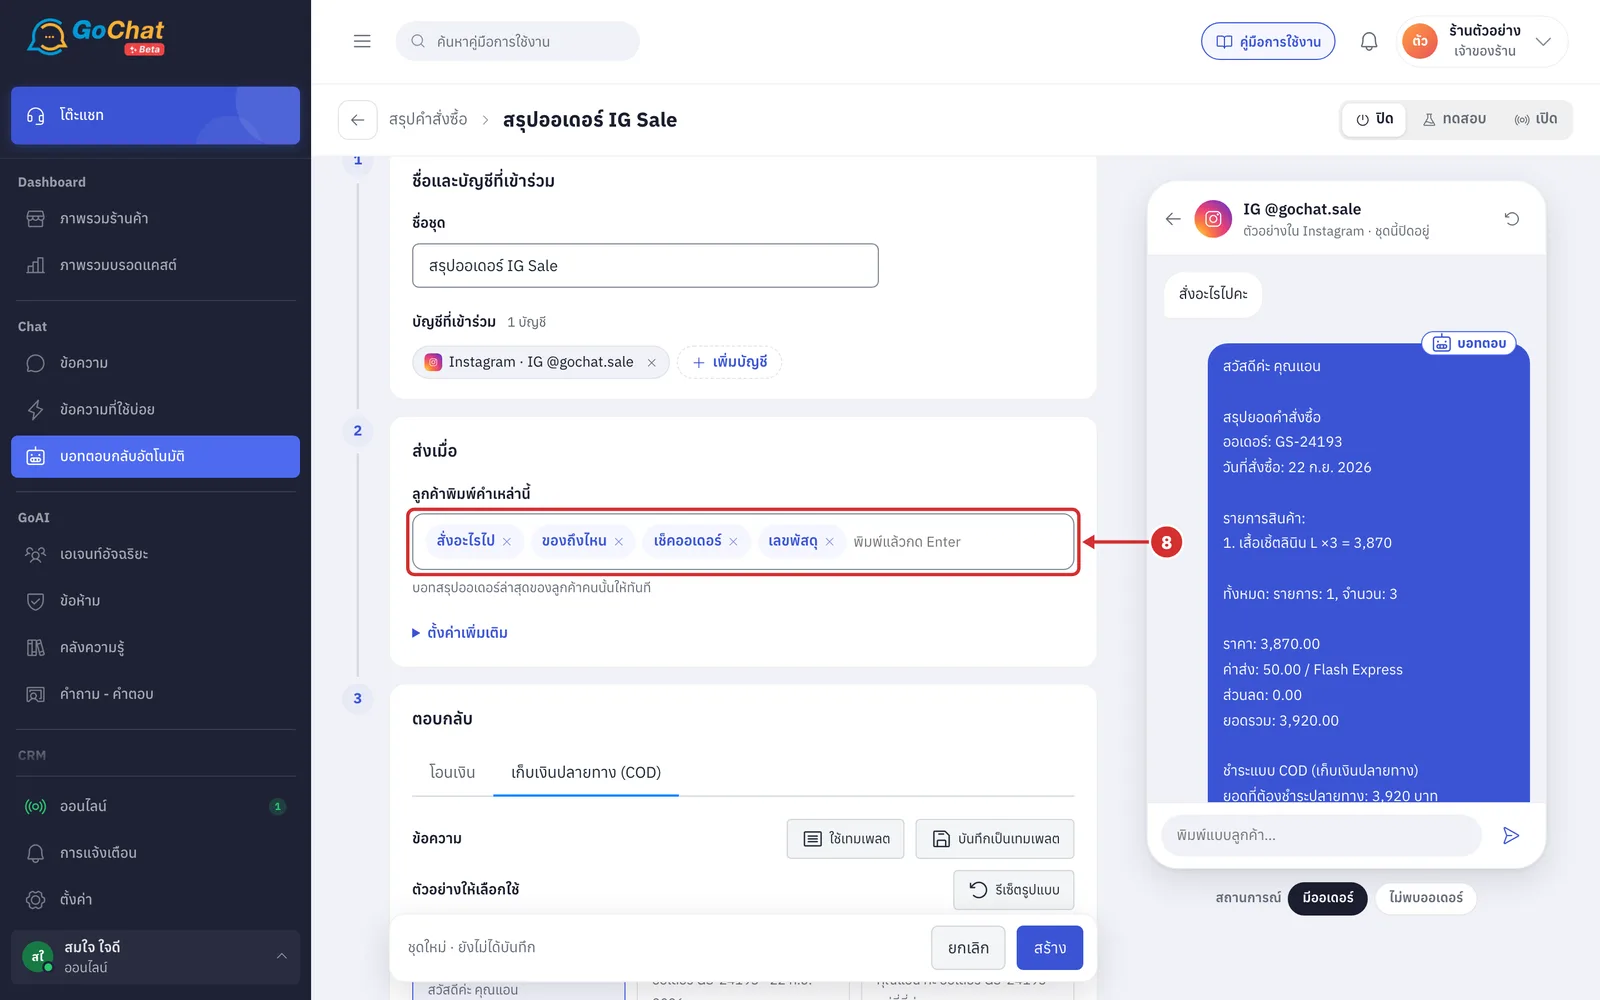
In the ส่งเมื่อ (Sends when) step, under ลูกค้าพิมพ์คำเหล่านี้ (Customer types these words), check or add the words customers use to ask about orders. Type a word and press Enter
New sets come with starter words: สั่งอะไรไป (what did I order), ของถึงไหน (where is my parcel), เช็คออเดอร์ (check order) and เลขพัสดุ (tracking number)
The bot answers when the customer's message contains any of the words; it does not have to be the whole message. For example, “ของถึงไหนแล้วคะ” matches ของถึงไหน
Click × on a word to remove it
At least 1 word is required. With none, you see ใส่คำที่ลูกค้าพิมพ์อย่างน้อย 1 คำ (Add at least 1 word customers type) when you save
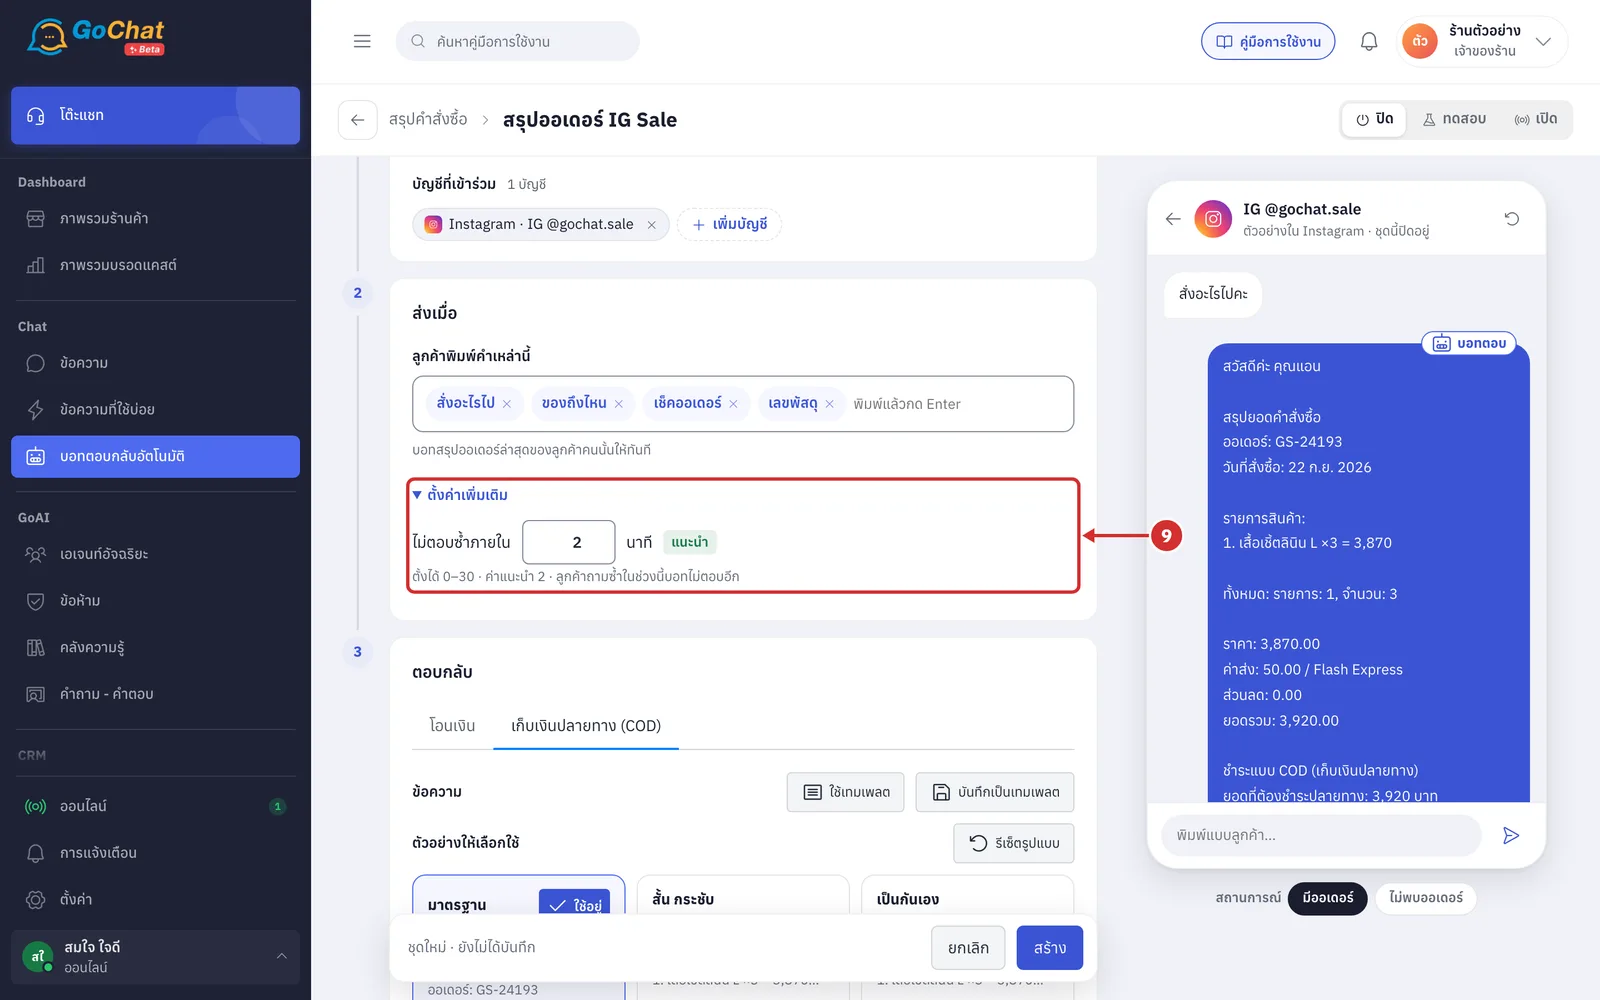
Click ตั้งค่าเพิ่มเติม (More settings) and set ไม่ตอบซ้ำภายใน (Don't reply again within) in minutes
If the customer asks again within this time, the bot does not answer again; this is counted per chat
You can set 0–30 minutes; the recommended value is 2 minutes (a แนะนำ (Recommended) badge shows when it matches)
While the set is in test, the bot uses ส่งซ้ำได้ทุก (Can resend every) from the test chats card instead
Setting the order summary message
In the ตอบกลับ (Reply) step, the order summary is split into 2 tabs by payment method, and the editor opens on the เก็บเงินปลายทาง (COD) (Cash on delivery) tab first. The bot picks the message by the payment method of the latest order and removes values the order does not have.
Choose the tab of the message you want to edit
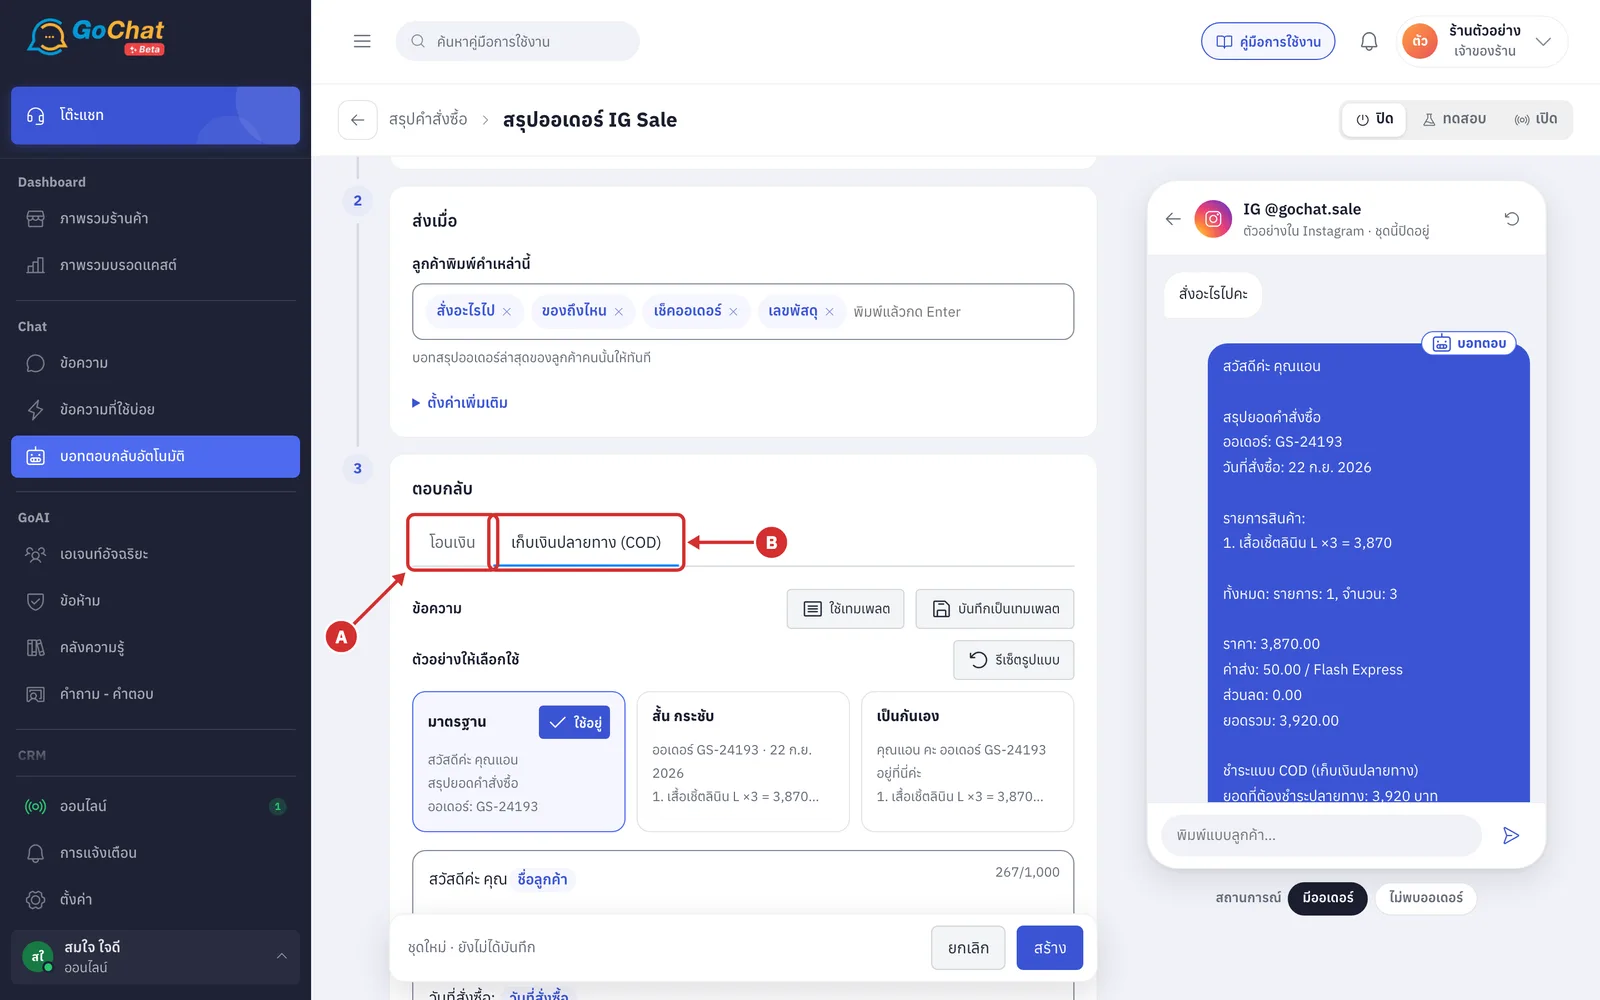
A โอนเงิน (Bank transfer) — the message for orders paid by transfer, including orders with no payment method
B เก็บเงินปลายทาง (COD) (Cash on delivery) — the message for cash-on-delivery orders
A tab whose message is not valid yet shows a red icon after its name
Under ตัวอย่างให้เลือกใช้ (Ready-made examples), click an example card to fill the message box, then edit it. There are 3 styles
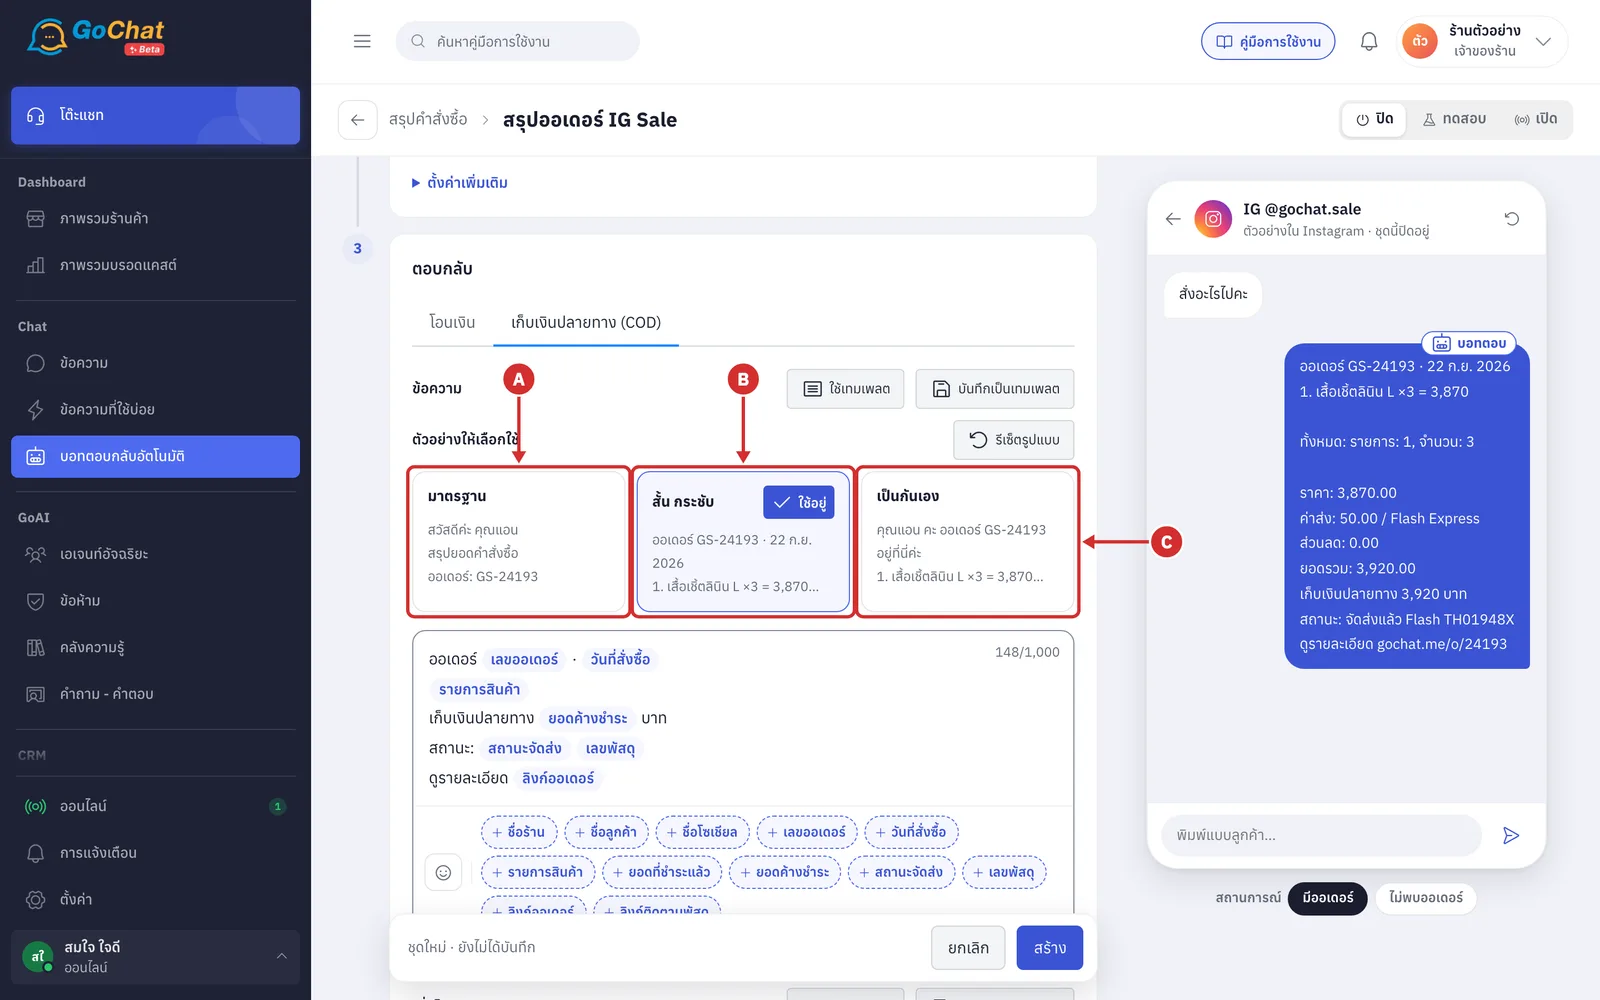
A มาตรฐาน (Standard) — a greeting with the order number, date, items, amount paid and a link to check the status (new sets start with this one)
B สั้น กระชับ (Short) — order number, date, items, amount, shipping status with tracking number, and a details link
C เป็นกันเอง (Friendly) — a conversational message, such as confirming the transfer was received or asking the customer to have cash ready for the courier
More details
Each card shows the first 3 lines of the message with variables replaced by sample values
The card that matches the message in the box shows ใช้อยู่ (In use)
The bank-transfer and cash-on-delivery tabs have differently worded examples
Click รีเซ็ตรูปแบบ (Reset format) to put that tab's message back to the มาตรฐาน (Standard) example
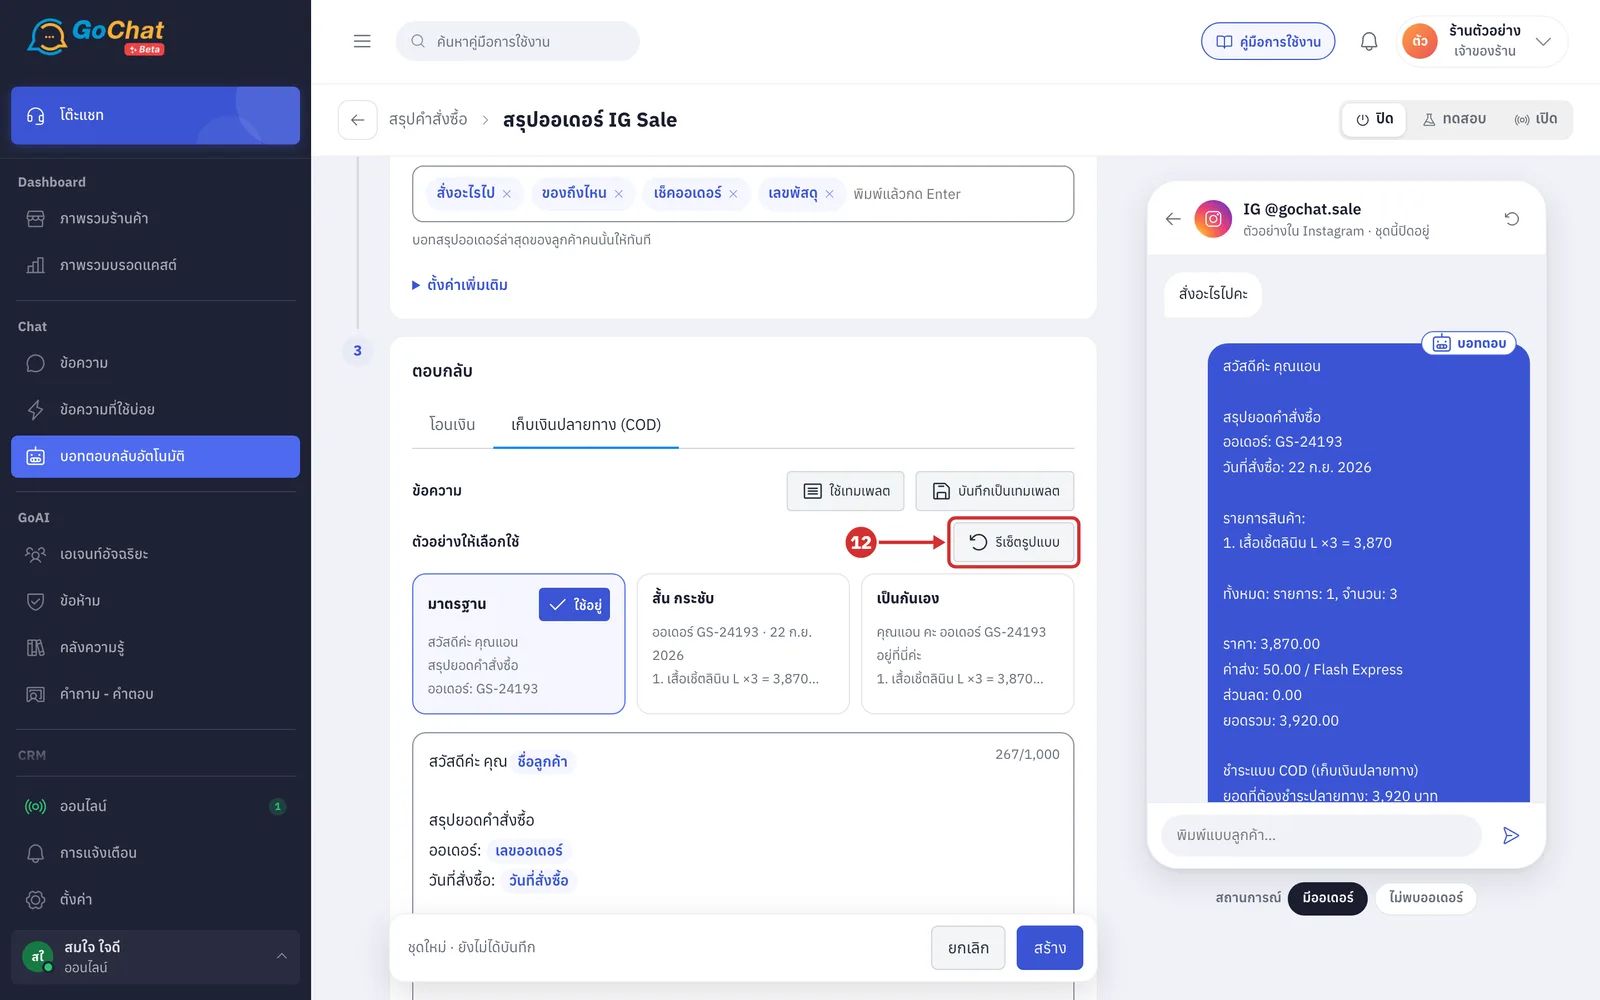
In ข้อความ (Message), edit the message the bot will send. You can use these variables
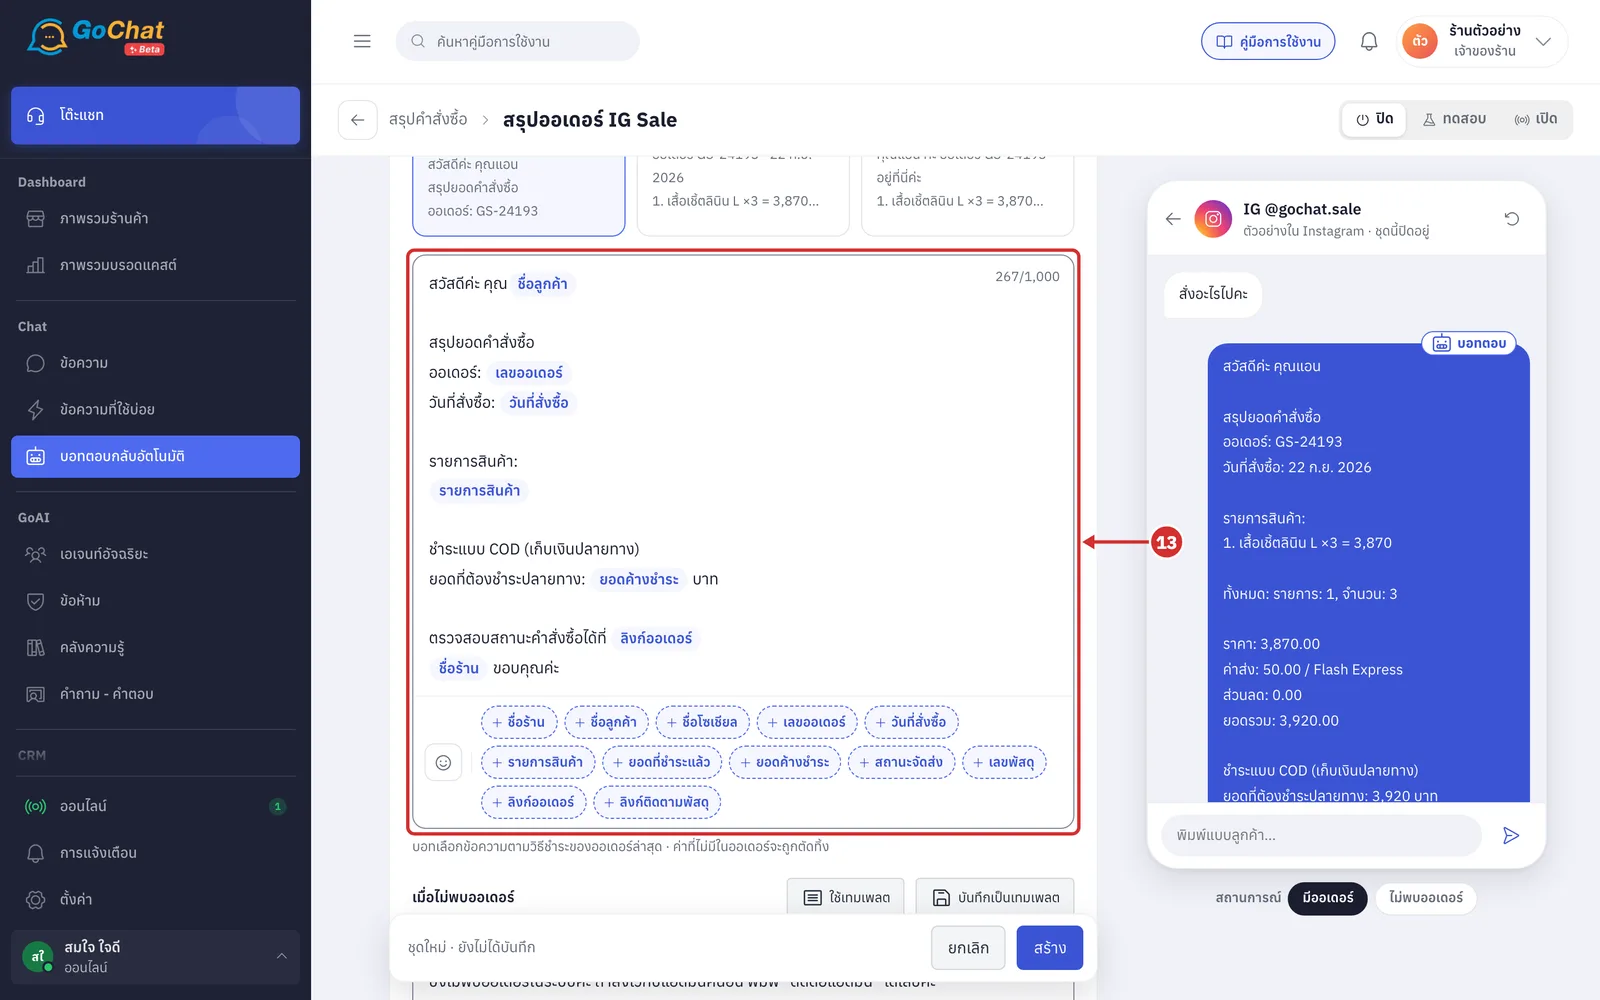
ชื่อร้าน (Shop name) — your shop's name in GoChat
ชื่อลูกค้า (Customer name) — the name on the order; if the order has none, the customer's name in the chat; with neither, “ลูกค้า” (customer). The examples already write คุณ{ชื่อลูกค้า}, so if a name starts with the same title, it is removed to avoid repeating it
ชื่อโซเชียล (Social name) — the name the customer set in the LINE, Facebook or Instagram app, not the name an admin gave them
เลขออเดอร์ (Order number)
วันที่สั่งซื้อ (Order date) — such as 22 ก.ย. 2569
รายการสินค้า (Items) — the first item's name, followed by “และอีก … รายการ” (and … more items) when there are several, then the total
ยอดที่ชำระแล้ว (Amount paid) and ยอดค้างชำระ (Amount due) — see About order summary sets
สถานะจัดส่ง (Shipping status) — the latest shipping step; if there is no shipping information yet, the order's status
เลขพัสดุ (Tracking number) — the carrier name followed by the tracking number, such as Flash TH01948X
ลิงก์ออเดอร์ (Order link) — the order page the customer can open; if there is none, the tracking link
ลิงก์ติดตามพัสดุ (Tracking link) — the parcel tracking page
More details
Both tabs' messages are required, up to 1,000 characters each
Shops moving from GoSell can paste their old messages that use GoSell-style variables, such as {order_no}, even though those variables have no buttons
Variables the app does not know cannot be saved; you see a message such as {…} ใช้ไม่ได้ — ลบออกก่อนบันทึก ({…} can't be used — remove it before saving)
How to insert variables is explained in Using the auto-reply bot
Click ใช้เทมเพลต (Use template) to use a message from your shop's template library instead of typing it. The เลือกเทมเพลตสรุปคำสั่งซื้อ (Choose order summary template) window opens
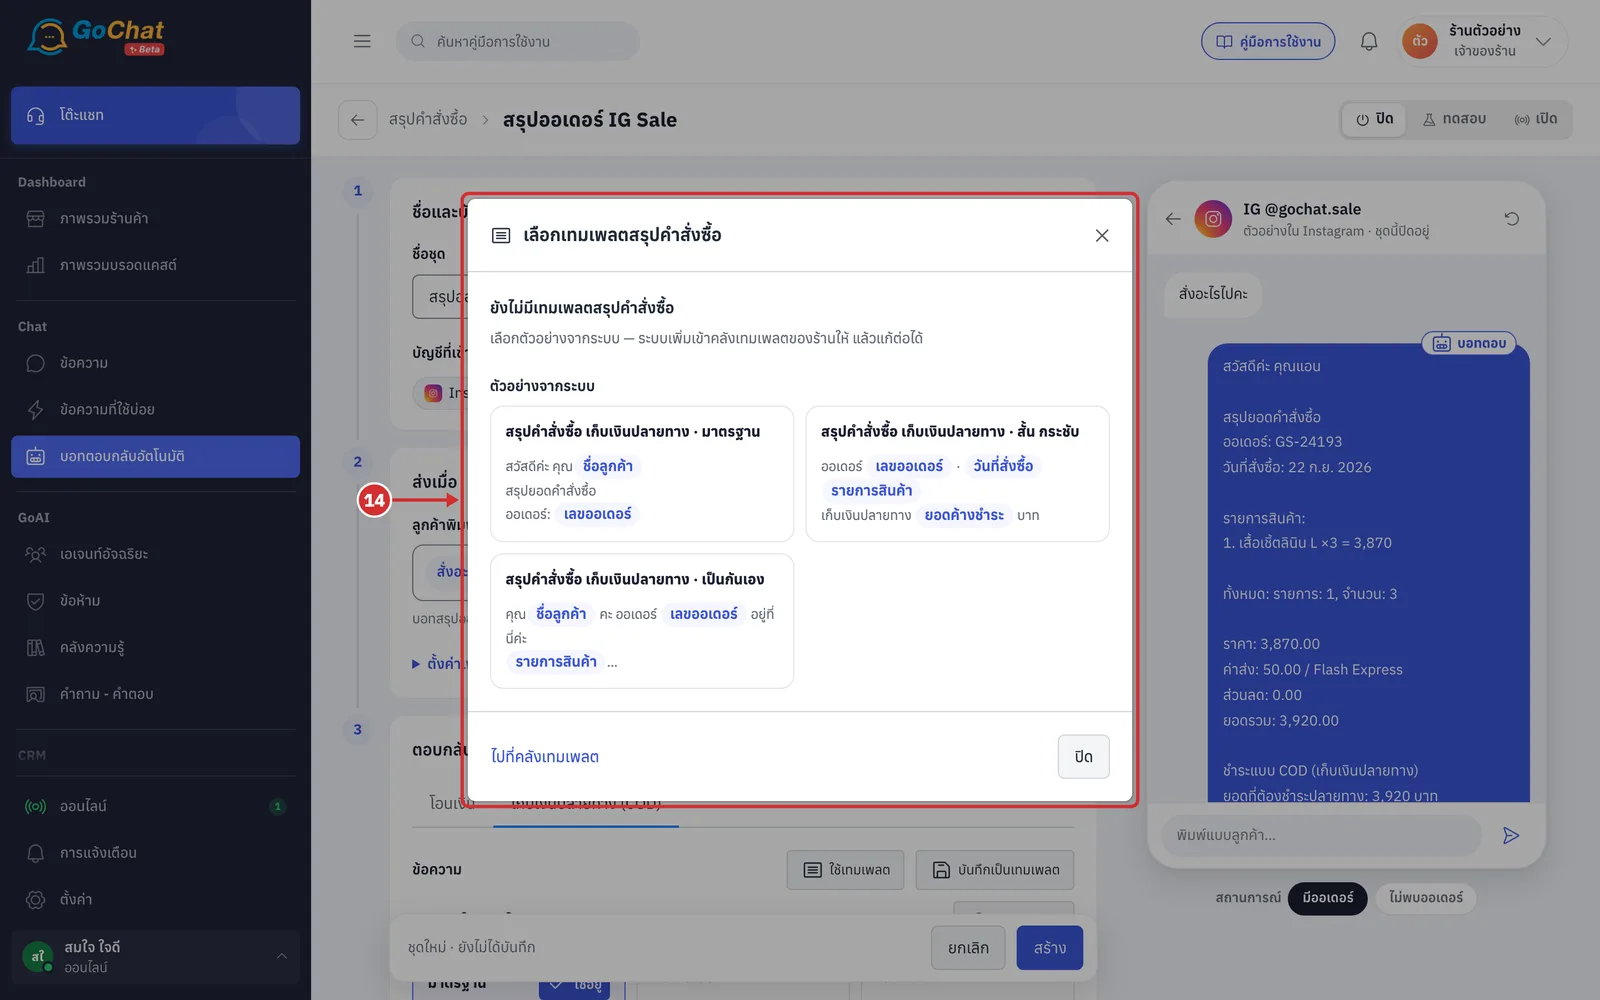
If your shop has templates, search by name or text and click the one you want
If your shop has no templates yet, the window shows ยังไม่มีเทมเพลตสรุปคำสั่งซื้อ (No order summary templates yet) and ตัวอย่างจากระบบ (System examples). Clicking an example adds it to your shop's template library straight away and uses it in this field
Click ไปที่คลังเทมเพลต (Go to template library) to open the templates page, or ปิด (Close) to close the window
A field that uses a template shows the template's name and text, which cannot be edited in the field, with these buttons
แก้ที่เทมเพลต (Edit in template) — opens the template to edit it; once edited, this field's message changes too
เลิกอ้างอิง แล้วแก้เอง (Unlink and edit myself) — copies the text into the field for you to edit and shows คัดลอกข้อความลงช่องแล้ว แก้ต่อได้เลย (Text copied into the field, keep editing)
เปลี่ยนเทมเพลต (Change template) — choose another template
If the template was deleted, or is not enabled for some accounts in the set, a warning appears at that field; customers of accounts the template is not enabled for do not get the message
Managing templates is explained in Managing message templates
Click บันทึกเป็นเทมเพลต (Save as template) to keep the field's message as a template for other sets. The บันทึกเป็นเทมเพลต (Save as template) window opens
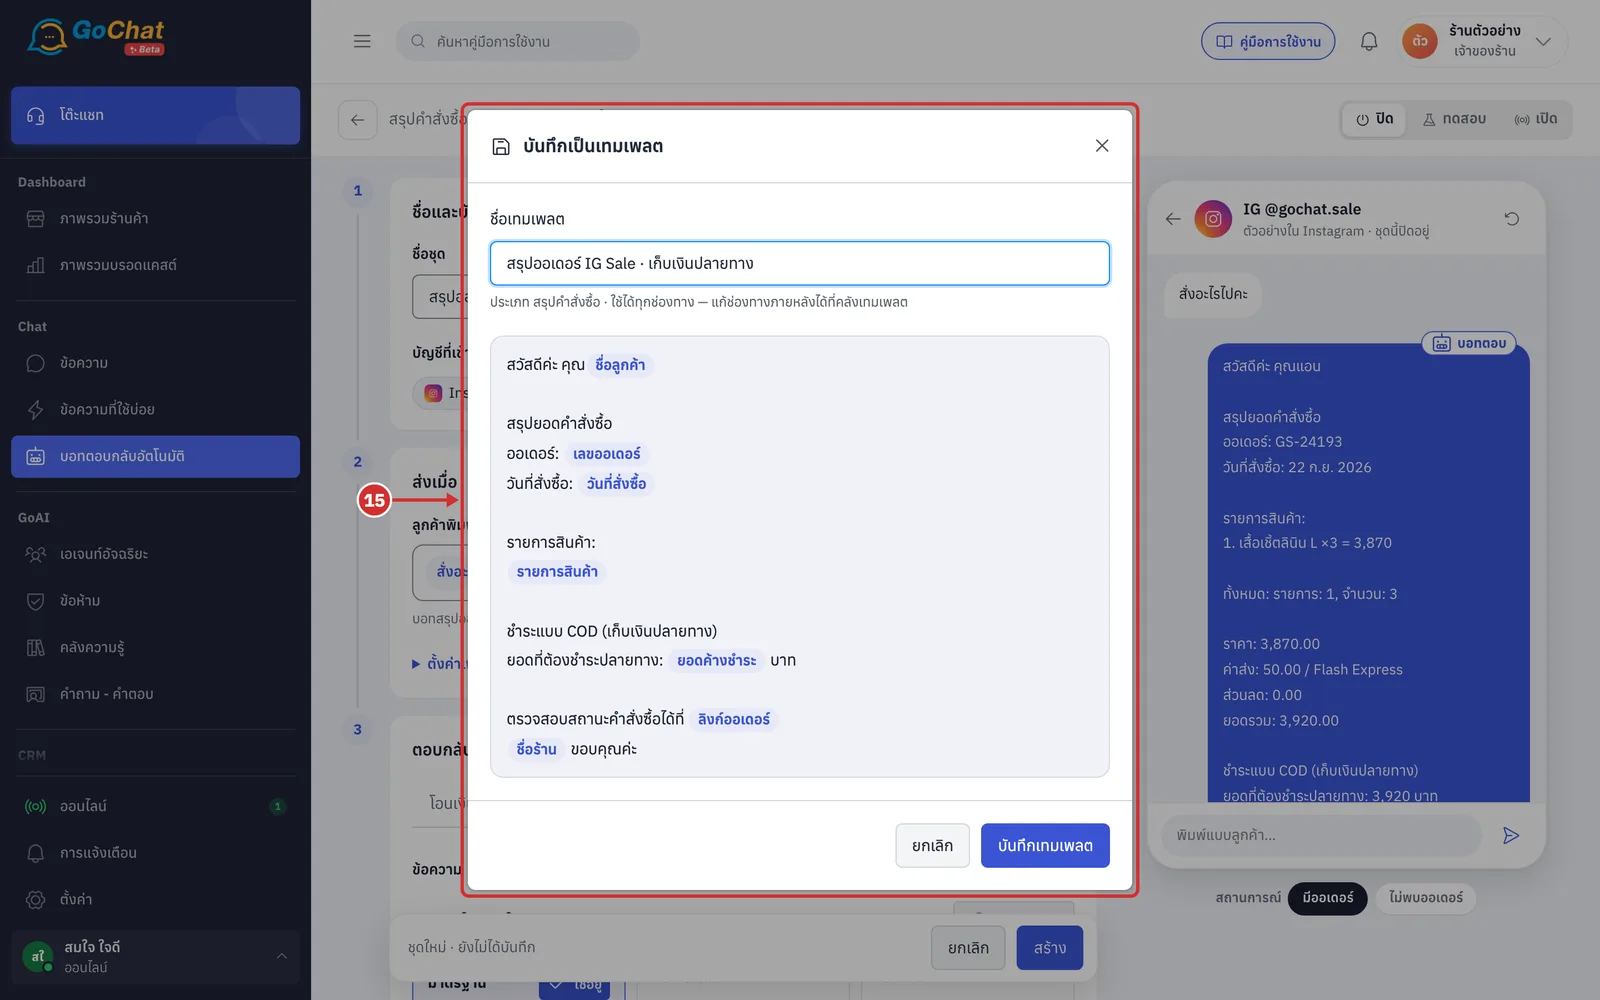
The button works once the field has a message
ชื่อเทมเพลต (Template name) is filled in from the set name and tab, such as สรุปออเดอร์ IG Sale · เก็บเงินปลายทาง. If the name is already used, you see มีเทมเพลตชื่อนี้อยู่แล้ว (A template with this name already exists)
New templates work on every channel; you can change the channels later in the template library
When you click บันทึกเทมเพลต (Save template), the template is added to the library straight away, you see สร้างเทมเพลต “…” แล้ว · ช่องนี้ใช้เทมเพลตแล้ว (Template “…” created · this field now uses it) and the field switches to that template
Setting the message for when no order is found
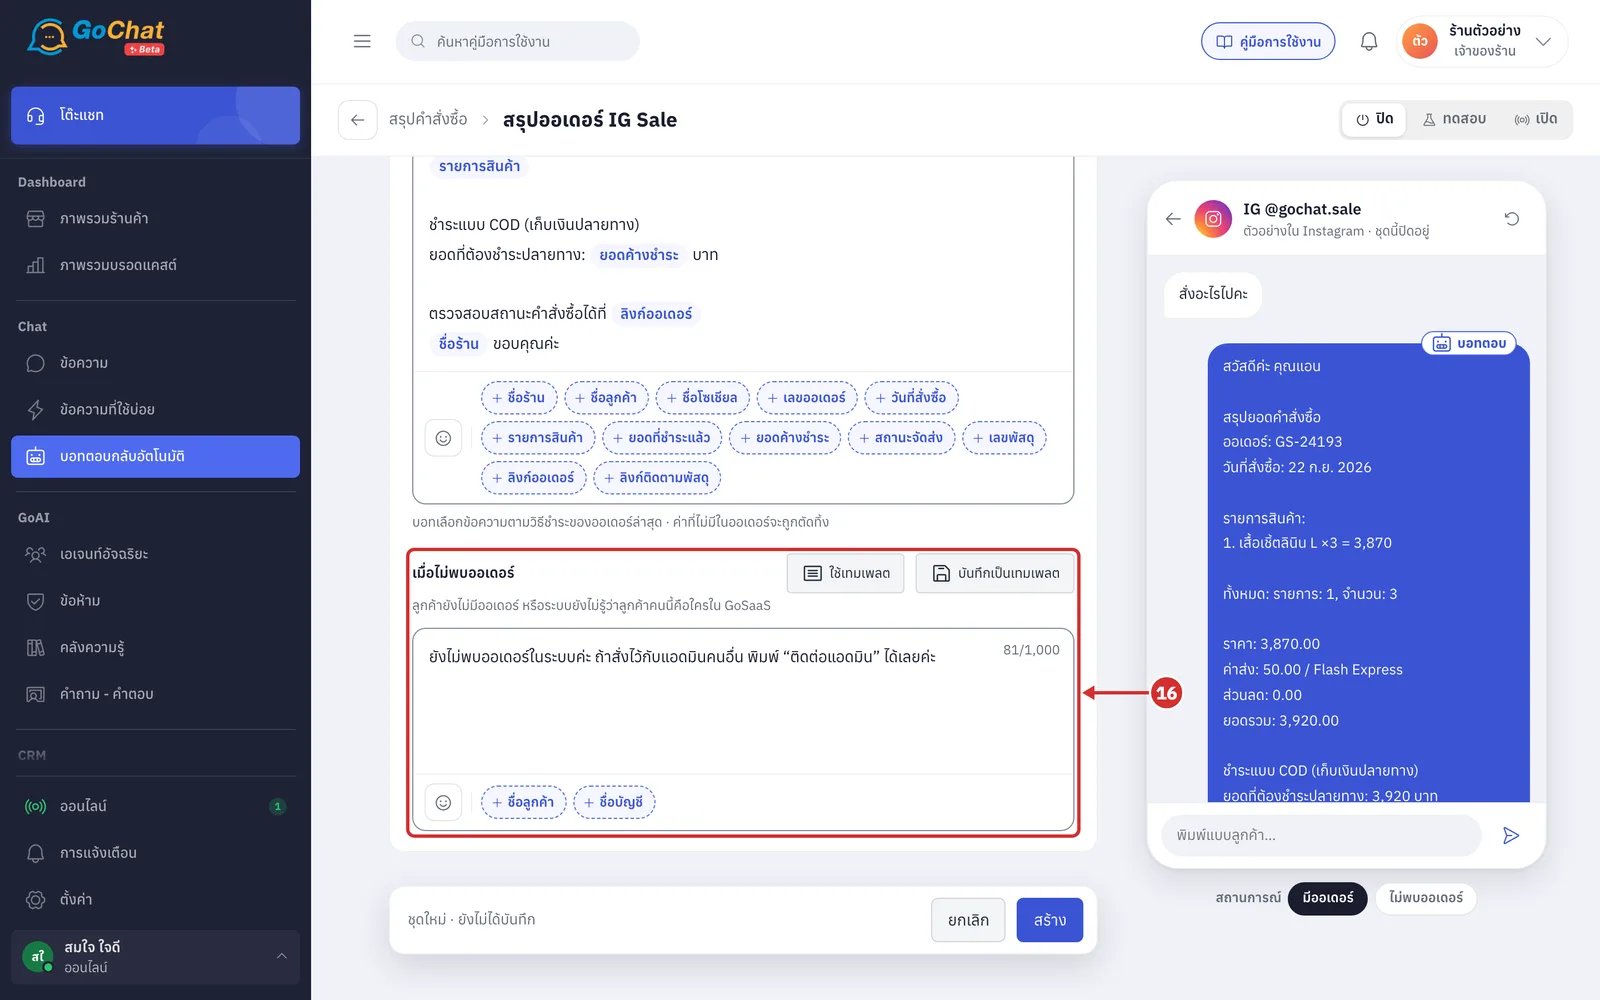
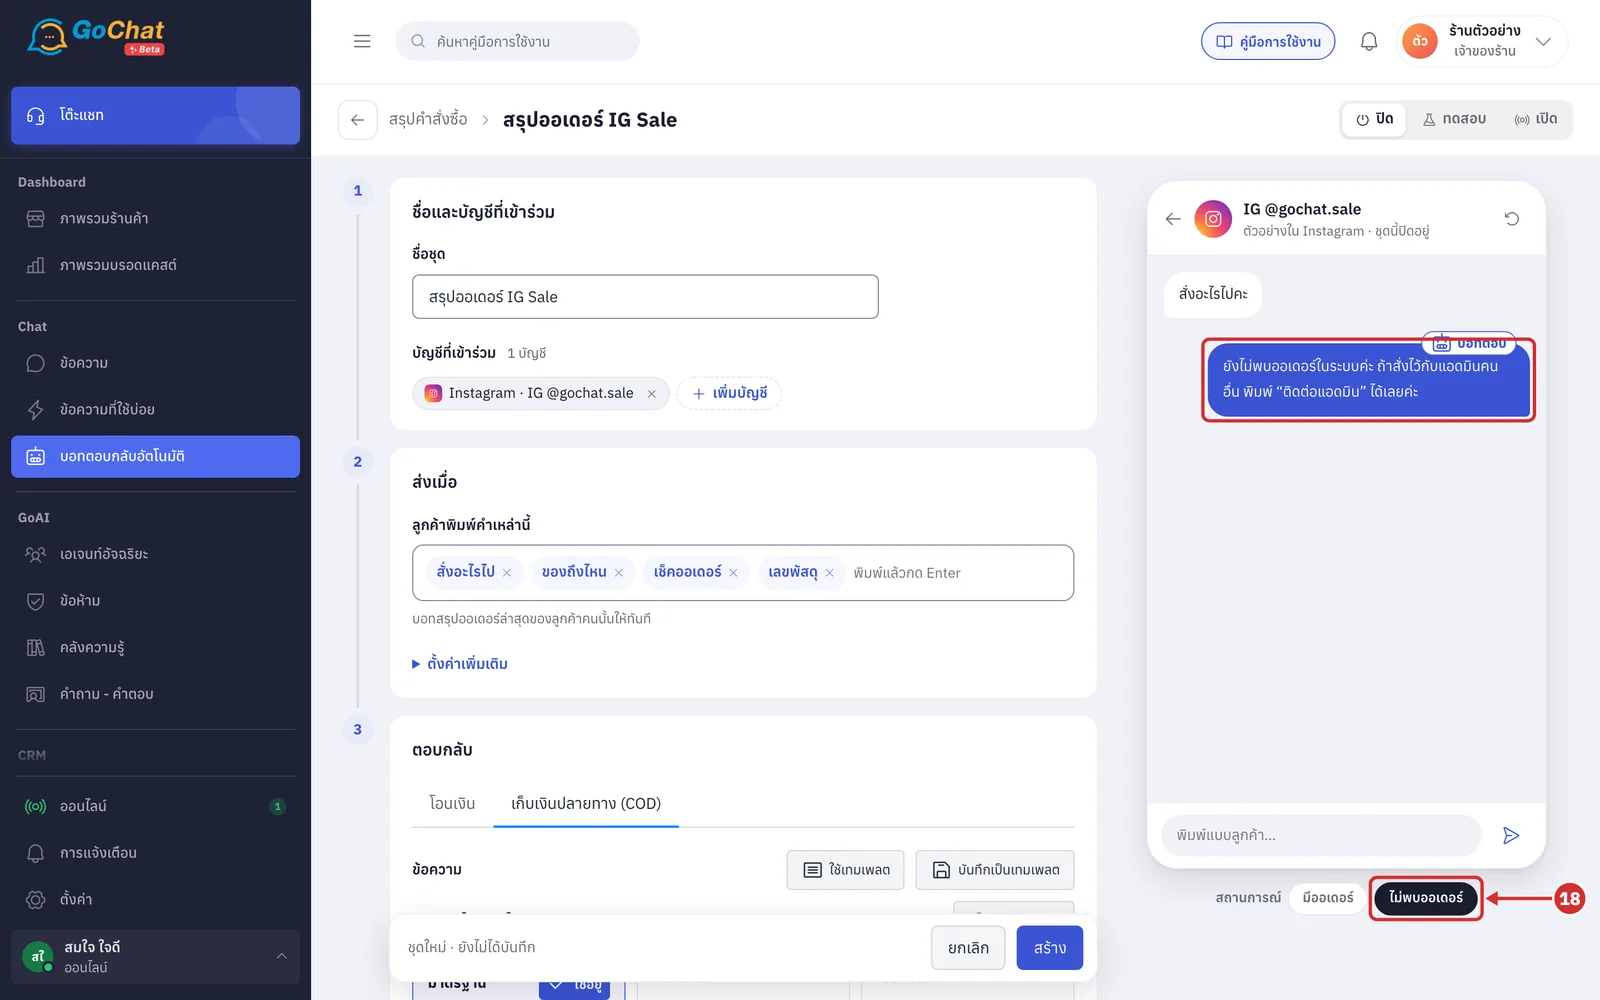
In เมื่อไม่พบออเดอร์ (When no order is found), edit the message the bot sends when the customer has no orders yet, or the app does not know who the customer is in GoSaaS
The starter message is ยังไม่พบออเดอร์ในระบบค่ะ ถ้าสั่งไว้กับแอดมินคนอื่น พิมพ์ “ติดต่อแอดมิน” ได้เลยค่ะ (No order found yet. If you ordered with another admin, type “ติดต่อแอดมิน” (contact admin))
You can use 2 variables: ชื่อลูกค้า (Customer name) (the customer's name in the chat, or “ลูกค้า” (customer) when there is none) and ชื่อบัญชี (Account name) (the page or account the customer messaged)
This field is required, and ใช้เทมเพลต (Use template) and บันทึกเป็นเทมเพลต (Save as template) work here the same way as for the order summary
Trying it in the chat preview
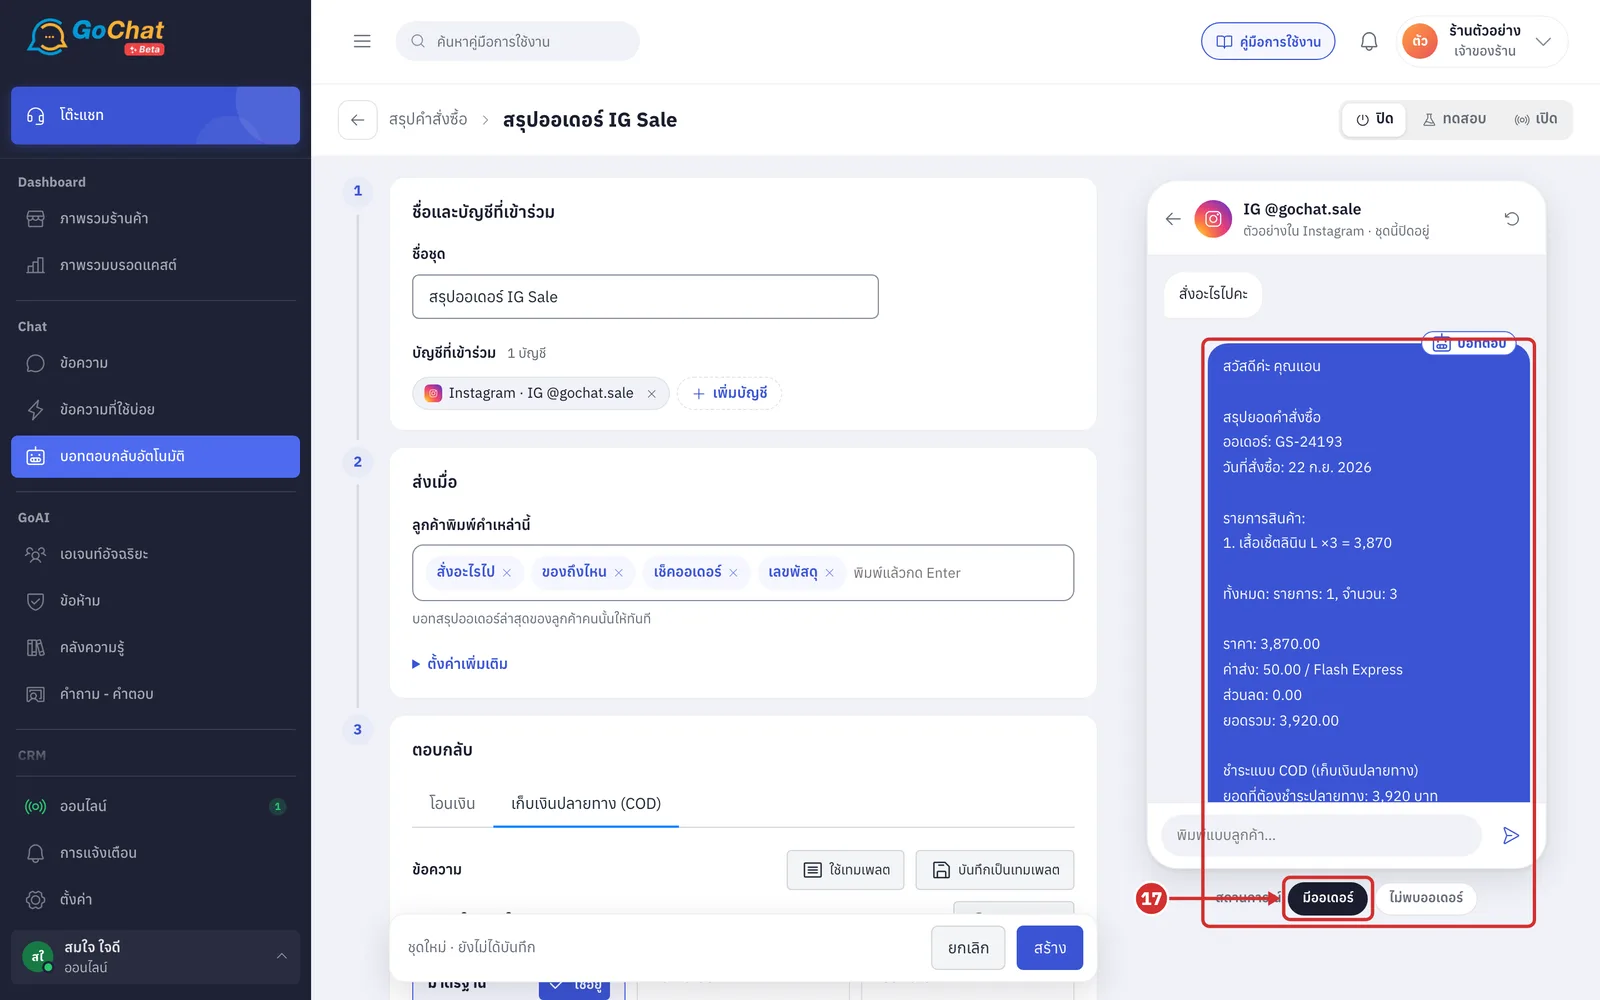
The chat preview on the right starts with the sample customer typing the first word you set followed by “คะ”, such as สั่งอะไรไปคะ (What did I order?), then shows the reply using the message of the payment tab that is open, filled with sample order GS-24193 rather than a real customer order.
Under สถานการณ์ (Scenario), click มีออเดอร์ (Has an order) to see the summary a customer gets when an order is found
Switch to the โอนเงิน (Bank transfer) or เก็บเงินปลายทาง (COD) (Cash on delivery) tab and the preview uses that tab's message
Click the บอทตอบ (Bot replied) badge to see why, such as the matching word and the sample order's payment method
The sample order shows the year in the Western calendar, while real messages show Thai Buddhist years, such as 22 ก.ย. 2569
Click ไม่พบออเดอร์ (No order found) to see the message a customer gets when no order is found
Saving
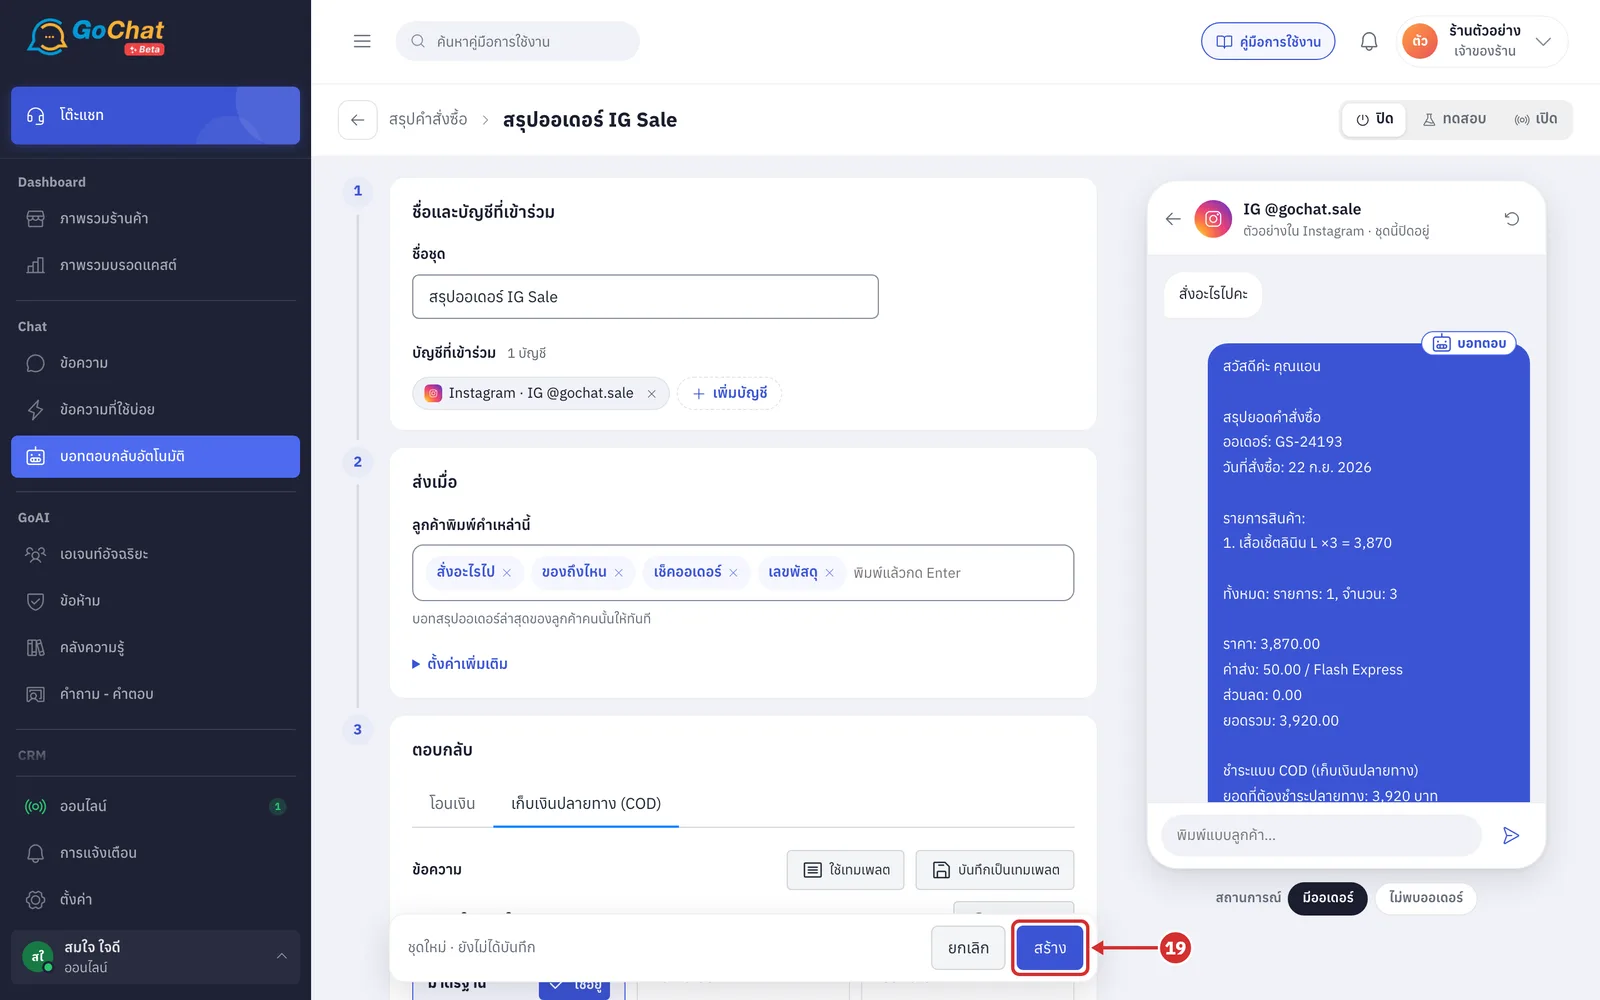
Choose a status at the top right, then click สร้าง (Create)
New sets are ปิด (Off)
ทดสอบ (Test) — try it with your team's chats
เปิด (On) — go live
The statuses are explained in Using the auto-reply bot
The app goes back to the list, shows บันทึก “สรุปออเดอร์ IG Sale” แล้ว (Saved “สรุปออเดอร์ IG Sale”) and the new set appears in the list
How order summaries work
The bot only sends order summaries in one-to-one chats with customers, not in group chats
The bot matches the words customers type by contains, unlike ตอบข้อความตามคีย์เวิร์ด (Keyword replies), where the whole message must match
Thai words ignore spaces and repeated letters
English words must match the whole word, in any letter case
Requests to talk to an admin and menu numbers the customer types come before order summaries, while order summaries come before ส่วนลด / โปรโมชั่น (Discounts / Promotions), คำถามที่พบบ่อย (FAQ) and ตอบข้อความตามคีย์เวิร์ด (Keyword replies)
The bot looks up the customer's latest order in GoSaaS using the customer linked to the chat in the order panel. If the chat has no linked customer, it searches by the customer's phone number (at least 9 digits)
When an order is found, the bot sends the tab's message for that order's payment method. When no order is found, or the customer is unknown, it sends the เมื่อไม่พบออเดอร์ (When no order is found) message
The bot sends nothing at all when
Your shop is not connected to GoSaaS, the connection has expired, or a network problem stops the order lookup
The customer's phone number matches several customers in GoSaaS, so it does not send someone else's order. In this case, link the customer to the chat in the order panel first
Variables the order has no value for are removed, and a line where every variable is empty is removed entirely. For example, an order with no link has no “ตรวจสอบสถานะคำสั่งซื้อได้ที่” (Check your order status at) line. Links are only shown if they start with https
Outside business hours, if the account is in an after-hours set where สรุปคำสั่งซื้อ (Order summary) is not chosen under นอกเวลา บอทยังช่วยตอบ (After hours, the bot still answers), the bot does not send order summaries while the shop is closed (set it up in Setting up after-hours messages)
Sending order summaries without the customer asking
This topic only answers when customers ask. To have the app send an order summary itself when an order is created or confirmed, or send shipping details when there is a tracking number, set it up in ตั้งค่า › สรุปคำสั่งซื้อ และเลขพัสดุ (Settings › Order summary and tracking number), explained in Order summary and tracking number settings.
Good to know: Sets that used to send automatically from this page show the banner ย้ายการส่งเองไปที่ ตั้งค่า → สรุปคำสั่งซื้อ และเลขพัสดุ แล้ว (Automatic sending has moved to Settings → Order summary and tracking number). Those sets no longer send summaries on their own; set it up again on that page.
About order summary sets
ยอดที่ชำระแล้ว (Amount paid) and ยอดค้างชำระ (Amount due) are worked out from the order's payment method, not from what the customer actually paid
Bank-transfer orders: the amount paid is the full amount and nothing is due, even if the customer has not transferred yet
Cash-on-delivery orders: the amount due is the full amount and the amount paid is 0
Instagram accepts messages of up to 1,000 bytes, or about 330 Thai characters. Longer messages fail to reach Instagram customers
If your shop is not connected to GoSaaS but the editor can still be opened, the editor shows the banner ร้านนี้ยังไม่ได้เชื่อมกับ GoSaaS บอทค้นออเดอร์ของลูกค้าไม่ได้ จึงยังไม่ตอบหัวข้อนี้ แม้เปิดใช้แล้ว (This shop is not connected to GoSaaS, so the bot cannot look up orders and does not answer this topic even when on)
When you delete a set, its accounts have no order summary message until you add them to another set
Order summaries the bot has sent are shown in Viewing auto-reply chat history