

Connecting a Facebook page
Connecting a Facebook page brings the Messenger messages customers send to the page into the GoChat inbox, and lets you reply from GoChat. You can connect several pages at once, and an Instagram account linked to a page comes along with that page. Anyone in the shop can connect, signing in to Facebook with an account that is an admin of the page. After connecting, you also need to set up the page on Facebook as described under Setting up conversations on your Facebook Page below.
Connecting a Facebook page
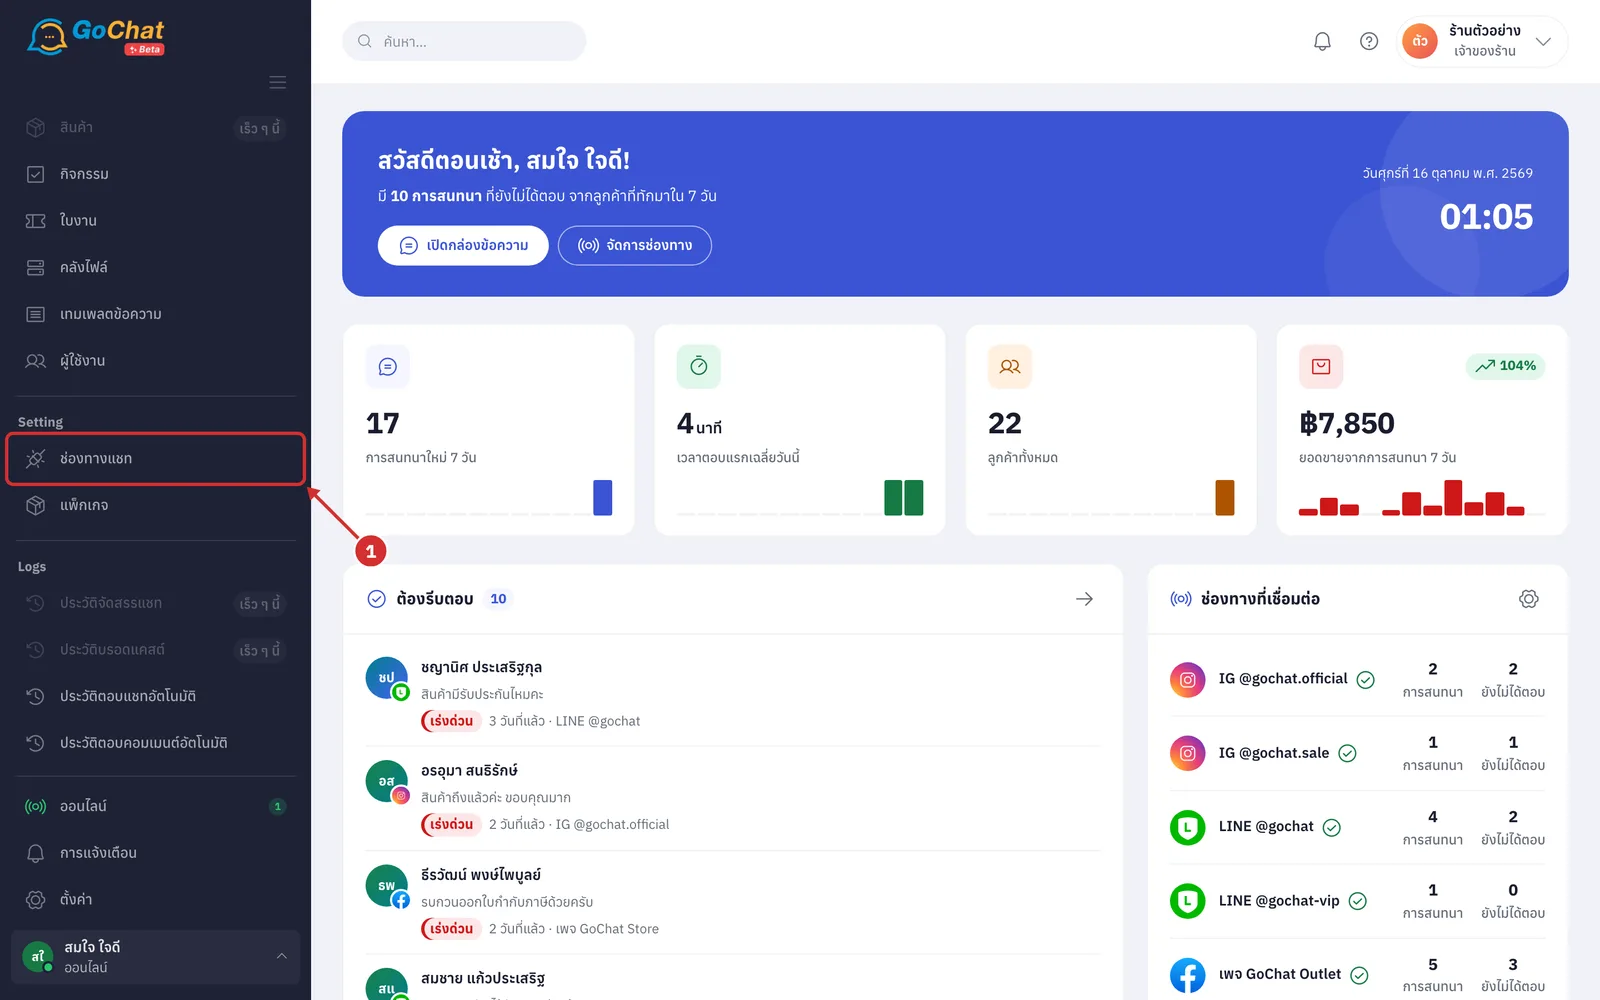
Go to the ช่องทางแชท (Chat channels) menu in the left menu bar
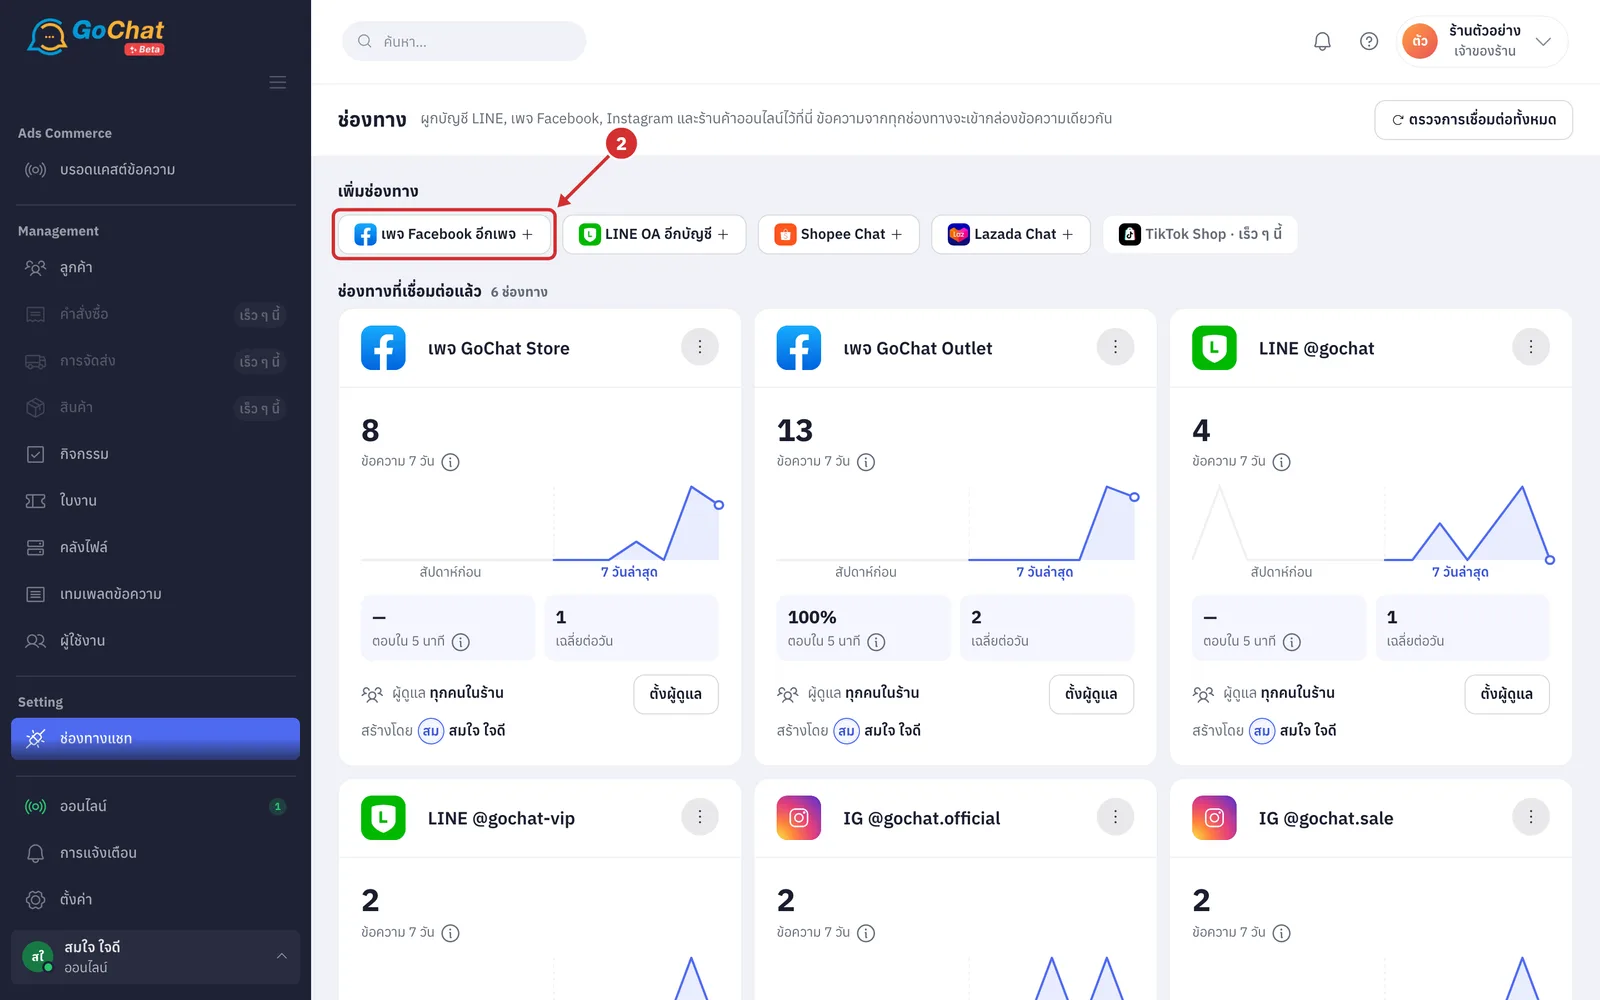
Under เพิ่มช่องทาง (Add a channel), click Facebook Messenger (if your shop already has a page connected, the button is called เพจ Facebook อีกเพจ (Another Facebook page); it takes you to Facebook's authorization page)
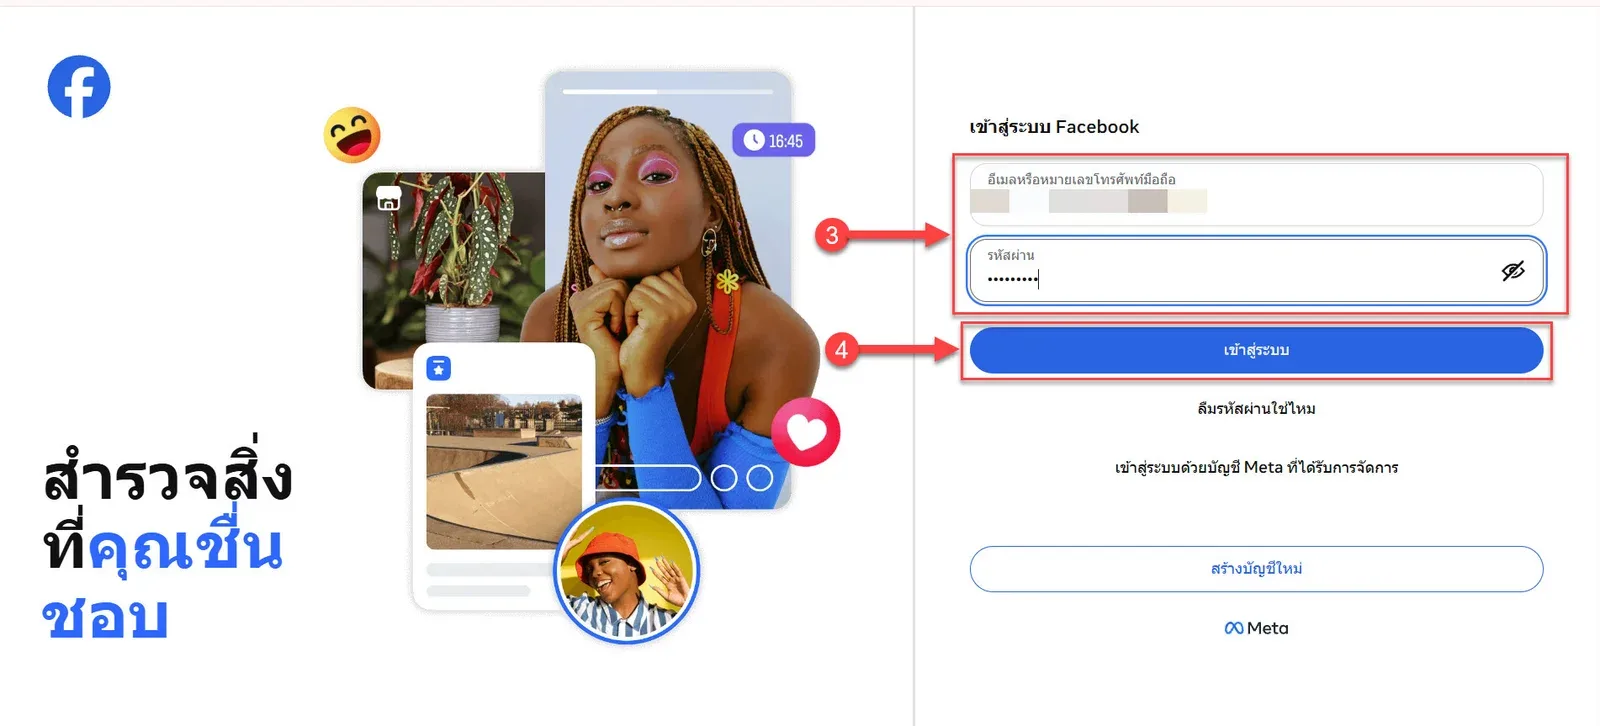
If you are not signed in to Facebook, the system takes you to the Facebook sign-in page. Enter the username and password of your Facebook account
Click เข้าสู่ระบบ (Log in)
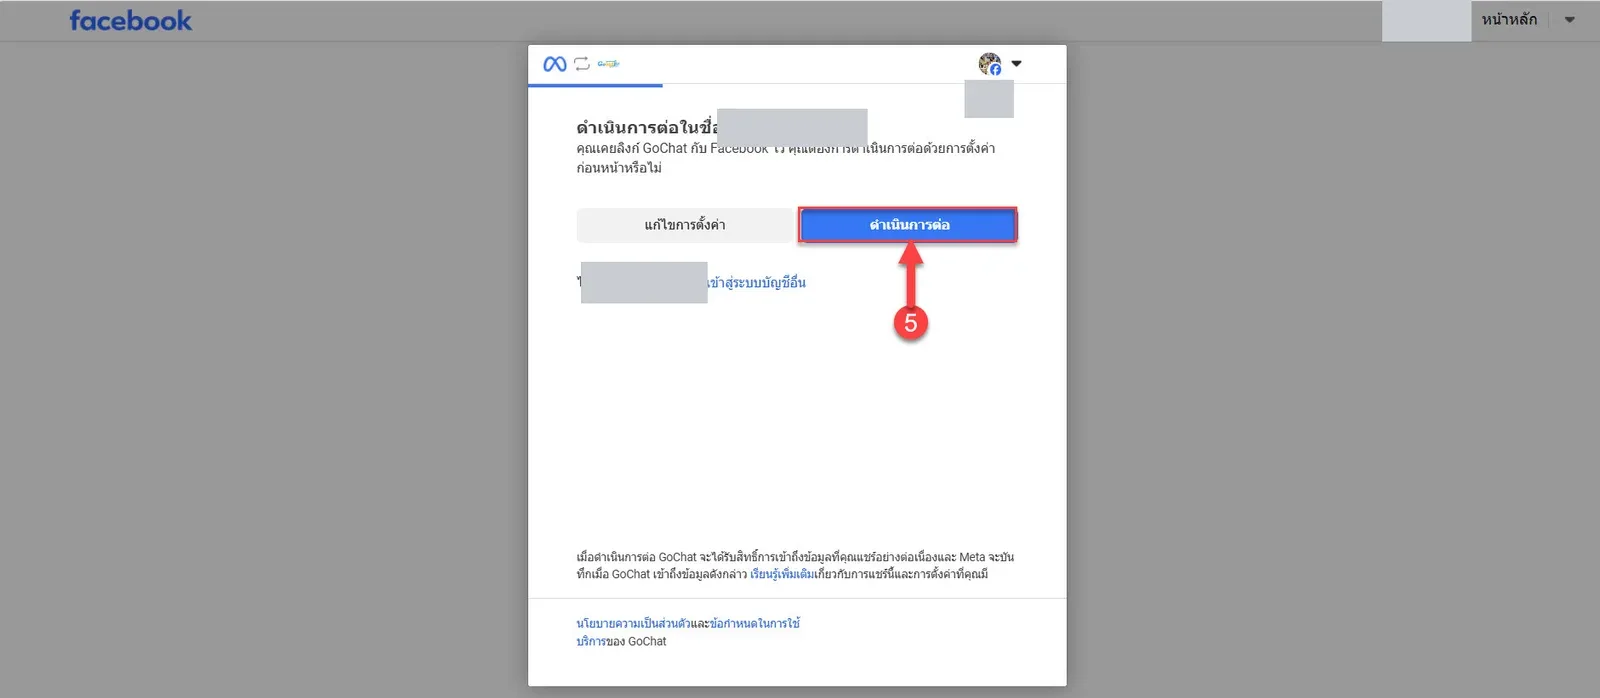
If you are already signed in to Facebook, the system shows the connection page. Click ดำเนินการต่อ (Continue)
The system returns to GoChat's เชื่อมต่อ Facebook เพจ (Connect Facebook page) screen at เลือกเพจที่จะเชื่อม (Choose pages to connect). Tick the Facebook pages you want to connect (you can choose several at once and add more later)
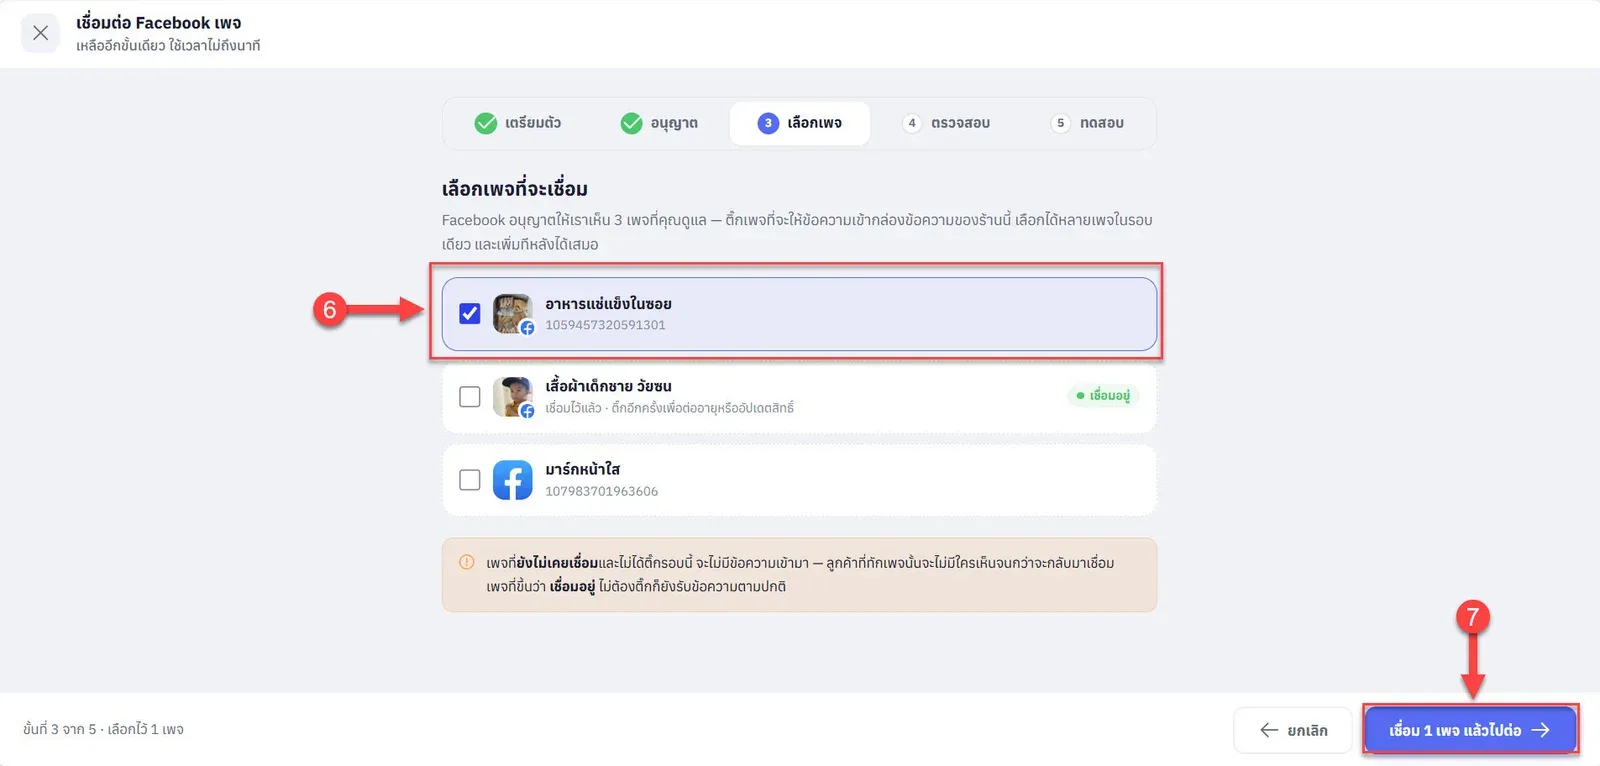
The list shows every page this Facebook account is an admin of; the page ID is under each name
A page with an @account label has an Instagram account linked; connecting the page also connects that Instagram account
A page labelled เชื่อมอยู่ (Connected) is already connected to this shop and working; it keeps receiving messages without being ticked. Tick it again to renew or update permissions
A page labelled ต้องเชื่อมใหม่ (Needs reconnecting) was connected before but its permission expired; tick it to authorize again
The orange box warns that pages that were never connected and are not ticked this time will not receive messages; customers who message those pages will not be seen until you connect them
If it says บัญชี Facebook นี้ไม่มีเพจที่ดูแลอยู่ (This Facebook account has no pages it manages), the account is not an admin of any page (Facebook does not share pages where you are only an editor); ask the page owner to raise your role first
Click เชื่อม 1 เพจ แล้วไปต่อ (Connect 1 page and continue) (the number follows how many pages you chose; with none chosen the button shows เลือกเพจก่อน (Choose a page first) and cannot be clicked; while connecting it shows กำลังเชื่อม… (Connecting…). If every page fails, you stay on this screen with the reason for each page and can tick again right away. Click ยกเลิก (Cancel) to go back to the Channels page without connecting)
When the connection succeeds, the system returns to the Channels page and shows เชื่อมเพจ Facebook "page name" สำเร็จ (Facebook page connected) (for several pages it shows เชื่อมเพจ Facebook สำเร็จ N เพจ (N Facebook pages connected) with their names; if a page has Instagram linked it says พร้อม Instagram (with Instagram) followed by the account name; if some pages failed, the bar is yellow and says สำเร็จ N จาก M เพจ (N of M pages connected); click ดูผลรายเพจ (See results per page) for the reasons). The new page's card has a ใหม่ (New) label. You can then choose:
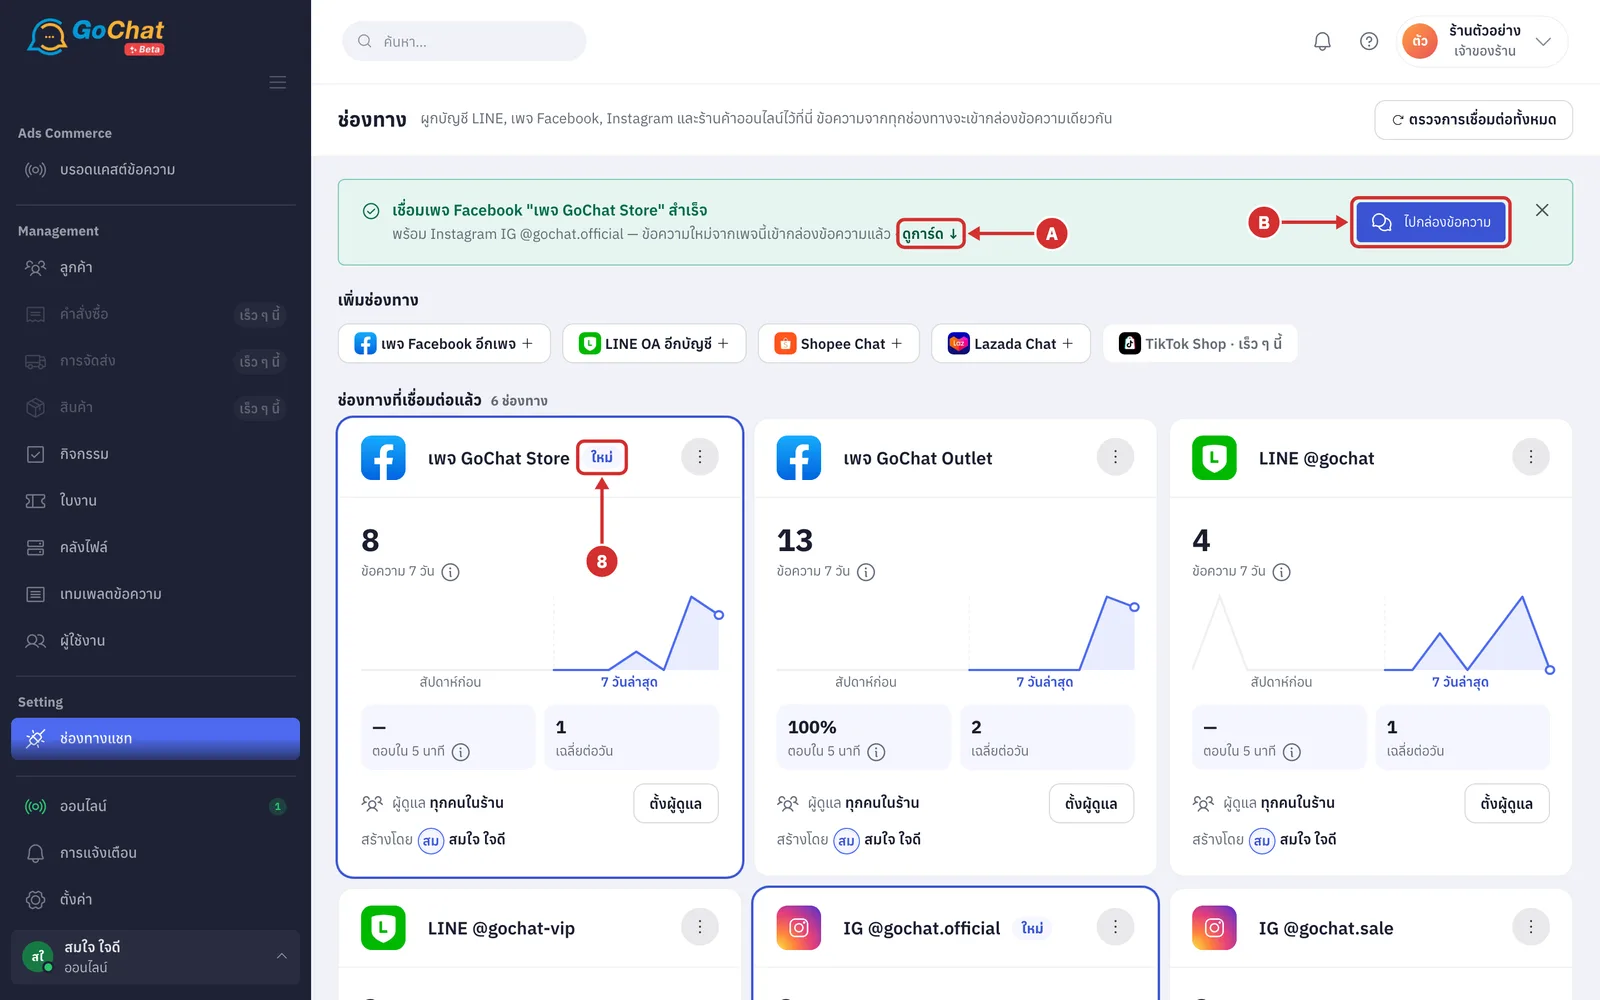
A ดูการ์ด ↓ (See card) to scroll to the card of the page you just connected
B ไปกล่องข้อความ (Go to inbox) to start replying to customers
Setting up conversations on your Facebook Page
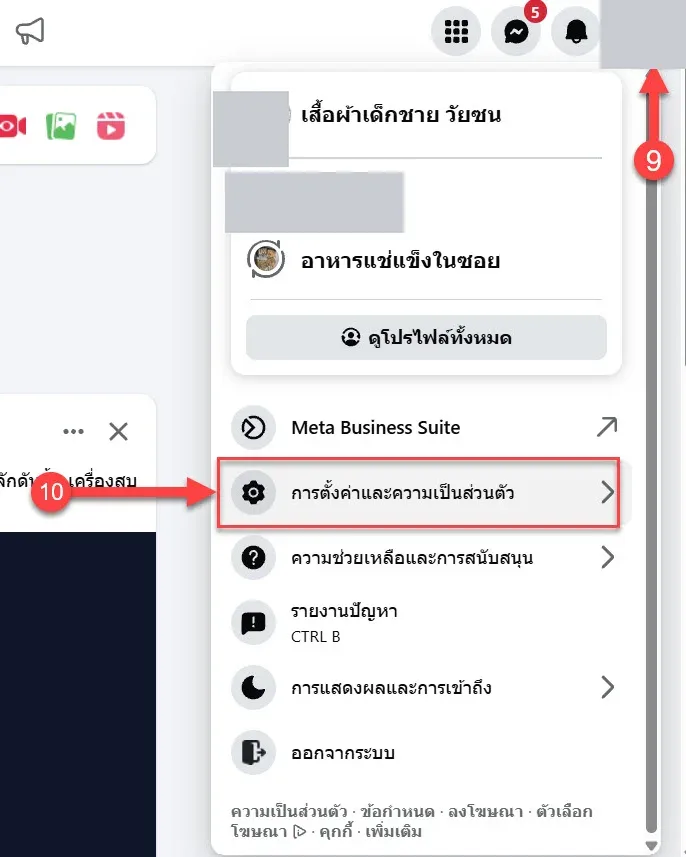
After connecting, go back to the Facebook Page you want to set up and click the ปุ่มลูกศร ใต้รูปภาพโปรไฟล์ (arrow under the profile picture)
Choose การตั้งค่าและความเป็นส่วนตัว (Settings & privacy)
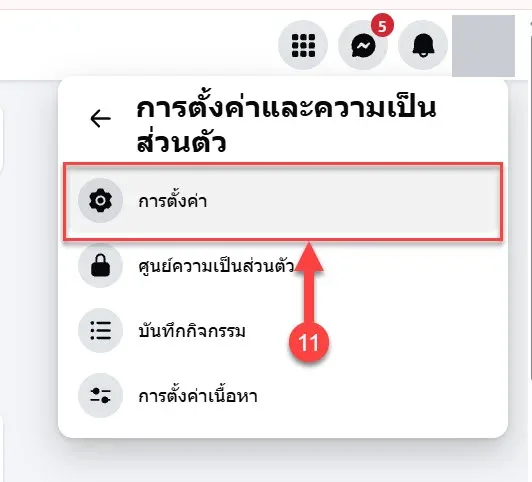
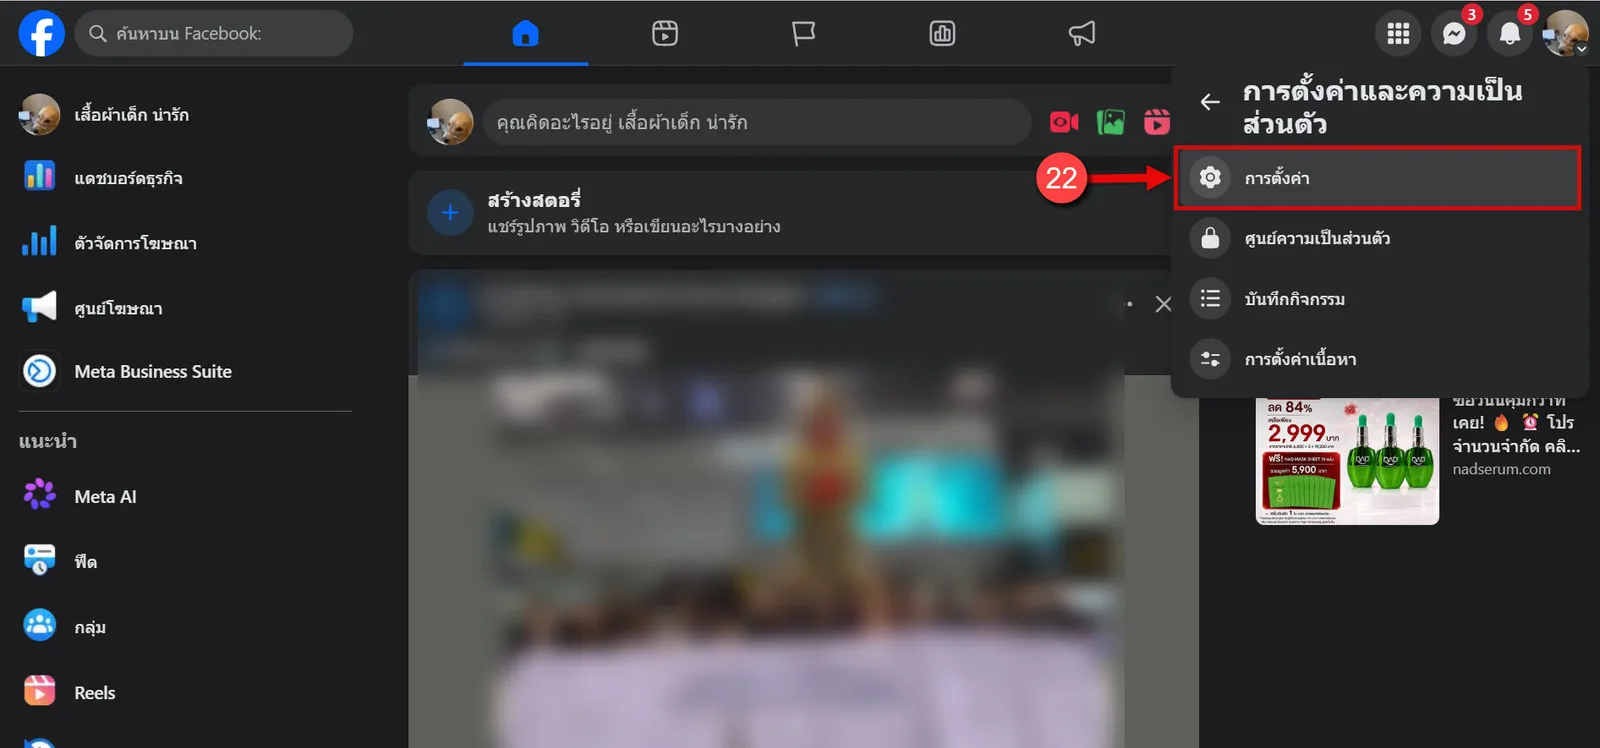
Choose การตั้งค่า (Settings)
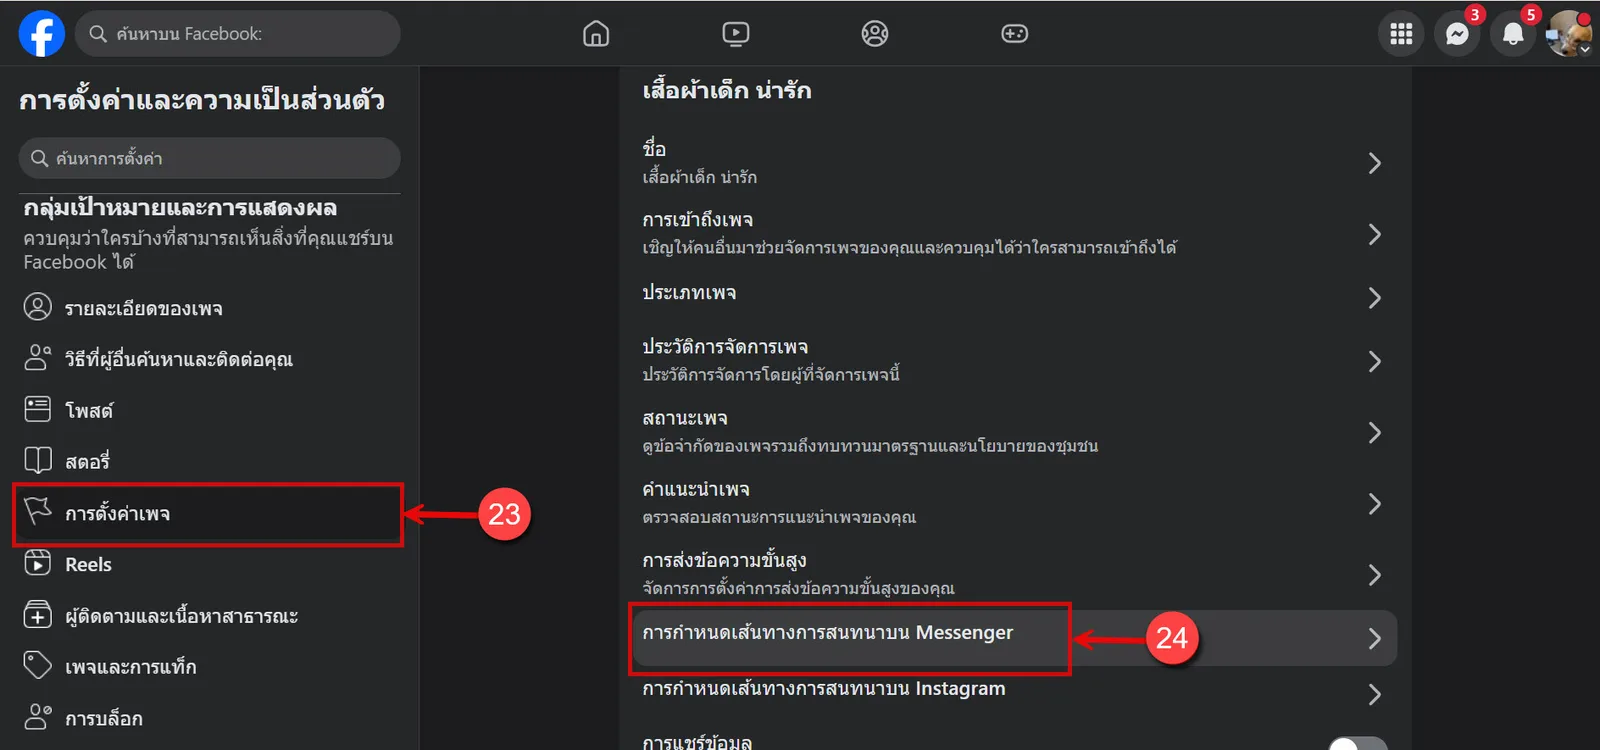
Choose การตั้งค่าเพจ (Page settings)
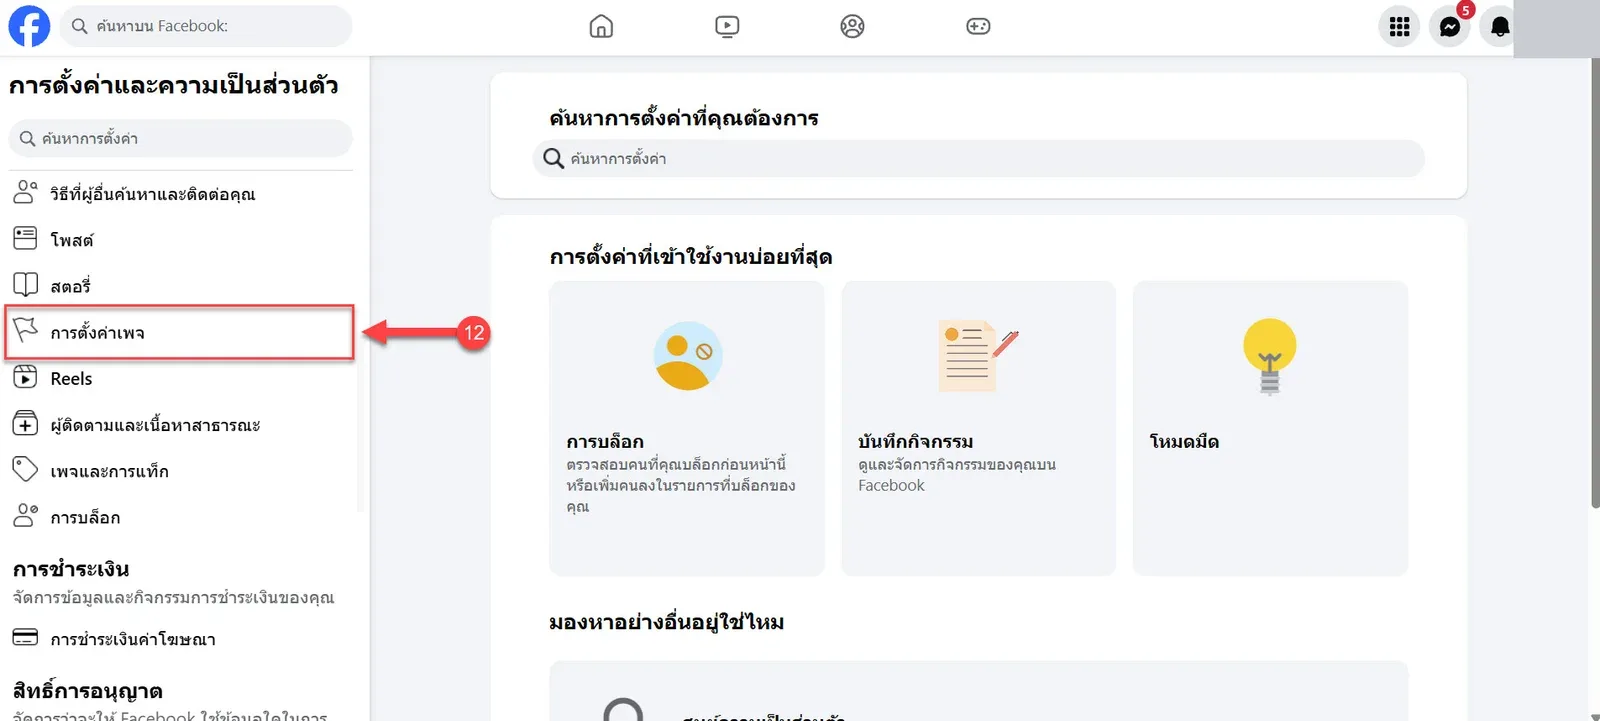
Choose การส่งข้อความขั้นสูง (Advanced messaging)
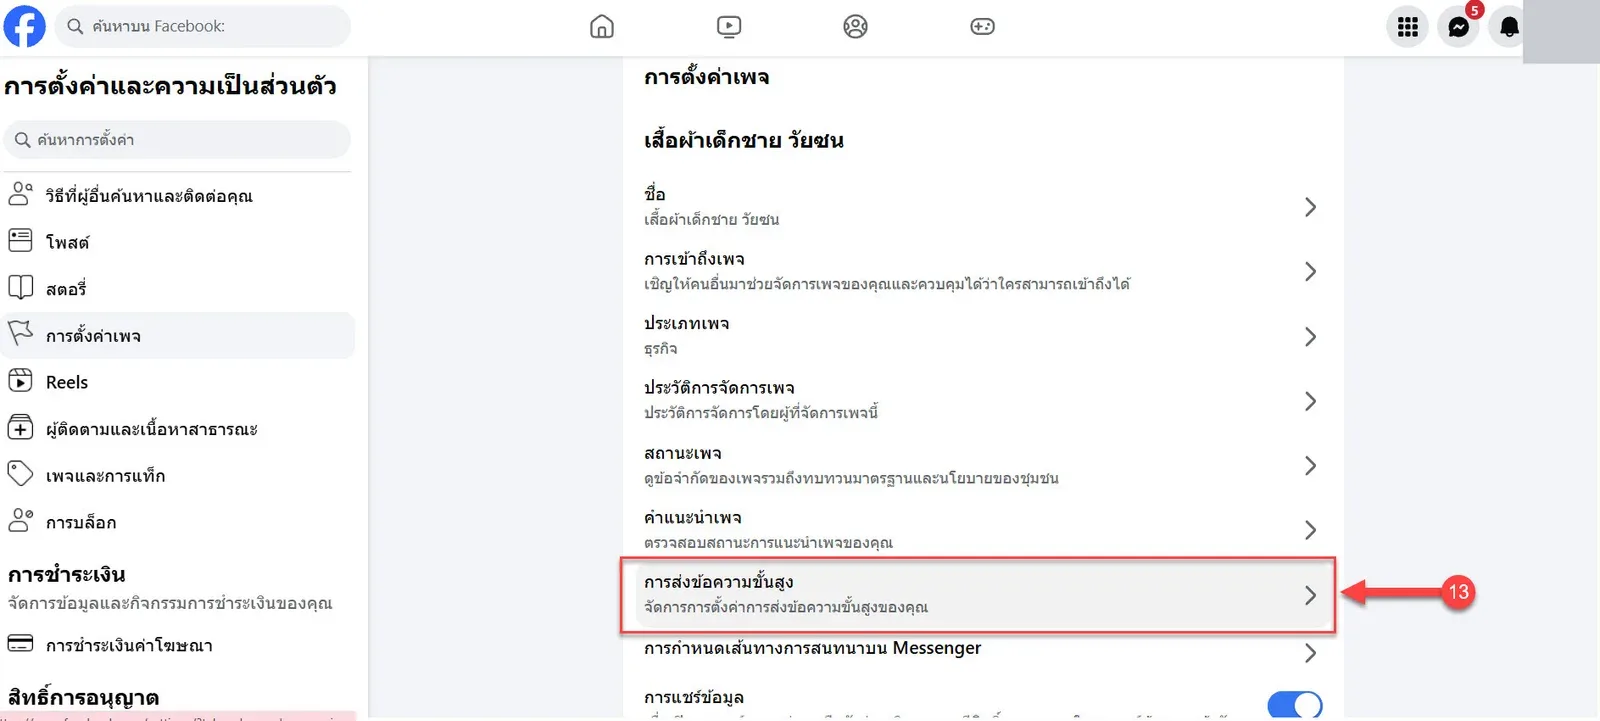
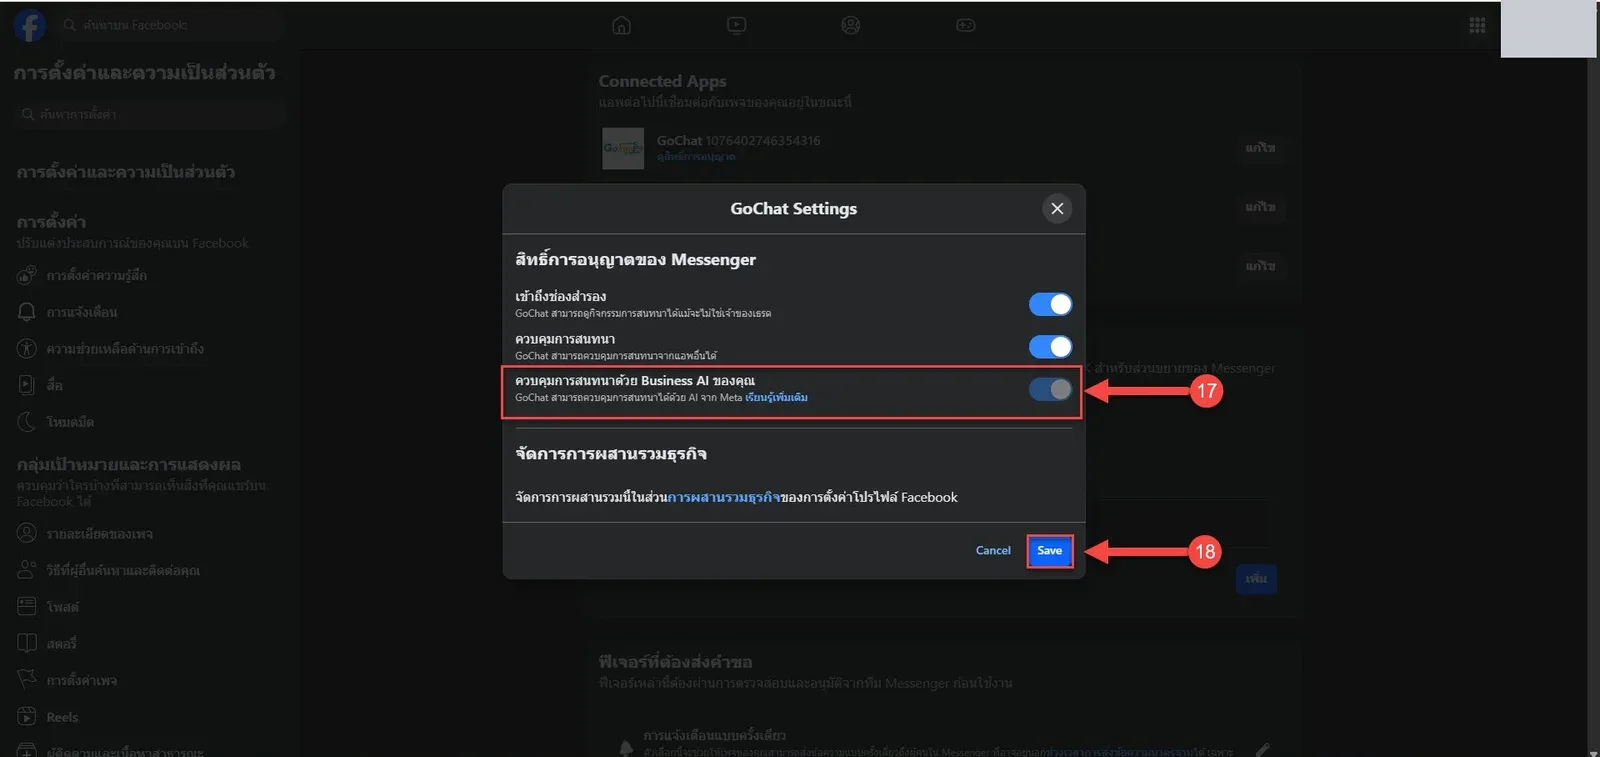
Under Connected Apps, find and select App Gochat, then click แก้ไข (Edit)
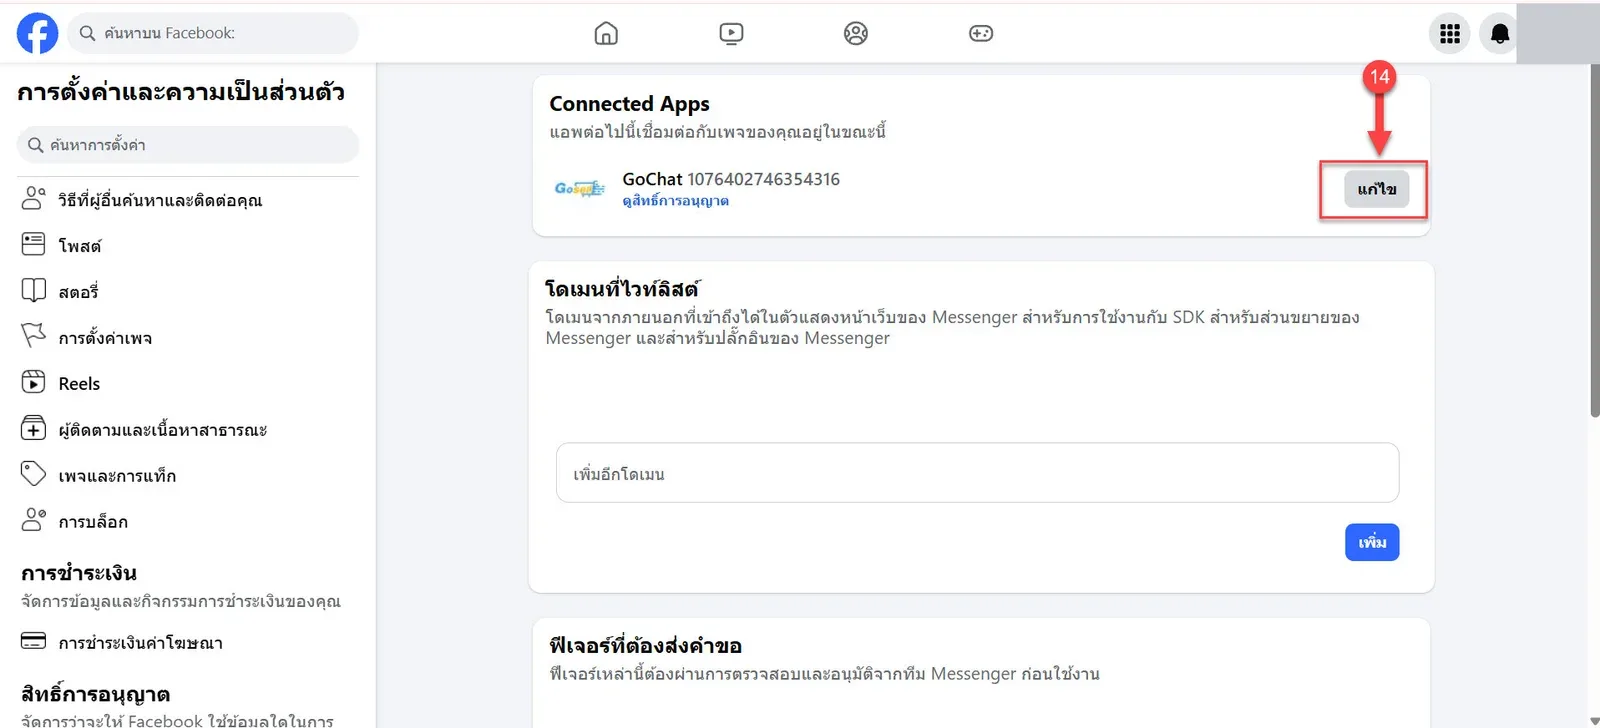
Under สิทธิ์การอนุญาตของ Messenger (Messenger permissions), turn on ควบคุมการสนทนา (Conversation control) so GoChat can manage and reply to Messenger conversations
Click SAVE
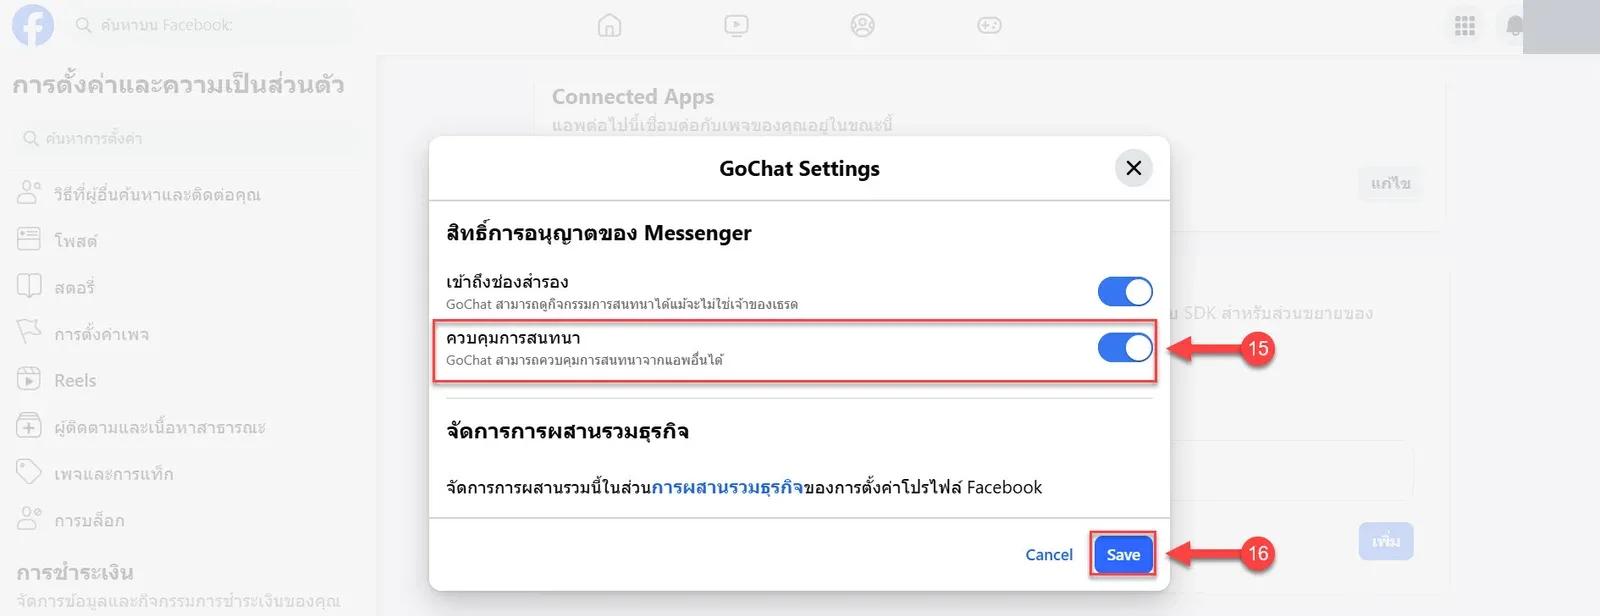
If your shop uses Business AI, turn on that setting as well so Business AI can work with your conversations
Click SAVE
If the connection fails
If you come back to the Channels page and see a red bar instead of the success bar, read its message, then click Facebook Messenger (or เพจ Facebook อีกเพจ (Another Facebook page)) to start again
A ยกเลิกการเชื่อมต่อที่หน้า Facebook (Cancelled on Facebook) someone clicked cancel on Facebook's authorization page
B เซสชันเชื่อมเพจหมดอายุ — กดเชื่อมใหม่อีกครั้ง (Page connection session expired — connect again) the choose pages screen was left open too long (over 30 minutes)
C ดึงรายชื่อเพจไม่สำเร็จ (Could not load pages) or แลกรหัสกับ Meta ไม่สำเร็จ (Could not exchange the code with Meta) Facebook did not respond successfully that time; try again
Note: Make sure ควบคุมการสนทนา (Conversation control) is turned on for App Gochat before you continue, so the system can receive and manage Messenger messages correctly. The permission Facebook grants expires; when it is close, the page's card shows ต้องต่ออายุใน N วัน (Renew within N days); click ต่ออายุตอนนี้ (Renew now) (see Managing chat channels).
Setting up the GoChat app to handle conversations on Facebook Messenger
To set the GoChat app as the default routing app for conversations on Facebook Messenger after connecting it
Setup steps
20. Go back to the Facebook Page you want to set up, then click the arrow under the profile picture at the top right of Facebook
21. Choose การตั้งค่าและความเป็นส่วนตัว (Settings & privacy)
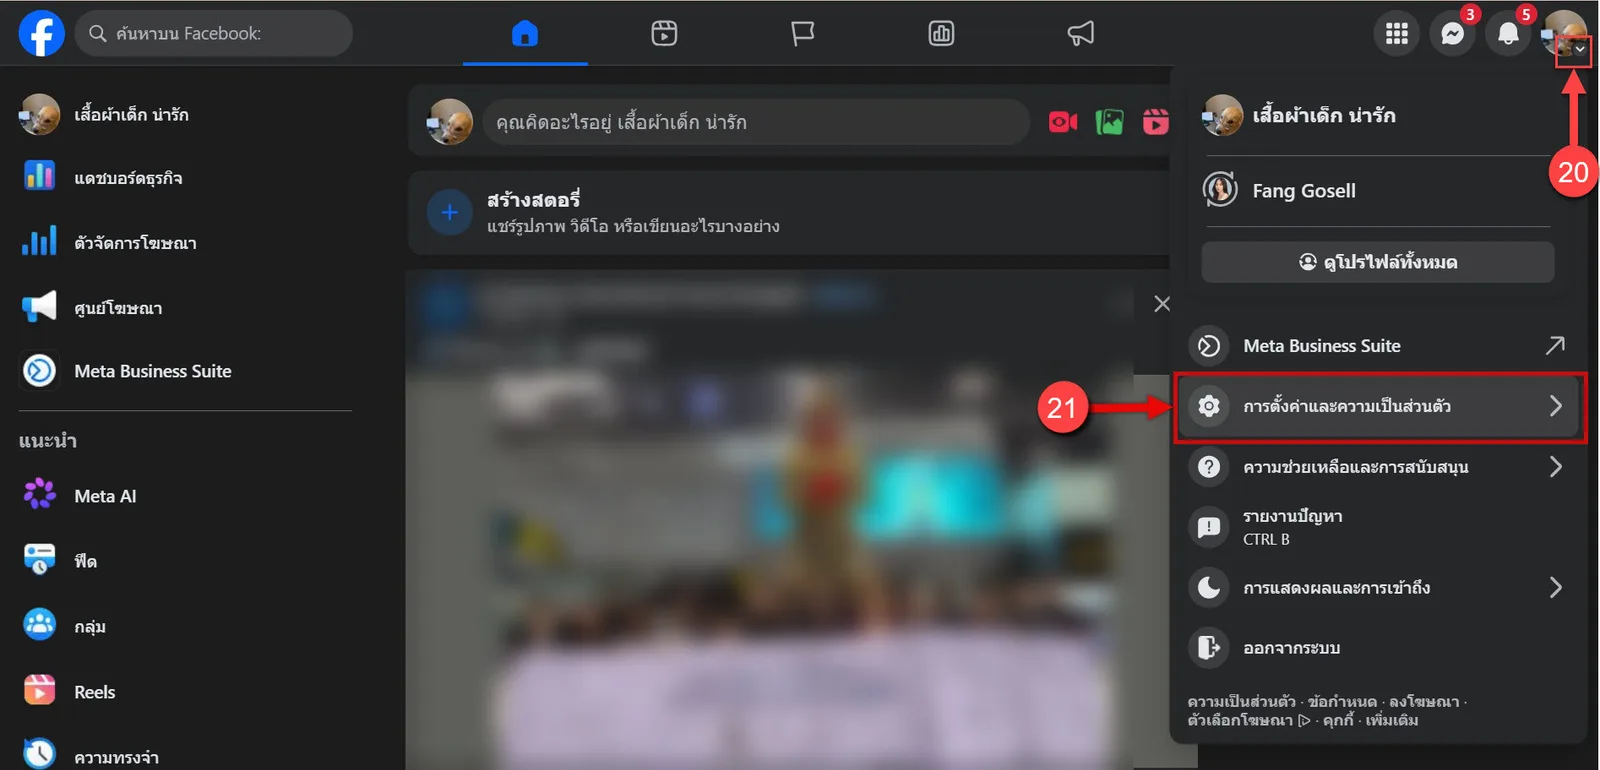
22. Choose การตั้งค่า (Settings)
23. Choose การตั้งค่าเพจ (Page settings)
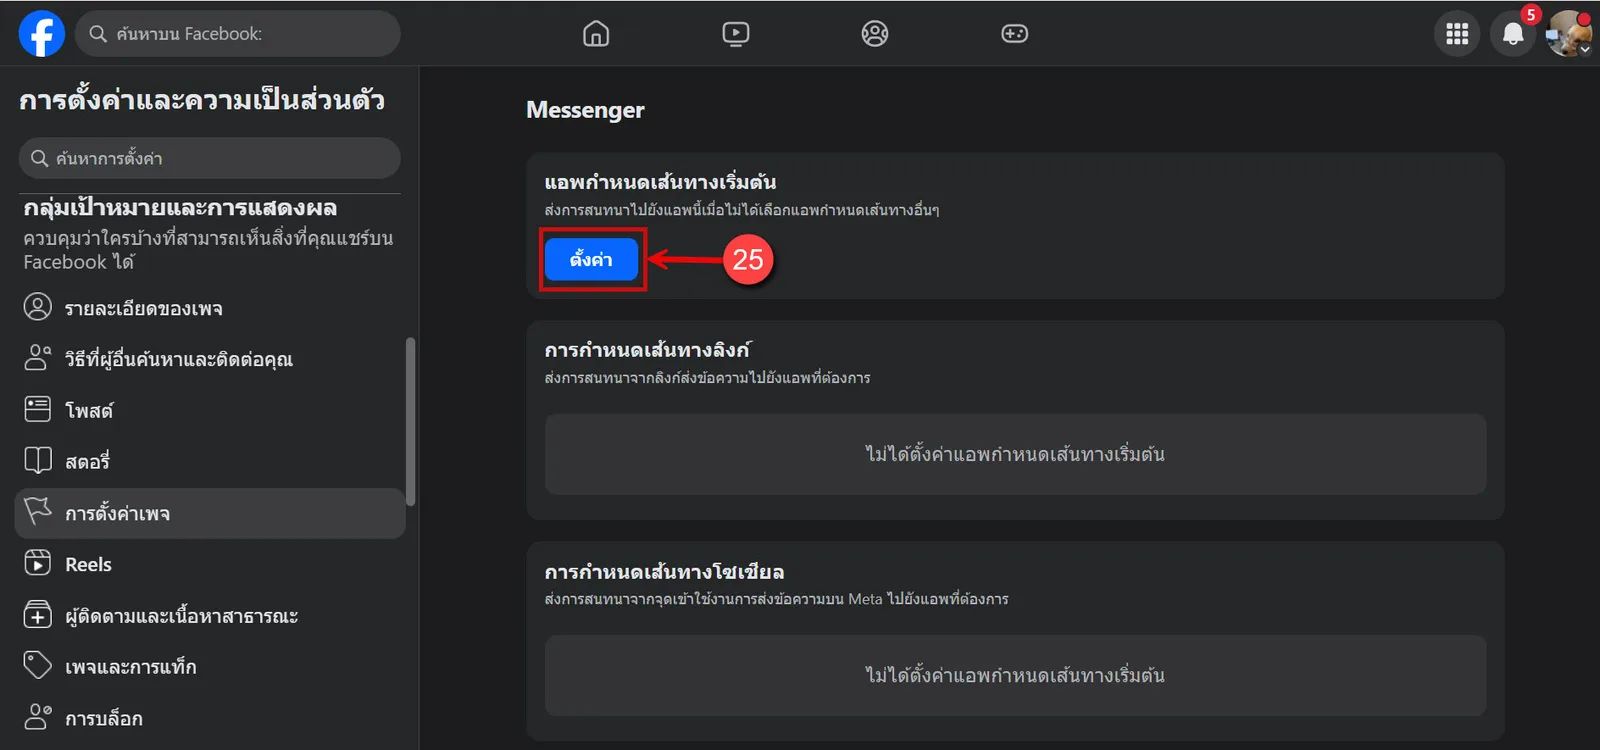
24. Go to การกำหนดเส้นทางการสนทนาบน Messenger (Messenger conversation routing)
25. Click ตั้งค่า (Set up) to start setting up conversation routing
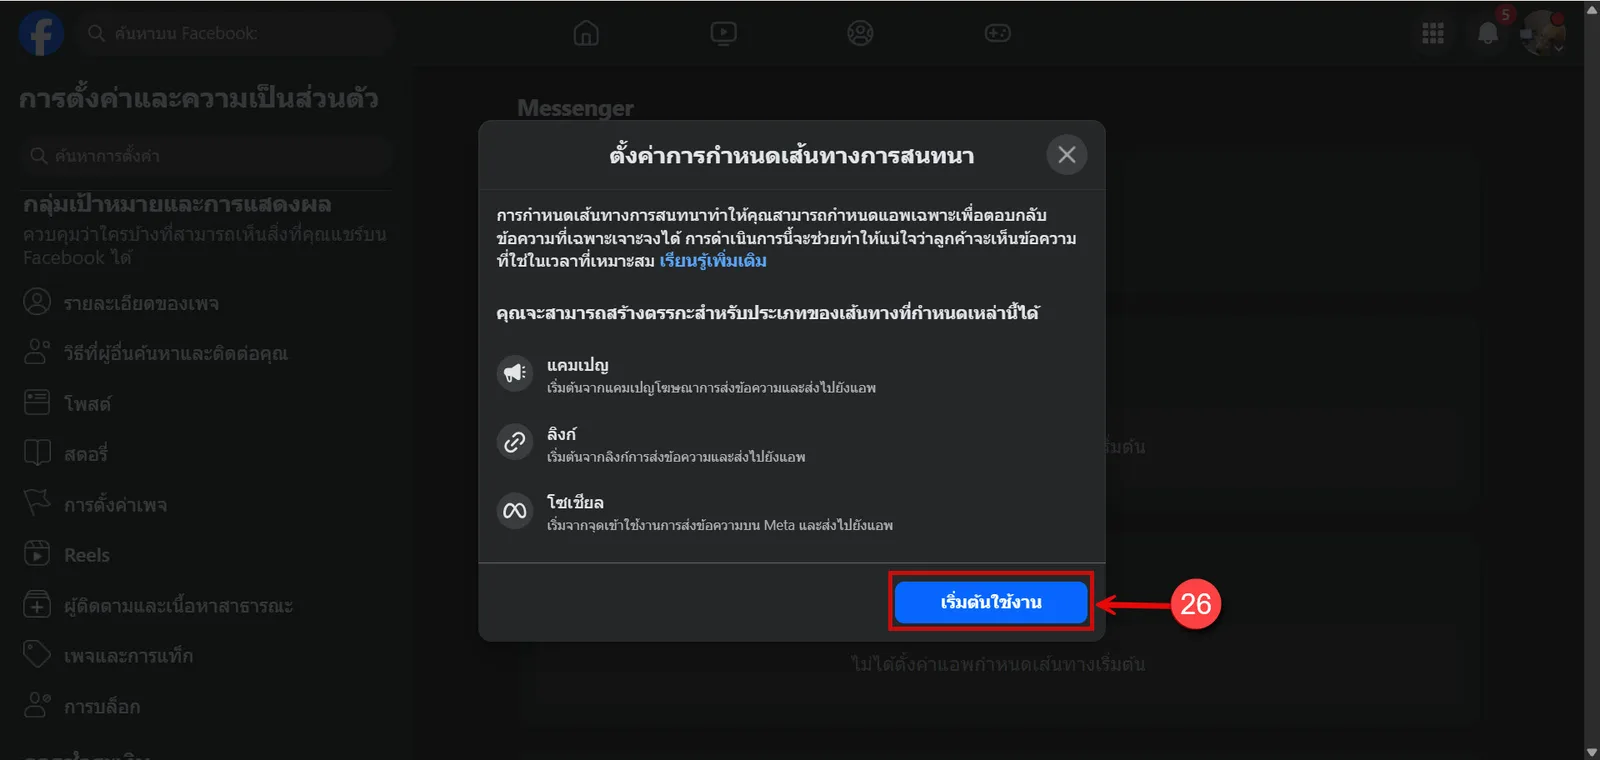
Click เริ่มต้นใช้งาน (Get started) to begin the setup
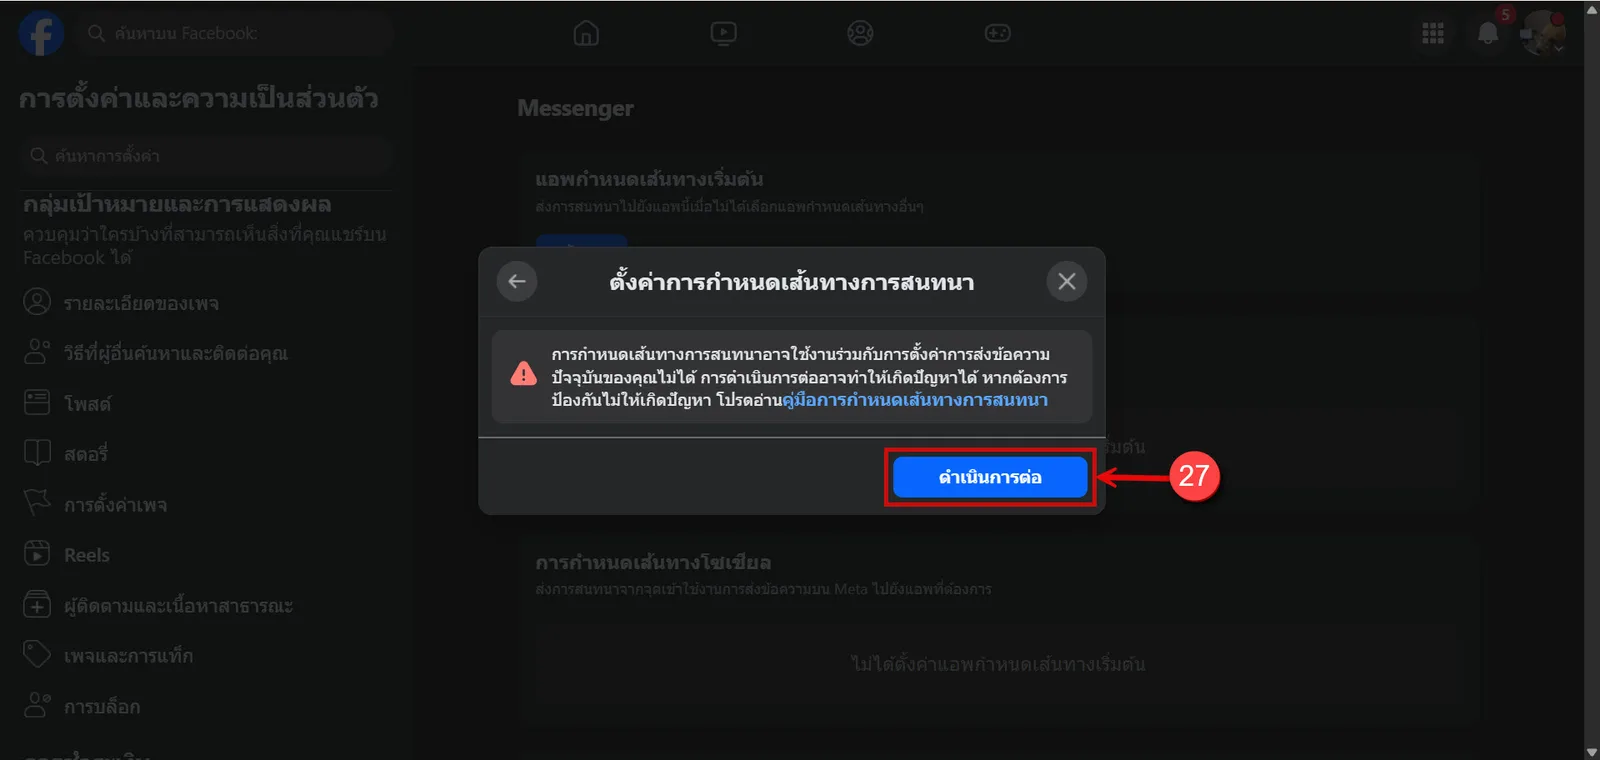
Click ดำเนินการต่อ (Continue) to go to the next step
Choose the GoChat app from the list
Then click ดำเนินการต่อ (Continue) to confirm the app
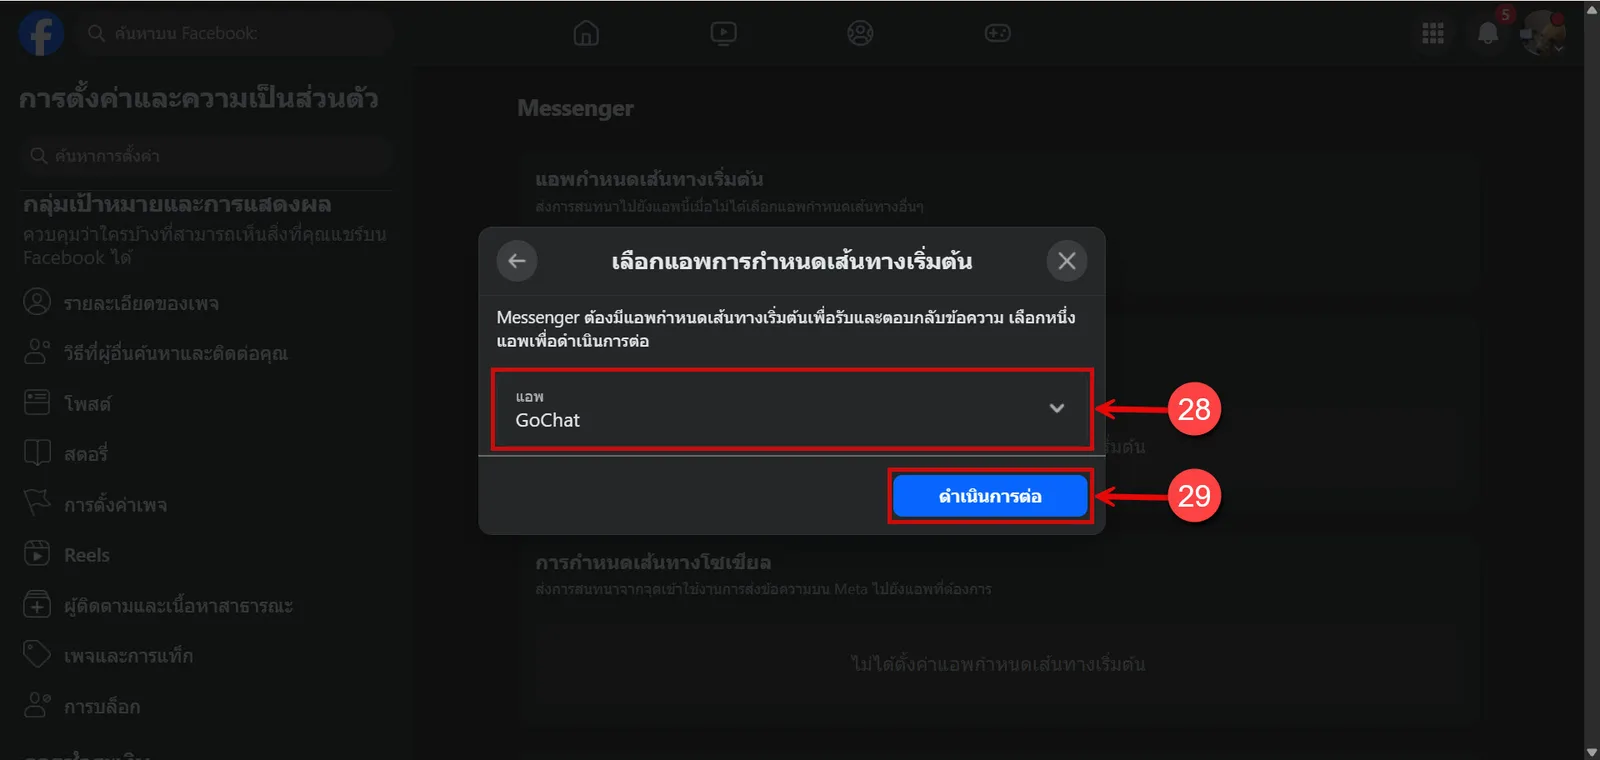
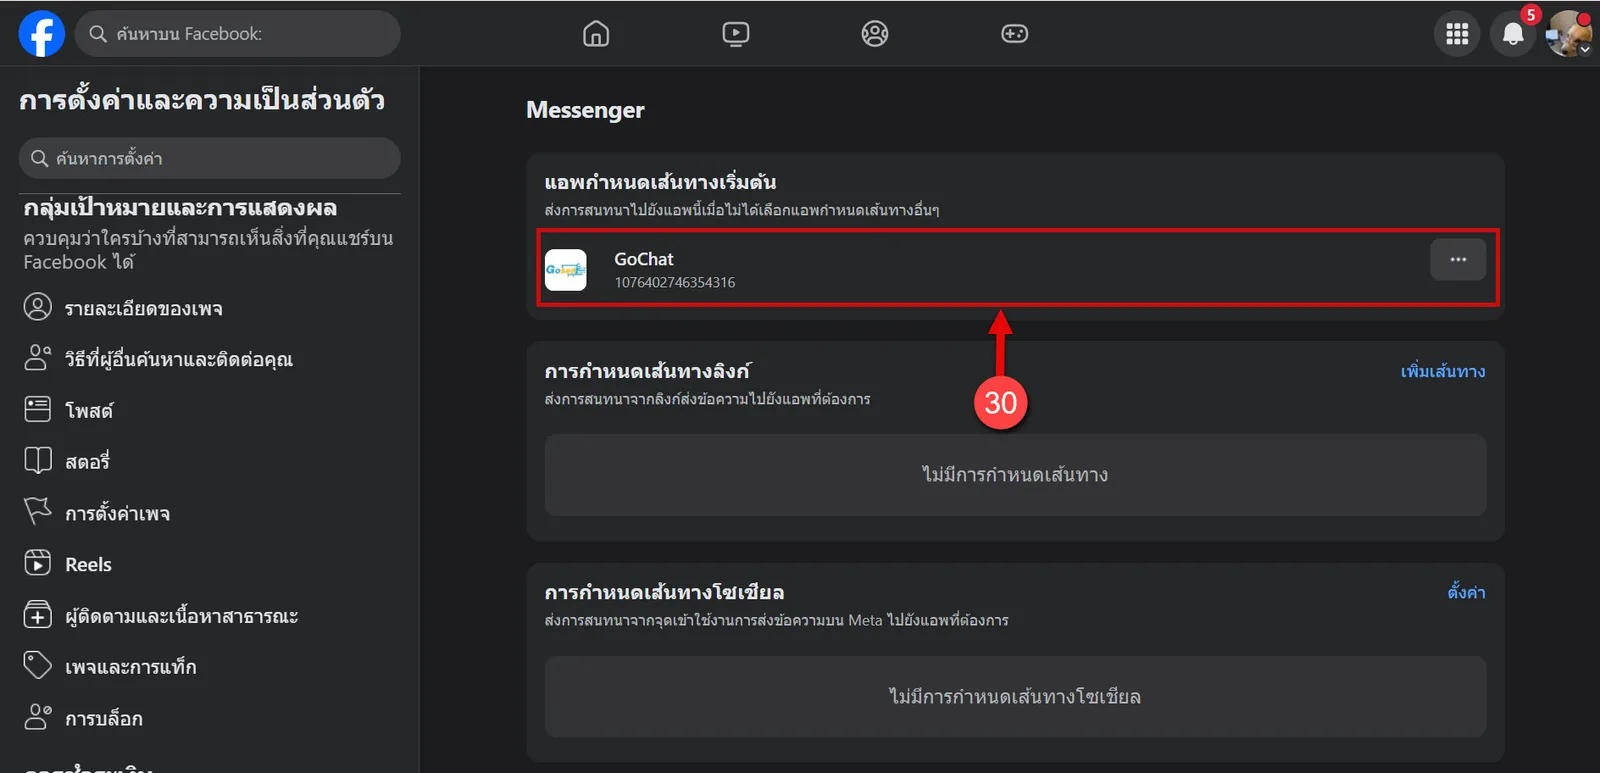
When done, GoChat is shown as the default routing app for conversations on Facebook Messenger
Granting permission to send customer notification messages
When you connect a Facebook page, you are also asked to accept permission to send customer notification messages. This lets the shop send customer notification messages approved by Meta even when the customer has been quiet for more than 24 hours (see การใช้ข้อความแจ้งเตือนลูกค้า). Pages connected before this permission existed must be reconnected once; existing messages are kept.
On the ช่องทางแชท (Chat channels) page, the card of a page without this permission shows the row ยังส่งเทมเพลตไม่ได้ (Cannot send templates yet) (point at or tap the (i) button for an explanation). Click เชื่อมใหม่ (Reconnect) in that row
The เชื่อมใหม่ (Reconnect) button is shown only to people who can connect this channel; others should ask the shop owner or whoever connected the page
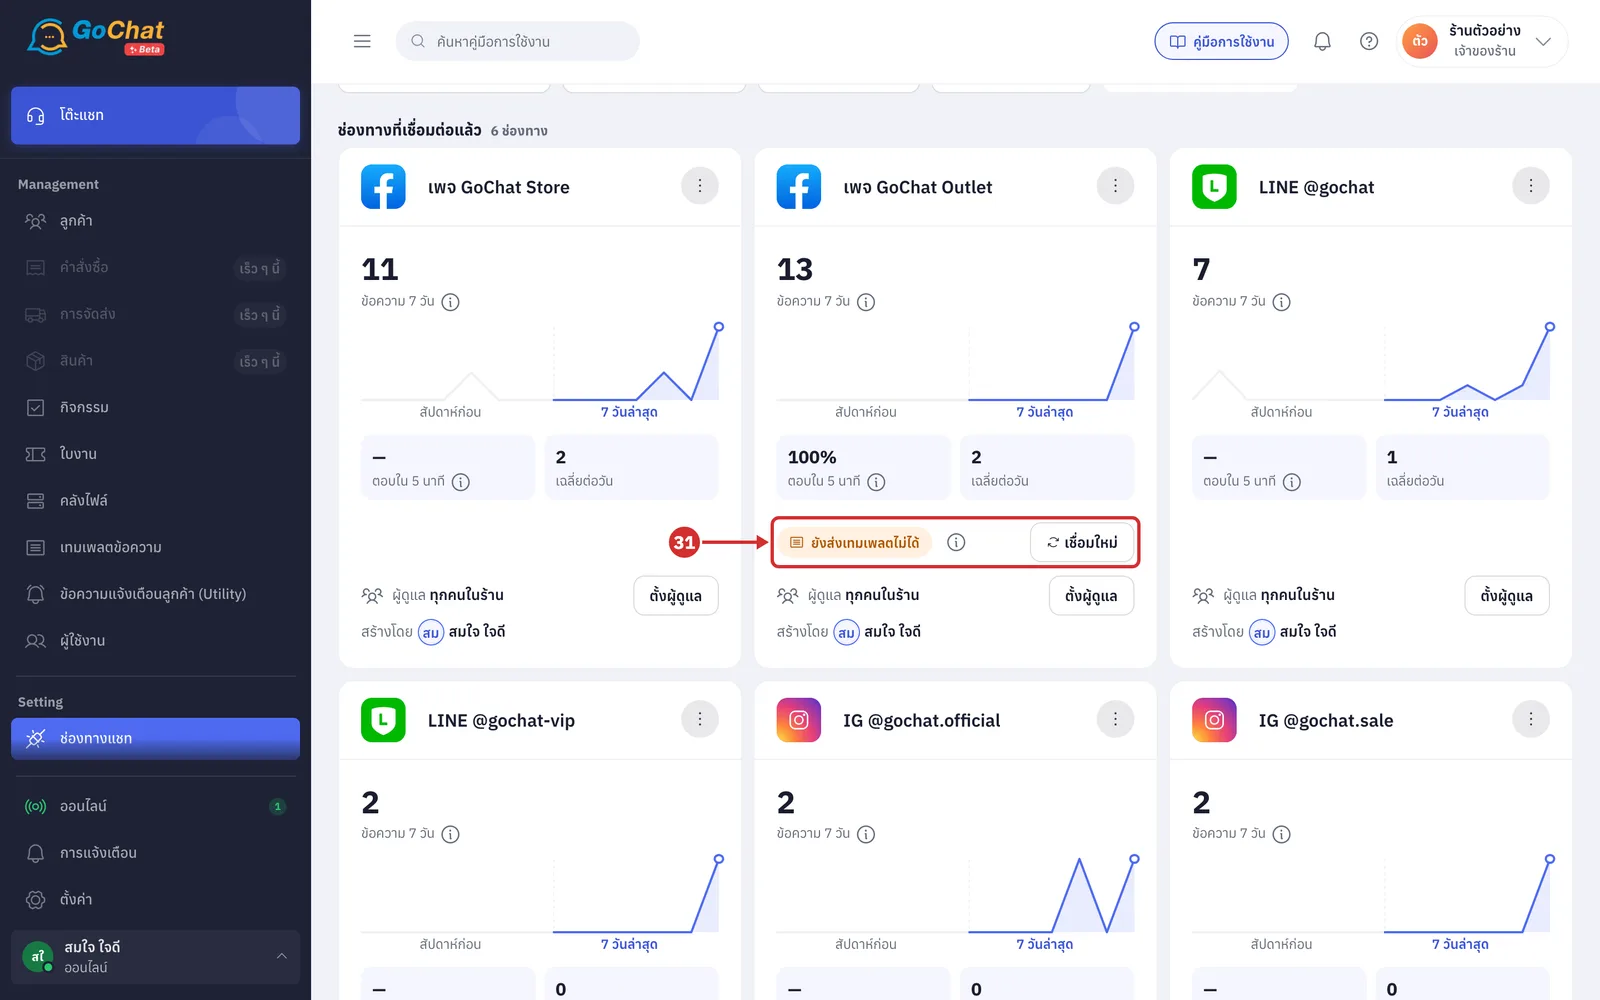
The system takes you to Facebook; follow steps 3–8 again. Facebook asks for the customer notification messages permission again, even if it was declined before; allow it. Back on the Channels page, the page's ยังส่งเทมเพลตไม่ได้ (Cannot send templates yet) row is gone