

Setting up chat order commands
รับออเดอร์จากแชท (Chat orders) lets your sales team type an order as a message in the format your shop sets, such as name, phone, address, product codes and payment method. The bot reads it, works out the total and creates the order in GoSaaS straight away, with an order number and a payment link. It works in 1:1 customer chats, in your sales team's LINE groups, for sales staff who message your page from their own app, and in the page inbox.
It is for shops connected to the GoSaaS order system, and the shop owner and admins can set it up.
Opening chat orders
Go to the บอทตอบกลับอัตโนมัติ (Auto-reply bot) menu under Chat in the left menu
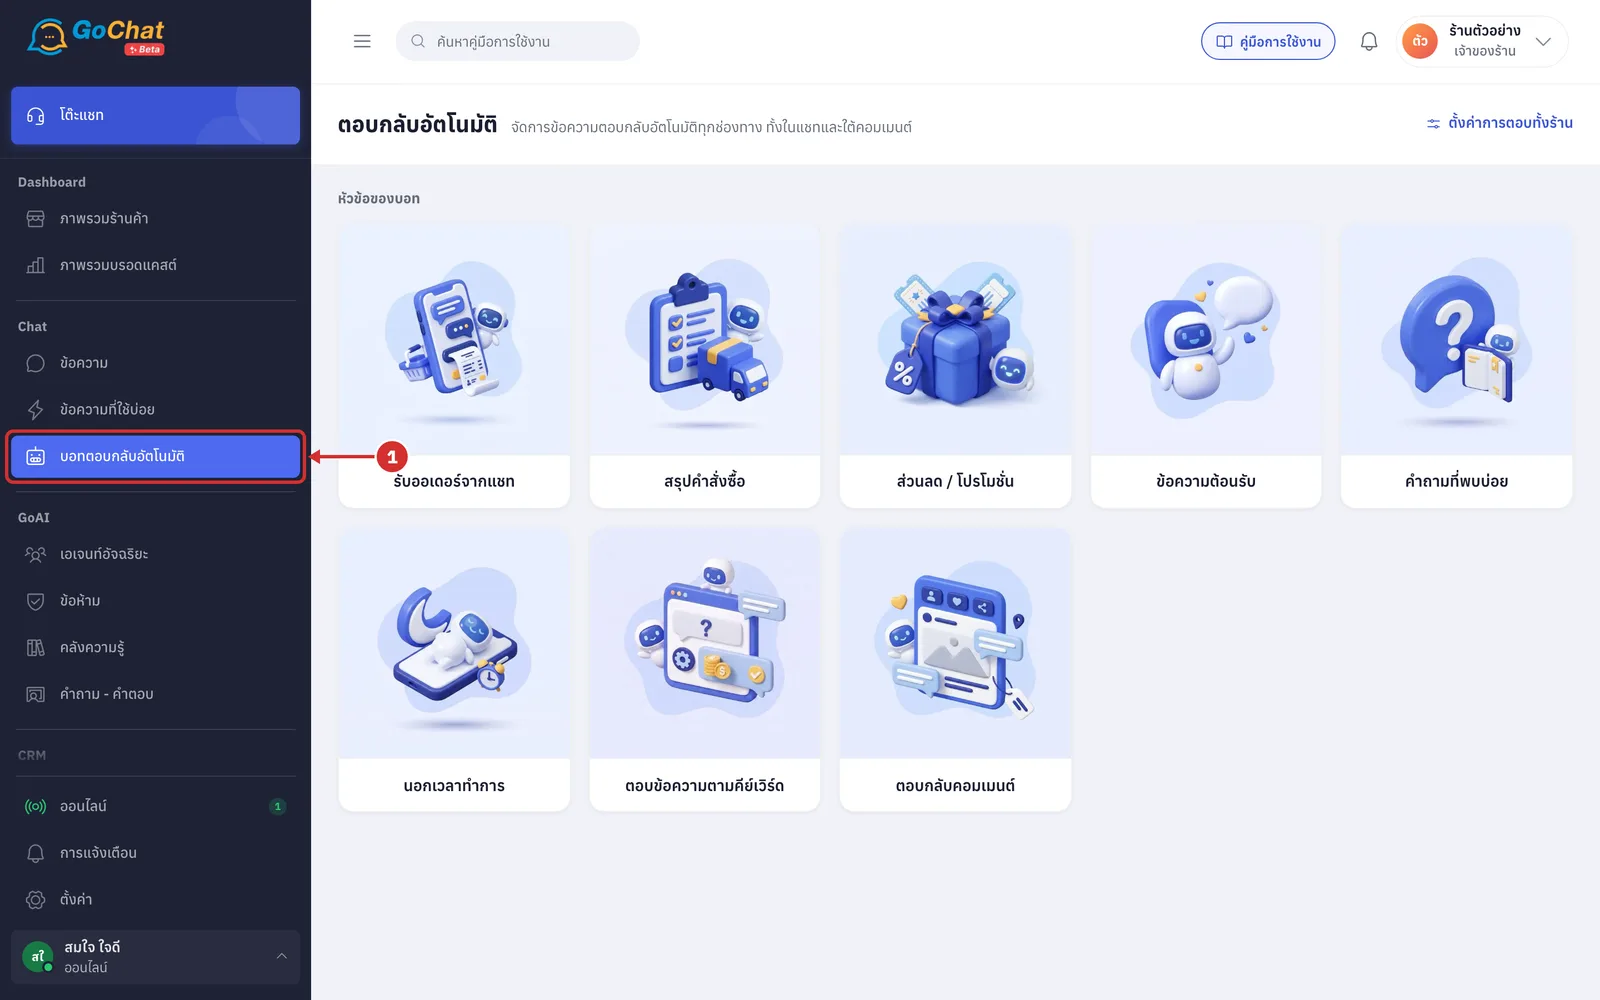
Click the รับออเดอร์จากแชท (Chat orders) card (this card and สรุปคำสั่งซื้อ (Order summary) only appear for shops connected to GoSaaS, because orders are created in GoSaaS)
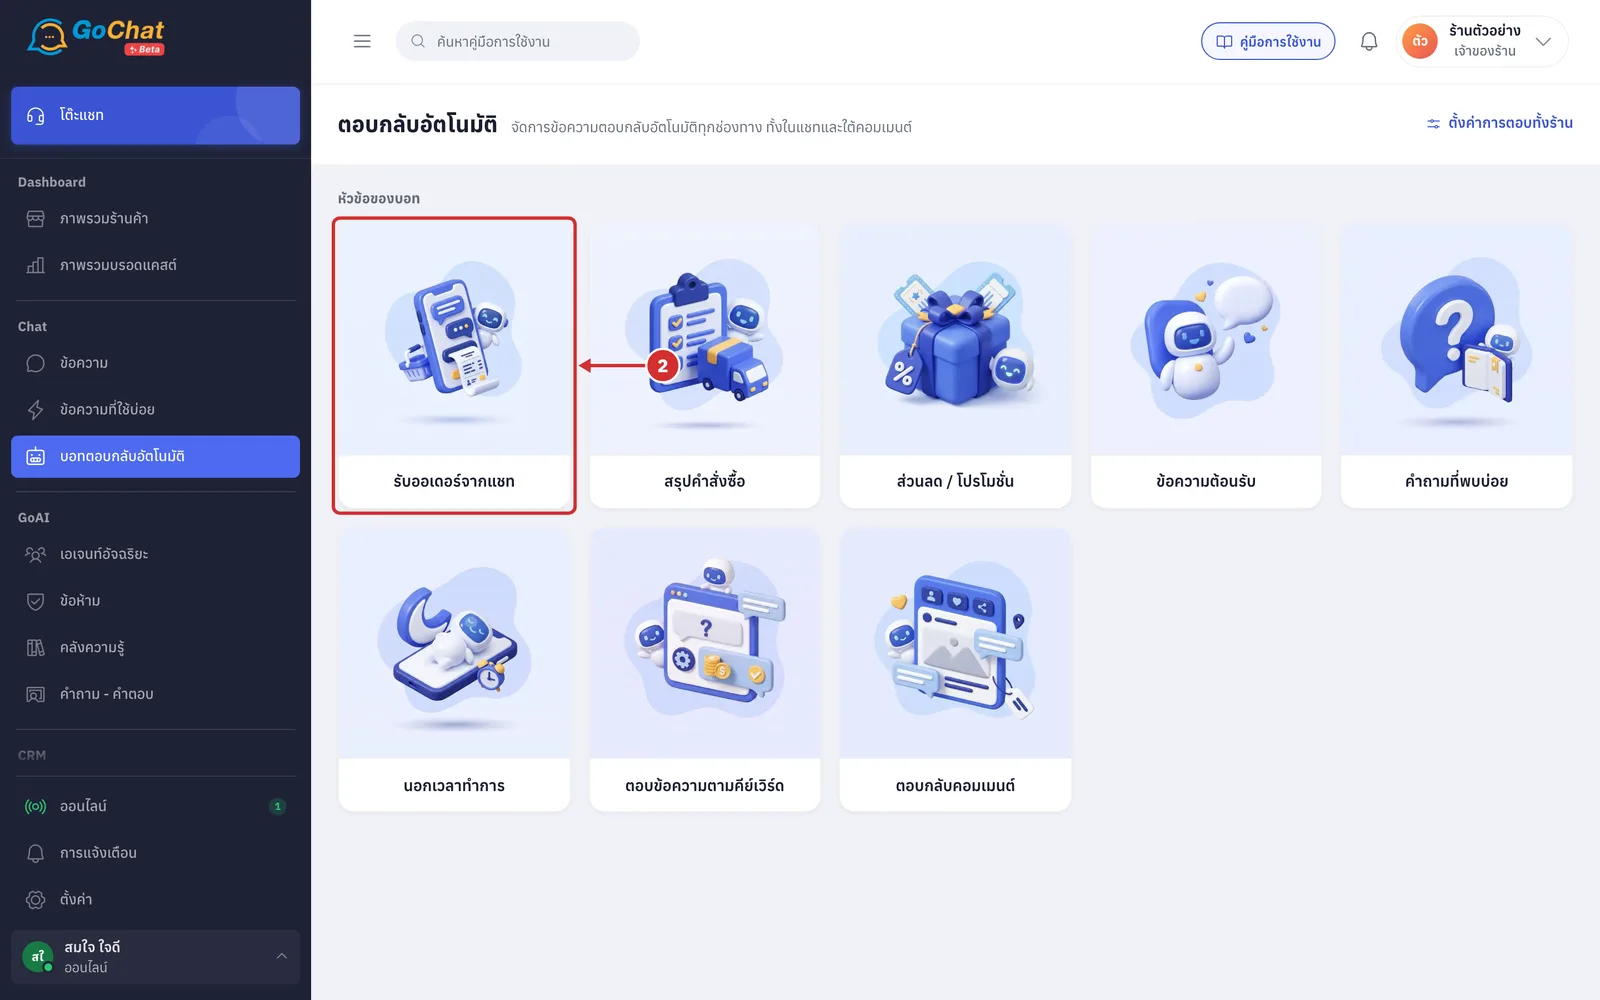
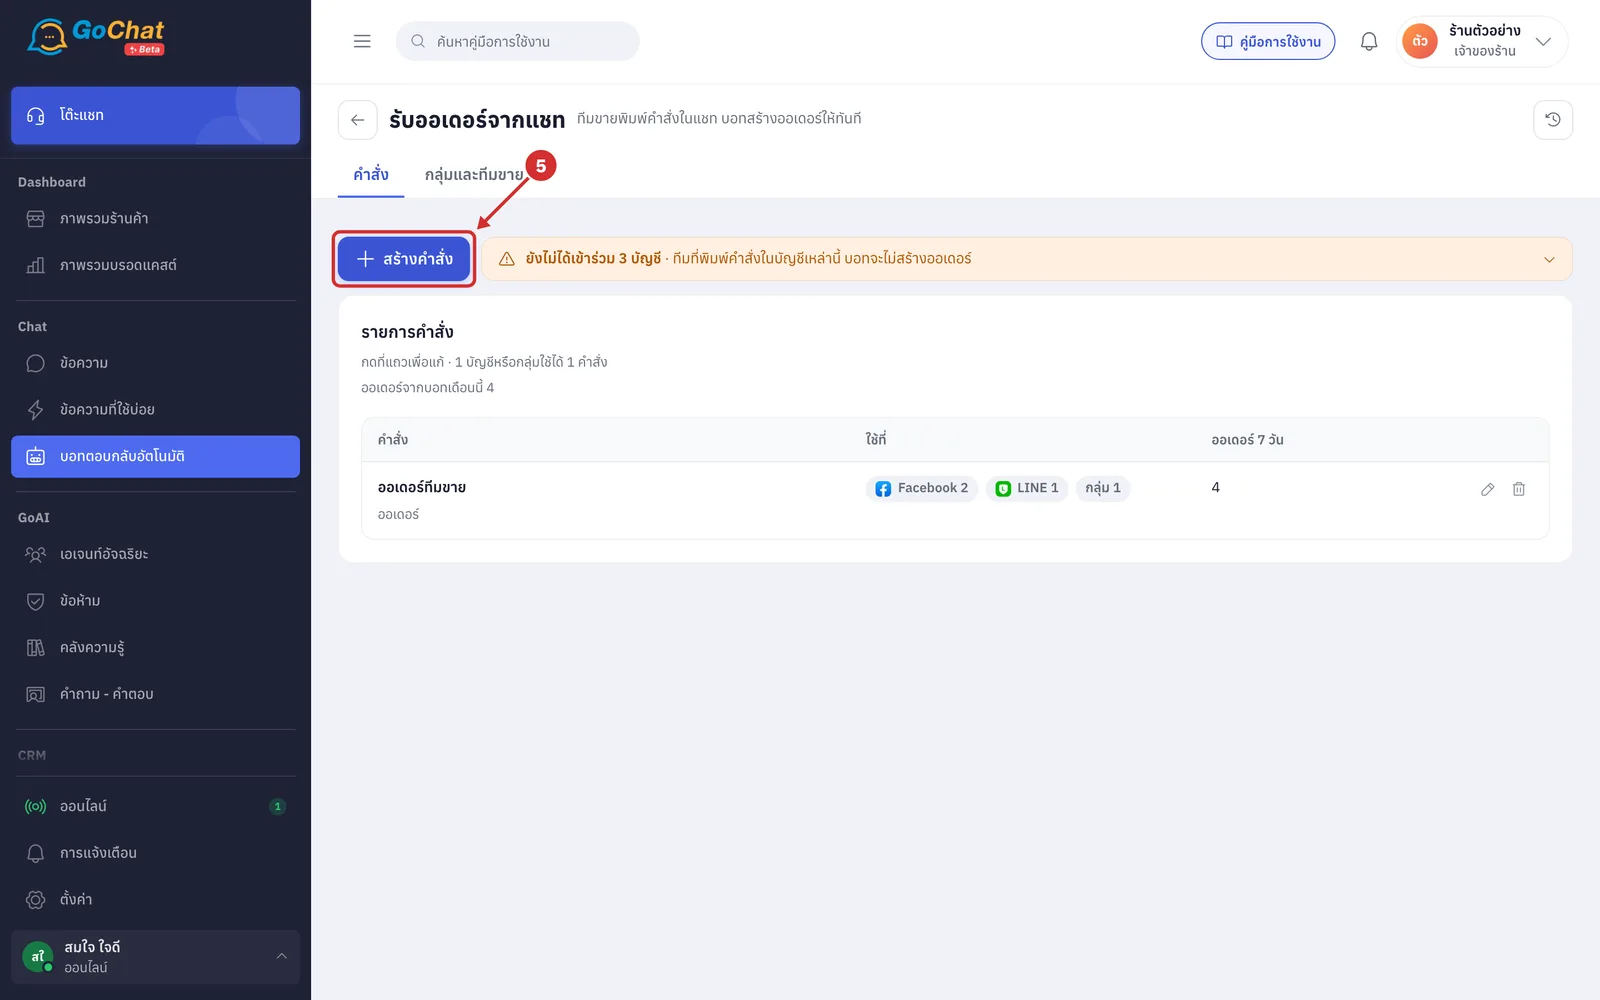
The รับออเดอร์จากแชท (Chat orders) page has these parts
A Tabs switch between 2 tabs
คำสั่ง (Commands): your shop's commands
กลุ่มและทีมขาย (Groups and sales team): LINE groups the bot is in and sales staff who order through private chats, covered in Orders in LINE groups and from the sales team
B สร้างคำสั่ง (Create command) creates a new command
C ยังไม่ได้เข้าร่วม … บัญชี (… accounts not joined) pages or accounts that are not in any command; if the team types commands in them, the bot will not create orders
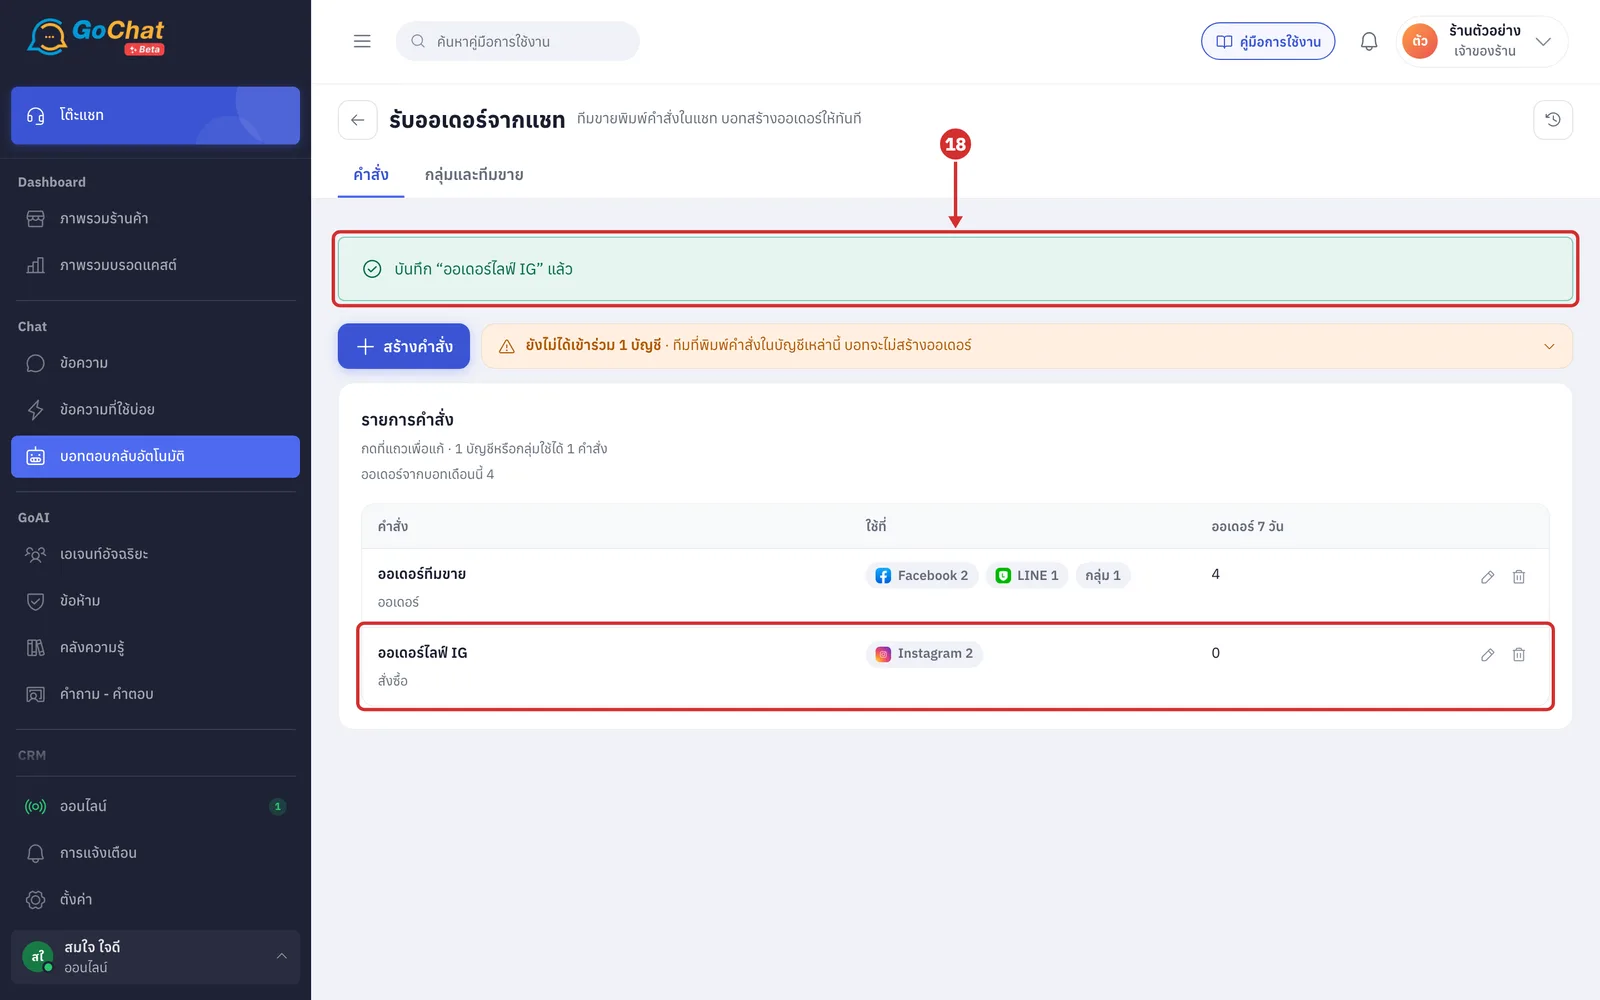
D Command list shows your shop's commands
Each row shows the command name and trigger words
ใช้ที่ (Used in): the pages, accounts and groups that use this command
ออเดอร์ 7 วัน (Orders in 7 days): the number of orders the bot created from this command
The pencil edits and the bin deletes
Commands that are off show ปิดอยู่ (Off)
Above the table, ออเดอร์จากบอทเดือนนี้ (Bot orders this month) counts every command
Each account or group can use 1 command
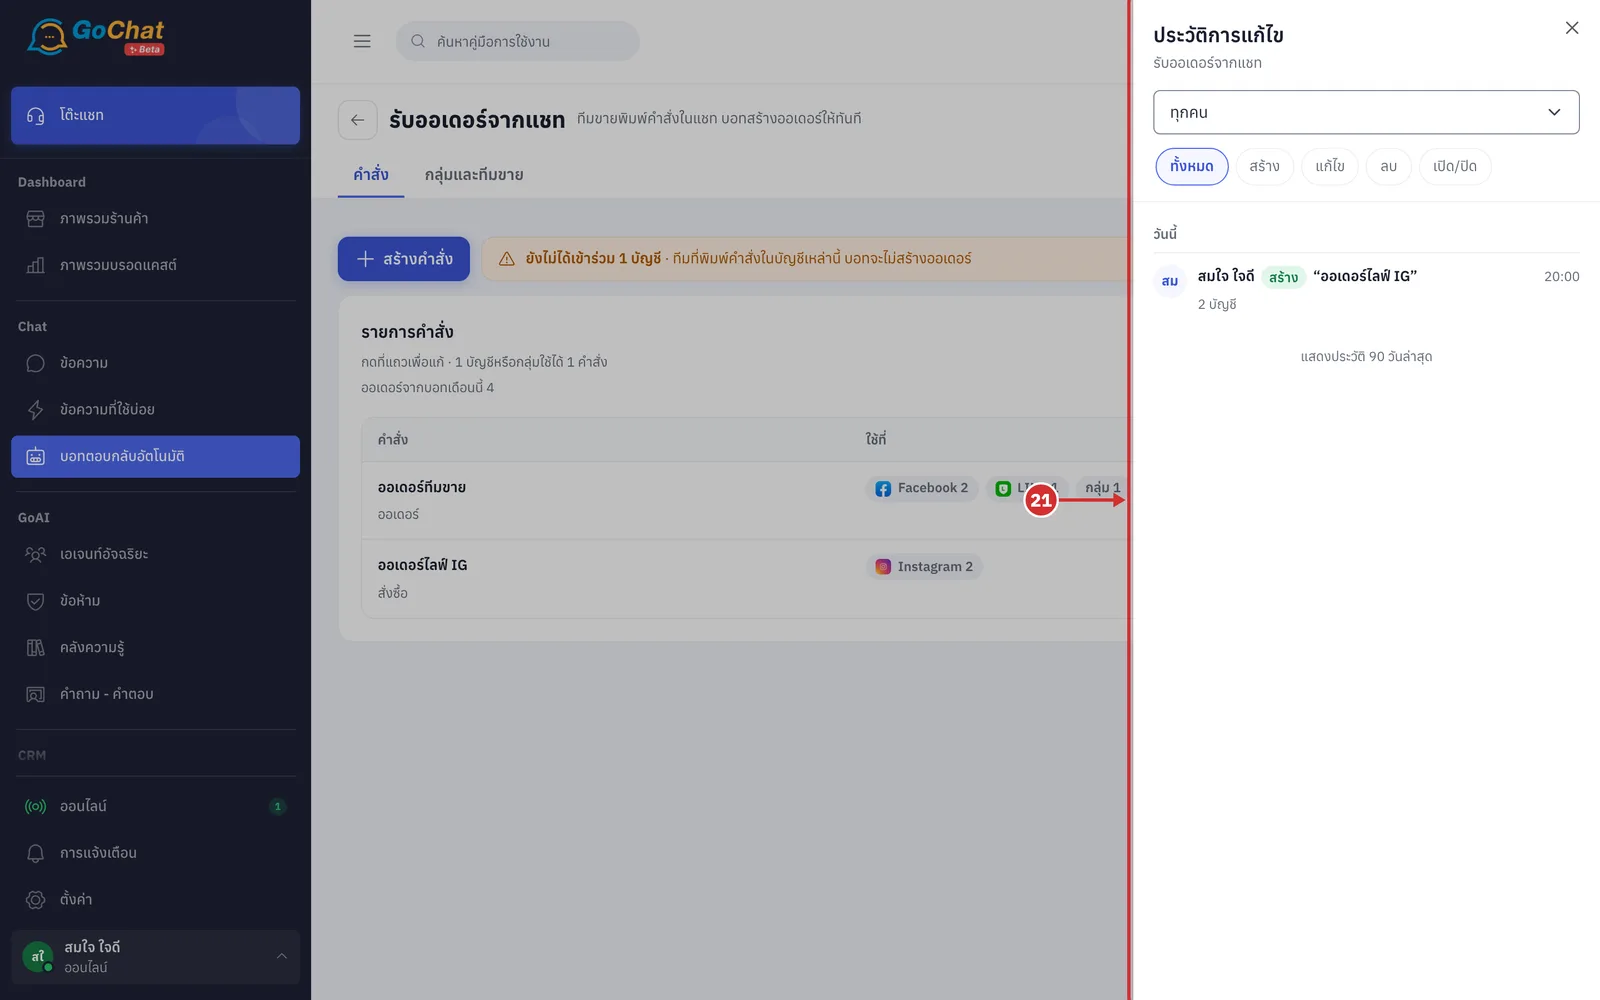
E Edit history shows who changed which command and when
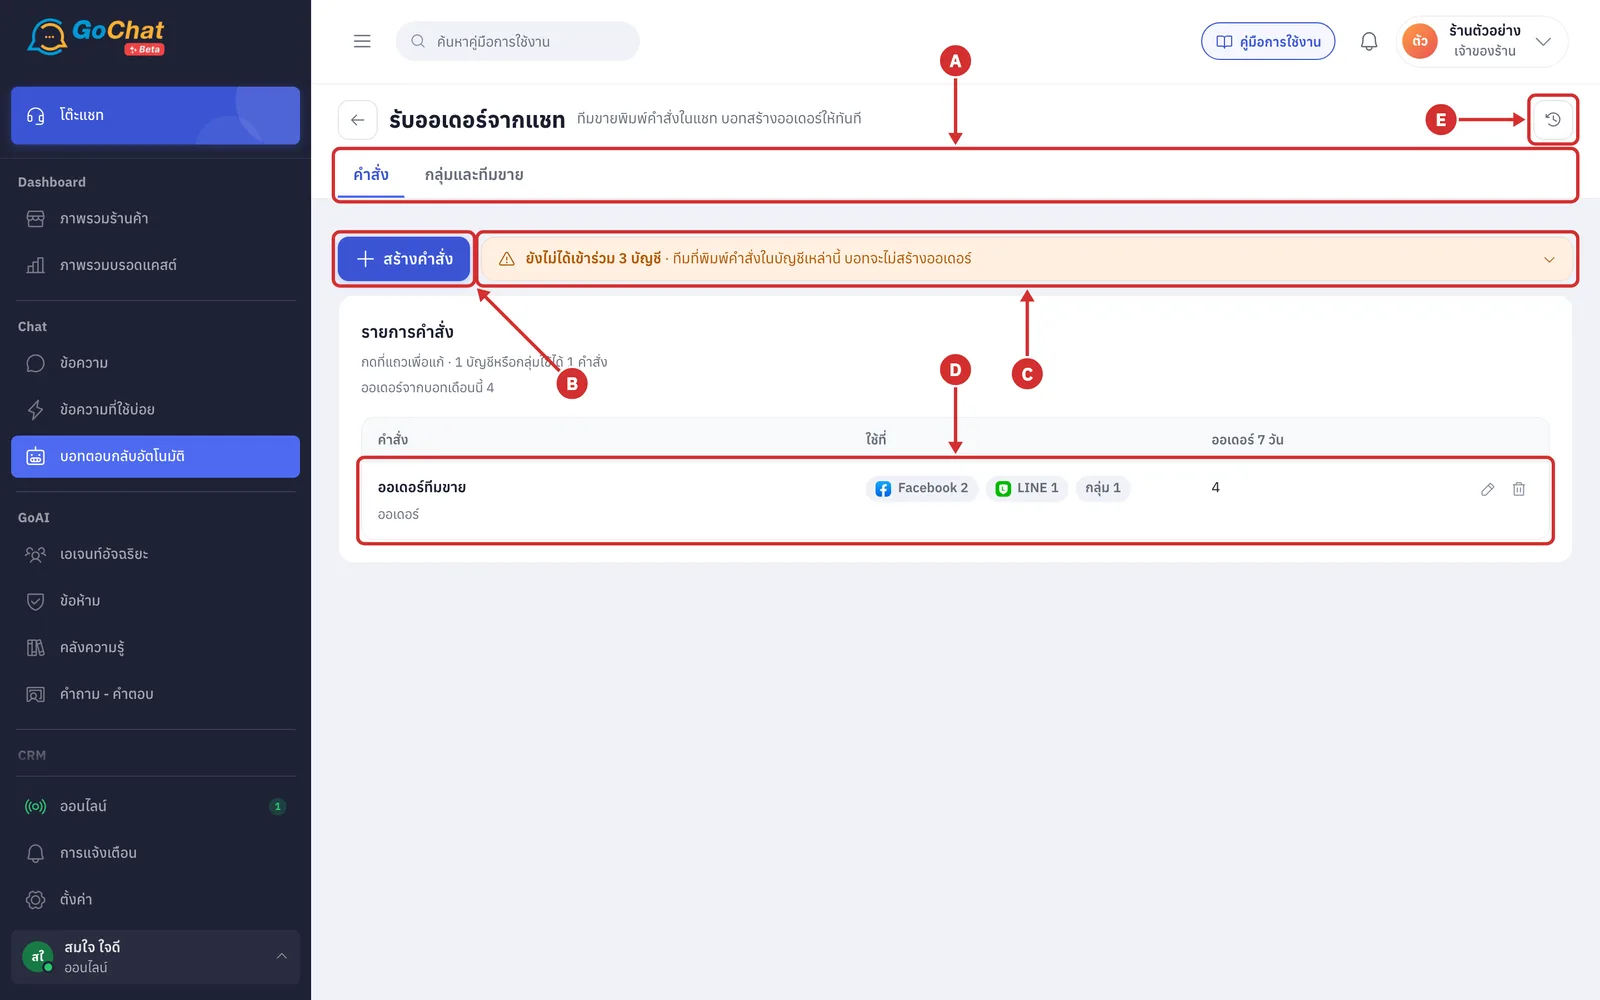
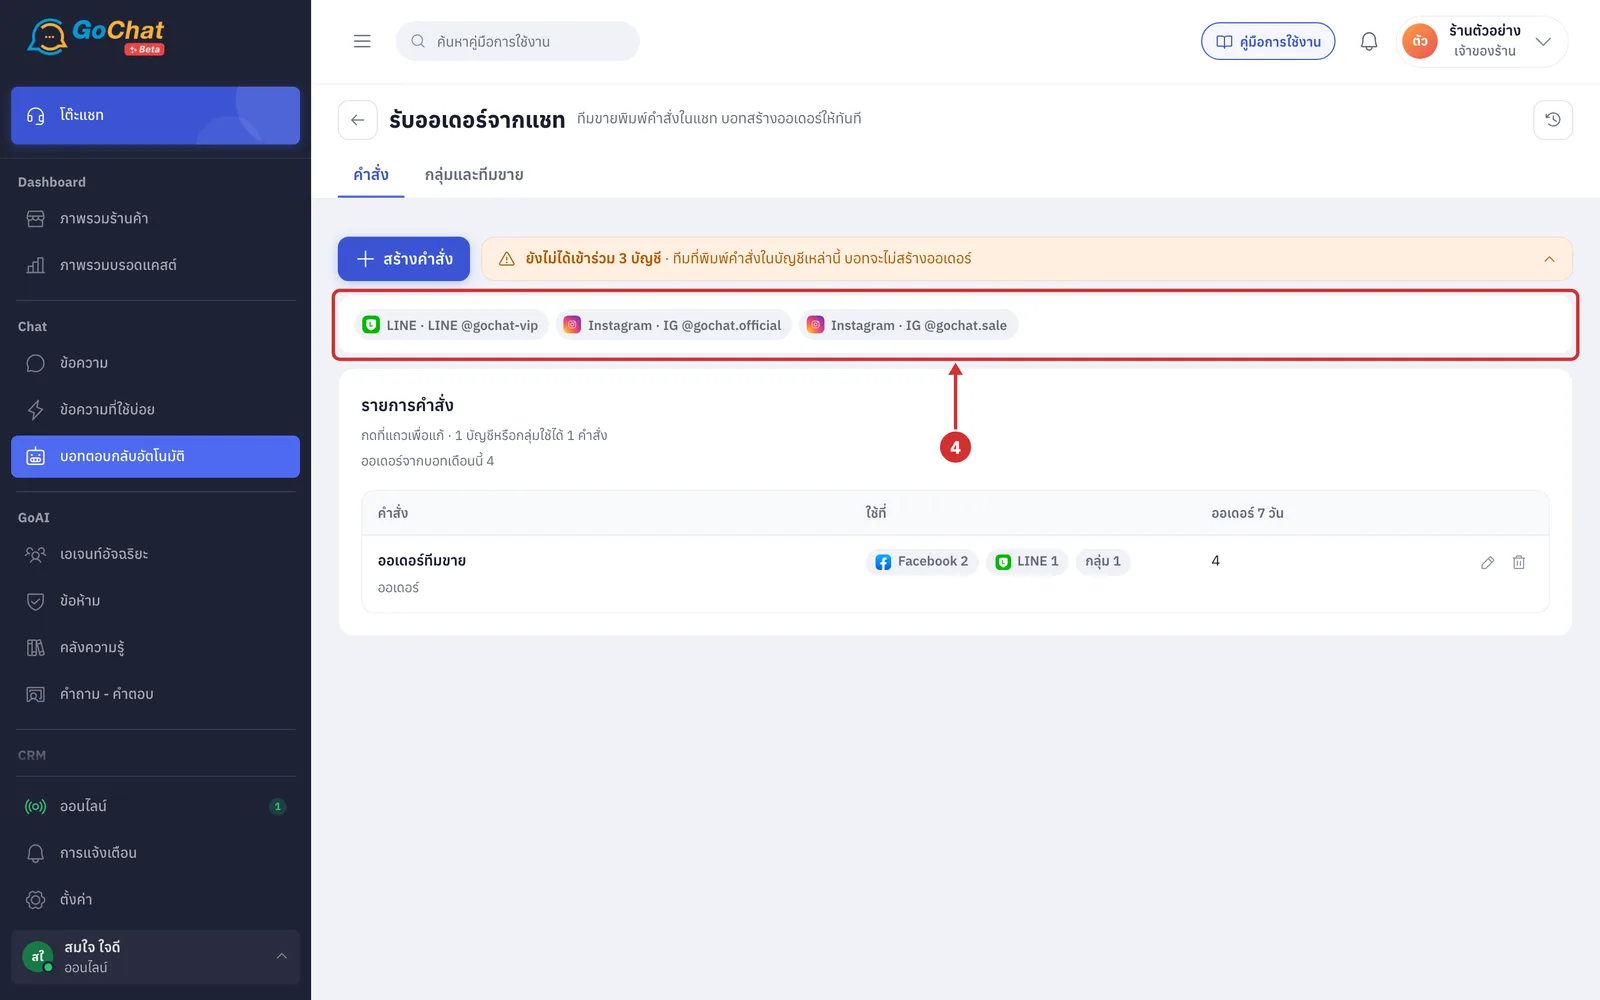
Click the ยังไม่ได้เข้าร่วม … บัญชี (… accounts not joined) bar to see the pages and accounts that do not use a command yet
Click again to hide the list
You can add these accounts to a command in step 1 of the command
Creating a command
Click สร้างคำสั่ง (Create command)
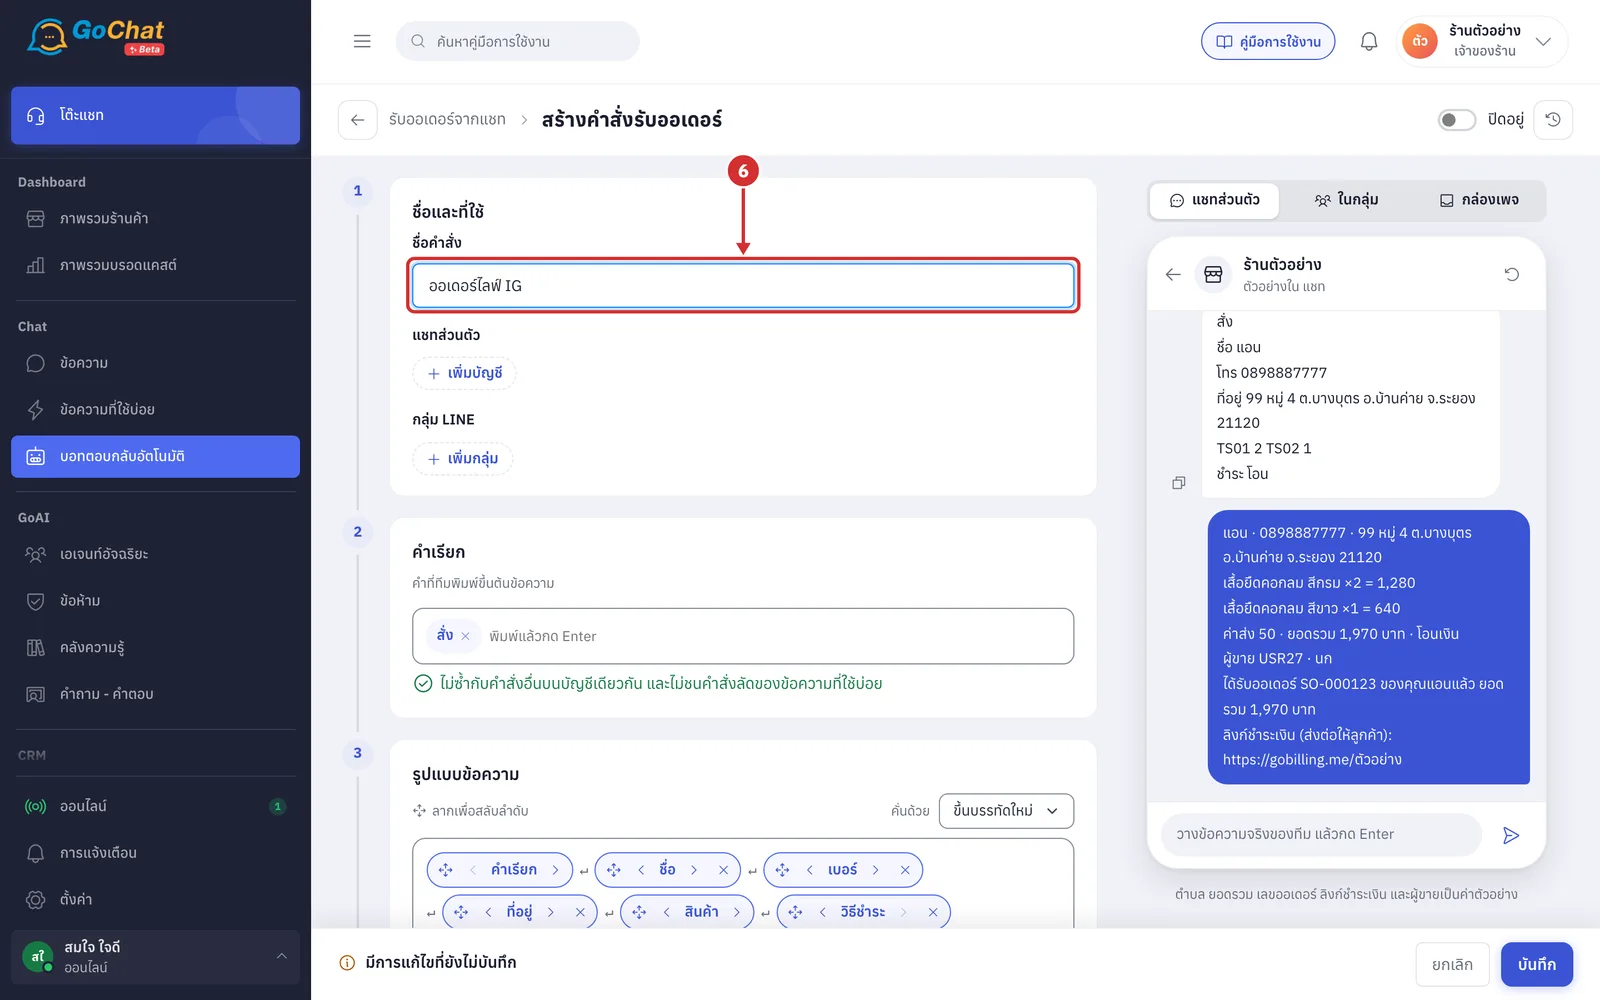
In step 1 ชื่อและที่ใช้ (Name and where), type a name your team will recognise in ชื่อคำสั่ง (Command name), such as ออเดอร์ไลฟ์ IG (IG live orders) (the team sees it in settings and history; customers never see it)
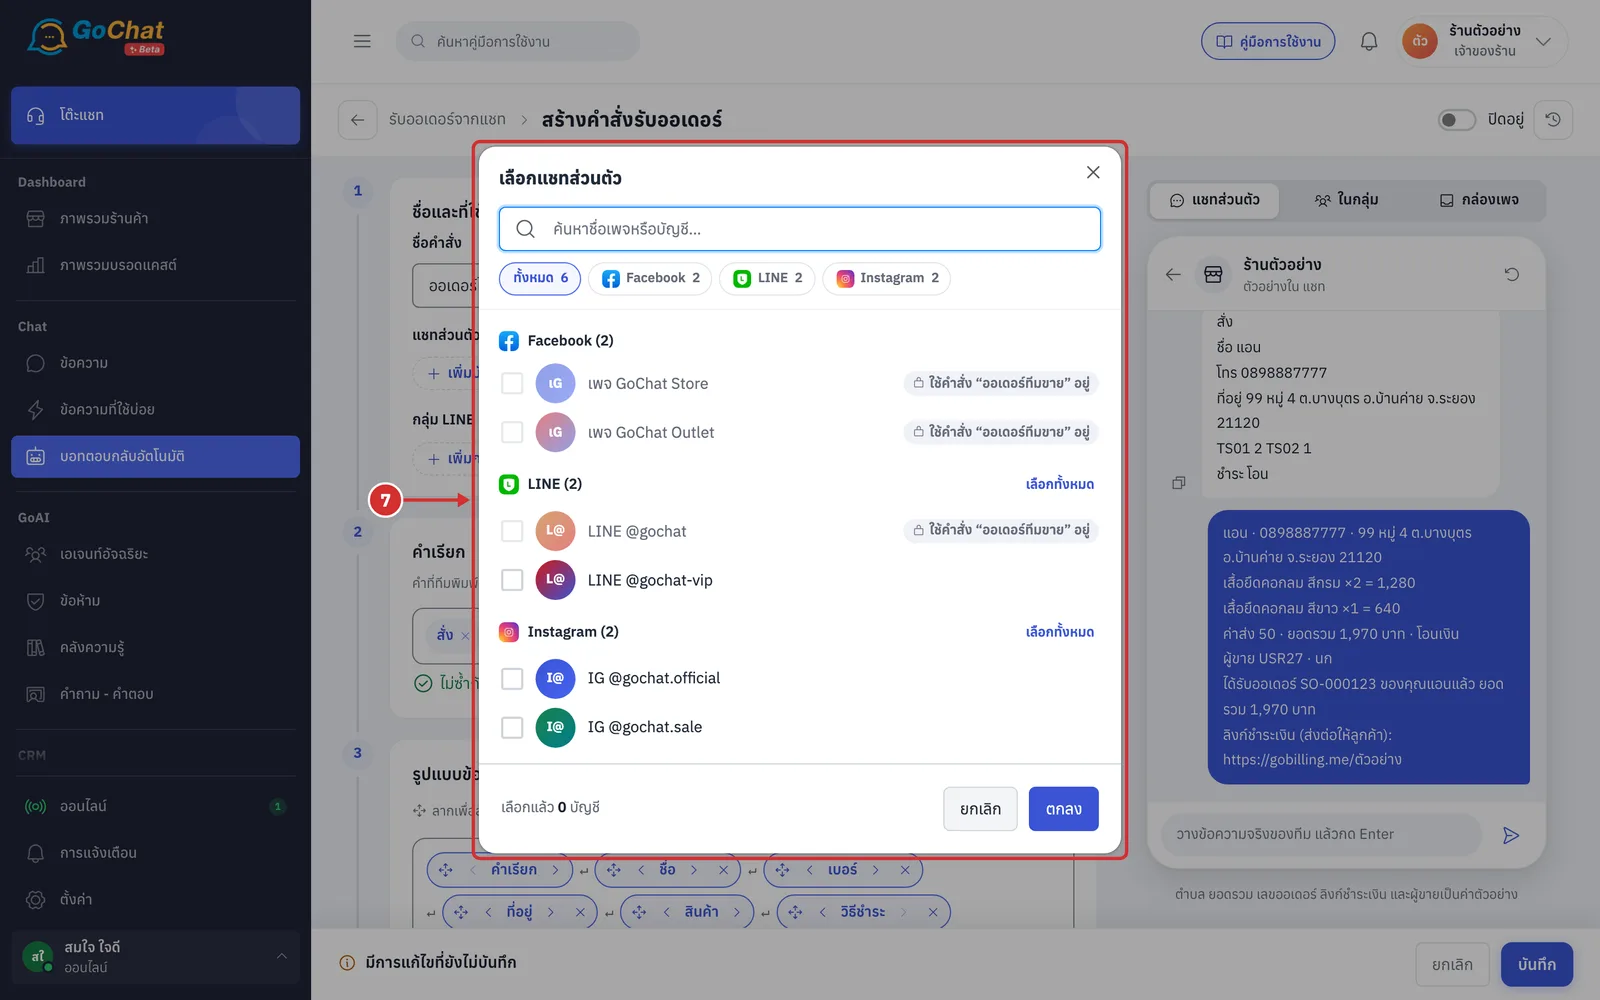
Under แชทส่วนตัว (Private chats), click + เพิ่มบัญชี (+ Add account). The เลือกแชทส่วนตัว (Choose private chats) window lists your shop's Facebook pages, LINE OA accounts and Instagram accounts
Search by name or use the platform buttons at the top to filter
Tick the accounts that can use this command, or use เลือกทั้งหมด (Select all) for a platform, then click ตกลง (OK)
Accounts labelled ใช้คำสั่ง “…” อยู่ (Uses command “…”) cannot be picked, because each account can use 1 command
The chosen accounts appear as chips with a count (click × to remove one). In these accounts
Admins can type commands in customer chats from Meta Business Suite (Facebook pages and Instagram)
Sales staff your shop has linked can type commands from their own app
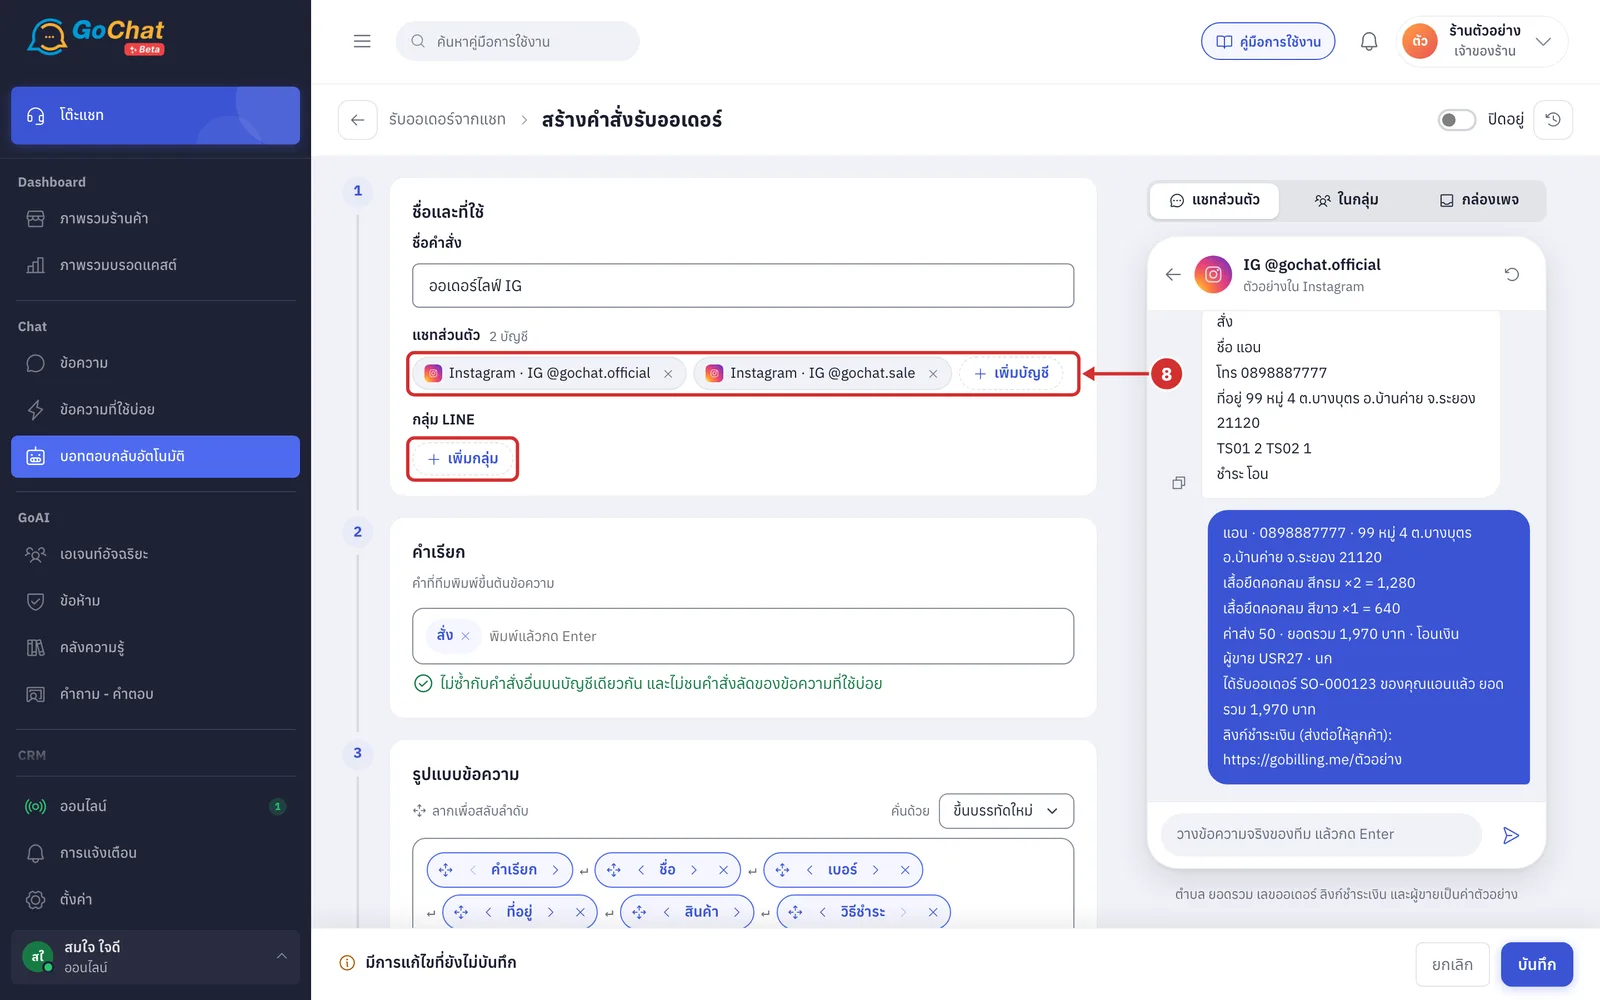
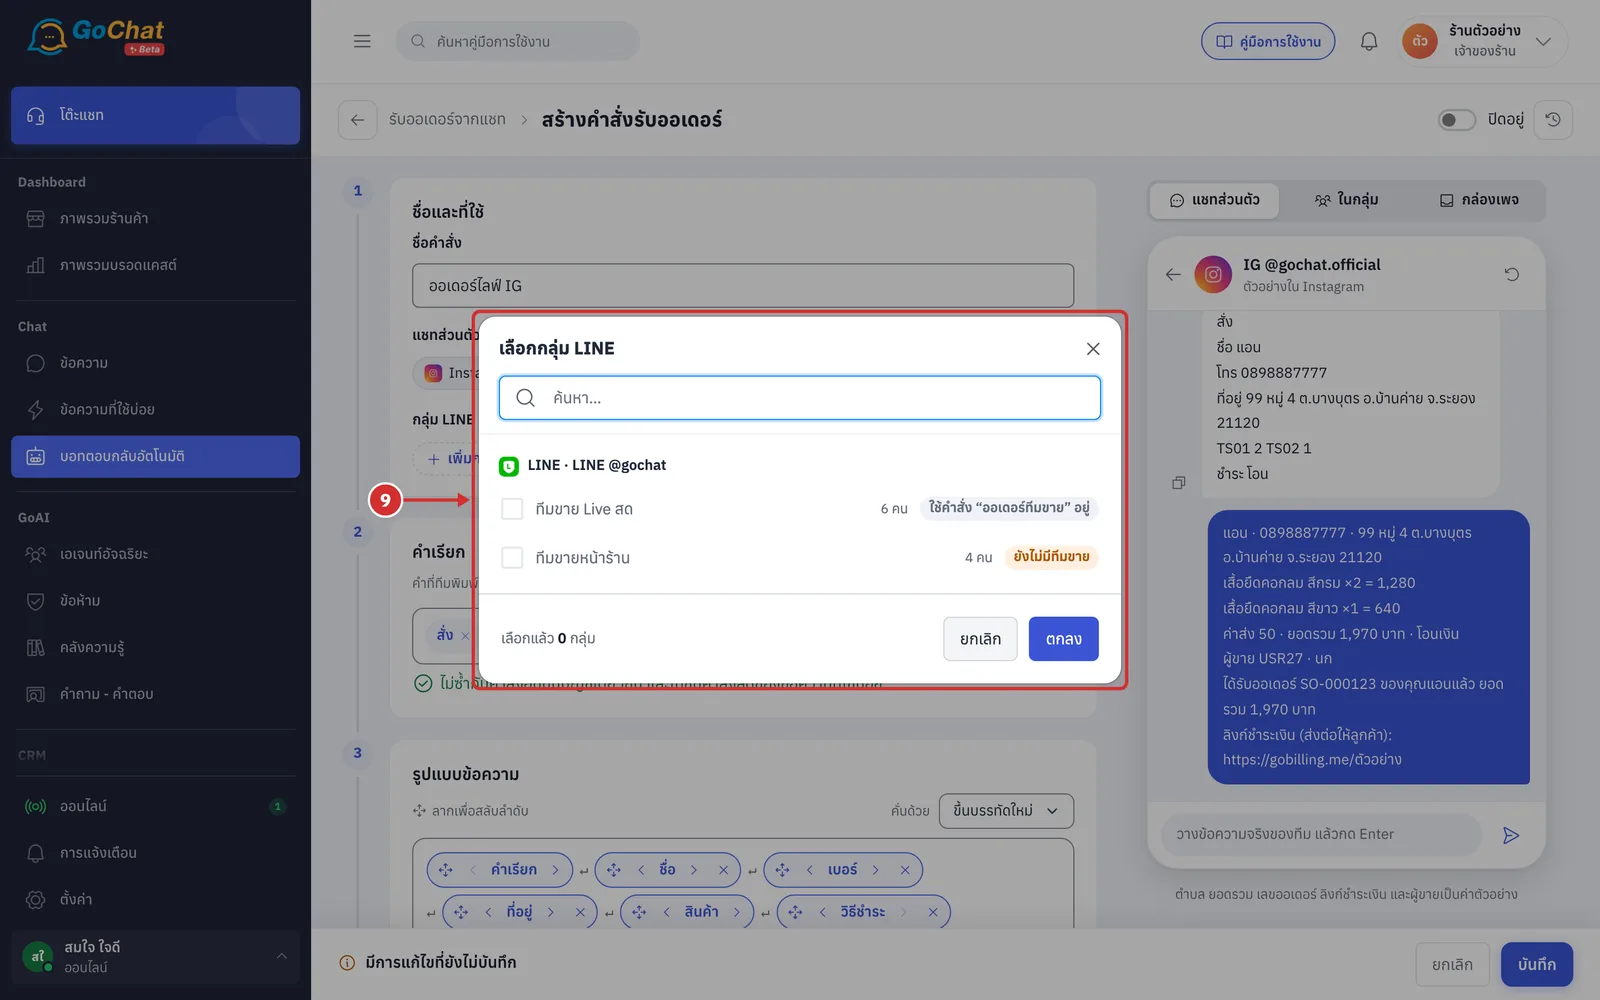
Under กลุ่ม LINE (LINE groups), click + เพิ่มกลุ่ม (+ Add group) to choose your sales team's LINE groups that the bot is in, then click ตกลง (OK)
The team can type commands in the chosen groups
Each group shows its member count
ยังไม่มีทีมขาย (No sellers yet) means nobody has been picked as a seller on the group page, so the command cannot be used there yet
A group appears in the list once your shop's LINE OA has been invited into it
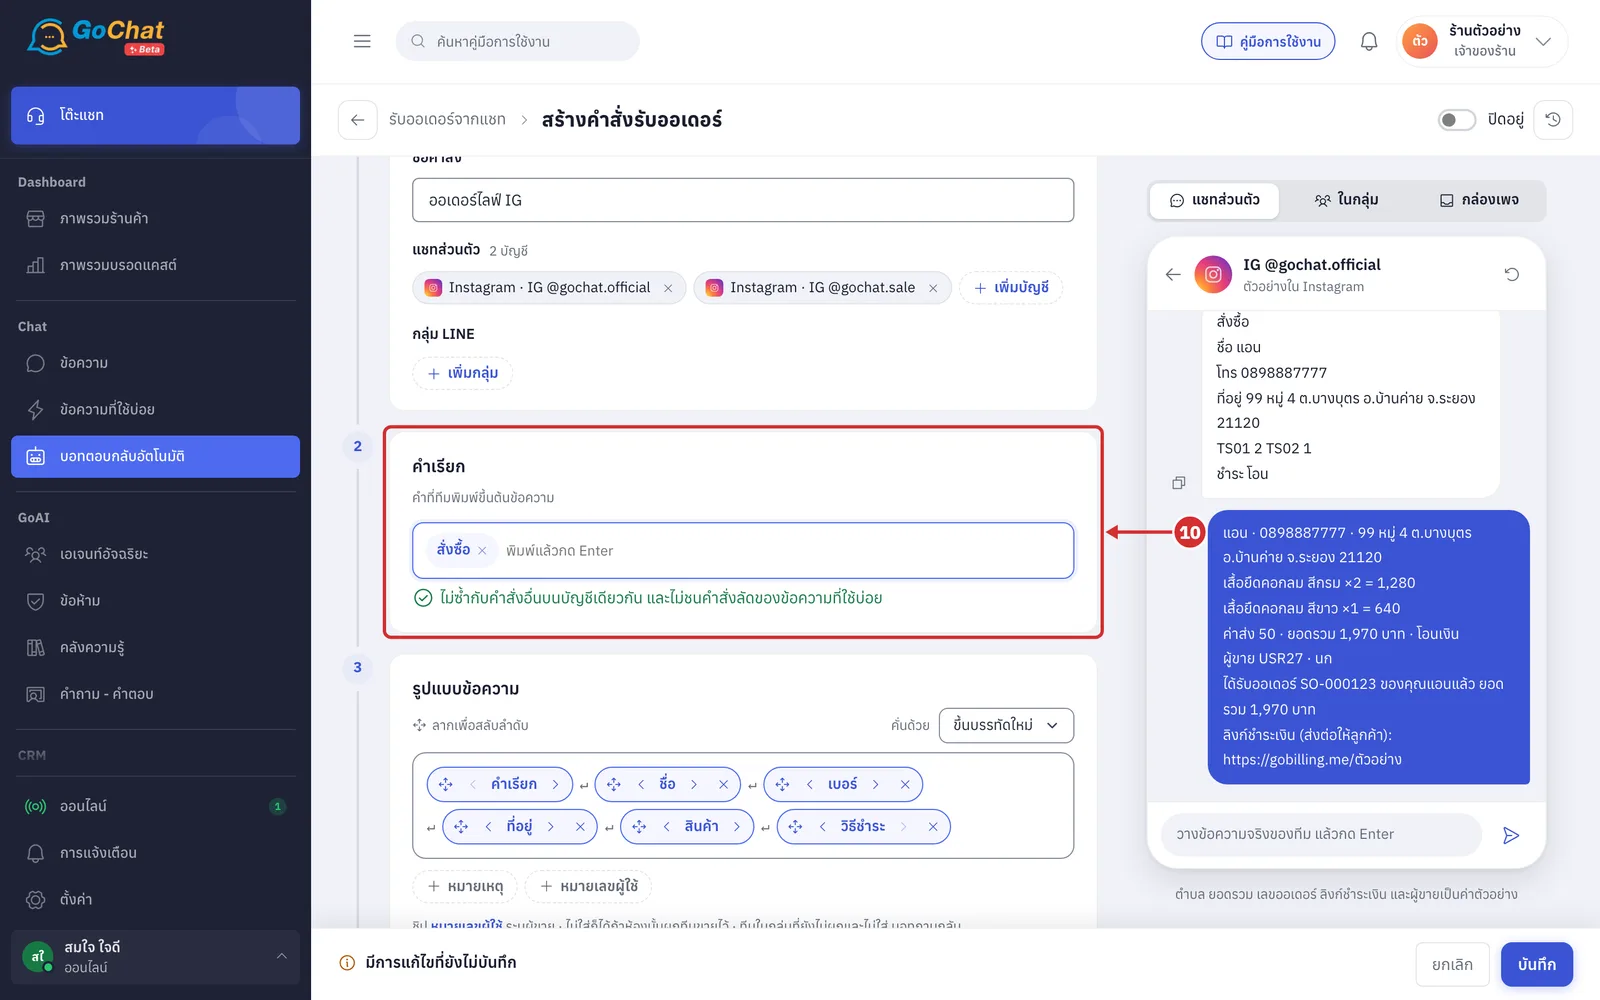
In step 2 คำเรียก (Trigger words), type the word your team types at the start of an order message, such as สั่งซื้อ (order), then press Enter
A new command comes with สั่ง (order) filled in; click × on a word to remove it
You can add several words, up to 10
It checks straight away that the word is ไม่ซ้ำกับคำสั่งอื่นบนบัญชีเดียวกัน และไม่ชนคำสั่งลัดของข้อความที่ใช้บ่อย (not used by another command on the same account and not clashing with saved reply shortcuts)
ยืนยัน, ok, ยกเลิก, แก้ไข and /report cannot be triggers, because the bot uses them to talk to the team
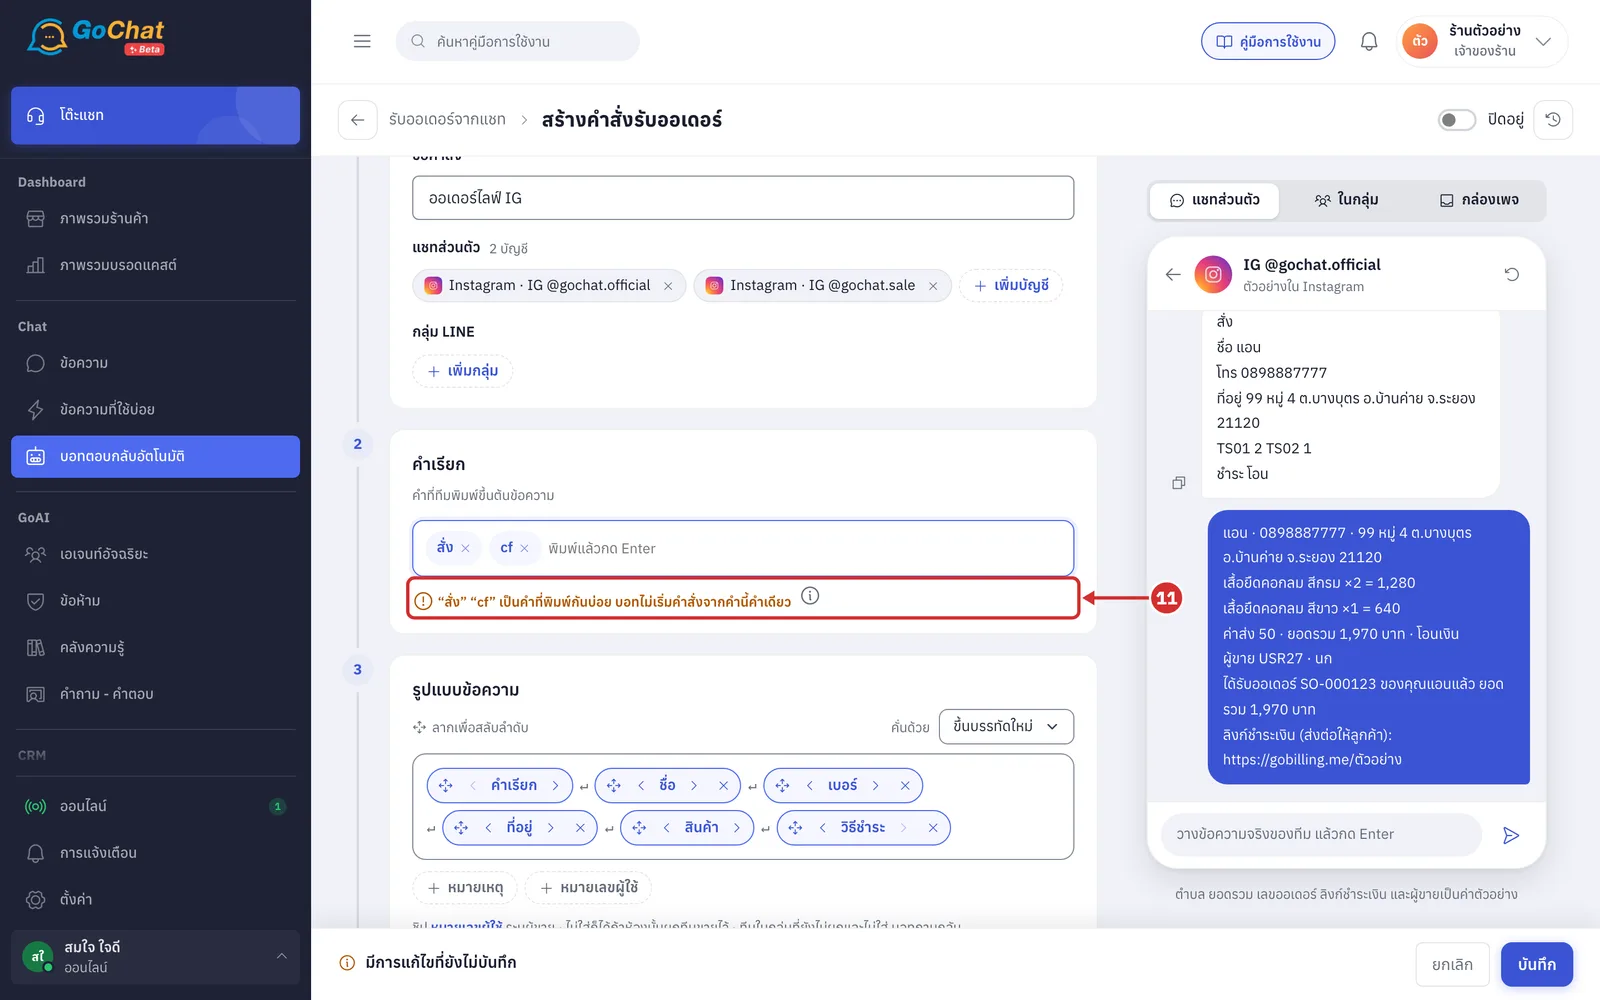
If a trigger is a word people type a lot in normal chats, such as cf, สั่ง, โอน or ซื้อ, it warns … เป็นคำที่พิมพ์กันบ่อย บอทไม่เริ่มคำสั่งจากคำนี้คำเดียว (… is a common word; the bot will not start a command from this word alone)
The bot starts a command when the trigger is in its place in the format and at least one readable detail is there, such as a product code, phone number, postcode, payment method or a name with a prefix like “ชื่อ แอน” or “คุณแอน”
Click (i) for the rule
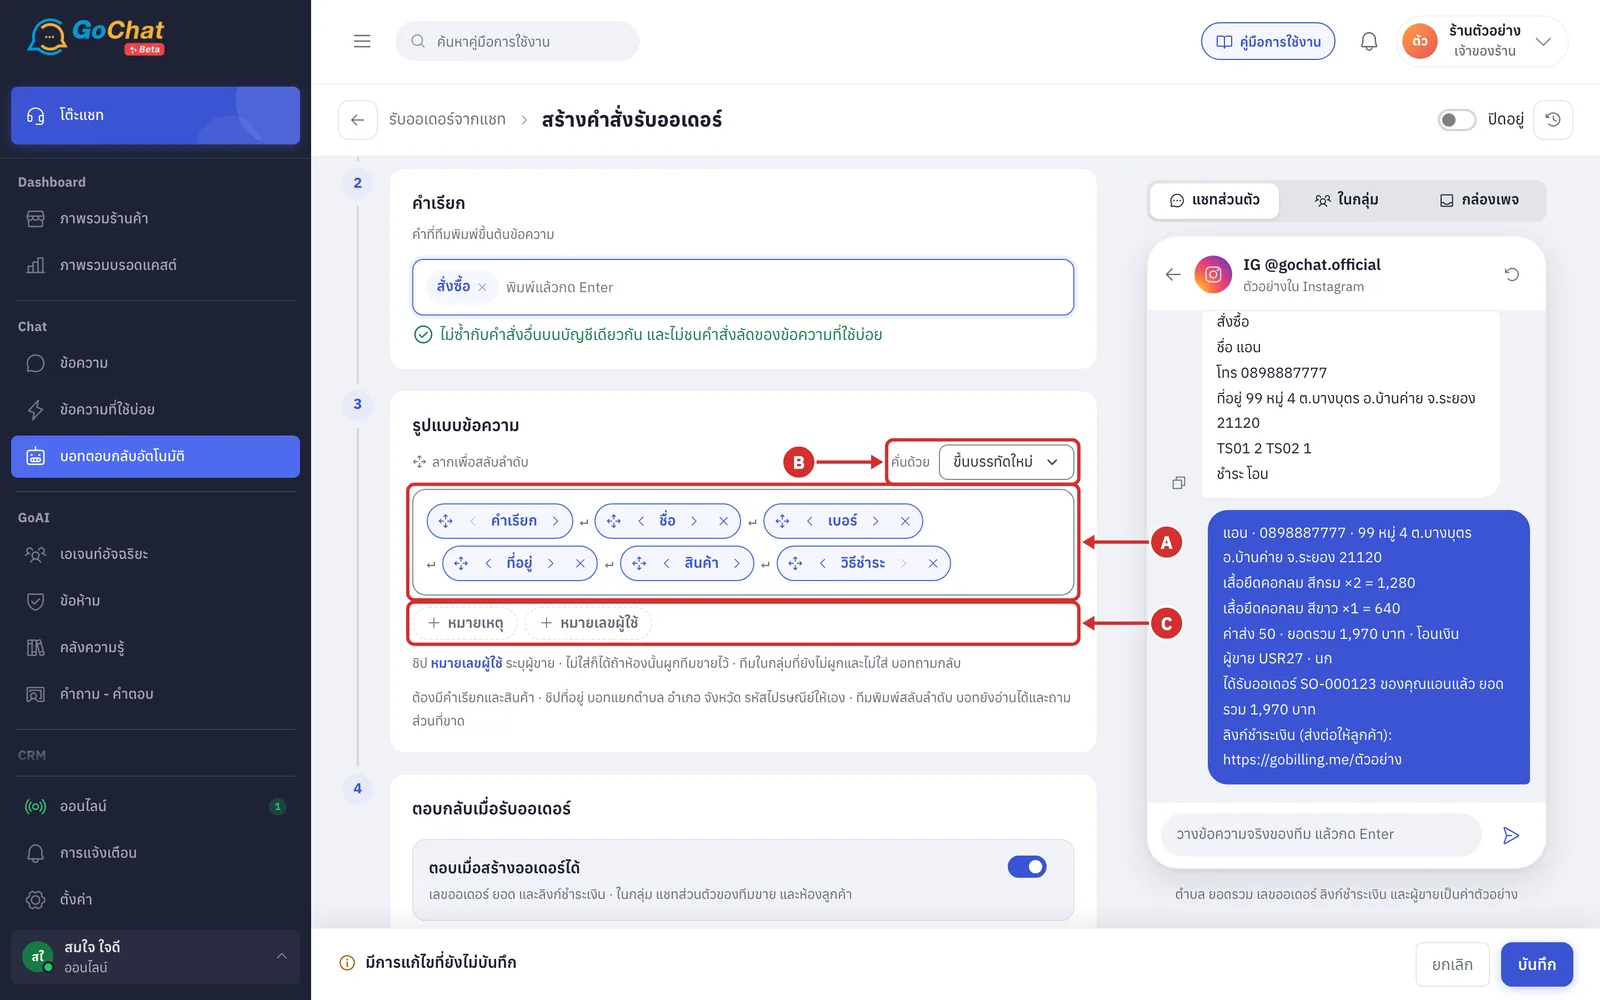
In step 3 รูปแบบข้อความ (Message format), set the order your team types the details in
A Detail order chips in the order the team types them; drag a chip or use ‹ › to reorder, and × to remove
คำเรียก (Trigger) and สินค้า (Products) are always required
For ที่อยู่ (Address), the bot splits subdistrict, district, province and postcode by itself
If the team types things out of order, the bot still reads them and asks for what is missing
B คั่นด้วย (Separated by) chooses what goes between details
ขึ้นบรรทัดใหม่ (New line, default)
เว้นวรรค (Space)
จุลภาค ( , ) (Comma)
ขีดล่าง ( _ ) (Underscore)
C Add details click the remaining chips to add them to the format, such as
หมายเหตุ (Note): text printed on the label
หมายเลขผู้ใช้ (User number): the seller's GoSaaS user code such as USR27; optional when the chat is linked to a seller, and group members who are not linked and leave it out get asked by the bot
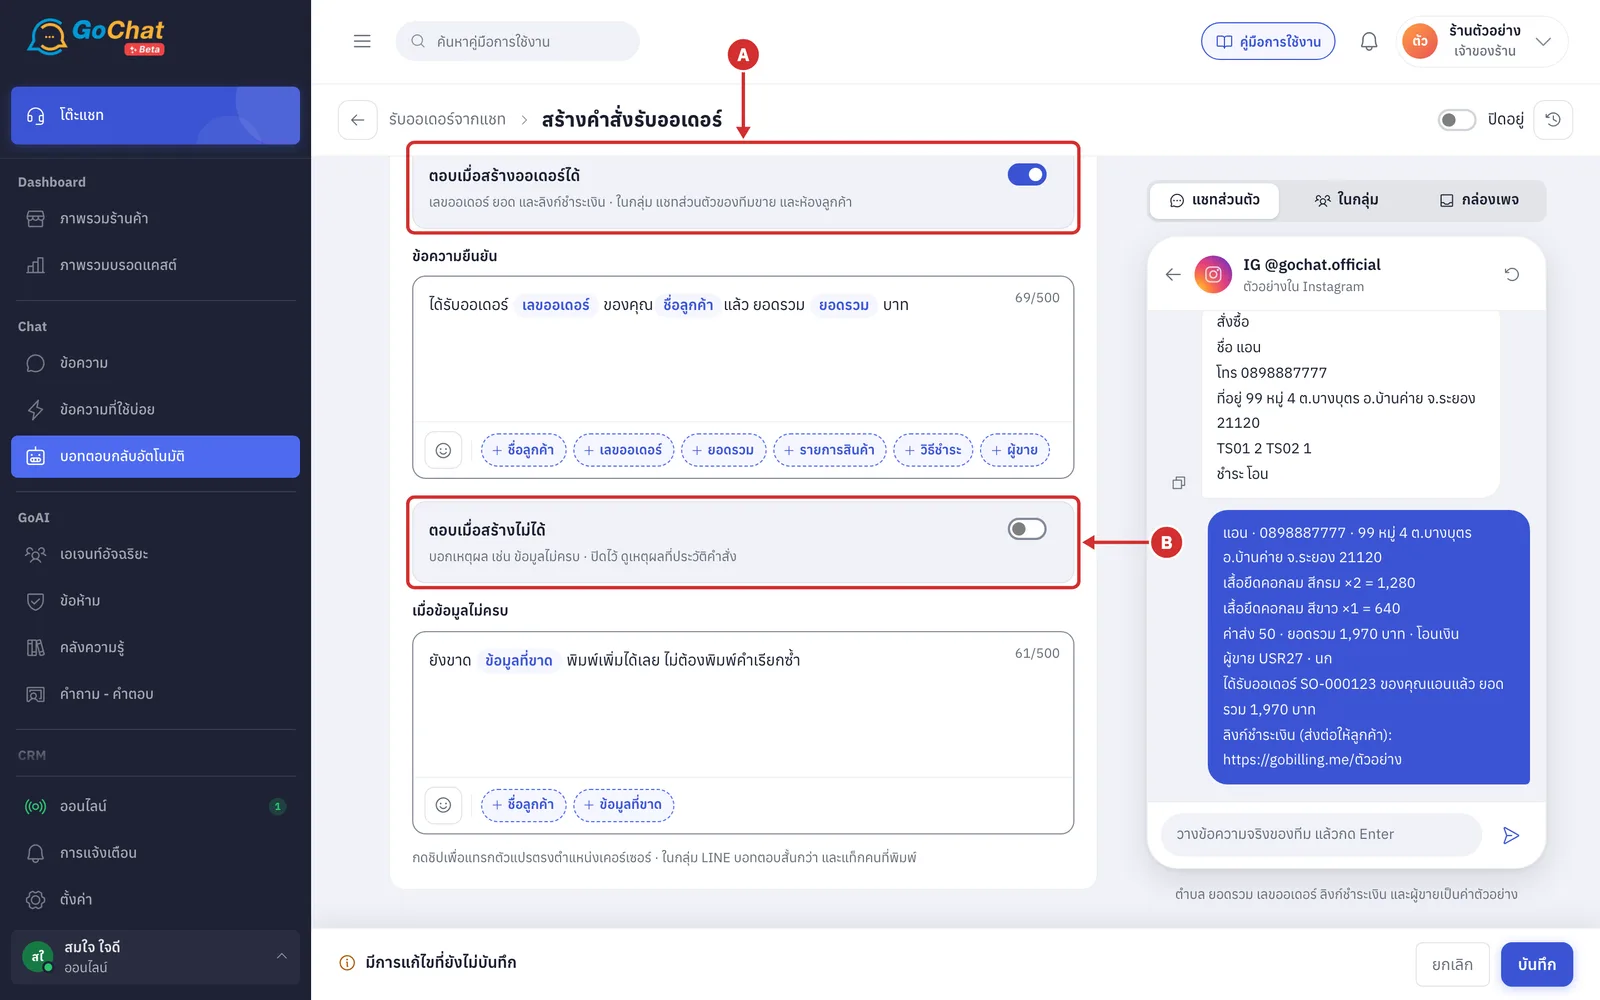
In step 4 ตอบกลับเมื่อรับออเดอร์ (Replies), set what the bot replies
A ตอบเมื่อสร้างออเดอร์ได้ (Reply when the order is created)
When on, the bot replies with the order number, total and payment link in groups, sales staff private chats and customer chats
You can edit ข้อความยืนยัน (Confirmation message) (default: ได้รับออเดอร์ {เลขออเดอร์} ของคุณ{ชื่อลูกค้า}แล้ว ยอดรวม {ยอดรวม} บาท — Order {order number} for {customer name} received, total {total} baht)
Click variable chips such as order number, total, item list, payment method or seller to insert them at the cursor
B ตอบเมื่อสร้างไม่ได้ (Reply when it cannot be created)
When on, the bot gives the reason, such as missing details
When off, the bot stays quiet and you can see the reason in the command history
เมื่อข้อมูลไม่ครบ (When details are missing) uses {ข้อมูลที่ขาด} (missing details) to say what to add
Each message can be up to 500 characters
In LINE groups the bot replies more briefly and tags the person who typed
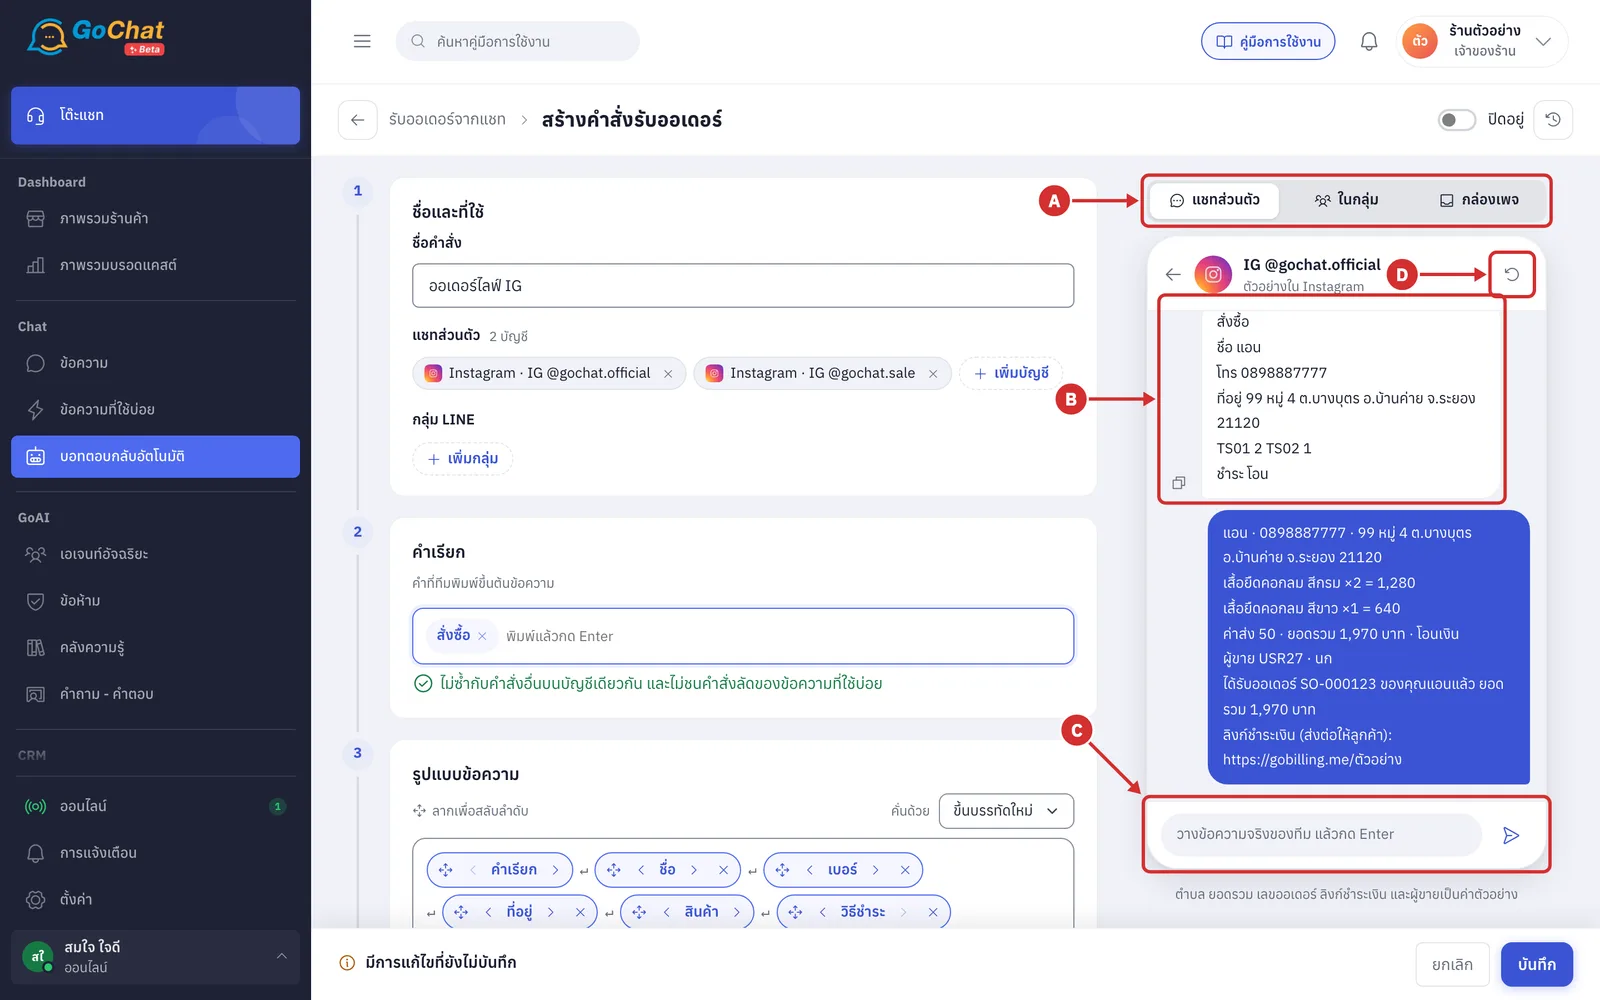
The panel on the right lets you try the command first (no real order is created and nothing is sent to anyone)
A Tabs show how the bot answers in each place
แชทส่วนตัว (Private chat): sales staff typing from their own app
ในกลุ่ม (In group): your team's LINE group
กล่องเพจ (Page inbox): an admin typing in a customer chat from the page inbox
B Sample message in the step 3 format with real product codes from your shop, and the bot's answer; click the copy icon to send the sample to your team
C Message box paste a real message from your team and press Enter to see whether the bot can read it (Shift+Enter for a new line)
D Start over clears the conversation in the panel
The line under the panel says which details are samples, such as subdistrict, total, order number and payment link
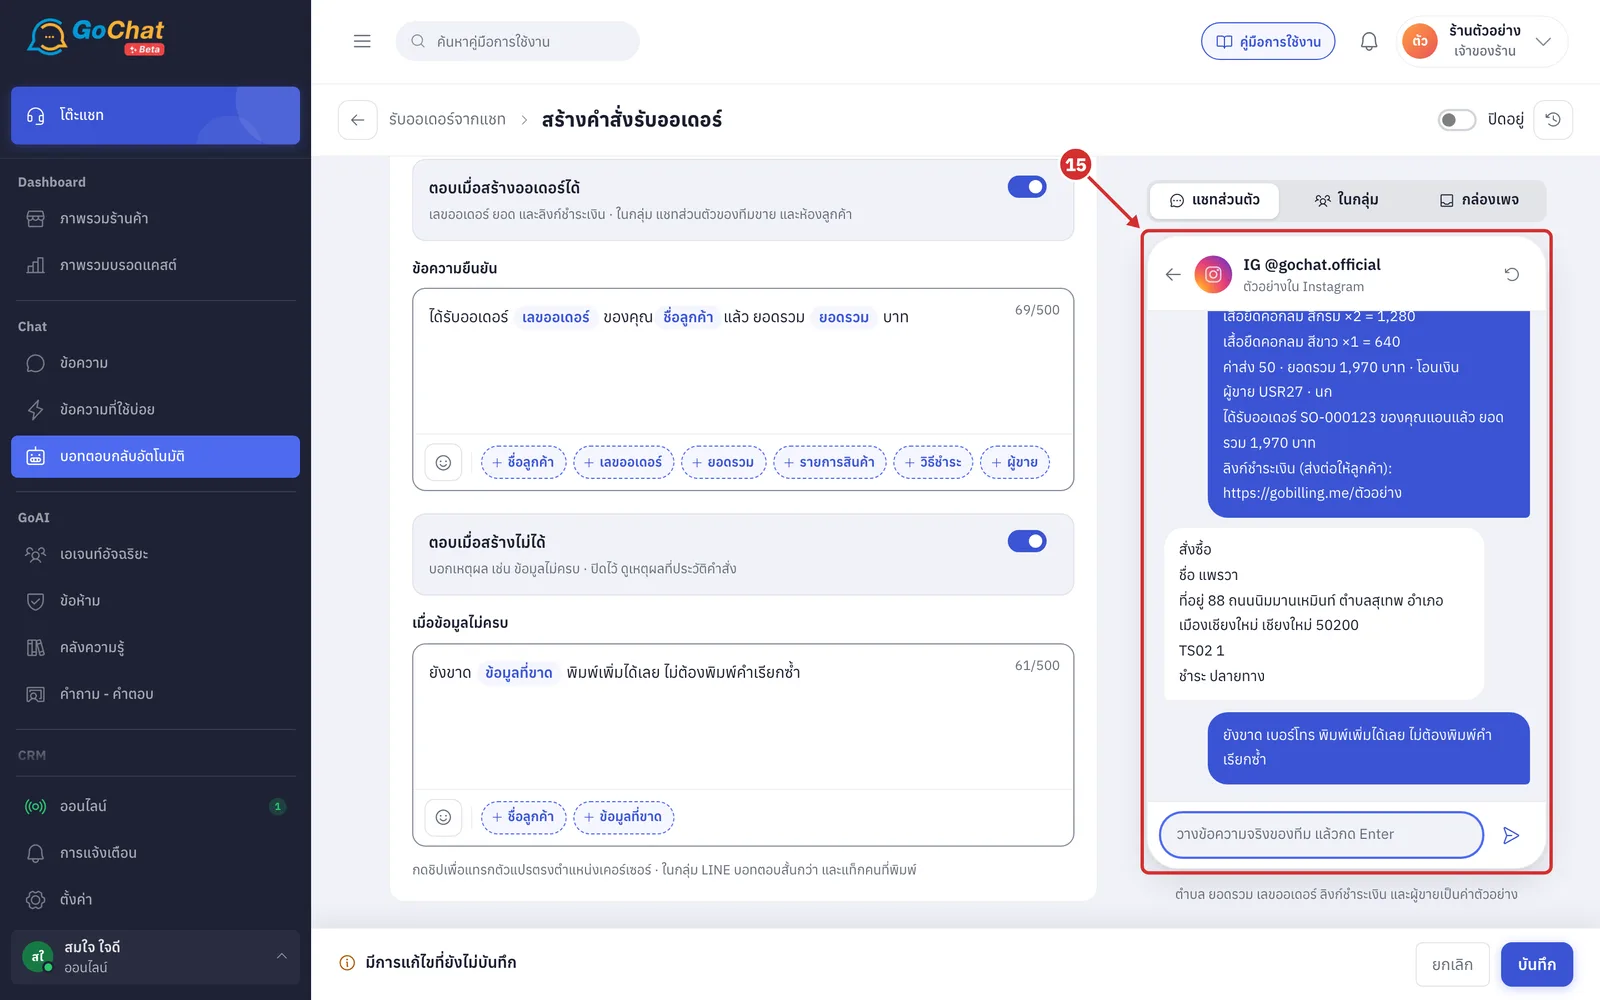
For example, paste a message without a phone number: the bot answers with your เมื่อข้อมูลไม่ครบ (When details are missing) message saying what is missing, just as your team will see it
With ตอบเมื่อสร้างไม่ได้ (Reply when it cannot be created) off, the panel shows a ไม่ตอบในแชท (ปิดไว้) · … (Not replied in chat (off) · …) line instead of a bot bubble
Product codes are checked against your shop's real products; codes your shop does not have get an "unknown code" answer
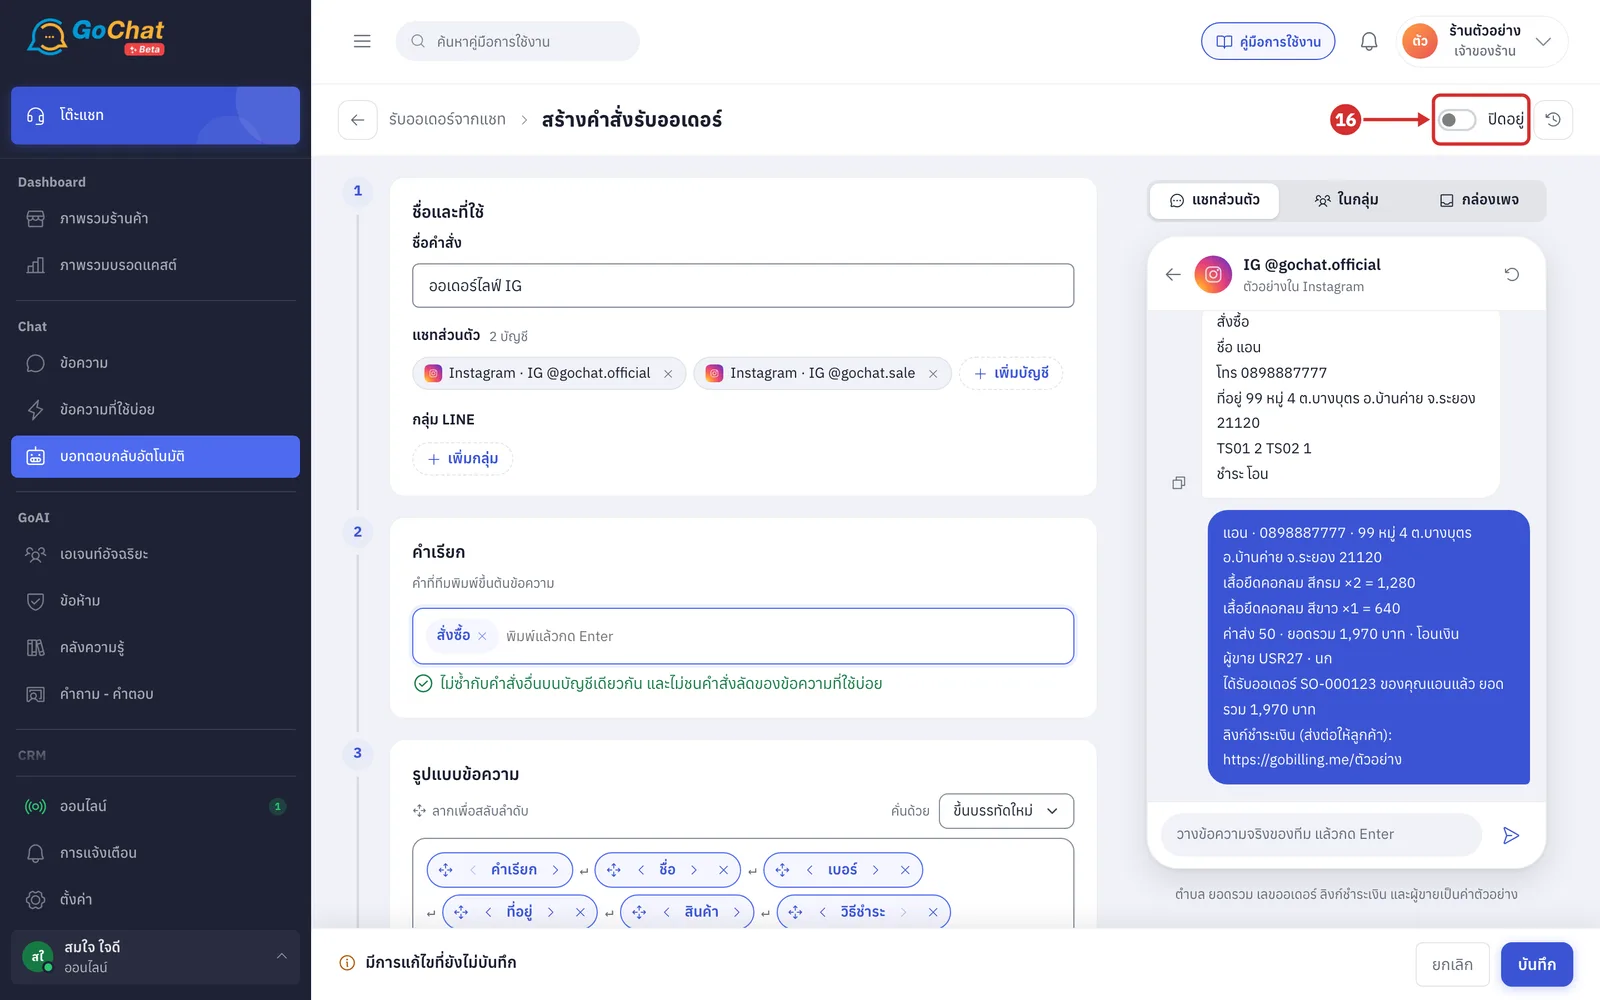
Use the switch at the top right to turn the command on or off
A new command starts ปิดอยู่ (Off) and takes effect when you save
For a saved command, flipping the switch saves straight away
Turning it off cancels orders the team is in the middle of typing, and the bot ignores this command until it is on again
Click บันทึก (Save) in the bottom bar
If something is missing it shows ยังบันทึกไม่ได้ · แก้ … จุดด้านบน (Cannot save yet · fix … fields above) with what to fix under each field
Click ยกเลิก (Cancel) to go back without saving
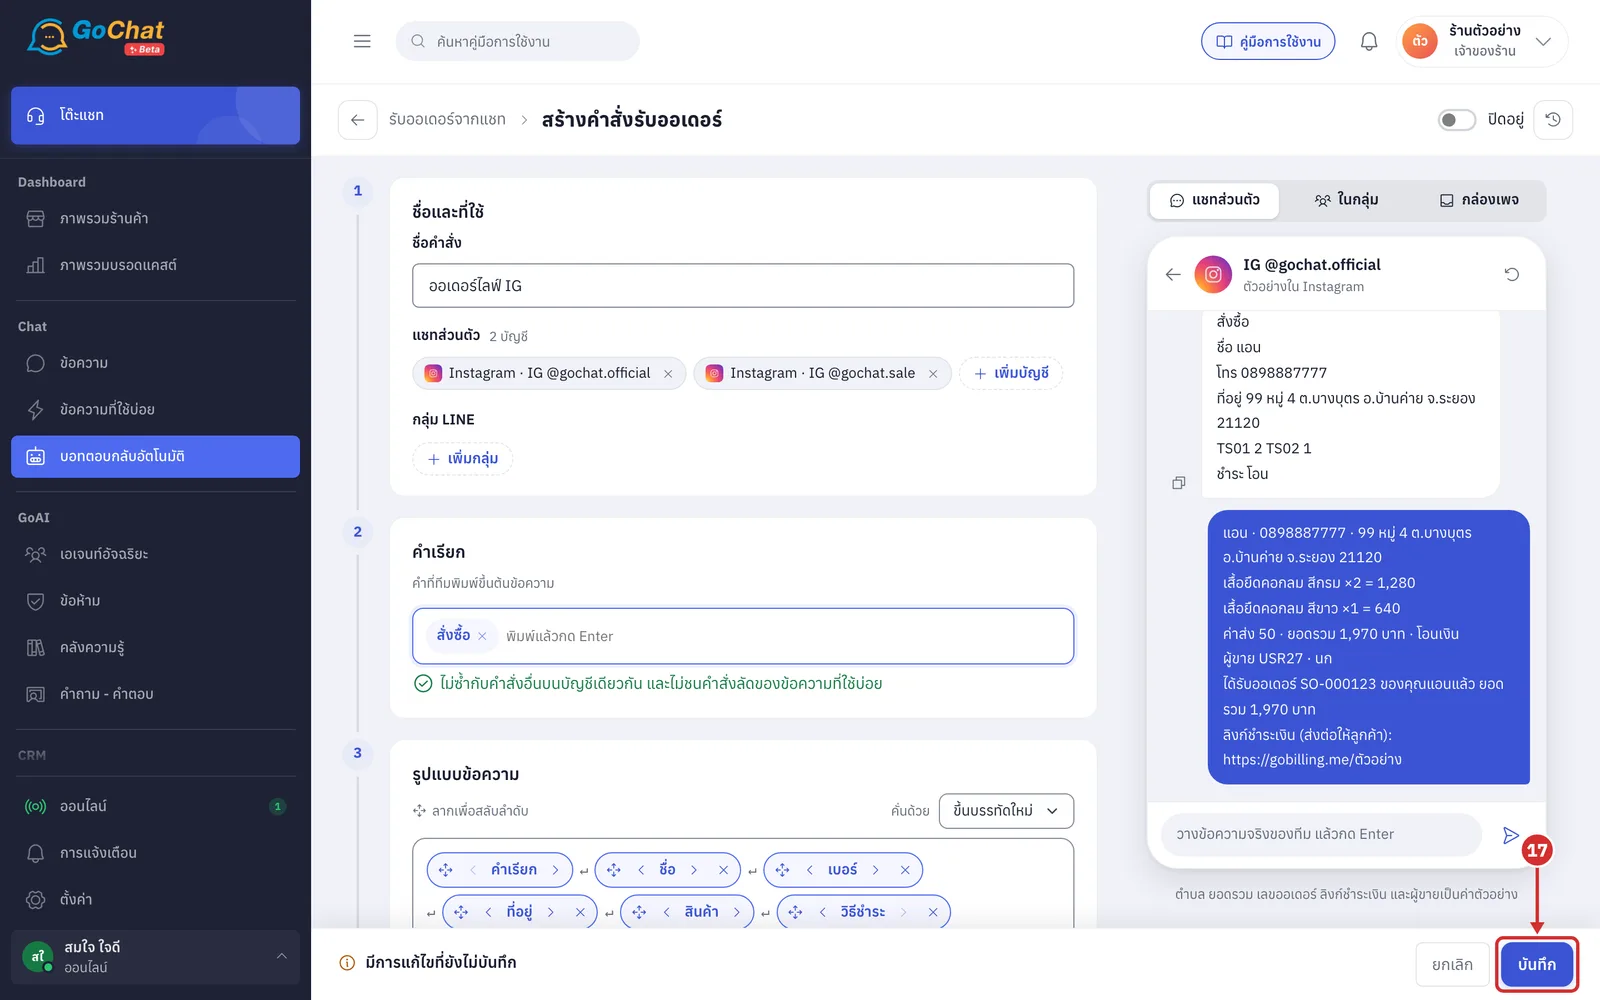
You go back to the list with the bar บันทึก “…” แล้ว (Saved “…”), and the new command is in the command list; your team can start typing it in the chosen accounts right away
Editing and deleting a command
Click a command row in the list. The แก้คำสั่ง “…” (Edit command “…”) page opens with its settings
Edit any step as when creating it
The bottom bar says มีการแก้ไขที่ยังไม่บันทึก (Unsaved changes) and บันทึก (Save) works once something has changed
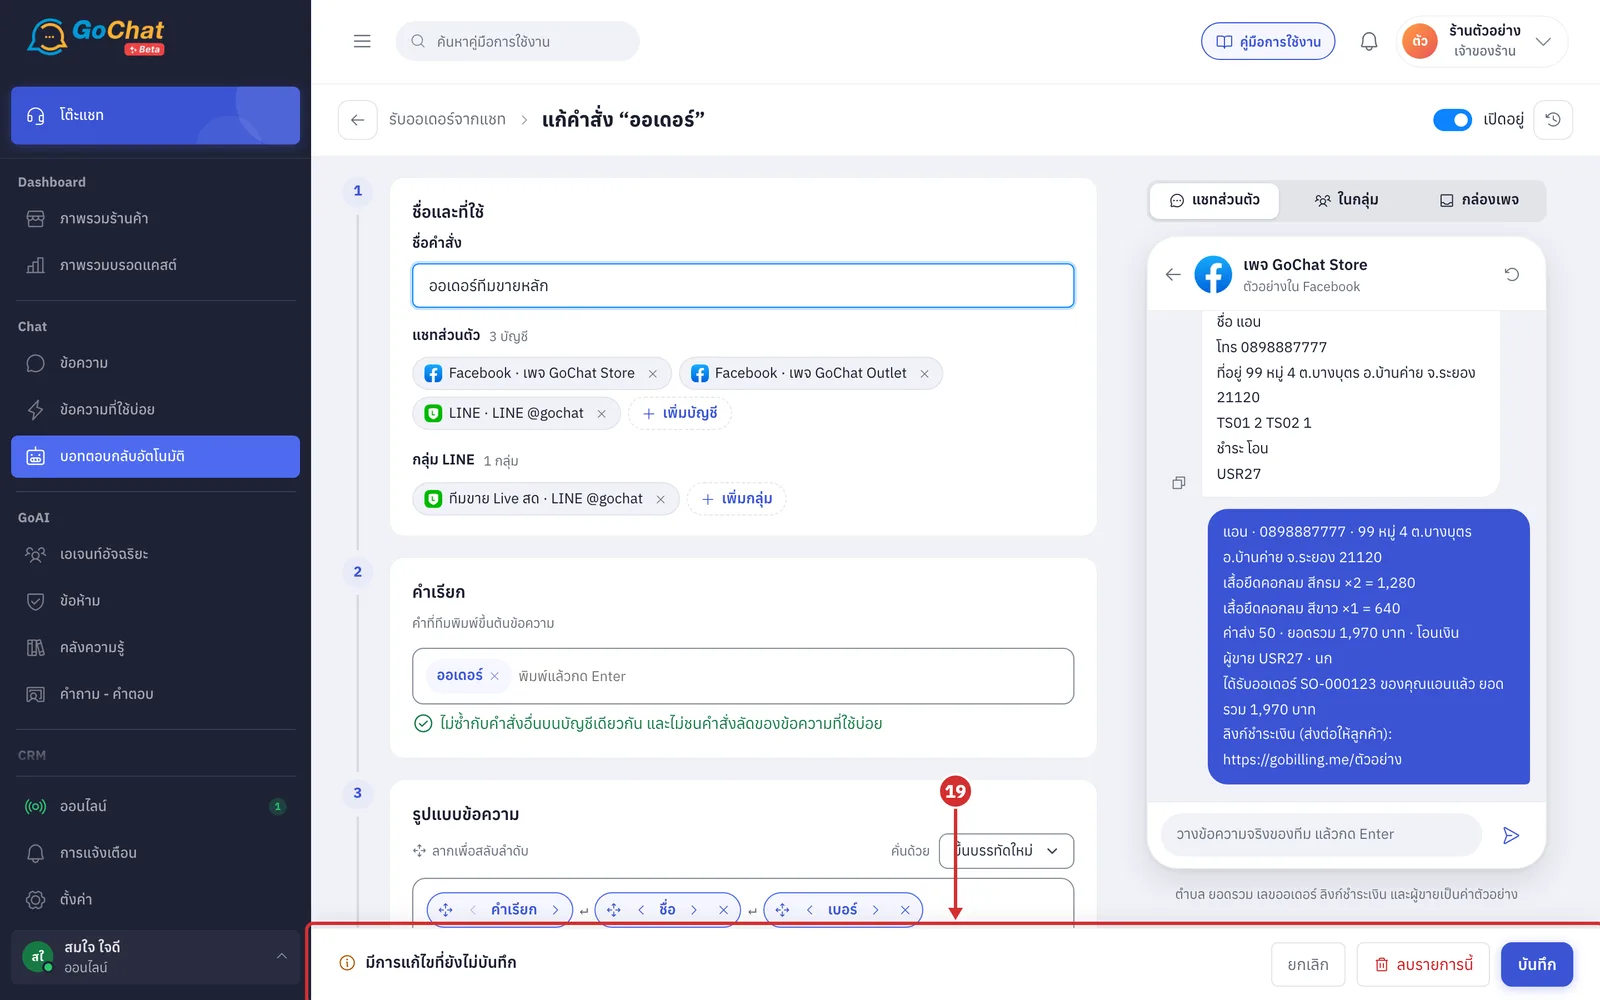
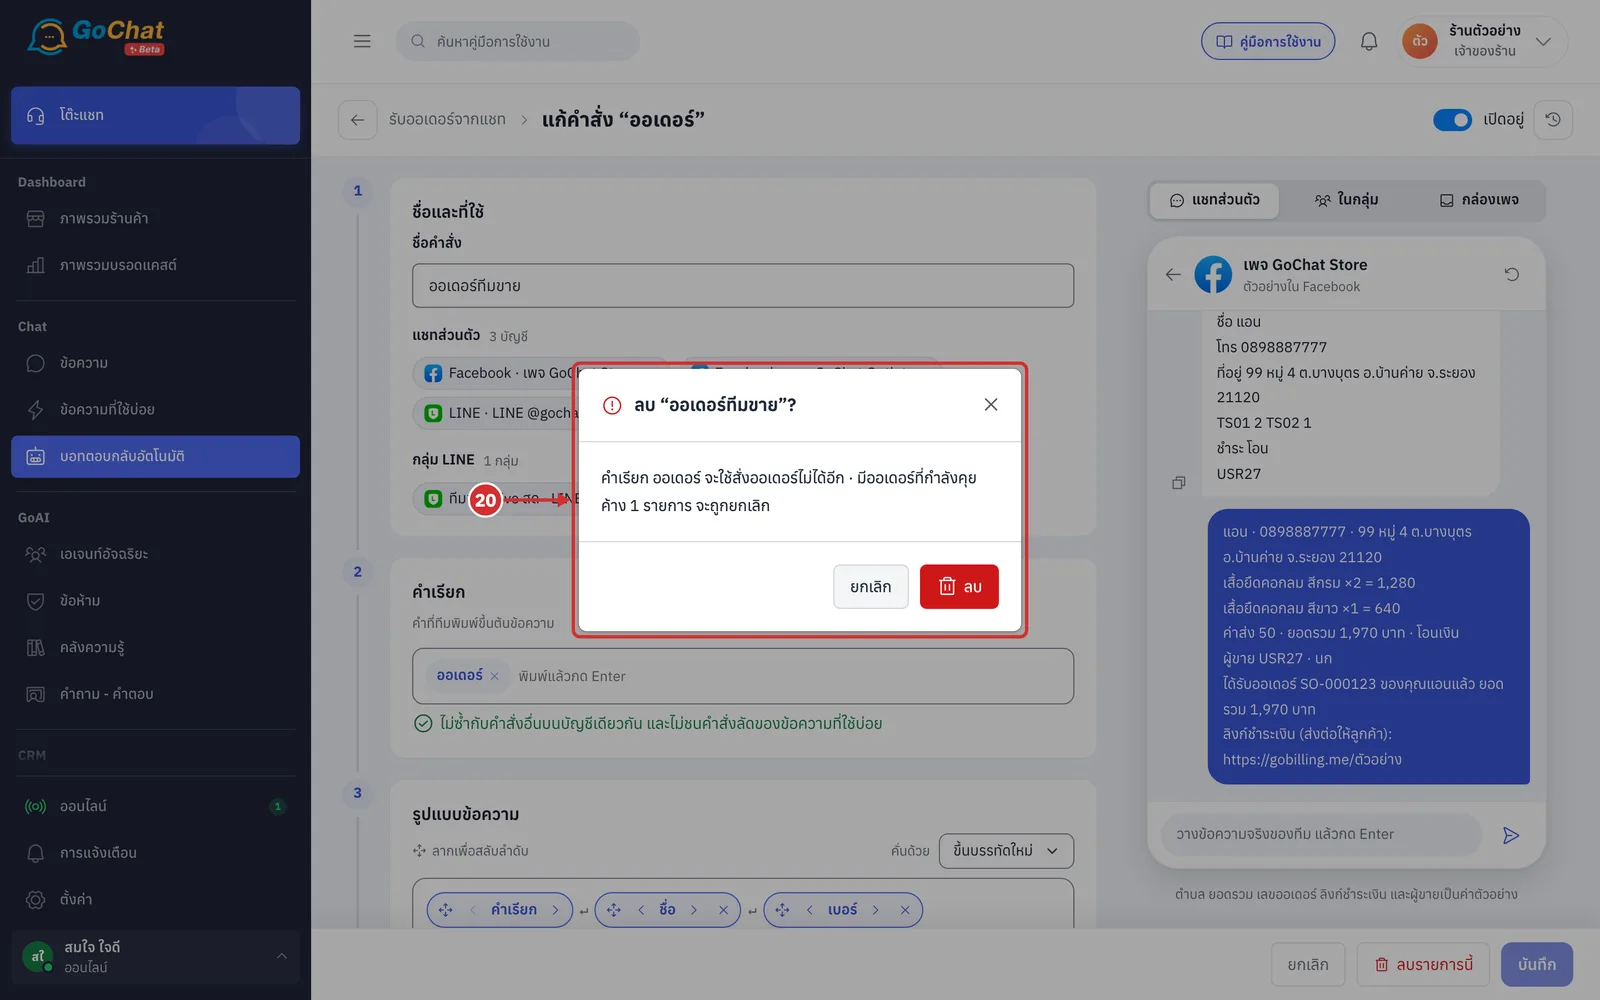
Click ลบรายการนี้ (Delete this command). The ลบ “…”? (Delete “…”?) window opens; click ลบ (Delete) to confirm or ยกเลิก (Cancel)
The window says the triggers of this command can no longer create orders
If orders are in progress, it says how many, and they will be cancelled
You can also delete from the bin on the list page
Orders already created stay in GoSaaS
Click the clock icon at the top right to open ประวัติการแก้ไข (Edit history) and see who changed what and when, with the values before and after
Using order commands
Read how to use commands in each place
Orders in 1:1 chats — an admin types the command in a customer chat from Meta Business Suite and the bot creates the order straight away
Orders in LINE groups and from the sales team — set up LINE groups, link sellers to GoSaaS users, daily sales reports and sales staff ordering through private chats
Viewing order command history — who ordered what, which order number it got and the conversation with the bot