

Using product follow-up bots
A เฉพาะกลุ่ม (Selected chats) bot on the บอทติดตามยอดขาย (Sales follow-up bot) page is a product follow-up bot: it lets you follow up customers who were interested in a specific product and then went quiet. An admin attaches the bot in a chat and picks the product, then the bot sends messages on the steps you set, with the product name, price and product card, for example to a customer who asked the price of a T-shirt and has not replied.
The shop owner and every admin can create and edit selected-chats bots, and everyone who can reply in a chat can attach or stop a bot in it. An attached bot only affects that chat. Parts shared with condition bots, such as sending images, quick replies, ordering steps, testing, send history and editing or deleting a bot, are explained in Creating a sales follow-up bot.
Creating a selected-chats bot
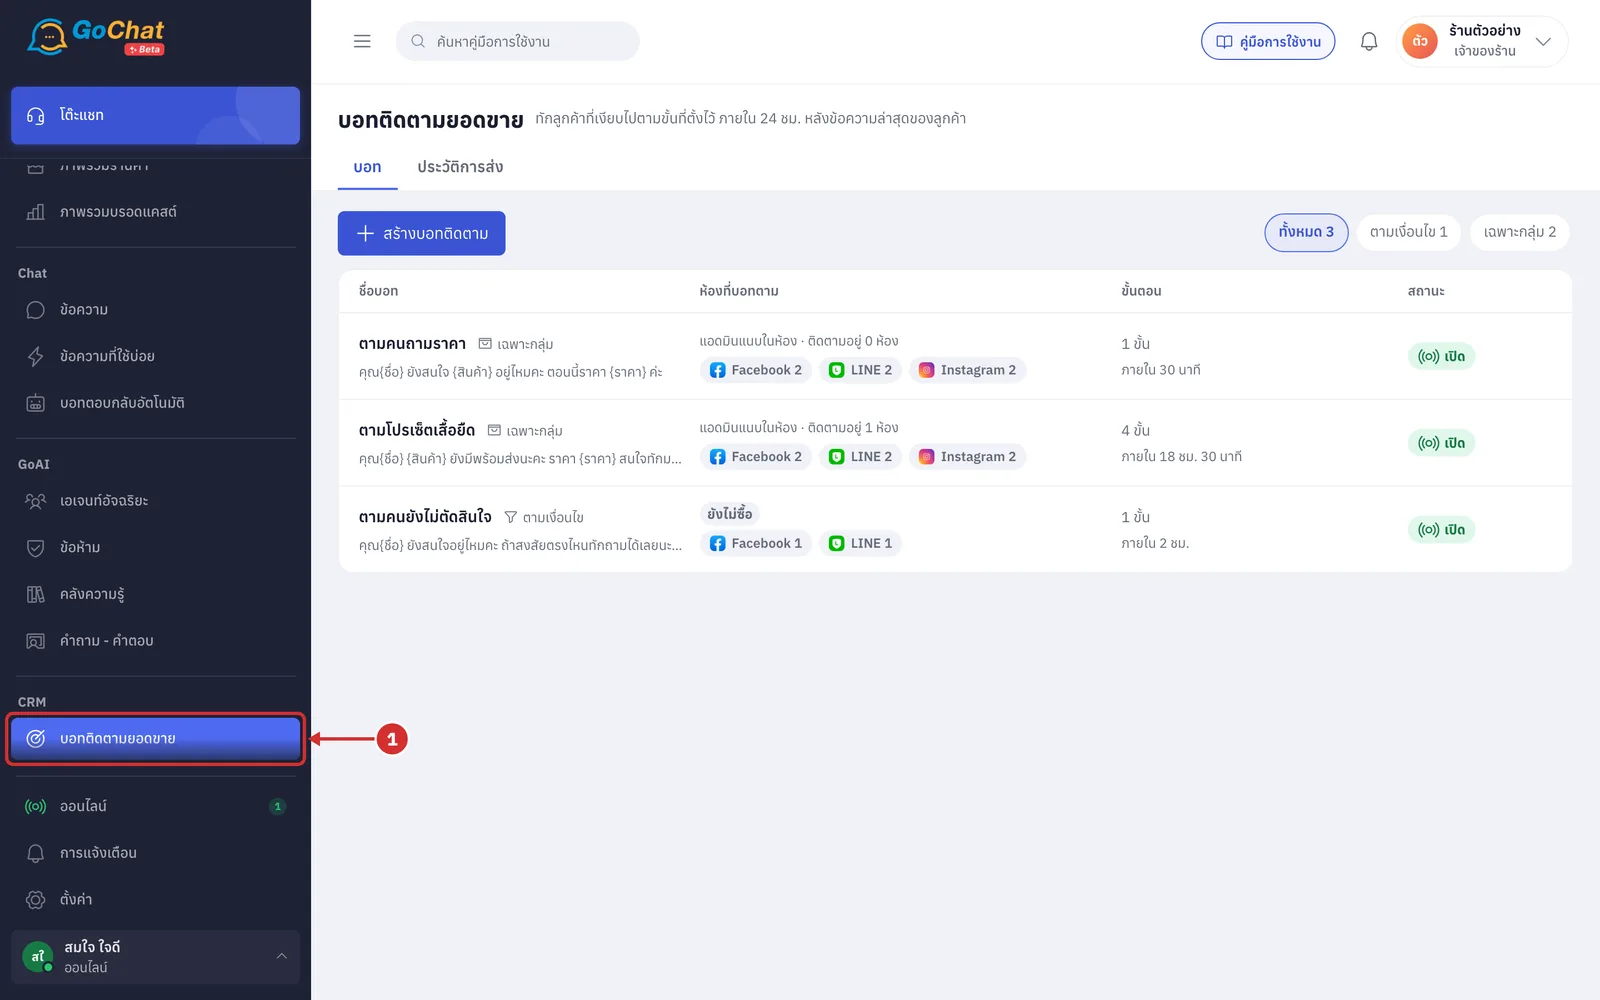
Under CRM, choose บอทติดตามยอดขาย (Sales follow-up bot) in the left menu bar
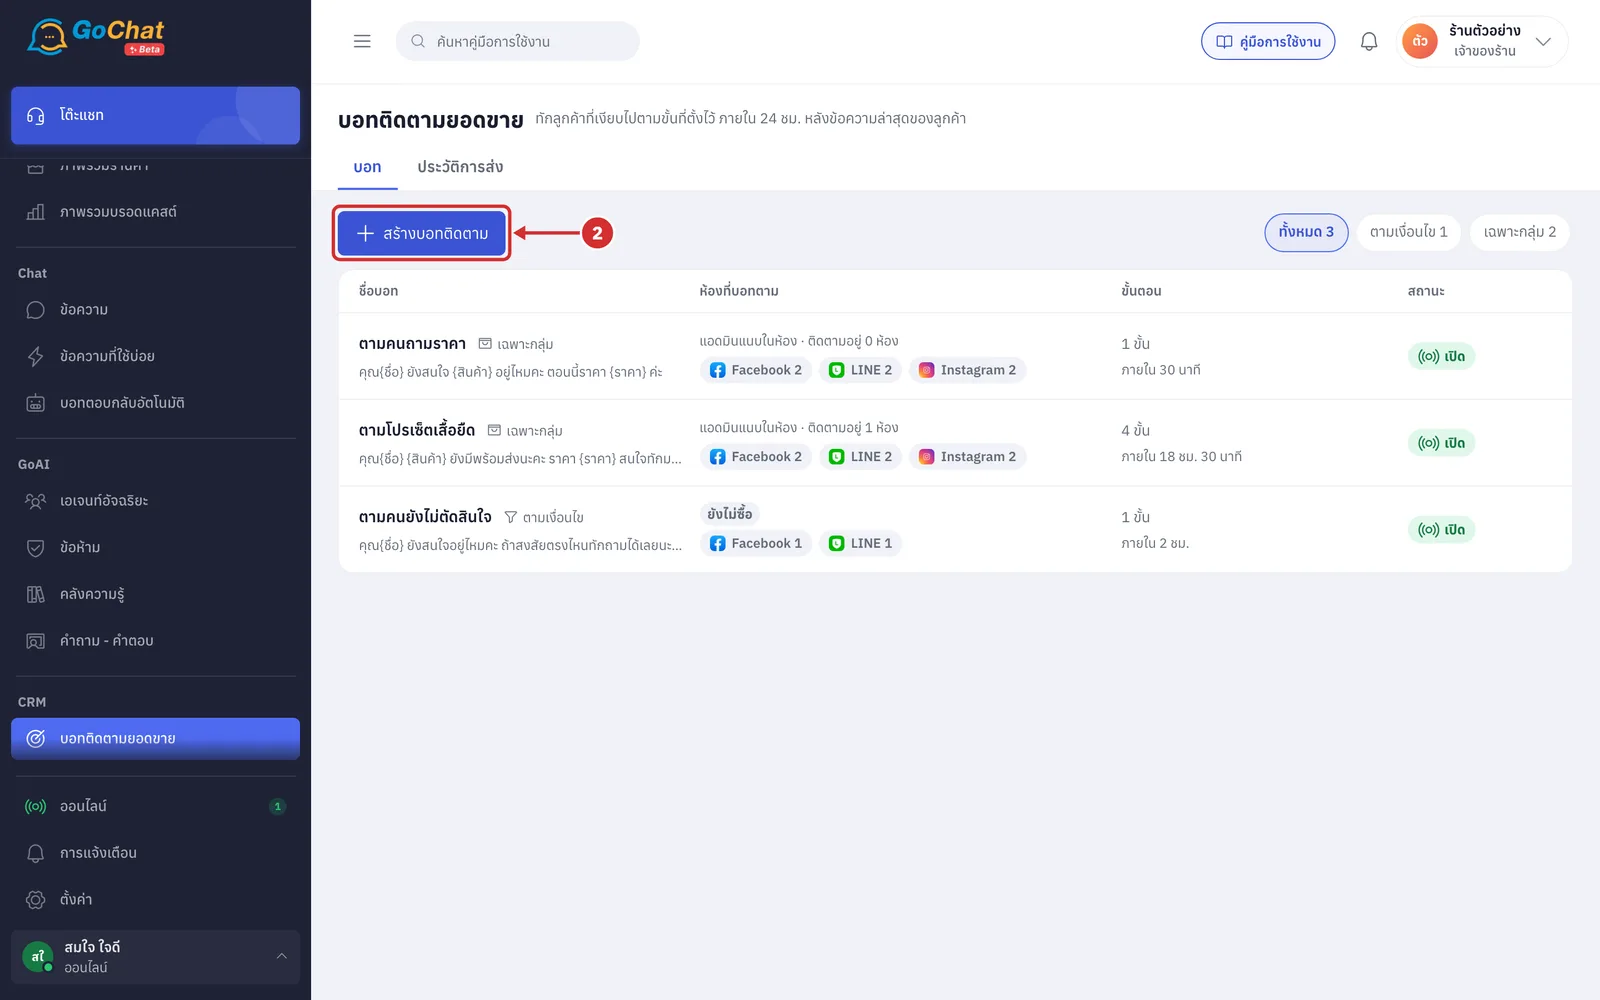
Click สร้างบอทติดตาม (Create follow-up bot)
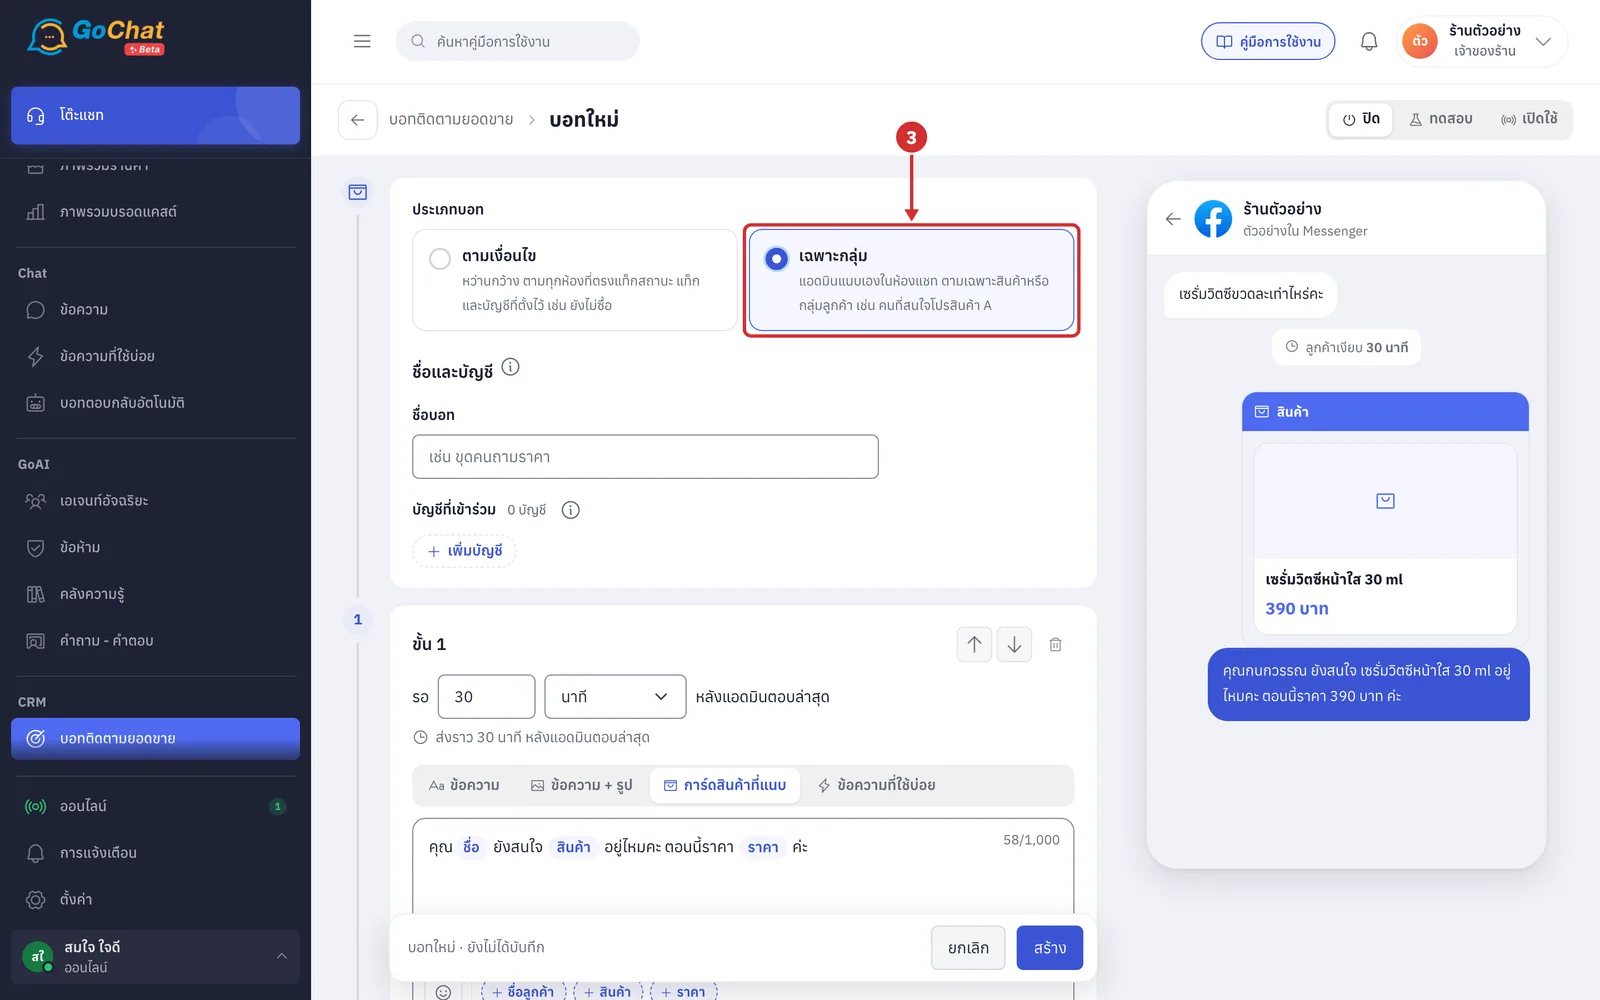
Under ประเภทบอท (Bot type), choose เฉพาะกลุ่ม (Selected chats), a bot that admins attach themselves in a chat to follow a specific product or customer group, such as people interested in a promotion for product A
The form keeps only ชื่อบอท (Bot name) and บัญชีที่เข้าร่วม (Accounts), with no tag fields, because this type of bot does not pick chats on its own
A bot's type cannot be changed after it is created
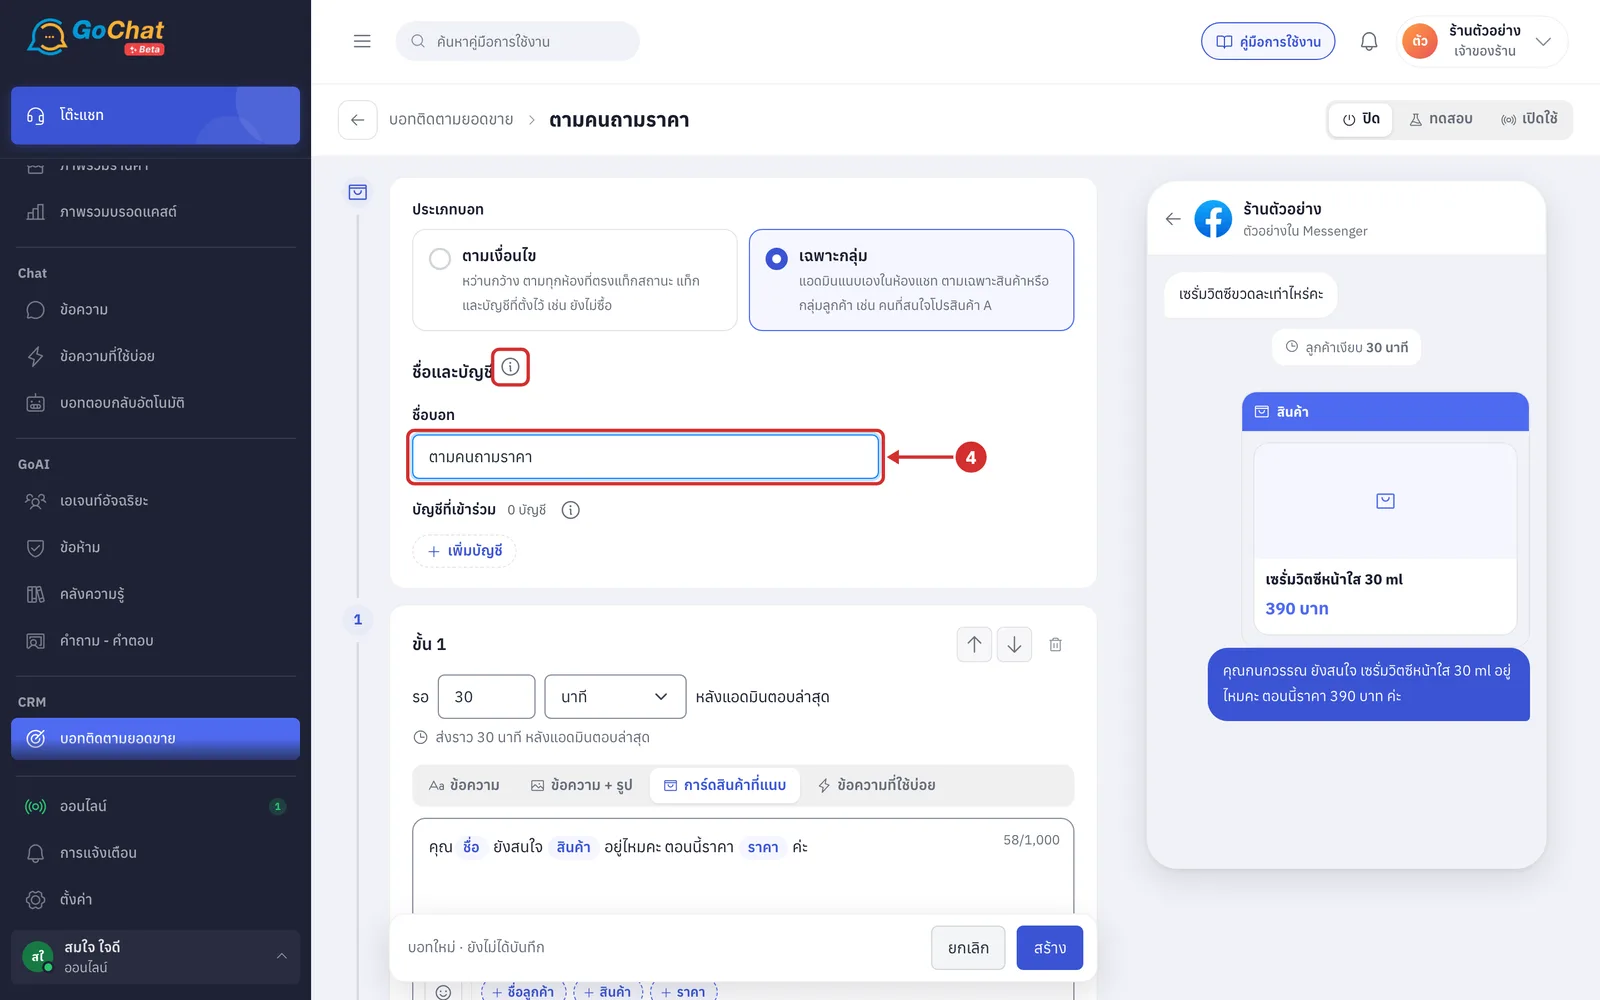
In ชื่อบอท (Bot name), name the bot, such as ตามคนถามราคา (Follow price askers)
This field is required, up to 60 characters
The name appears in the bot list, in chats and in the send history; customers do not see it
Click the i icon next to the ชื่อและบัญชี (Name and accounts) heading to see how this type works: admins pick the product when they attach the bot, and this bot replaces a condition bot in the chat it is attached to
Under บัญชีที่เข้าร่วม (Accounts), click เพิ่มบัญชี (Add account)
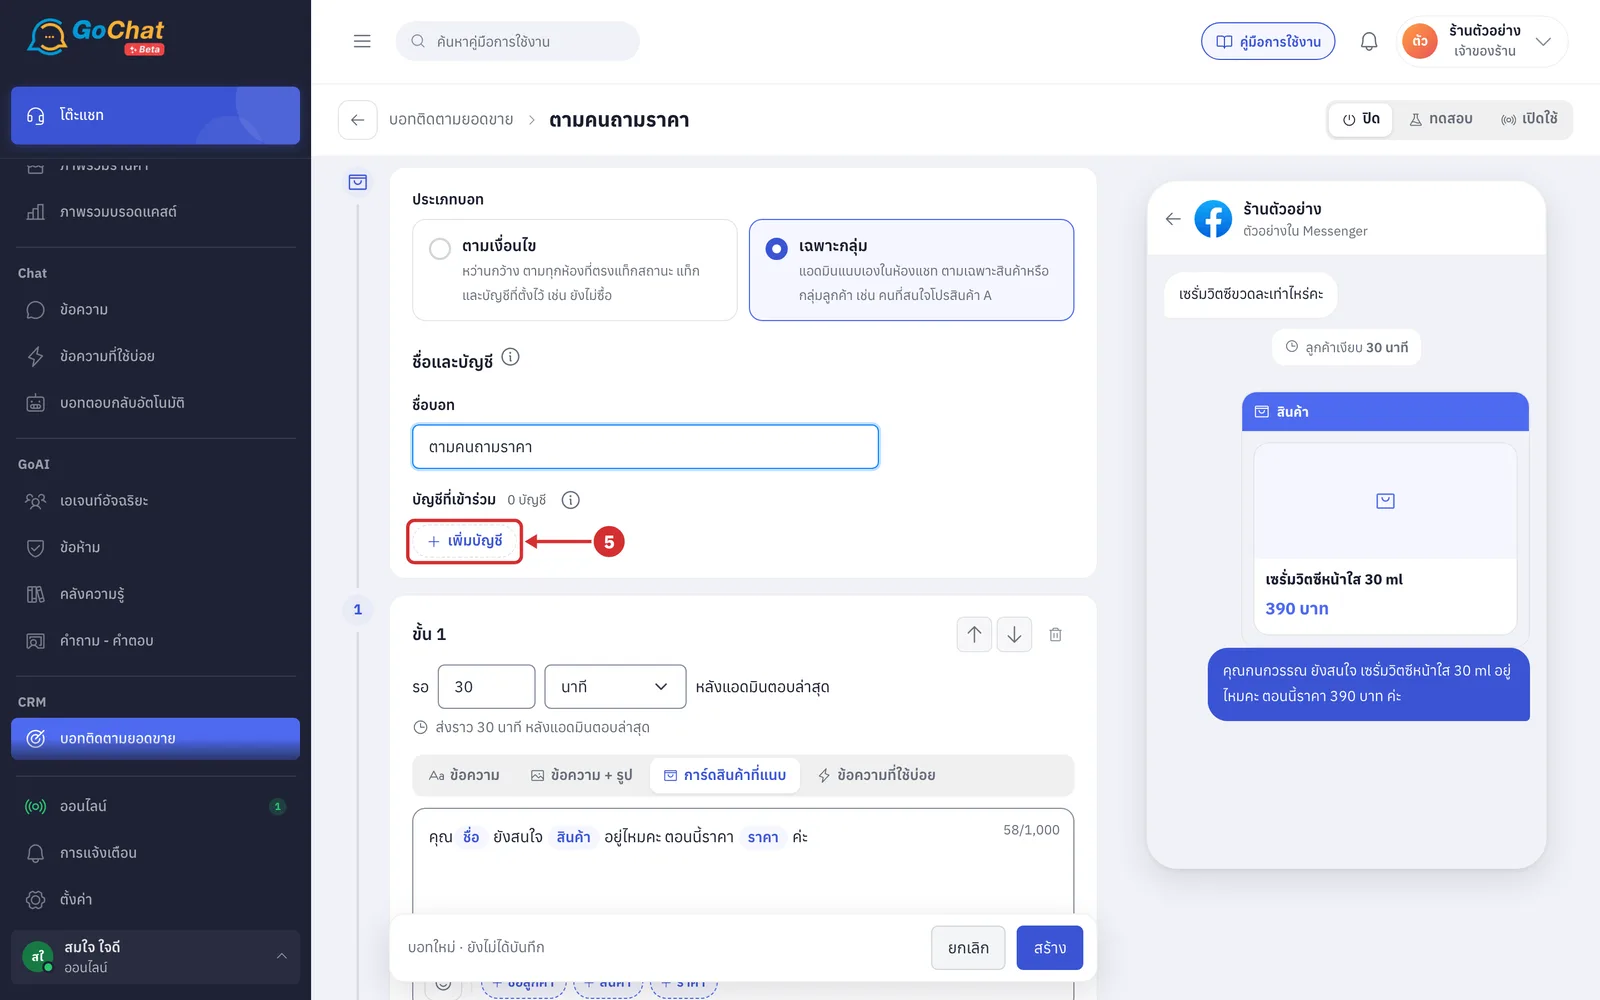
In the เลือกบัญชีที่เข้าร่วม (Choose accounts) window, tick the pages or accounts that will use this bot, or click เลือกทั้งหมด (Select all) to choose every account of that channel
Only Facebook, Instagram and LINE accounts can be chosen, and at least 1 account is required
1 บัญชีใช้ได้หลายบอทเฉพาะกลุ่ม (One account can be used by many selected-chats bots), so no account is locked in this window
The bot can only be attached in chats of the chosen accounts
Once a whole channel is chosen, the button changes to ยกเลิกทั้งหมด (Deselect all) to remove the whole channel
Search for a page or account name in the box at the top, or click a channel name to show only that channel
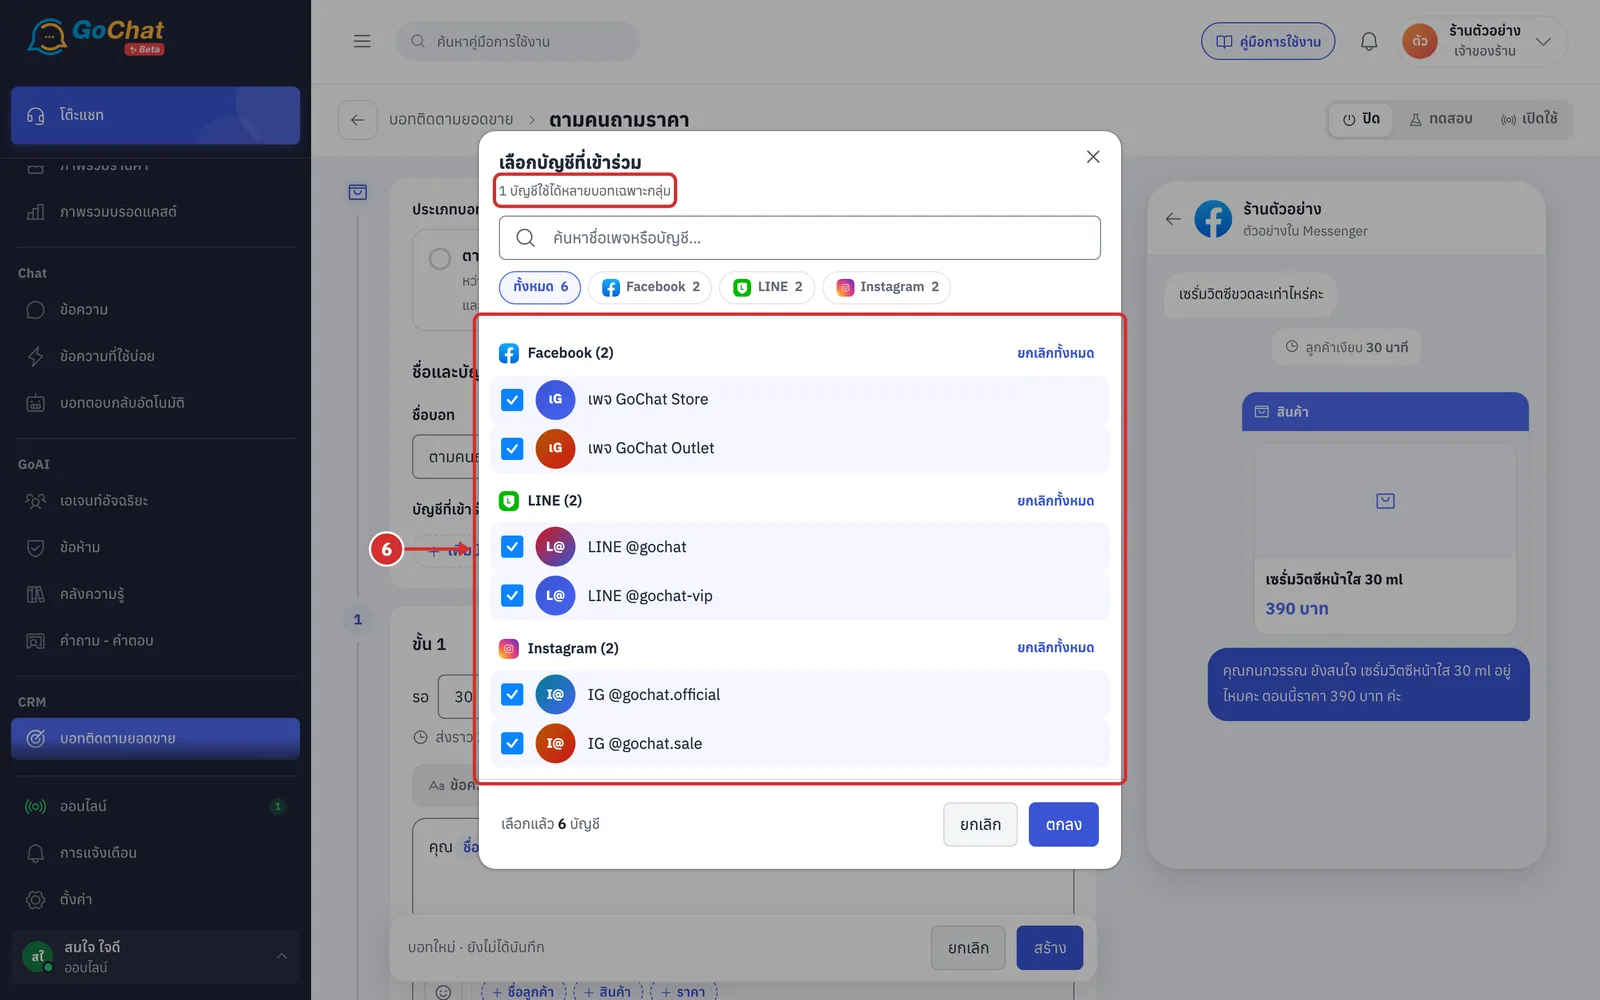
Click ตกลง (OK). The chosen accounts appear under บัญชีที่เข้าร่วม (Accounts)
The bottom of the window shows how many accounts are chosen
Click × on an account to remove it
Messages the bot sends on LINE use the LINE OA account's monthly message quota, as the i icon next to the heading explains
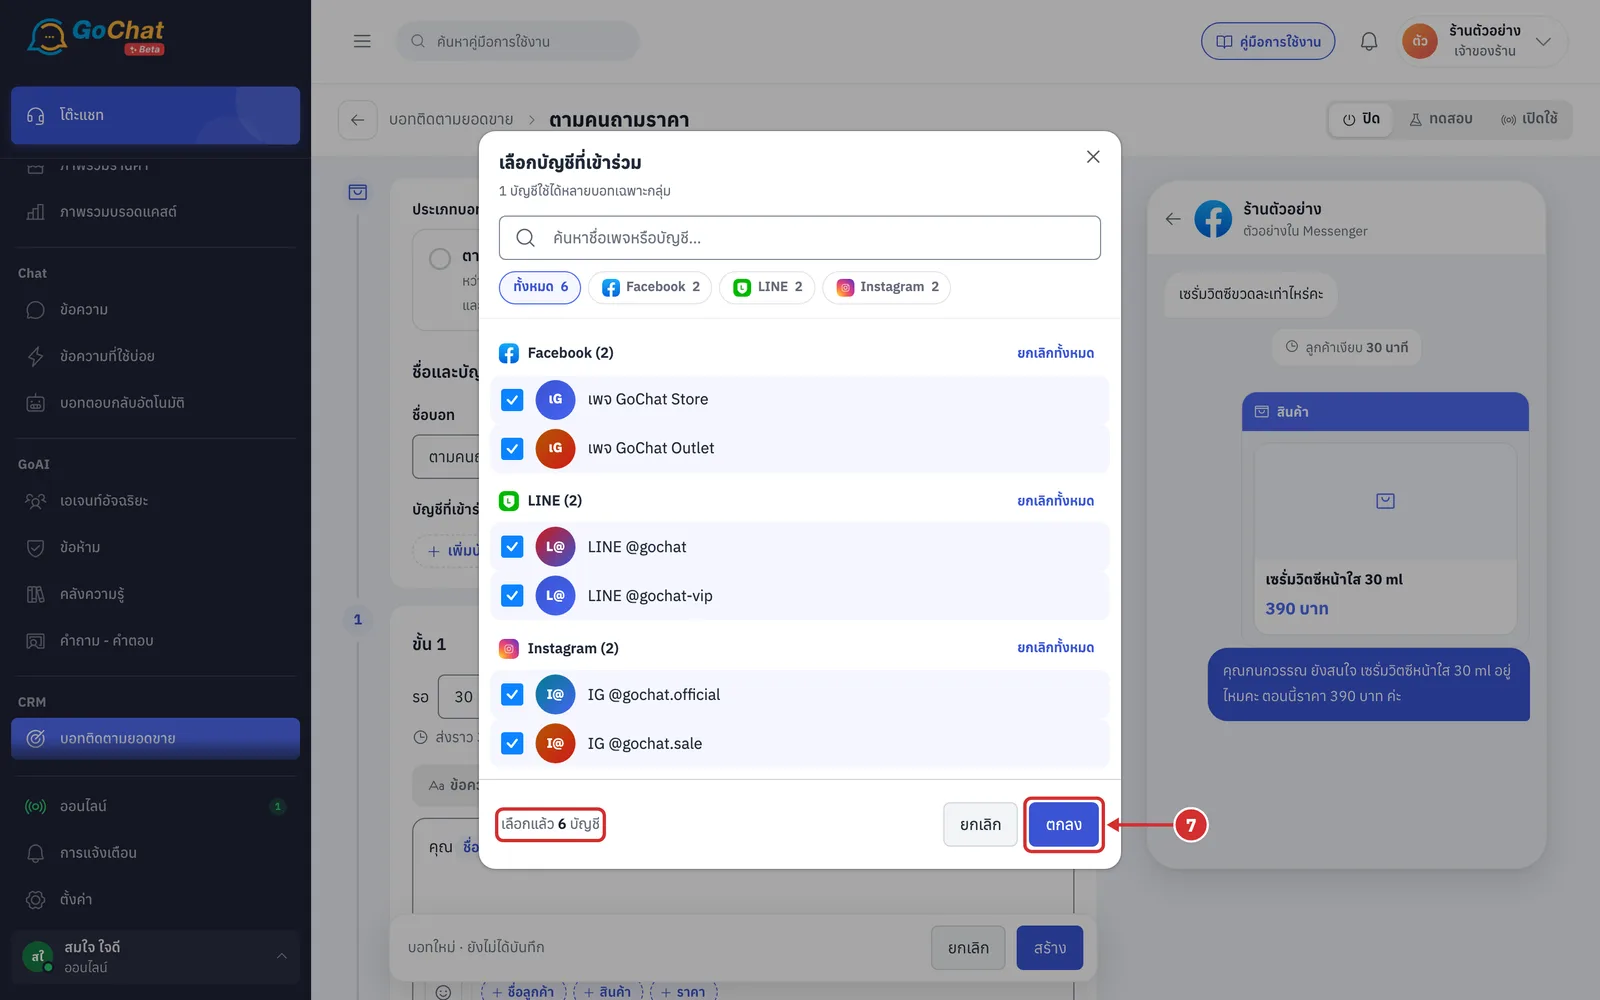
In ขั้น 1 (Step 1), set how long to wait after the admin's last reply: type a number, then choose นาที (minutes) or ชั่วโมง (hours)
The default is 30 minutes, and the wait must be at least 1 minute
The wait counts from your shop's latest reply to the customer, not from when the bot is attached
The line under the field shows roughly how long after the admin's last reply this step is sent
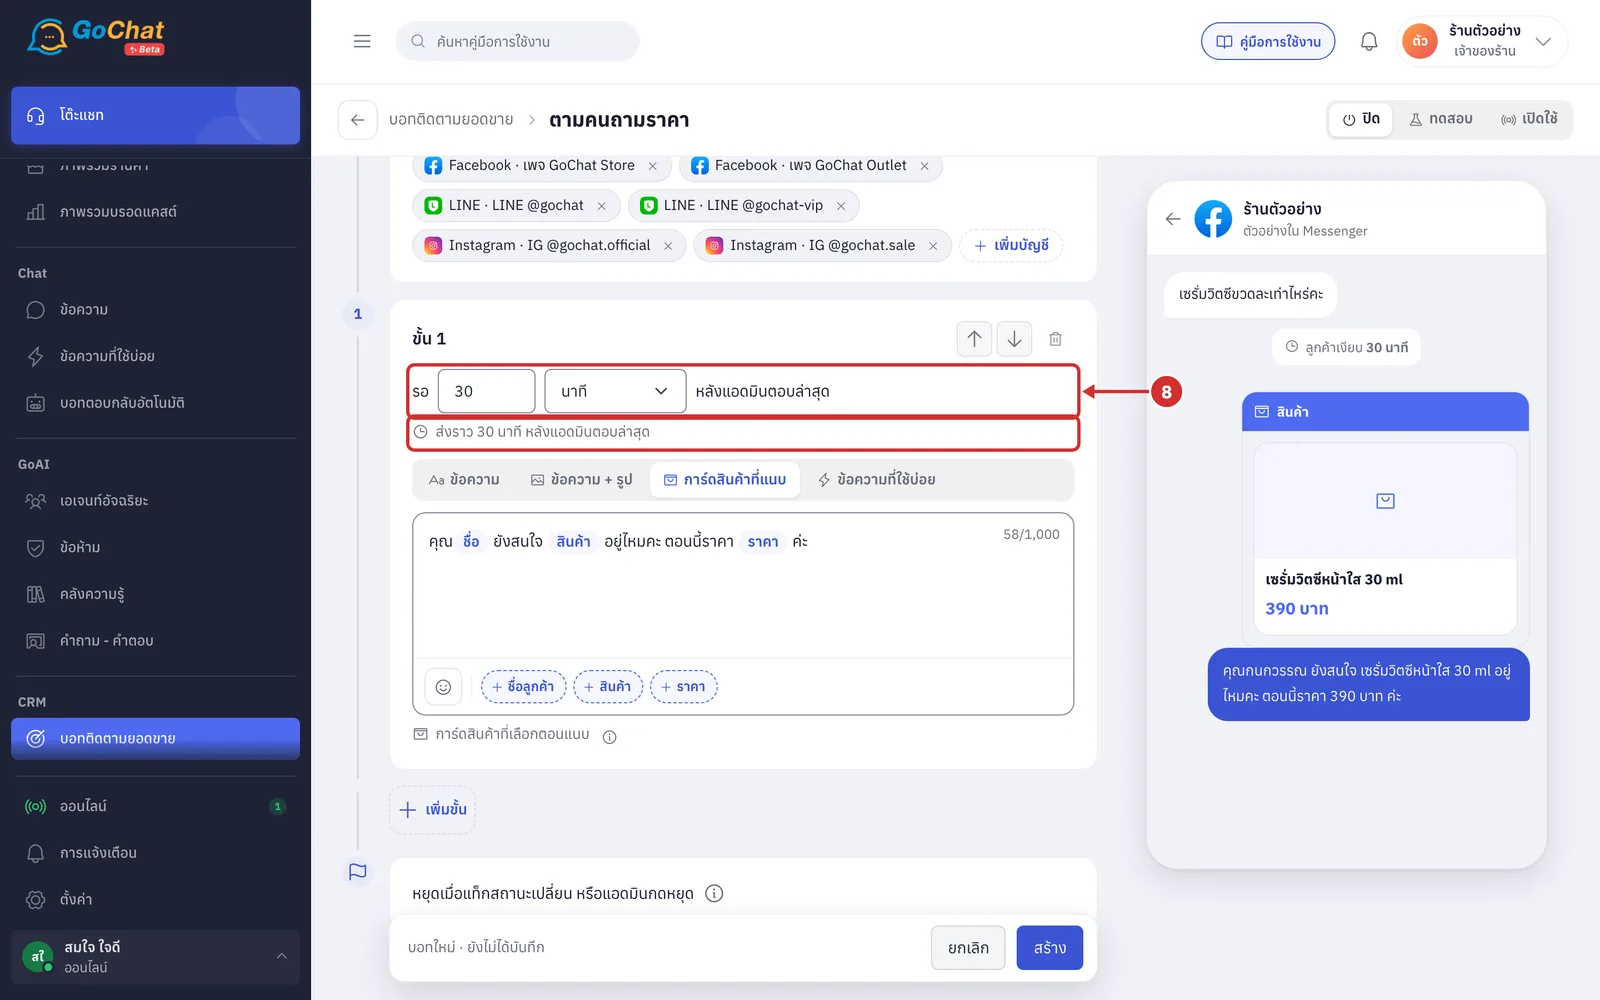
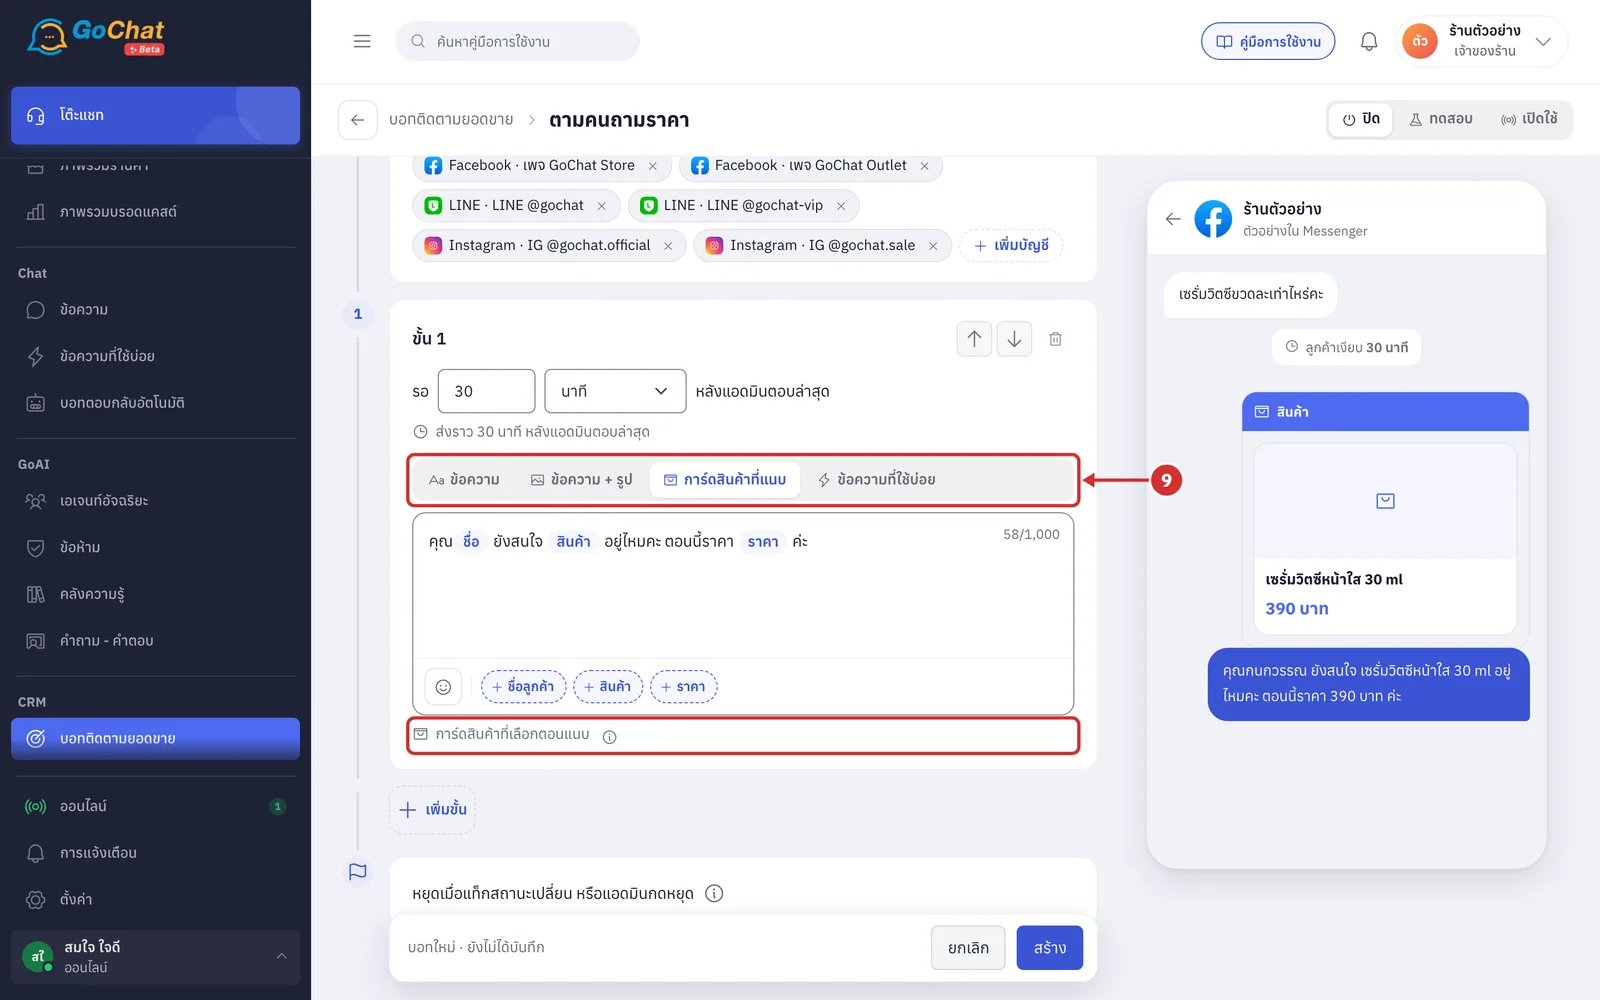
Choose the step's content type
ข้อความ (Message) — sends a message only
ข้อความ + รูป (Message + image) — sends a message followed by 1 image
การ์ดสินค้าที่แนบ (Attached product card) — sends a message followed by the card of the product the admin picks when attaching the bot (the การ์ดสินค้าที่เลือกตอนแนบ (Card of the product picked when attaching) line); you do not pick a product on this page, and the message can be left empty
ข้อความที่ใช้บ่อย (Quick replies) — sends your shop's quick replies in full
More details
Shops connected to GoSaaS get การ์ดสินค้าที่แนบ (Attached product card) as the default; shops that are not connected do not have this type, and the default step is ข้อความ (Message)
How to choose images and quick replies is explained in Creating a sales follow-up bot
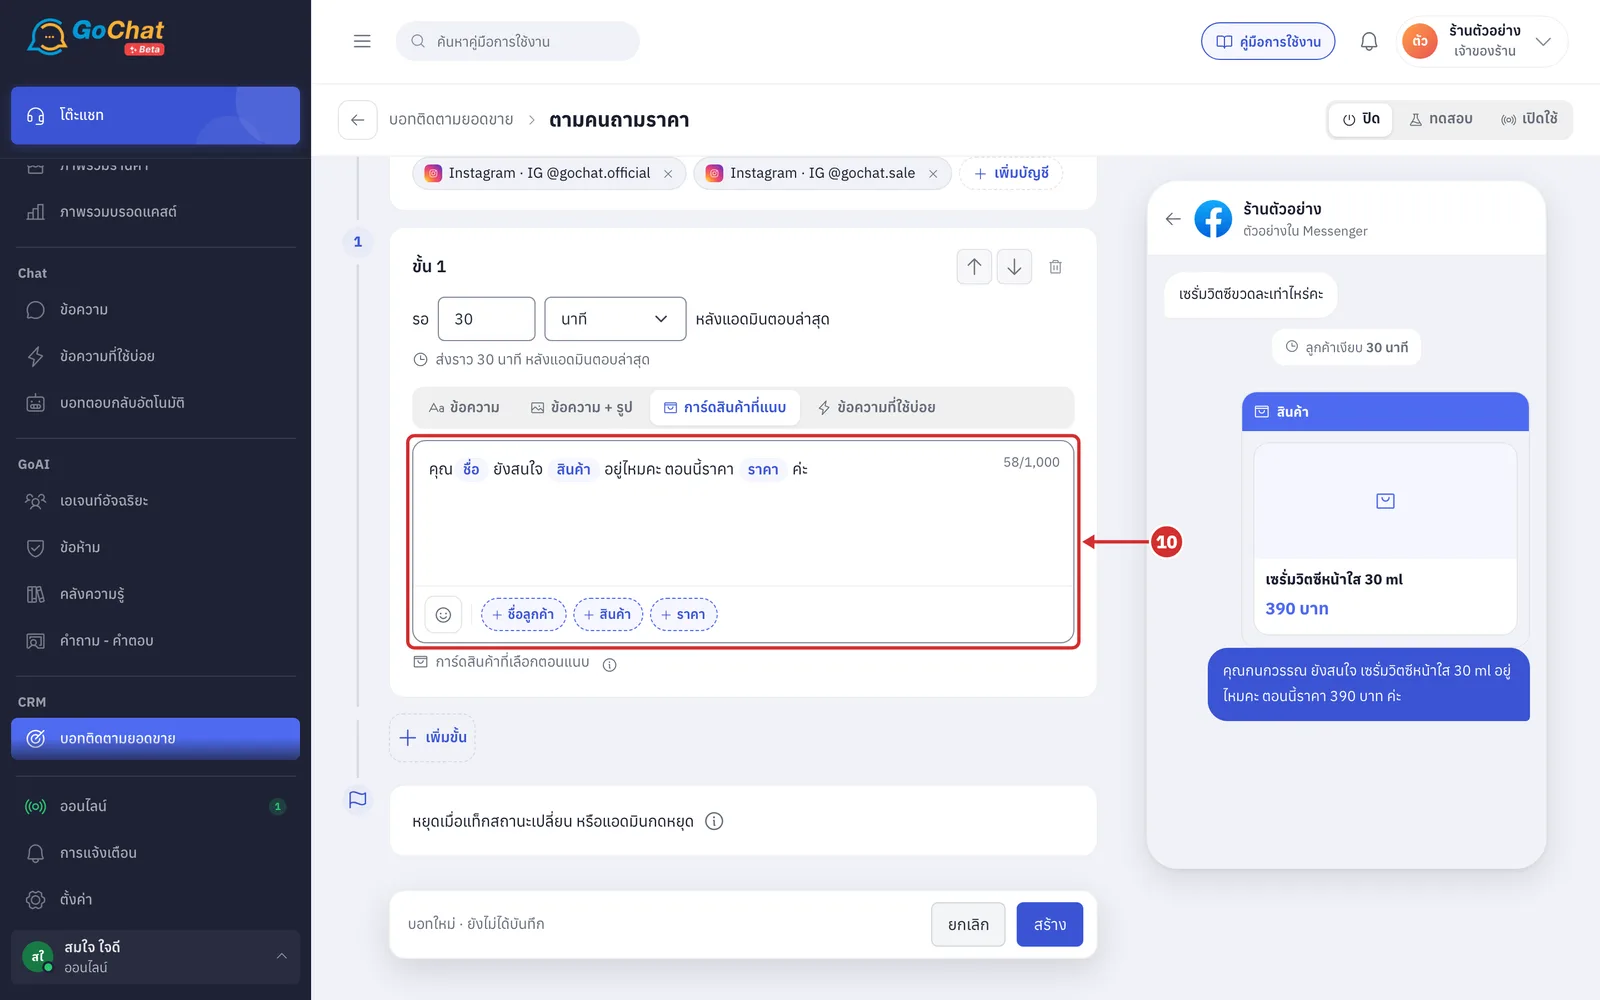
In the message box, edit the message the bot will send. You can insert these variables
ชื่อลูกค้า (Customer name) — the name of the customer in that chat
สินค้า (Product) — the name of the product the admin picks when attaching the bot
ราคา (Price) — the product's price in your catalogue when the bot sends
More details
Click a variable button under the box, or type { to choose a variable
A default message with all 3 variables is filled in for you, and you can edit it
The message can be up to 1,000 characters, and the smiley button inserts emoji
The product and price variables only work in selected-chats bots
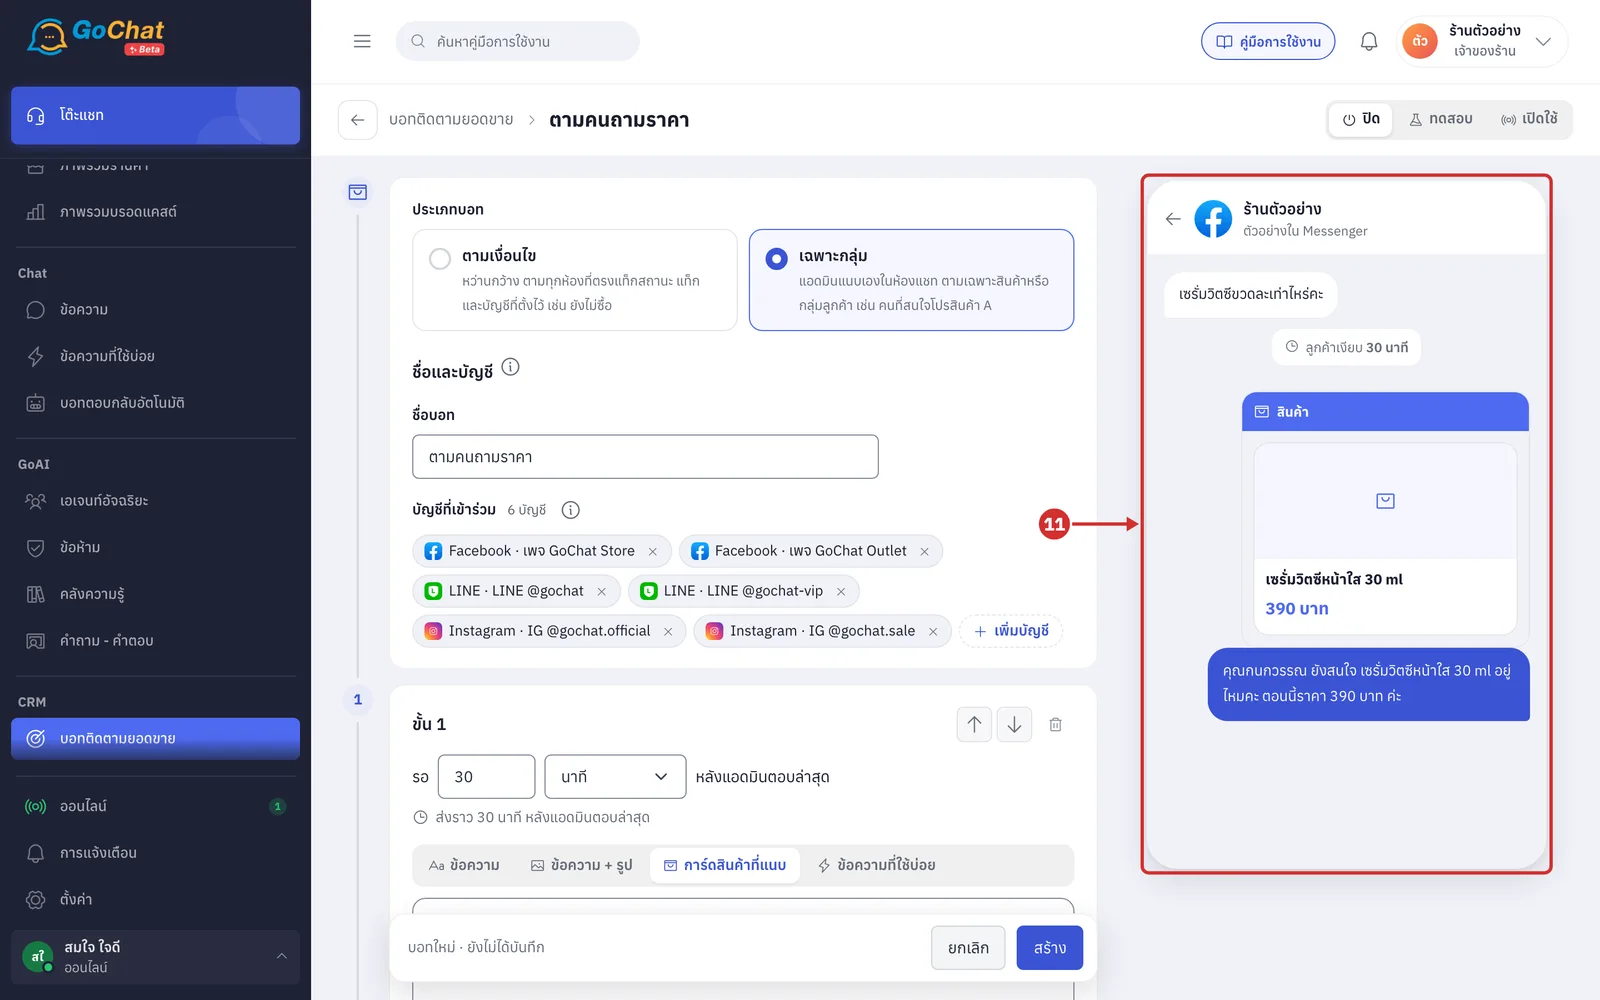
Check the chat preview on the right of the page
The preview starts with a sample customer asking a product's price, then shows how long the customer stays quiet before the bot sends each step
Variables use sample values: customer name กนกวรรณ, product เซรั่มวิตซีหน้าใส 30 ml and price 390 บาท
A product card step shows 1 sample card
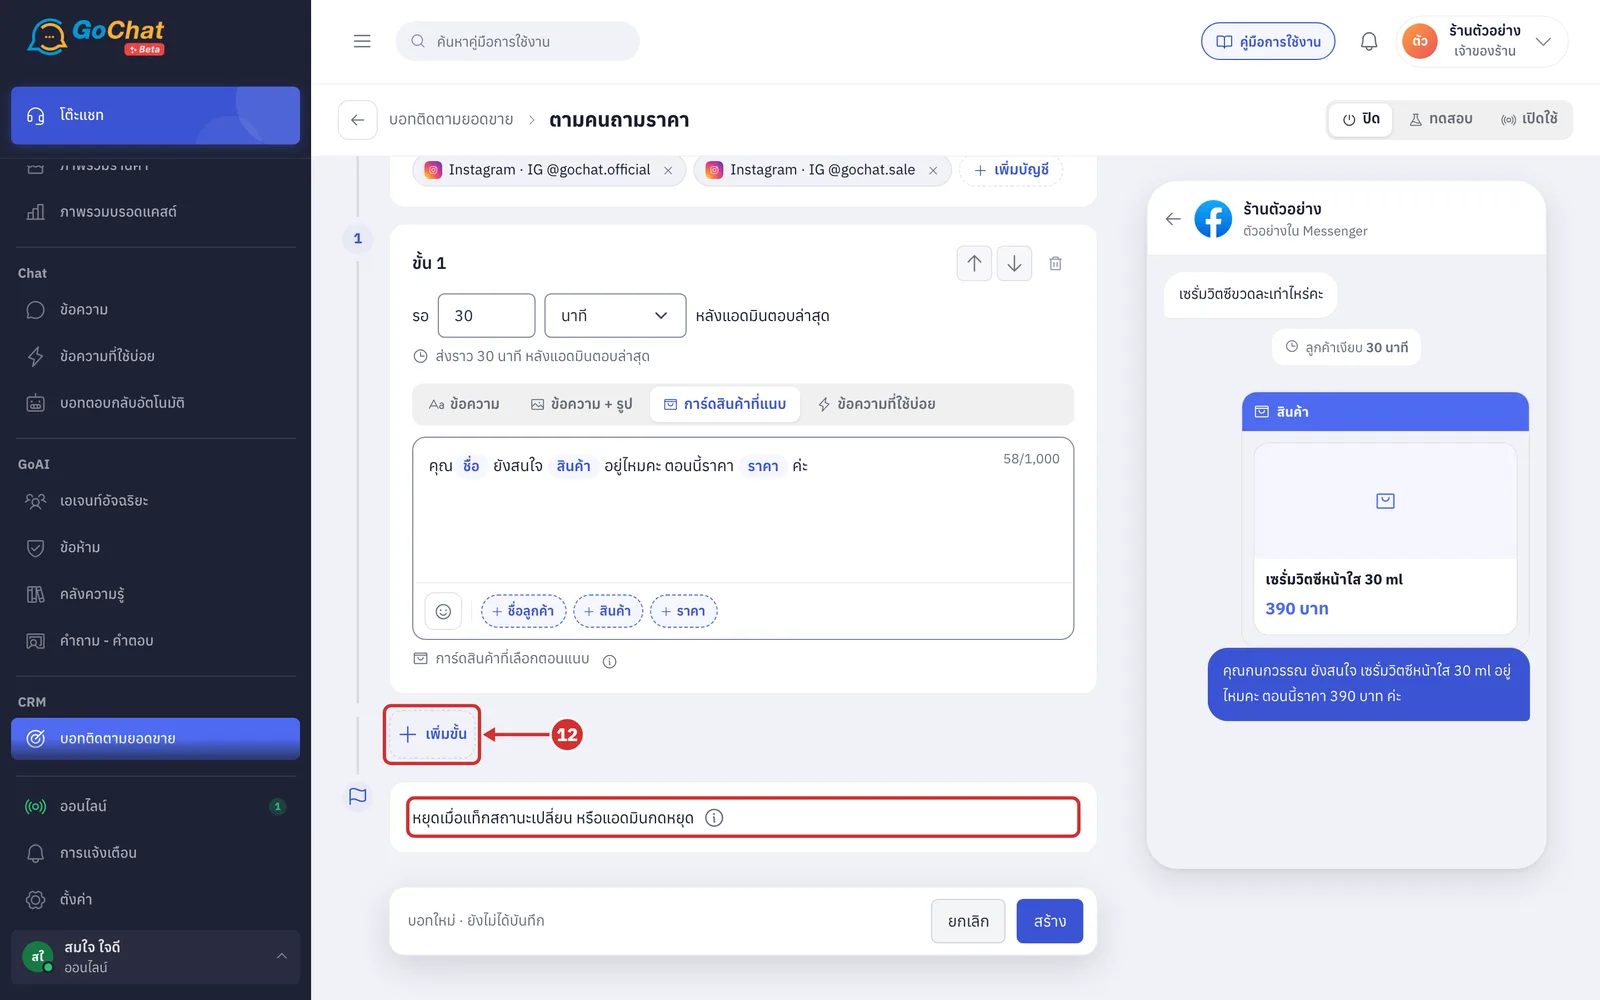
To follow up again when the customer still does not reply, click เพิ่มขั้น (Add step), then set the next step's wait and message
Next steps start with ถ้ายังไม่ตอบ รอต่ออีก (If still no reply, wait another) and count the wait from the previous step
You can set up to 10 steps, with no more than 23 hours in total
Under the button is the stop condition หยุดเมื่อแท็กสถานะเปลี่ยน หรือแอดมินกดหยุด (Stops when the status tag changes or an admin stops it); other reasons the bot stops are in Why the bot stops following
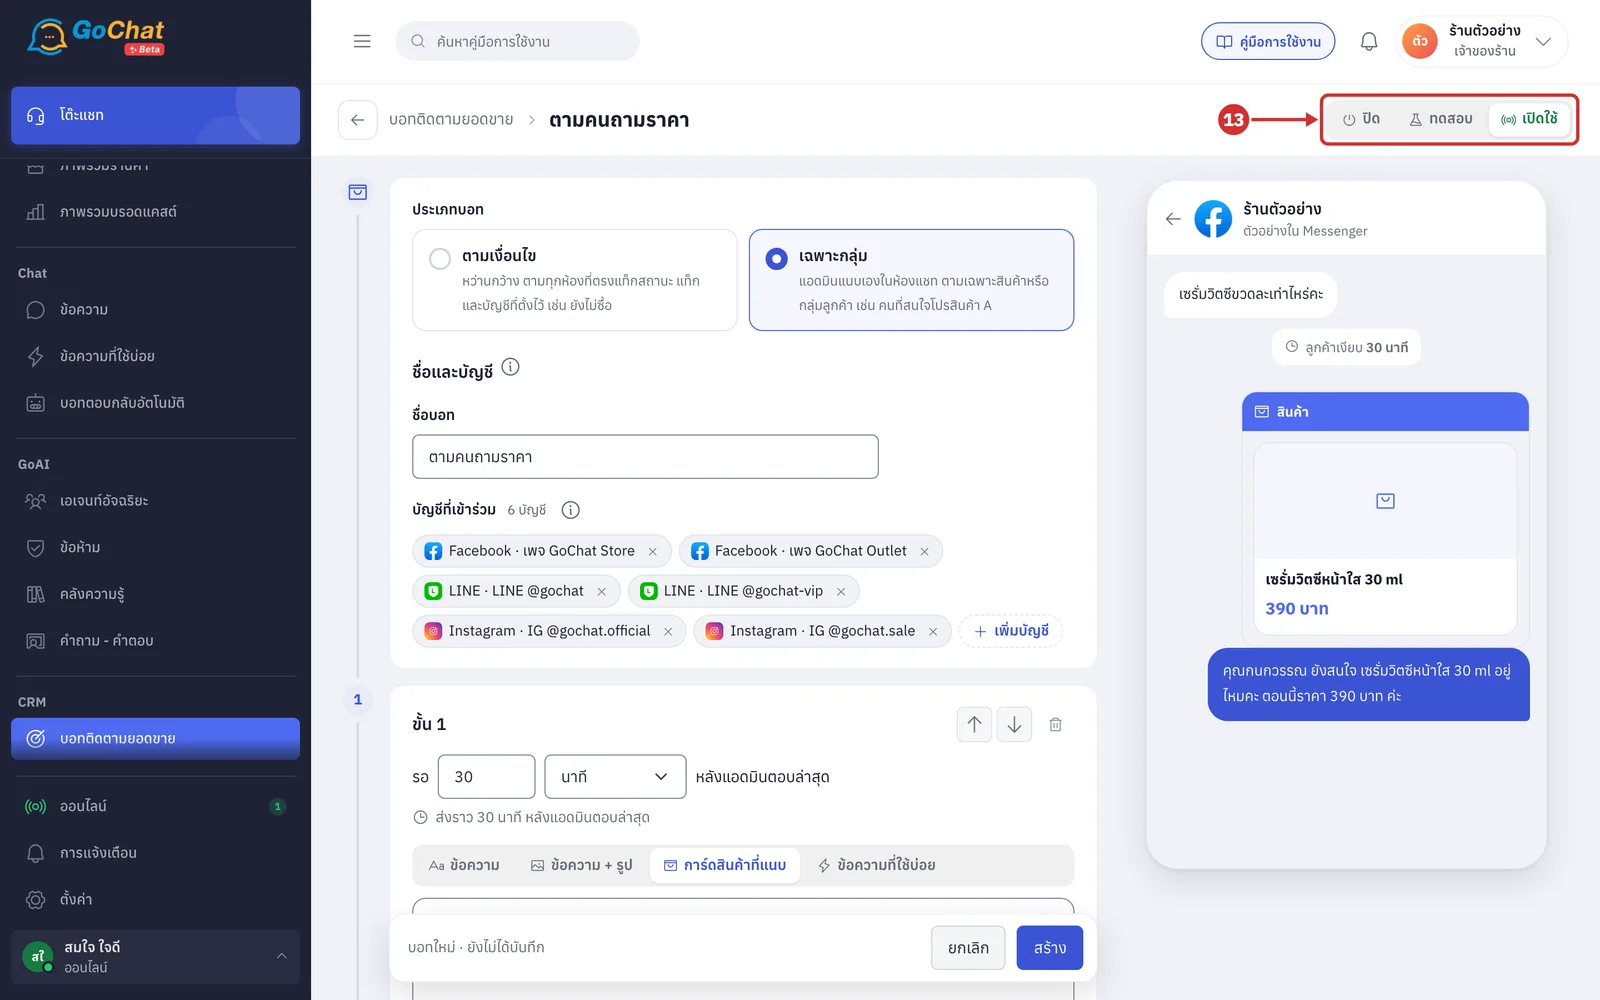
At the top right, choose the bot's status
ปิด (Off) — cannot be attached in chats yet; new bots start in this status
ทดสอบ (Test) — can only be attached in the chats of the test chats you chose; how to choose test chats is explained in Creating a sales follow-up bot
เปิดใช้ (On) — can be attached in every chat of the chosen accounts; this example uses this status
The status is saved when you click สร้าง (Create)
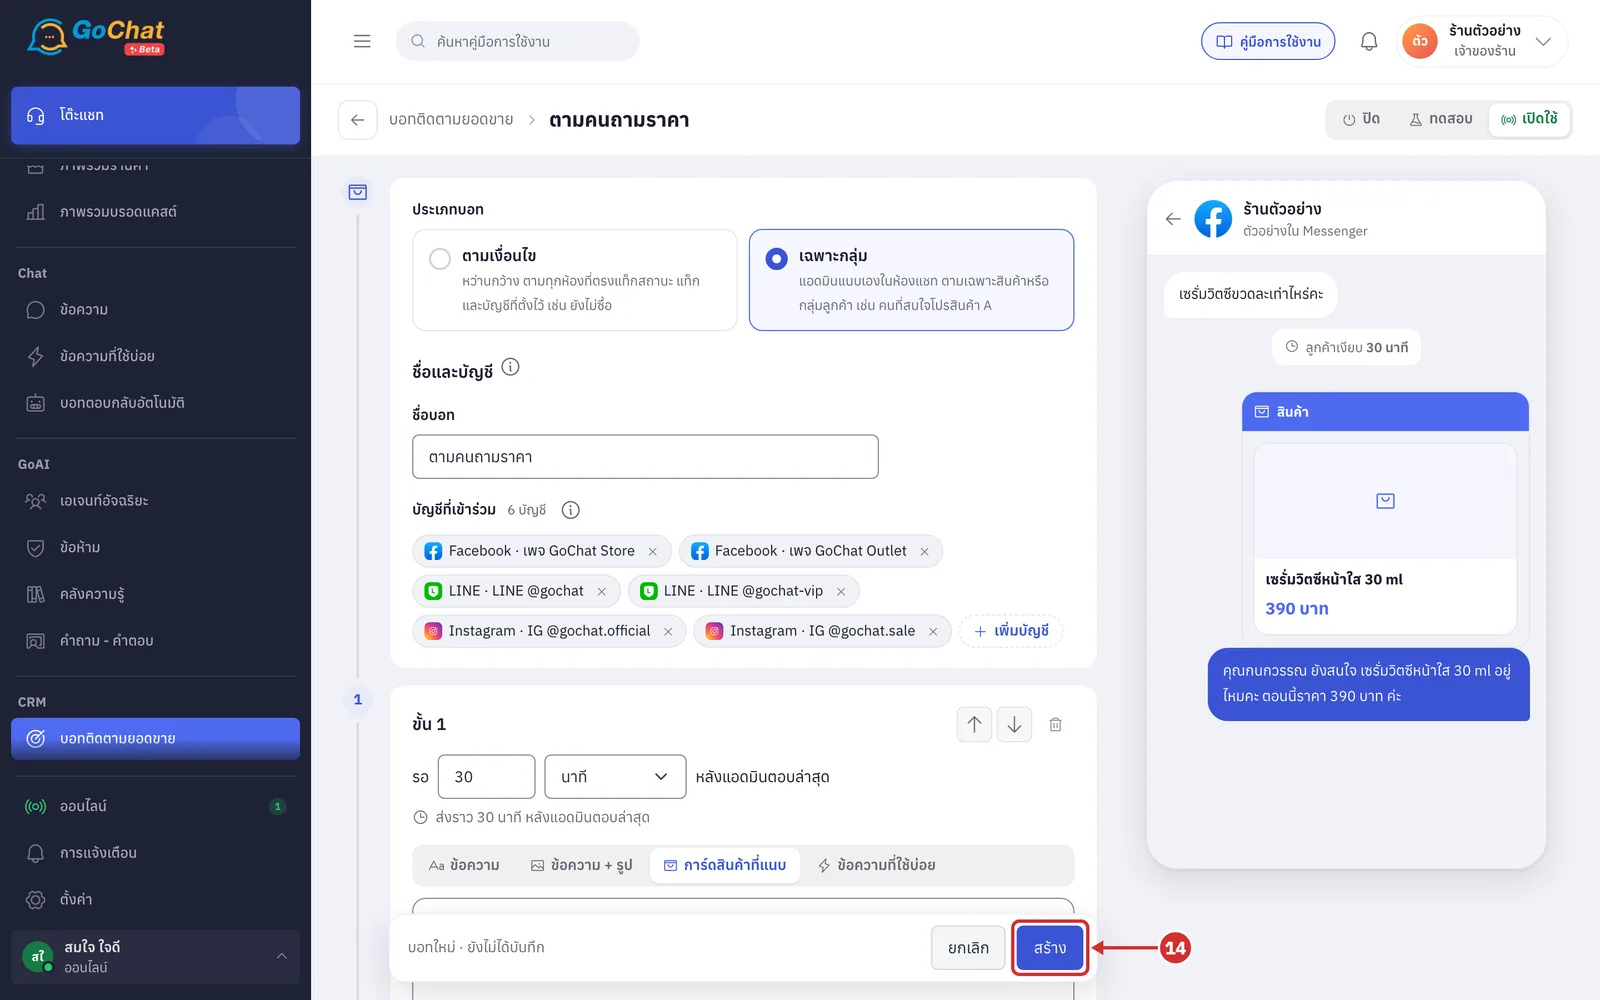
Click สร้าง (Create)
Before you click, the bar at the bottom shows บอทใหม่ · ยังไม่ได้บันทึก (New bot · Not saved yet)
Click ยกเลิก (Cancel) to go back without saving
If something is missing, the bar at the bottom shows red text saying what to fix, such as เลือกบัญชีอย่างน้อย 1 บัญชี (Choose at least 1 account)
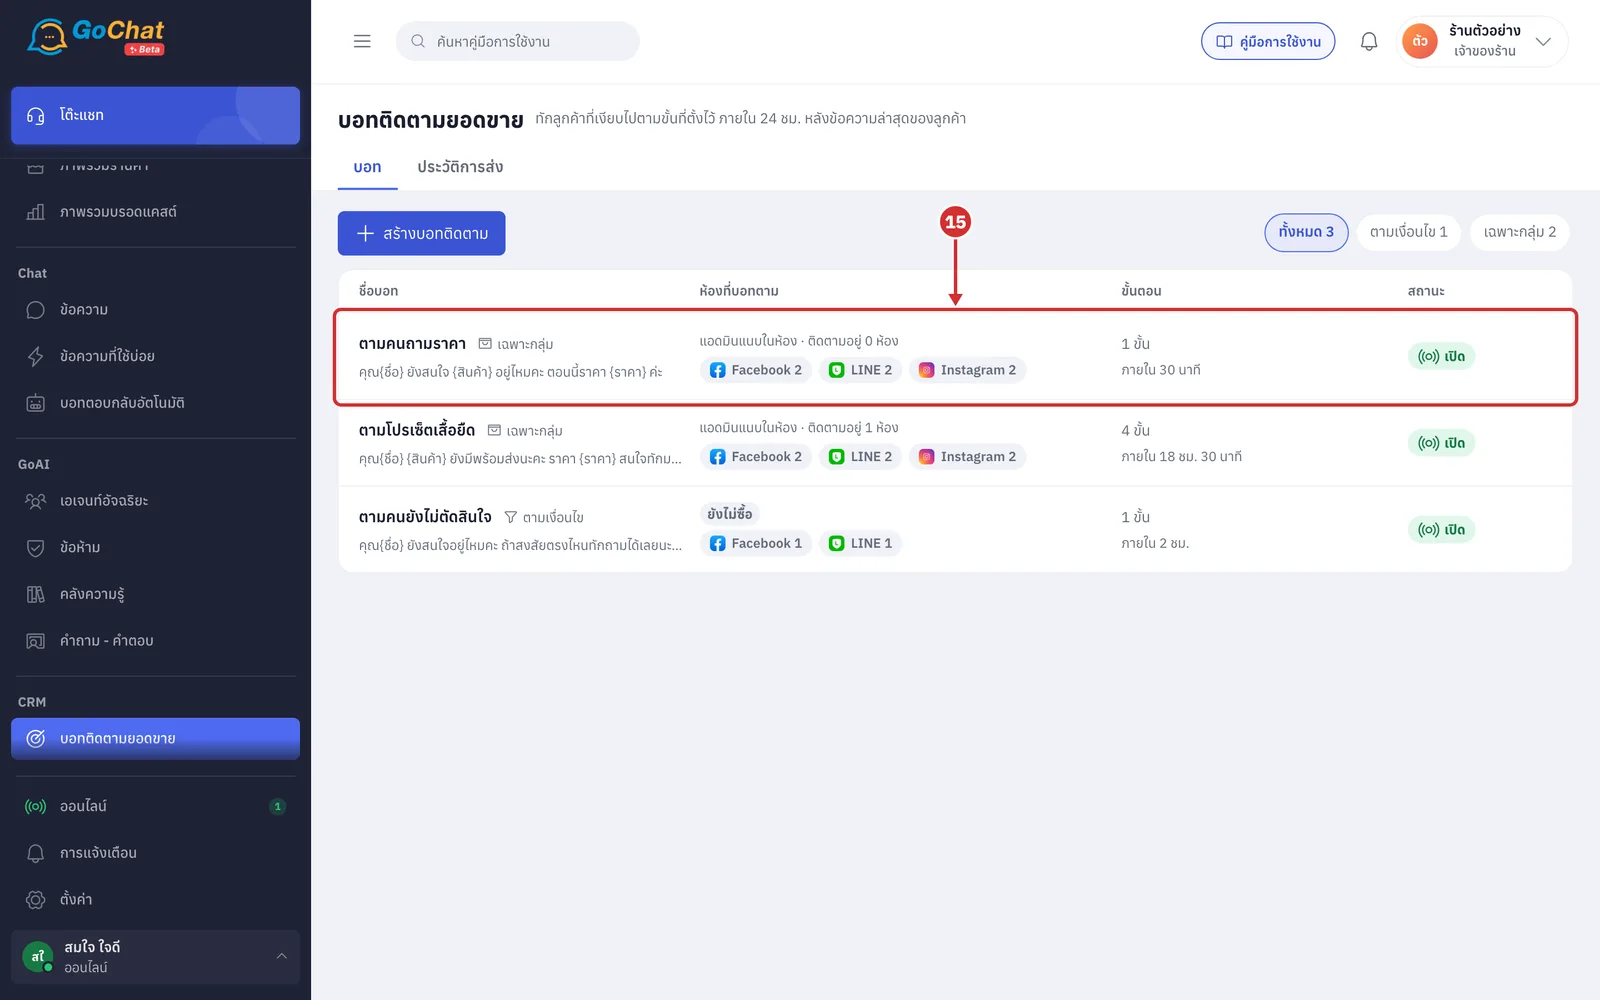
The app goes back to the บอทติดตามยอดขาย (Sales follow-up bot) page, and the new bot appears in the list
For selected-chats bots, the ห้องที่บอทตาม (Chats the bot follows) column shows แอดมินแนบในห้อง · ติดตามอยู่ N ห้อง (Attached by admins in chats · Following N chats) with the account labels
The ขั้นตอน (Steps) column shows the number of steps and the total time
Attaching the bot in a chat
A selected-chats bot does not pick chats on its own. An admin attaches it in each chat and picks the product the customer is interested in.
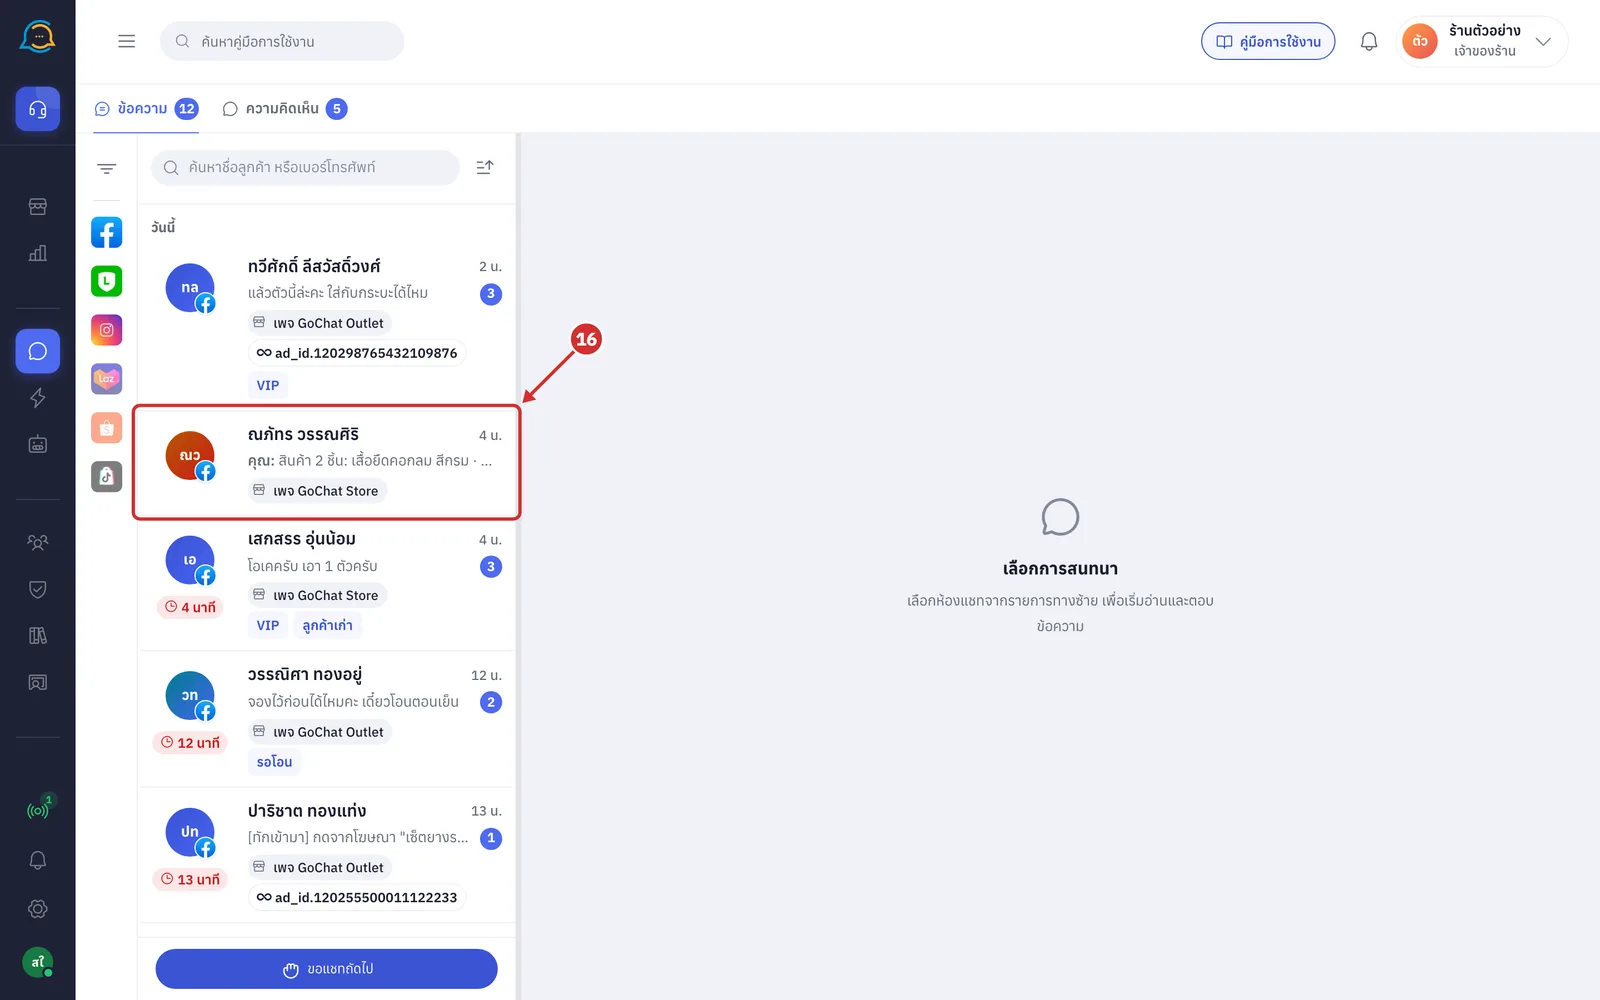
On the ข้อความ (Messages) page, click the chat of the customer you want to follow up
In the right panel, on the บอทติดตาม (Follow-up bot) row, click บอทติดตาม (Follow-up bot)
This row only appears in private chats of Messenger, Instagram and LINE
If the chat has suggested products and a selected-chats bot that can be used in it, แนะนำ “ชื่อบอท” (Suggested “bot name”) appears after the button; the suggested bot is the most recently created selected-chats bot that can be used in this chat
If you cannot edit this chat, for example because it is held by another admin, the button cannot be clicked; point at or tap it to see why
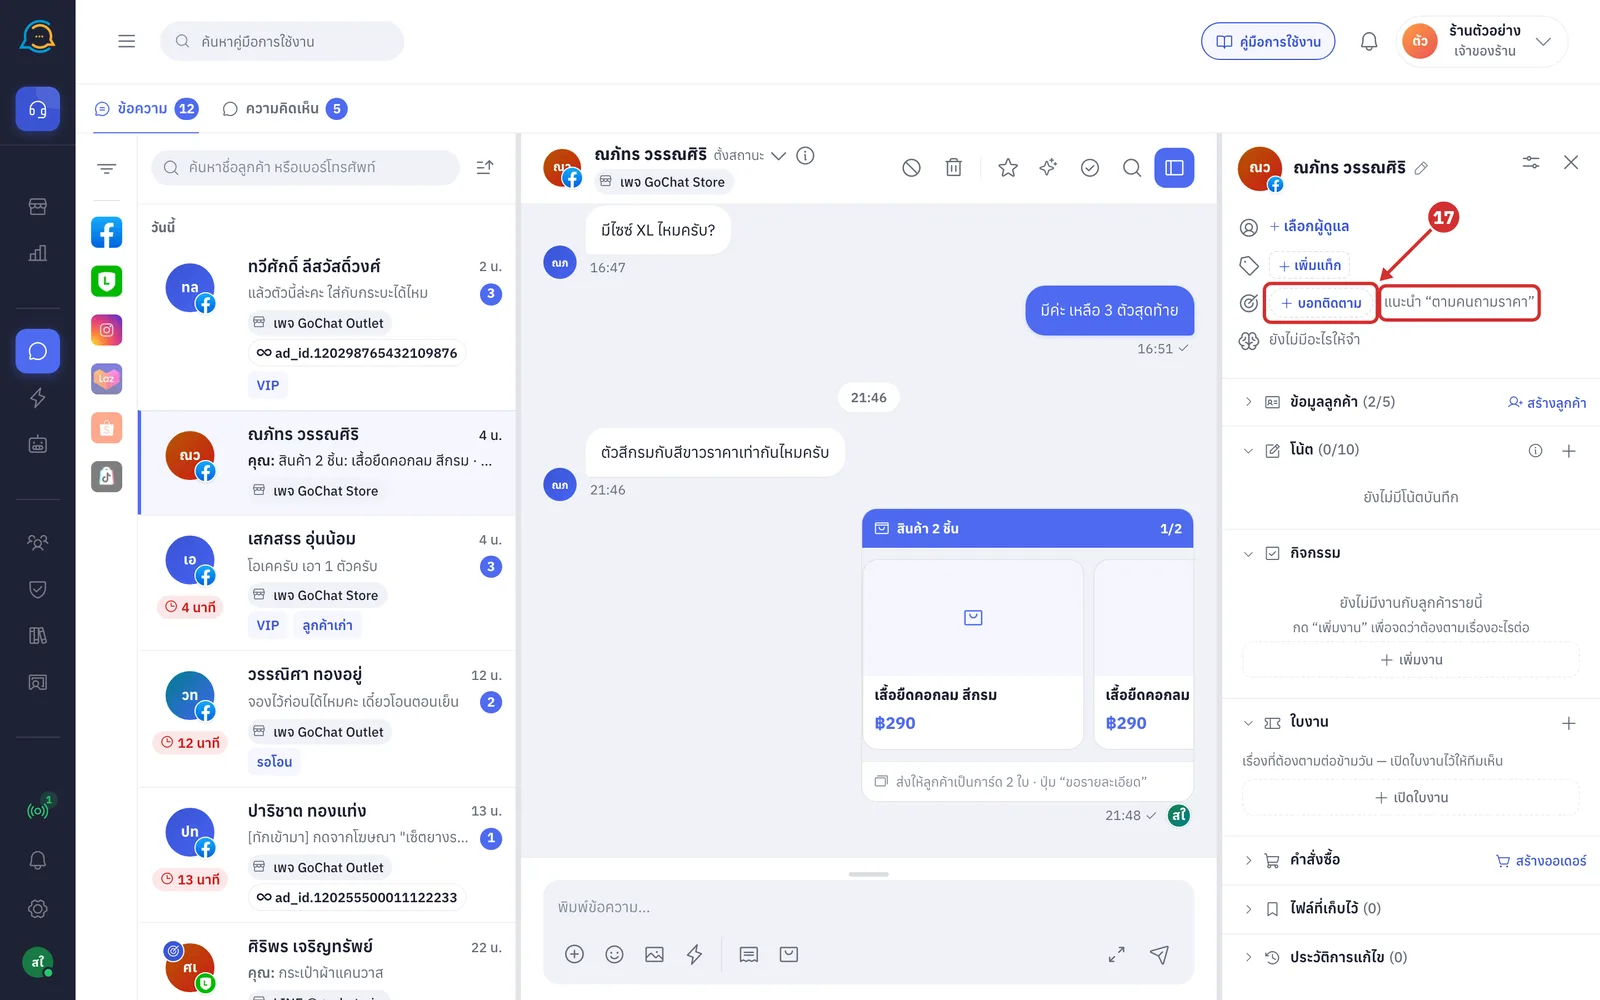
In the แนบบอทติดตาม (Attach follow-up bot) window, under บอท (Bot), choose the bot to use
Each bot shows its number of steps and total time, such as 1 ขั้น · ภายใน 30 นาที (1 step · within 30 minutes)
The suggested bot is selected for you first; without a suggestion, the first bot in the list is selected
The list only shows selected-chats bots that are เปิดใช้ (On) and include this chat's account, or bots in ทดสอบ (Test) where this chat is a test chat
If no bot can be used, ยังไม่มีบอทเฉพาะกลุ่มที่เปิดอยู่ (No selected-chats bot is on yet) appears with the link ไปที่บอทติดตามยอดขาย (Go to Sales follow-up bot)
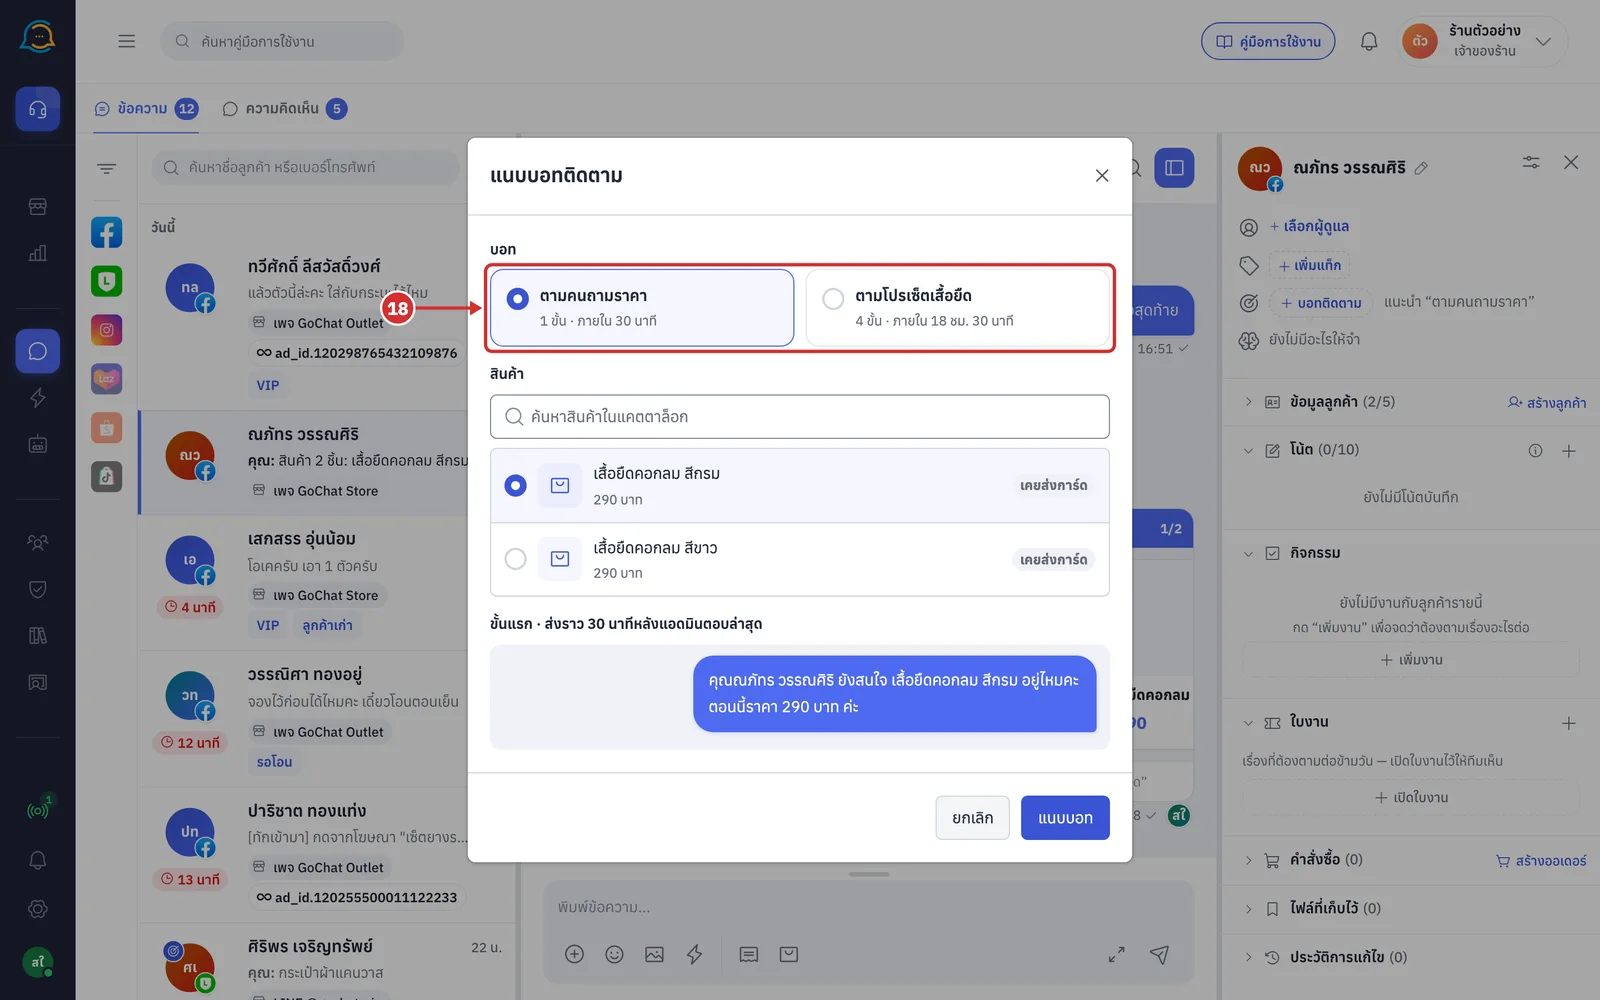
Under สินค้า (Product), choose the product the customer is interested in from the suggested products; the first one is selected for you. The label after each product shows where the suggestion comes from
เคยส่งการ์ด (Card sent before) — your shop sent this product's card in the chat within the last 30 days
อยู่ในร่างออเดอร์ (In a draft order) — the product is in a draft order of this chat
CF ในไลฟ์ (CF in a live) — the customer confirmed this product in a live, and that order has not been cancelled
More details
Up to 5 suggested products are shown
If the chat has no suggested products yet, ห้องนี้ยังไม่มีสินค้าที่แนะนำ ค้นจากแคตตาล็อกด้านบน (This chat has no suggested products yet; search the catalogue above) appears
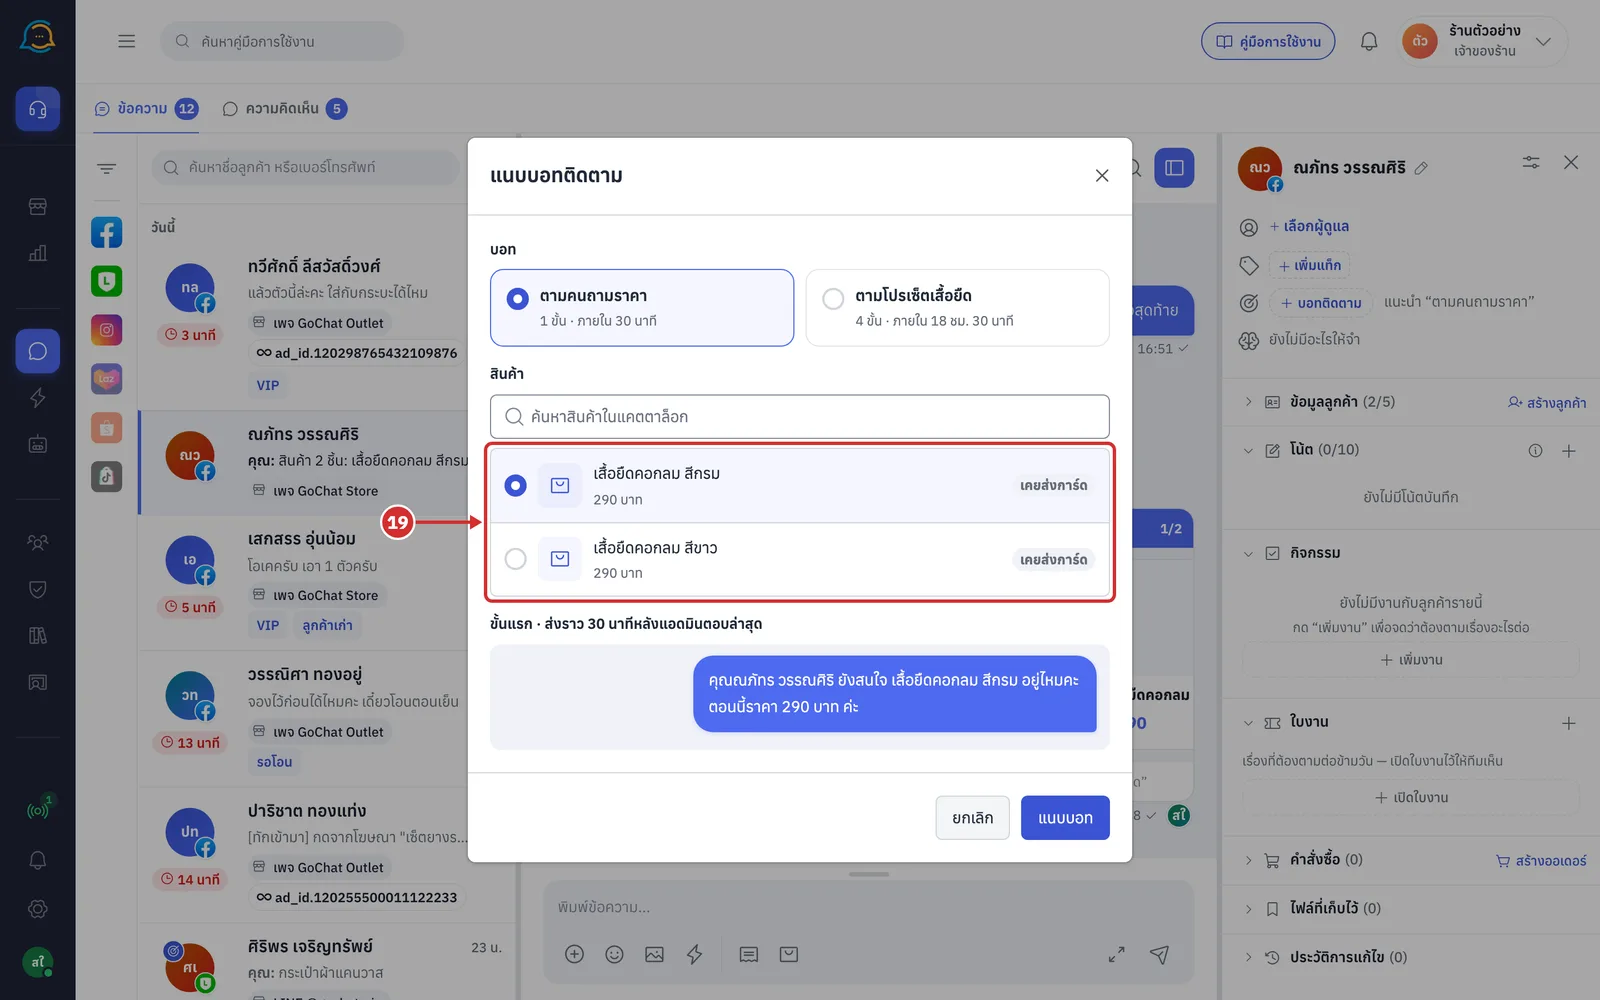
If the product you want is not in the list, type a product name or SKU in ค้นหาสินค้าในแคตตาล็อก (Search the catalogue), then choose the product from the results
Searching only works for shops connected to GoSaaS; otherwise ร้านนี้ยังไม่ได้เชื่อม GoSaaS จึงค้นสินค้าไม่ได้ (This shop is not connected to GoSaaS, so products cannot be searched) appears
If nothing matches, ไม่พบสินค้าที่ค้น (No matching products) appears
Clear the search to go back to the suggested products
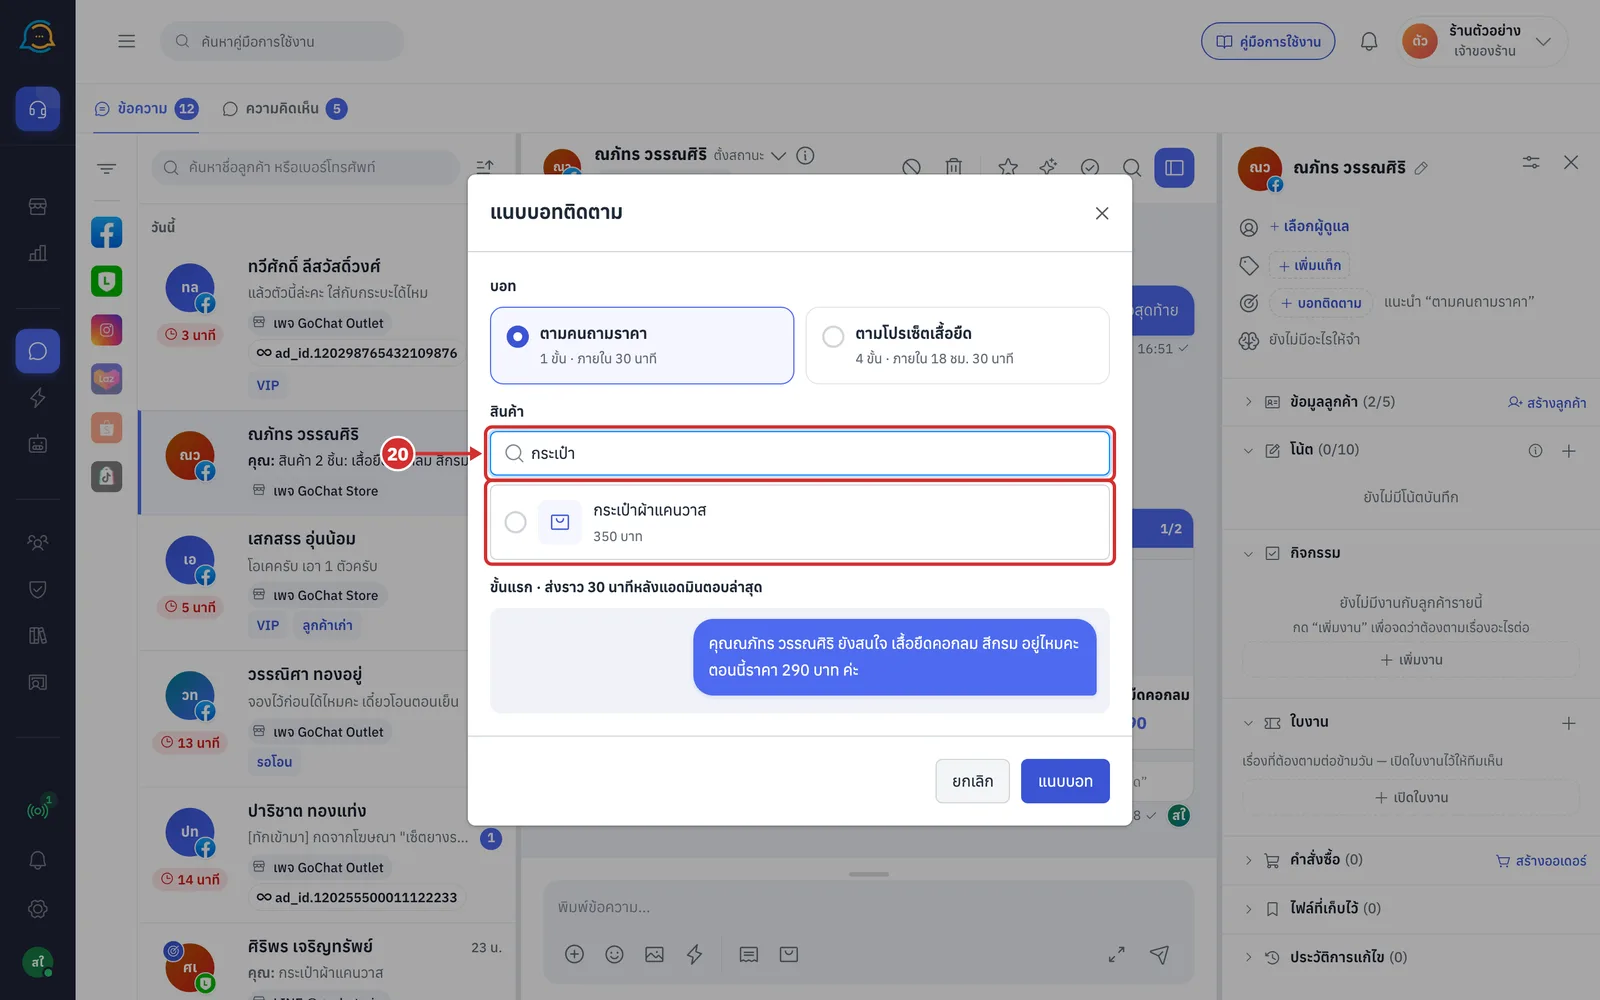
Check the sample message of ขั้นแรก (First step), which already uses the real customer name, product name and price
The heading says when the bot will send, such as ขั้นแรก · ส่งราว 30 นาทีหลังแอดมินตอบล่าสุด (First step · sent about 30 minutes after the admin's last reply)
If the first step is a product card with no message, the sample shows การ์ดสินค้า · ชื่อสินค้า (Product card · product name)
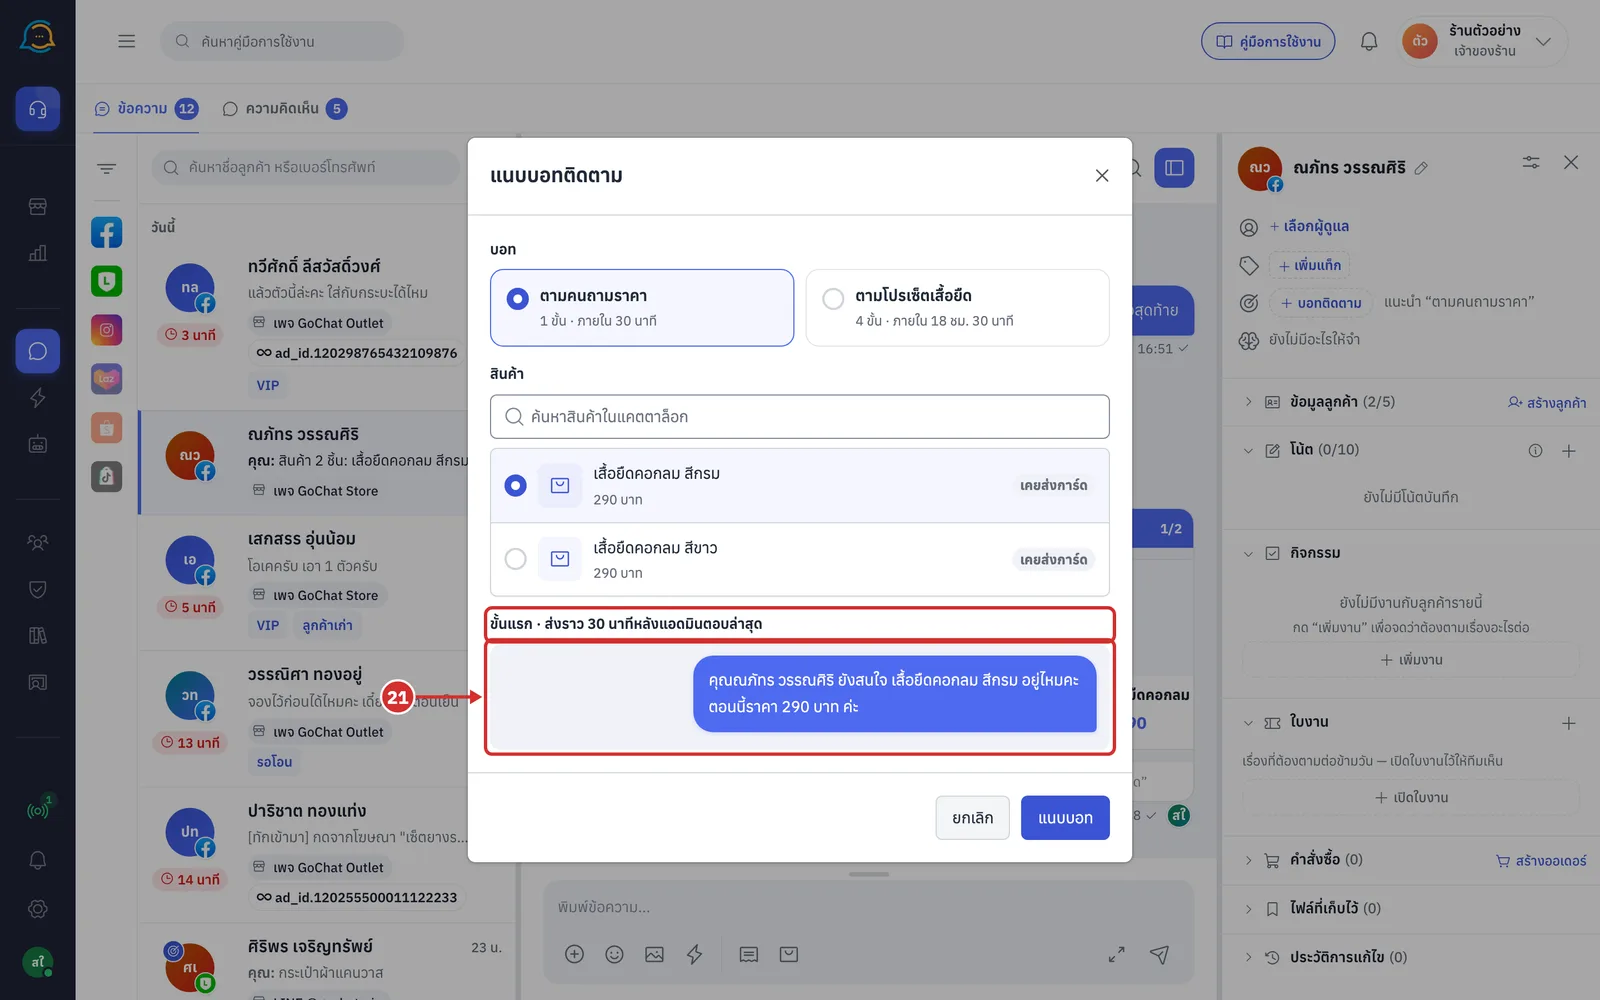
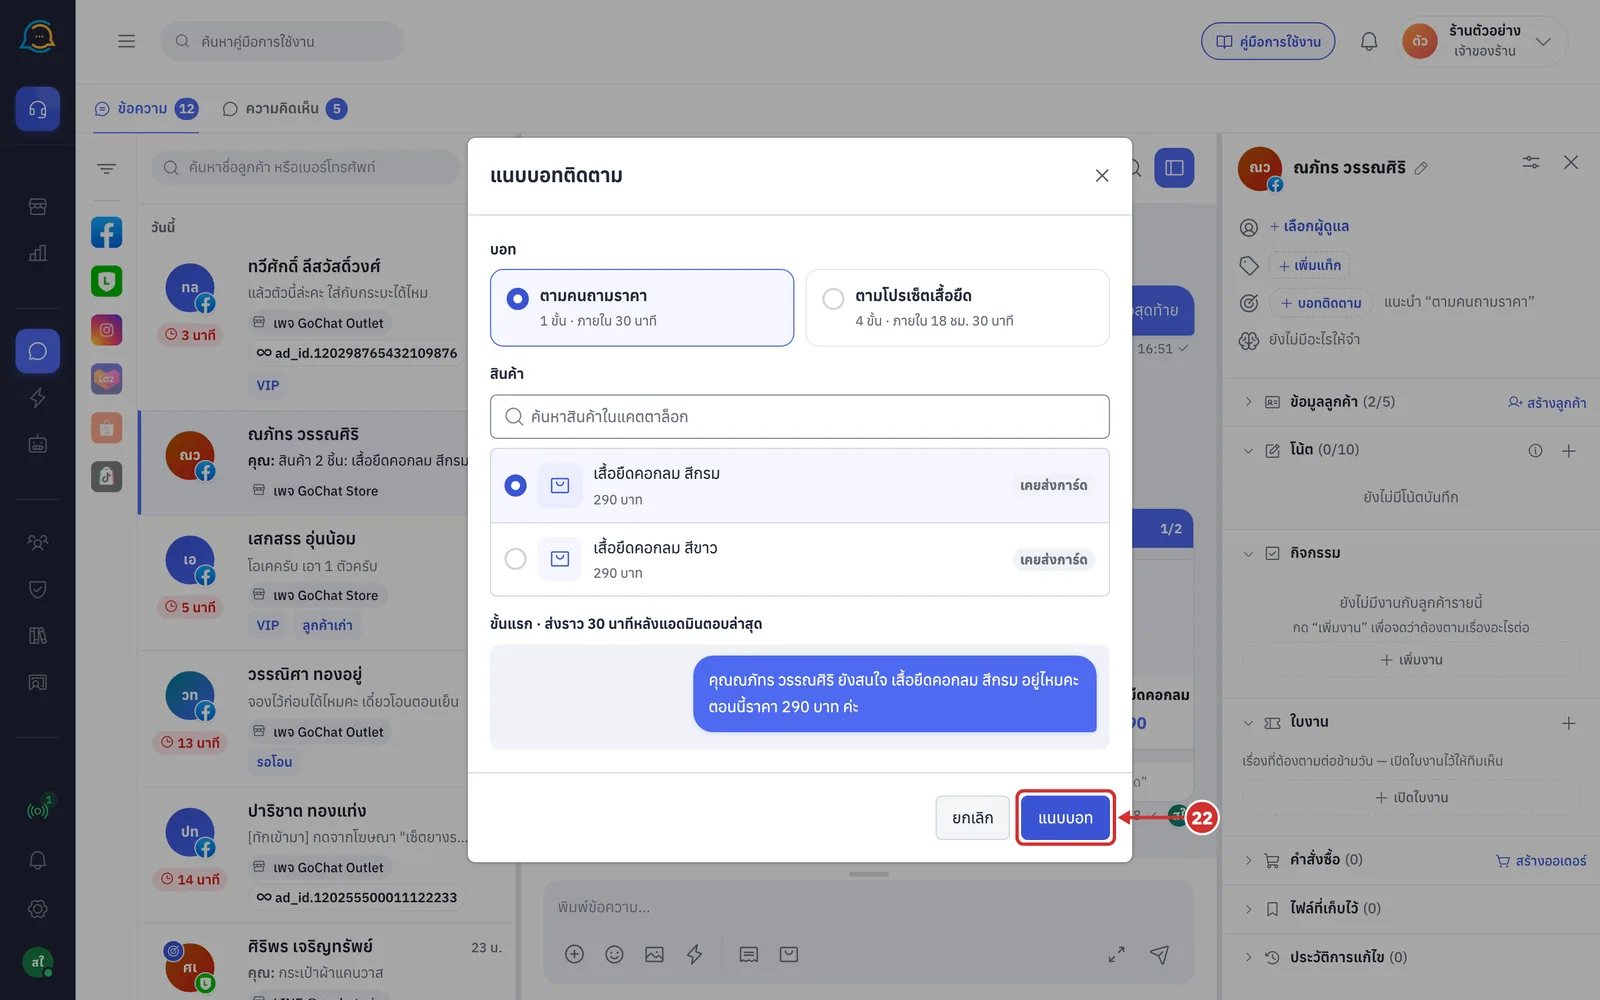
Click แนบบอท (Attach bot)
The button works once both a bot and a product are chosen, and shows กำลังแนบ… (Attaching…) while it works
Click ยกเลิก (Cancel) to close the window without attaching
If attaching fails, a message explains why; see Messages when attaching fails
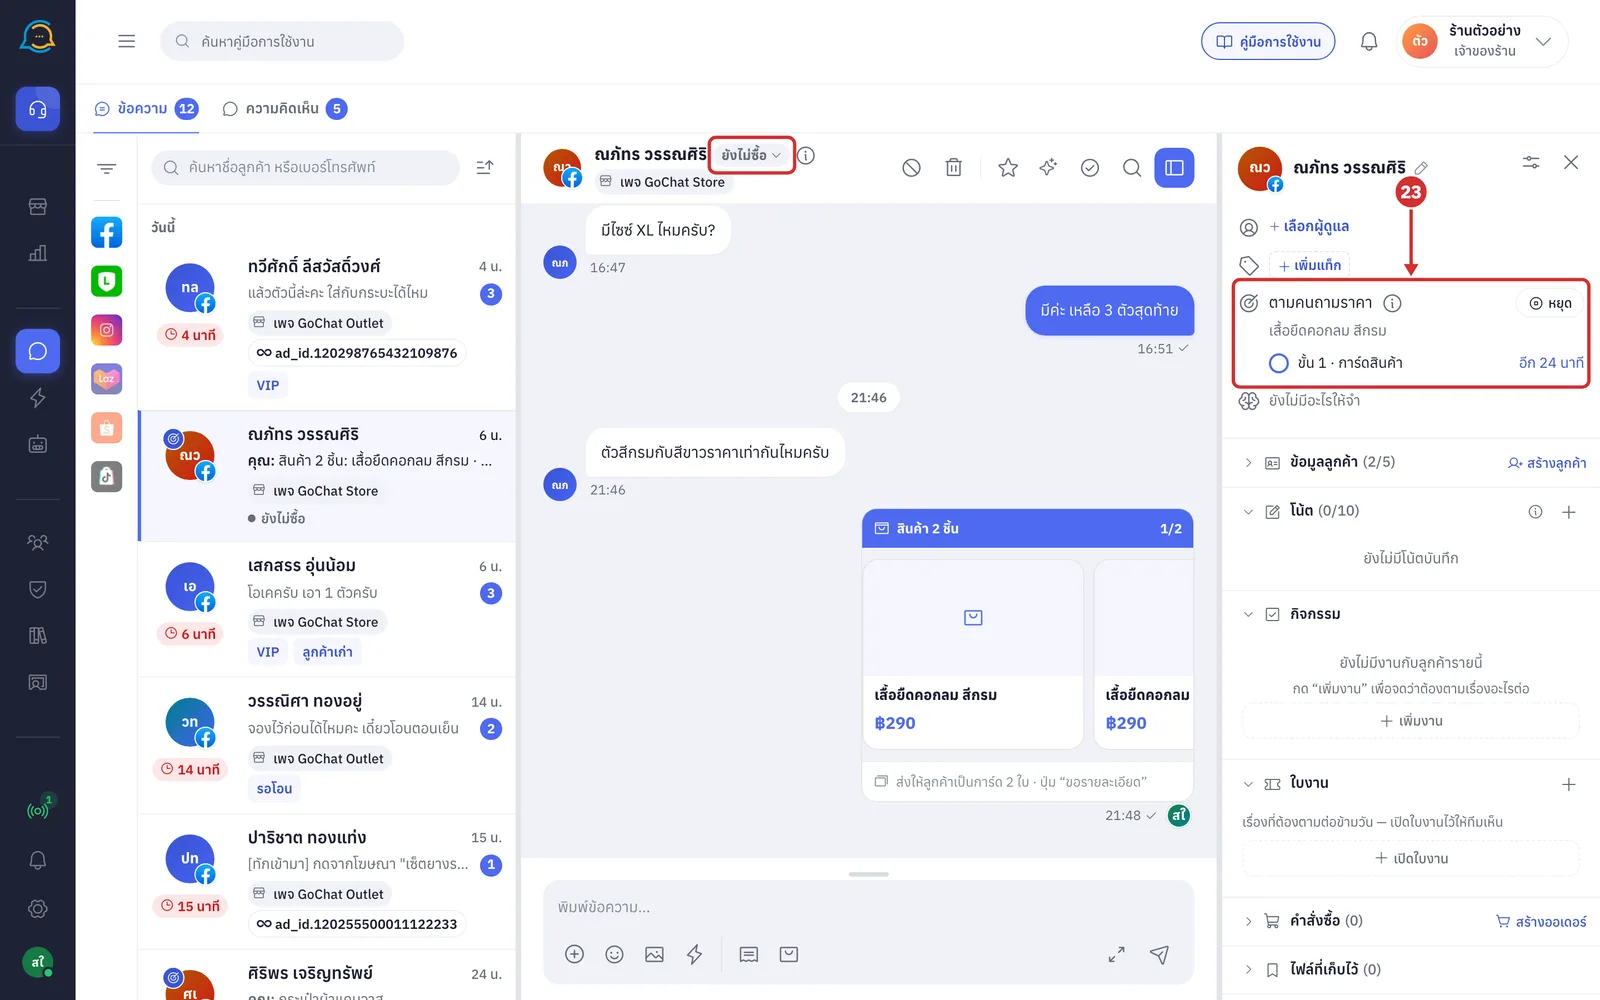
The window closes, and the บอทติดตาม (Follow-up bot) row shows the bot name, the chosen product and the steps with when they will be sent
If the chat had no status tag, the status label at the top of the chat is set to ยังไม่ซื้อ (Not bought yet) for you (it showed ตั้งสถานะ (Set status) before)
In the chat list, the customer's picture gets a bot badge; see step 26
Reading the follow-up bot row
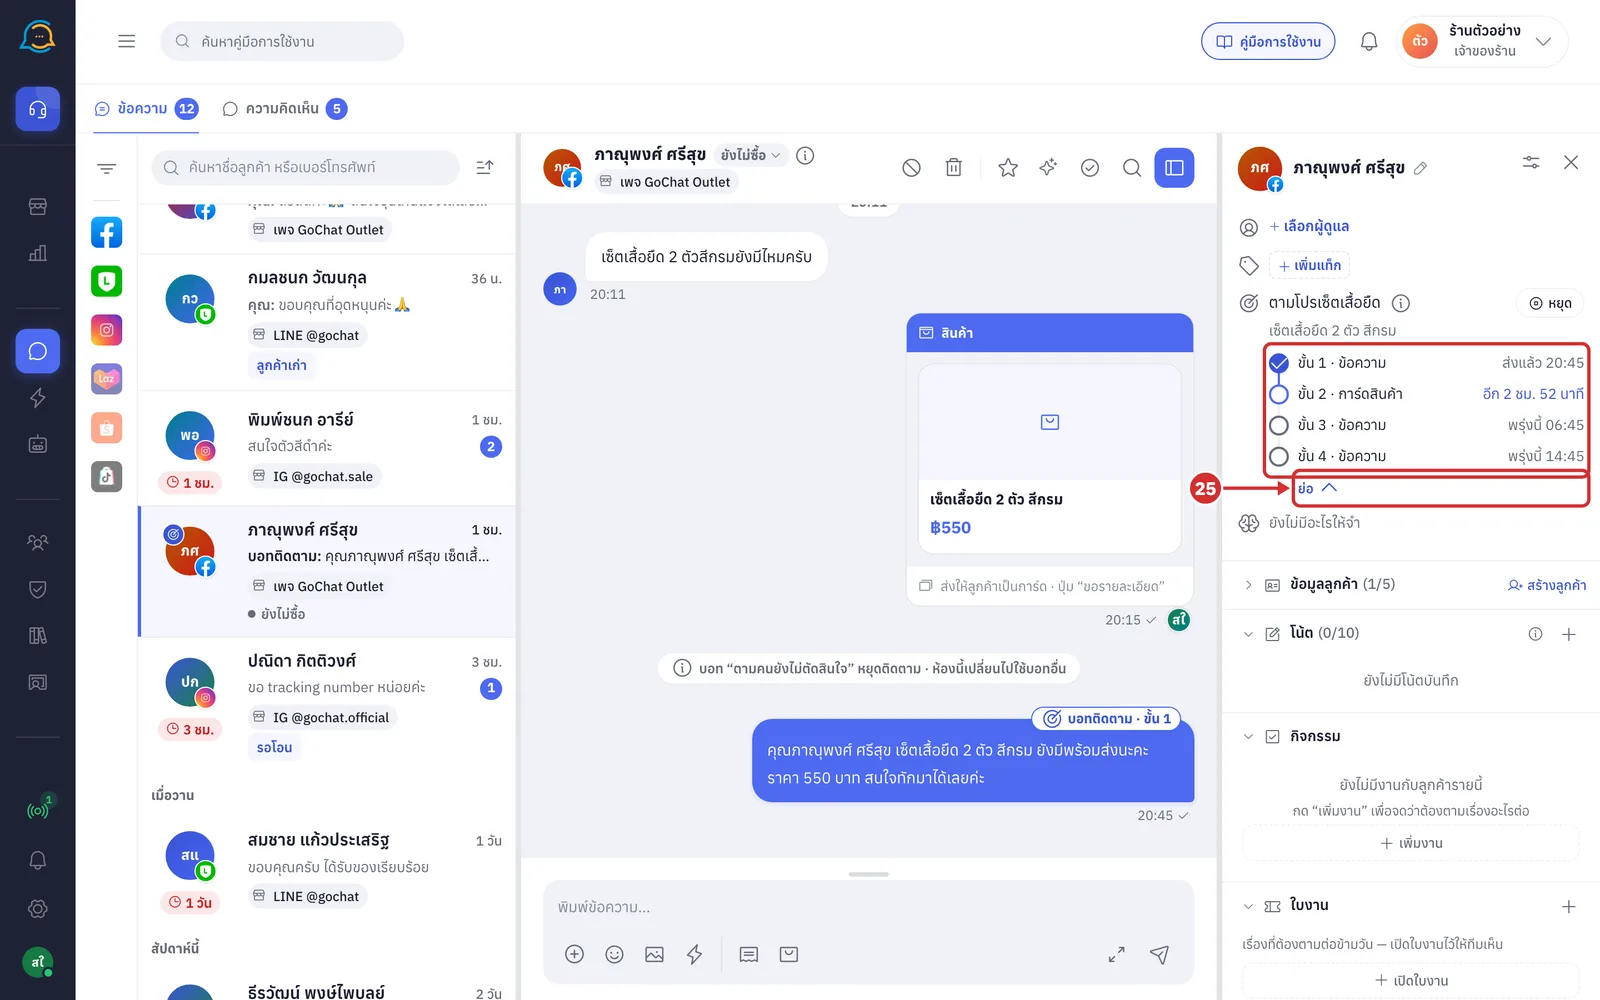
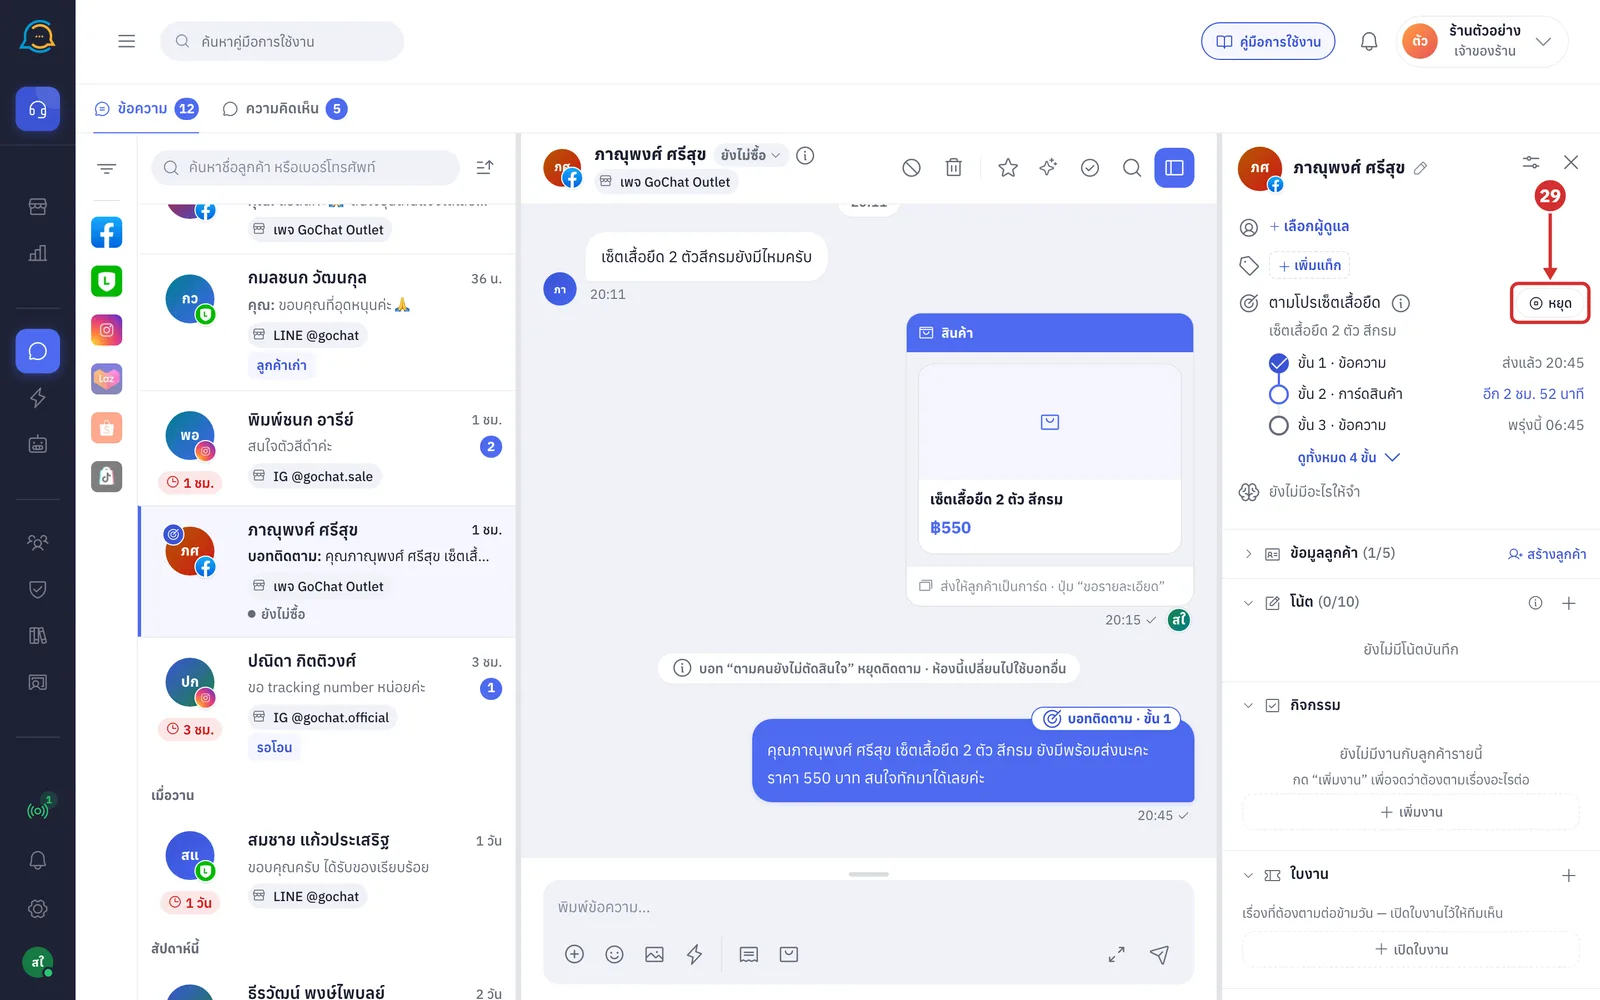
While the bot is following a chat, the บอทติดตาม (Follow-up bot) row in the right panel shows its progress in that chat.
Open a chat the bot is following. The บอทติดตาม (Follow-up bot) row shows
The bot name, with an i icon that explains when the bot stops on its own, and the หยุด (Stop) button
The product name picked when attaching the bot
The steps; each step shows its number, content type and status
Step status
ส่งแล้ว (Sent) followed by a time — a step that has been sent
อีก … (In …) — the time left before the current step is sent
กำลังส่ง (Sending) — the current step is due now
ราว … (About …) or พรุ่งนี้ … (Tomorrow …) — the estimated time of a later step; beyond tomorrow it shows a date
รอส่ง (Waiting to send) — a later step past its estimated time
รอคุณตอบลูกค้า (Waiting for you to reply) — the customer replied while the bot was waiting; the bot does not stop, but waits for an admin to reply before it starts counting the next step
ส่งไม่สำเร็จ (Not sent) — a step that failed to send
ข้ามขั้นนี้ (Step skipped) — a step that could not be sent before the 24-hour window ended
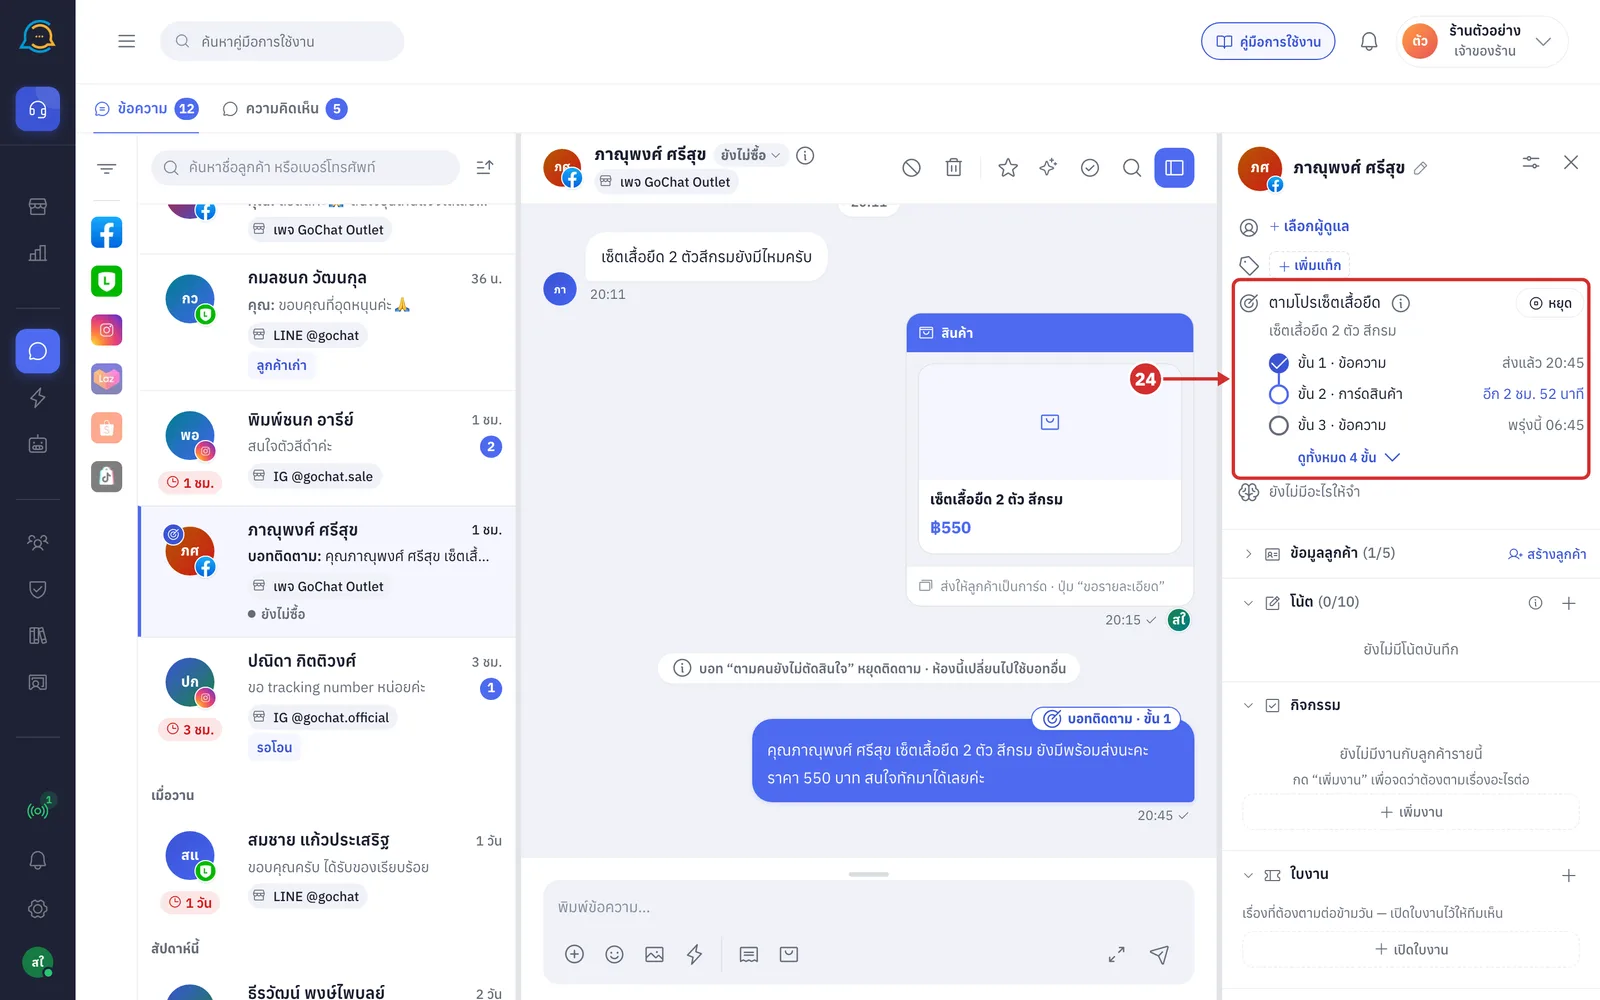
Click ดูทั้งหมด N ขั้น (See all N steps) to see every step
This button only appears for bots with more than 3 steps, which normally show only the previous, current and next step
Once every step is shown, the button changes to ย่อ (Collapse)
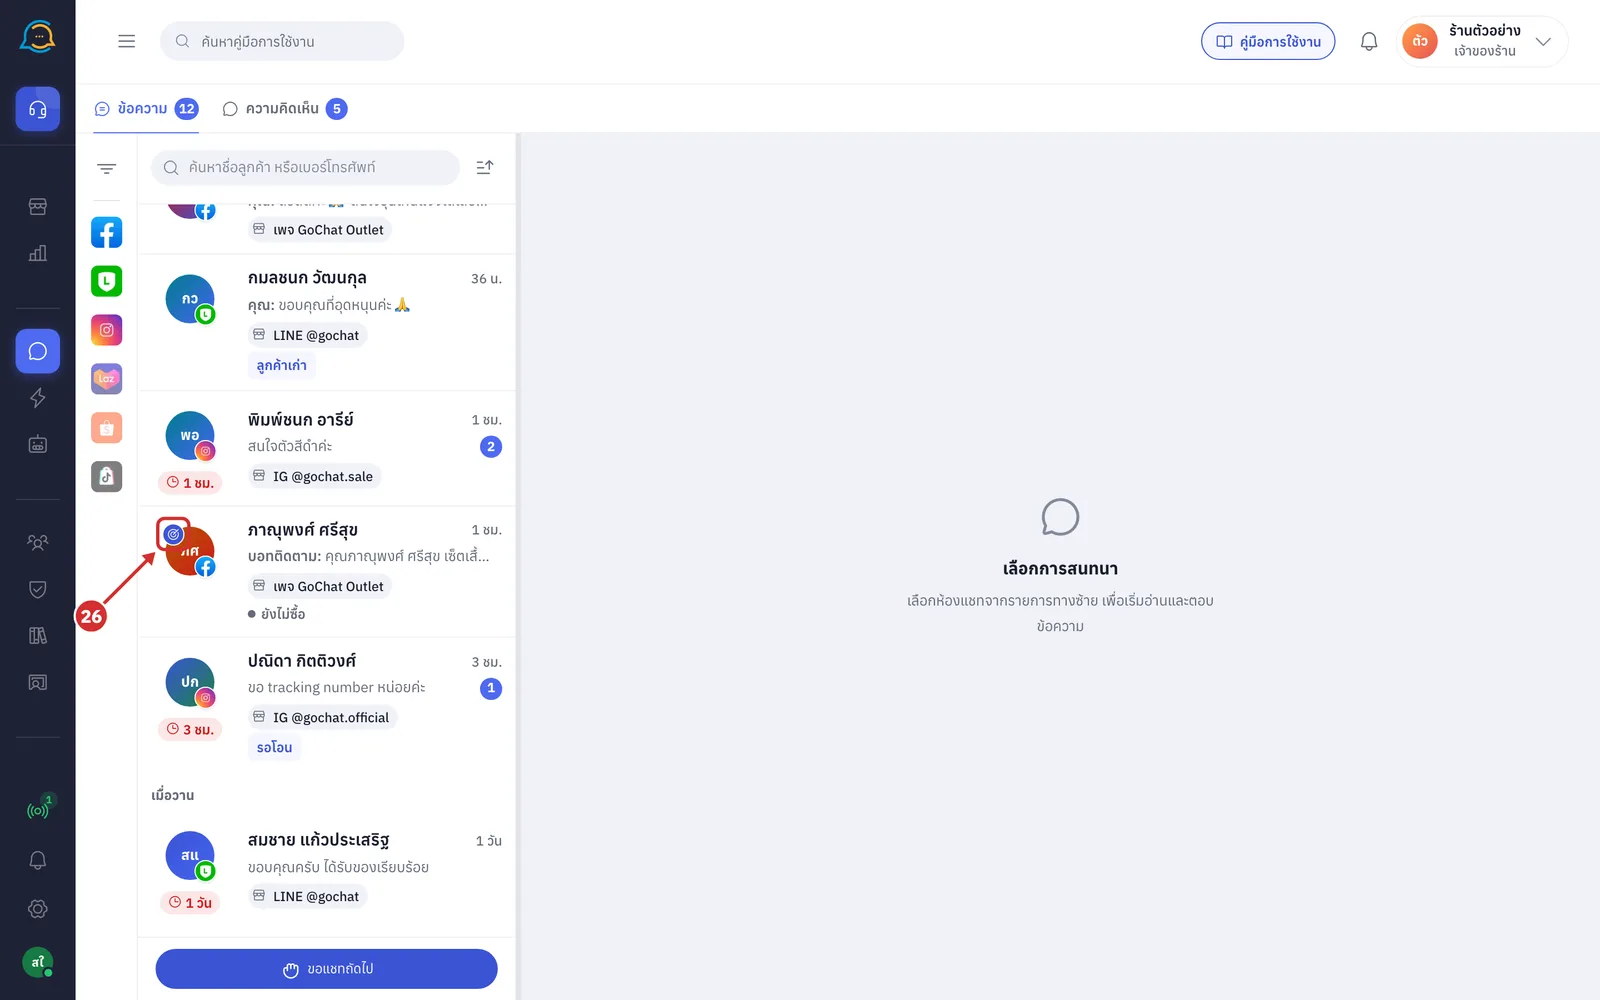
In the chat list, chats the bot is following have a bot badge at the top left of the customer's picture
The badge blinks when the next step will be sent within 10 minutes
Switching from a condition bot to a selected-chats bot
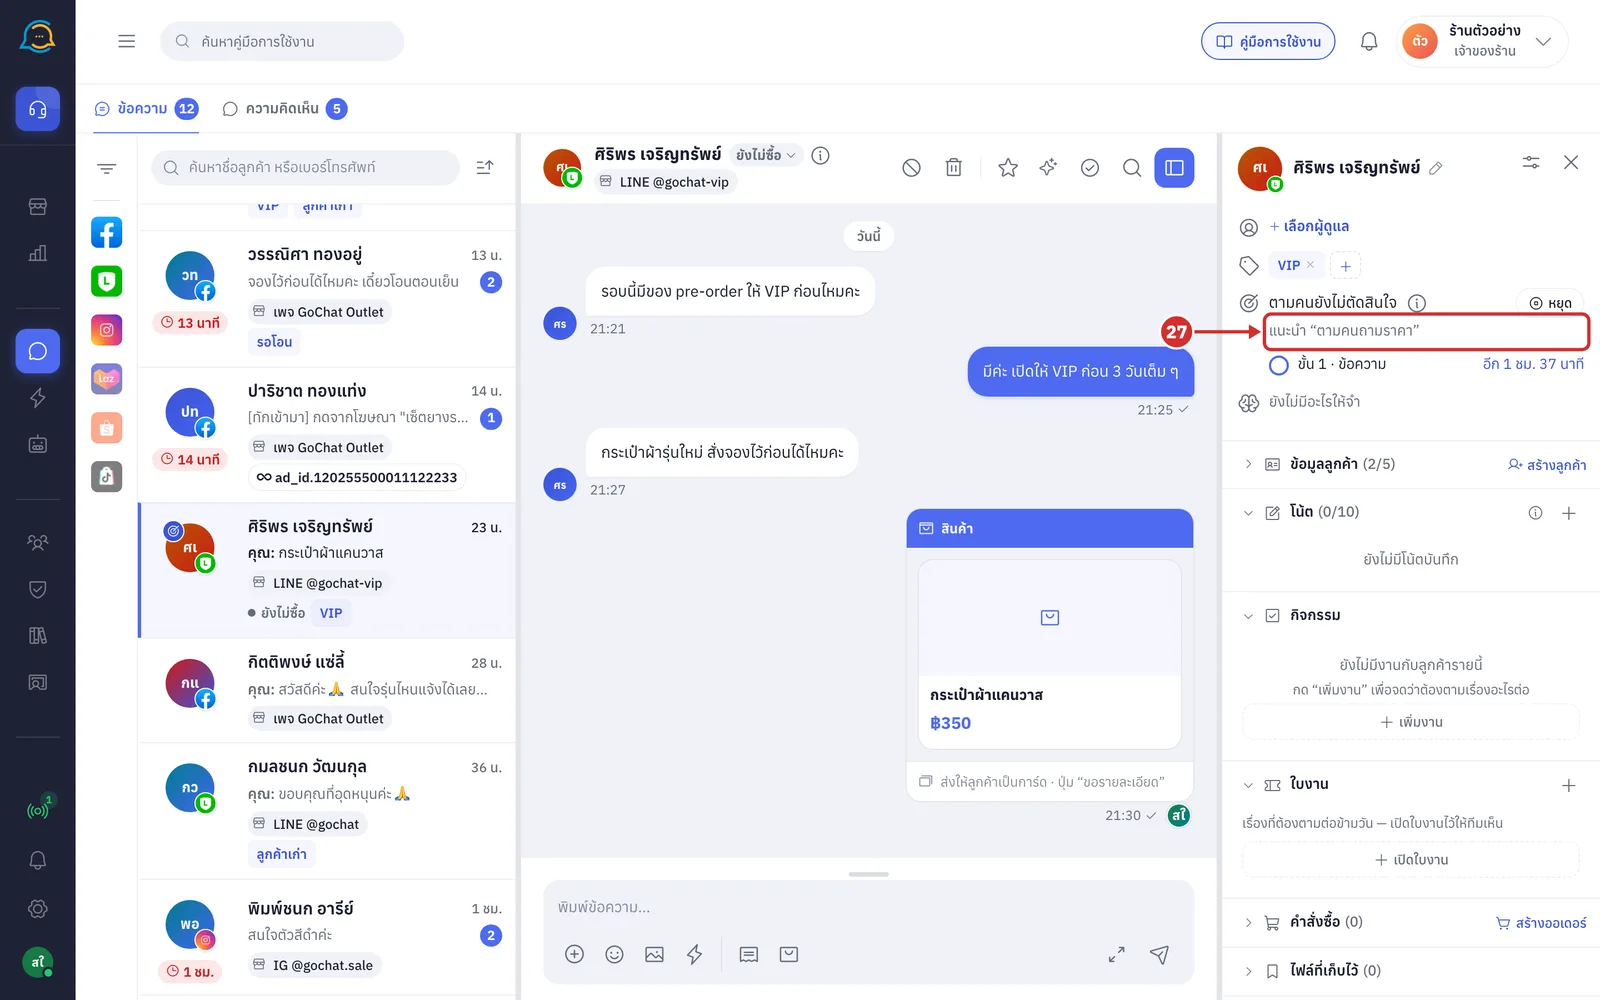
A chat can have one follow-up bot at a time. If a condition bot is following a chat and you want the bot to follow up the product the customer is interested in instead, you can attach a selected-chats bot in its place.
In a chat a condition bot is following, click แนะนำ “ชื่อบอท” (Suggested “bot name”) under the bot name to open the แนบบอทติดตาม (Attach follow-up bot) window
This button appears when the chat has suggested products and a selected-chats bot that can be used in it
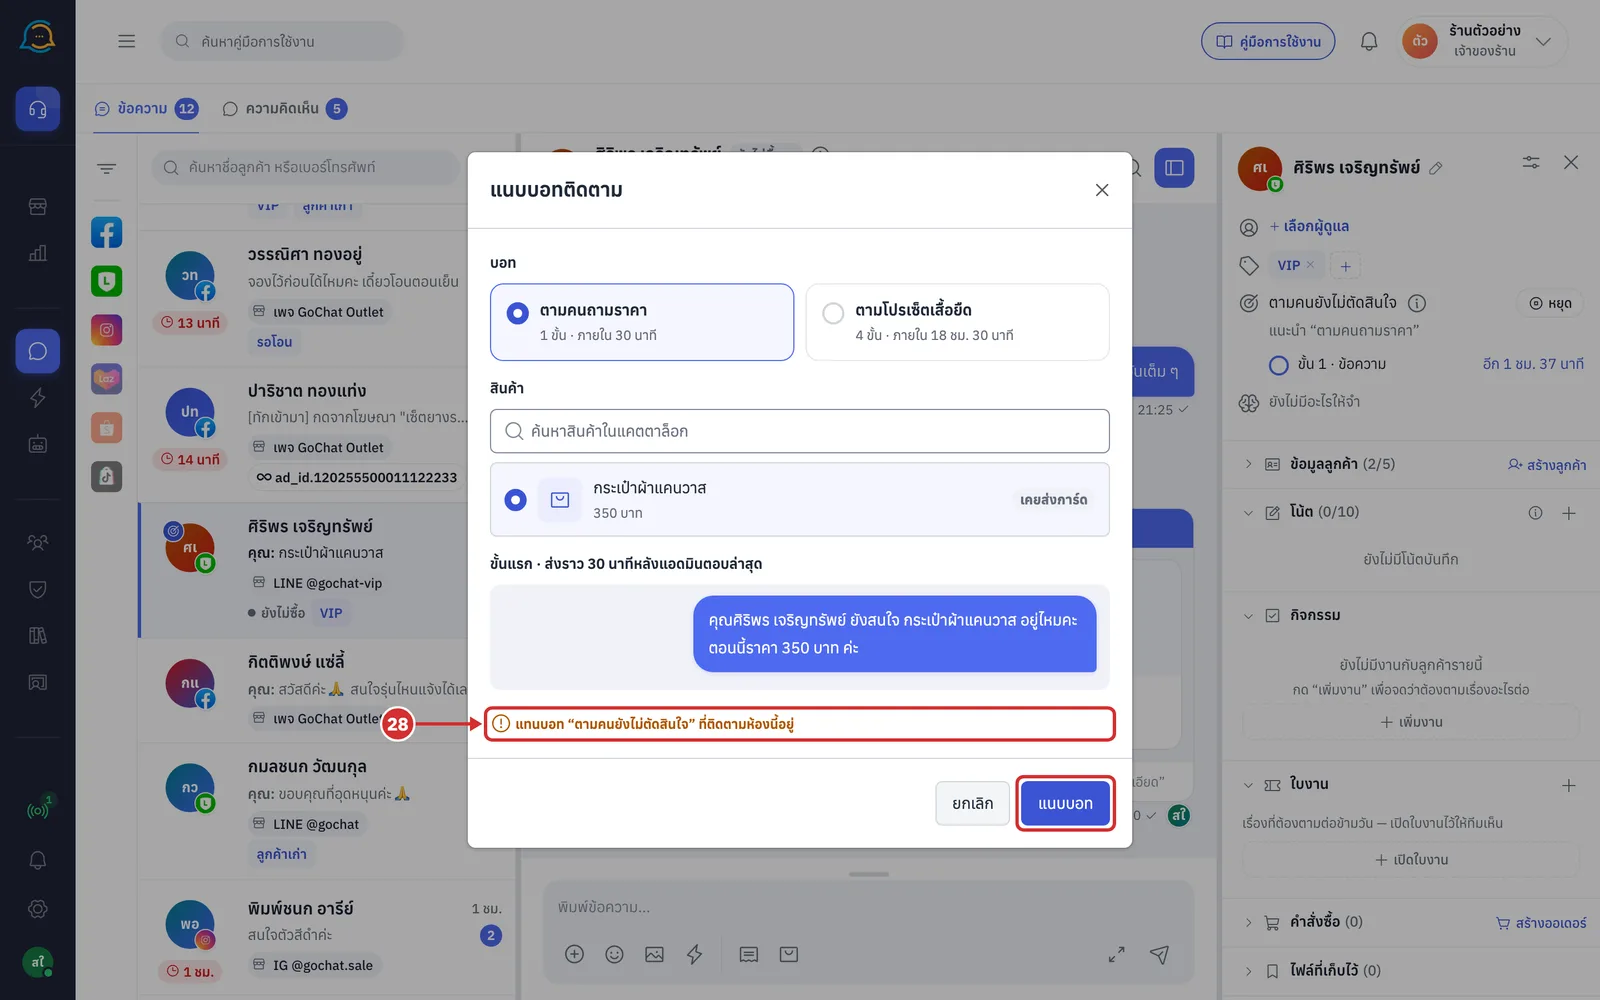
Choose the bot and product as in steps 18–21. The window shows แทนบอท “ชื่อบอท” ที่ติดตามห้องนี้อยู่ (Replaces bot “bot name” that is following this chat); then click แนบบอท (Attach bot)
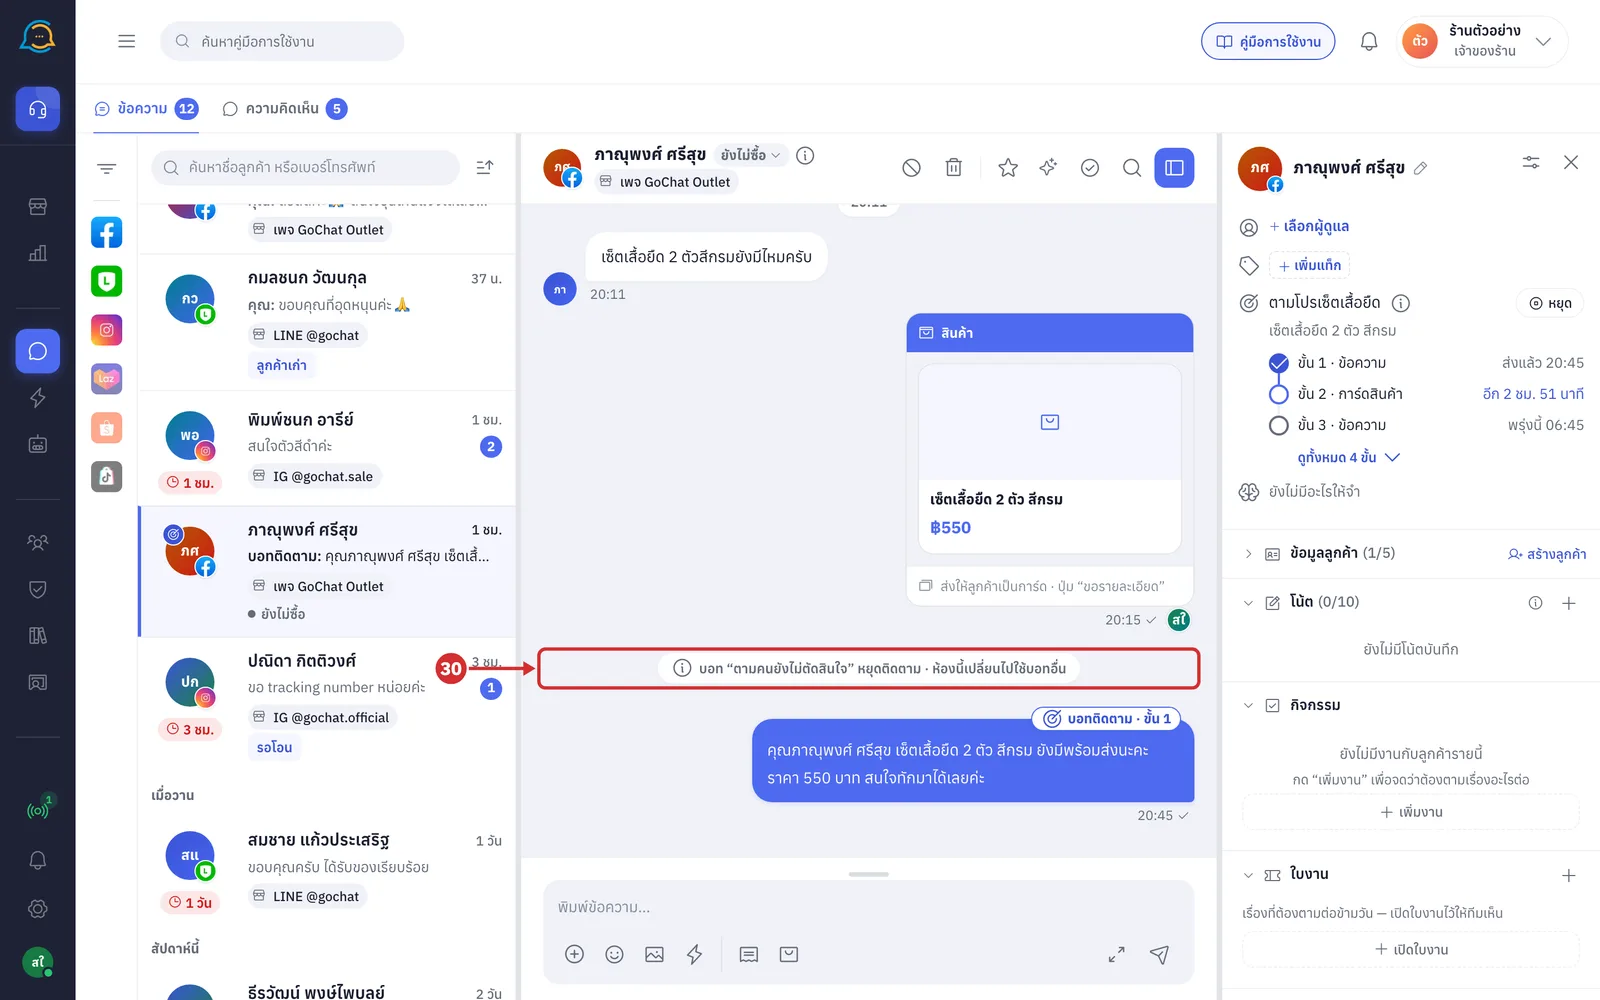
The old bot stops at once, and the chat gets a line with the reason ห้องนี้เปลี่ยนไปใช้บอทอื่น (This chat switched to another bot), as in step 30
While the selected-chats bot is following, condition bots do not attach to this chat again
Stopping the bot
On the บอทติดตาม (Follow-up bot) row, click หยุด (Stop) to stop the bot in that chat at once
The row goes back to the บอทติดตาม (Follow-up bot) button so you can attach a bot again
If stopping fails, the bot comes back in the row with a message
The same bot can be attached to the same chat once per status-tag round; attaching it again shows บอทนี้เคยติดตามห้องนี้ในรอบนี้แล้ว (This bot already followed this chat in this round)
When the bot stops, whether you stopped it or it stopped on its own, the chat gets the line บอท “ชื่อบอท” หยุดติดตาม (Bot “bot name” stopped following) followed by the reason
Only your team sees this line; customers do not
When you stop it yourself, the reason is แอดมินกดหยุด (Stopped by an admin); the other reasons are in the next section
Why the bot stops following
The stop line in the chat shows one of these reasons.
สถานะของห้องเปลี่ยน (The chat's status changed) — the chat's status tag changed, either moved automatically by GoSaaS orders or changed by an admin from the status label at the top of the chat; selected-chats bots stop whenever the status tag changes, whatever the new value
ส่งครบทุกขั้นแล้ว (All steps sent) — the bot sent its last step
เลยกรอบ 24 ชั่วโมงแล้ว (Past the 24-hour window) — the customer has not sent a message for more than 24 hours, so the bot cannot send any more
แอดมินกดหยุด (Stopped by an admin) — an admin clicked หยุด (Stop) on the follow-up bot row
บอทถูกปิด (Bot turned off) — the bot's status was changed to ปิด (Off)
บอทถูกลบ (Bot deleted) — the bot was deleted from the Sales follow-up bot page
ห้องนี้เปลี่ยนไปใช้บอทอื่น (This chat switched to another bot) — an admin attached another selected-chats bot in this chat
บอทถูกแก้ให้สั้นลง (Bot shortened) — the bot has fewer steps now, so this chat has no next step
แก้ขั้นตอนของบอท (Bot steps edited) — steps were added, deleted or moved, or a step's content type changed; editing only the message or the wait keeps the bot following
แอดมินตั้งว่าไม่สนใจ (Marked not interested by an admin) — the chat was set to ไม่สนใจ (Not interested) from the chat's right-click menu
ห้องนี้ไม่อยู่ในบัญชีหรือแชททดสอบของบอทแล้ว (This chat is no longer in the bot's accounts or test chats) — the chat's account was removed from the bot, the bot was changed from เปิดใช้ (On) to ทดสอบ (Test), or the chat was removed from the test chats
Messages when attaching fails
If the bot cannot be attached, one of these messages appears.
ลูกค้าเงียบเกิน 24 ชั่วโมงแล้ว บอทส่งข้อความไม่ได้ (The customer has been quiet for more than 24 hours; the bot cannot send messages) — the customer has not sent a message for more than 24 hours, so the bot cannot be attached
บอทนี้กำลังติดตามห้องนี้อยู่แล้ว (This bot is already following this chat) — the chosen bot is already following this chat
บอทนี้เคยติดตามห้องนี้ในรอบนี้แล้ว (This bot already followed this chat in this round) — the same bot can be attached to the same chat once per status-tag round
ไม่พบบอทนี้ หรือบอทใช้กับห้องนี้ไม่ได้ (Bot not found, or it cannot be used in this chat) — caused by one of these
The bot is off
The bot does not include this chat's account
The bot is in test status and this chat is not a test chat
ไม่พบสินค้านี้ในแคตตาล็อก (This product is not in the catalogue) — the app has no name and price for the chosen product; search for the product in the search box and choose it again
แนบไม่สำเร็จ: เชื่อมต่อเซิร์ฟเวอร์ไม่ได้ ลองกดแนบอีกครั้ง (Attach failed: cannot reach the server; try attaching again) — shown in the attach window when the server cannot be reached
How selected-chats bots work
The bot does not pick chats on its own; an admin attaches it in each chat
A chat can have one follow-up bot at a time, and attaching a selected-chats bot stops the bot already following that chat
The first step counts its wait from your shop's latest reply to the customer; later steps count from when the previous step was sent, or from the admin's latest reply if it came after that
If the customer replies while the bot is waiting, the bot does not stop, but waits until an admin replies and then counts the next step from that reply
The bot can only send within 24 hours of the customer's last message
The price the bot sends is the product's price in your catalogue at send time; if the product is out of stock or no longer for sale when the step is due, a product card step shows ส่งไม่สำเร็จ (Not sent)
A chat with no status tag is set to ยังไม่ซื้อ (Not bought yet) when the bot is attached