

Sending broadcasts
The บรอดแคสต์ LINE (LINE broadcast) page sends one set of messages from your shop's LINE Official Account to many customers at once. You can send to all friends, only customers with a GoChat label, or into LINE groups; add text, images, stickers and rich messages (images customers can tap); send now or schedule ahead; and then see how many people it reached and opened it. The เจ้าของร้าน (Shop owner) and every แอดมิน (Admin) in the shop can create, schedule, cancel and resend broadcasts.
Opening the broadcast page
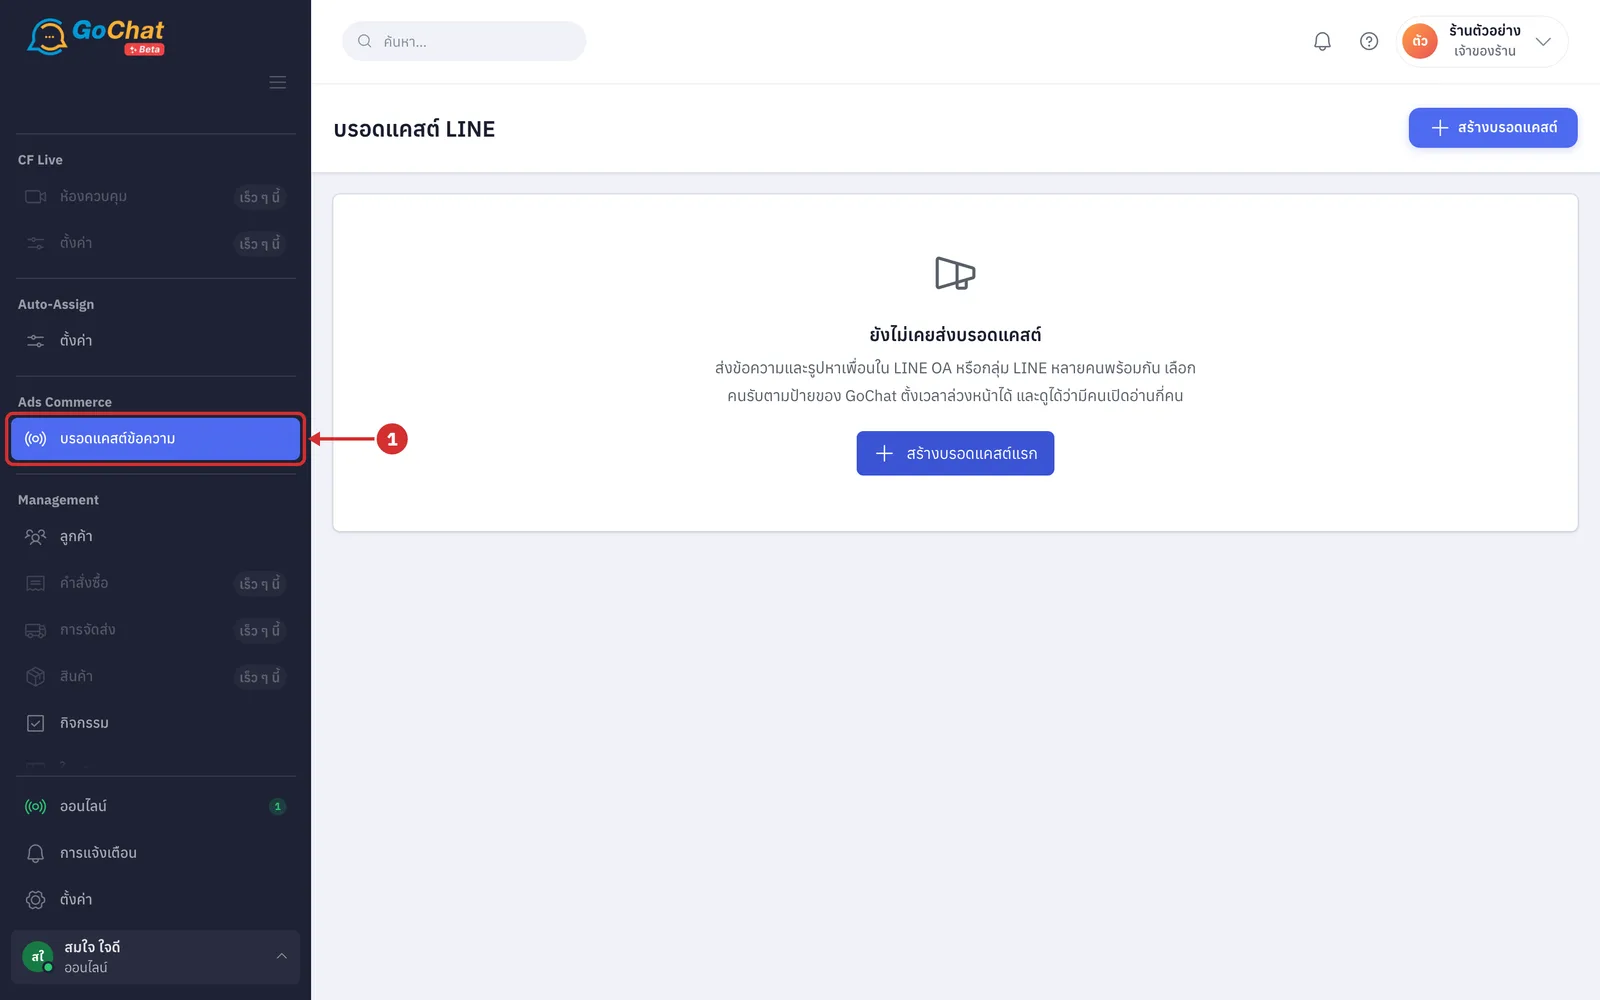
Under Ads Commerce, choose บรอดแคสต์ข้อความ (Message broadcast) in the left menu bar. The บรอดแคสต์ LINE (LINE broadcast) page opens (if your shop has never sent one, it shows ยังไม่เคยส่งบรอดแคสต์ (No broadcasts sent yet) with a สร้างบรอดแคสต์แรก (Create your first broadcast) button you can use instead of step 2)
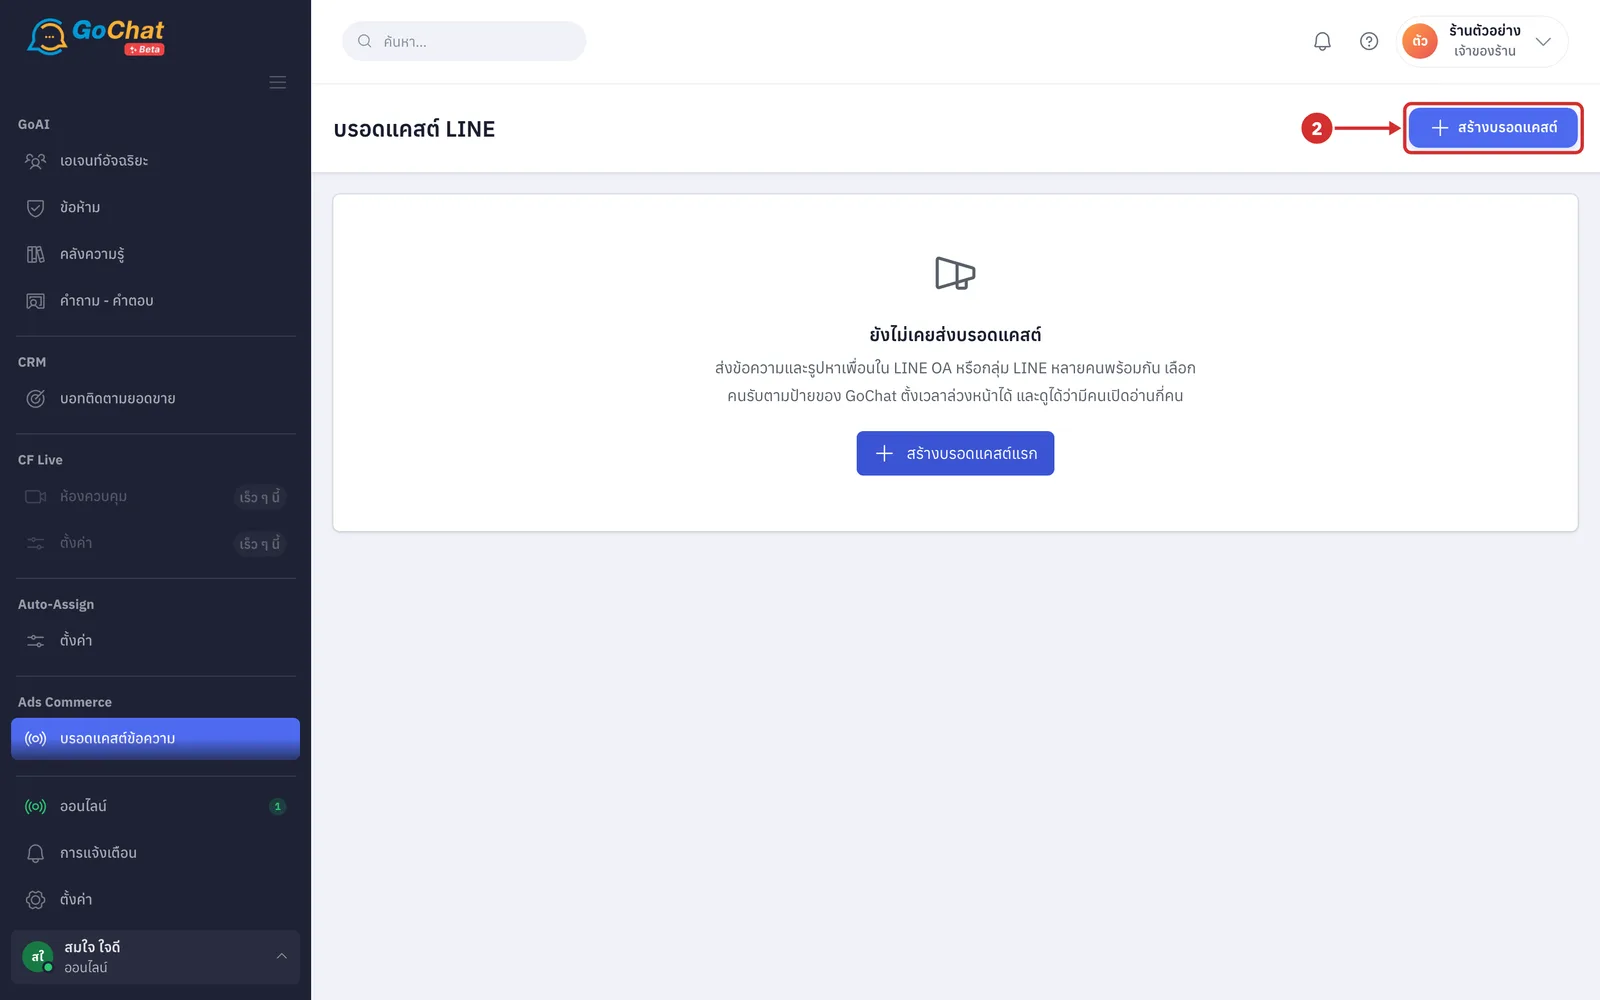
Click สร้างบรอดแคสต์ (Create broadcast) at the top right to open the สร้างบรอดแคสต์ LINE (Create LINE broadcast) page
Choosing the account and recipients
The สร้างบรอดแคสต์ LINE (Create LINE broadcast) page has cards from top to bottom, a LINE chat preview on the right, and a summary bar with the send button at the bottom. Nothing is saved until you confirm in step 19. Click ยกเลิก (Cancel) at the top right, or the back arrow before the page title, to return to the list (what you entered is not kept).
On the ส่งจาก LINE OA (Send from LINE OA) card, choose the LINE OA account to send from (messages are sent as that account, and message quota is counted per account; once the system has fetched figures from LINE, the account's ID, approximate number of friends and this month's remaining quota, or แพ็กเกจไม่จำกัดจำนวนข้อความ (Unlimited messages plan), appear under its name; switching accounts clears the LINE groups you ticked; if the account is disconnected, a red box says LINE OA นี้ต้องเชื่อมใหม่ก่อนจึงจะส่งได้ (This LINE OA must be reconnected before sending) with a link to the ช่องทาง (Channels) page)
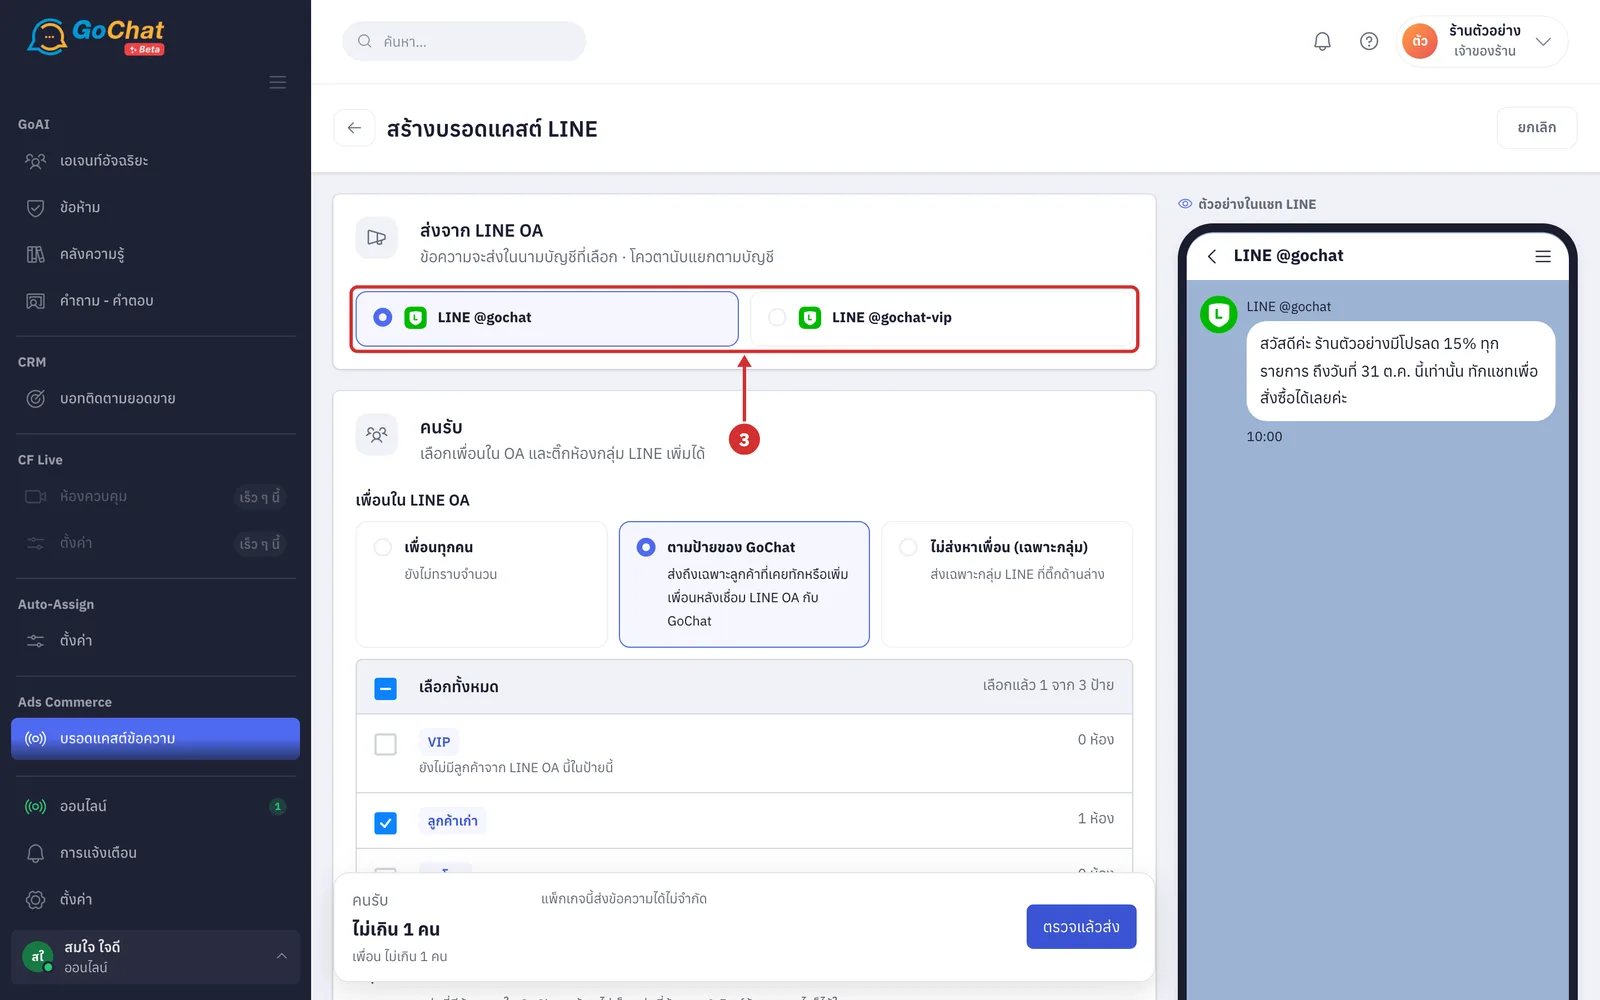
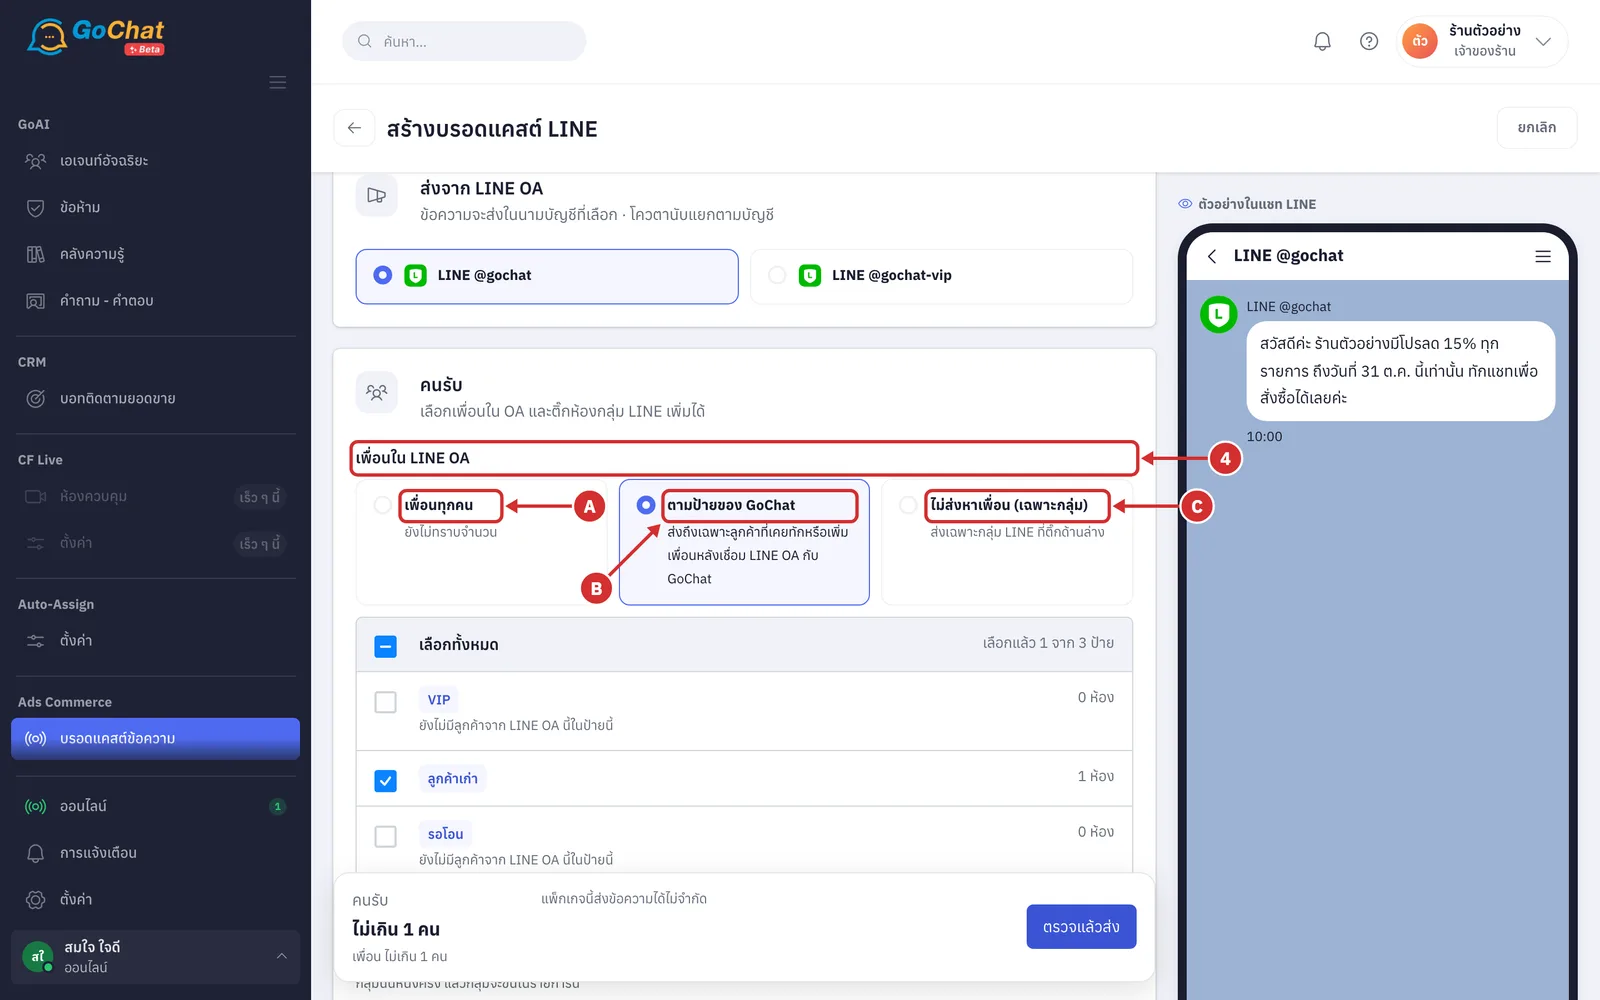
Under เพื่อนใน LINE OA (Friends of the LINE OA), choose which friends to send to. There are 3 options:
A เพื่อนทุกคน (All friends) sends to every friend of the account; the approximate number appears under the option (if it says ยังไม่ทราบจำนวน (Number unknown), the system has not fetched the friend count from LINE yet and this option cannot send for now; the bar at the bottom asks you to wait up to 1 hour and try again)
B ตามป้ายของ GoChat (By GoChat label) sends only to customers who messaged or added the account as a friend after it was connected to GoChat and whose chats have the labels you choose (customers with several labels get it once; people who blocked the account are skipped; recipients are counted again at send time)
C ไม่ส่งหาเพื่อน (เฉพาะกลุ่ม) (No friends, groups only) sends only to the LINE groups you tick in step 6
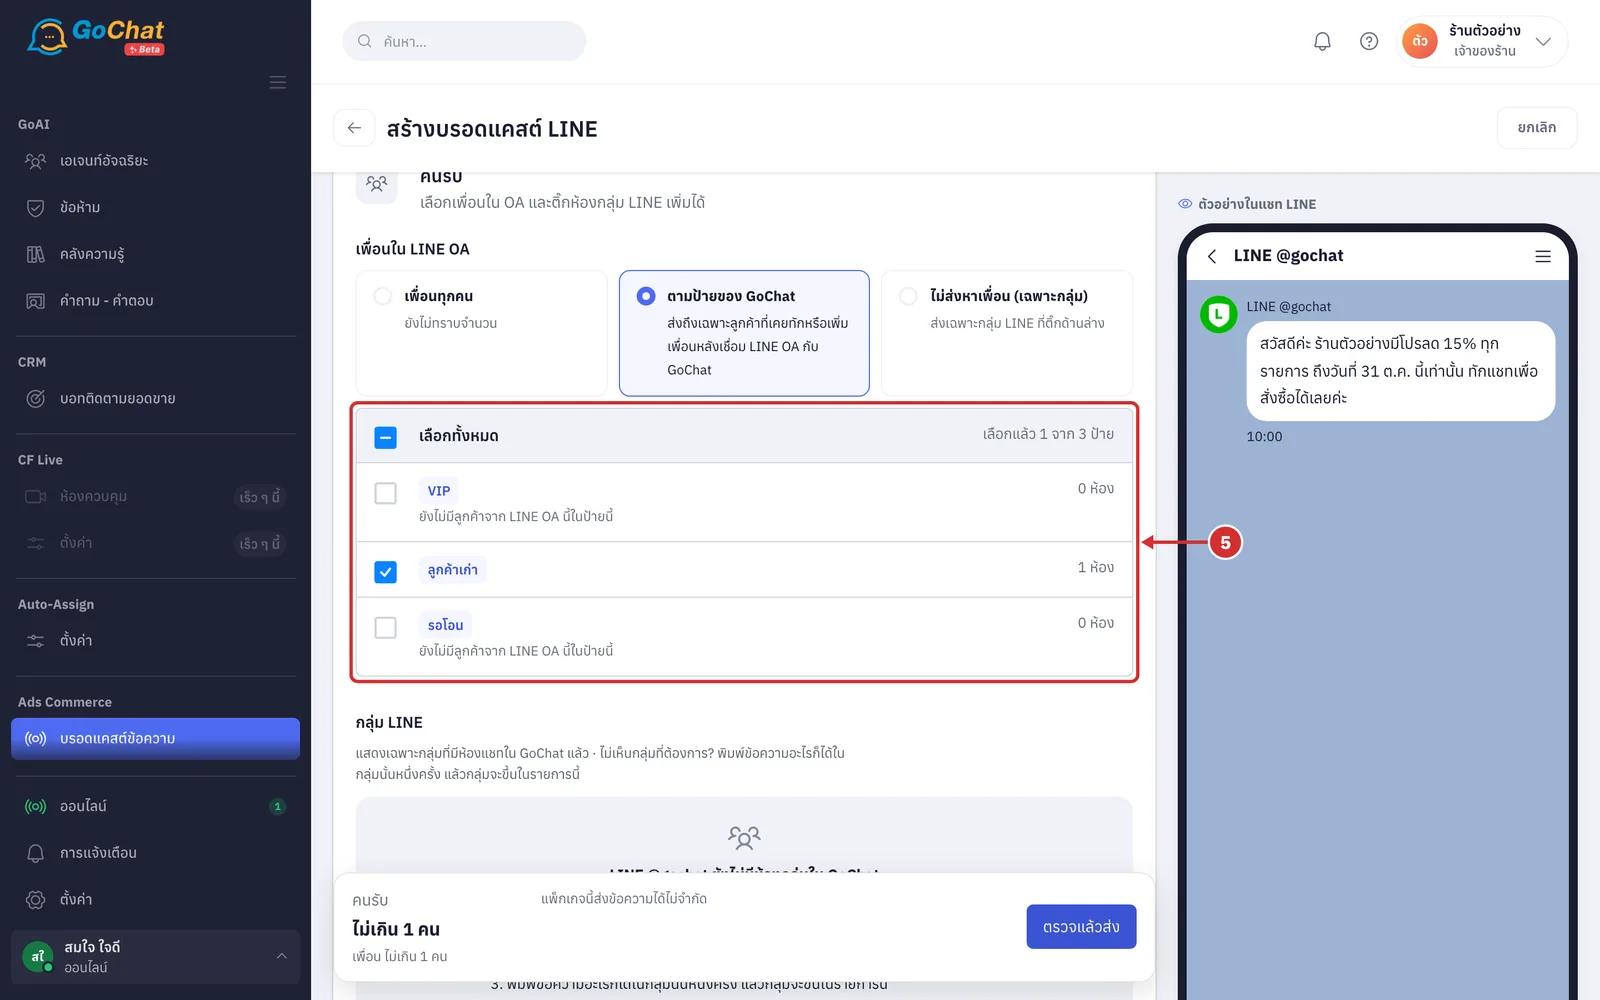
If you chose ตามป้ายของ GoChat (By GoChat label), tick the labels you want; the number on the right of each row is how many of this account's chats have that label (if a label includes LINE group chats it shows มีห้องกลุ่ม N ห้องในป้ายนี้ — ส่งเข้ากลุ่มด้วย (N group chats in this label, they will be sent too); if no customer of this account has the label it shows ยังไม่มีลูกค้าจาก LINE OA นี้ในป้ายนี้ (No customers from this LINE OA in this label yet); the top row เลือกทั้งหมด (Select all) ticks or clears every label at once and shows เลือกแล้ว N จาก M ป้าย (N of M labels selected); if your shop has no labels yet, create them in ตั้งค่า › ป้าย (Settings › Labels))
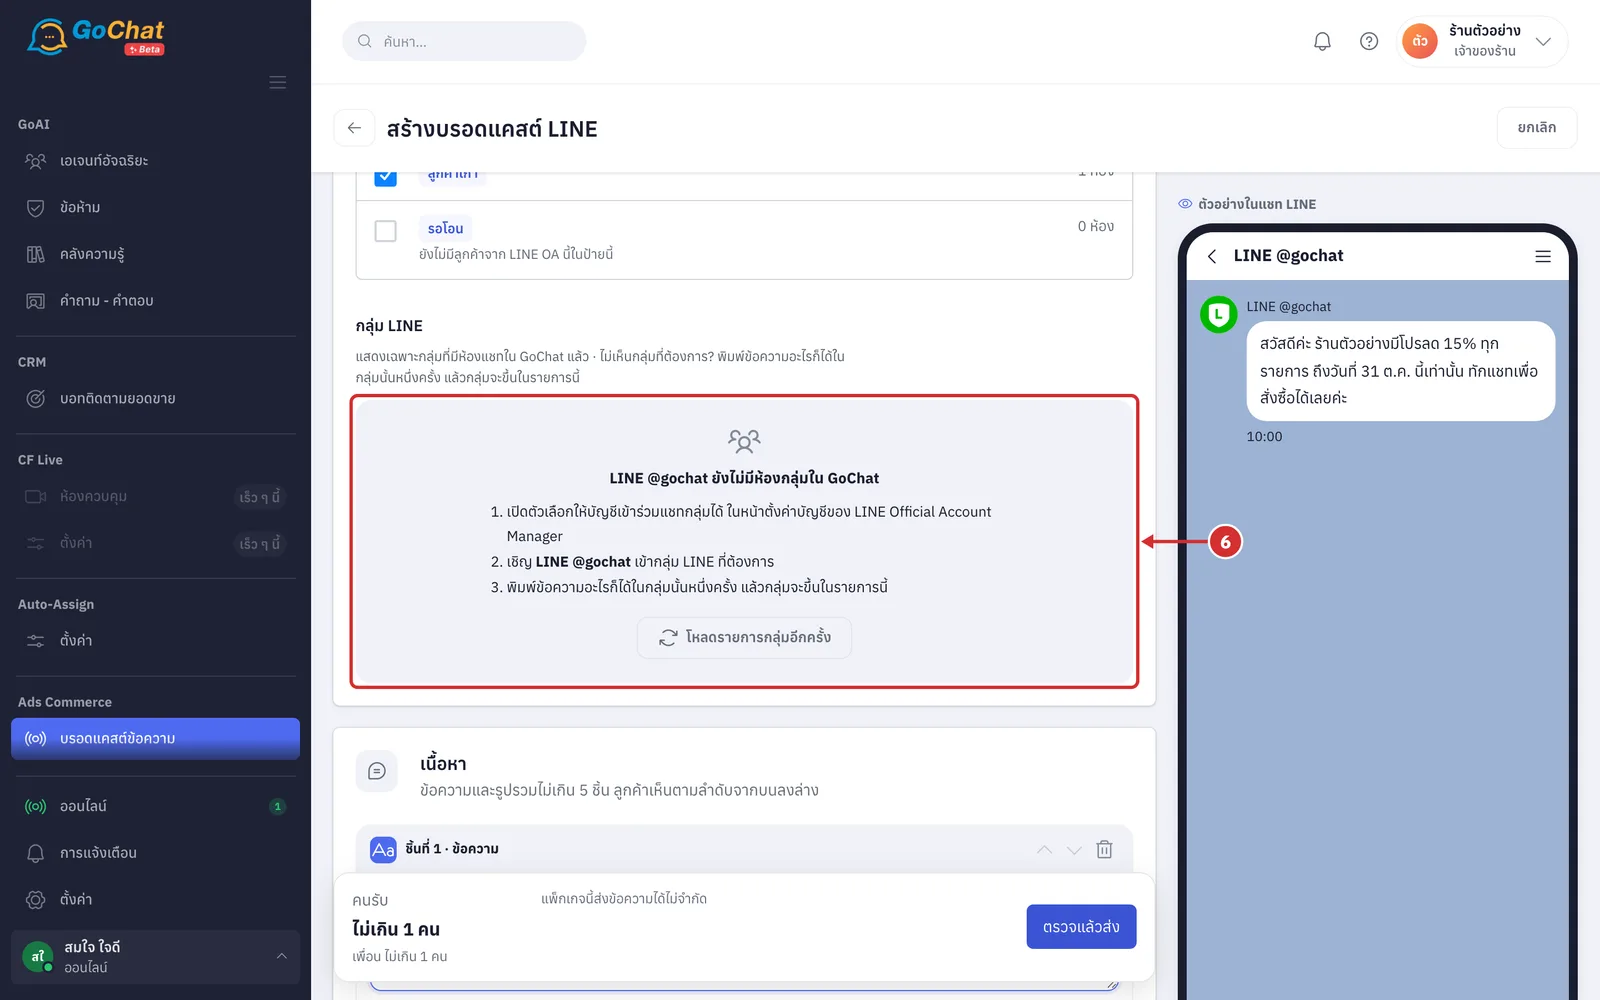
Under กลุ่ม LINE (LINE groups), tick any LINE groups to send to as well; the list only shows groups that already have a chat in GoChat, with the number of members on the right (groups in the labels chosen in step 5 are ticked and locked and show รวมอยู่แล้วจากป้าย (Already included from label); groups the shop account was removed from cannot be ticked; there is a เลือกทั้งหมด (Select all) row like the label list; if the account has no group chats yet, 3 steps are shown: allow the account to join group chats in LINE Official Account Manager, invite the account to the group, then type any message in that group once, and click โหลดรายการกลุ่มอีกครั้ง (Reload group list))
Adding content
Content comes in 4 types: text, image, sticker and rich message, up to 5 pieces in total. Customers see them in order from top to bottom. The page starts with one text piece.
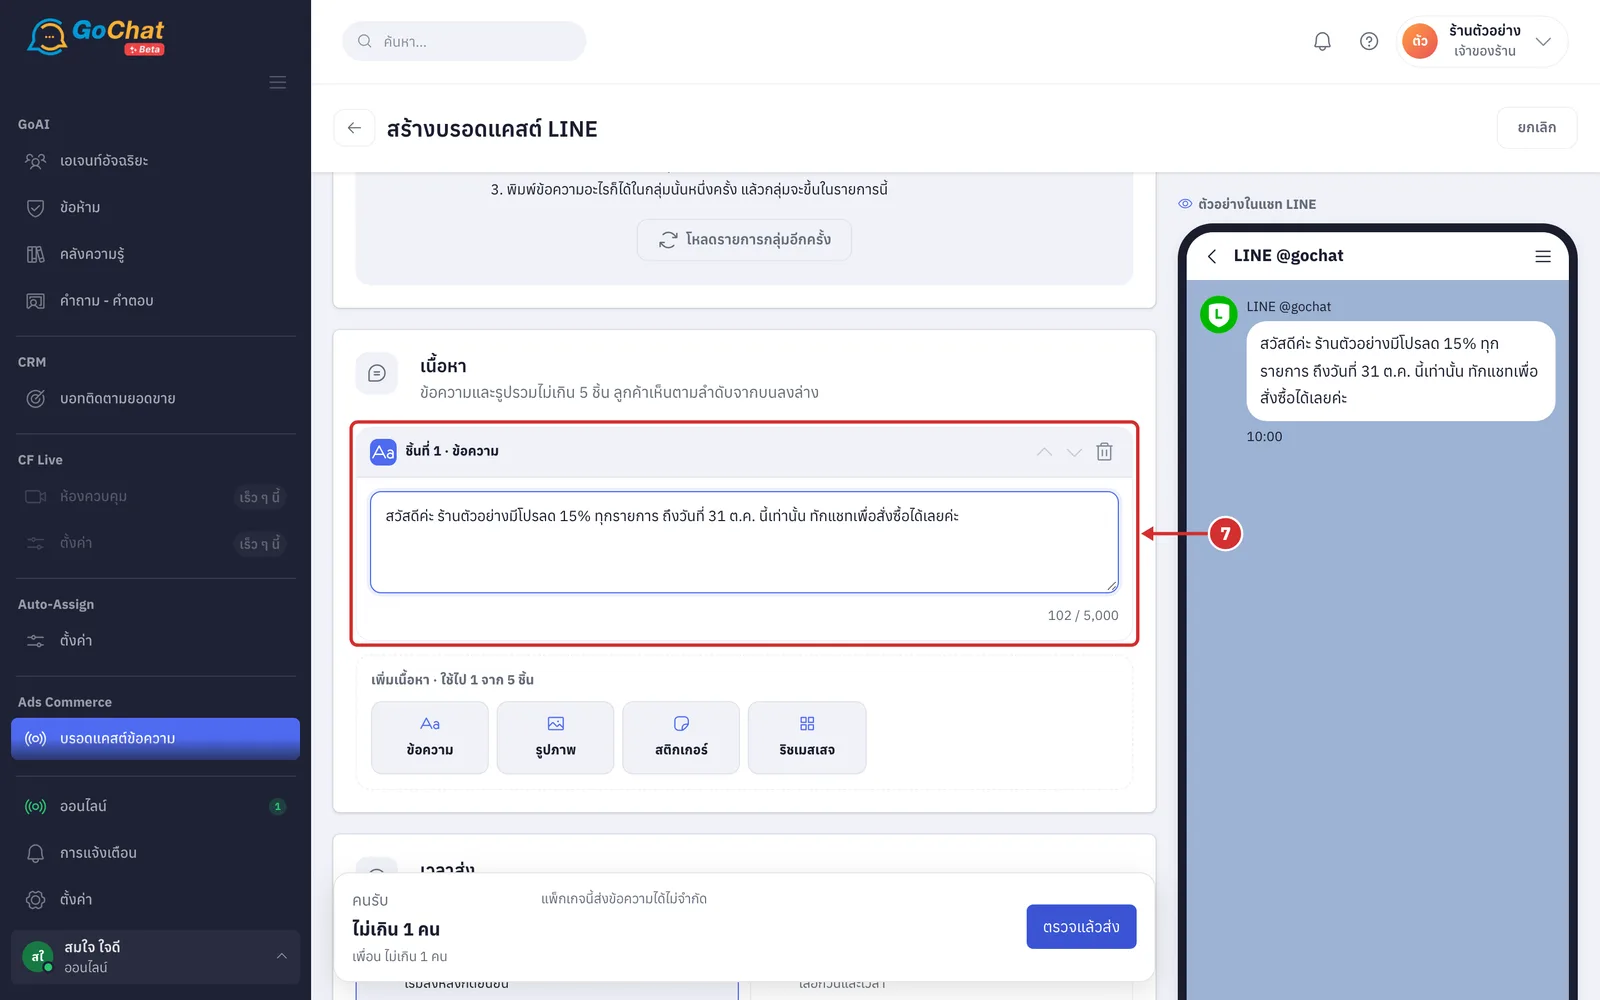
In ชิ้นที่ 1 · ข้อความ (Piece 1 · Text), type the message (the counter under the box shows characters out of 5,000; text longer than 5,000 characters is split and counts as several pieces; an empty text box must be filled in or deleted before you can send)
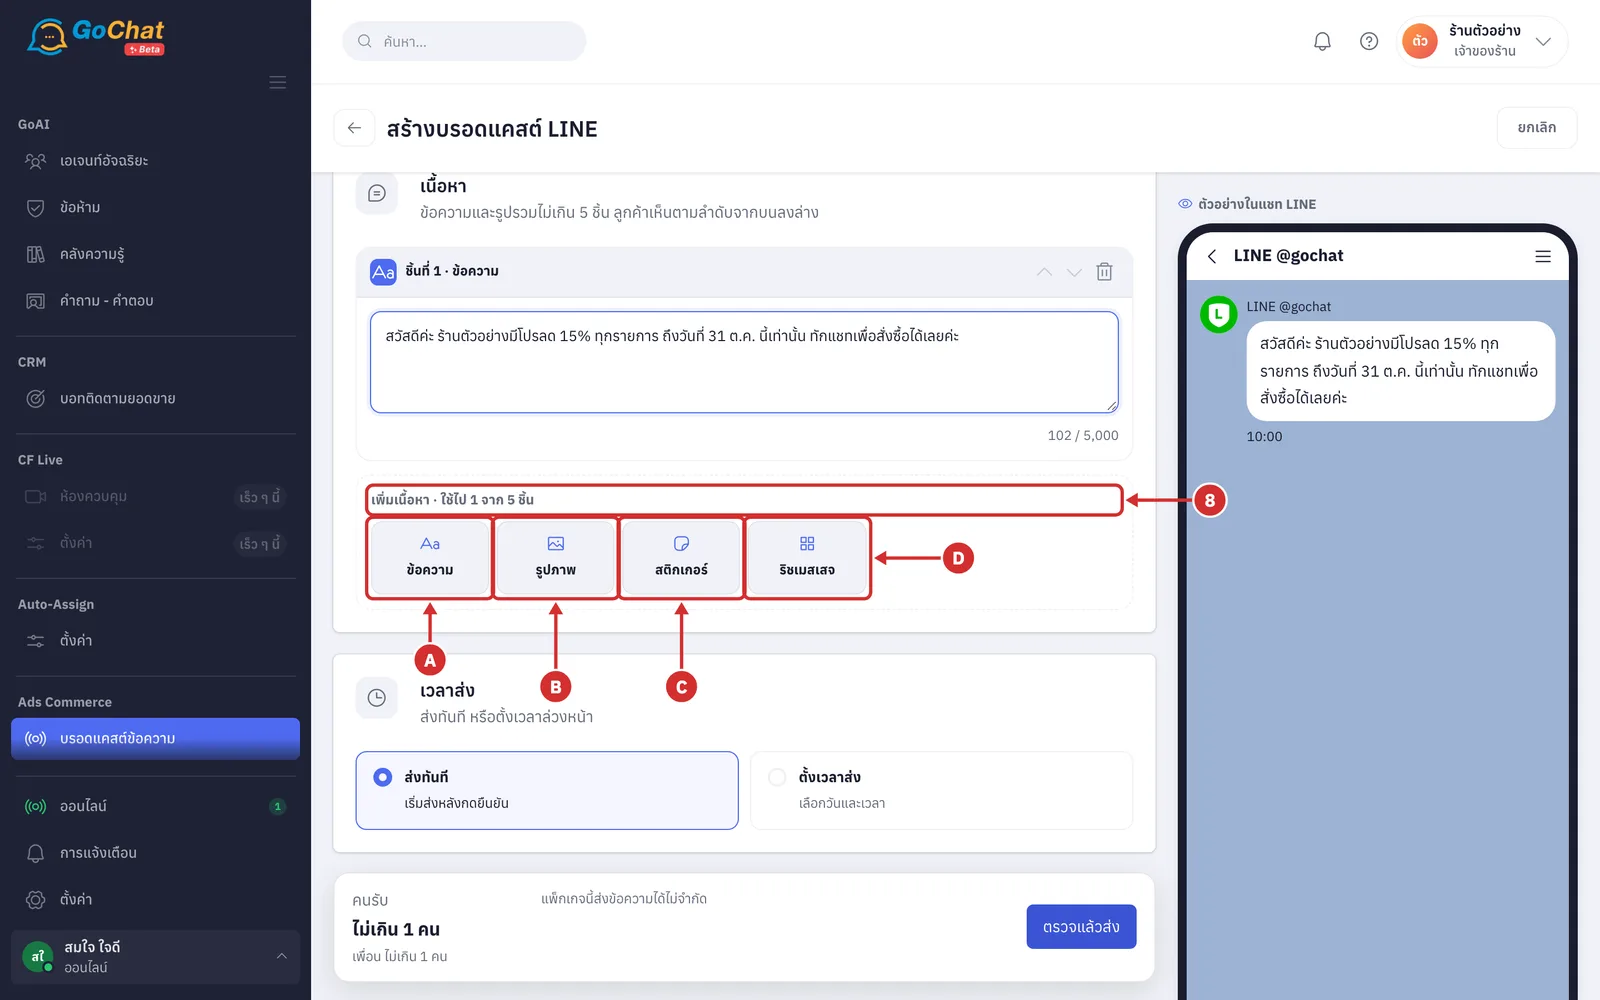
At เพิ่มเนื้อหา · ใช้ไป N จาก 5 ชิ้น (Add content · N of 5 pieces used), click the type of piece to add at the end (with 5 pieces the buttons are disabled and it shows ครบ 5 ชิ้นแล้ว — ลบชิ้นเดิมก่อนถึงจะเพิ่มได้ (5 pieces already, delete one to add more))
A ข้อความ (Text) adds another text box
B รูปภาพ (Image) picks an image from your device, up to 10 MB (while uploading it shows กำลังอัปโหลด (Uploading); when done it shows the image with its file name and size; if the upload fails, the reason appears in a red box under the content)
C สติกเกอร์ (Sticker) opens the LINE sticker picker (step 9)
D ริชเมสเสจ (Rich message) an image split into areas that customers tap to open a link or send a message (see Adding a rich message)
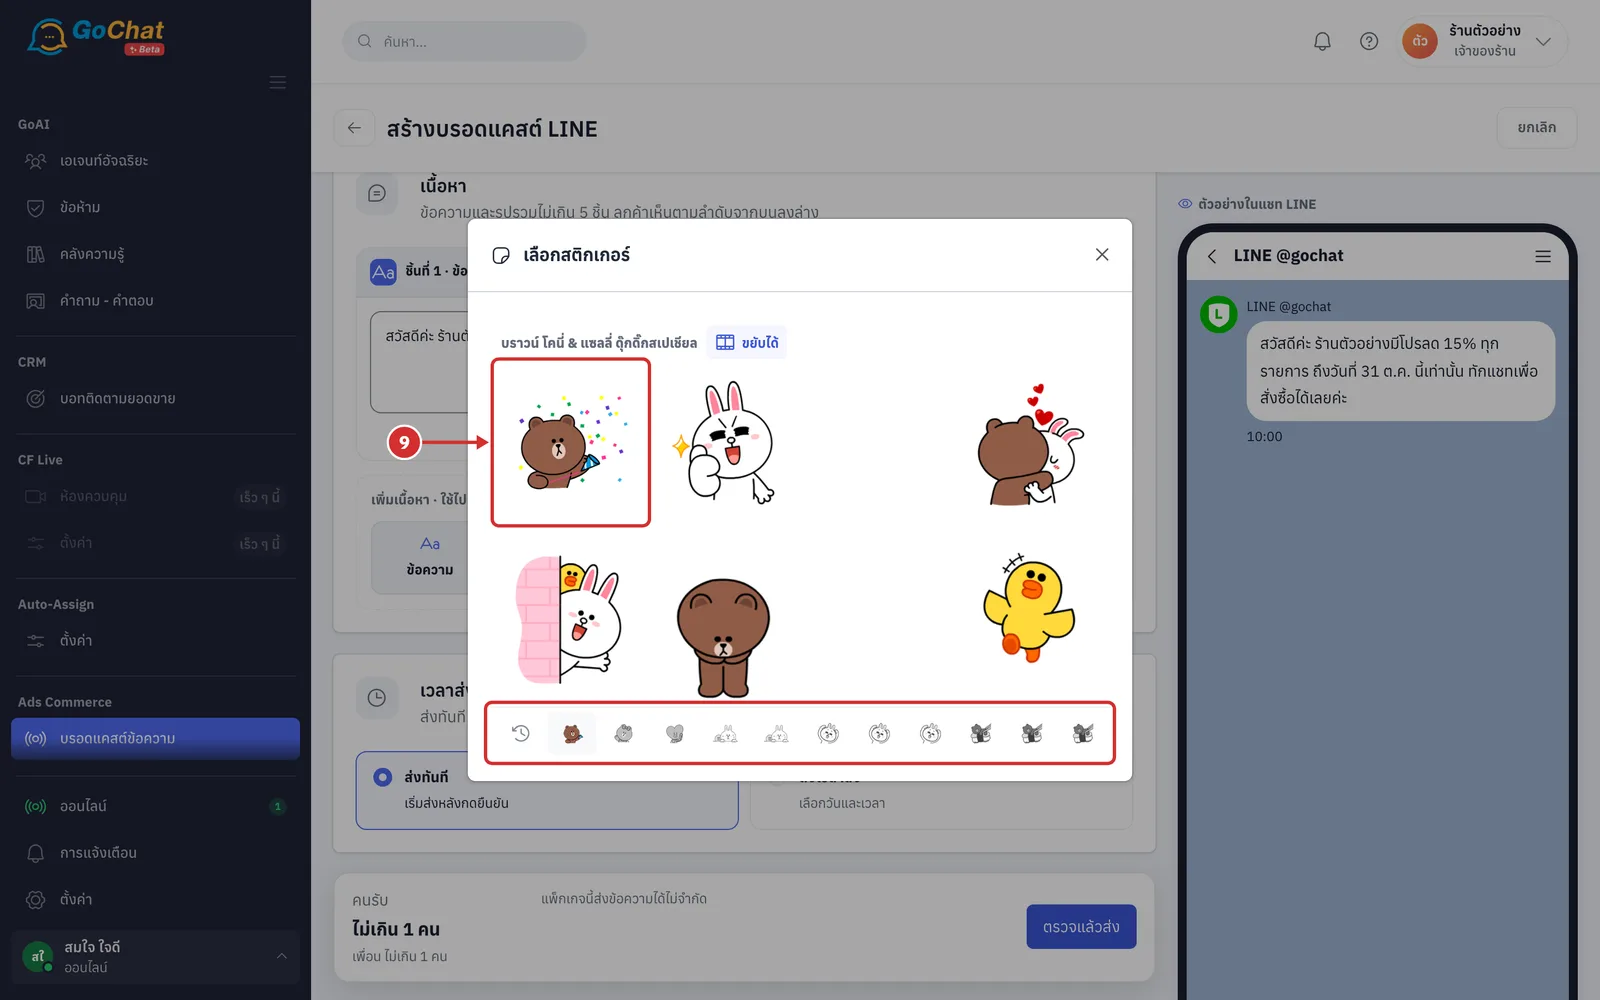
Click สติกเกอร์ (Sticker), then tap the sticker you want in the เลือกสติกเกอร์ (Choose a sticker) window; it is added as a new piece and the window closes (the bar at the bottom of the window switches sticker sets, and the clock icon is ใช้ล่าสุด (Recently used); it is the same set as the sticker panel in LINE chats)
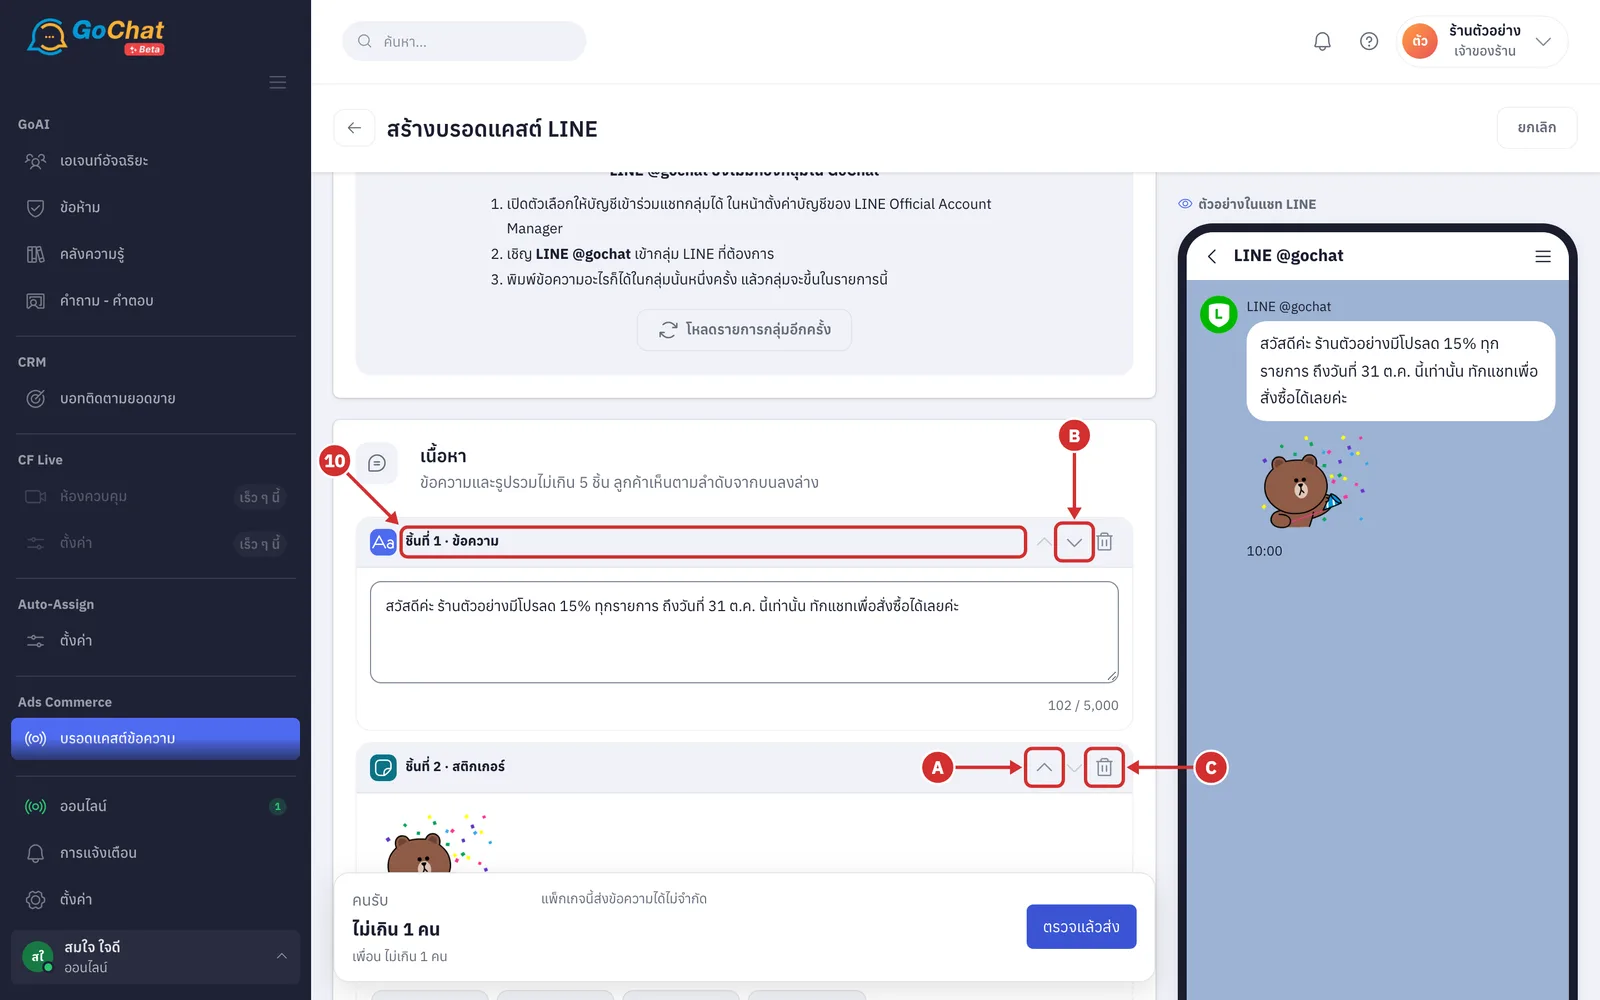
Use the buttons in each piece's header to reorder or delete it
A up arrow moves the piece up one place (disabled on the first piece)
B down arrow moves the piece down one place (disabled on the last piece)
C trash icon deletes the piece
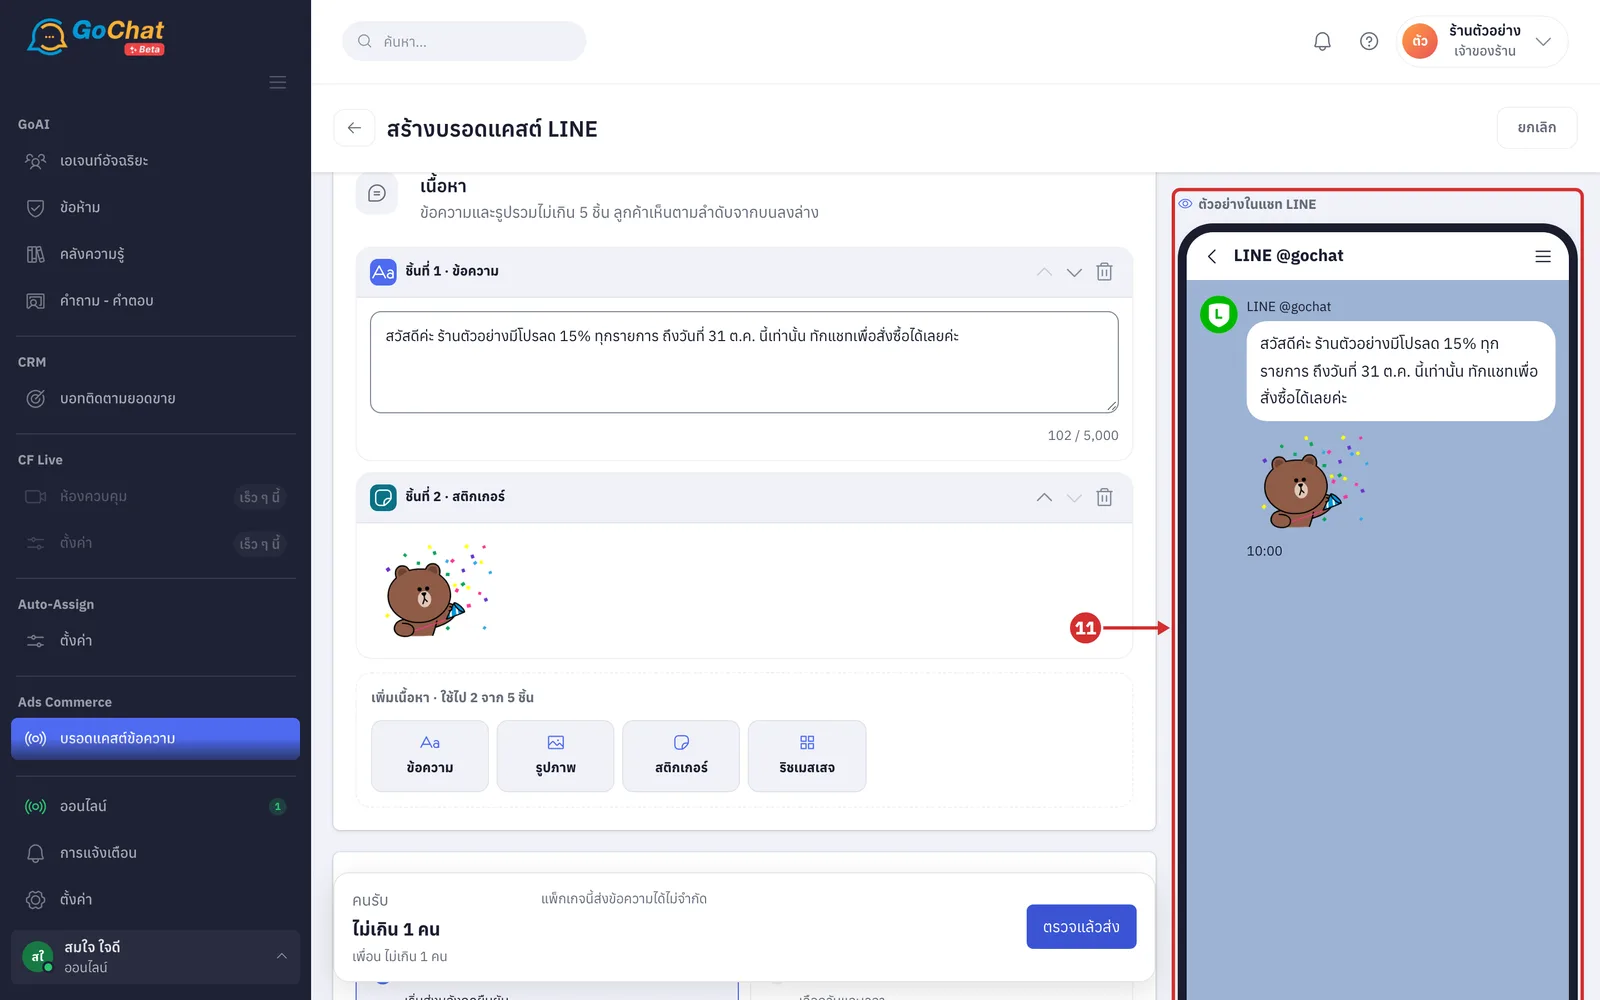
Check the preview under ตัวอย่างในแชท LINE (Preview in LINE chat) on the right, which shows the account name and every piece in the order customers will see them, and updates as you edit
Adding a rich message
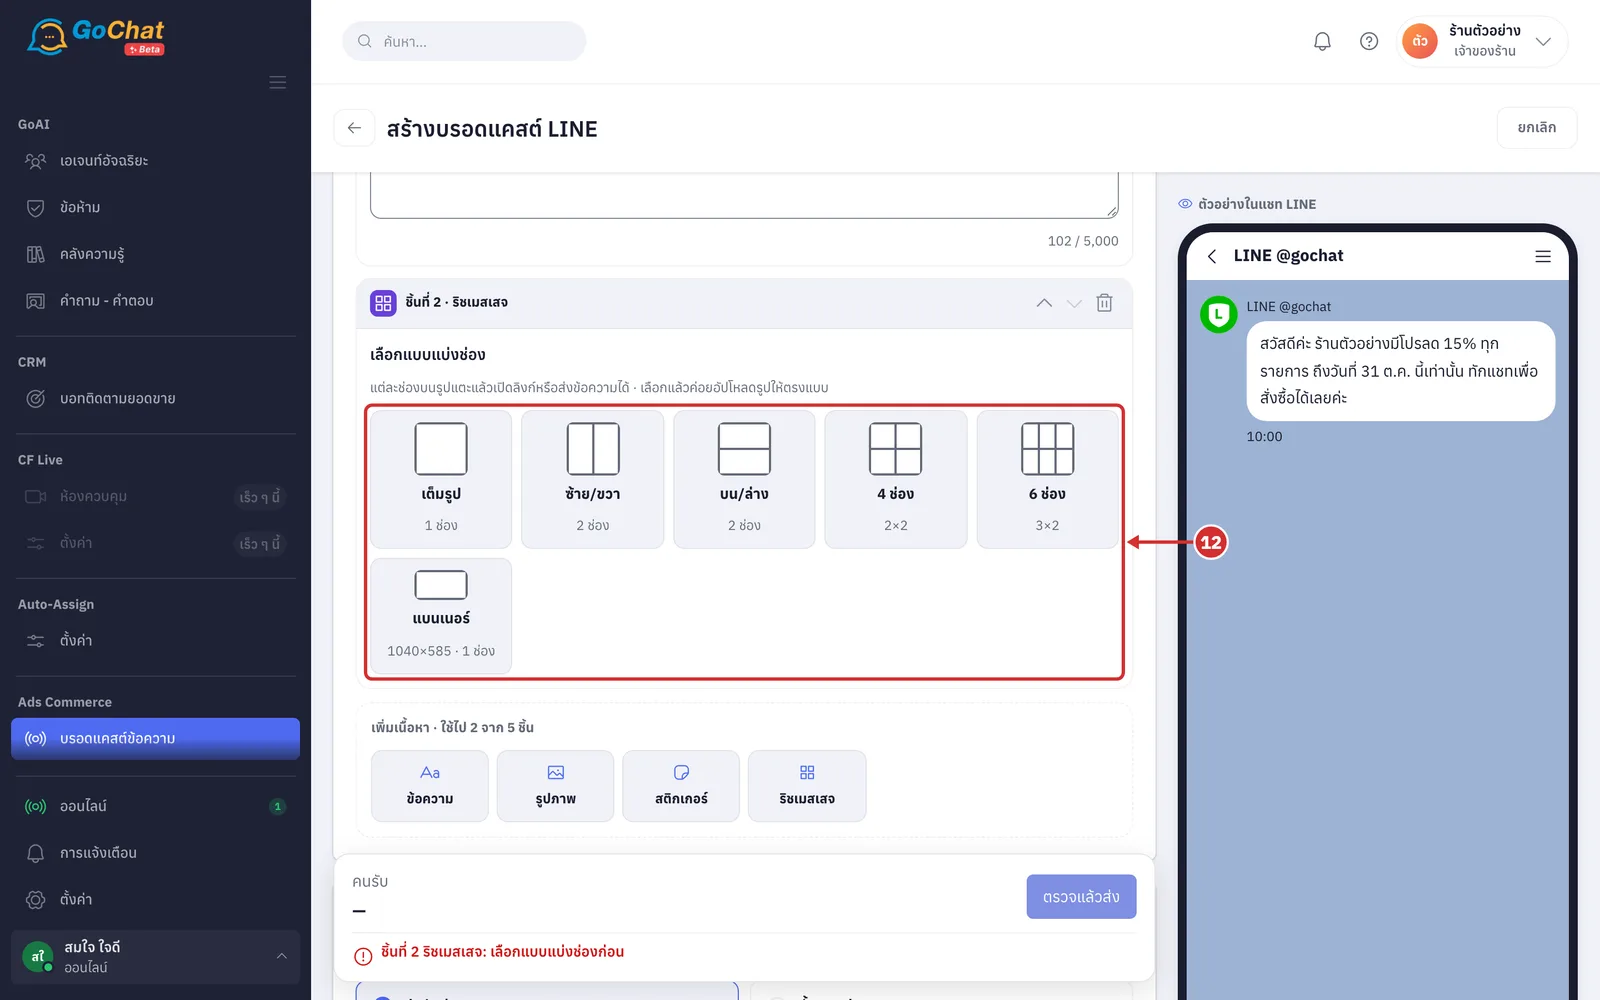
Click ริชเมสเสจ (Rich message) and choose how to split the image. There are 6 layouts: เต็มรูป (Full image, 1 area), ซ้าย/ขวา (Left/right, 2 areas), บน/ล่าง (Top/bottom, 2 areas), 4 ช่อง (4 areas, 2×2), 6 ช่อง (6 areas, 3×2) and แบนเนอร์ (Banner, 1040×585, 1 area) (choose the layout first, then upload an image to fit it; while the piece is incomplete, the bar at the bottom says what it still needs)
Click the อัปโหลดรูปสำหรับแบบ… (Upload an image for the … layout) box and choose a JPG or PNG image up to 10 MB (1040px wide or more is sharpest; the system crops the centre of the image to fit the layout; text in the image should be large because some phones get an image only 240px wide; the top row shows the chosen layout and image size, and เปลี่ยนแบบ (Change layout) lets you pick another layout)
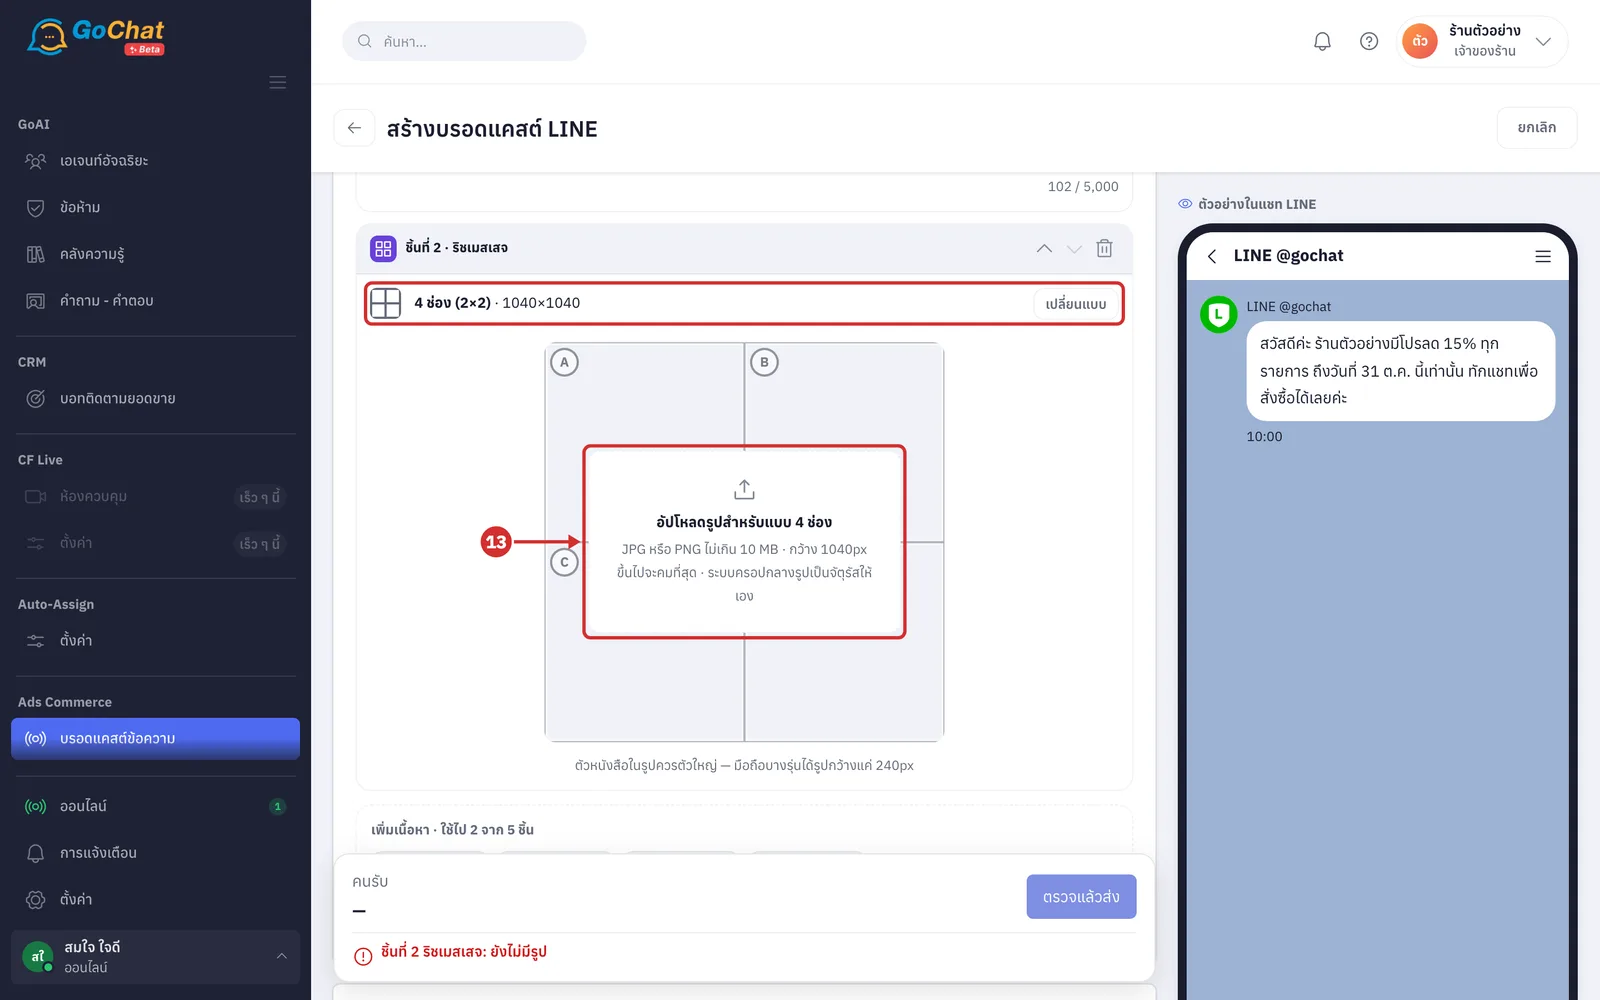
After uploading, the image shows a letter for each area (A, B, …) marked ยังไม่ตั้ง (Not set). Tap each area, then under แตะแล้ว (When tapped) choose เปิดลิงก์ (Open link) or ส่งข้อความ (Send message).
เปิดลิงก์ (Open link) takes a link starting with https://, http://, tel: (a phone number such as tel:0812345678) or line://, up to 1,000 characters (Thai letters in a link count as several characters). ส่งข้อความ (Send message) takes ข้อความที่ลูกค้าส่งกลับ (Message the customer sends back), up to 400 characters; when a customer taps, LINE sends this text as the customer into your shop's chat, so sending to many people brings many chats in at once.
Click เสร็จ (Done) to close an area's window (what you typed is kept), and use the arrows in the window to go to the previous or next area. Areas filled in wrongly show ต้องแก้ (Needs fixing) with the reason; under the image it shows ตั้งแล้ว N จาก M ช่อง (N of M areas set), and every area must be set before you can send.
The ข้อความแจ้งเตือน (Notification text) box is what customers see in notifications and the chat list instead of the image, up to 1,500 characters; if left empty the system uses “account name ส่งรูปภาพ” (account name sent an image). Click เปลี่ยนรูป (Change image) to upload a new image. If you switch to a layout with fewer areas so that areas you set would be lost, the system asks first in a เปลี่ยนแบบแบ่งช่อง? (Change layout?) window (areas with the same letter keep their settings). The preview on the right adds a แจ้งเตือนบนมือถือ (Mobile notification) box, and area lines in the preview appear only when you hover; customers see the plain image.
Setting the send time
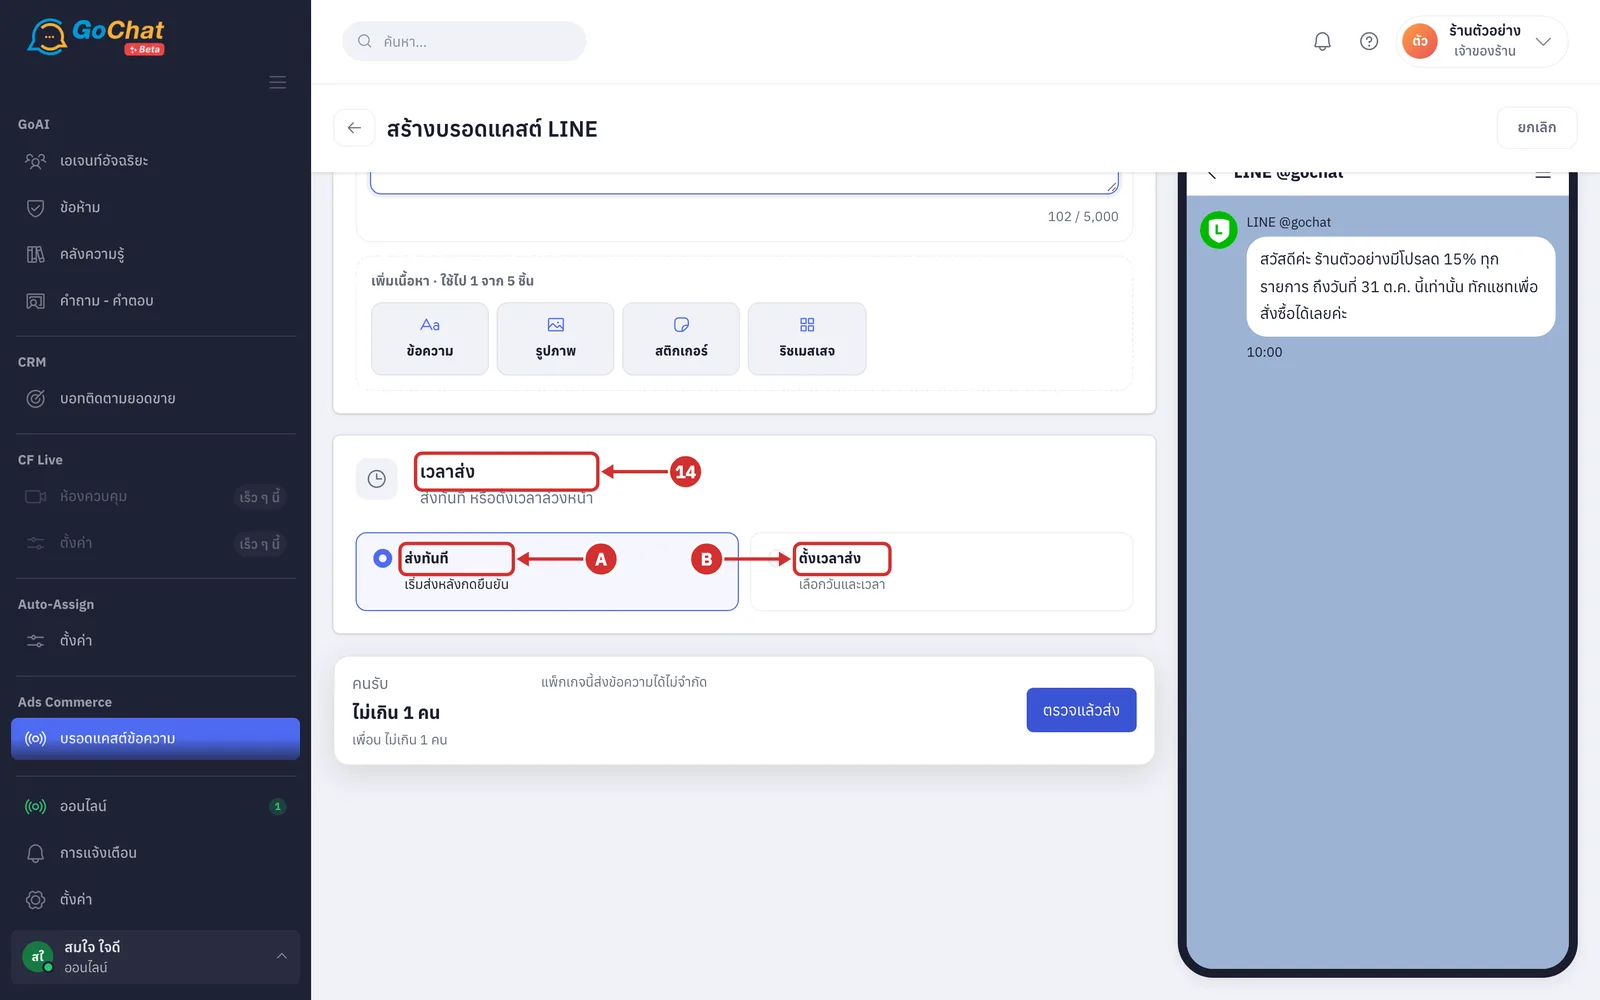
On the เวลาส่ง (Send time) card, choose when to send
A ส่งทันที (Send now) starts sending after you confirm
B ตั้งเวลาส่ง (Schedule) lets you pick a date and time in advance
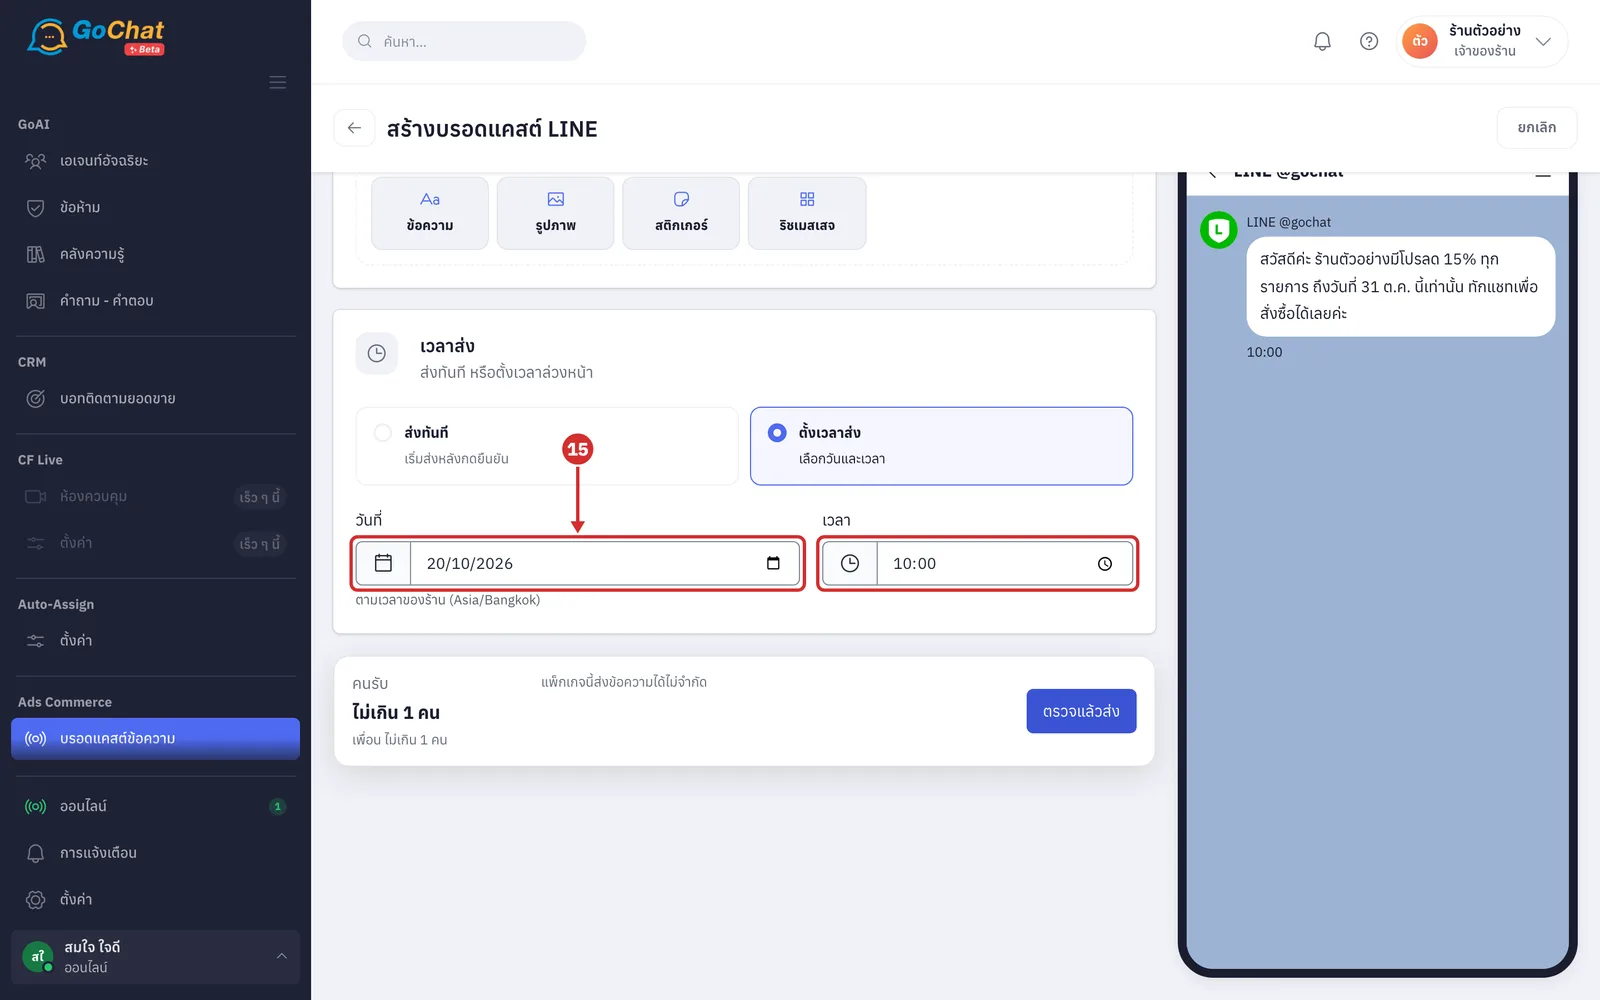
If you chose ตั้งเวลาส่ง (Schedule), pick the วันที่ (Date) and เวลา (Time) to send, in your shop's time (the time zone is shown under the fields; past dates cannot be chosen; without a date it shows เลือกวันและเวลาที่จะส่งก่อน (Choose a send date and time first); a time that has already passed shows เวลาส่งอยู่ในอดีต — เลือกเวลาใหม่ (The send time is in the past, choose a new time))
Checking the numbers and sending
In the bar at the bottom, check คนรับ (Recipients) and โควตาข้อความเดือนนี้ (This month's message quota) (recipients show ประมาณ N คน (About N people) for all friends and ไม่เกิน N คน (Up to N people) for labels, with a line splitting friends and groups; the quota bar shows ใช้ไปแล้ว (Used), the amount ตั้งเวลาไว้ (Scheduled) by other broadcasts this month, out of the total quota, and เหลือหลังส่ง (Left after sending) or ขาดอีก (Short by); in LINE groups each member counts as 1 message; unlimited accounts show แพ็กเกจนี้ส่งข้อความได้ไม่จำกัด (This plan sends unlimited messages); for a time scheduled next month the quota cannot be checked in advance)
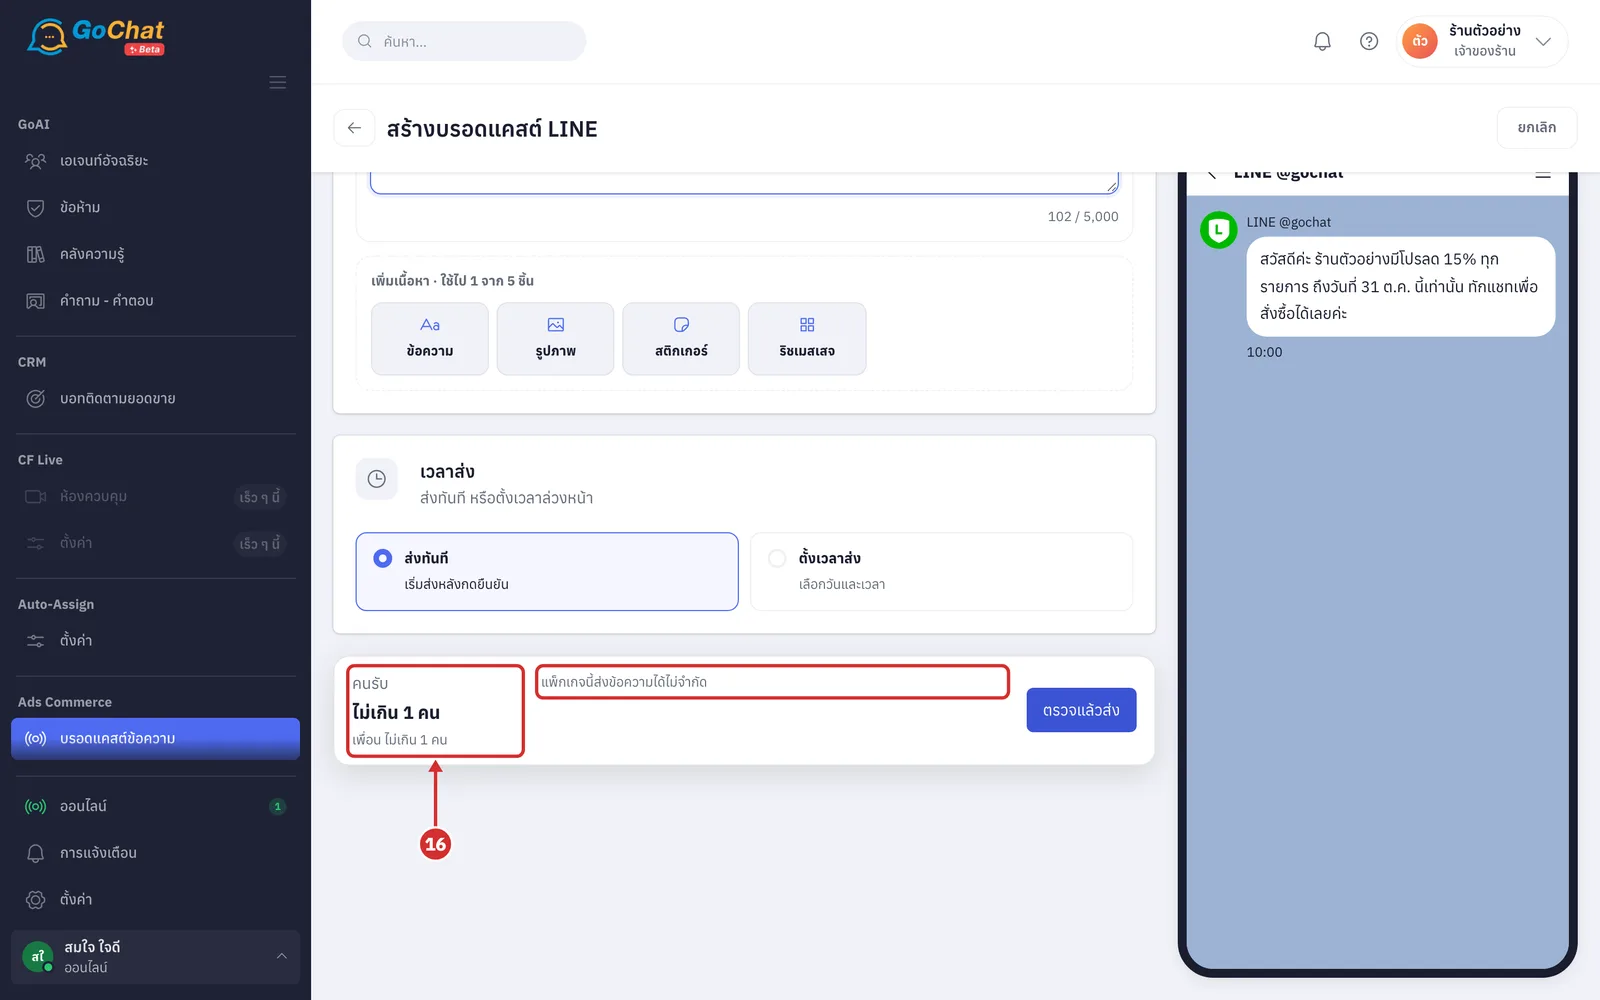
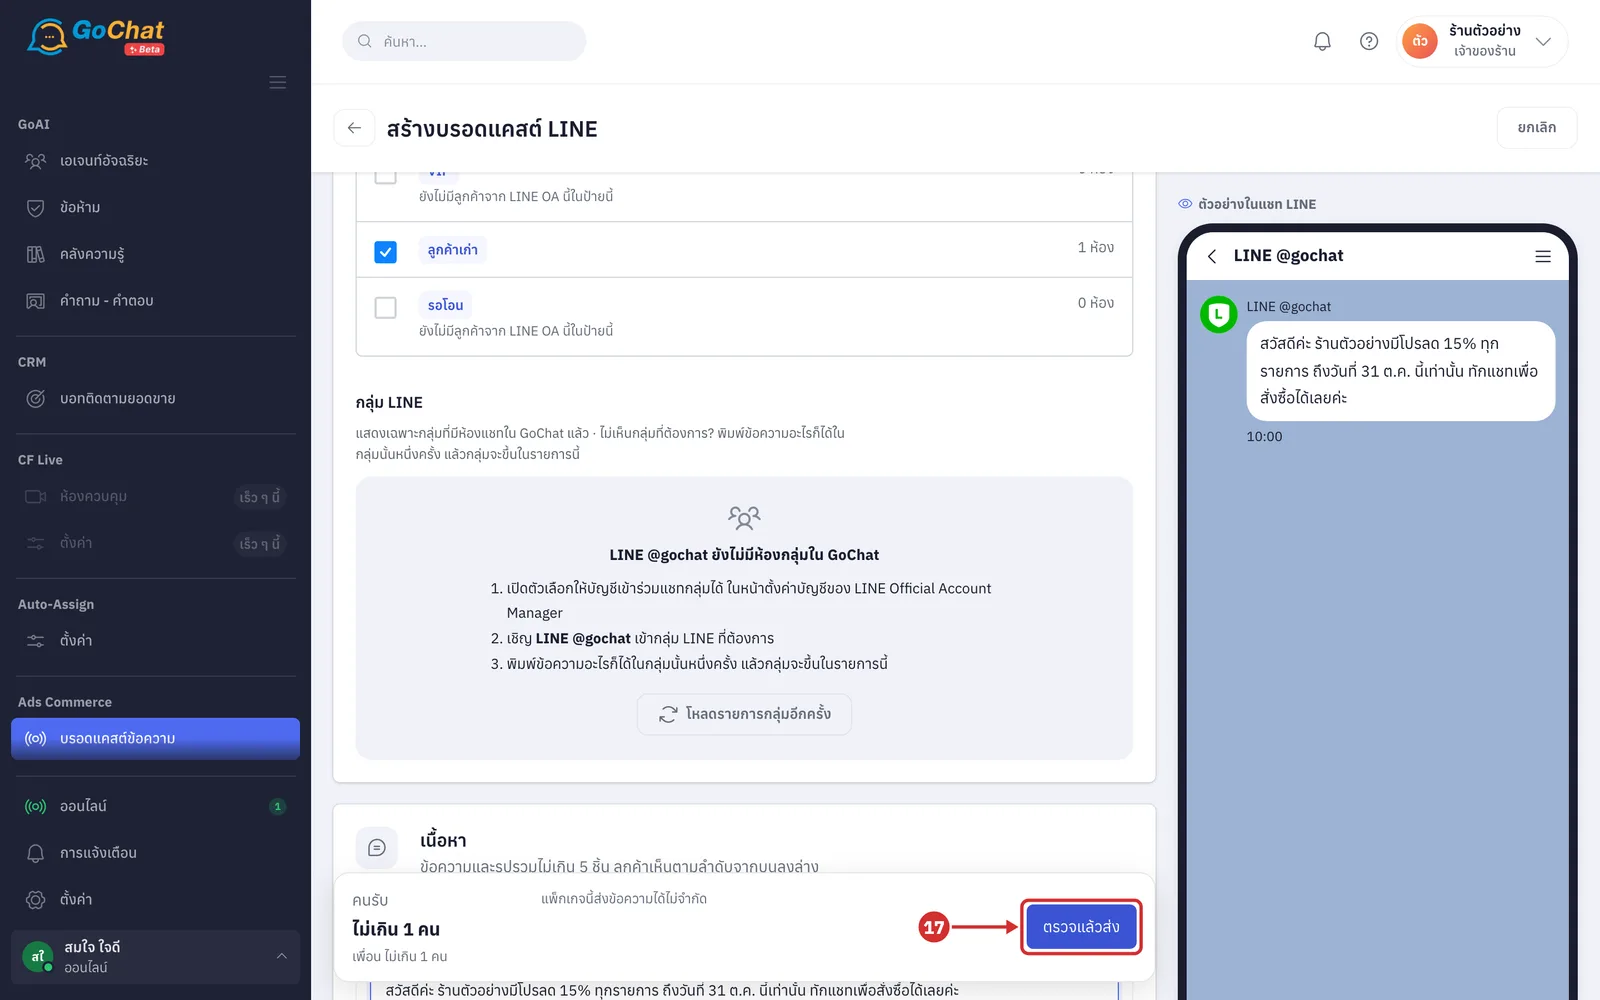
Click ตรวจแล้วส่ง (Review and send) (while counting, the button shows กำลังคำนวณ… (Calculating…); if it cannot be sent yet, the button is disabled and the bar shows the reason in red, such as เลือกป้ายอย่างน้อย 1 ป้าย (Choose at least 1 label), ยังไม่มีผู้รับ — เลือกป้ายหรือกลุ่มที่มีคน (No recipients yet, choose labels or groups with people), ต้องเชื่อม LINE ใหม่ก่อนจึงจะส่งได้ (Reconnect LINE before sending) or โควตาไม่พอ — ขาดอีกประมาณ N ข้อความ (Not enough quota, about N messages short); if you send to both friends and groups, the bar warns in yellow that people who are both friends and group members get it twice and count twice against the quota)
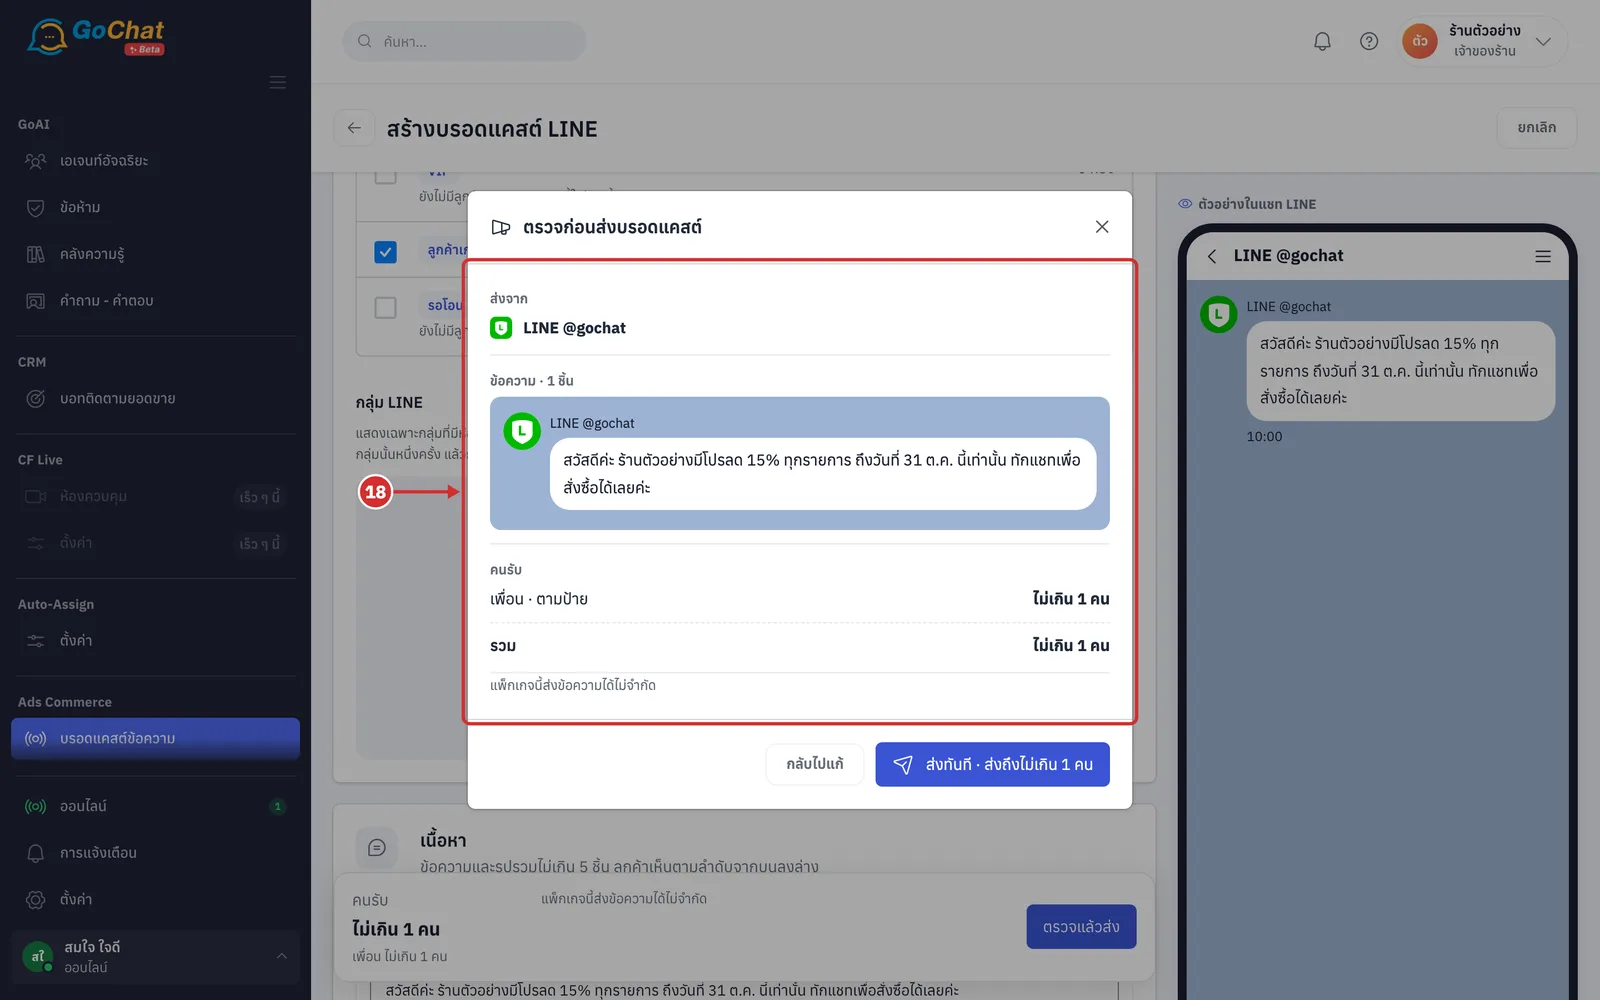
In the ตรวจก่อนส่งบรอดแคสต์ (Review broadcast before sending) window, check ส่งจาก (Send from), ข้อความ (Messages) and คนรับ (Recipients) (the friend count, the groups marked จากป้าย (From label) or เลือกเอง (Picked) and the รวม (Total)), plus the quota the system checks with LINE when this window opens (click กลับไปแก้ (Go back and edit) to make changes)
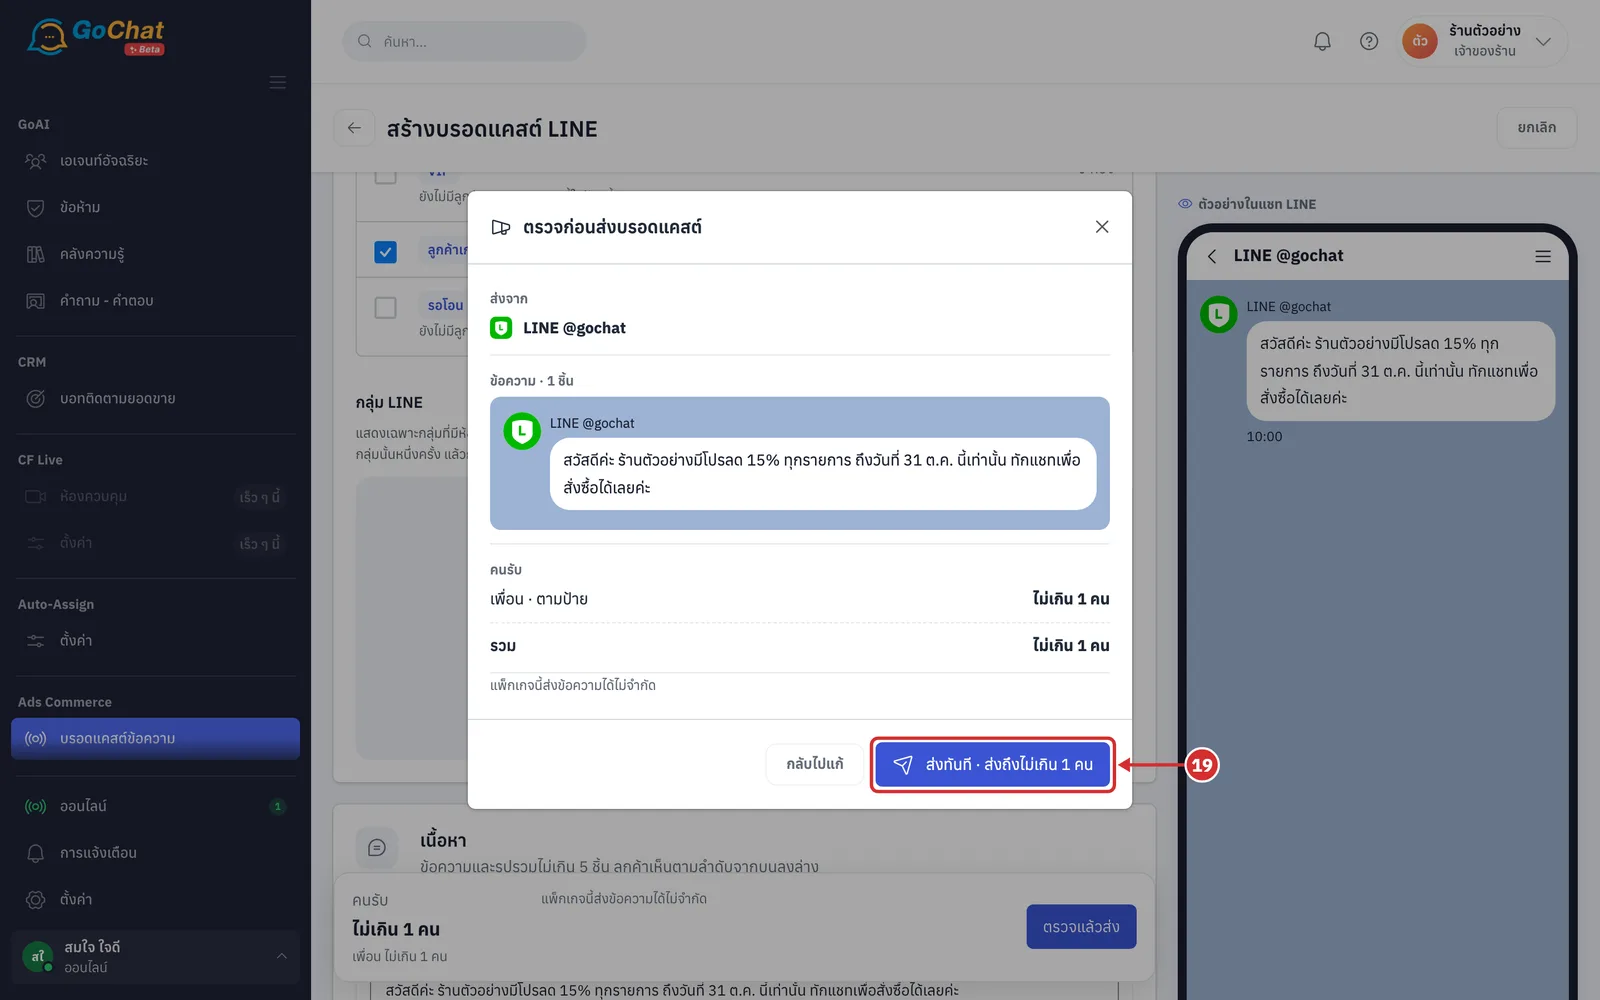
Click ส่งทันที · ส่งถึง… (Send now · to …) (for a scheduled broadcast the button shows ตั้งเวลา (Schedule) followed by the chosen date and time). The system saves the broadcast and takes you to its รายละเอียดบรอดแคสต์ (Broadcast details) page (send now starts within about 1 minute; clicking twice or a network hiccup does not create a duplicate)
Reading the broadcast list
The บรอดแคสต์ LINE (LINE broadcast) page has a ตั้งเวลาไว้ (Scheduled) tab (the number next to it is how many; nearest send time first) and a ประวัติ (History) tab (sent, sending, failed and canceled broadcasts; newest first). If nothing is scheduled, the page opens on ประวัติ (History). Each tab shows up to 200 broadcasts.
The เนื้อหา (Content) column shows the text of every piece joined together (click it to open the details), thumbnails of images, stickers and rich messages, the LINE OA name, and a recipients line such as เพื่อนทุกคน + N กลุ่ม (All friends + N groups), ตามป้าย (By label) with the label names, or เฉพาะกลุ่ม · N กลุ่ม (Groups only · N groups). The ตั้งเวลาไว้ (Scheduled) tab has เวลาส่ง (Send time), สถานะ (Status) and สร้างโดย (Created by) columns and a three-dot button at the end of each row with ดูรายละเอียด (View details) and ยกเลิกการส่ง (Cancel sending).
The ประวัติ (History) tab has ส่งเมื่อ (Sent at), สถานะ (Status), ส่งถึง (Delivered), เปิดอ่าน (Opened), คลิก (Clicks) and ส่งโดย (Sent by) columns. Opens and clicks come from LINE, update every hour, and are followed by the percentage of people reached. น้อยกว่า 20 (Fewer than 20) means LINE does not reveal numbers under 20 people, to protect recipients' privacy (the i icon next to it explains the same). A dash means there is no number yet; point at it to see why, such as รอส่งให้ครบก่อน (Waiting for sending to finish), LINE ยังไม่ส่งสถิติ ปกติได้ภายใน 1 วันหลังส่ง (LINE has not sent statistics yet, usually within 1 day of sending) or LINE ไม่ส่งสถิติของข้อความที่ส่งเข้ากลุ่ม (LINE does not give statistics for messages sent to groups).
There are 6 statuses: ตั้งเวลาไว้ (Scheduled); กำลังส่ง (Sending), with ส่งแล้ว N จาก M ชุด (N of M batches sent) under it, where all friends is 1 batch, labels are sent in batches of up to 500 people and each group is 1 batch, and the page updates by itself while sending; ส่งแล้ว (Sent); ส่งได้บางส่วน (Partly sent) and ไม่สำเร็จ (Failed), with the cause under the label; and ยกเลิกแล้ว (Canceled), with the time it was canceled.
Viewing broadcast details
Click a broadcast's content, or choose ดูรายละเอียด (View details) from the three-dot button, to open the รายละเอียดบรอดแคสต์ (Broadcast details) page. The top line shows the status, send time, creator and sending account. A scheduled broadcast has a ตั้งเวลาไว้ — จะส่ง … (Scheduled, will send …) bar saying it can be canceled before the send time; while sending there is a กำลังส่ง (Sending) bar with a progress bar, and the page updates without refreshing.
Once sending has started, there are number cards for ส่งถึง (Delivered), เปิดอ่าน (Opened) and คลิก (Clicks) (opens and clicks show the percentage ของที่ส่งถึง (of those reached); partly sent broadcasts show ไม่ได้ส่งประมาณ N คน (About N people not sent)). Under the cards is when statistics were last updated; LINE keeps updating them for up to 14 days after sending. When a broadcast went to both friends and groups, the numbers add both parts, so people in both are counted twice.
The คนรับ (Recipients) card summarises the friend option, the labels used and the number of LINE groups. If it went to groups or some recipients did not get it, a results table lists each group or batch with สมาชิก (Members) and ผล (Result) (ส่งแล้ว (Sent), รอส่ง (Waiting), ยังไม่ได้ส่ง (Not sent yet), ไม่สำเร็จ (Failed) or ส่งไม่ได้ (Cannot send), with the reason under the row). A name search appears with more than 10 rows, rows are shown 50 at a time, and แสดงอีก (Show more) shows the rest. The เนื้อหา (Content) card on the right shows the messages as customers see them in LINE.
Canceling a scheduled broadcast
On the ตั้งเวลาไว้ (Scheduled) tab, click the three-dot button at the end of the row and choose ยกเลิกการส่ง (Cancel sending), or click ยกเลิกการส่ง (Cancel sending) at the top right of the details page. The ยกเลิกบรอดแคสต์ (Cancel broadcast) window asks you to confirm and shows the scheduled time. Click ยกเลิกบรอดแคสต์ (Cancel broadcast) to confirm, or ไม่ยกเลิก (Don't cancel) to close the window. A canceled broadcast moves to the ประวัติ (History) tab as ยกเลิกแล้ว (Canceled), and you need to create a new one to send it (you can only cancel before sending starts; once it has started it shows เริ่มส่งแล้ว ยกเลิกไม่ได้ (Sending has started, cannot cancel)).
Resending what was not sent
If a broadcast is ส่งได้บางส่วน (Partly sent) or ไม่สำเร็จ (Failed) because the month's message quota ran out while sending, the account needed reconnecting, or it passed its send time by more than 23 hours without being sent, the details page shows a yellow box with how much was not sent and why. Click เลือกกลุ่มที่จะส่งต่อ (Choose groups to resend) (or เลือกรายการที่จะส่งต่อ (Choose items to resend)) to go to the table (if the quota ran out there is a ซื้อข้อความเพิ่มใน LINE Official Account Manager (Buy more messages in LINE Official Account Manager) button; if the account was disconnected there is a เชื่อม LINE ใหม่ที่หน้าช่องทาง (Reconnect LINE on the Channels page) button).
The table has ยังไม่ได้ส่ง (Not sent yet), ส่งแล้ว (Sent), ส่งไม่ได้ (Cannot send) and ทั้งหมด (All) tabs with counts. On ยังไม่ได้ส่ง (Not sent yet), every row that can be resent is ticked for you; untick rows one by one or use เลือกทั้งหมด (Select all). The bar at the bottom shows how many will be resent, the approximate number of people and the quota. Click ส่งต่อ (Resend) and check the ส่งต่อบรอดแคสต์ (Resend broadcast) window, which checks the quota with LINE again, lists what will be sent and confirms that items already received are not sent again; then click ส่งต่อ (Resend) in the window. Sending starts within about 1 minute, and rows that receive it show ได้รับตอนส่งต่อ (Received on resend) with the time.
If the quota is not enough, the ส่งต่อ (Resend) button is disabled and shows โควตาไม่พอ — ขาดอีกประมาณ N ข้อความ (Not enough quota, about N messages short). Buy more messages and click ตรวจโควตาอีกครั้ง (Check quota again), or click เลือกเท่าที่โควตาพอ (Select only what the quota covers) to send part of it first. A resend uses the same messages as the first round and cannot be edited; to change them, create a new broadcast. Rows on the ส่งไม่ได้ (Cannot send) tab cannot be resent, for example when the shop is no longer in that group or ส่งแล้วแต่ LINE ไม่ยืนยันผล อาจถึงแล้ว — ไม่ส่งซ้ำ (Sent but LINE did not confirm, it may have arrived, not resent).
Note: Broadcasts can only be sent through LINE Official Account. If your shop has not connected one, the page shows ร้านนี้ยังไม่ได้เชื่อม LINE OA (This shop has not connected a LINE OA) with a ไปหน้าช่องทาง (Go to Channels) button (see Connecting LINE OA). LINE groups that receive a broadcast show your shop's messages in that group chat, with a LINE บรอดแคสต์ (LINE broadcast) line under the last one that takes you back to the details page (individual customers' chats do not have this line). If your shop's plan does not include broadcasts, the review window shows แพ็กเกจของร้านไม่มีบรอดแคสต์ — อัปเกรดแพ็กเกจเพื่อใช้งาน (Your plan does not include broadcasts, upgrade to use it). See statistics for all broadcasts in Broadcast overview.